Welcome to all of you to my humble Blog at HIVE. Today I want to thank you for joining me every day, thank you for your friendship, for being attentive, you definitely encourage me to keep going and never give up.
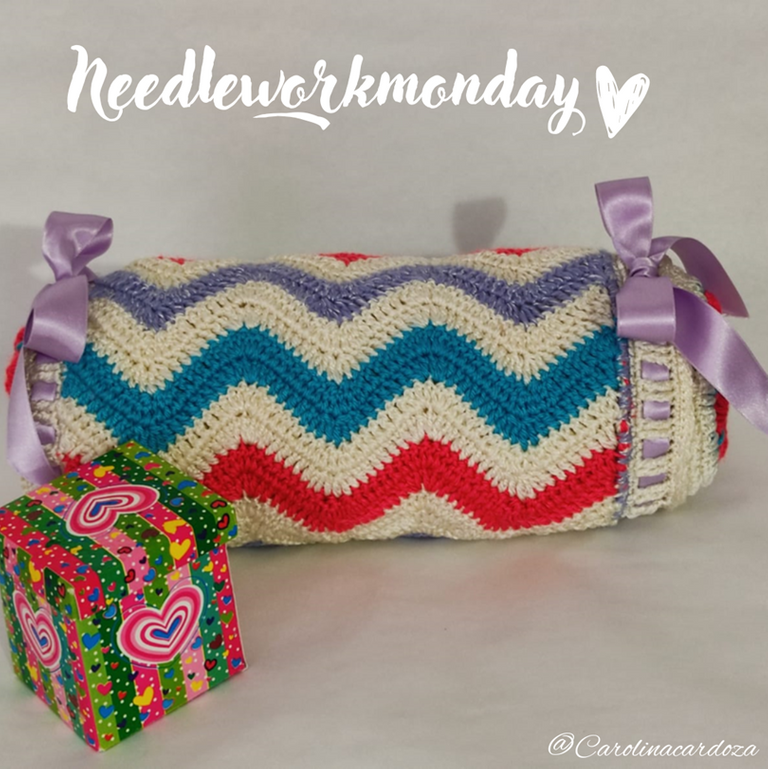
Today I am going to show you how to crochet the chevron stitch or zigzag stitch, this is a very nice stitch and very easy to do. You can use it in blankets, cushions, shawls and so on.

This stitch is ideal for beginners because we are only going to use chains and high stitches. We are also going to practice increases and decreases. So if you are just starting to knit, don't be afraid to get into this project for yourself, for your home or for someone special, you will surely learn a lot and you will be happy to see how your performance increases day after day.
I always wanted to knit this stitch, but I had never been given the opportunity; it was a few days ago that I looked at my bed cushions and noticed that they were already worn out, so I took the initiative, organized my things and my time and here I am, showing you the results and the step by step.
The beauty of this type of fabric is when you intersperse different colors, as it really stands out wherever you use it.
Materials:
Any kind of wool and a crochet needle.

Step by step
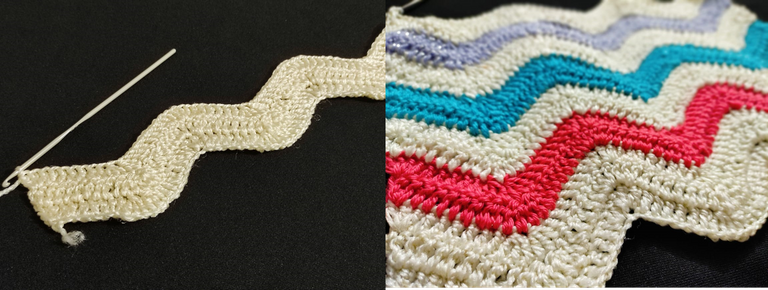
For this weaving we need multiples of 20, so we are going to count up to the length we are going to use. Then whatever you need you are going to count by 20's until you have the width you want. For this cushion we are going to knit 80 +3 chains which equals our first high stitch. We're going to start knitting and on the 80th chain we're going to knit two double crochet stitches. So here what I have is 3 high stitches counting with these 3 starting chains. Now what I'm going to do is in each base stitch I'm going to knit a single crochet until I get 6. Now in the next stitch we're going to make 2 decreases taking 3 unfinished high stitches, then I'm going to pick up the loop and pull out the 4 strands that I have on the needle. Remember that there are 2.

Now we are going to knit 6 double crochet stitches, you will notice that when we make a decrease the peak goes down, then in the next peak we will knit an increase. In the base stitch we are going to knit 3 high stitches in the same stitch and we are going to repeat again, then we are going to knit 6 high stitches. Now we are going to knit decrease and so we continue repeating until we reach the final stitch of the chains where we will finish with three high stitches in the same stitch.
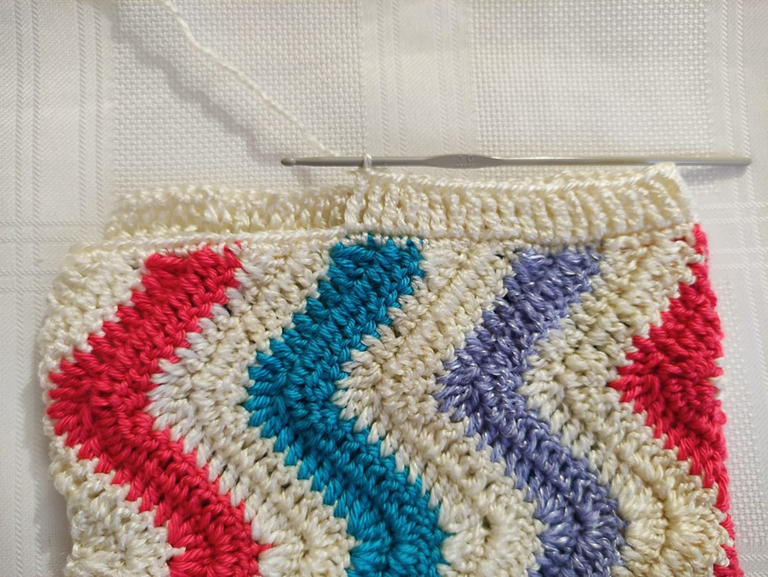
We pick up 3 chains that are equivalent to our first high stitch, in that same stitch we will knit 2 high stitches, then we continue with 6 high stitches and when we get to the decreases we repeat decreases as well. This way we keep repeating the same process of the previous round until we finish.
Remember that the peak that goes down is decrease and the peak on top is increase. You can continue until you get the desired size, alternating colors as you like.
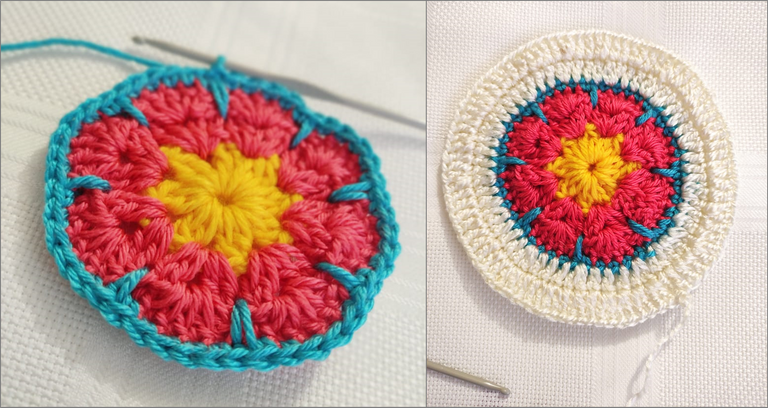
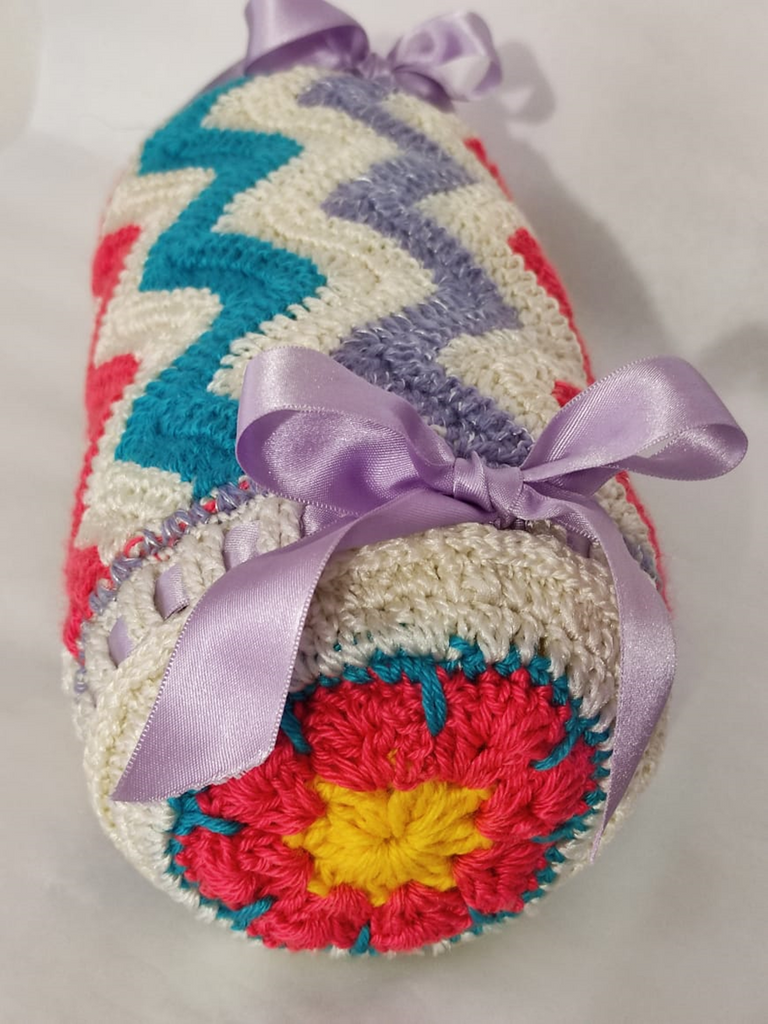
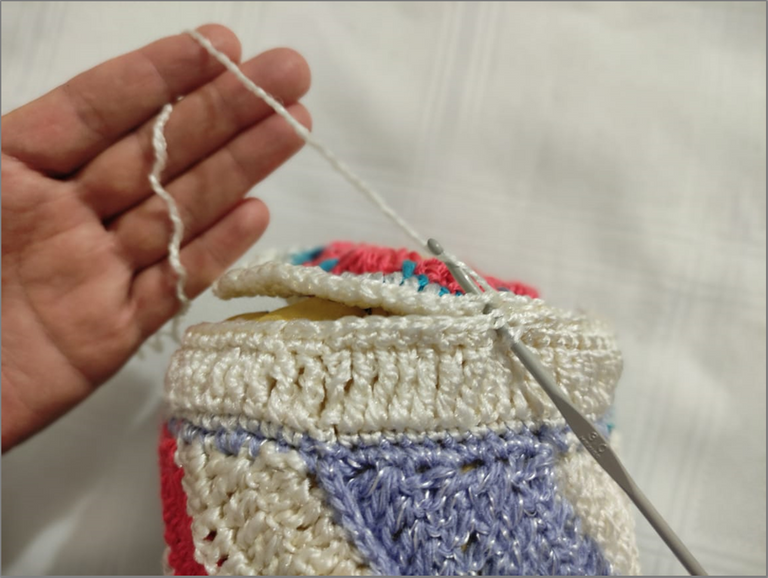
For the tops or sides we can make two circles in stockinette stitch increasing in each row until we get the same amount of stitches that our cylinder has or you can also knit something more elaborate like this African flower that is really beautiful. Finally we join with satin stitch or with our wool needle.
As you can see my friends, it is very easy, I made it in just one afternoon, the truth is that I hadn't knitted for days and my body was asking for it. The cushion really turned out beautiful, so for a few days it will only be for decoration, and then I will take it for myself, to rest my neck and be relaxed.
I hope you liked it, soon I want to make the other caramel cushion that my husband uses, but for that one I plan to practice a different weaving pattern.
As always I invite you to use the tools that the internet allows us, on google, pinterest, Youtube you can get plenty of tutorials in any language, easy and difficult. You just have to search.

Hoy les voy a mostrar cómo hacer el punto Chevron o punto zigzag a crochet, este es un punto muy bonito y muy fácil de hacer. Lo pueden emplear en mantas, cojines, chales y pare de contar.
Este punto es ideal para principiantes porque nada más vamos a utilizar cadenas y puntos altos. También vamos a practicar aumentos y disminuciones. Así que si tus estas comenzando a tejer no tengas miedo en adentrarte en este proyecto para ti, para tu casa o para alguien especial, de seguro aprenderás mucho y serás feliz de ver como día tras día aumenta tu desempeño.
Yo siempre quise tejer este punto, pero nunca se me había dado la oportunidad; fue hace unos días que observe mis cojines de la cama y noté que ya estaban desgastados, así que tomé la iniciativa, organicé mis cosas y mi tiempo y aquí estoy, mostrándoles ya el resultados y el paso a paso.
Lo bonito de este tipo de tejido es cuando intercalas distintos colores, ya que resalta mucho donde quiera que lo uses.
Materiales:
Cualquier tipo de lana y una aguja de crochet.
Pasó a paso
Para este tejido necesitamos múltiplos de 20, así que vamos a ir contando hasta la longitud que nosotros vamos a utilizar. Entonces lo que ustedes necesiten van a ir contando de 20 en 20 hasta tener el ancho que usted desee. Para este cojín vamos a tejer 80 +3 cadenetas que equivalen a nuestro primer punto alto. Vamos a comenzar a tejer y en la cadena número 80 vamos a hacer dos puntos altos. Entonces acá lo que tengo son 3 puntos altos contando con estas 3 cadenas de inicio. Ahora lo que voy a hacer es en cada punto de base un punto alto hasta obtener 6. Ahora en el siguiente punto vamos hacer 2 disminuciones tomando 3 puntos altos sin terminar, luego tomo lazada y saco las 4 hebras que tengo en la aguja. Recuerda que son 2.
Ahora vamos a volver a tejer 6 puntos altos, ustedes observaran que cuando hacemos disminución el pico va hacia abajo, luego en el siguiente pico tejeremos un aumento. En el punto de base que vamos a tejer 3 puntos altos en el mismo punto y vamos a repetir nuevamente, seguido vamos a tejer 6 puntos altos. Ahora vamos a tejer disminución y así continuamos repitiendo hasta llegar al punto final de las cadenas donde terminaremos con tres puntos altos en el mismo punto.
Levantamos 3 cadenas que equivalen a nuestro primer punto alto, en ese mismo punto tejeremos 2 puntos altos, luego seguimos con 6 puntos altos y cuando lleguemos a las disminuciones repetimos disminuciones también. Así seguimos repitiendo el mismo proceso de la vuelta anterior hasta terminar.
Recuerda que el pico que baja es disminución y el pico de arriba es aumento. Puedes continuar hasta obtener el tamaño deseado intercalando color como mejor te guste.
Para las tapas o laterales podemos realizar dos círculos en punto alto aumentando en cada vuelta hasta obtener la misma cantidad de puntos que tiene nuestro cilindro o también puedes tejer algo más elaborado como esta flor de África que es realmente hermosa. Por ultimo unimos con punto raso o con nuestra aguja lanera.
Como ven amigas es muy fácil, lo hice en tan solo una tarde, la verdad es que hace días no tejía y ya el cuerpo me lo estaba pidiendo. El cojín realmente quedó hermoso, así que durante unos cuantos días solo estará de decoración, ya luego lo tomaré para mí, para descansar mi cuello y estar relajada.
Espero que les haya gustado, pronto quiero hacer el otro cojín caramelo que usa mi esposo, pero para ese tengo pensado practicar un patrón de tejido diferente.
Como siempre los invito a utilizar las herramientas que internet nos permite, en google, pinterest, Youtube puedes conseguir infinidad de tutoriales en cualquier idioma, fáciles y difíciles. Solo tienes que buscar.
𝕋𝕠𝕕𝕠 𝕧𝕒𝕝𝕖 𝕝𝕒 𝕡𝕖𝕟𝕒 𝕤𝕚 𝕝𝕝𝕖𝕧𝕒, 𝕙𝕚𝕝𝕠𝕤, 𝕥𝕖𝕝𝕒𝕤 𝕪 𝕞𝕦𝕔𝕙𝕒𝕤 𝕡𝕦𝕟𝕥𝕒𝕕𝕒𝕤 𝕕𝕖 𝔸𝕄𝕆ℝ.

The rewards earned on this comment will go directly to the people sharing the post on Twitter as long as they are registered with @poshtoken. Sign up at https://hiveposh.com.
Me encanta cómo combinaste los colores y el punto que usaste 😍😍 te quedó precioso!! gracias por compartir esta idea tan linda
Hola Imena, es un punto muy sencillo de hacer, me gusto mucho trabajarlo.
El tejido en zigzag quedó genial.
Hola amigo, como estas. que bueno que te gustó. me encanta verte escribir en español.
Thank you for sharing this amazing post on HIVE!
Your content got selected by our fellow curator @rezoanulvibes & you just received a little thank you via an upvote from our non-profit curation initiative!
You will be featured in one of our recurring curation compilations and on our pinterest boards! Both are aiming to offer you a stage to widen your audience within and outside of the DIY scene of hive.
Join the official DIYHub community on HIVE and show us more of your amazing work and feel free to connect with us and other DIYers via our discord server: https://discord.gg/mY5uCfQ !
If you want to support our goal to motivate other DIY/art/music/homesteading/... creators just delegate to us and earn 100% of your curation rewards!
Stay creative & hive on!
gracias a todos.
Que hermoso cojín tejido amiga me encantó está cuchi.
Hola Yuri, gracias por tus palabras. la verdad es que le pongo un montón de ganas a lo que hago.
Me enamoré de éste pequeño cojín, que hermoso, las formas de las líneas son perfectas. Tu técnica de tejido es profesional, y que colores tan hermosos!
Hola Blueclair, te cuento que esas líneas me gustaron tanto que ahora quiero hacer un proyecto mas grande con ese punto.
Excelente trabajo @carolinacardoza como lo que ya nos tienes acostumbrados.
Eres una gran artesana y en todos tus proyectos se nota el amor que le pones.
Gracias por compartir este paso a paso con nosotros. Saludos!
Ah! eso si te doy la razón, es el amor quien mueve mis manos. Estos proyectos siempre han estado guardados en mi corazón, lo que no me alcanza es el tiempo para hacerlos todos, jejeje.
Me gusto mucho trabajar este punto, es super rápido de hacer.
Congratulations, your post has been upvoted by @dsc-r2cornell, which is the curating account for @R2cornell's Discord Community.
Enhorabuena, su "post" ha sido "up-voted" por @dsc-r2cornell, que es la "cuenta curating" de la Comunidad de la Discordia de @R2cornell.
Gracias señor Cornell, lo amo.