Hello, friends especially needleworkers @needleworkmonday community!
Progressing is hard, especially for a left abandon project. But I was enthusiast to our WIP project, so I spent day by day crocheting my mini net bag. Not easy because I made big mistakes that I realized after I almost finished my project. What a big NO! I made the slipped stitches to single crochets, a big NO because I couldn’t fix it, the slipped stitch really had less texture than the single crochets I made for the project, no wonder as a bag, the net bag I made, looked unproportional, it had too big handles. So with a deep regret, I opened all of the crochets I made :’.
Although this project is not an easy one for a beginner like me, but this project help me learn a lot. I must not missed every single crochet, even i couldn’t just swap the crochets to other, because it would effect a lot to my crochet project. So then day by day, I continued processing, even I spent my evenings with this project and I missed my drawings plus sometimes I even missed my exercise time, LOL. But it really worth it because finally I could finish my first WIP project and the feeling I got was incomparable.
Oh yes I am very sorry for all my friends who are not in our needleworkmonday community, this tutorial is one of my entry for the WIP challenge where I finally continue my old abandoned project for this contest. You could read about it here
https://peakd.com/hive-127911/@needleworkmonday/needleworkmondays-wip-challenge
Now before I forget how I made it… let’s go and see how I process it all, from the very first beginning..
Project Time: I spent day by day, around 2-2.5 hours a day but then I had to start over again. So if I measure the time, counting all, but I reduced the days when I needed to start over. So I measure the time since I started over, it was around 20 hours.
Difficulty: Quite difficult for me :’
Materials & things needed:
- T-Shirt yarn
- 8 mm crochet hook
- Craft scissors
- Plastic pins
- Measurement tape
How to make it:
1ST
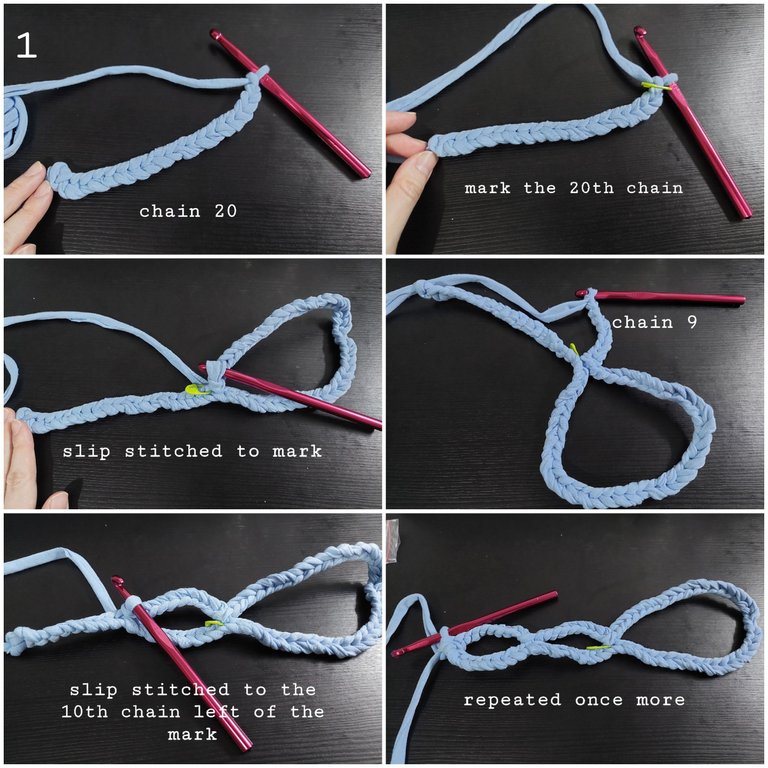
I measured the yarn for 150 cm then left it. I then start chaining 20 and mark. Then I chained another 40 and I slipped stitch to the mark. After that, Chain 9, slip stitched to the 10th chain on the left of the mark. Then i repeated it once more.
2ND
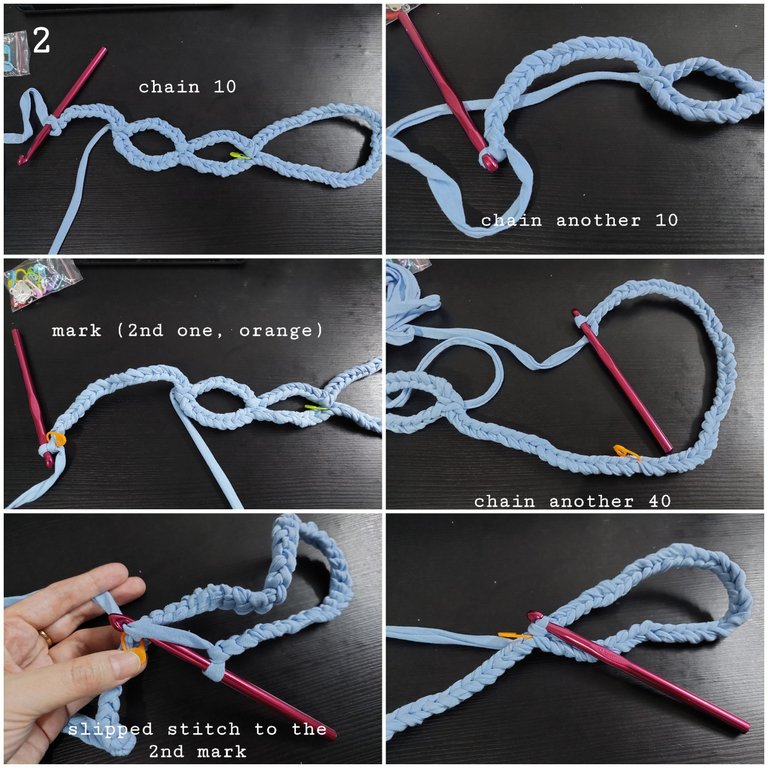
Next I chained 10, then I chained another 10 so it would equal 20 chain and mark it (2nd mark, orange) on the 20th chain. Then i made 40 chain. Slipped stitch to the 2nd mark.
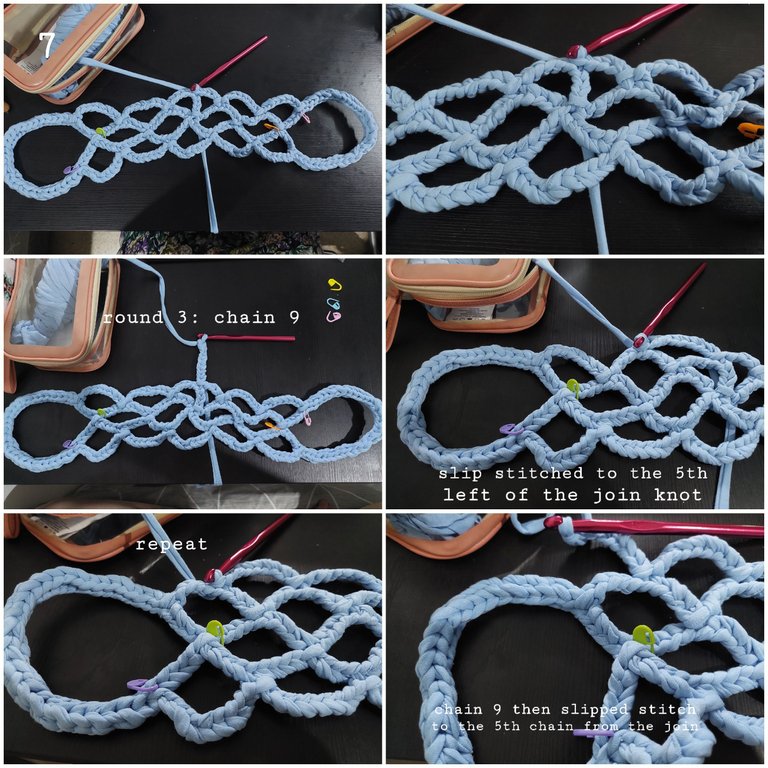
3RD
Then I crocheted chain 9, slipped stitch to the left 10th chain of the 2nd mark, repeated it once more. I continued by chaining 9 then slipped stitch to the 5th from the join knot.
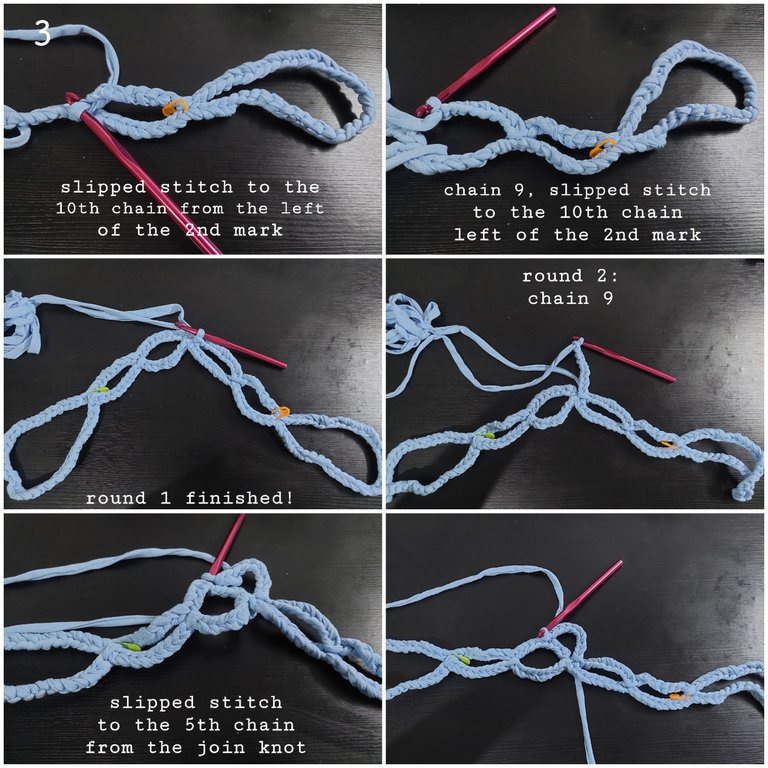
4TH
Repeated again 2 times. For the handle, mark 5th chain left of the join knot, then slipped stitch from my hook to the 3rd mark (purple one).
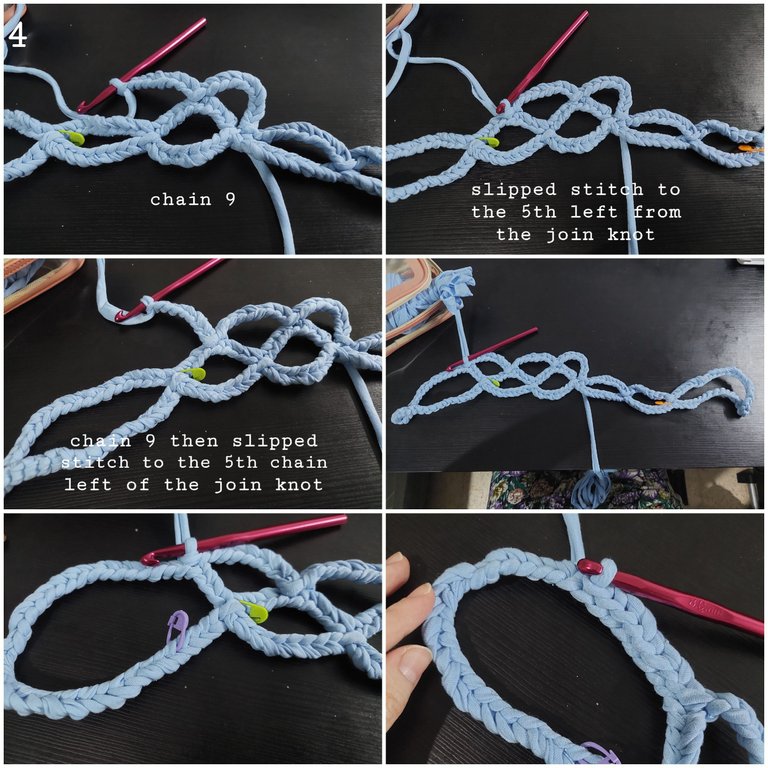
5TH
I did again the chaining 9, slipped stitch to the 5th left of the join knot. Then I repeated the process 4 times.
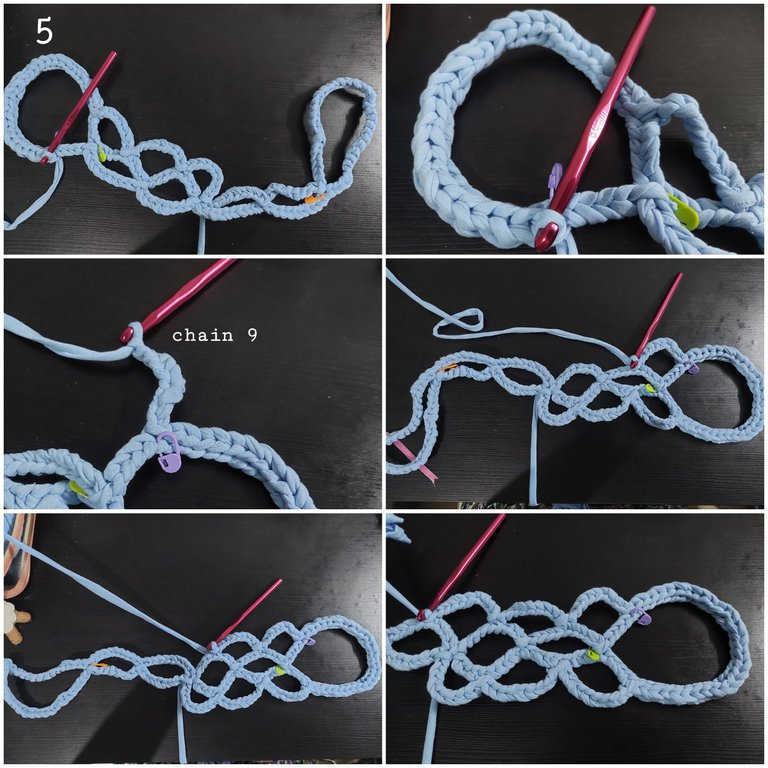
6TH
I did the same for the handle, first I marked 5th chain left of the join knot, then slipped stitch from my hook to the 4th mark (pink one). Then I made two times of chaining 9 then slipped stitch to the 5th from the join knot. Chain 4, slipped stitch to the 5th left of the join knot.
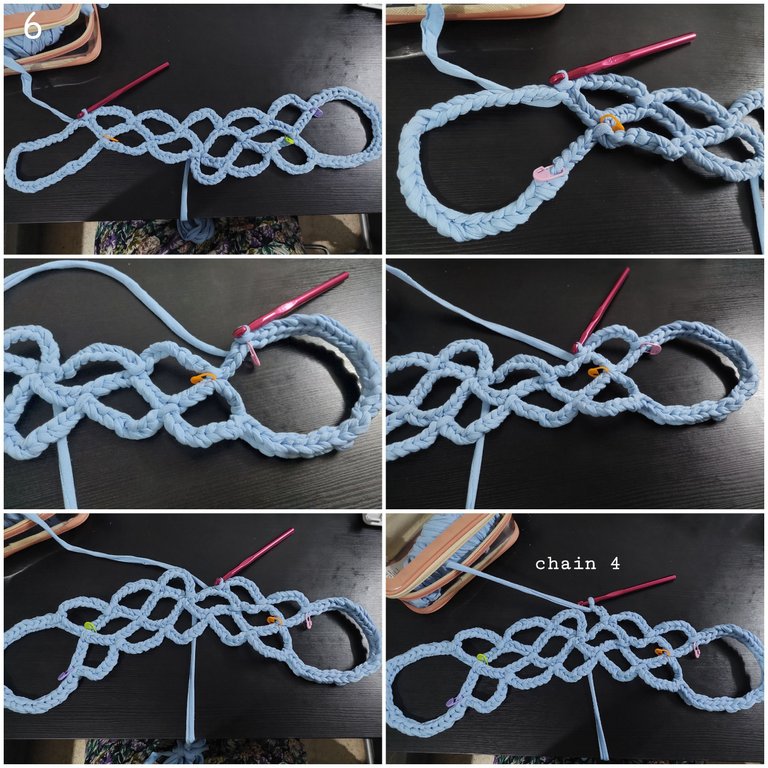
7TH
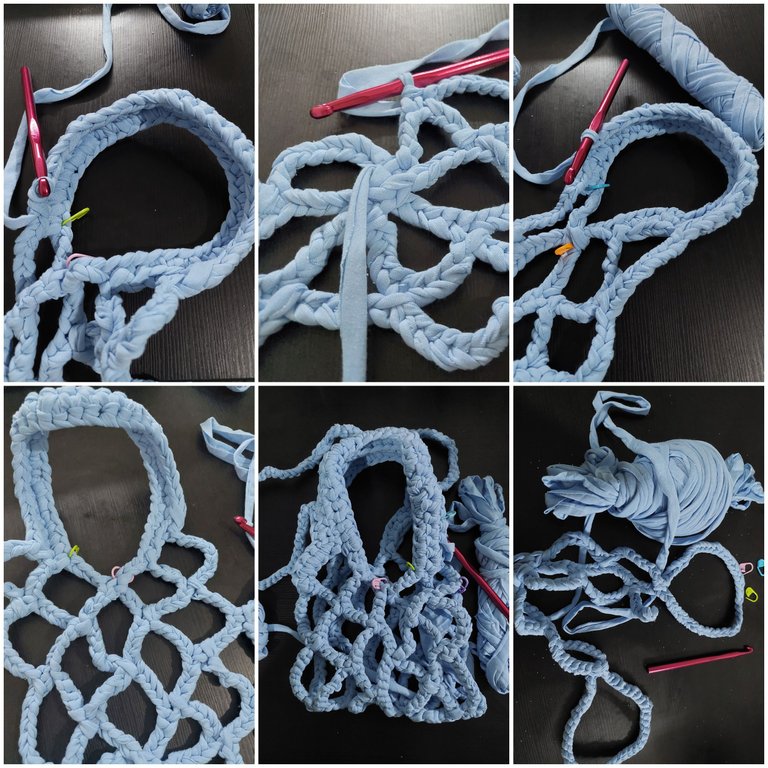
You could see the result closer (first row of the pictures below). Then chained 9, slipped stitch to the 5th left of the join knot. And I repeated it 2 times.
8TH
Then I marked 5th chain from the purple mark (yellow one). Slipped stitch until that mark. Chain 9, slipped stitch to the 5th left of the join knot. Repeated 5 times. I also marked 5th chain from the pink mark (blue one). Slipped stitch until that mark. Then again, crocheted chain 9, slipped stitch to the 5th left of the join knot. Repeated 2 times. Next I crocheted chain 9, slipped stitch to the 5th left of the join knot. Repeated once. Then I slipped stitch 10. And I made 110 chain. I marked 5th (pink) and 10th (blue). Slipped stitch from the blue to the pink mark. Then again I did the Chain 9..
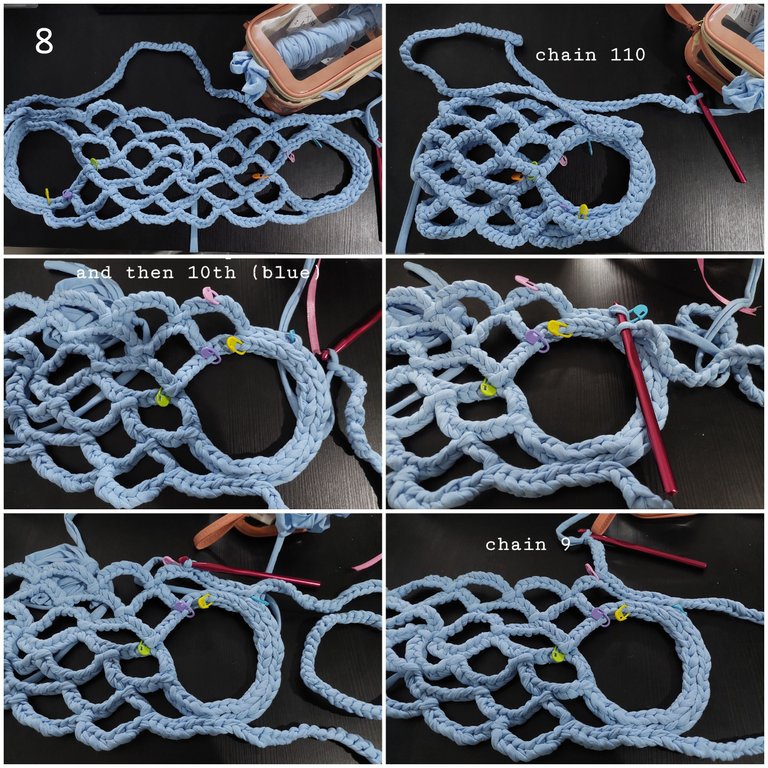
9TH
slipped stitch to the 5th left of the join knot. Repeated 4 times. Slipped stitch 10 then chain 110.
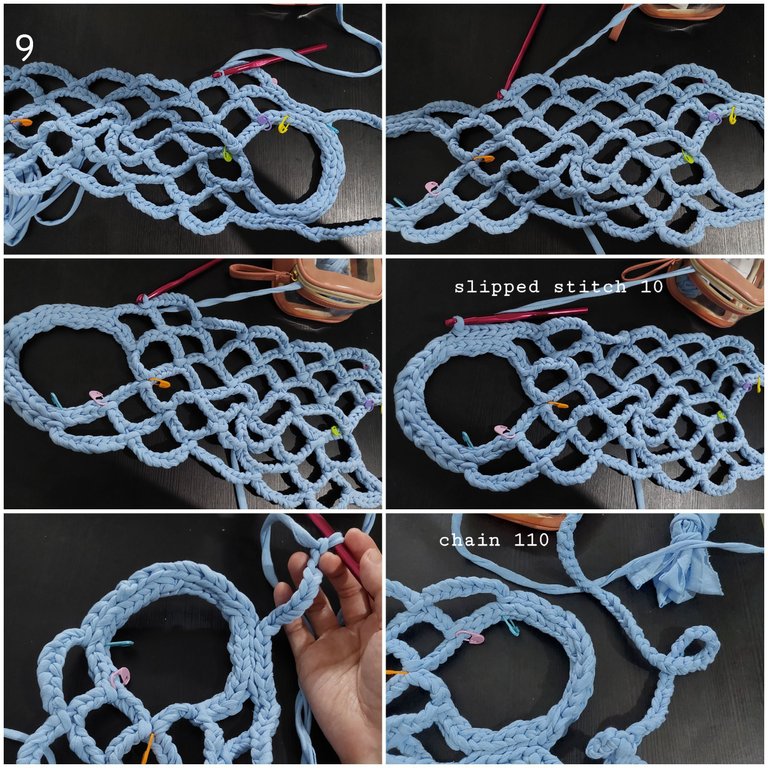
10TH
Next i marked 5th from the join and then 10th (i used the green and purple, i release other pin markers). Then i slipped stitch from purple to green. Chain 9, slipped stitch to the 5th left of the join knot. Repeated once. Chain 4, slip stitched to the 5th left the join. I turned it up. Then chain 6..
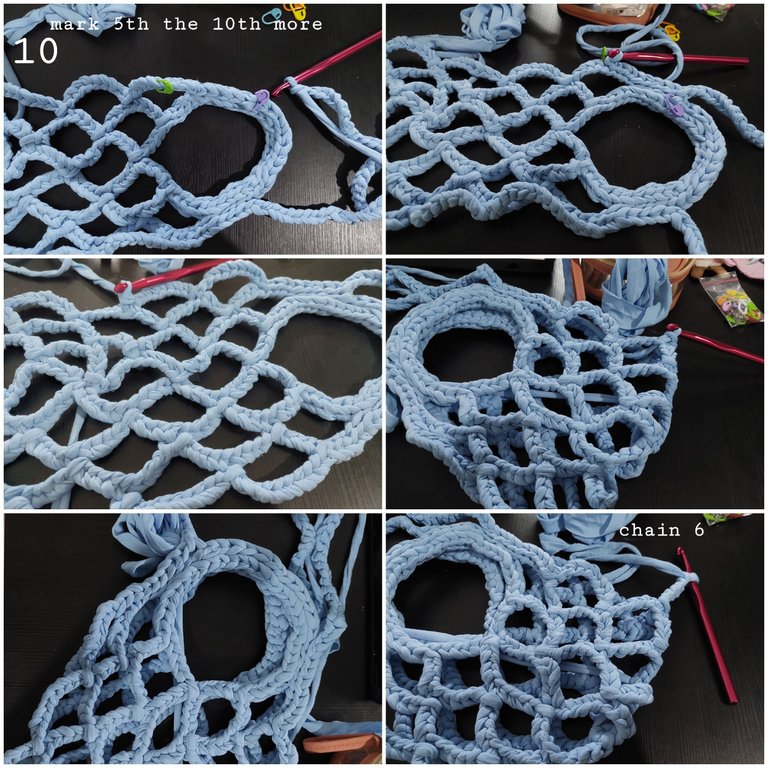
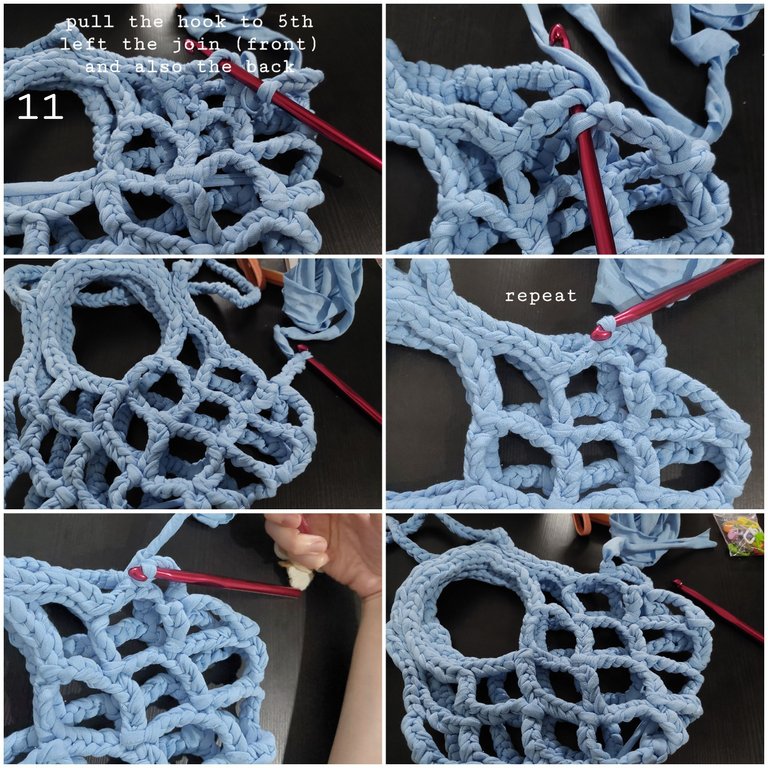
11TH
I then inserted the hook to the 5th chain of the front and also back, slipped. Repeated once more. Cut then chain 1 and pull through.
12TH
I also chained 4 from the tail then join to the left. Repeated. Chain 4 again then slipped to the 5th stitch (in the middle). Chain 6,
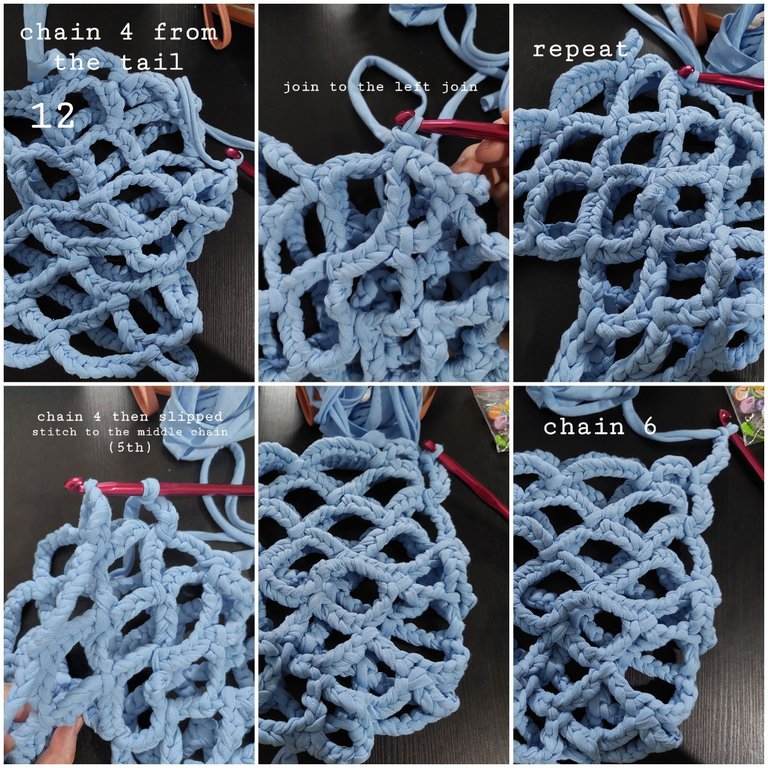
__
13TH
After that I slipped stitch to the 5th chain of front and back to join them. Repeated. Chain 1 pull through. Finished then turn it up.
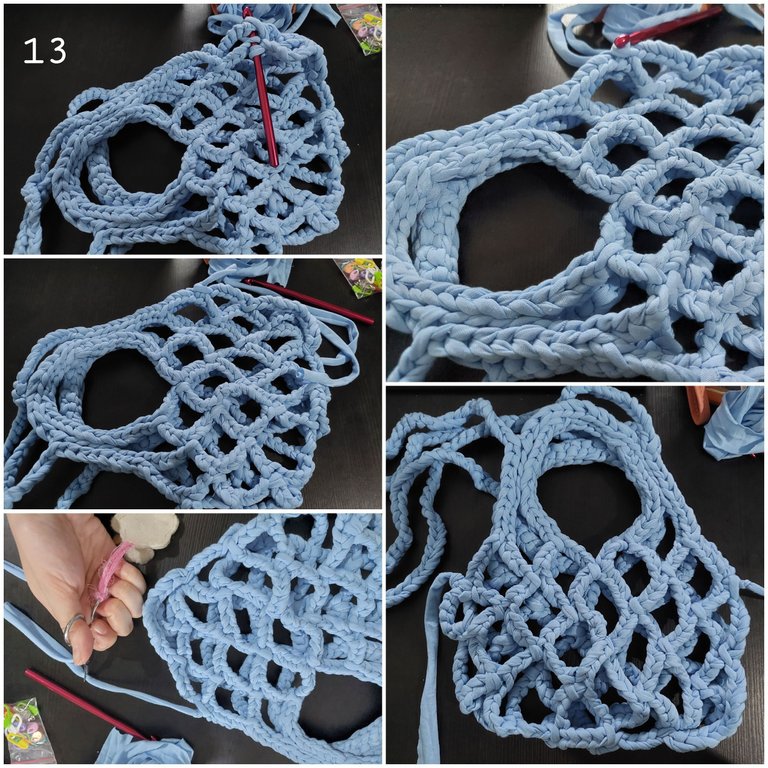
__
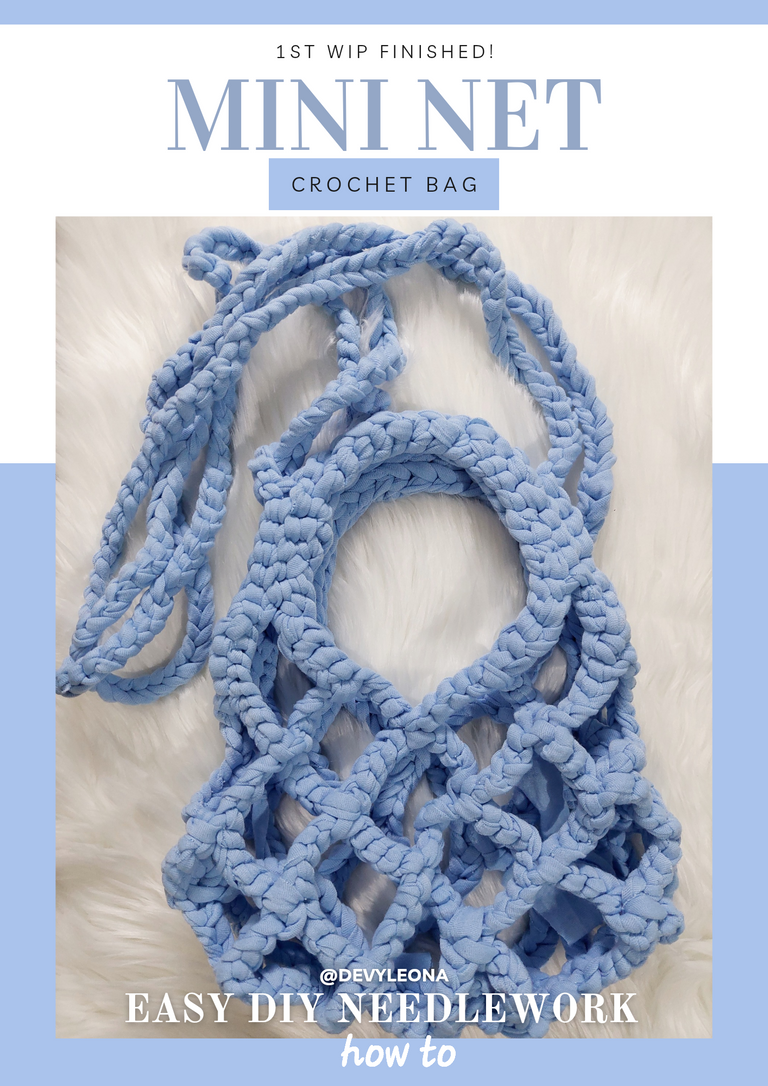
VOILA, now this cute mini net crochet bag is ready to use..

Isn’t it so cute?
I also could put my very first amirugumi flower on it, they are match each other.
And good thing is I also continued one of my WIP projects that match to this mini net bag, stay tuned to know it…
Thanks for reading my article, if you enjoy my article, upvote, reblog, follow me and stay tune for more CRAFT things from me!
All of the pictures were taken with Samsung A52 5G android phone and I used canva to make my cover picture.
A bit about the author
She works in a bank but she interests in CRAFT (CRaft, Art, Food and Travel). To pursue her art passion she does the cross stitch, embroidery, handsewing, crafts, crochet and also draws. Find hers in
https://de-creartique.redbubble.com and https://decreartique.threadless.com/designs. Also find her cute collectibles pixel cat pictures here https://opensea.io/collection/pixelcryptocat .
Wow these is pure masterpiece, the net is a delight to behold, and you did an excellent job.
Thanks @vickoly, i would like to do better next time, it was my first time doing crochet bag
You're welcome, with more practice and Engagement in crocheting, you'll surely improve and get better.
Keep up the good work and have a blessed week.
Thanks once more, for sure i will keep continuing...
Have a blessed week too!
🤗
This is so great!!! And it looks a lot difficult, not easy at all. No wonder you made some tiny mistakes. It has such an intricate pattern. It reminds me of an archeology book I once read… there was explained that in some cultures knots and braided have a kind of religious/ritual meaning besides being pretty to look at. I forgot if it was about Celtic culture… I guess I need to look it up.
But back to your bag: congratulations!!!!!!!
Thank you so much @neumannsalva... i am so glad you like it and it's comforting me to know that this one is not easy even for a master like you. Actually i need a tip to make a constant tension on my crochet, how could you have the same tension and rythm for your crochet? I just looked at your lavender cardi and i love how you neatly working it 😍
Such an idea astonished me because I have never seen something great like this kind of bag you just displayed. This means through needlework everything is possible to crochet.
Thank you so much :) @apunawu
This is awesome. The yellowish smiley blended well. Your work is nice.
Thank you
I am very happy with the effort you put in to move forward. You selected something complex and you were able to handle it, that's absolutely wonderful. The bag looks beautiful, and the amigurrmi flower is adorable and makes a perfect combination with the bag.
Thank you for the step by step, it is very valuable
Thanks a lot @jicrochet. Well it is great to finally finish one of the wip, thanks for supporting me to join the challenge. And i relieved that you even said that this was a complex project to do, fyuh, it took my evenings actually... glad you like it :)
Thank you for sharing this amazing post on HIVE!
Your content got selected by our fellow curator @rezoanulvibes & you just received a little thank you via an upvote from our non-profit curation initiative!
You will be featured in one of our recurring curation compilations and on our pinterest boards! Both are aiming to offer you a stage to widen your audience within and outside of the DIY scene of hive.
Join the official DIYHub community on HIVE and show us more of your amazing work and feel free to connect with us and other DIYers via our discord server: https://discord.gg/mY5uCfQ !
If you want to support our goal to motivate other DIY/art/music/homesteading/... creators just delegate to us and earn 100% of your curation rewards!
Stay creative & hive on!
Thanks
Wow only an artist can do it, congratulations.
Thanks :)
Oh my God! This is super beautiful
Your hands are blessed 🥰🥰🤗
Weldon 👌💪😊🥳🥳💃
Thank you very much