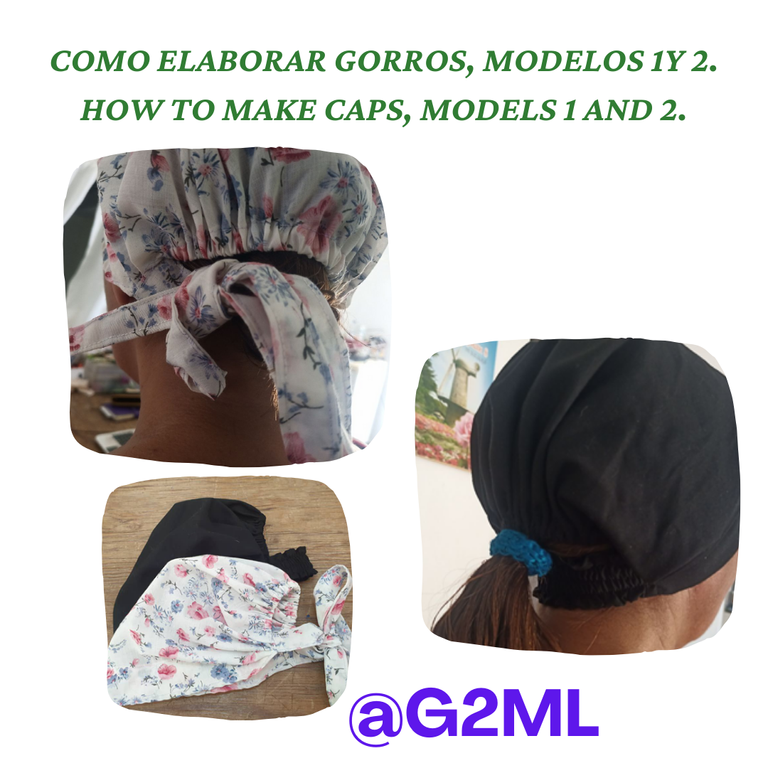
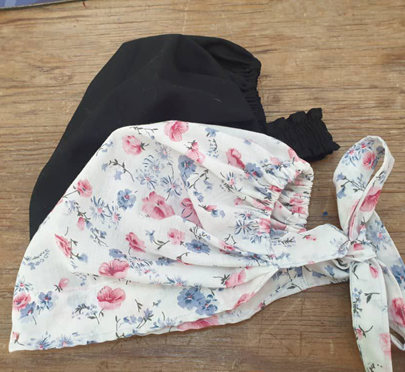
Hola querida comunidad Hive, como siempre esperando estén muy bien y disfrutando la semana. Les comento tengo una sobrina que está estudiando medicina y otra que inició fisioterapia, y pensando en ellas hice estos gorros, si les gusta le podré hacer más modelos. Combinarlos con sus uniformes y tendrán sus cabezas bien cubiertas a la hora de estar en sus prácticas.
Con un retazo de tela, que sea suave y otros materiales como elástico, hilo y aguja se puede diseñar y adaptar al tamaño de la cabeza. Aquí te cuento como lo hice y además me sirve para hacer otra publicación con otra variante. Aquí te dejo los detalles.
Hello dear Hive community, as always I hope you are very well and enjoying the week. I have a niece who is studying medicine and another who started, and thinking of them I made these surgical caps, if you like I can make more models. Combine them with their uniforms and they will have their heads well covered at the time of their practices.
With a piece of fabric, which is soft and other materials such as elastic, thread and needle can be designed and adapted to the size of the head. Here I tell you how I did it and also serves me to make another publication with another variant. Here are the details.

MATERIALES:
Tela
Elástico de 8mm y uno de 4 cm
Tijeras, hilo, alfileres y cinta métrica
Máquina de coser
MATERIALS:
Fabric
Elastic of 8mm and one of 4 cm.
Scissors, thread, pins and measuring tape.
Sewing machine
PROCEDIMIENTO:
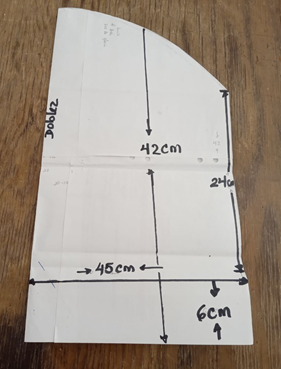
El patrón consta de un rectángulo de 45cm por 42cm. Por la parte ancha, se le marcan 6cm, que van desde la parte posterior hasta arriba, hice una línea para visualizar. Desde ese punto subo 24cm y hago otro punto para unir con el borde superior formando una semi-curva. Como se ve en la fotografía. Cuando llevamos a la tela debemos tomar en cuenta el doblez de la tela.
PROCEDURE:
The pattern consists of a rectangle of 45cm by 42cm. On the On the wide side, I mark 6cm, which goes from the back to the top, I made a line to visualize. From that point I go up 24cm and make another stitch to join with the top edge forming a semi-curve. As seen in the picture. When we take to the fabric we must take into account the fold of the fabric.
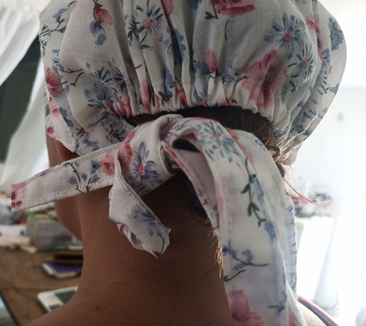
MODELO 1:
Con tira para sujetar.
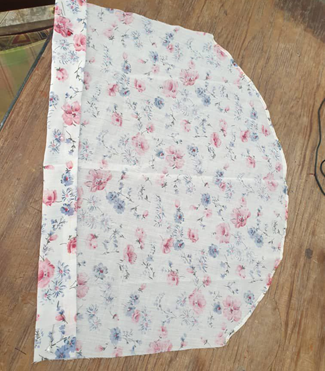
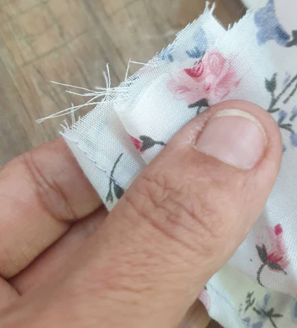
Recorté el patrón del gorro, una pieza y doble cuidosamente la orilla en 6 cm que es el frente del gorro. Y además hice unos dobles por el lado semi-circular por donde irá el elástico de 8 mm
MODEL 1:
With strip for fastening.
I cut out the pattern of the hat, one piece and carefully fold the edge in 6 cm which is the front of the hat. I also made some folds on the semi-circular side where the 8 mm elastic will go.
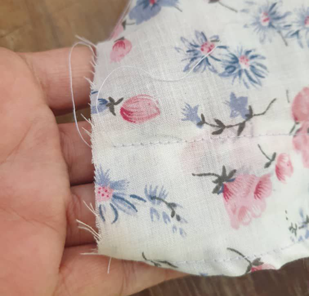
Pasé una costura recta por el borde más grande y también por la semi- curva.
I ran a straight seam along the larger edge and also along the semi-curved edge.
Pasé con un alfiler el elástico y fruncí para cerrar a máquina.
I pinned the elastic and gathered to machine close.
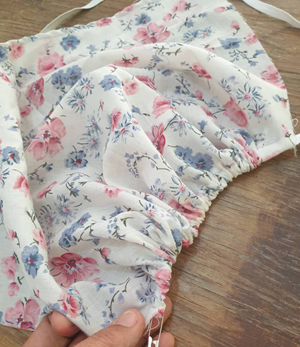
Luego, hice varios tachones o dobleces, teniendo cuidado que queden iguales para el otro lado, hasta llegar a cubrir toda la tela.
Then, I made several crosses or folds, taking care that they are the same for the other side, until I covered all the fabric.
Pasé una costura recta por ambas partes. En esta parte es donde le colocaré la tira para sujetar.
I sewed a straight seam on both sides. This is where I will place the fastening strip.

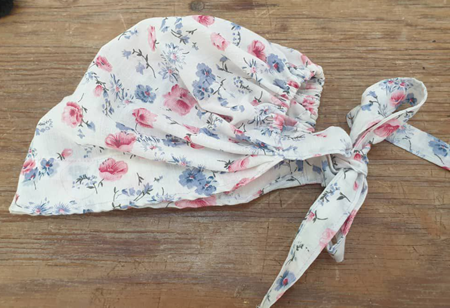
Le coloqué una tira en ambos lados de largo suficiente para hacer un lazo o que pueda amarrarse en el frente también, y me quedó de esta manera.
I placed a strip on both sides long enough to make a loop or that can be tied in the front as well, and it looked like this.
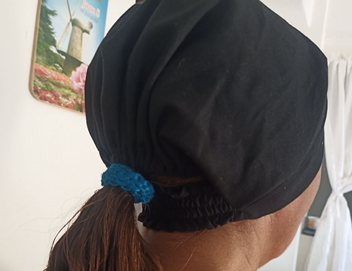
MODELO 2:
Con Elástico para sujetar.
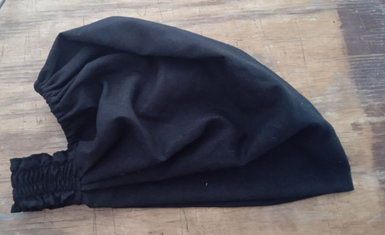
Este modelo solo sufre una variación para sujetar, y es simplemente colocar un elástico de 10 cm de largo y de ancho de 4 cm. Se cose en una tira del mismo color del gorro. Y se le coloca en la parte posterior del gorro cuidando que queden todas las costuras guardadas.
MODEL 2:
With elastic for fastening.
This model has only one variation for fastening, and it is simply to place an elastic of 10 cm long and 4 cm wide. It is sewn in a strip of the same color of the cap. And it is placed on the back of the hat taking care that all the seams are saved.

Son muy versátiles, y los diferentes modelos que te presento son por la practicidad del que los usa. Puedes tener el cabello largo o corto y queda de igual modo escondido dentro del gorro.
They are very versatile, and the different models that I present to you are for the practicality of the wearer. You can have long or short hair and it is equally hidden inside the cap.
Todas las fotos son con el teléfono Redmi 9 A, La edición con Canva y el traductor es Deepl. y los separadores de texto de @eve66. ¡Gracias por visitar mi blog!
All photos are with Redmi 9 A phone, Editing with Canva and the translator is Deepl. and the text separators of @eve66 Thanks for visiting my blog!
This is beautiful and neatly sewn. Your niece would be so happy to wear them during their practicals.
Excelente tutorial, te quedaron muy lindos, bien elaborados, te felicito gracias por compartir y enseñarnos hacerlos. 😃 🤗
Saludos g2ml, los gorros quedaron hermosos, mi favorito el de color negro, se ve cómodo y sencillo de hacer.
Feliz domingo!
Oooh que gran trabajo, quedaron geniales y prácticos, además de hermosos 👏
Oooh what a great job, they turned out great and practical, as well as beautiful 👏.