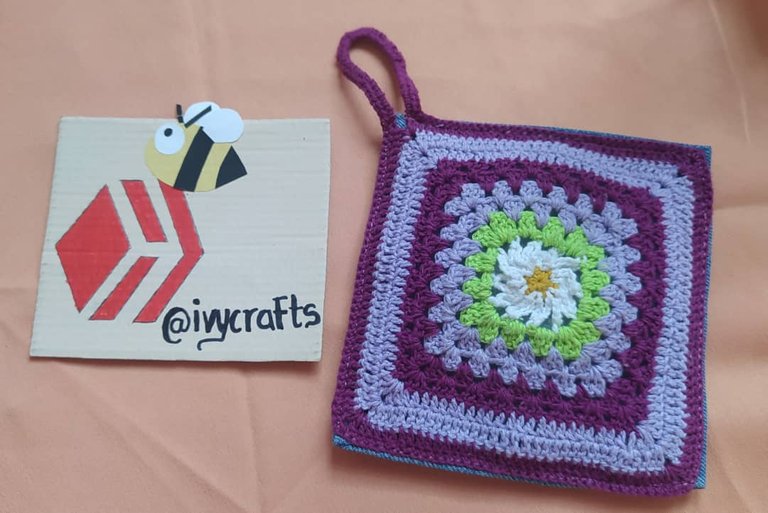
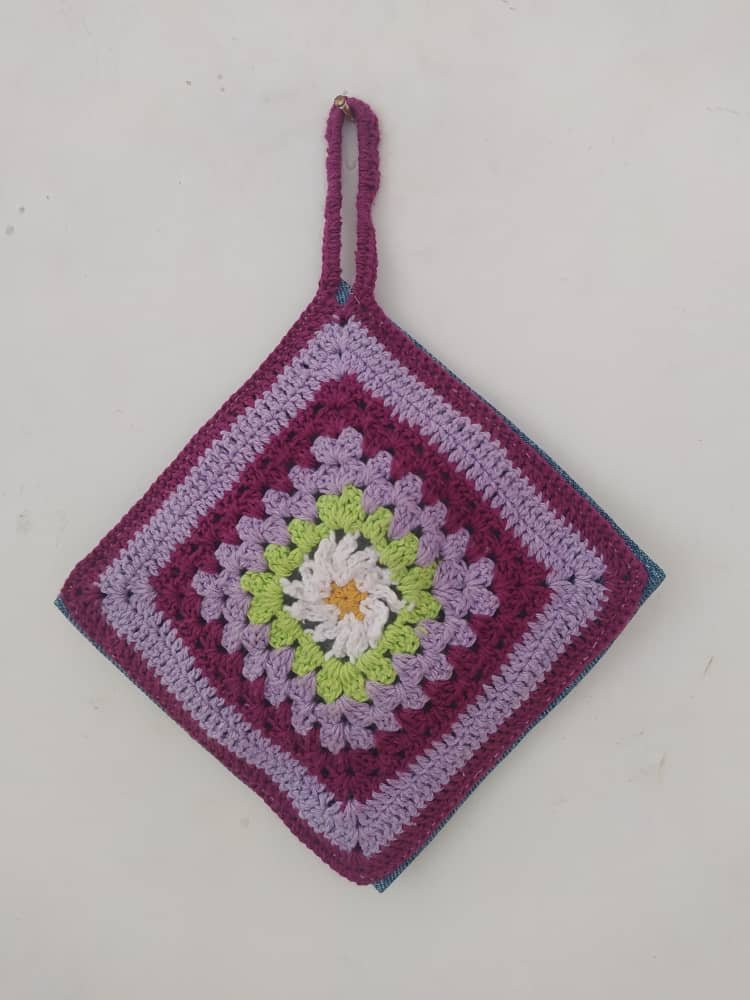
Helloooo Hiveers, happy start of the week my dear readers. Today I am very happy to make my first post of this year in the #NeedleWorkMonday community. I arrived on Friday in my city Carora, very excited and happy to be back, I saw my stuff and immediately thought of making you a tutorial. I had so many things in mind, but I thought this potholder would be perfect, although I didn't have much faith that would look pretty, I was very surprised with the result. I made this potholder thinking of my mom since she recently told me that she needed a potholder, and since I had some fabric from an old pair of jeans and some matching colors of pábilo thread, I decided to make it.
Holaaaa Hiveers, feliz inicio de semana mis queridos lectores. Hoy estoy muy feliz de hacer mi primera publicación de este año en la comunidad #NeedleWorkMonday. Llegué el viernes a mi ciudad Carora, muy emocionada y feliz de estar de vuelta, vi mi material e inmediatamente pensé en hacerles un tutorial. Tenía tantas cosas en mente, pero creí que este agarra ollas sería perfecto, aunque no tenía mucha fe de que quedara bonito, me sorprendió mucho el resultado. Este agarra ollas lo hice pensando en mi mamá ya que ella me dijo hace poco que necesitaba un agarra ollas, y como tenía una tela de un pantalón vaquero viejo y colores hilo pábilo que combinaban, me propuse a hacerlo.
Materials/Materiales:
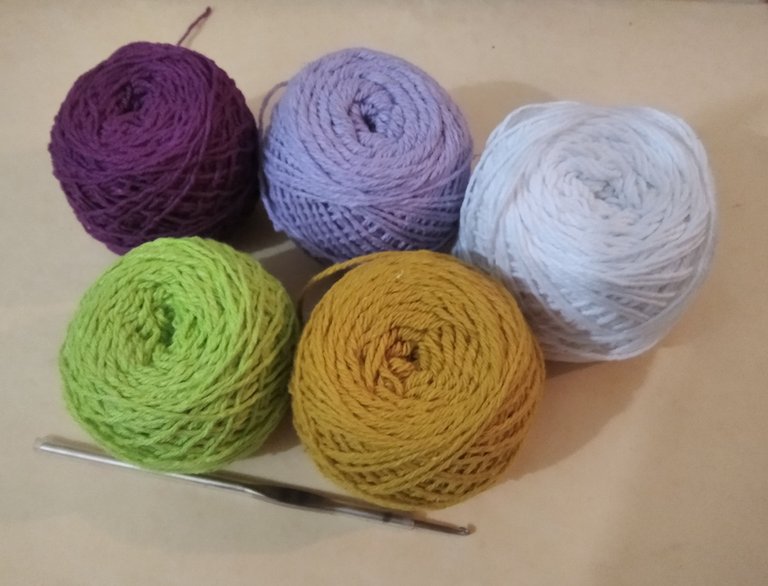
- Pábilo yarn colors: yellow, white, green, lilac and vinotint.
- Crochet hook #1.
- A piece of fabric from a pair of jeans.
- A bit of wadding.
- Thread and needle for sewing.
You can use any color you wish.
- Hilo pábilo de colores: amarillo, blanco, verde, lila y vinotinto.
- Ganchillo #1.
- Un trozo de tela de algún pantalón vaquero.
- Un poco de guata.
- Hilo y aguja para coser.
Ustedes pueden usar los colores que deseen.
Abbreviations//Abreviaciones:
- AM: magic ring.
- Ch: Chain(s).
- Hdc: half high point.
- Slst: Slip stitch.
- Sc: low point.
- Dc: high stitch.
- BLO: take only the back strand.
- AM: anillo mágico.
- Ch: cadena(s).
- Mpa: medio punto alto.
- Pr: punto raso.
- Pb: punto bajo.
- Pa: punto alto.
- BLO: tomar únicamente la hebra trasera.
Process/Proceso:
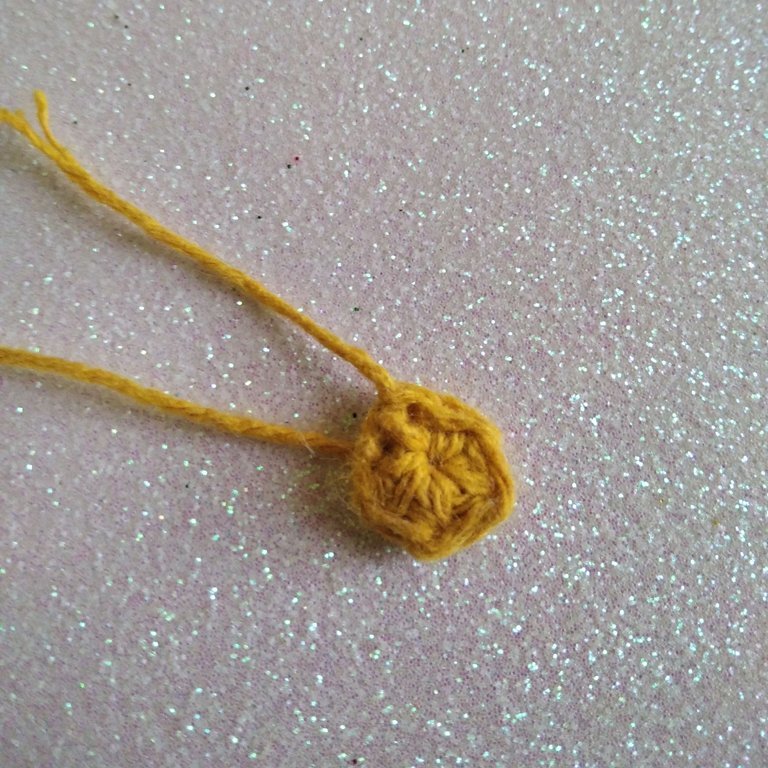
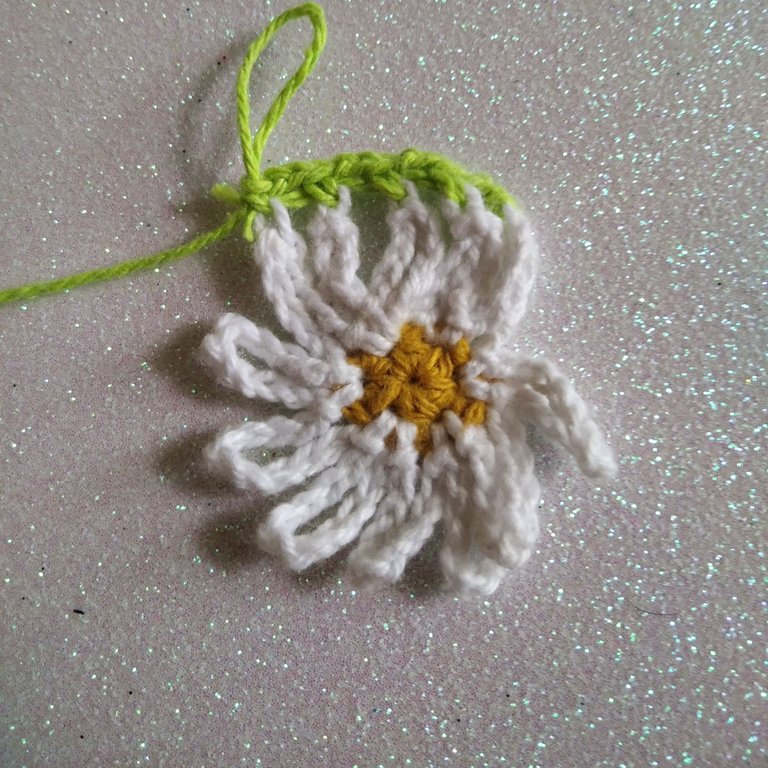
- Rnd 1: With the yellow yarn we start making 2ch and 5hdc in an AM, we close with a slst.
- Rnd 2: Join the white yarn and knit the whole round (11ch, slst, 11ch, slst). We should get a total of 12 petals.
- Rnd 1: Con el hilo amarillo comenzamos haciendo 2ch y 5mpa en un AM, cerramos con un pr.
- Rnd 2: Unimos el hilo blanco y hacemos en toda la ronda, (11ch, pr, 11ch, pr). Nos debe de salir un total de 12 pétalos.
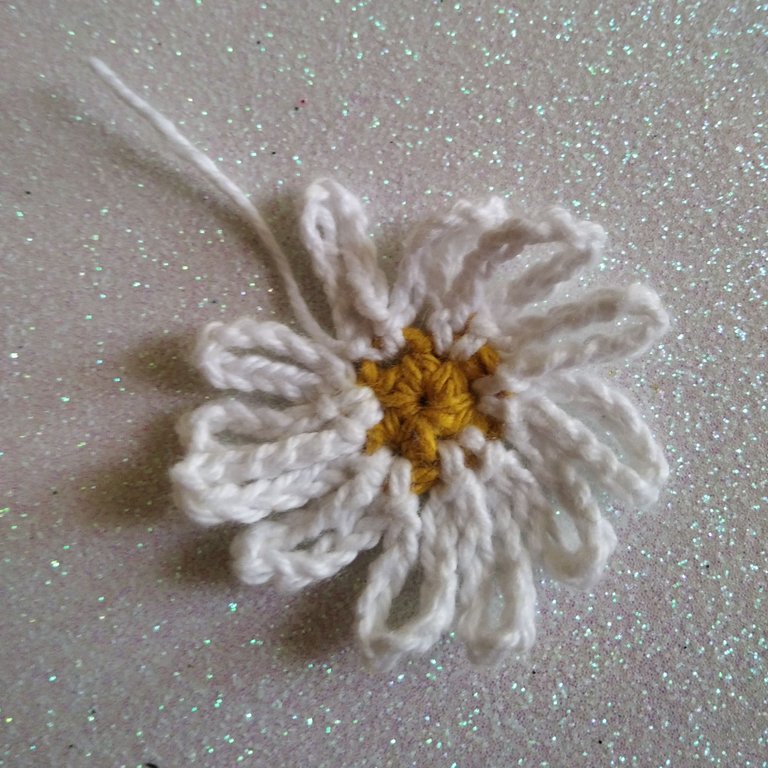
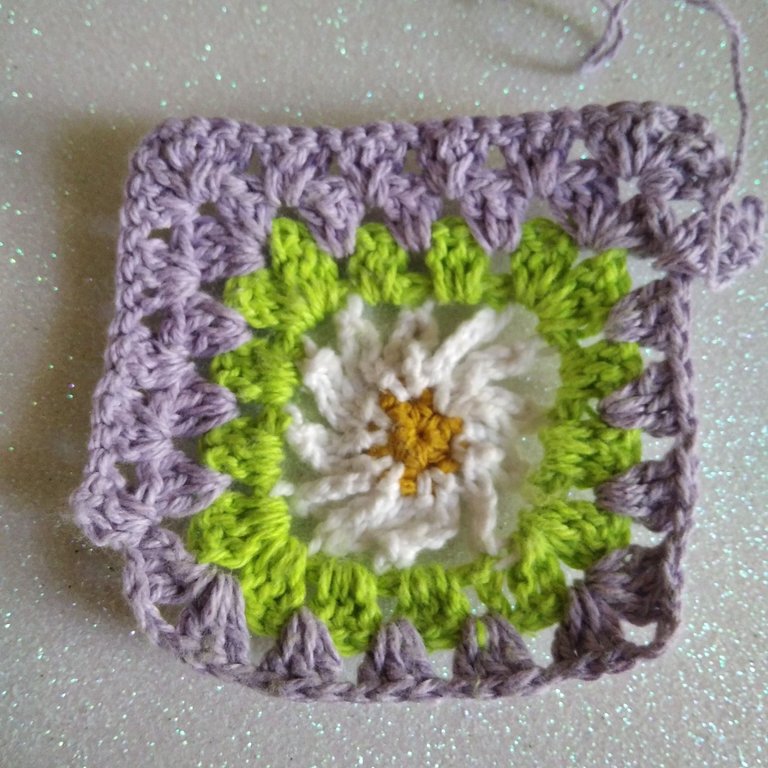
- Rnd 3: Join the green yarn and in the 6th stitch of the petal make 1sc in BLO and then 2ch, repeat the same in each petal. We close the round with 1slst.
- Rnd 3: Unimos el hilo verde y en la puntada 6ta del pétalo hacemos 1pb en BLO y luego 2ch, repetimos lo mismo en cada pétalo. Cerramos la vuelta con 1pr.

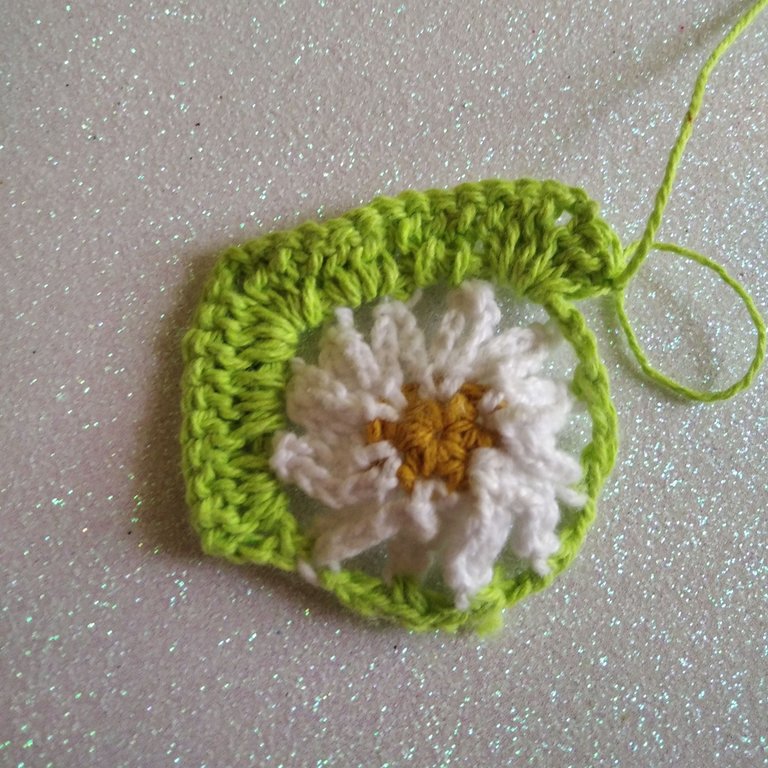
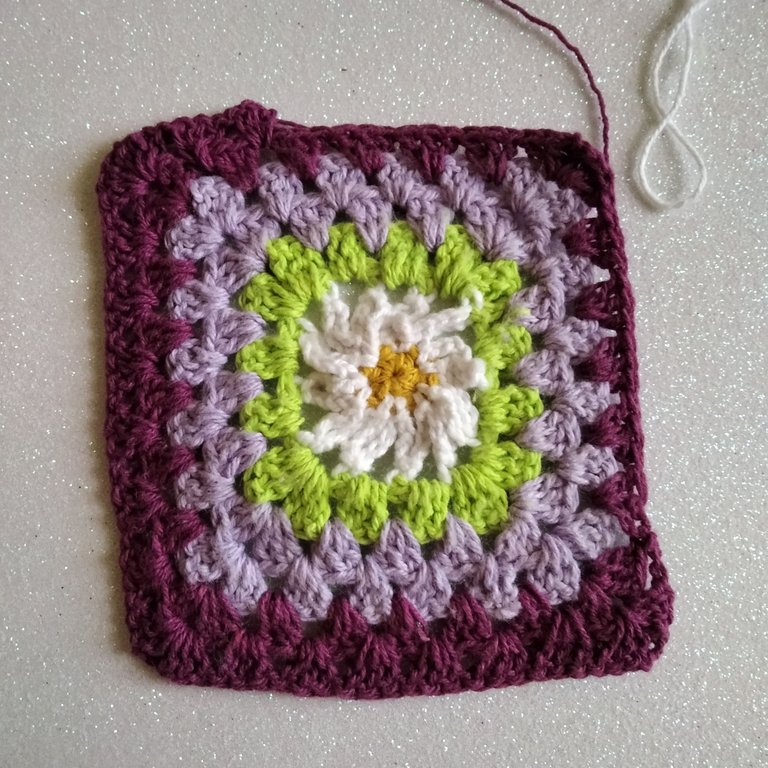
Rnd 4: We continue with the green yarn, we make 3ch (counts as a dc), in the next two ch openings we make 3dc, and to form the corner we make (3dc, 2ch, 3dc), repeat until we get the 4 corners, close the round with a slst.
Rnd 5: Join the purple yarn, make 3ch, in each ch opening make 3dc, and to form the corner again we make (3dc, 2ch, 3dc), repeat until we get the 4 corners, close the round with a slst.
Rnd 4: Continuamos con el hilo verde, hacemos 3ch (cuenta como un pa), en los siguientes dos espacios de ch hacemos 3pa, y para formar la esquina hacemos (3pa, 2ch, 3pa), repetimos hasta obtener las 4 esquinas, cerramos la vuelta con un pr.
Rnd 5: Unimos el hilo lila, hacemos 3ch, en cada abertura de ch hacemos 3pa, y para formar la esquina nuevamente haremos (3pa, 2ch, 3pa), repetimos hasta obtener las 4 esquinas, cerramos la vuelta con un pr.
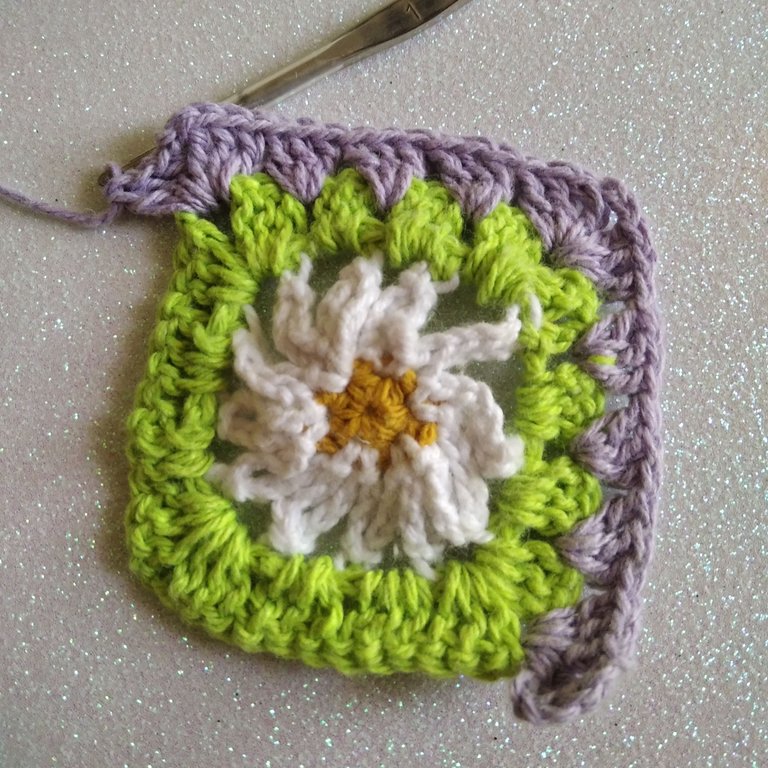
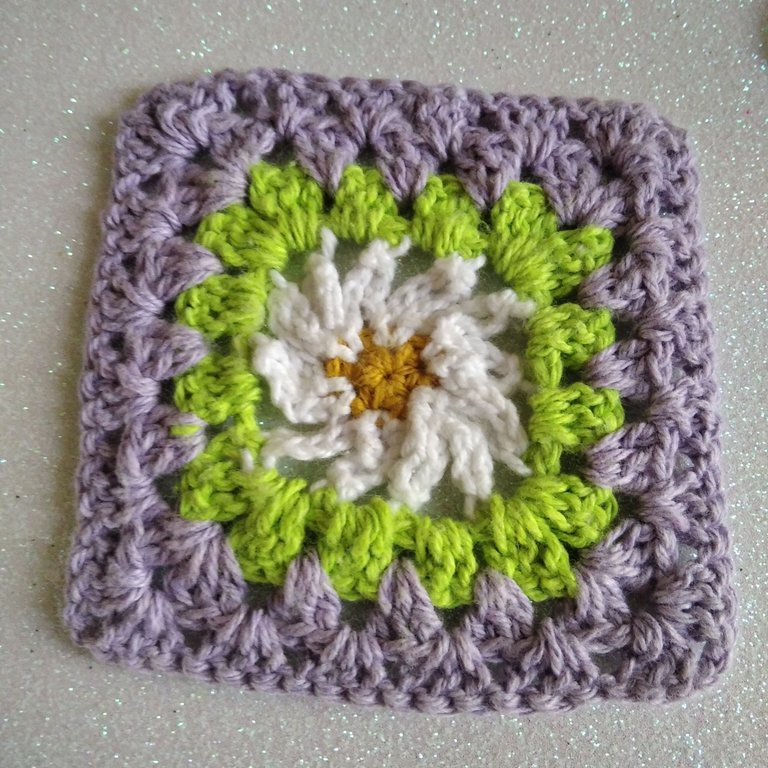
Rnd 6: Continue with the purple yarn, make 3 ch, in the following ch spaces, make 3dc, when you reach the corner make (3dc, 2ch, 3dc), repeat until you get the 4 corners, close the row with a slst.
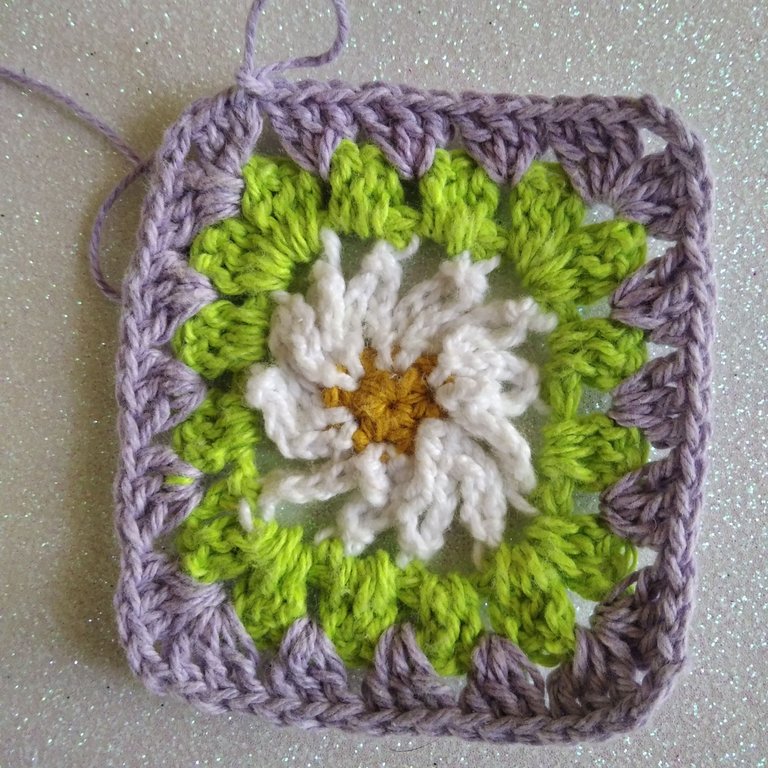
Rnd 7: Repeat the previous row.
Rnd 6: Seguimos con el hilo lila, hacemos 3 ch, en los siguientes espacios de ch, haremos 3pa, al llegar a la esquina haremos (3pa, 2ch, 3pa), repetimos hasta obtener las 4 esquinas, cerramos la vuelta con un pr.
Rnd 7: Repetimos lo de la vuelta anterior.
- Rnd 8: Join the vinotint yarn, make 3ch, in each ch opening make 3dc, and to form the corner again we will make (3dc, 2ch, 3dc), repeat until we get the 4 corners, close the round with a slst.
- Rnd 8: Unimos el hilo vinotinto, hacemos 3ch, en cada abertura de ch hacemos 3pa, y para formar la esquina nuevamente haremos (3pa, 2ch, 3pa), repetimos hasta obtener las 4 esquinas, cerramos la vuelta con un pr.
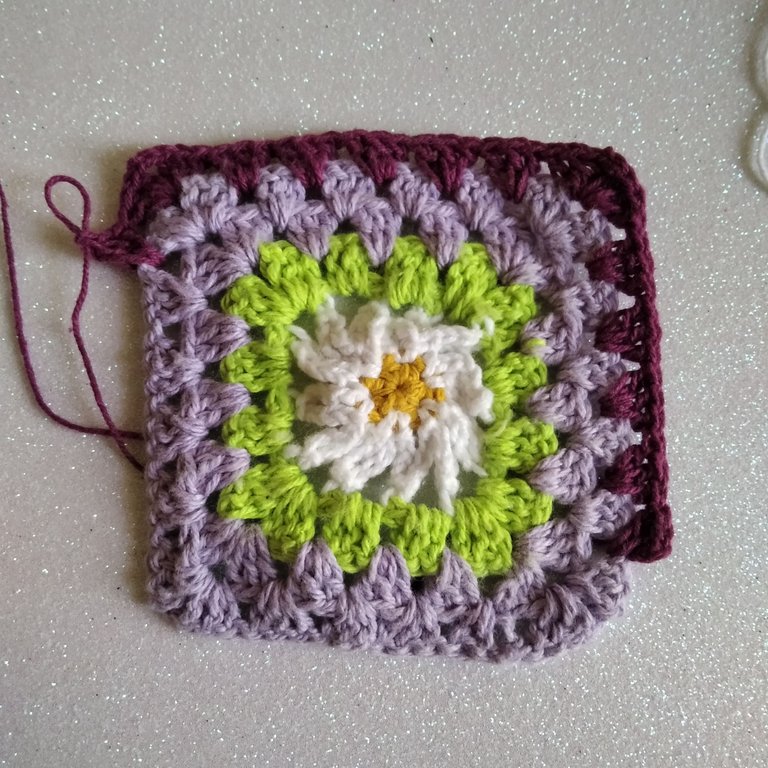
- Rnd 9: We do the same as in row 8.
- Rnd 9: Hacemos los mismo de la vuelta 8.
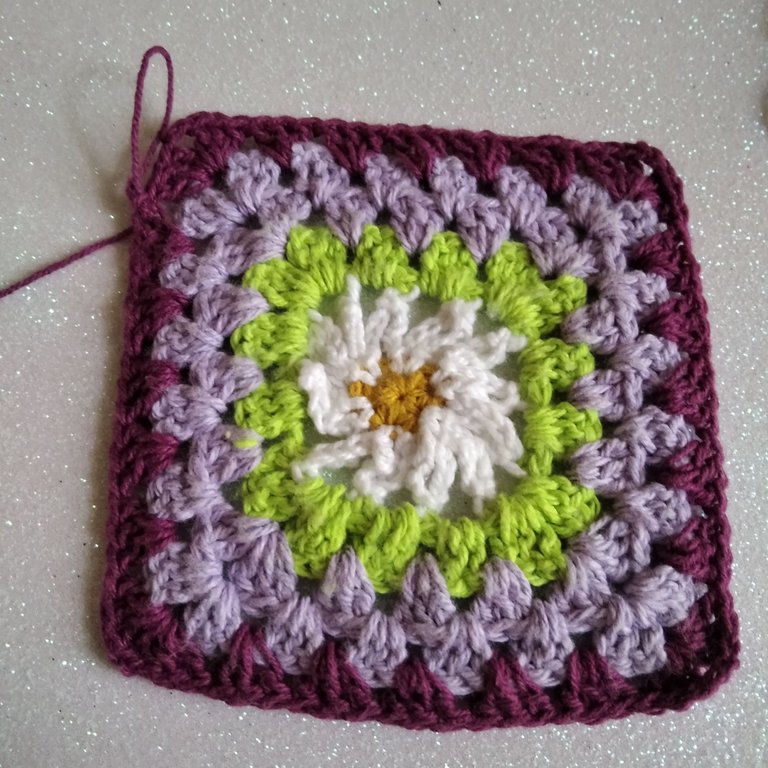
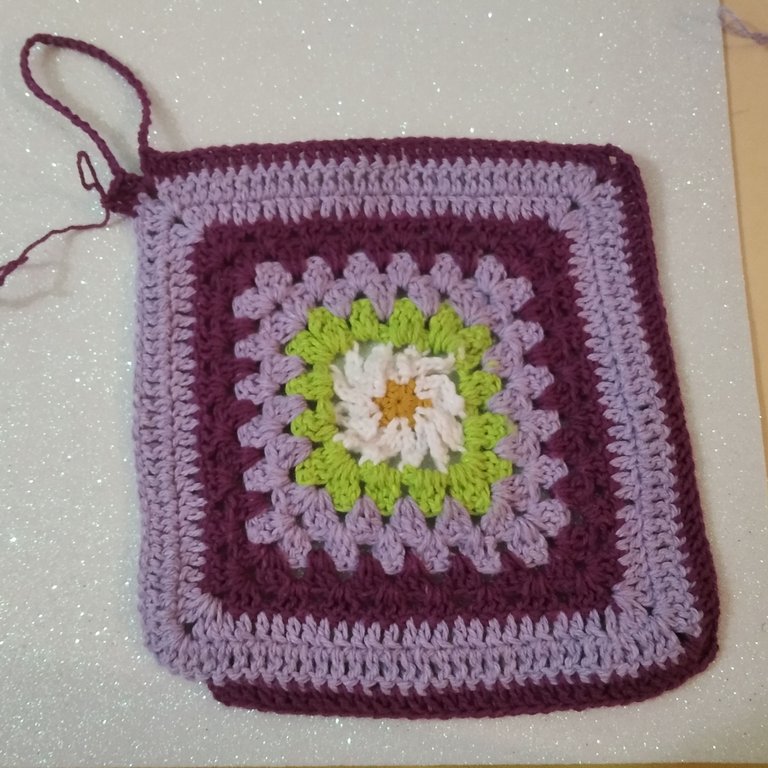
- Rnd 10-11: Join the purple yarn. We begin by making 3ch, then in each stitch we make 1dc and in each corner we make (2dc, 2ch), we close the row with a slst.
- Rnd 10-11: Unimos el hilo lila. Comenzamos haciendo 3ch, luego en cada puntada hacemos 1pa y en cada esquina hacemos (2pa, 2ch), cerramos la fila con un pr.
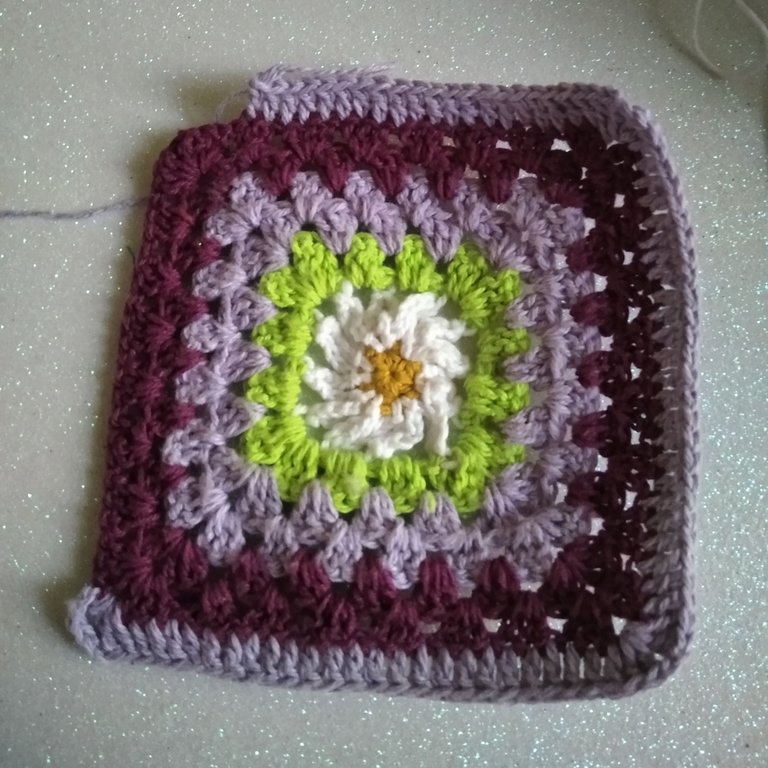
- Rnd 12: We join the vinotint yarn. We start by making 3ch, then in each stitch, we make 1dc, in one of its corners we make 50ch (potholder handle), and in the rest of the corners we make (2dc, 2ch), we close the row with a slst.
- Rnd 12: Unimos el hilo vinotinto. Comenzamos haciendo 3ch, luego en cada puntada hacemos 1pa, en una de sus equinas hacemos 50ch (asa del agarra ollas) y en el resto de las esquinas hacemos (2pa, 2ch), cerramos la fila con un pr.
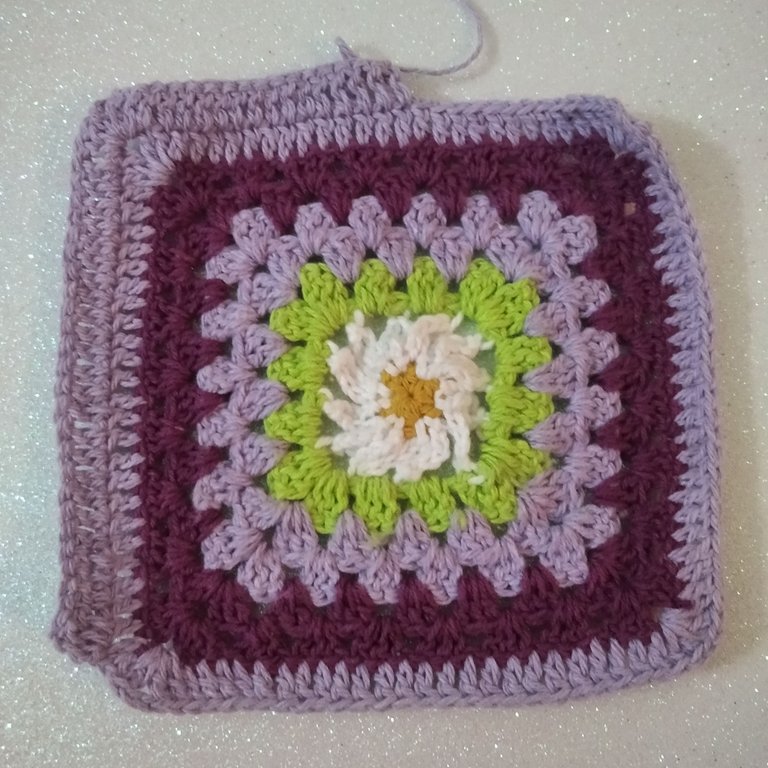
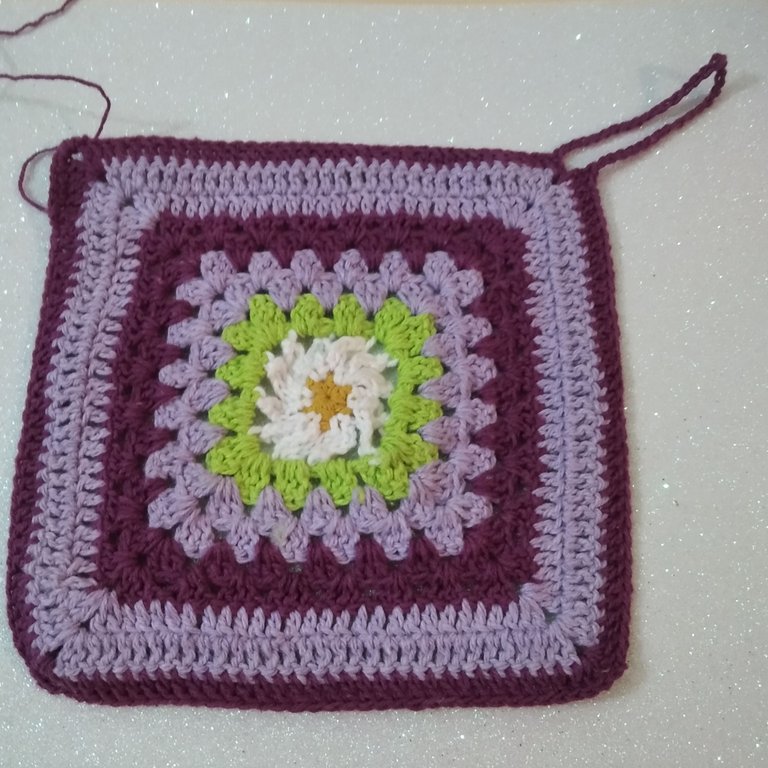
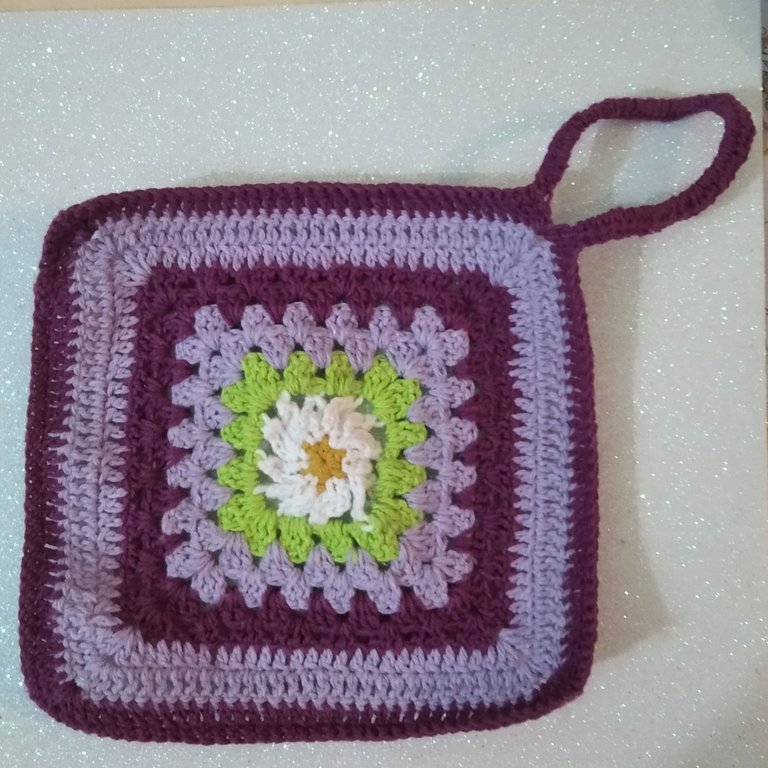
- Rnd 13: We continue with the vinotint yarn, 1ch, 1sc in all the rounds except the corners, there we make over the chains (1sc, 1ch, 1sc). Fill in the handle with hdc. We cut and hide excess.
- Rnd 13: Continuamos con el hilo vinotinto, 1ch, 1pb en toda la ronda exceptuando las esquinas, ahi se hace encima de las cadenas (1pb, 1ch, 1pb). Rellenamos el asa con mpa. Cortamos y escondemos excedentes.
- I cut a 16x16cm square of wadding, and another 16x16cm square of the fabric leaving 1cm on each side for sewing.
- Corté un cuadrado de 16x16cm de guata, y otro cuadrado 16x16cm de la tela dejando 1cm de cada lado para coser.
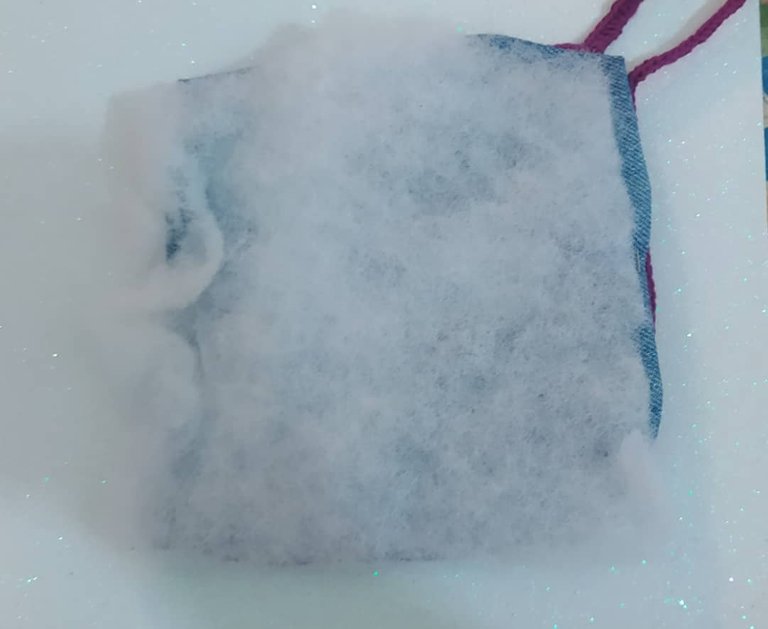
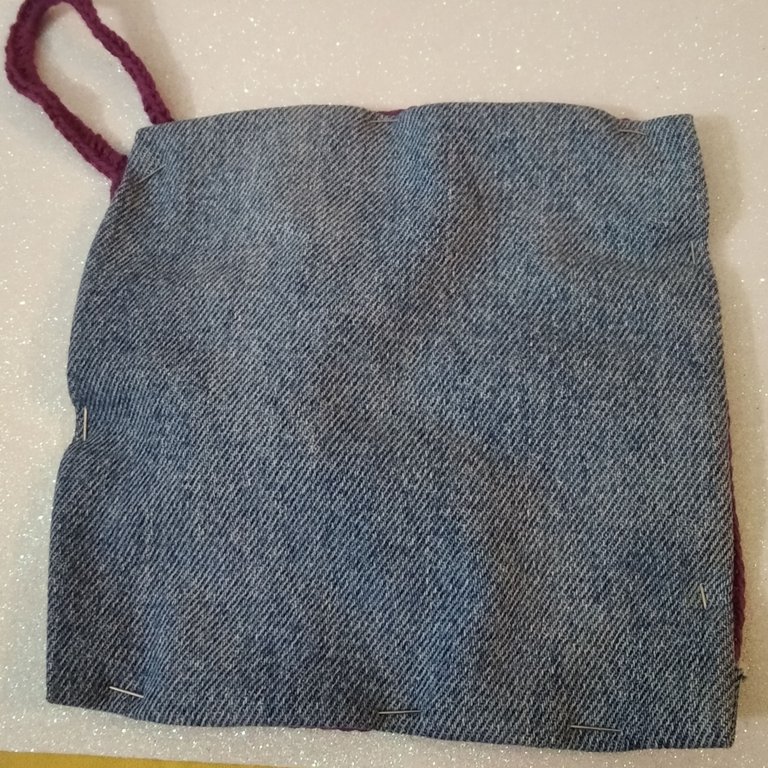
- With the help of the pins, I positioned the fabric and the wadding well to sew them together.
- Con ayuda de los alfileres situé bien la tela y la guata para coserlos.
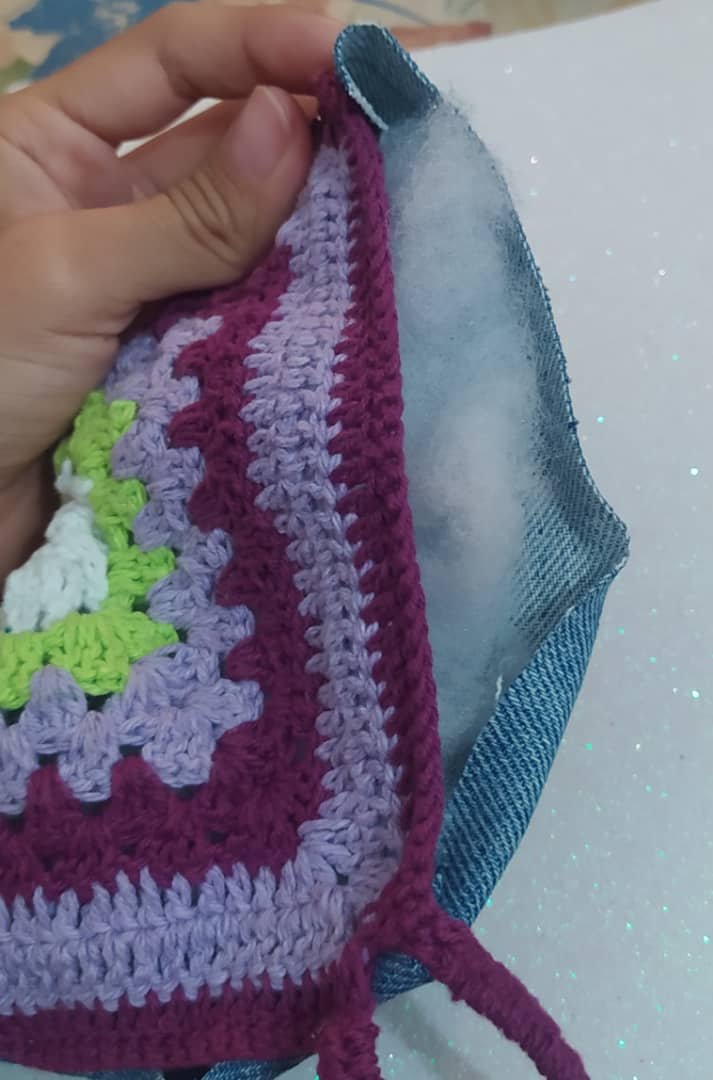
- After stitching (front and back).
- Después de cosido (adelante y detrás).
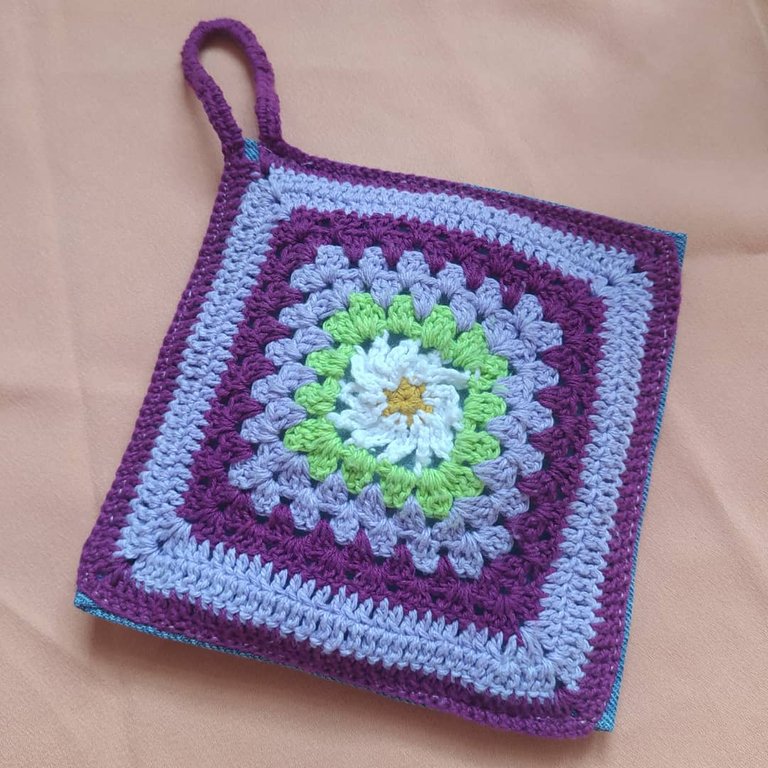
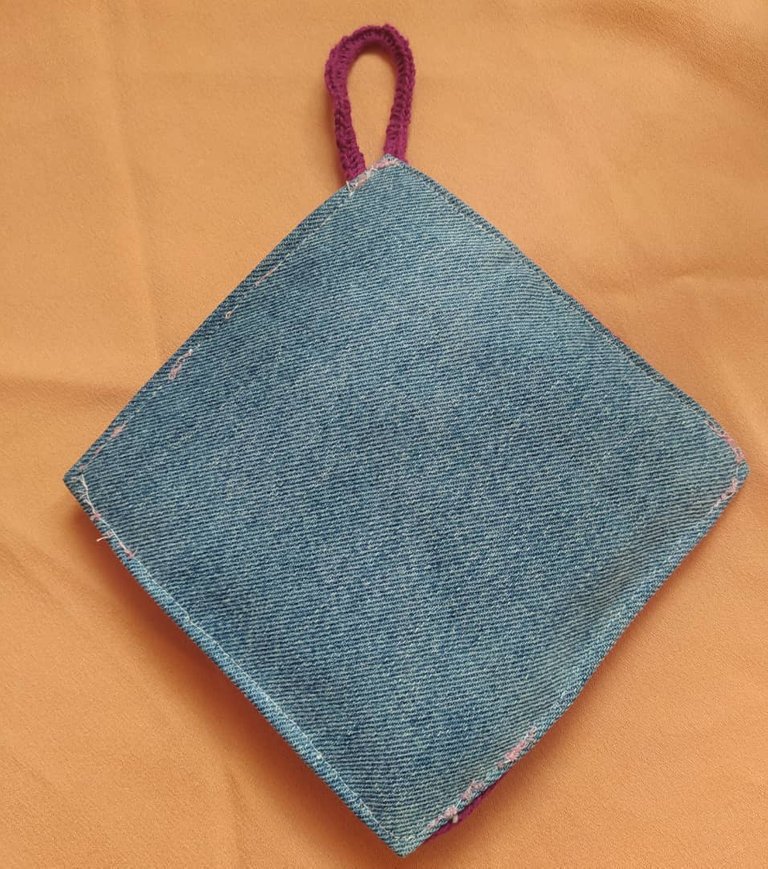
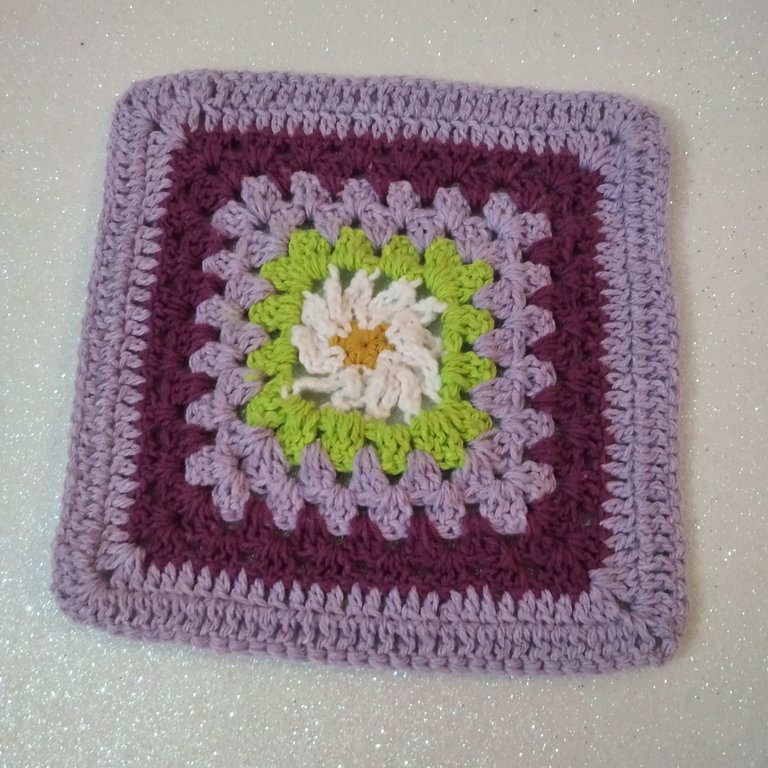
- My mom loved it so much that she used it all at once when she saw it. 🥰
- Y así quedó el agarra ollas, a mi mamá le encantó tanto que lo usó de una vez al verlo. 🥰
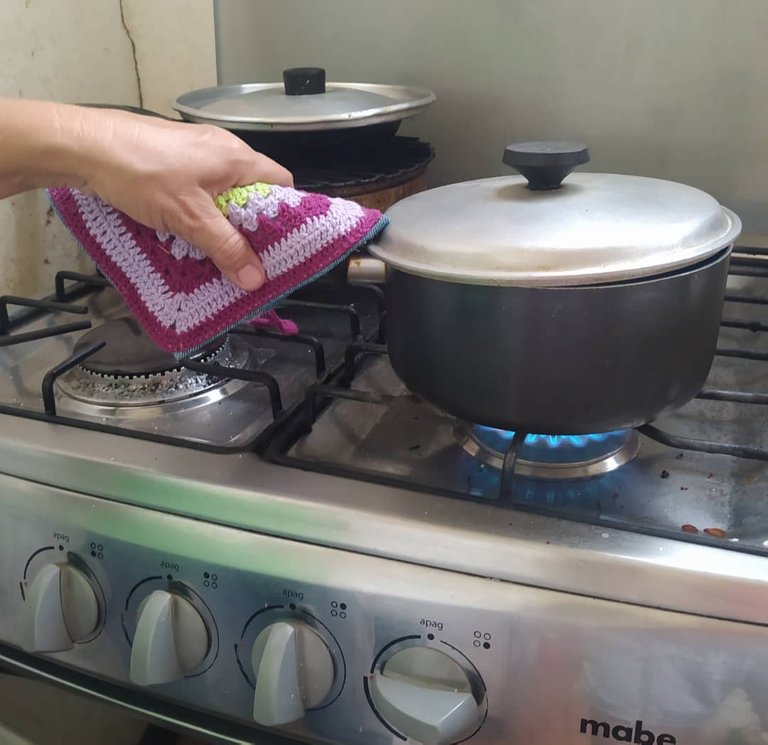
I was thrilled to share the tutorial for this potholder today. It's a great gift that you can give to your mom, aunt or grandmother. I know they will love it, you can also make several squares and make a purse, cup holder or cardigans. Let your imagination fly. Greetings to the entire @needleworkmonday community. Happy and blessed Monday.
Me encantó muchísimo compartir el tutorial de este agarra ollas hoy. Es un excelente detalle que puedes regalarselo a tu mamá, tía o abuela. Sé que les encantará, también puedes hacer varios squares (cuadrados) y hacer un bolso, portavasos o cardigans. Deja que tu imaginación vuele. Saludos a toda la comunidad @needleworkmonday. Feliz y bendecido Lunes.
You have reached the end of my post. Thanks for reading me❤️ Have a nice day 😊❤️ If you need help do not hesitate to write me on my Discord Ivycrafts#0396.❤️
Has llegado al final de mi publicación. Gracias por leerme❤️ Ten un lindo día 😊❤️ Si necesitas ayuda no dudes en escribirme a mi Discord Ivycrafts#0396.❤️
Text and photos are my authorship. Text translated with DeepL. Photos taken with my Xiaomi Redmi 8.
Texto y fotos son de mi autoría. Texto traducido con DeepL. Fotos sacadas con mi Xiaomi Redmi 8.


The rewards earned on this comment will go directly to the person sharing the post on Twitter as long as they are registered with @poshtoken. Sign up at https://hiveposh.com.
I really like that potholder! I think the colors you chose were nice.
Thank you very much, I'm glad you liked it. Grateful for visiting my blog.❤️ Happy Day 😁
Wow beautiful crochet thanks for sharing @ivycrafts
Thanks ❤️
😊😊😊 you’re welcome
Feliz 2022!
Quedé impregnada del entusiasmo de tu publicación. Ha quedado precioso el agarra ollas, es super útil en la cocina y además decorativo
Gracias por compartir tu proceso creativo.
Saludos
¡Saludos! Feliz 2022😁 es que sí estaba muy entusiasmada, muchas gracias. Me alegra mucho que te haya gustado. Gracias por visitar mi blog ❤️
Very cute and functional! Love that you used jeans material on the back! Your crochet work is very beautiful.
Thanks for sharing!
I'm so glad you liked my potholder. 🥰 have a happy day.❤️