¡Hola, hola! Hivers y también a esta hermosa comunidad, espero todos se encuentren súper bien, animados e inspirados 💟
Hello, hello! Hivers and also to this beautiful community, I hope everyone is feeling super well, encouraged and inspired 💟
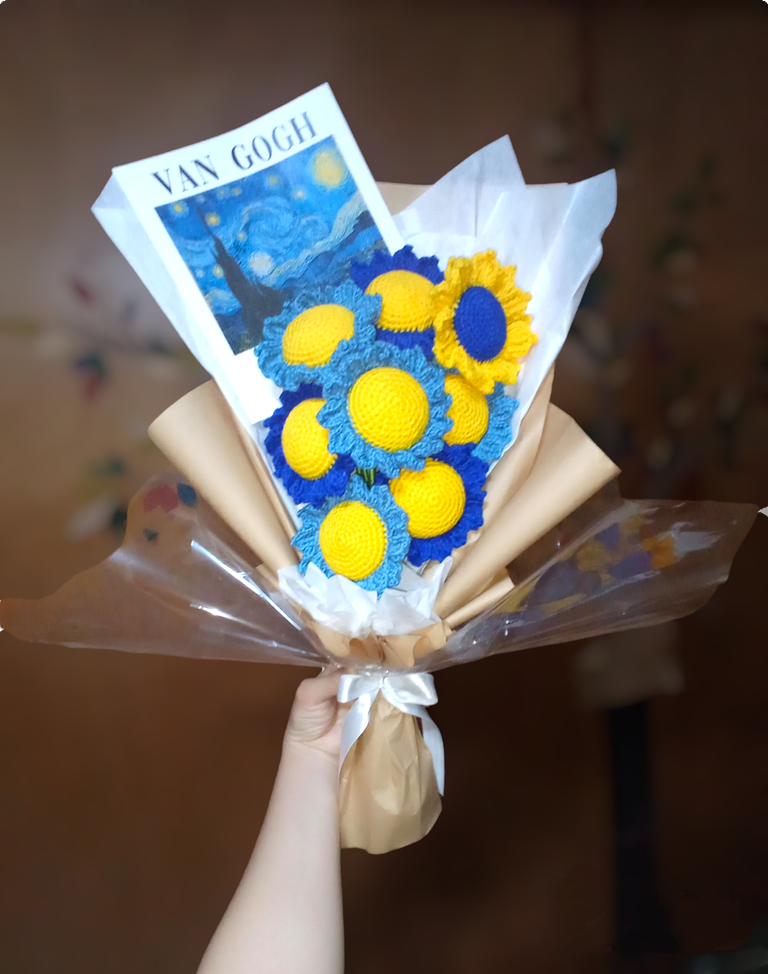
Hoy les traigo un hermoso trabajo en crochet que la verdad represento un pequeño reto para mí, no precisamente por tejer las flores sino más bien porque es la primera vez que realizo un ramo con más de 3 flores y el reto en si era envolverlas y que se viera bonito jajaja… para mi esa es la parte complicada de realizar ramos de flores eternas.
Este fue un pedido realizado por un amigo, para obsequiarlo a una chica especial de la cual no quiso revelar su identidad jajaja… yo siempre de curiosa.
El pedido fue un ramo de girasoles inspirado en la pintura de LA NOCHE ESTRELLADA DE VAN GOGH, él me solicitó específicamente que el ramo incluyera únicamente girasoles, yo le había sugerido margaritas, rosas o tulipanes, pero él quería específicamente girasoles y que estos fuesen de color azul con algo de amarillo.
Y esto me causo curiosidad así que averiguando un poco en internet descubrí que Van Gogh había pintado varios cuadros de Girasoles y que para el tenían un importante significado, y pues, supuse que ya que el ramo estaba inspirado en una pintura de este artista también por esa razón era la solicitud de que el ramo tuviese únicamente girasoles. Y bueno si al igual que a mi les da curiosidad saber sobre la relación o importancia de Van Gogh con los girasoles les dejo este link https://en.wikipedia.org/wiki/Sunflowers_(Van_Gogh_series)
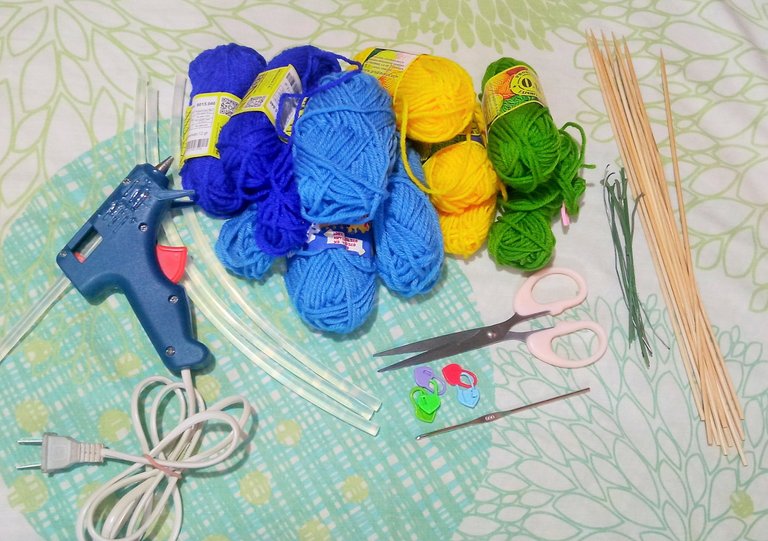
Los MATERIALES que utilice fueron:
- Estambres de color azul cielo y azul rey, amarillo, verde y marrón.
- Aguja de crochet #000.
- Marcadores de puntos.
- Aguja lanera.
- Relleno siliconado.
- Silicón en barra y pistola de silicón.
- Alambre.
- Palillos de altura.
- Tijera.
Today I bring you a beautiful crochet work that actually represented a little challenge for me, not exactly for knitting the flowers but rather because it is the first time I make a bouquet with more than 3 flowers and the challenge itself was to wrap them and make it look pretty hahaha... for me that is the complicated part of making eternal flower bouquets.
This was an order placed by a friend of mine, to give it to a special girl whose identity he didn't want to reveal hahaha... I'm always curious.
The order was a bouquet of sunflowers inspired by THE STARRY NIGHT painting by VAN GOGH, he specifically asked me that the bouquet included only sunflowers, I had suggested daisies, roses or tulips, but he specifically wanted sunflowers and that these were blue with some yellow.
And this made me curious so I found out that Van Gogh had painted several pictures of sunflowers and that for him they had an important meaning, and well, I assumed that since the bouquet was inspired by a painting of this artist also for that reason was the request that the bouquet had only sunflowers. And well, if like me you are curious to know about the relationship or importance of Van Gogh with sunflowers I leave you this link https://en.wikipedia.org/wiki/Sunflowers_(Van_Gogh_series)
The MATERIALS I used were:
- Sky blue and king blue, yellow, green and brown stamens.
- Crochet needle #000.
- Stitch markers.
- Wool needle.
- Silicone stuffing.
- Silicone stick and silicone gun.
- Wire.
- Height sticks.
- Scissors.
Proceso de tejido:
Bueno esto no será un tutorial como normalmente acostumbro, pero si les explicare el proceso del tejido de los girasoles y como realice el ramo como tal y uno que detalle que se me presento mientras tejía las flores.
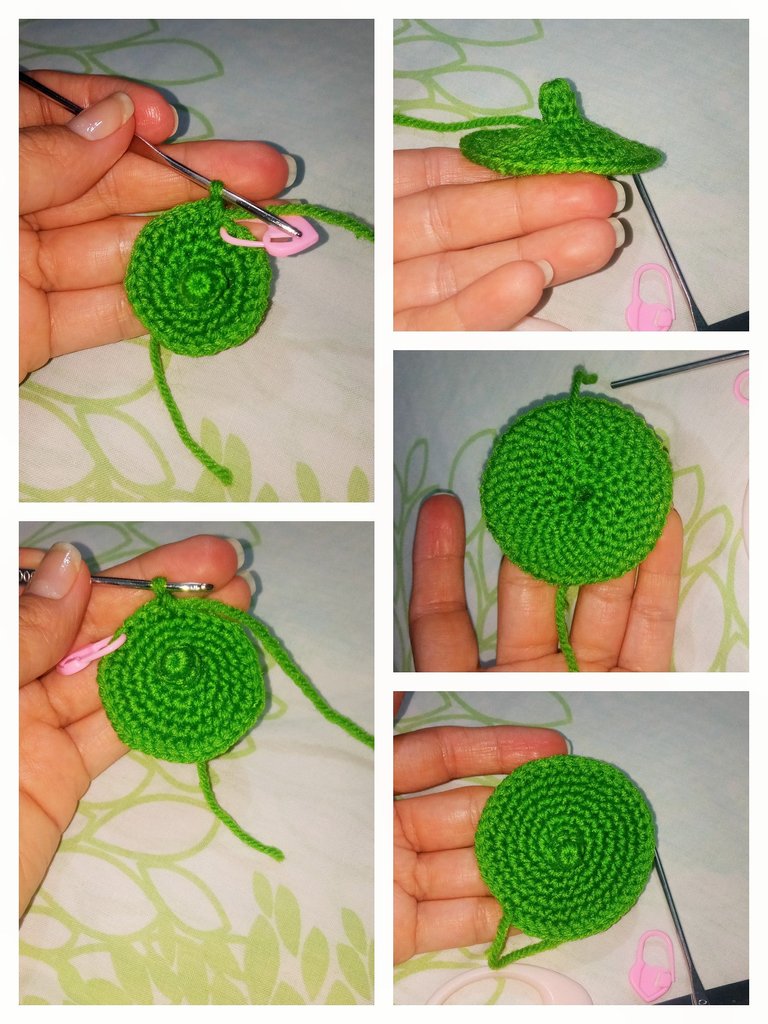
Para iniciar realice todos los centros de los girasoles, ya que tenía que tejer 8 girasoles decidí trabajar en serie, para tejer los centros inicie con un anillo mágico y tejí 6 puntos bajos, y fui haciendo aumentos en múltiplos de 6 en cada vuelta hasta obtener un total de 42 puntos bajos, y el tejido lo realice tejiendo en espiral, es decir no cerraba las vueltas si no que las tejía de corrido.
En total realice 7 vueltas, y en lugar de usar estambre marrón como acostumbro hacerlo al tejer girasoles, use estambre amarrillo para hacer los centros de las flores.
Weaving process:
Well this will not be a tutorial as I usually do, but I will explain the process of knitting the sunflowers and how I made the bouquet as such and one detail that came to me while knitting the flowers.
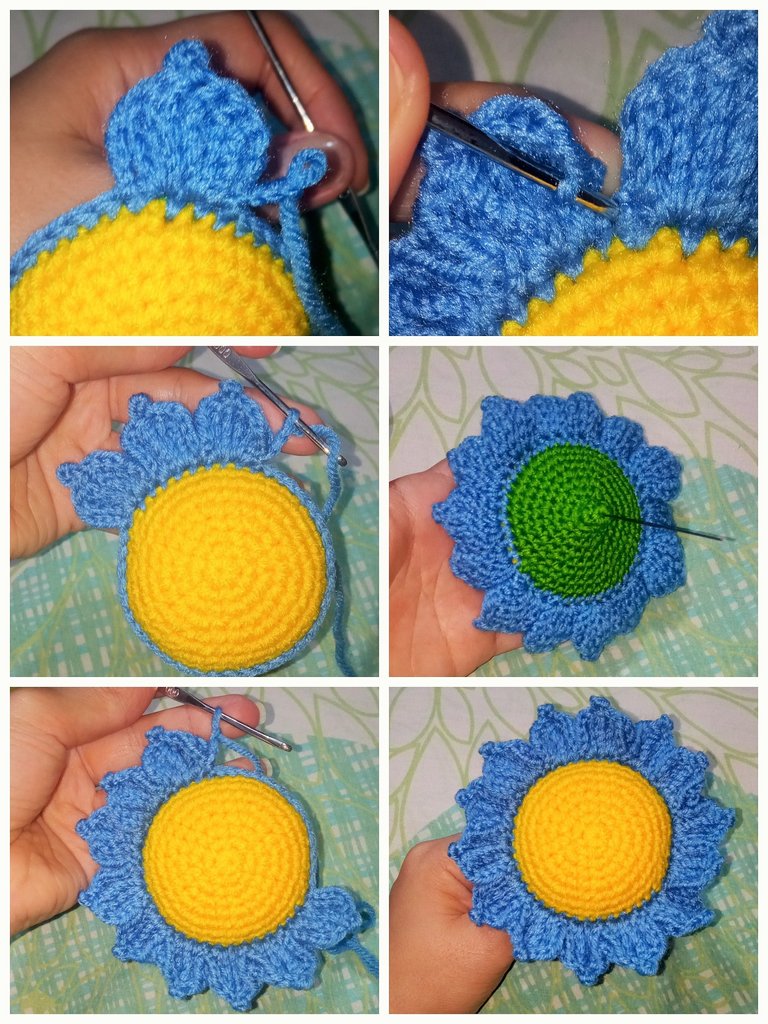
To begin with I made all the sunflower centers, since I had to knit 8 sunflowers I decided to work in series, to knit the centers I started with a magic ring and knit 6 single crochet stitches, and I was making increases in multiples of 6 in each row until I obtained a total of 42 single crochets, and the knitting was done knitting in spiral, that is to say I did not close the rows but knitted them in a row.
In total I made 7 rows, and instead of using brown yarn as I usually do when knitting sunflowers, I used yellow yarn to make the centers of the flowers.
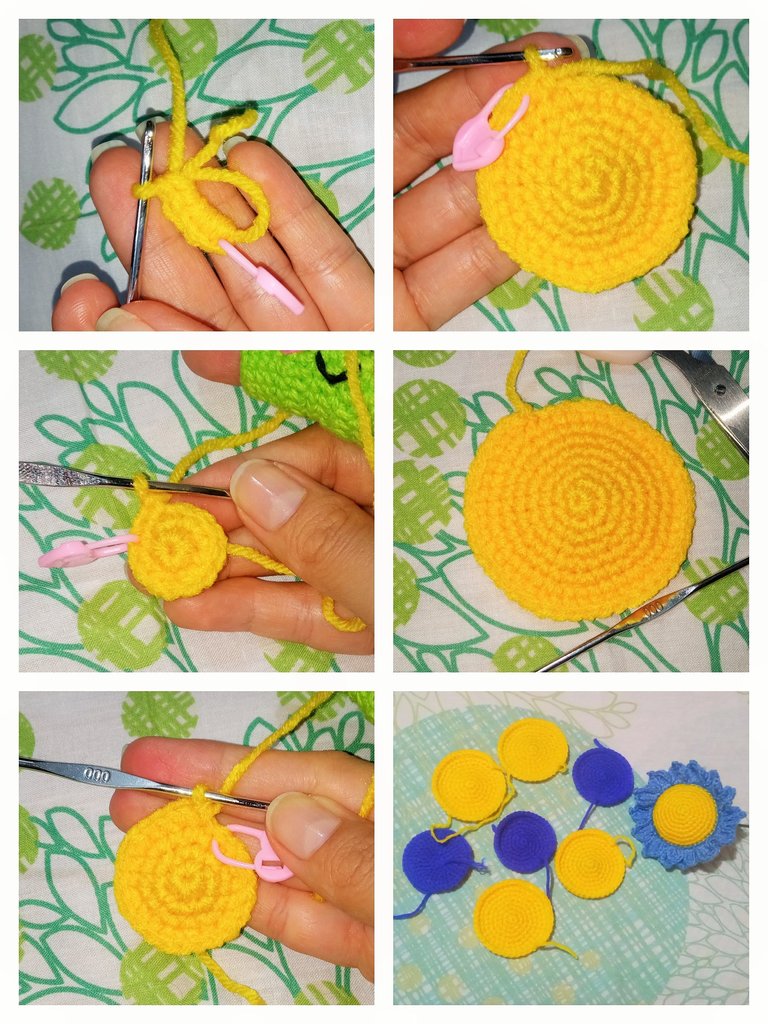
La verdad mientras tejía en mi mente me reía y me decía a mí misma como en los tutoriales de maquillaje… ´confía en el proceso´ jajaja… porque realmente no me imaginaba como iban a resultar estos girasoles con pétalos azules y centro amarillo jajaja…. Pero seguí tejiendo, también realice algunos en color azul rey para probar más adelante que tal se vería la flor con el centro de este color.
Antes de iniciar el trabajo en serie había tejido una flor completa, para poder visualizar y también mostrarle al cliente que tal se vería el girasol en color azul cielo con el centro amarillo.
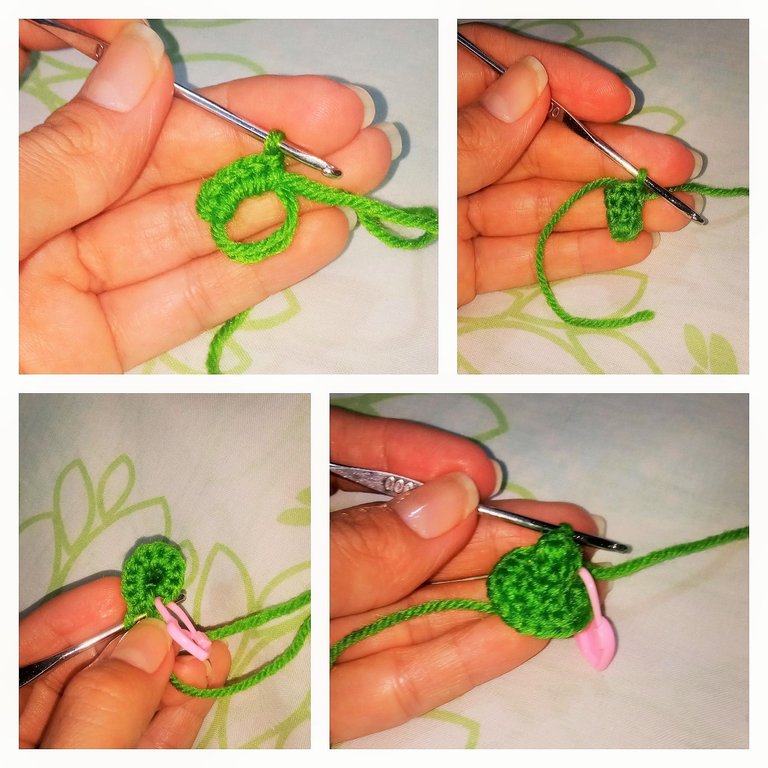
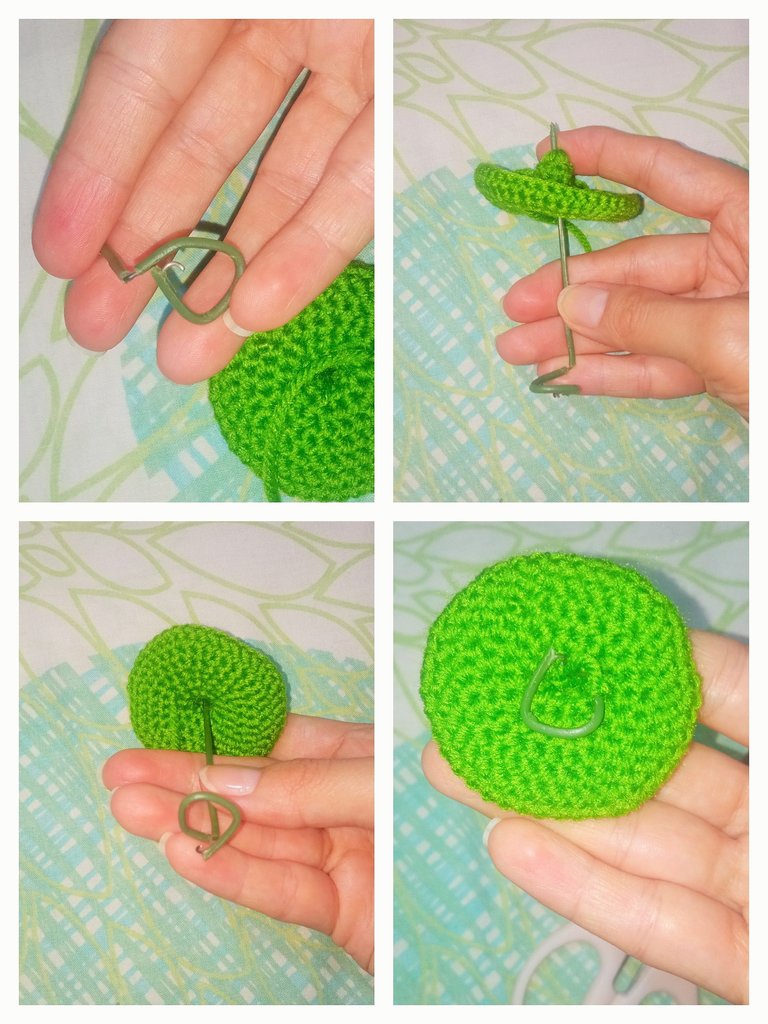
Luego continúe realizando la parte de atrás de los girasoles, esta si la realice con estambre verde como de costumbre, pero hice una pequeña variante de como acostumbro tejer mis girasoles ya que quería introducir un pequeño trozo de alambre entre el palillo de altura y la flor para darle algo de movimiento a las mismas, ya que pensé que de esta manera se me podría facilitar el armado del ramo al momento de envolverlo.
La variante fue que al iniciar el tejido realice 3 vueltas seguidas de 6 puntos bajos, y luego continúe tejiendo igual que lo hice con los centros de las flores realizando aumentos en cada vuelta hasta tener un círculo de 42 puntos bajos.
The truth is that while I was knitting in my mind I was laughing and telling myself like in the makeup tutorials... 'trust the process' hahaha... because I really did not imagine how these sunflowers with blue petals and yellow center were going to turn out hahaha.... But I kept on knitting, I also made some in royal blue to test later how the flower would look with the center in this color.
Before starting the series work I had knitted a complete flower, so I could visualize and also show the customer how the sunflower would look in sky blue with the yellow center.
Then I continued weaving the back of the sunflowers, this time with green yarn as usual, but I made a small variation of how I usually weave my sunflowers because I wanted to introduce a small piece of wire between the height stick and the flower to give some movement to them, as I thought that in this way I could facilitate the assembly of the bouquet when wrapping it.
The variation was that at the beginning of the knitting I knit 3 rows of 6 single crochet stitches, and then I continued knitting as I did with the flower centers, making increases in each row until I had a circle of 42 single crochet stitches.
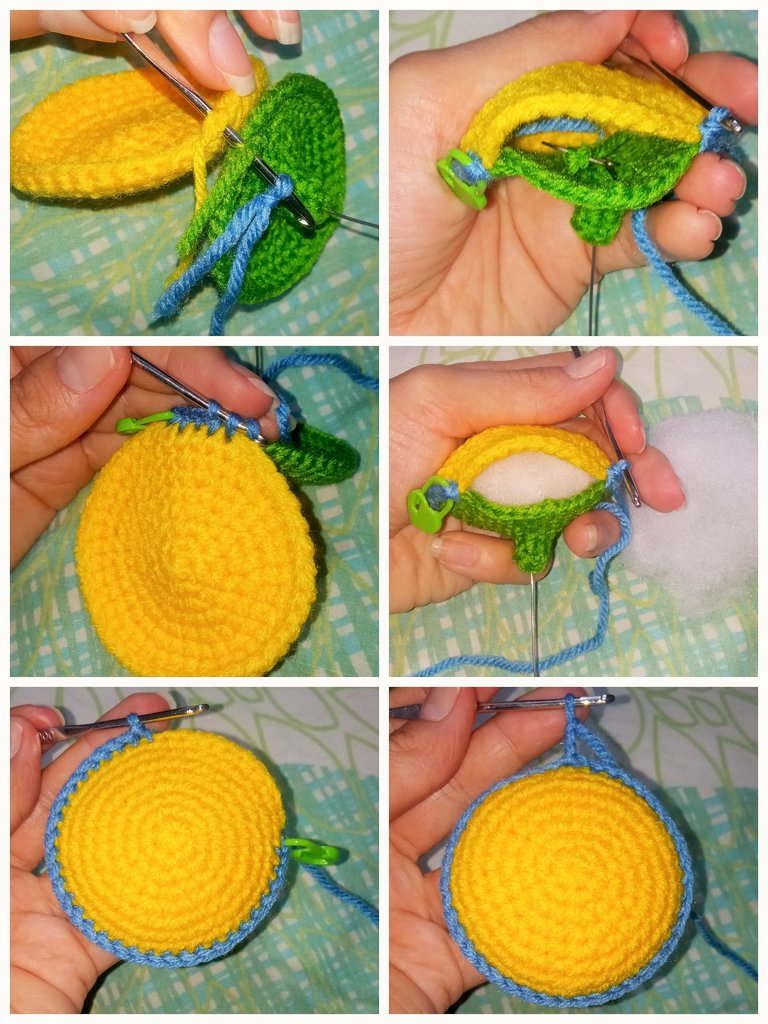
Ya que mi amigo no quería que en el ramo se visualizara otro color que no fuese el azul y el amarillo me solicito que no le colocara hojas a las flores, así que estos girasoles me dieron un poco menos de trabajo en cuanto al tejido se refiere.
El siguiente paso fue unir los centros con la parte posterior de la flor y esto lo hice realizando una vuelta de 42 puntos bajos en el color correspondiente a los pétalos de la flor, unos eran en azul rey otros en azul cielo y solo una flor seria en color amarillo, ya que esta representaría en el ramo la luna de la pintura que es de color amarillo.
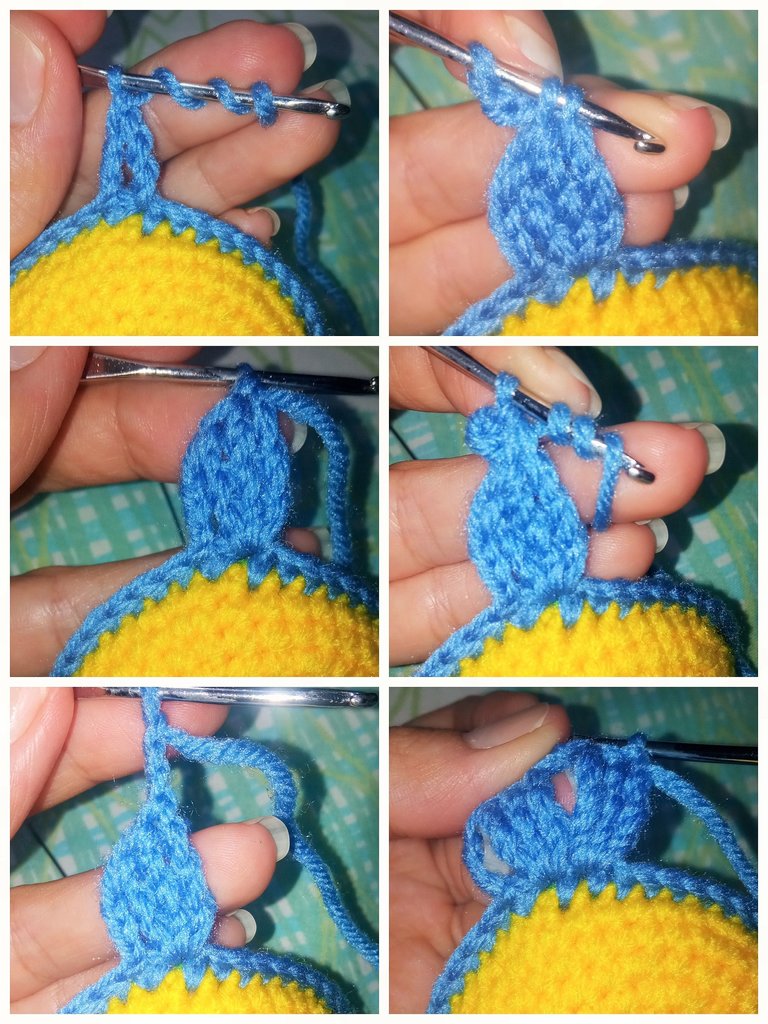
Para tejer los pétalos realice la siguiente secuencia de puntos, 3 cad, 3 puntos altos triples, 1 punto picot de 2 cad, 3 puntos altos triples, 3 cad, y 1 punto deslizado. En total realice 14 pétalos en cada flor.
Al momento de tejer la flor de pétalos amarillos no me terminaba de cuadrar el color del centro de la flor, no sabía si dejarlo en azul rey o hacerlo en azul cielo así que le di las opciones al cliente y el decidió que fuese en azul rey.
Since my friend did not want the bouquet to show any color other than blue and yellow, he asked me not to add leaves to the flowers, so these sunflowers gave me a little less work as far as the knitting was concerned.
The next step was to join the centers with the back of the flower and I did this by making a round of 42 low stitches in the color corresponding to the petals of the flower, some were in royal blue others in sky blue and only one flower would be in yellow, as this would represent in the bouquet the moon of the painting which is yellow.
To knit the petals make the following sequence of stitches, 3 ch, 3 triple double crochet, 1 picot stitch of 2 ch, 3 triple crochet, 3 ch, and 1 slip stitch. In total make 14 petals in each flower.
At the moment of knitting the yellow petals flower I didn't know if I should leave it in king blue or make it in sky blue, so I gave the options to the client and he decided to make it in king blue.
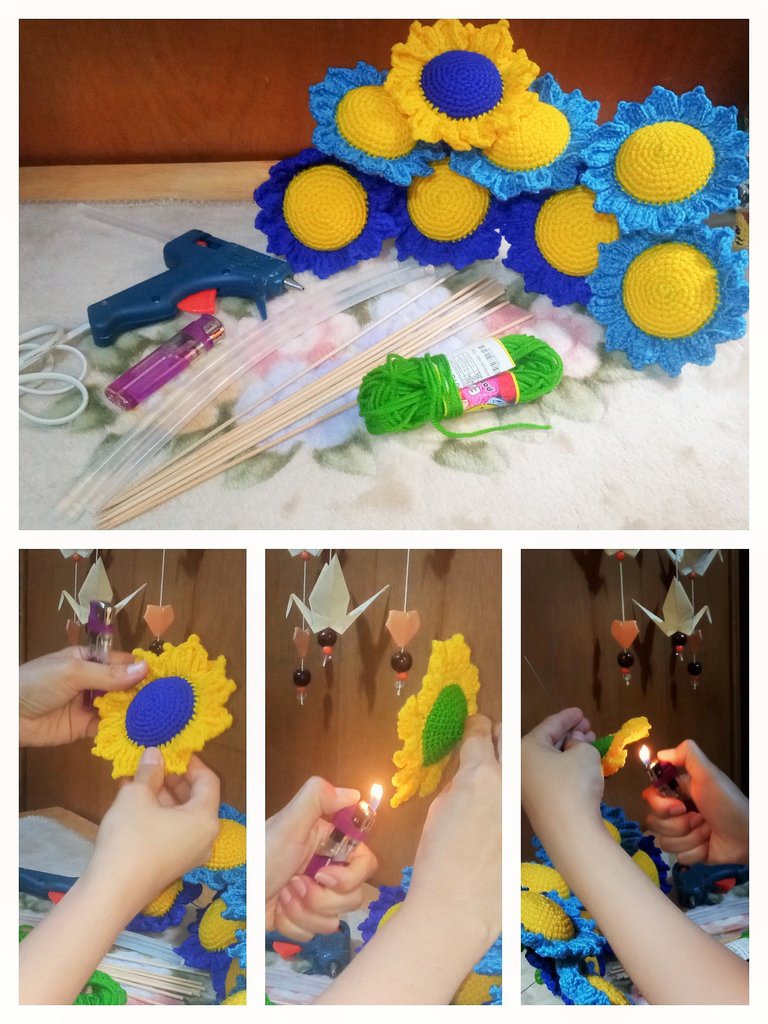
Ya solo faltaba unir las flores a los tallos que serían los palillos de altura, y forrar estos con estambre verde. Un truco que uso para eliminar todas las pelusas que quedan al tejer con estambre es pasar las flores por el fuego de una vela o de un yesquero, esto se hace súper rápido y con mucho cuidado de no quemar el tejido.
Now all that was left to do was to attach the flowers to the stems, which would be the tall sticks, and line them with green yarn. A trick I use to remove all the lint that remains when weaving with yarn is to pass the flowers through the fire of a candle or a tinderbox, this is done super fast and very careful not to burn the fabric.

Y ahora si viene la parte que más difícil se me hiso, envolver el ramo.
Lo Primero fue elegir con que papel hacerlo… coreano, celofán, de seda o Kraft, jajaja… gracias a Dios tenía varias opciones, termine eligiendo el papel Kraft, un poco de papel de seda blanco y también un poco de papel celofán.
El gran reto era ordenar las flores de tal manera que el ramo quedara firme al manipularlo y transportarlo, así que se me había ocurrido usar un pedazo de anime en forma de rectángulo o cubo donde pudiera introducir los girasoles para luego colocar el papel, pero esto no resulto como yo esperaba así que deseche esa idea.
Luego comencé a armar las flores juntándolas y atando los tallos con un hilo, y me fue gustando el resultado pero quedaba muy inestable al manipularlo, así que se me ocurrió colocar un pedazo de cartón como base para las flores y resulto bastante bien.
And now comes the most difficult part for me, wrapping the bouquet.
The first thing was to choose which paper to do it with... Korean, cellophane, silk or Kraft, hahaha... thank God I had several options, I ended up choosing Kraft paper, some white silk paper and also some cellophane paper.
The big challenge was to arrange the flowers in such a way that the bouquet would be firm when handled and transported, so I had thought of using a piece of anime in the shape of a rectangle or cube where I could insert the sunflowers and then place the paper, but this did not turn out as I expected so I discarded that idea.
Then I started to assemble the flowers by putting them together and tying the stems with a thread, and I liked the result but it was very unstable when manipulated, so I thought of using a piece of cardboard as a base for the flowers and it turned out quite well.
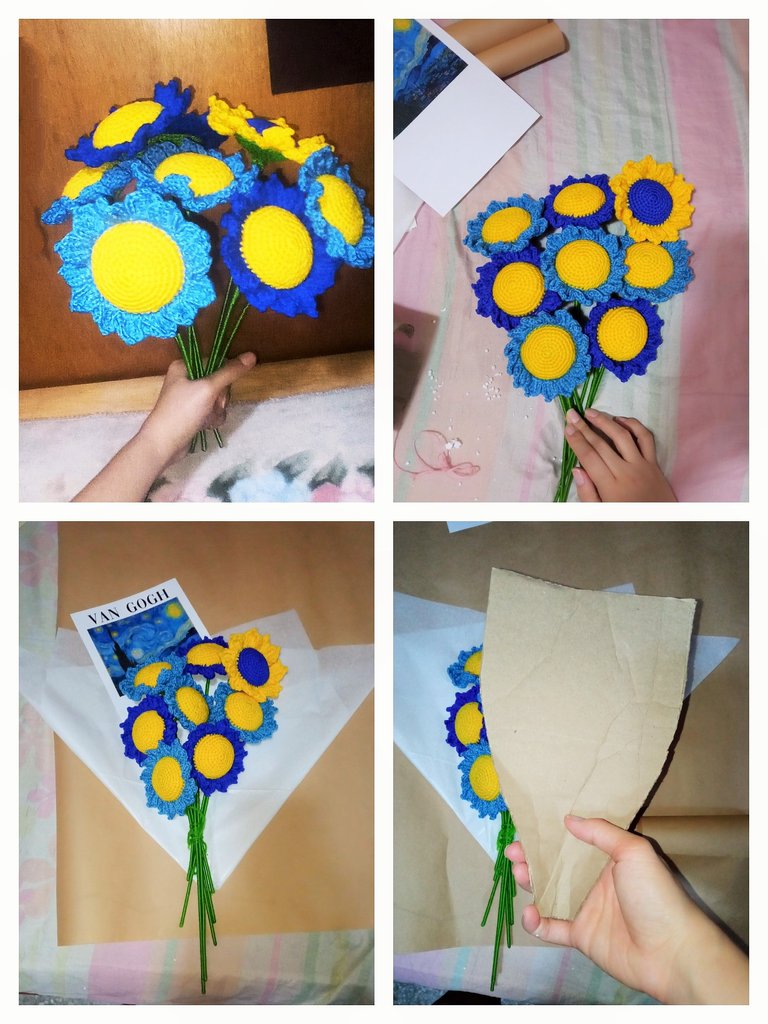
El cartón lo oculte entre el papel Kraft y el papel de seda, y luego ate las flores junto con este cartón y coloque otro cartón envolviendo los tallos para aportar más firmeza al ramo. Y el resultado ahora si fue de mi agrado, así que continúe colocando el envoltorio. Este proceso me tomo bastante tiempo pero me gustó mucho el resultado final, y ya solo faltaba fijar la pieza faltante que era una impresión en cartulina texturizada de la pintura de LA NOCHE ESTRELLADA DE VAN GOGH y listo.
Yo estaba feliz con el trabajo realizado y lo más importante mi amigo también a él le encanto el ramo y me dijo que a la muchacha a la que se lo regalo también le encanto así que eso me alegro mucho de verdad.
Es gratificante ver como es apreciado el trabajo que realizamos con tanto esmero, ya que al tejer siempre doy lo mejor de mí y lo hago con mucho amor.
I hid the cardboard between the Kraft paper and the tissue paper, and then tied the flowers together with this cardboard and placed another cardboard wrapping around the stems to give more firmness to the bouquet. And now the result was to my liking, so I continued wrapping the bouquet. This process took me a long time but I really liked the final result, and all that was left was to fix the missing piece which was a textured cardboard print of THE STARRY NIGHT OF VAN GOGH painting and that was it.
I was happy with the work done and most importantly my friend also he loved the bouquet and told me that the girl he gave it to also loved it so I was really happy about that.
It is gratifying to see how the work we do with so much care is appreciated, since I always give the best of me when I weave and I do it with love.

BUENO AMIGOS DESEO LES HAYA GUSTADO TANTO COMO A MÍ EL RESULTADO FINAL DE ESTA HERMOSO RAMO DE GIRASOLES TEJIDO A CROCHET INSPIRADO EN LA NOCHE ESTRELLADA DE VAN GOGH, TAMBIEN ESPERO SUS BONITOS COMENTARIOS Y/O VOTOS, ASÍ ME MOTIVAN PARA SEGUIR COMPARTIENDO MIS CREACIONES CON USTEDES, YO ESTARÉ FELIZ DE RESPONDER TODOS SUS COMENTARIOS, SEAN FELICES Y QUE LA MUSA DE LA CREATIVIDAD NUNCA LOS ABANDONE!
¡GRACIAS POR VISITAR MI BLOG!
Se despide de ustedes con mucho cariño su amiga Nathalie @laranitacrochet
WELL FRIENDS I HOPE YOU LIKED AS MUCH AS I DID THE FINAL RESULT OF THIS BEAUTIFUL SUNFLOWER BOUQUET CROCHETED INSPIRED BY VAN GOGH'S THE STARRY NIGHT, I ALSO HOPE YOUR NICE COMMENTS AND / OR VOTES, AND MOTIVATE ME TO CONTINUE SHARING MY CREATIONS WITH YOU, I WILL BE HAPPY TO ANSWER ALL YOUR COMMENTS, BE HAPPY AND THAT THE MUSE OF CREATIVITY NEVER LEAVE YOU.!
THANK YOU FOR VISITING MY BLOG!
Your friend Nathalie @laranitacrochet bids you a fond farewell.
*Todas las fotografías utilizadas en la publicación son propiedad de la autora.
*Las fotografías fueron tomadas y editadas con mi REDMI 9 y con la App FotoRoom.
*La traducción la hice en https://www.deepl.com/es/translator
*All photographs used in this publication are property of the author.
*The pictures were taken and edited with my REDMI 9 and the FotoRoom App.
*The translation was done at https://www.deepl.com/es/translator
Congratulations, your post has been upvoted by @dsc-r2cornell, which is the curating account for @R2cornell's Discord Community.
Enhorabuena, su "post" ha sido "up-voted" por @dsc-r2cornell, que es la "cuenta curating" de la Comunidad de la Discordia de @R2cornell.
Thank you very much for the support ☺️🤗
Waooo, te felicito por haber superado este reto tan satisfactoriamente. El ramo me fascino. Yo que soy amante de los girasoles no conocía esta historia de los girasoles azules, pero me enamoró ver como luce todo el ramo. Excelente trabajo amiga, muchas felicidades.
Muchas gracias Katty 😊🤗 Si realmente fue interesante aprender sobre la historia de Van Gogh y realizar el ramo también fue un buen reto y aprendizaje 😁💖🌻
Gracias por leer mi post ☺️🤗
Que ramo más hermoso, te felicito 🌹🌷🌼💐💮🌻🪷🌺🏵️🌸🥀☘️
Muchas gracias ☺️🤗 💖🌻
Te felicito quedaron muy hermosos
Muchas gracias @gladymar1973 ☺️🤗🌻
Feliz dia
Igualmente 🌻🌅
The flower bouquet is pretty
Thank you very much 😊
You are highly Welcome
Wow, this really look nice, the color combination is very beautiful, thank you so much for sharing
Thank you for your comment and reading my post ☺️
es un trabajo super particular, queda muy bonito, me encanta la paleta de colores
Muchas gracias! ☺️
So nice
You explanation is well dictated for users to learn
Thank you! 😊 it's what you want!
Wow, I didn’t even fire can do that work too
That’s a good and useful trick
This is pretty and you chose really nice colors
Thank you so much @abenad 😌🤗
You’re welcome
Amé este hermoso trabajo, amiga. El ramo quedó espectacular 😊 te felicito.
Muchas gracias amiga 😊🤗