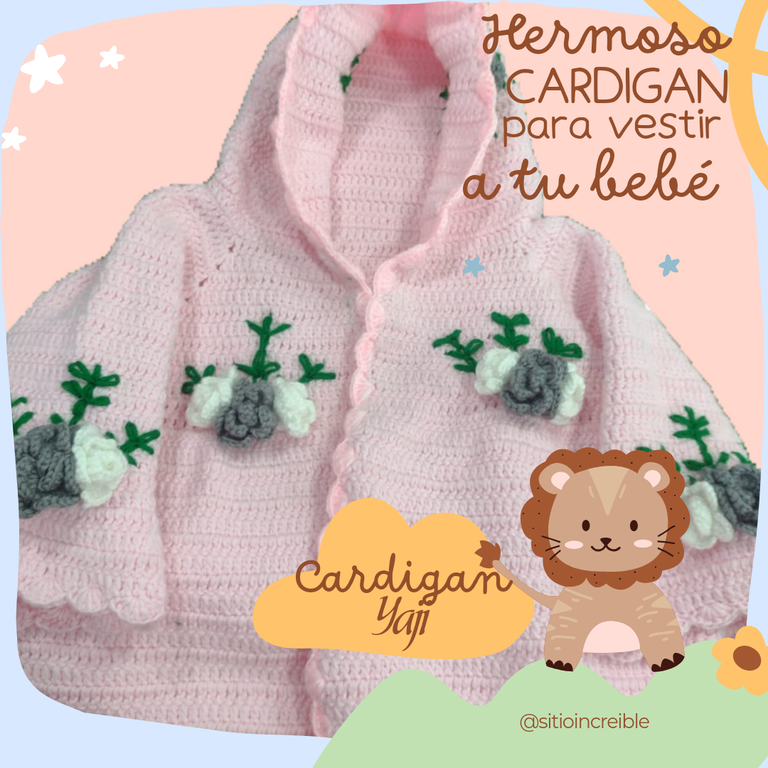
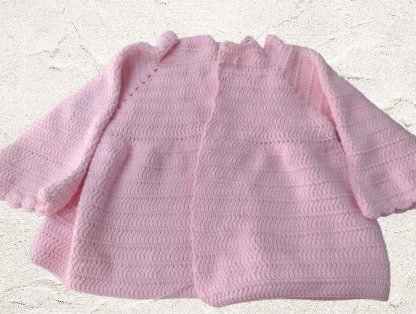
Buenos días mis amigos de HIVE no habia podido subir contenido, porque he pasado muy ocupada en mi empleo porque estuvimos de inventario y no tenía mucho tiempo para tejer. Y también les cuento que los proyectos que les comparto por esta plataforma son proyectos que hago por algún encargo. Esta vez me pidieron hacer un cardigan para una bebe de 6 a 9 meses. me mandaron la imagen y no encontré el patrón pero me guié de algunos videos que vi en youtube. Quedó hermoso. Ya les muestro y les hago un mini tutorial. Bueno manos a la obra.
>Good morning my friends from HIVE, I have not been able to upload content, because I have been very busy at my job because we were in inventory and I did not have much time to knit. And I also tell you that the projects that I share with you on this platform are projects that I do for a commission.
This time they asked me to make a cardigan for a 6 to 9 month old baby. They sent me the image and I couldn't find the pattern but I was guided by some videos I saw on YouTube. It turned out beautiful. I'll show you and make a mini tutorial for you.
Well, get to work.
✨✨✨✨✨✨✨✨✨✨✨✨✨✨✨✨✨
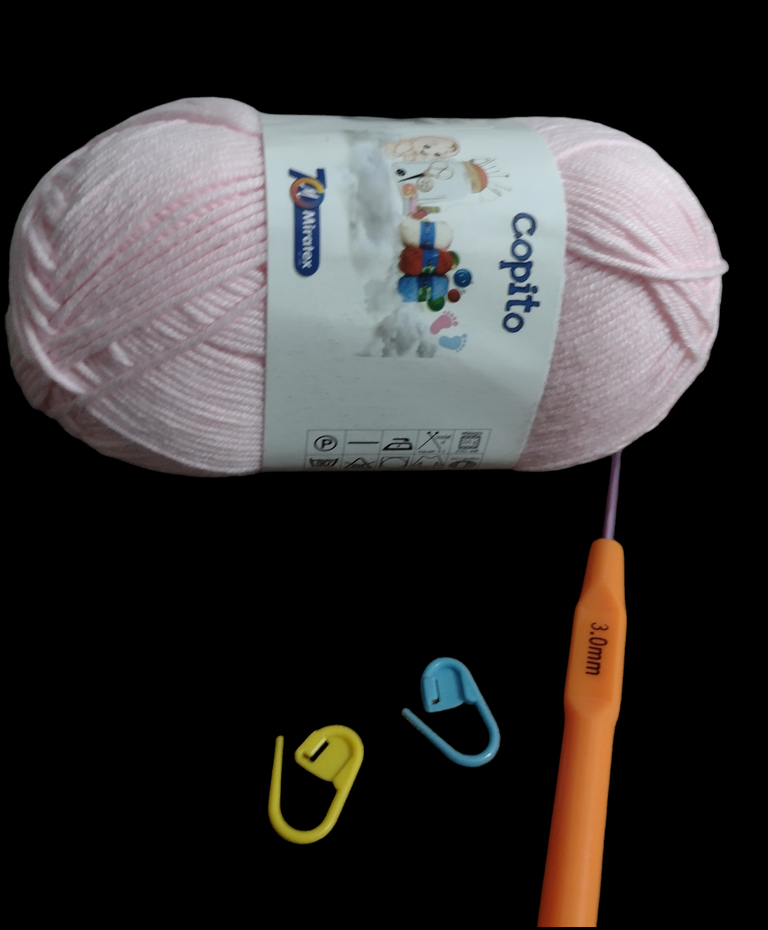
MATERIALES /> MATERIALS
400 gramos de hilo copito / > 400 grams of cotton yarn
Aguja crochet 3mm / > Crochet needle 3mm
Marcadores de punto / > Stitch markers
✨✨✨✨✨✨✨✨✨✨✨✨✨✨✨✨✨
Para empezar debemos tener en cuenta que el modelo lo hice iniciando con un canesú las medidas del canesú para una talla de 6 a nueve meses son las siguientes:
hacemos 112 cadenetas las que vamos a dividir así: 18 cadenetas frente, 18 cadenetas para la manga 36 cadenas para la espalda, 18 para la manga, 18 para el frente. Estos puntos se marcan con los marcadores de puntos.
>To begin with, we must keep in mind that I made the model starting with a yoke. The measurements of the yoke for a size from 6 to nine months are as follows:
We make 112 chains, which we are going to divide like this: 18 front chains, 18 chains for the sleeve, 36 chains for the back, 18 for the sleeve, 18 for the front. These points are marked with the point markers.
✨✨✨✨✨✨✨✨✨✨✨✨✨✨✨✨✨
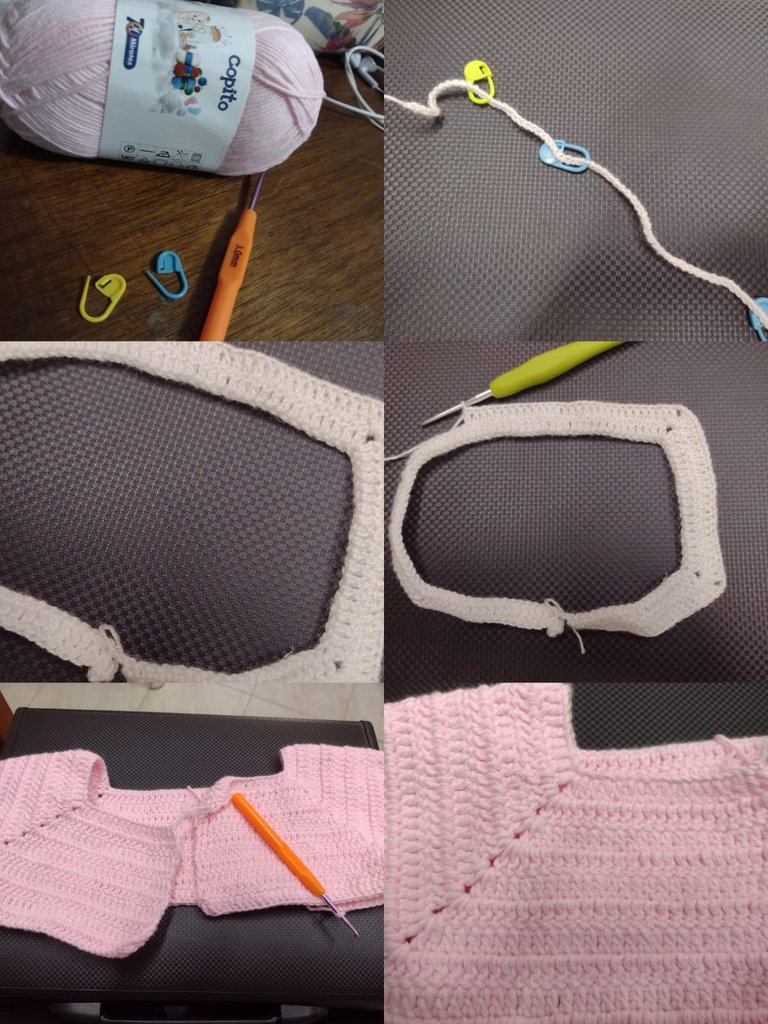
Después de hacer las cadenetas subimos con 3 cadenetas y hacemos los primeros 18 puntos altos, hasta donde está el primer marcador, en este punto haremos 2 aumentos separados de 2 cadenas. seguimos haciendo puntos altos sobre cada punto y volvemos a hacer 2 aumentos en el punto donde está el marcador separado de 2 cadenetas, seguimos haciendo 36 puntos altos que serían los de la espalda hasta el marcador, en este punto hacemos igual los aumentos separados por 2 cadenetas, seguimos haciendo los 18 puntos altos hasta el próximo marcador donde haremos los aumentos separados de 2 cadenetas, luego hacemos los últimos 18 puntos altos, que serían de la parte delantera del canesú. así terminaremos la primera vuelta.
>After making the chains we go up with 3 chains and make the first 18 double crochets, up to where the first marker is, at this point we will make 2 separate increases of 2 chains. We continue making double crochets on each point and we make 2 increases again at the point where the marker is separated by 2 chains, we continue making 36 double crochets that would be the ones on the back up to the marker, at this point we do the same increases separated by 2 chains, we continue making the 18 double crochets until the next marker where we will make the separate increases of 2 chains, then we make the last 18 double crochets, which would be from the front part of the yoke. This is how we will finish the first round.
✨✨✨✨✨✨✨✨✨✨✨✨✨✨✨✨✨
Damos vuelta al tejido y hacemos exactamente lo mismo. Puntos altos en cada punto y donde están los aumentos los volvemos a hacer en las 2 cadenetas separadas de 2 cadenetas. así hacemos 11 vueltas.
>We turn the fabric over and do exactly the same. Double crochets in each stitch and where the increases are, we do them again in the 2 separate chains of 2 chains. So we did 11 laps.
✨✨✨✨✨✨✨✨✨✨✨✨✨✨✨✨✨✨
hacemos una última vuelta para hacer la sisa del canesú. damos la vuelta al tejido y hacemos puntos altos por cada punto alto, cuando llegamos al primer aumento de la vuelta anterior lo juntamos con el siguiente aumento tejiendo un punto alto en los 2 puntos uniendo y formando así la primera sisa. seguimos haciendo puntos altos en cada punto y hacemos lo mismo, cuando lleguemos al aumento juntamos el otro aumento haciendo un punto alto uniendo así la otra sisa, seguimos haciendo puntos altos hasta terminar la vuelta.
>We make one last round to make the armhole of the yoke. We turn the fabric and make double crochets for each double crochet, when we reach the first increase of the previous round we join it with the next increase by knitting a double crochet in the 2 points, joining and thus forming the first armhole. We continue making double crochets in each point and do the same, when we reach the increase we join the other increase making a double crochet thus joining the other armhole, we continue making double crochets until finishing the round.
✨✨✨✨✨✨✨✨✨✨✨✨✨✨✨✨✨
la siguiente vuelta haremos puntos altos haciendo aumentos cada 10 puntos.
>The next round we will do double crochets making increases every 10 stitches.
✨✨✨✨✨✨✨✨✨✨✨✨✨✨✨✨✨
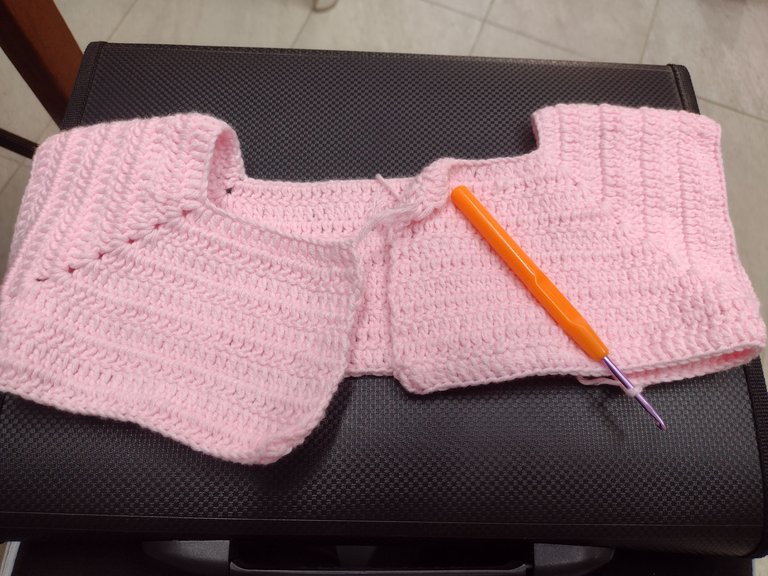
la siguiente vuelta hacemos puntos altos sobre cada punto y así seguimos haciendo vueltas en ese mismo patrón de puntos altos sobre cada punto hasta tener el largo deseado.
>The next round we make double crochets over each point and so we continue doing rounds in that same pattern of double crochets over each point until we have the desired length.
✨✨✨✨✨✨✨✨✨✨✨✨✨✨✨✨✨
para hacer las mangas hacemos puntos altos alrededor de la sisa haciendo 20 vueltas del mismo patrón para la vuelta 21 hacemos aumentos cada 8 puntos para crear el bolerito de la manga.
>To make the sleeves we make double crochets around the armhole making 20 rounds of the same pattern. For round 21 we make increases every 8 stitches to create the bolerito of the sleeve.
✨✨✨✨✨✨✨✨✨✨✨✨✨✨✨✨✨
De la vuelta 22 a la 26 hacemos puntos altos sobre cada punto.
>From rounds 22 to 26 we make double crochets over each stitch.
✨✨✨✨✨✨✨✨✨✨✨✨✨✨✨✨✨
Terminamos la manga haciendo la vuelta 27 con abanicos. haciendo 5 puntos altos en un mismo punto dejando 3 puntos libres un punto deslizado 3 puntos libres 5 puntos altos en el mismo punto y así hasta terminar esa vuelta.
>We finish the sleeve doing round 27 with fans. making 5 double crochets in the same point leaving 3 free stitches a slipped stitch 3 free stitches 5 double crochets in the same point and so on until finishing that round.
✨✨✨✨✨✨✨✨✨✨✨✨✨✨✨✨✨
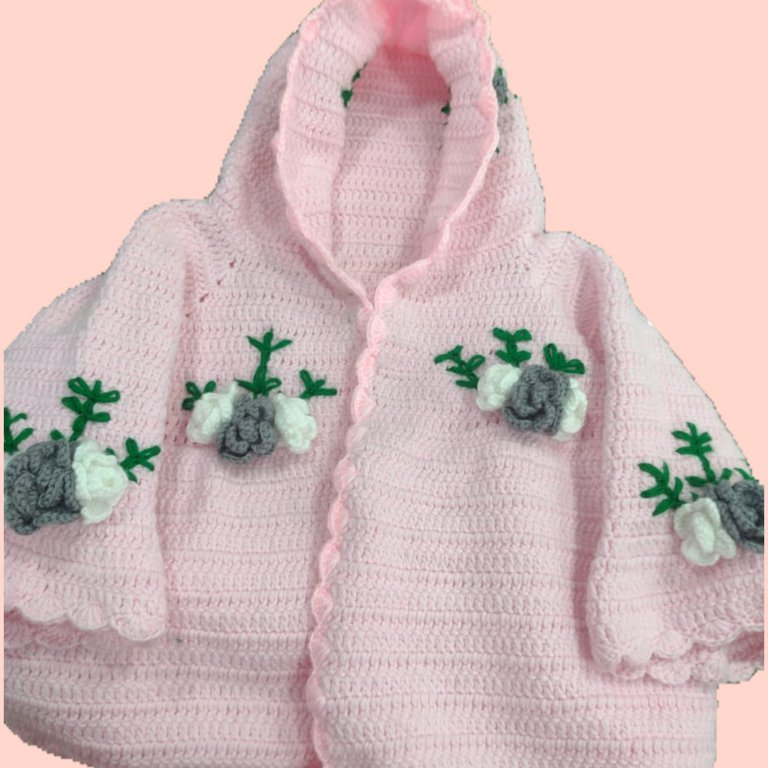
Para la capucha hacemos puntos altos donde empieza el cuello un punto alto sobre cada punto tendríamos 112 puntos altos. así hasta tener 23 vueltas.
>For the hood we make double crochets where the neck begins, a double crochet over each stitch we would have 112 double crochets. like this until you have 23 laps.
✨✨✨✨✨✨✨✨✨✨✨✨✨✨✨✨✨
Cuando ya tengamos las 23 vueltas terminadas tomamos las 2 puntas y las unimos con puntos deslizados. Así nos queda terminada la capucha del cardigan.
>When we have finished the 23 rounds, we take the 2 ends and join them with slipped stitches. This is how the hood of the cardigan is finished.
✨✨✨✨✨✨✨✨✨✨✨✨✨✨✨✨✨
No les pude tomar foto a cada uno de los pasos porque el tiempo que tenía para tejer fue muy limitado porque era muy poco. y no me daba tiempo para poder tomar muchas fotos, aca les dejo las que pude tomar ya que necesitaba terminar y entregar el trabajo.
>I couldn't take a photo of each of the steps because the time I had to knit was very limited because it was very little. and I didn't have time to take many photos, here are the ones I was able to take since I needed to finish and hand in the work.
Wow this is really pretty
The color is really nice too
The design you added to the cardi makes it perfect
I wouldn’t hesitate to buy this for myself 😍
The design was sent to me by my sister from a publication she saw on Instagram, and I loved it. The design she sent me is white and the flowers are a different color. I had those colors and I took a risk. It's good that you like my work.
You took a good risk
Yeah. But I think it turned out well. Well, I liked how she turned out.
Yeah I do too
😍
Hola @mare0480, es un gusto saludarte.
El cárdigan está hermoso, es muy tierno y delicado, el color es muy sutil.
Gracias por compartir un paso a paso tan detallado.
Bendiciones 🤗
Que bueno que te gustó. Seguiré compartiendo mis trabajos.
Saludos amiga @mare0480 Pero qué preciosidad de cárdigan, me encanta ese color, y los detalles de las flores son adorables, muy bien combinados, hiciste un trabajo increíble.
Thanks for your comment. I feel happy because of the beautiful things they say about my work. That makes me want to improve every day and give my best in my projects.
Hola. Que lindo Cardigan, dices que el tiempo fue limitado para hacerlo, pero en mi mente me imagino que fue mucho trabajo porque quedó hermoso, hasta con capucha.
Si fue mucho trabajo. Pero tenía poco tiempo para tejer. Que me gaste 15 días haciéndolo. Tejía 15 minutos a 30 por día y así no rinde.
Sin duda alguna un trabajo impecable y súper hermoso amiga... 😍💖 Me encantó de verdad, los colores combinan muy bien y se ve muy tierno el resultado final 😁👍
Felicitaciones por tan hermoso trabajo 😊
Gracias mujer ☺️☺️