Hola mis amigos de HIVE hoy nuevamente paso por esta plataforma para dejarles otro paso a paso de un proyecto que hice. No había podido subirlo porque estuve un poco ocupada con el trabajo y otras cosas de ama de casa, en fin, cosas de la vida. Pero acá estoy entregándoles un poco de mi trabajo, nunca lo había hecho así que creo que me quedo bien para ser la primera vez espero les guste.
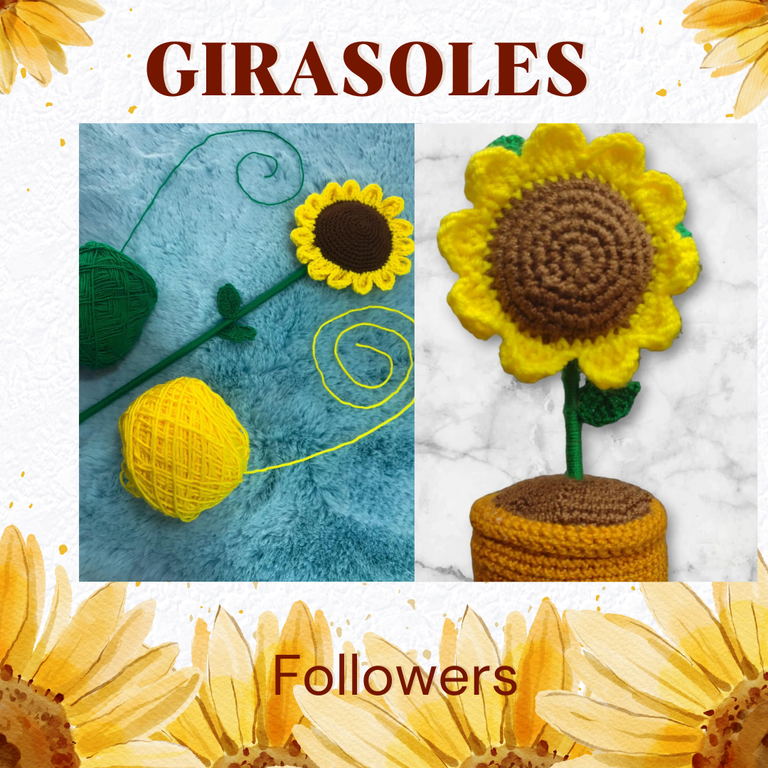
>Hello my HIVE friends, today I'm stopping by again to leave you another step by step of a project I did. I hadn't been able to upload it because I was a little busy with work and other housewife things, in short, things in life. But here I am giving you a little of my work, I have never done it before so I think it looks good for the first time, I hope you like it
🌻🌻🌻🌻🌻🌻🌻🌻🌻🌻🌻🌻🌻🌻🌻🌻🌻🌻🌻🌻🌻🌻🌻🌻🌻🌻🌻🌻🌻🌻🌻🌻
Materiales/ Materials
Hilo coral maron, mostaza, amarillo, verde />Brown, mustard, yellow, green coral thread.
Aguja de crochet 1.5 />Crochet hook 1.5.
tijera />scissors.
marcadores de puntos / >point markers
pegamento / >glue
palito de pincho / skewer stick
Algodon sintetico />synthetic cotton
🌻🌻🌻🌻🌻🌻🌻🌻🌻🌻🌻🌻🌻🌻🌻🌻🌻🌻🌻🌻🌻🌻🌻🌻🌻🌻🌻🌻🌻🌻🌻🌻
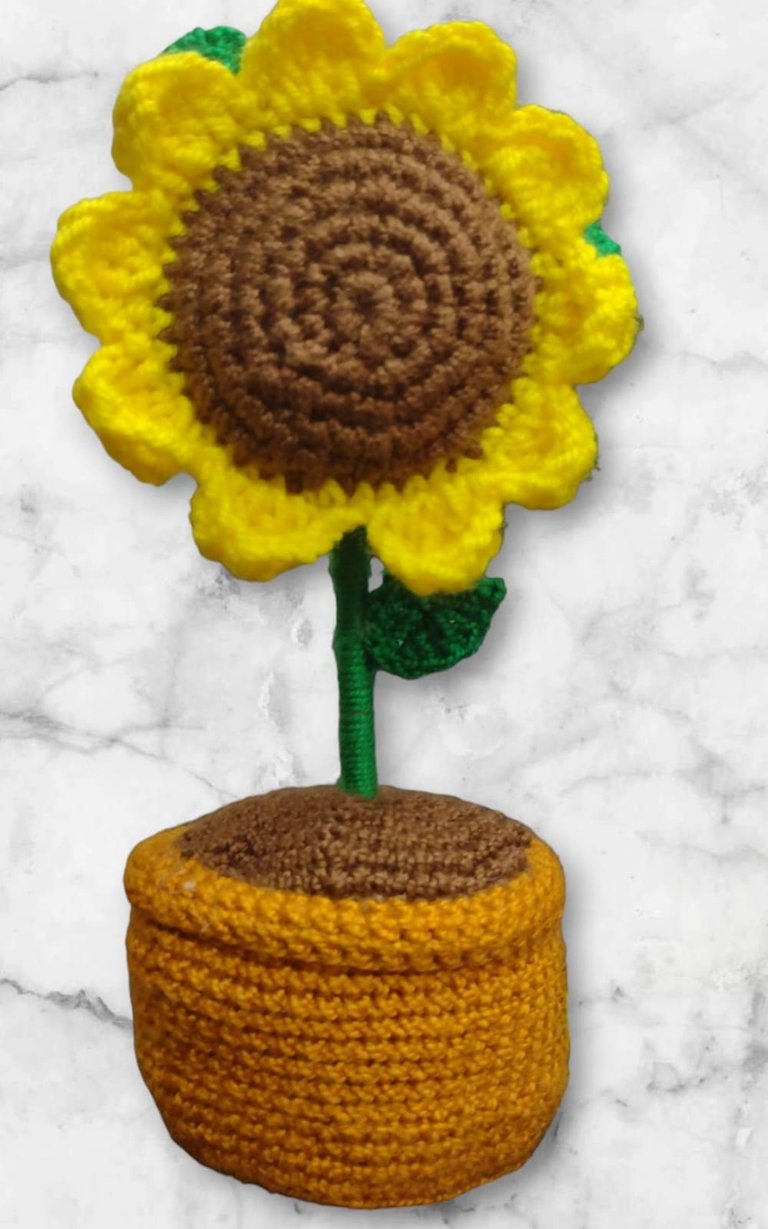
LA MACETA / >THE FLOWER POT
Lo primero que realicé fue la maceta, la hice de color moztaza y empecé haciendo un anillo mágico dentro de este 6 puntos bajos. En la segunda vuelta hacemos aumentos en cada punto. En la tercera vuelta hacemos 2 puntos bajos, 1 aumento, repetimos hasta terminar la vuelta. En la tercera vuelta hacemos 3 puntos bajos ,1 aumento repetimos hasta terminar la vuelta. En la cuarta vuelta hacemos 4 puntos bajos , 1 aumento repetimos hasta terminar la vuelta. En la quinta vuelta hacemos 5 puntos bajos, 1 aumento repetimos hasta terminar la vuelta En la sexta vuelta hacemos puntos bajos sobre cada punto hasta terminar la vuelta, así seguimos asiento vueltas hasta tener el diámetro que necesitemos para la base de nuestra maceta. Yo hice 10 vueltas.
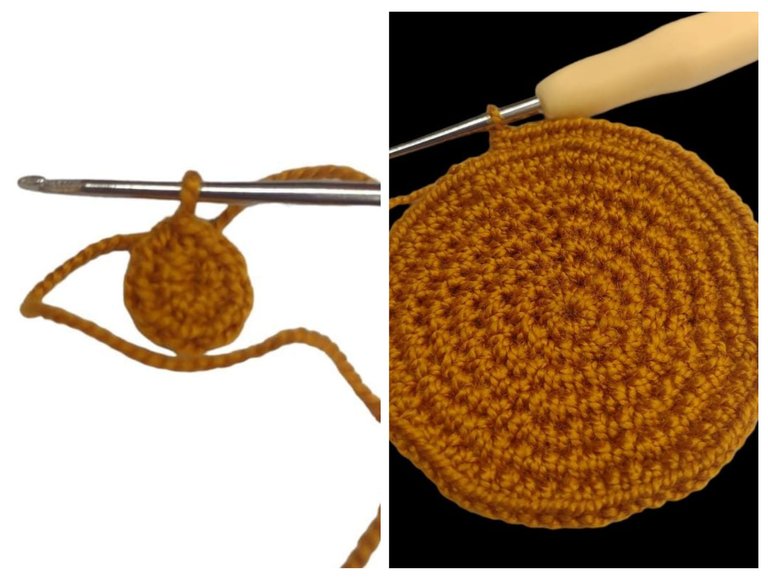
>The first thing I made was the flower pot, I made it a mozzarella color and I started by making a magic ring inside this 6 single crochet stitches. On the second round we increase in each stitch. In the third round we make 2 single crochets, 1 increase, we repeat until we finish the round. In the third round we make 3 single crochets, 1 increase and repeat until the round is finished. In the fourth round we make 4 single crochets, 1 increase we repeat until finishing the round. On the fifth round we make 5 single crochets, 1 increase we repeat until finishing the round. On the sixth round we make single crochets on each stitch until we finish the round, so we continue stitching rounds until we have the diameter we need for the base of our pot. I did 10 laps.
🌻🌻🌻🌻🌻🌻🌻🌻🌻🌻🌻🌻🌻🌻🌻🌻🌻🌻🌻🌻🌻🌻🌻🌻🌻🌻🌻🌻🌻🌻🌻🌻
Teniendo ya la base de nuestra maceta empezaremos a subir y hacemos puntos bajos tomando solo la hebra trasera del tejido hasta terminar esta vuelta, las siguientes las haremos normal tomando las dos hebras del punto. subiremos hasta tener 5 centímetros de altura.
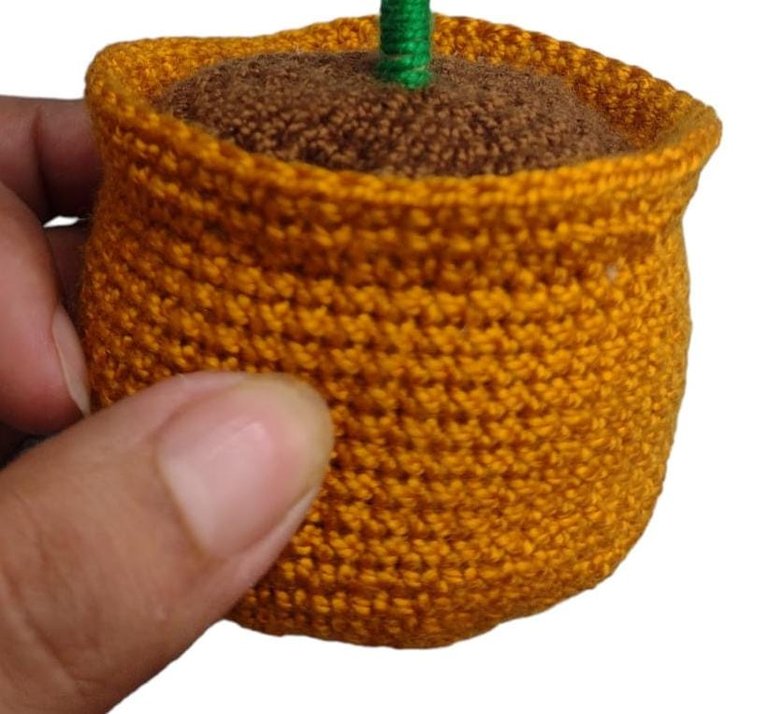
>Having now the base of our pot, we will begin to go up and make single crochets, taking only the back strand of the fabric until we finish this row. We will make the following rows normal, taking the two strands of the stitch. We will go up until we are 5 centimeters high.
🌻🌻🌻🌻🌻🌻🌻🌻🌻🌻🌻🌻🌻🌻🌻🌻🌻🌻🌻🌻🌻🌻🌻🌻🌻🌻🌻🌻🌻🌻🌻🌻
Para simular la tierra de la maceta utilizaremos el color marrón y haremos los mismos pasos que hicimos para hacer la base de la maceta con el mismo diámetro, debe quedar con el mismo diámetro porque la pondremos encima de la maceta y la juntaremos y quedara asi como si fuera la tierra para nuestra flor.
>To simulate the soil in the pot we will use the color brown and do the same steps that we did to make the base of the pot with the same diameter, it must be the same diameter because we will put it on top of the pot and we will put it together and it will look like this if it were the earth for our flower.
🌻🌻🌻🌻🌻🌻🌻🌻🌻🌻🌻🌻🌻🌻🌻🌻🌻🌻🌻🌻🌻🌻🌻🌻🌻🌻🌻🌻🌻🌻🌻🌻
Para unir estas dos piezas haremos puntos bajos tomando las dos piezas haciendo punto bajo sobre cada punto dejamos un espacio para rellenar con algodón sintético, después de rellenar continuamos haciendo los puntos bajos hasta cerrar y asi nos quedaría hecha nuestra maceta.
>To join these two pieces we will make single crochets taking the two pieces by making single crochet on each point we leave a space to fill with synthetic cotton, after filling we continue making the single crochets until closed and thus our pot would be made.
🌻🌻🌻🌻🌻🌻🌻🌻🌻🌻🌻🌻🌻🌻🌻🌻🌻🌻🌻🌻🌻🌻🌻🌻🌻🌻🌻🌻🌻🌻🌻🌻
GIRASOL />SUNFLOWER
Para hacer el girasol haremos dos piezas una de color marron y la otra verde siguiendo el patrón de la base de la maceta pero más pequeñas yo las hice de 8 vueltas cada una.
>To make the sunflower we will make two pieces, one brown and the other green following the pattern of the base of the pot, but smaller I made them with 8 turns each.
🌻🌻🌻🌻🌻🌻🌻🌻🌻🌻🌻🌻🌻🌻🌻🌻🌻🌻🌻🌻🌻🌻🌻🌻🌻🌻🌻🌻🌻🌻🌻🌻
Las unimos con el color amarillo del que haremos los petalos. para la union la hacemos con puntos bajos juntando las dos piezas cuando ya estemos cerca de cerrar las dos piezas rellenamos con el algodon sintetico y cerramos las piezas.
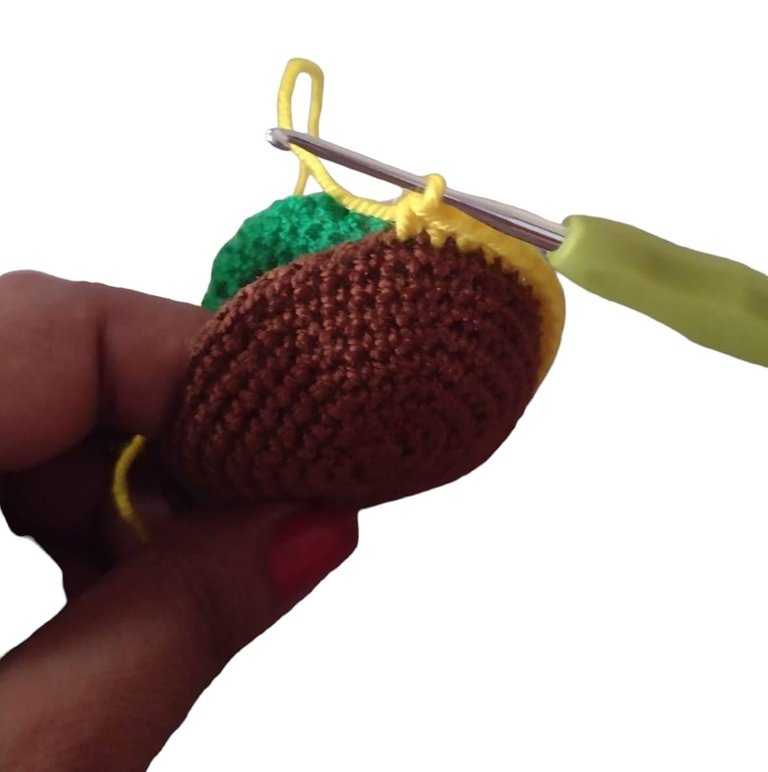
>We join them with the yellow color from which we will make the petals. For the union we do it with single stitches, joining the two pieces. When we are close to closing the two pieces, we fill with the synthetic cotton and close the pieces.
🌻🌻🌻🌻🌻🌻🌻🌻🌻🌻🌻🌻🌻🌻🌻🌻🌻🌻🌻🌻🌻🌻🌻🌻🌻🌻🌻🌻🌻🌻🌻🌻
Para los pétalos subimos con 4 cadenas en el siguiente punto hacemos un aumento de punto alto triple. (Este se hace tomando 3 lazadas de hilo metiendo la aguja en el punto, tomamos nuevamente lazada sacamos del punto y sacamos la aguja de dos en dos tres veces.), pasamos al otro punto y hacemos otro aumento de punto alto triple seguimos con 4 cadenas y punto deslizado en el siguiente punto. así tenemos nuestro primer pétalo. Levantamos nuevamente con 4 cadenas, 2 aumentos de punto alto triple, 4 cadenas punto deslizado así hasta terminar la vuelta y que queden nuestros pétalos.
>For the petals we go up with 4 chains in the next stitch we do a triple double crochet increase. (This is done by taking 3 loops of thread, inserting the needle into the point, we take the loop again, we take it out of the point and we take out the needle two by two three times.), we move on to the other point and do another triple high crochet increase, we continue with 4 chains and slipped stitch into the next stitch. so we have our first petal. We lift again with 4 chains, 2 triple high crochet increases, 4 chains of slipped stitch like this until we finish the round and our petals remain.
🌻🌻🌻🌻🌻🌻🌻🌻🌻🌻🌻🌻🌻🌻🌻🌻🌻🌻🌻🌻🌻🌻🌻🌻🌻🌻🌻🌻🌻🌻🌻🌻
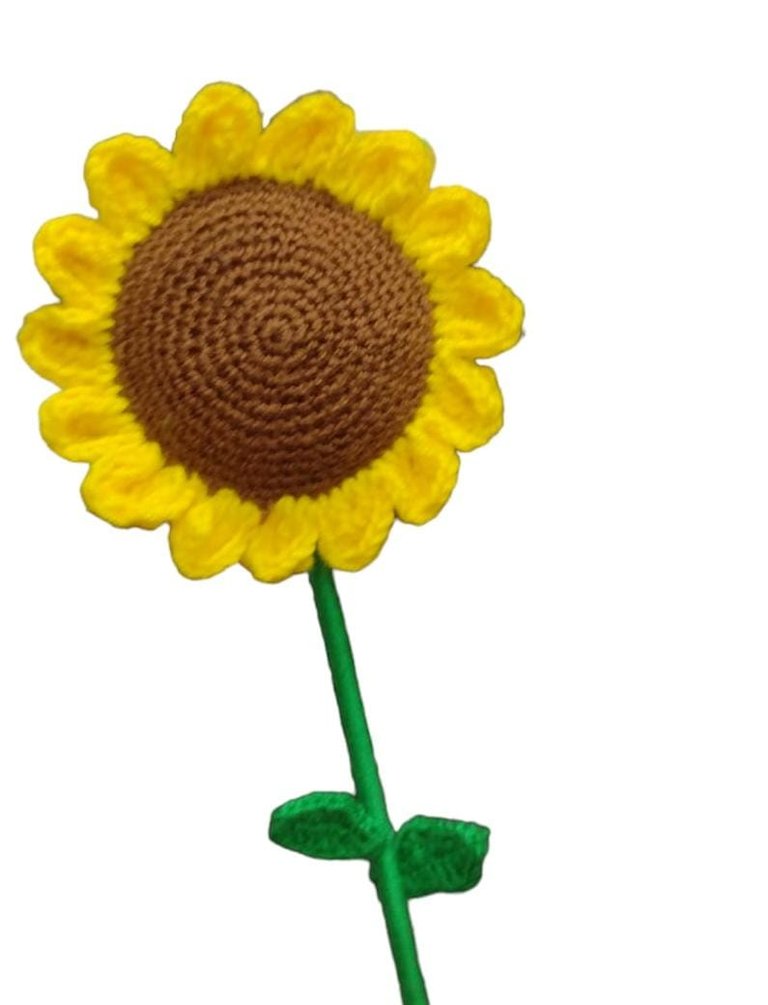
EL TALLO / >THE STEM
Para hacer el tallo tomaremos el palito de chuzo lo cortamos de 10 a 12 centímetros y le enrollamos el hilo verde teniendo en cuenta que el palito va centrado en la maceta, y esto que va dentro de la maceta no lo vamos a enrollar con el hilo. teniendo esto claro enrollamos el hilo en el palito ponemos una gotita de pegamento en la puntita del hilo para que no se nos mueva.
>To make the stem we will take the chuzo stick, cut it from 10 to 12 centimeters and wind the green thread taking into account that the stick is centered in the pot, and we are not going to wrap this thing that goes inside the pot with the thread. . Having this clear, we wind the thread on the stick and put a drop of glue on the tip of the thread so that it does not move.
🌻🌻🌻🌻🌻🌻🌻🌻🌻🌻🌻🌻🌻🌻🌻🌻🌻🌻🌻🌻🌻🌻🌻🌻🌻🌻🌻🌻
Para terminar pegamos la flor en el extremo del tallo de la mitad de nuestra flor.
así quedaría terminado nuestro trabajo.
>To finish we glue the flower to the end of the stem of the middle of our flower.
>Thus our work would be finished.
🌻🌻🌻🌻🌻🌻🌻🌻🌻🌻🌻🌻🌻🌻🌻🌻🌻🌻🌻🌻🌻🌻🌻🌻🌻🌻🌻🌻🌻🌻
Les cuento que nunca había realizado nada así. Siempre he encaminado mi trabajo como tejedora en la ropa, y no fue fácil aunque no se demora mucho tiempo tejiendo si es complejo por la tensión que se debe tener al tejer para que el punto no quede flojo. mire muchos tutoriales que me decían que usara un punto x pero siento que con el punto normal de punto bajo me quedo bien.
>I tell you that I have never done anything like this. I have always focused my work as a knitter on clothing, and it was not easy although it does not take long to knit, but it is complex due to the tension that must be had when knitting so that the stitch is not loose. I watched many tutorials that told me to use an x stitch but I feel that with the normal single crochet stitch it fits me well.
Hola @mare0480, estos girasoles que nos compartes son realmente hermosos, me gustó mucho que nos mostrarás el patrón de la maceta. Felicidades por este lindo proyecto
Gracias por comentar y que bien que les guste mi trabajo. Seguiré esforzándome para mejorar mi labor.😍😍
I love ur colour combination
Thank you.
Aww this is really beautiful
With how you did it nobody will believe that it’s your first time because it really looks perfect
This is beautiful
Thanks woman. I don't really like amigurumis because of the work they do, but hey, everything has to be done in this life, my grandmother said.
Yeah she’s right
Que hermoso girasol y con su maceta incluida, me encanta para decorar la mesa de costura, has hecho un gran trabajo.
Saludos!
Muchas gracias que bueno que les halla gustado mi trabajo. 😍😍
Congratulations @mare0480! You have completed the following achievement on the Hive blockchain And have been rewarded with New badge(s)
Your next target is to reach 2500 upvotes.
You can view your badges on your board and compare yourself to others in the Ranking
If you no longer want to receive notifications, reply to this comment with the word
STOPCheck out our last posts:
Beautiful, this is really a work of art. It is too good for your first time.😍
Thanks for the support. I'm glad you liked my work. 😍
Que hermoso trabajo, los girasoles me parecen unas hermosas plantas y tu trabajo capta muy bien, lo extraordinario de los mismos. Saludos. 🤗
Muchas gracias
So many things keeps us busy but its good that you also spared some time to do something lovely as the 🌞 flower.
I know that someday soon I would be able to make use of the crotchet as well.
Hello. Crochet is not difficult to learn, you just have to dedicate time to practice like everything in life. If you take some time to do this project and I know there will be more to come.
Esta súper hermoso 😍😍😍
Gracias Mary