Hello dear hive friends, today I decided to join contest #7 from @ocd, who through the @NeedleWorkMonday community invites me to post about sewing and the step-by-step that goes into this.
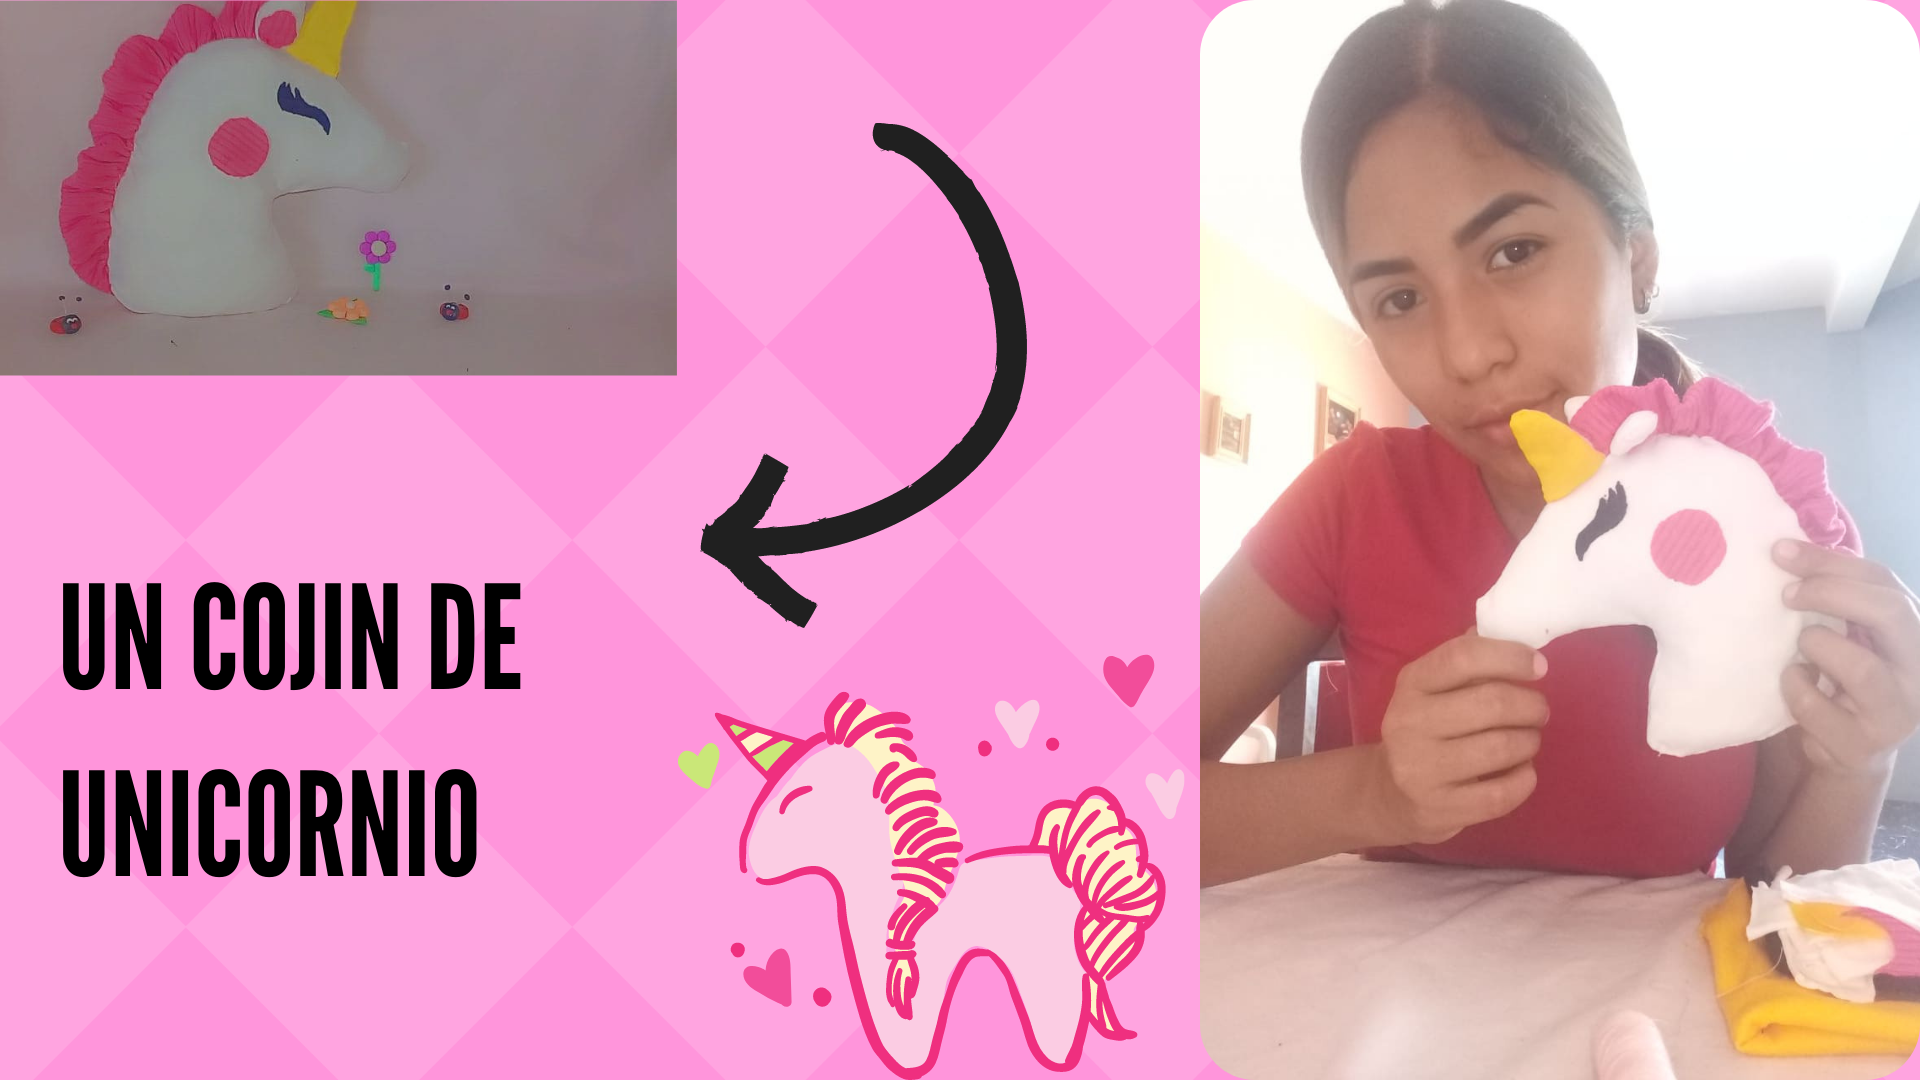 Foto de mi autoría tomada con mi teléfono inteligente.
Edición hecha por mi desde canva
Se creativo es una esencia que forma parte de todos nosotros, me fascina la costura, ya que podemos hacer realidad cualquier imagen o diseño que tengamos en mente, tome la decisión de hacer este proyecto un cojín de unicornio porque me parece una figura demasiado maravillosa, desde niña soy fanática de los Pony, me encanta ver sus comiquitas por eso me identifico mucho con el. Así que sin mas preámbulo comenzare este tutorial del concurso.
Being creative is an essence that is part of all of us, I love sewing, because we can make any image or design we have in mind, I decided to make this project a unicorn cushion because it seems to me a very wonderful figure, since I was a child I am a fan of the Pony, I love to watch their comics so I identify a lot with it. So without further ado I will begin this tutorial of the contest.

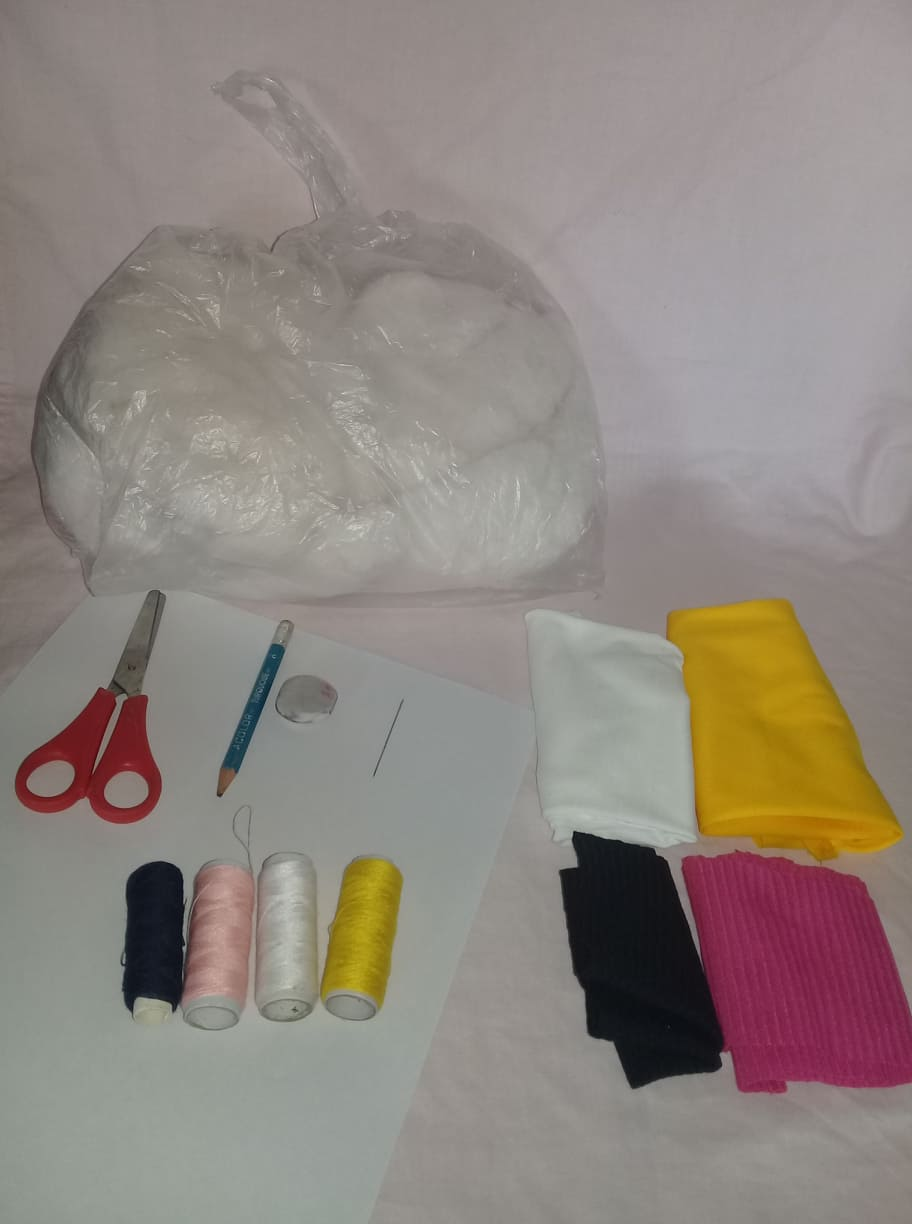
Materiales que utilice para realizar este unicornio son los siguientes:
- Una hoja para realizar nuestro patrón.
- Lápiz.
- Borrador.
- Tijera.
- Aguja.
- Hilo de colores negro, blanco, rosado y amarillo.
- Tela de colores blanca, amarillo, negra y fucsia.
- Una bolsa de relleno de algodón.
Materials used to make this unicorn are the following:
- A sheet to make our pattern.
- Pencil.
- Eraser.
- Scissors.
- Needle.
- Black, white, pink and yellow thread.
- White, yellow, black and fuchsia colored fabric.
- Cotton stuffing bag.
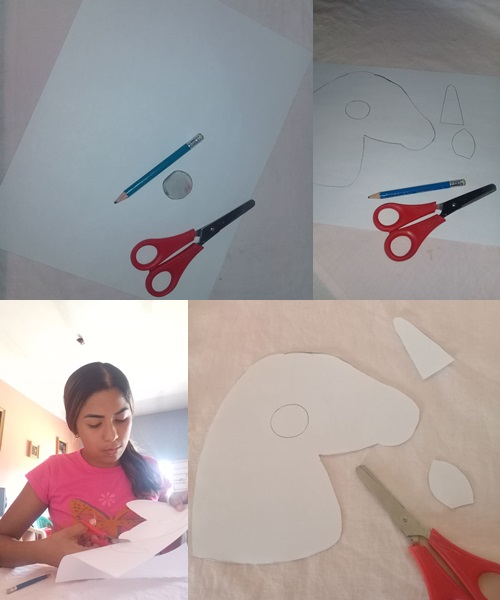
Paso 1: Toma hoja en blanco, lápiz y tijera. Dibuja tu patrón de unicornio y recorta cada una de las piezas.
Step 1: Take a blank sheet of paper, pencil and scissors. Draw your unicorn pattern and cut out each piece.
Paso 2: Tomamos cada pieza del patrón y la recortamos en su respectivo color de tela ayudándonos a sostenerlo con agujas o alfileres con cabeza de perla.
Step 2: We take each piece of the pattern and cut it out in its respective color of fabric helping us to hold it with needles or pins with pearl head.
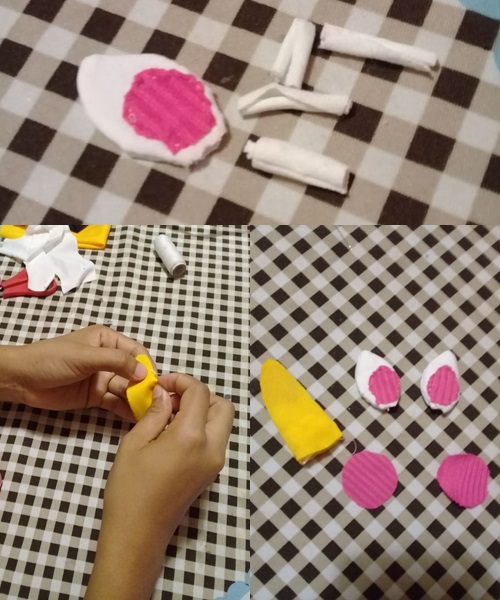
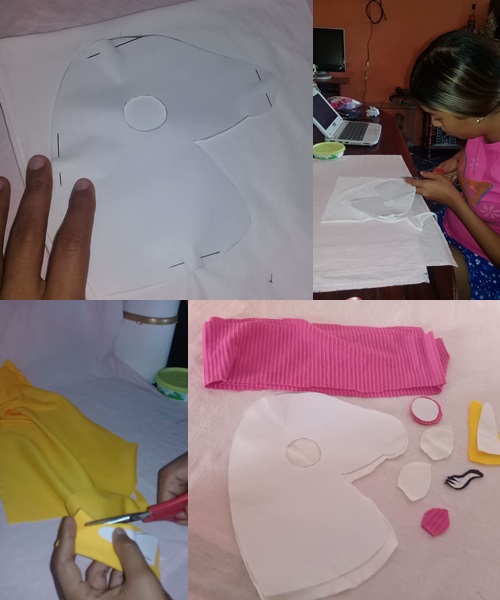
Paso 3: Empezamos a coses la parte trasera y delantera de las orejas y el cuerno del unicornio con puntos de costuras a mano Pespunte, al finalizar la rellenamos con retazos de tela que van quedando o con el relleno de algodón.
Step 3: We start sewing the back and front part of the ears and the horn of the unicorn with hand stitches. At the end we fill it with scraps of fabric that are left over or with the cotton stuffing.
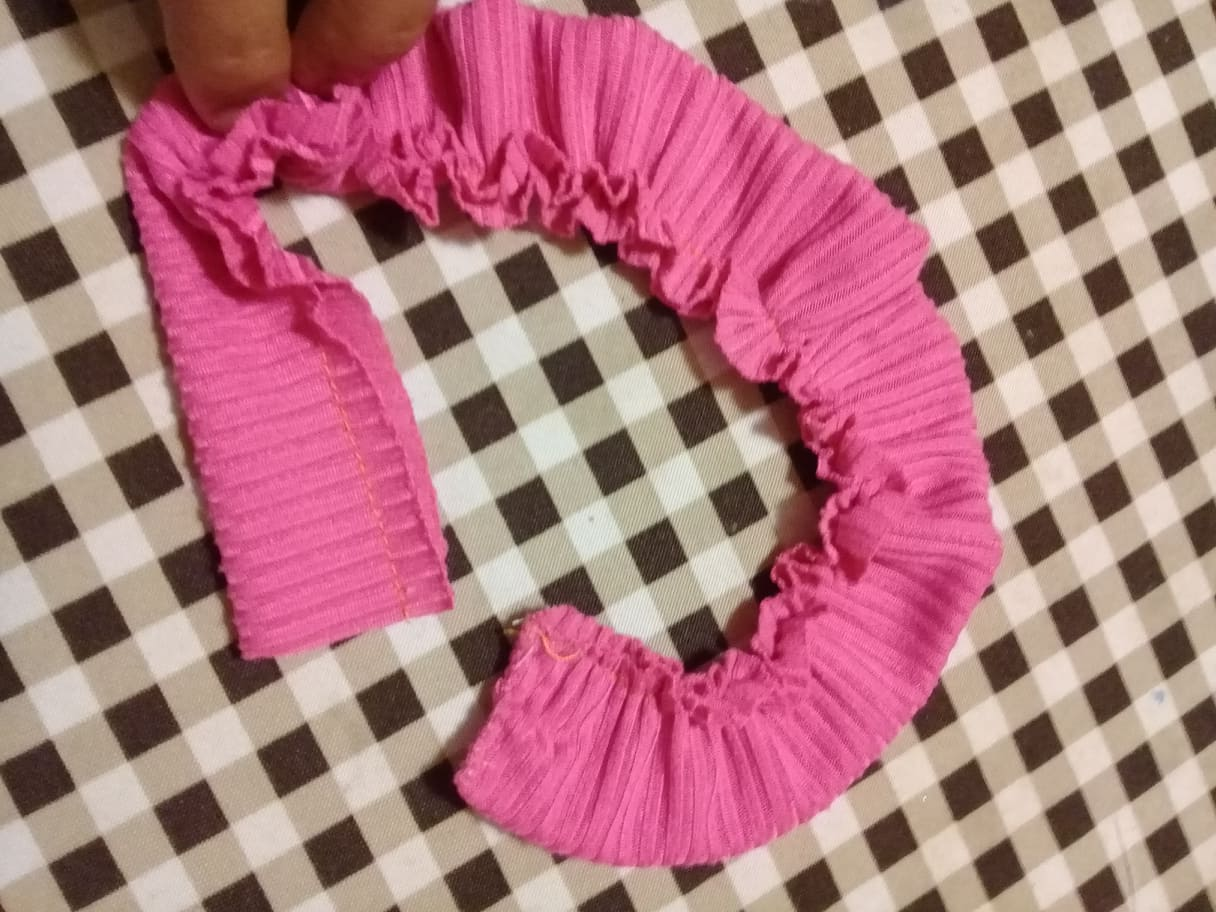
Paso 4: Tomamos la tela de color fucsia y hacemos un arruchado con puntos de costura Pespunte, dándole la forma que deseamos, para el cabello del unicornio.
Step 4: We take the fuchsia colored fabric and make a ruffle with backstitch stitches, giving it the shape we want, for the unicorn's hair.
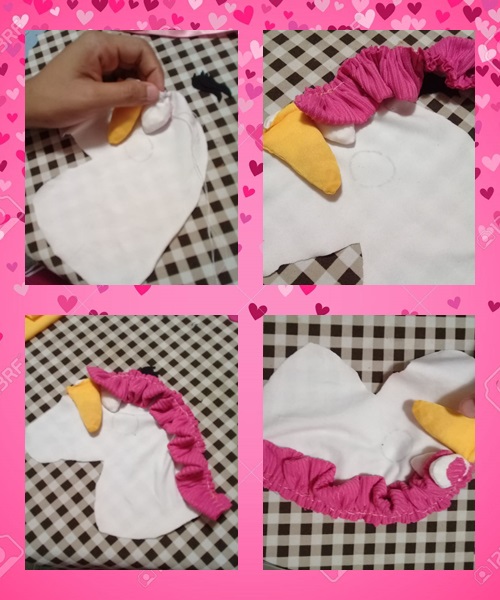
Paso 5: Se toma una de las parte de la cara del unicornio, y con puntos de Pespunte se cose el cuerno y una de las orejas, luego se une el cabello hasta llegar al final. Al terminar se cose la otra oreja a la misma altura de la anterior.
Step 5: Take one part of the unicorn's face, and sew the horn and one of the ears with backstitches, then join the hair until the end. When finished, sew the other ear at the same height as the previous one.
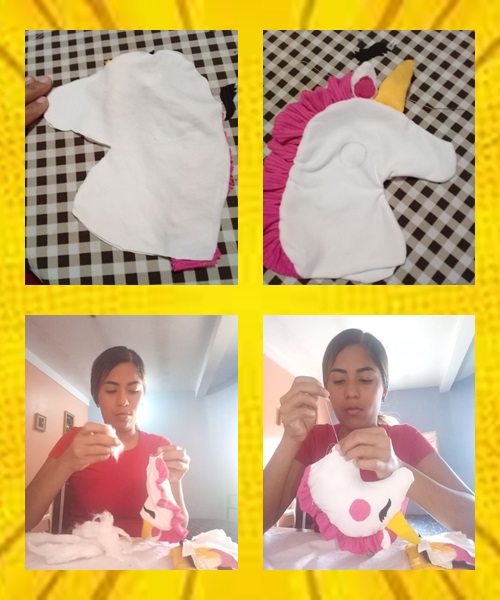
Paso 6: Se toma la otra cara del unicornio uniéndola con las orejas, cuerno y cabello con puntos Pespunte dejando le un mínimo hueco, para luego voltear lo y rellenarlo con algodón, Al terminar de rellenarlo se cose el hueco que se dejo con puntos deslizado. Pengándole con silicon liquido las pestañas y el circulo.
Step 6: Take the other side of the unicorn and join it with the ears, horn and hair with lockstitch leaving a small gap, then turn it over and fill it with cotton. When you finish filling it, sew the gap left with slipped stitches. Stitch the eyelashes and the circle with liquid silicone.
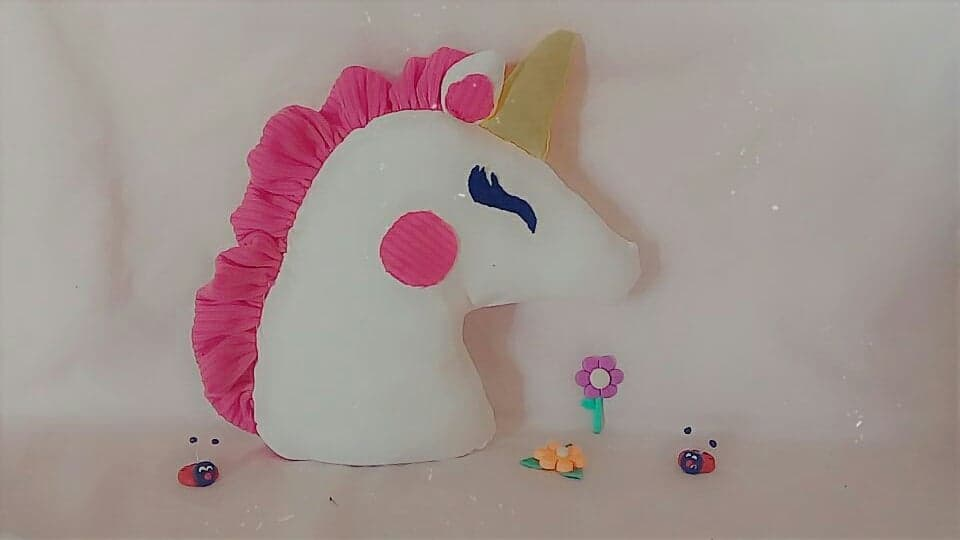
Family this is the result of the beautiful unicorn cushion, I really liked it, as it decorates too much and even serves as a toy for my daughter.
All the photos are my authorship and the collage was made from PhotoScape.
Que ternura! Esta súper lindo ese unicornio y el tutorial bien explicado. Se me ocurren un montón de ideas para hacer. Gracias por compartirlo.
Tambien me gustaria invitarte a visitar la comunidad @hivemexico 👉 https://peakd.com/c/hive-147104/created pues alli hacemos actividades semanales donde valoramos contenido como el tuyo, ademas es una opotunidad para conocer mas personas y aprender unos de otros sobre Hive.
Eres bienvenida tambien en La Comunidad HiveMexico en Discord https://discord.gg/DWVwyZ8 👈 enlace para ir directo alli. Saludos!!
Hola Mari, me alegro mucho que te haya gustado mi paso a paso. Gracias por invitarme a la comunidad de @hivemexico
Saludos.
Hey @mariadiaz! Welcome to the NeedleWorkMonday Community!
Your unicorn would definitely make a great piece to decorate a girls room. So cute! I think it’s neat that we can make the things we loved when growing up and enjoy those memories. Thank you for entering the contest :)
Every week needleworkers from around the globe get together to share our work, patterns, tips, ideas and shortcuts as we support one another. Our goal is to inspire the Hive blockchain to give crafting a try.
On Monday’s we use the #needleworkmonday tag and on all other days we use the #needlework tag without the word Monday attached. We share and post our work directly from the Community page.
We encourage our members to share the process of their work through photos (as you have done in this post). This not only validates your work but it takes us along the creative journey with you 🙂
For more information about what we do and for our posting guidelines please visit our FAQs.
Thank you ~
Thank you for your words, no doubt making that unicorn was a unique moment, the important thing is to be creative and put all the love and attitude.
Greetings and blessings.
You’re welcome ;)
Thank you, blessings to you as well ~
Congratulations @mariadiaz! You have completed the following achievement on the Hive blockchain and have been rewarded with new badge(s) :
Your next payout target is 50 HP.
The unit is Hive Power equivalent because your rewards can be split into HP and HBD
You can view your badges on your board and compare yourself to others in the Ranking
If you no longer want to receive notifications, reply to this comment with the word
STOPCheck out the last post from @hivebuzz:
Support the HiveBuzz project. Vote for our proposal!