---> ESPAÑOL <---
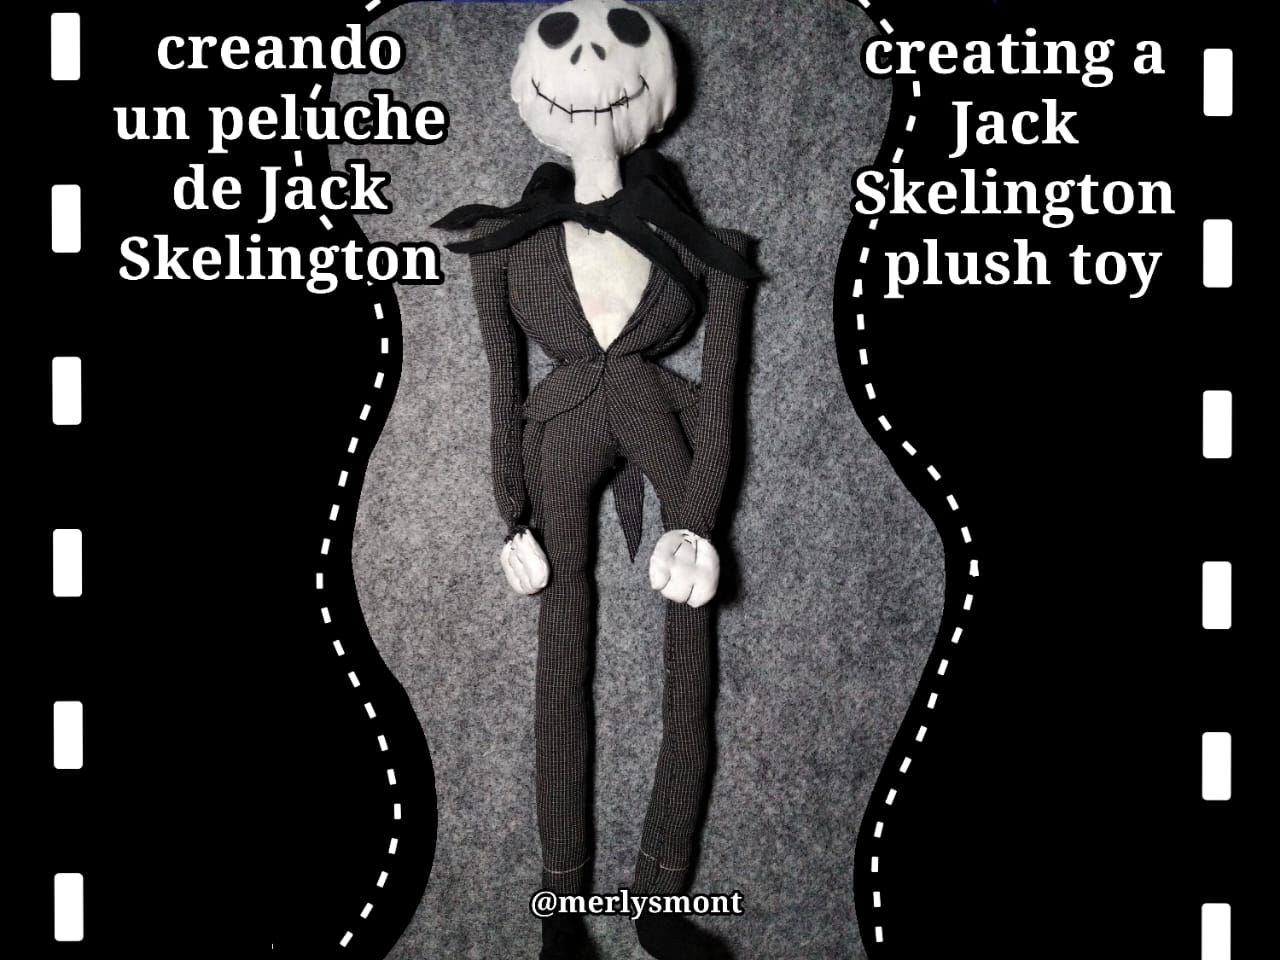
El día de hoy quería compartir con ustedes el paso a paso en la realización de un peluche del personaje Jack Skellintong que hice con pequeños retazos de tela reciclada que mi mama tenía en casa.
Pensé en realizar este peluche ya que tenía la idea de hacer algún trabajo de agujas alusivo a las fechas de octubre, donde se celebra el Halloween y todo está asociado con lo terrorífico, y la película de “El extraño mundo de Jack” tiene esa vibra tenebrosa, pero a la vez divertida que las caracteriza. También porque desde pequeña yo amo esta película y a su protagonista, además de otras parecidas como “El Cadáver de la Novia”, “Frankenweenie” y “Coraline”.
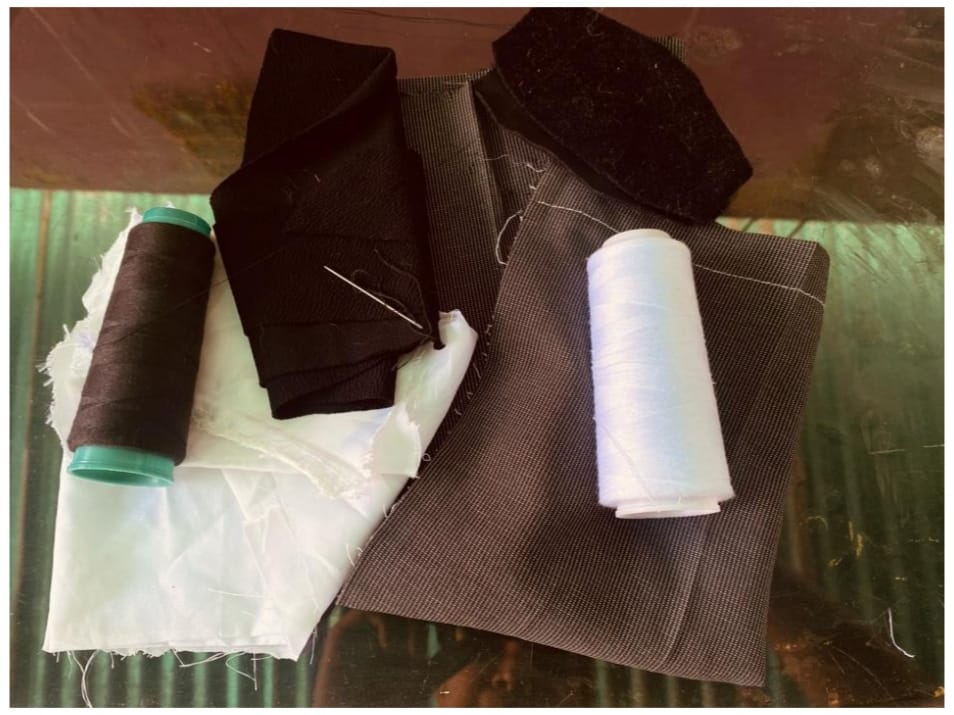
Inicié buscando entre las cosas de costurera de mi mamá distintos retazos de tela que fueran parecidos a los colores y formas que conforman el personaje de Jack. Entre ellos encontré una tela gris con franjas blancas que pertenecía a un short que ya no me quedaba, retazos blancos de tela para franelas que sobraron de anteriores proyectos que realizó mi mamá e igualmente pequeños retazos de tela negra. También busqué hilos blanco y negro, tijeras y una aguja. Además, busqué otros sobrantes de telas más pequeños para utilizarlos como relleno para el peluche, así que todo mi peluche es de materiales reciclados.
 Materiales
Primer paso:
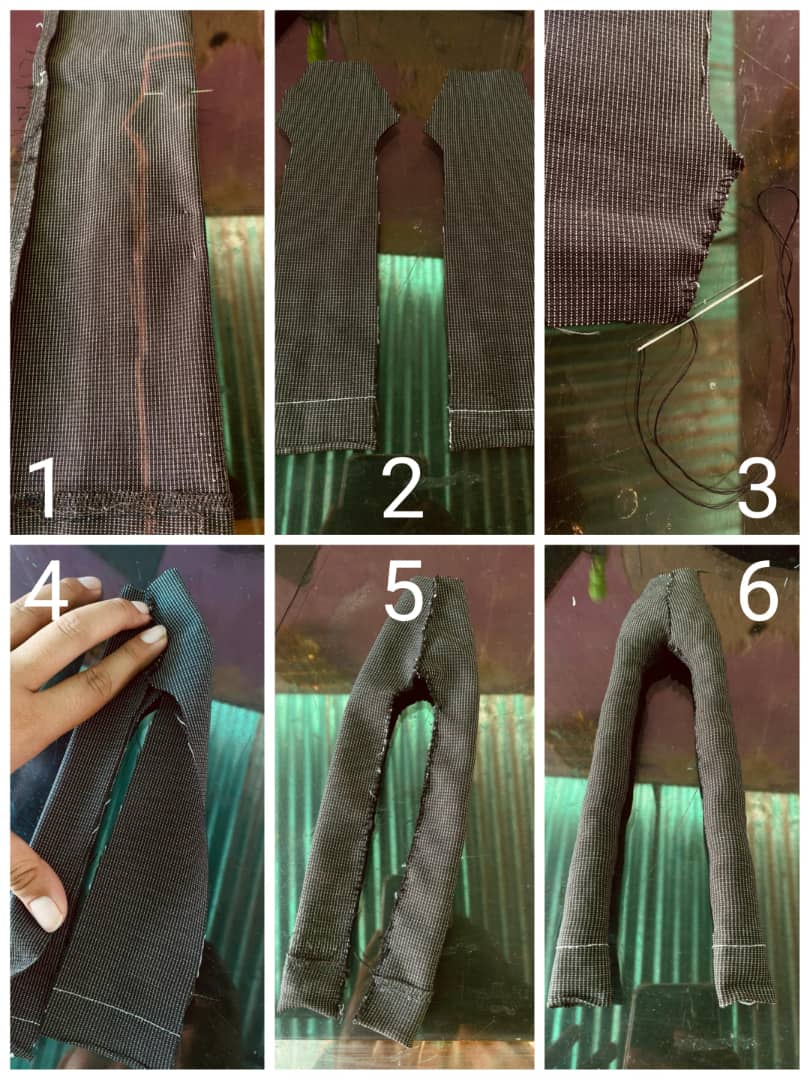
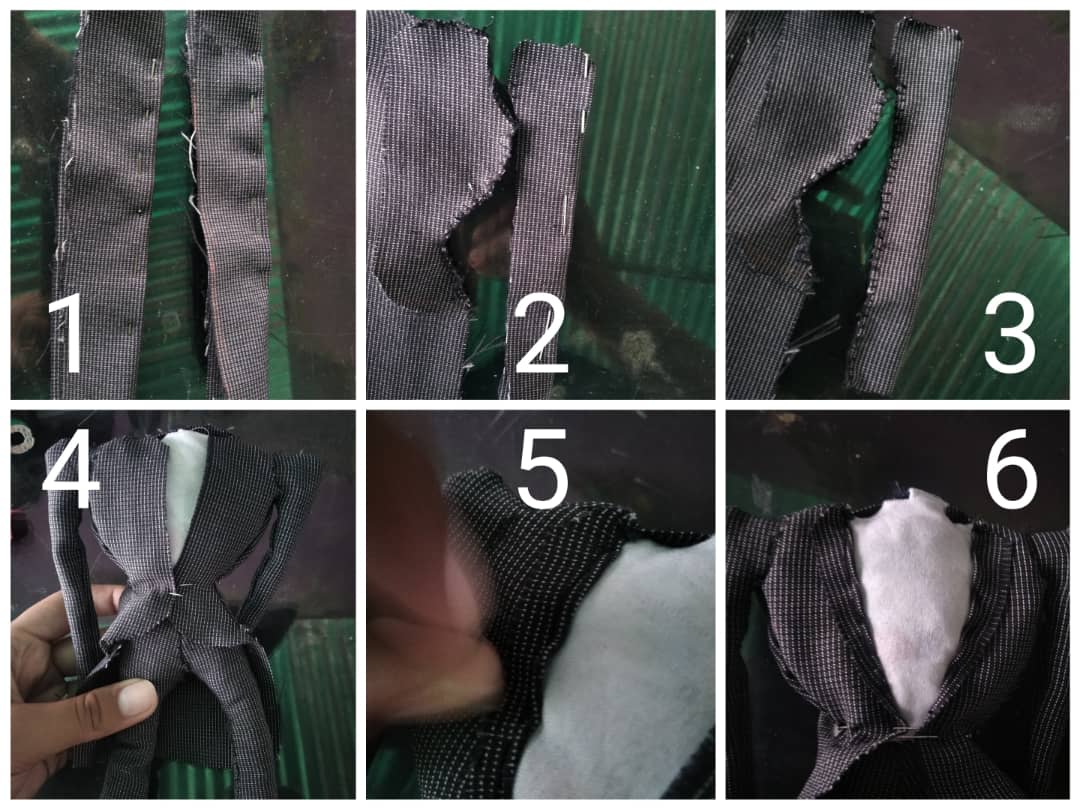
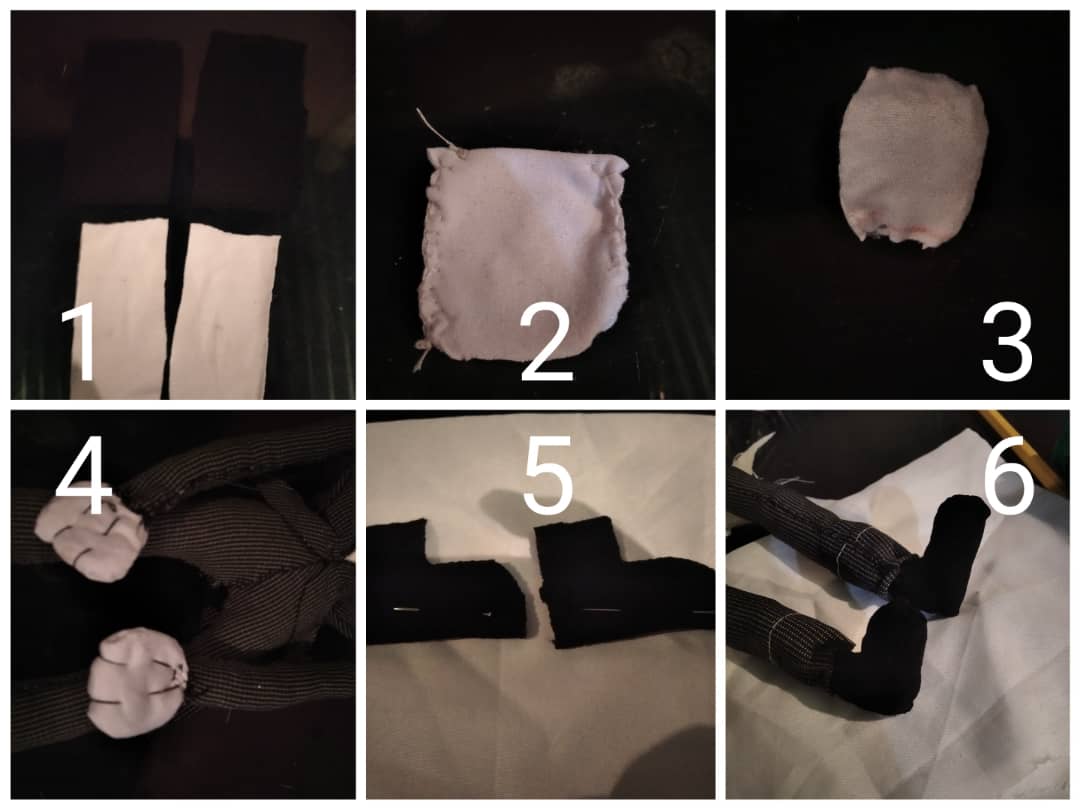
Para realizar mi peluche empecé por utilizar el retazo de tela gris con franjas blancas, lo doblé dos veces a la mitad y corté la forma que se aprecia en la primera imagen del siguiente collage, quedando así dos figuras iguales que se ven como las de la segunda imagen del collage. Estas dos piezas las coloqué una encima de la otra y las uní con costura por la orilla, desde la parte que más sobresale hasta la parte de arriba que es la más corta (como en la tercera imagen del collage). Luego doblé esto como se ve en la cuarta fotografía y la sostuve así con un par de alfileres mientras la terminaba de fijar con costura por toda la orilla, tal como se ve en la quinta foto. Esto al final le di vuelta para dejar las costuras en la parte de adentro y lo rellené para así crear el pantalón de mi personaje.
Segundo paso:
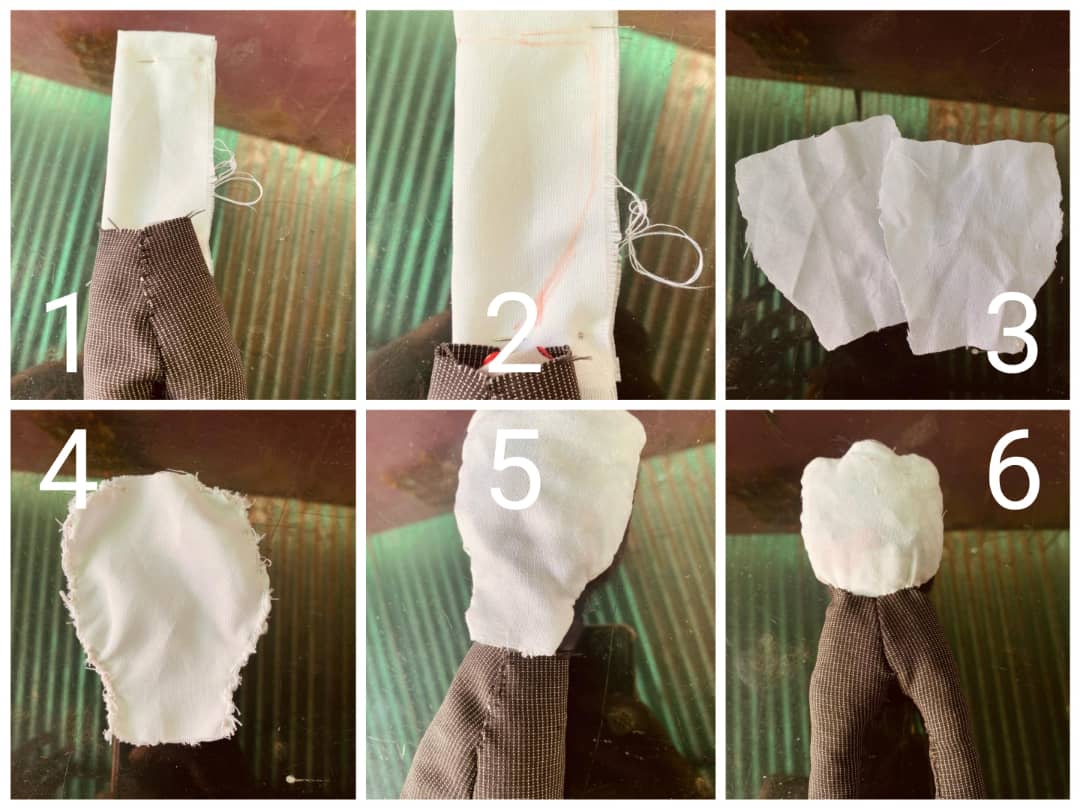
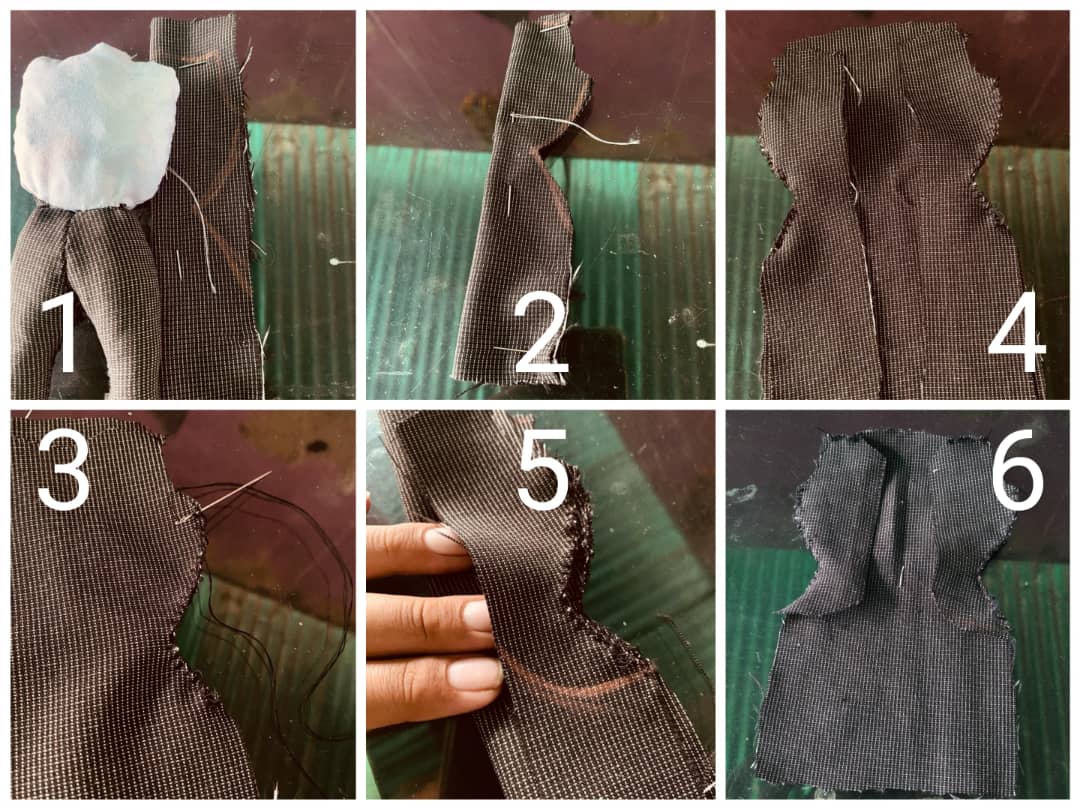
Para el segundo paso utilicé tela blanca que doblé dos veces a la mitad, ajustando el tamaño al ancho de la cintura del pantalón que realicé en el paso anterior. Esta tela la marqué como en la segunda imagen del siguiente collage, haciendo una especie de embudo donde la parte de arriba es igual de ancha que la cintura del pantalón y la de abajo igual a la mitad de esta. De esto salieron dos pedazos de tela iguales, que uní por toda la orilla a excepción de la parte inferior y un espacio de aproximadamente un centímetro en el medio de la parte superior. Le di la vuelta a la pieza de modo que las costuras quedaran hacia la parte interior, la uní al pantalón por la parte que coincidía con el ancho de la cintura y lo rellené, quedando como se ve en la ultima foto del collage.
Tercer paso:
Con la misma tela que utilicé en el primer paso y doblada a la mitad, marqué la silueta del cuerpo de mi peluche (el pantalón y el torso) pero haciéndole un poco más grande y la recorté, quedando así de la forma en que se ve en la segunda imagen del siguiente collage. Hice lo mismo nuevamente con otro pedazo de la misma tela, pero esta vez si lo hice ajustado al tamaño real del cuerpo del peluche, quedando así una pieza mas grande que la otra. Estas dos piezas las uní por la orilla, únicamente por la parte que se muestra en la tercera imagen del siguiente collage, desde el comienzo de una de las partes que más sobresale hasta la otra que sobresale igualmente. Luego corté por la mitad la parte más pequeña, quedando así un pequeño espacio entre ambas mitades y en ambas recorte un semicírculo como el trazo que aparece en la quinta imagen. También cosí la parte de arriba de cada mitad con la parte que coincidía con la pieza de atrás, como en la sexta imagen, y de esta forma empecé a crear lo que sería la chaqueta de Jack.
Cuarto paso:
En otro pedazo de la misma tela del paso anterior recorté dos rectángulos y los doblé a la mitad de forma que quedaran dos rectángulos mucho más altos que anchos. Estos los coloqué al lado de la pieza que hice antes y recorté como aparece en la segunda imagen del siguiente collage, coincidiendo con la forma de la pieza anterior. Ambos rectángulos los fijé doblados a la mitad con costura por la orilla hasta donde empezaba el semicírculo y también en la parte superior y los uní a la pieza del paso anterior como muestra la tercera imagen, a esto le di vuelta para dejar las costuras del lado de adentro y lo fijé con alfileres al cuerpo del peluche, creando así la chaqueta. Estando de esta forma hice una costura sencilla pero resistente que unió la chaqueta con el cuerpo del muñeco y que además le dio un doblez a la parte del medio de la chaqueta que se aprecia en la sexta imagen del siguiente collage.
Quinto paso:
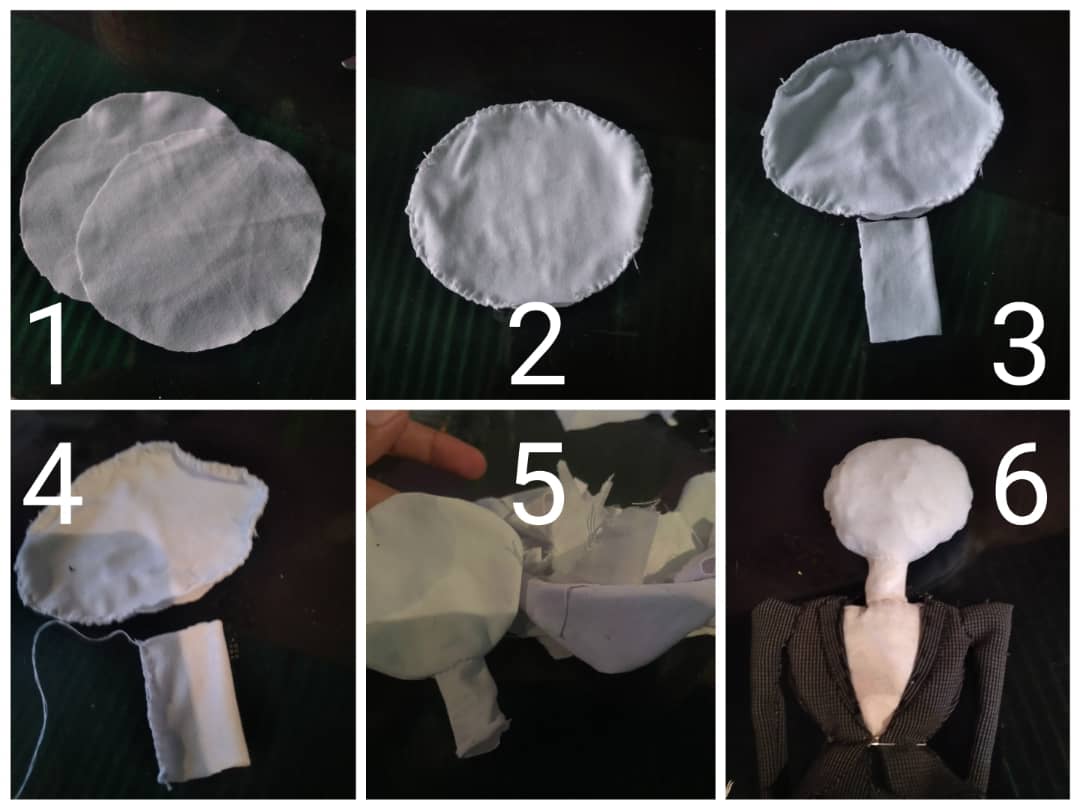
Para este paso hice a un lado un momento lo que llevaba hecho y me puse a hacer la cabeza. Para esta pieza agarré retazos de tela blanca que recorté como dos óvalos iguales, casi equivalentes al tamaño del torso del peluche. Estos dos óvalos los uní entre si por toda la orilla, dejando únicamente un espacio de aproximadamente un centímetro sin costura en la parte media inferior. También con la misma tela hice un rectángulo de dos centímetros aproximadamente, que doblé y cosí a la mitad para que fuera igual de ancho que el hueco que había quedado en la pieza de la cabeza, para así crear el cuello. Estas dos piezas, la cabeza y el cuello las uní creando así la forma de un globo sin inflar, al que luego di vuelta para guardar las costuras en la parte interna, rellené y uní al resto del cuerpo en el agujero que dejé en el torso el segundo paso.
Sexto paso:
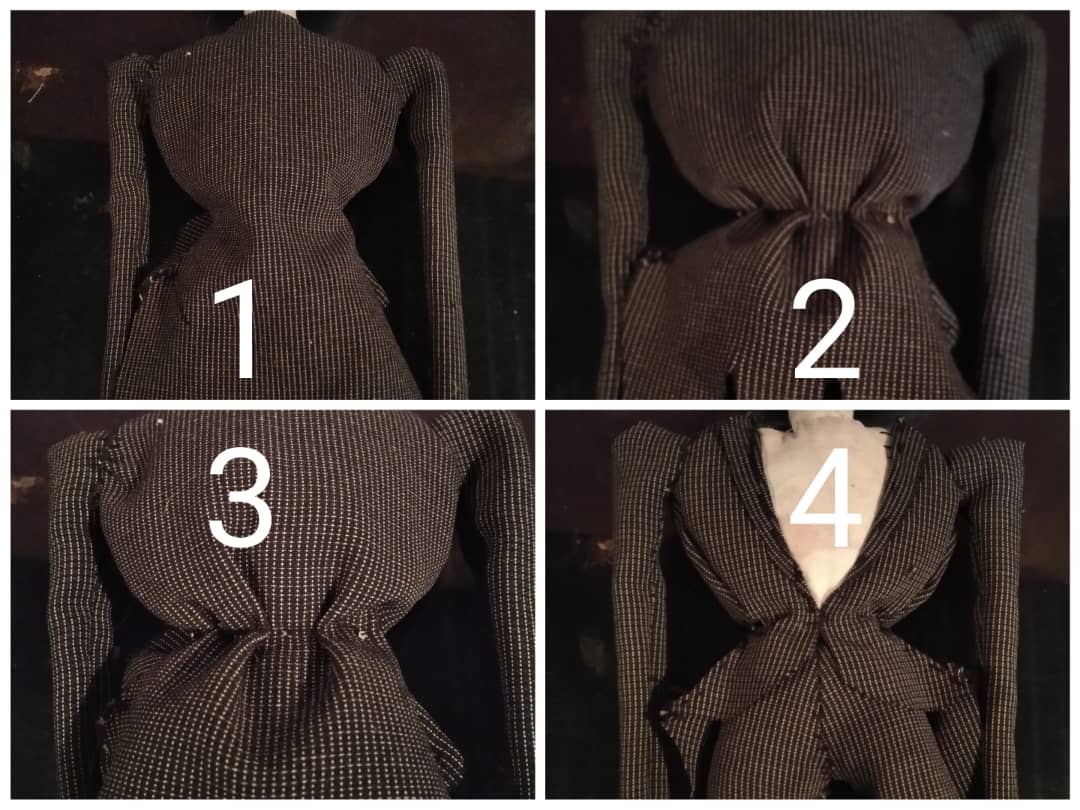
Aquí seguí con el la chaqueta, ya que di la vuelta al peluche y me di cuenta que esta le quedaba algo grande por la parte de atrás. Le hice un par de dobleces y cosí toda la cintura de modo que el cuerpo y la chaqueta quedaran unidos, también hice un par de piquetes en la parte inferior trasera de la chaqueta para crear así una forma parecida a la del traje de que Jack usa en la película y quemé un poco todas las puntas sueltas para que la tela no se dañara.
Séptimo paso:
En este paso recorté cuatro rectángulos de tela, dos blancos y dos negros. Los blancos los doblé y cosí a la mitad para crear unos cuadrados que rellené, cerré y cosí a los brazos previamente rellenos para así formar las manos (las terminé con un par de costuras con hilo negro simulando los dedos). Con los rectángulos negros hice los zapatos recortando la típica forma de los zapatos en las caricaturas, cosiéndolos por la orilla, rellenándolos y uniéndolos a cada una de las piernas del pantalón.
Octavo (ultimo) paso:
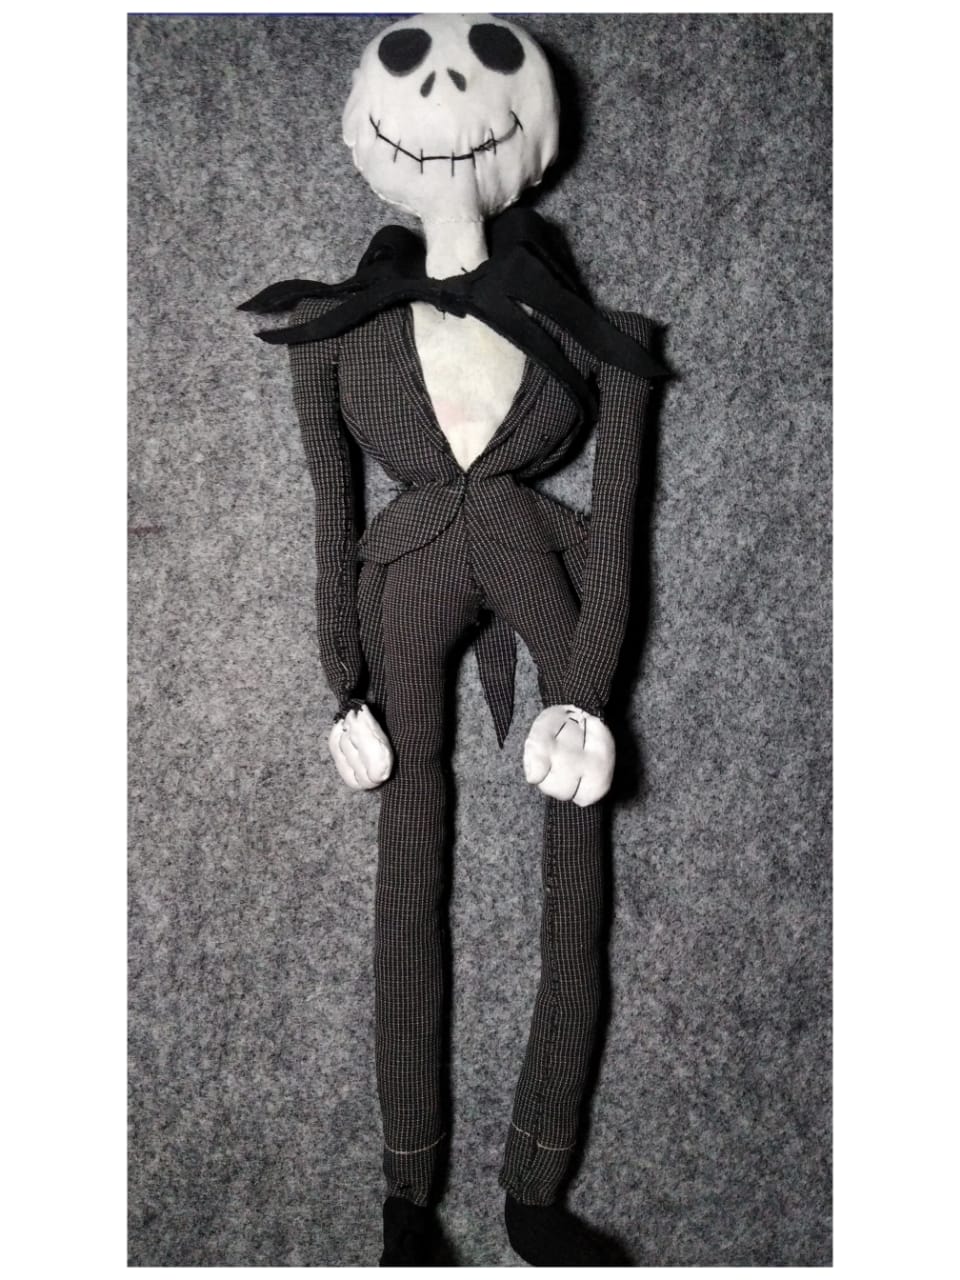
Terminé solo con los detalles: le hice su sonrisa características con costuras hechas con hilo negro, pinté sus ojos y las cuencas de su nariz con pintura para telas negra y le hice un collarín parecido al que usa en la película con otro retazo de tela negra.
Esto ha sido todo por el día de hoy, gracias por leer, espero saludarles nuevamente muy pronto. Bendiciones para todos.
Todas las fotografías son de mi propiedad, editadas con la app móvil IbisPaint y funciones básicas de mi teléfono Redmi 8
ENGLISH
Today I wanted to share with you the step by step of the elaboration of a plush toy of Jack Skellintong character that I made with small scraps of recycled fabric that my mother had at home.
I came up with the idea of making this stuffed animal because I had the idea of making some needlework alluding to the dates of October, where Halloween is celebrated and everything is associated with the terrifying, and the movie "The strange world of Jack" has that scary, but at the same time fun vibe that characterizes them. Also because since I was a child I love this movie and its main character, as well as other similar movies like "The Corpse Bride", "Frankenweenie" and "Coraline".
I started looking through my mom's sewing things for different fabric scraps that were similar to the colors and shapes that make up Jack's character. Among them I found a gray fabric with white stripes that belonged to a pair of shorts that no longer fit me, white scraps of fabric for flannel that were left over from previous projects my mom had done and also small scraps of black fabric. I also looked for black and white thread, scissors and a needle. In addition, I looked for other smaller fabric scraps to use as stuffing for the stuffed animal, so all of my stuffed animal is made from recycled materials.
Materials
First step:
To make my stuffed animal I started by using the piece of gray fabric with white stripes, I folded it twice in half and cut the shape that can be seen in the first image of the following collage, thus leaving two equal figures that look like the ones in the second image of the collage. I placed these two pieces on top of each other and sewed them together along the edge, from the part that sticks out the most to the top, which is the shortest part (as in the third image of the collage). Then I folded this as seen in the fourth picture and held it like this with a couple of pins while I finished sewing it all the way around the edge, as seen in the fifth picture. This at the end I turned it inside out to leave the seams on the inside and stuffed it to create my character's pants.
Second step:
For the second step I used white fabric that I folded twice in half, adjusting the size to the width of the waistband of the pants I made in the previous step. I marked this fabric as in the second image of the following collage, making a kind of funnel where the top part is equal to the width of the waistband of the pants and the bottom part is equal to half of it. From this came out two equal pieces of fabric, which I joined all around the edge except for the bottom and a space of about one centimeter in the middle of the top. I turned the piece over so that the seams were towards the inside, joined it to the pants at the part that coincided with the width of the waist and stuffed it, leaving it as shown in the last photo of the collage.
Third step:
With the same fabric I used in the first step and folded in half, I marked the silhouette of the body of my stuffed animal (the pants and torso) but making it a little bigger and cut it out, leaving it as shown in the second image of the following collage. I did the same thing again with another piece of the same fabric, but this time I adjusted it to the real size of the stuffed animal's body, making one piece bigger than the other. These two pieces were joined by the edge, only by the part shown in the third image of the following collage, from the beginning of one of the parts that sticks out the most to the other one that sticks out as well. Then I cut the smaller part in half, leaving a small space between the two halves and cut out a semicircle in both halves like the trace shown in the fifth image. I also sewed the top part of each half with the part that coincided with the back piece, as in the sixth image, and in this way I began to create what would be Jack's jacket.
Fourth step:
On another piece of the same fabric from the previous step I cut out two rectangles and folded them in half so that two rectangles were much taller than they were wide. These I placed next to the piece I made before and cut out as shown in the second image of the following collage, matching the shape of the previous piece. Both rectangles I fixed them folded in half with a seam along the edge up to where the semicircle started and also at the top and joined them to the piece from the previous step as shown in the third image, I turned it over to leave the seams on the inside and pinned it to the body of the stuffed animal, thus creating the jacket. This way I made a simple but resistant seam that joined the jacket with the body of the doll and also gave a fold to the middle part of the jacket that can be seen in the sixth image of the following collage.
Fifth step:
For this step I put aside for a moment what I had done and started to make the head. For this piece I took pieces of white fabric that I cut out as two equal ovals, almost equivalent to the size of the torso of the stuffed animal. These two ovals I joined them together along the edge, leaving only a space of about one centimeter without a seam in the lower middle part. Also with the same fabric I made a rectangle of approximately two centimeters, which I folded and sewed in half so that it would be the same width as the hole that had been left in the head piece, to create the neck. I joined these two pieces, the head and the neck, creating the shape of an uninflated balloon, which I then turned over to keep the seams on the inside, stuffed and joined to the rest of the body in the hole I left in the torso in the second step.
Sixth step:
Here I continued with the jacket, as I turned the stuffed animal inside out and realized that it was a little big in the back. I made a couple of folds and sewed the whole waist so that the body and jacket were joined together, I also made a couple of picks in the lower back of the jacket to create a shape similar to the suit Jack wears in the movie and I burned a little bit all the loose ends so that the fabric would not be damaged.
Step seven:
In this step I cut out four rectangles of fabric, two white and two black. I folded the white ones and sewed them in half to create squares that I filled, closed and sewed to the previously filled arms to form the hands (I finished them with a couple of seams with black thread to simulate the fingers). With the black rectangles I made the shoes by cutting out the typical shape of the shoes in cartoons, sewing them along the edge, stuffing them and attaching them to each of the pant legs.
Eighth (last) step:
I finished with just the details: I made her signature smile with stitching done with black thread, painted her eyes and nose sockets with black fabric paint, and made her a collar similar to the one she wears in the movie with another piece of black fabric.
That's all for today, thanks for reading, I hope to greet you again very soon. Blessings to all.
All photos are my own, edited with IbisPaint mobile app and basic functions of my Redmi 8 phone.
Congratulations @merlysmont! You have completed the following achievement on the Hive blockchain And have been rewarded with New badge(s)
Your next payout target is 250 HP.
The unit is Hive Power equivalent because post and comment rewards can be split into HP and HBD
You can view your badges on your board and compare yourself to others in the Ranking
If you no longer want to receive notifications, reply to this comment with the word
STOPTo support your work, I also upvoted your post!
Check out our last posts:
Quedó muy lindo, a mi me encanta Jack 😍
Me encantó tu Jack, nunca pasara de moda este curioso personaje, te felicito, saludos 👋🏻