Hi Hi!
I am happy that this time the contest is directed to one of the communities with which I feel a lot of affinity. Nedlework is a community especially characterized by people who make crafts that include needles in the manufacturing process, such as sewing, weaving, embroidery, among others.
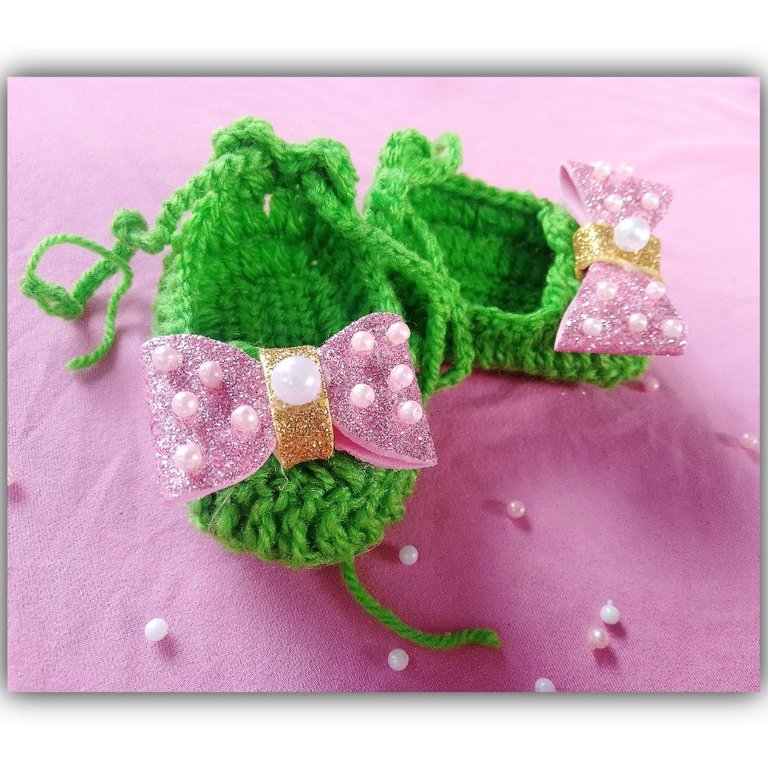
For the active contest, I got to work knitting some cute and cuddly baby shoes. Personally, I really like the combination of colors and, above all, the final decoration.
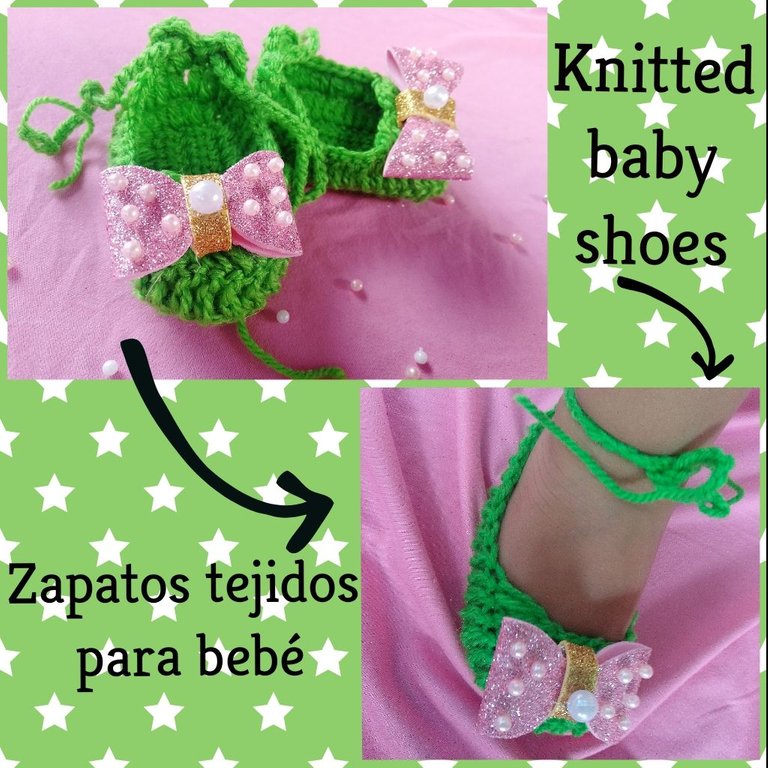
This type of shoe is loved by mothers, it is that they are a beautiful detail that looks spectacular on the baby. They are so cute.! And in addition, they are delicately made of worsted thread, which gives them comfort and good assembly.
Let's see my step by step!: 🙌🙌🙌
✂️✂️✂️✂️✂️✂️
Materials:
- 2 bundles of yarn.
- 2 decorative bows made with metallic foami and decorated with pearls.
- Knitting needle, which is comfortable for this type of thread.
- Scissor.
- Silicon.
✂️✂️✂️✂️✂️✂️
Step by Step:
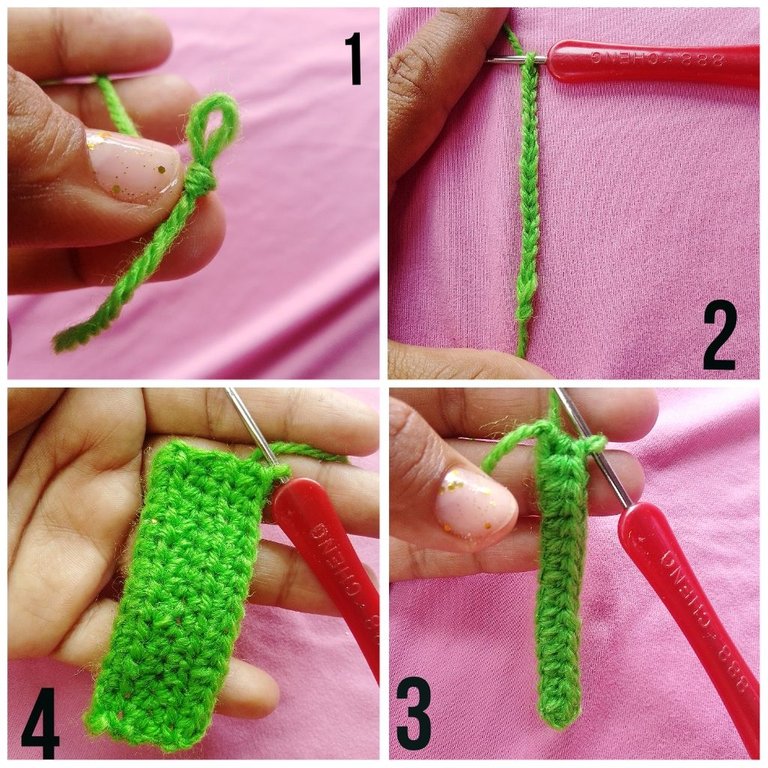
A.- We take the end of the worsted thread and make a hoop, see figure 1. We make some chains, this will be based on the size of the baby's foot, for sizes from 0 to 3 months, 13 to 15 chains are used. See figure 2. Now we assemble a row of midpoint. See figure 3. Arriving at the end of the row, we go up a chain and assemble another row. This will determine the width of the base of the shoe. In my case, I usually consider that 4 rows is enough. See figure 4.
B.- Now, we chain 4 high, and assemble a row of double crochet around the template. We unite at the end. See figures 5 and 6. We repeat this step again, and as it would be as in figure 7. So, we must now make two decoration figures, see figure 8. This, at the back of the shoe. It is made with 4 chains, and 3 double crochets that we join and seal in the next lower chain.
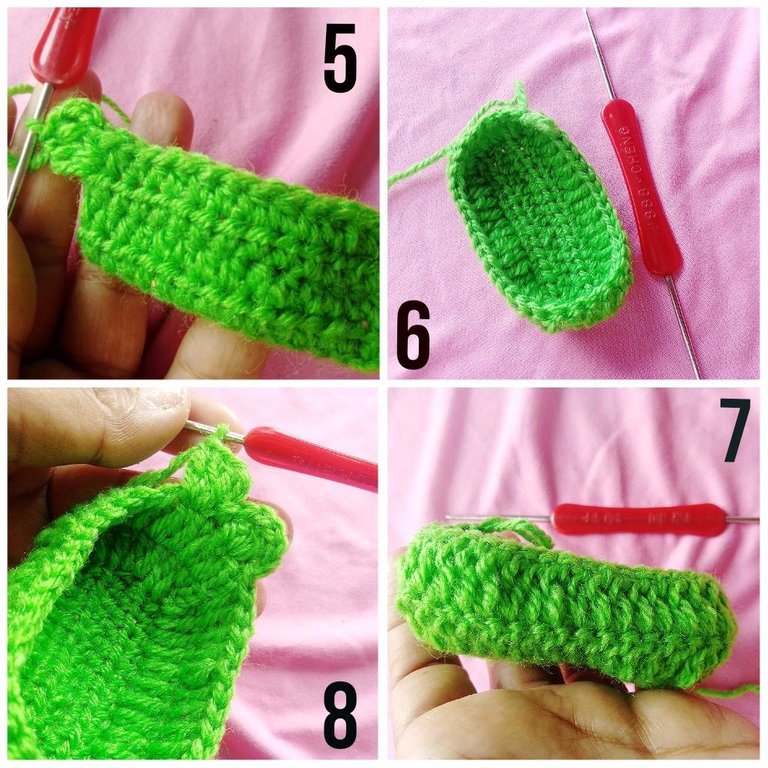
C.- When performing the previous step, they should look like this. See figure 9. Remember that to make the little shoes, you must use the same number of stitches in both, so that one will not be larger than the other. In the middle part, we will now draw 4 chains to the air. See figure, 10. We pick up 3 treble crochets. See figure 11.
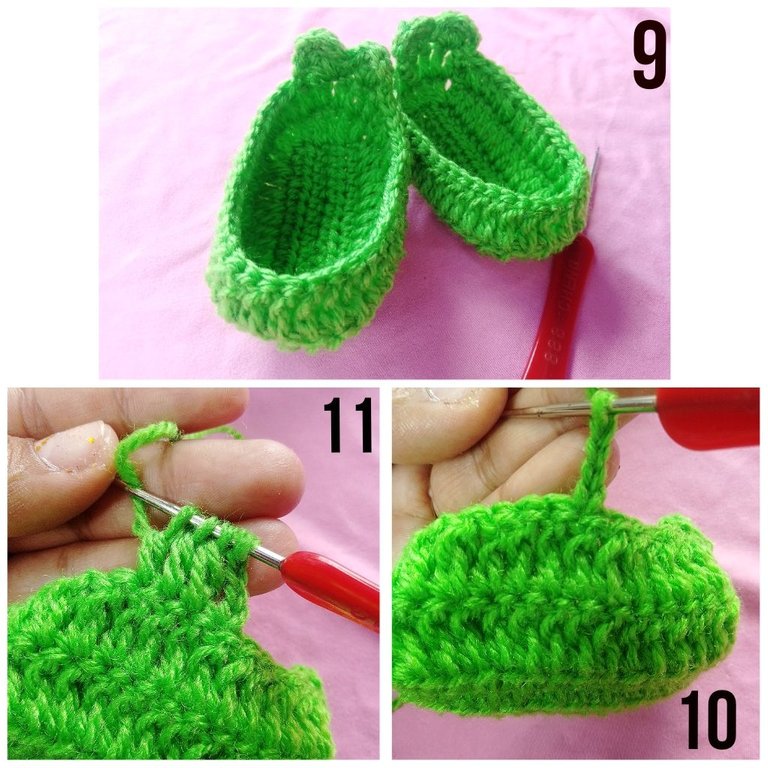
D.- We join with a sliding point. See figure 12. We skip a lower chain stitch and repeat. In the first row it is done 4 times, and in the second 1 only time, this so that it closes and forms the front flap of the shoe. See figures 13 and 14. Then, the piece at the end of this step looks as shown in figure 15.
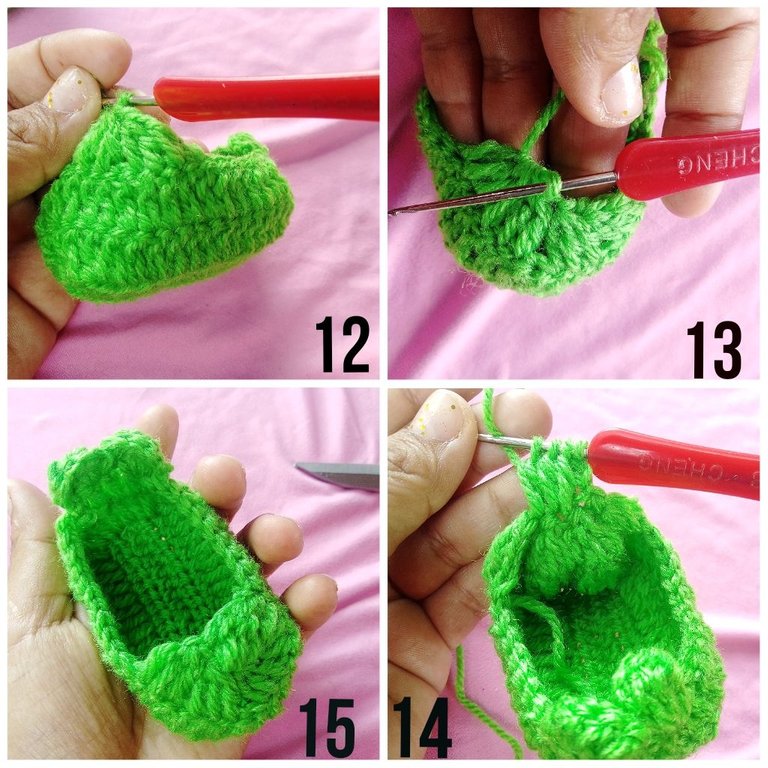
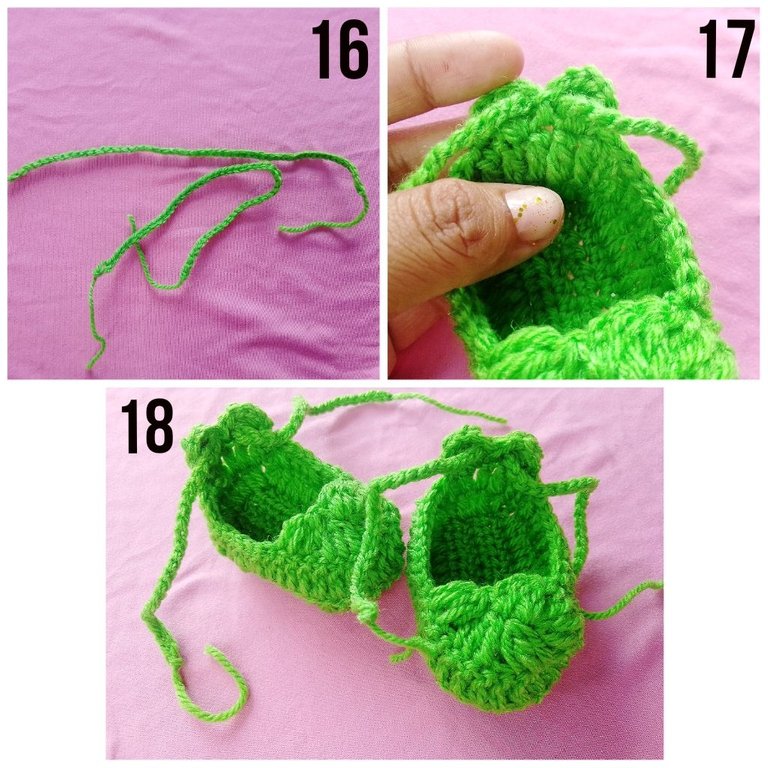
E.- Besides, we have two braids. Each has 55 chains. However you can make it bigger or smaller, this is to tie the ankle. See figure 16. We carefully insert into the back of the shoe. See figure 17. When doing the procedure on both shoes, it looks as seen in figure 18.
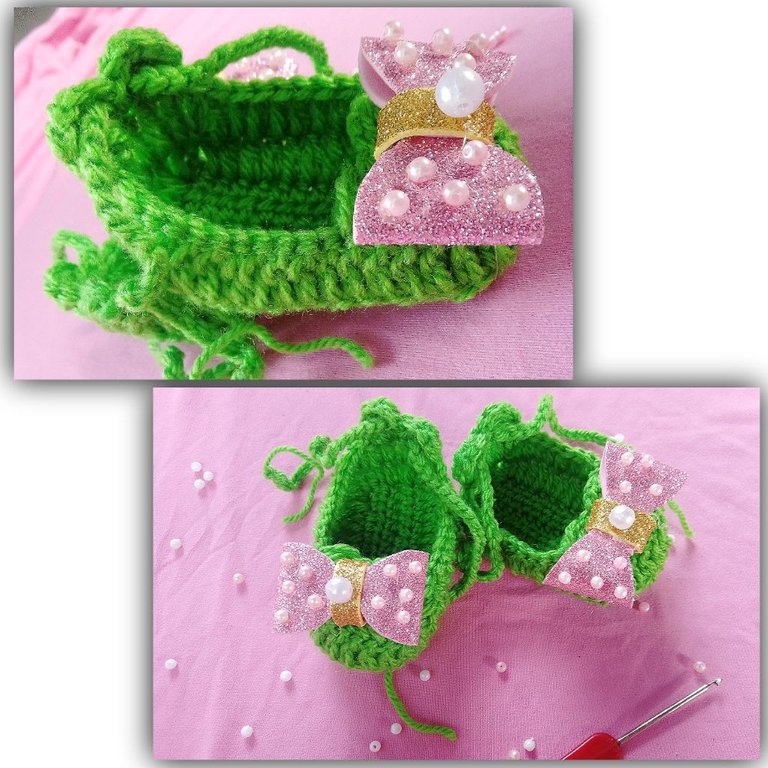
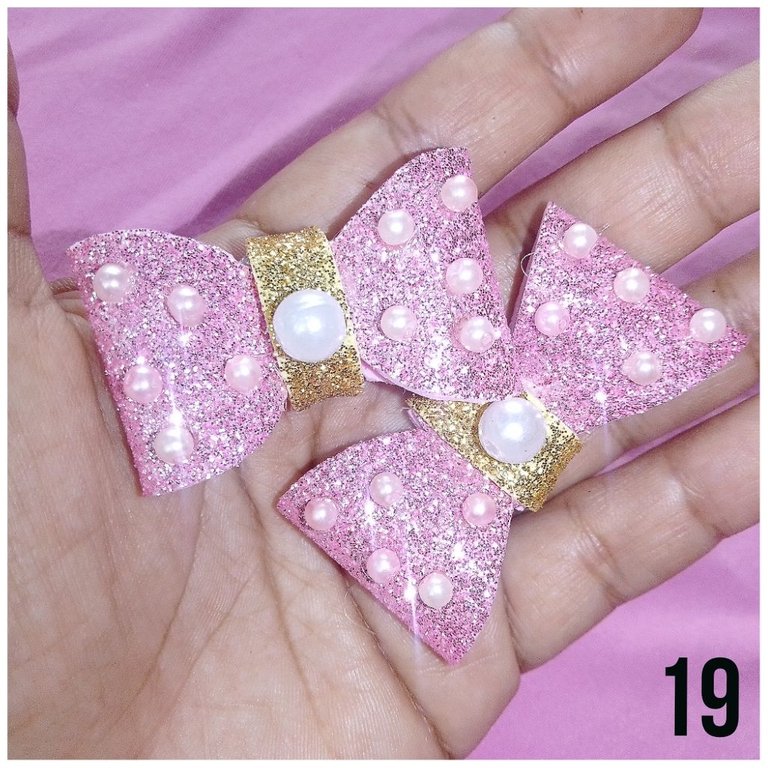
F.- Here I show you the ties that I will use to decorate. See figure 19. This is optional, you can use a woven piece, flexible dough figure or other detail. However, I love the color that this type of metallic foami gives it, plus the pearls give it a different touch. This tie, I also did it, is very simple. With Silicon, we secure the ties on the front flap of the shoe.
✂️✂️✂️✂️✂️✂️
Being ready, take a look: 😊
They are cute, let's say in my town!
🥰🥰
Thank you for your time, sincerely: Ana Pialejo, under my username: @pialejoana.
✨✨✨✨✨✨✨
Versión en Español:
Hola, Hola!
Estoy contenta de que esta vez el contest es dirigido a una de las comunidades con la que siento mucha afinidad. Nedlework es una comunidad especialmente caracterizada por personas que elaboran manualidades que incluyan agujas en el proceso de elaboración, cómo costura, tejidos, bordados, entre otras.
Para el concurso activo, me puse manos a la obra para tejer unos lindos y tiernos zapatos para bebé. De manera personal, me gusta mucho la combinación de colores y sobretodo, la decoración final.
Este tipo de zapatitos es amado por las madres, es que son un detalle hermoso que luce espectacular en el bebé. Son tan cuquis.! Y además, son delicadamente hechos en hilo estambre, que les confiere comodidad y buen armado.
Veamos mi paso a paso!: 🙌🙌🙌
✂️✂️✂️✂️✂️✂️
Materiales:
- 2 paquetes de estambre.
- 2 lazos decorativos hechos con foami metalizado y decorado con perlas.
- Aguja se tejer, que sea cómoda para este tipo de hilo.
- Tijera.
- Silicon.
✂️✂️✂️✂️✂️✂️
Paso a paso:
A.- Tomamos la punta del hilo estambre y hacemos un aro, ver figura 1. Realizamos unas cadenetas, esto será en base al tamaño del pie del bebé, para tallas de 0 a 3 meses, se usan de 13 a 15 cadenetas. Ver figura 2. Montamos ahora una hilera de punto medio. Ver figura 3. Llegando al culminar la hilera, subimos una cadenetas y montamos otra hilera. Esto, determinará lo ancho de la base del zapatito. En mi caso, normalmente considero que con 4 hileras es suficiente. Ver figura 4.
B.- Ahora, realizamos 4 cadenetas de altura, y montamos una hilera de varetas alrededor de la plantilla. Unimos al final. Ver figuras 5 y 6. Este paso lo volvemos a repetir, y tal cual nos quedaría como en la figura 7. Entonces, debemos ahora hacer dos figuras de decoración, ver figura 8. Esto, en la parte trasera del zapatito. Se hace con 4 cadenetas, y 3 puntos altos que unimos y sellamos en la siguiente cadena inferior.
C.- Al realizar el paso anterior, deben quedar así. Ver figura 9. Recuerden que para hacer los zapatitos, en ambos deben usar la misma cantidad de puntos, así no quedará uno más grande que otro. En la parte media, sacaremos ahora 4 cadenetas al aire. Ver figura , 10. Levantamos 3 puntos altos. Ver figura 11.
D.- Unimos con un punto deslizable. Ver figura 12. Saltamos un punto de cadenetas inferior y repetimos. En la primer hilera se hace 4 veces, y en la segunda 1 sola vez, esto para que cierre y forme la tapa delantera del zapato. Ver figuras 13 y 14. Entonces, la pieza al culminar este paso luce como se observa en la figura 15.
E.- Aparte, tenemos dos trenzas. Cada una tiene 55 cadenetas. Sin embargo ustedes la pueden hacer más grande o más pequeña, esto es para atar al tobillo. Ver figura 16. Insertamos con cuidado en la parte trasera del zapatito. Ver figura 17. Al hacer el procedimiento en ambos zapatitos, luce como se ven en la figura 18.
F.- Aquí te muestro los lazos que usaré para decorar. Ver figura 19. Esto es opcional, puedes usar una pieza también tejida, figura de masa flexible u otro detalle. Sin embargo, me encanta el color que le aporta este tipo de foami metalizado, además de que las perlas le dan un toque diferente. Este lazo, también lo hice yo, es muy sencillo. Con Silicon, aseguramos los lazos en la tapa delantera del zapato.
✂️✂️✂️✂️✂️✂️
Estando listos, da un vistazo: 😊
Son una monada, dijéramos en mi pueblo.!
🥰🥰
Gracias por su tiempo, atentamente: Ana Pialejo, bajo mi usuario: @pialejoana.
Te quedaron hermosos esos zapatitos de bebé @pielejoana.
Muchas gracias 🤗 @isabelpena
Wow! wow! wow! Cuteness overload! This makes me want to learn crocheting. My two elder sisters used to crochet when I was young, I never thought that at my age I would want to learn this art.
Crochet is cute, creative and even therapeutic ... I think it gives us a lot of space to relax after we have learned. I hope and you can learn soon! greetings 😊
Those are super cute! Love that green!
JOIN US ON DISCORD
SUBSCRIBE TO THE LIFESTYLE LOUNGE COMMUNITY HERE
JOIN US ON TWITTER
Thank you. And yes, this green shade is vibrant!
😊
This is really beautiful, it even looked more beautiful in the leg of the baby. Well done, thanks for sharing.
Thank you.! I confess that it was somewhat difficult to take the photo, my baby (the model) kept moving her leg. ! haha. 😅Greetings.
😂😂😂😂😂 exactly what did you expect, for it to be a Rosey ride, I doubt that, especially not with a baby. But then, it did pay off, this is one amazing work. Well done!
Exactly. ! Photos with babies, it's complicated! haha. 🤣
Thank you very much, greetings.🤗
I understand the whole stress. You are welcome
ah cute little crochet shoes you made..Great job :)
Thank you, thank you. ! 🤗
you're welcome. would love to see the shoes in other colours too :)
Aww... Ty.! And sure.! 🤗
uwc :)
Wow. Just mind blowing crochet work and step by step explanation with photos. Nice.
Thank you. ! 🤗 Lovely comment.
Oh wow! These shoes really look so cute. I've been wanting to make crocheted slip ons for my kids but I can't seem to know where to start.
The shoes of this type are very cute. You must start by learning the basic points, after mastering them you must go to the assembly. I hope you get it soon. ! Greetings! 🤗
Hermosos zapatitos para bebé, una ternura sin duda alguna. Aquí en Venezuela, suelen hacer demasiado de este tipo y los bebes se ven tan hermosos con ellos puestos. Mis tías, siempre tienen encargos para los recién nacidos en mi amado pueblo. Es un gran negocio para emprender.
Muchas gracias. Y si, aquí en Venezuela es muy común ver a los bebés recién nacidos con sus lindos zapatitos combinados con la vestimenta. Yo tengo algunos encargos, de manera esporádica... JJ. 😅😅
Saludos. ! 🤗🥰
hermosos zapatitos, me encantaron mucho..
Muchas gracias. Me contenta. 😊
Estos zapatitos son una cuchitura total...! Dios mía qué habilidad tan hermosa para tejer... Me fascinó! Genial además el color que escogiste!
Que cuchitura, me encantaron esos zapatitos sobretodo ese color tan llamativo.