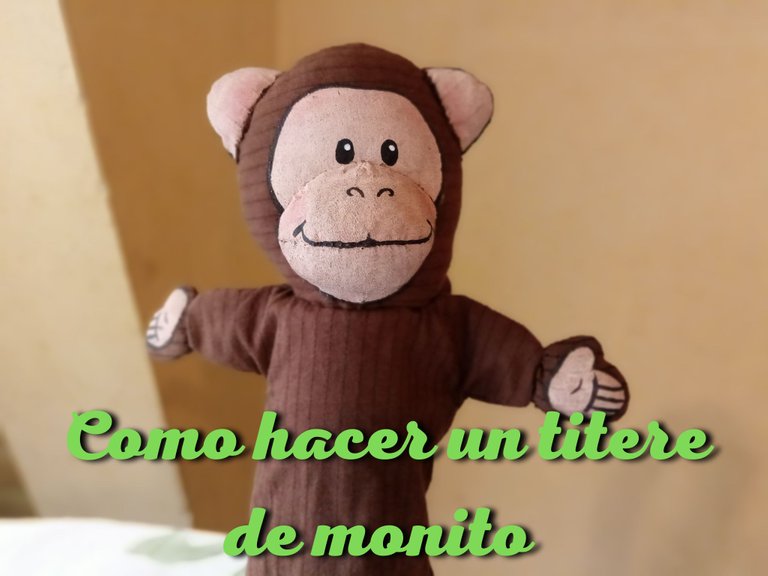
Hola hola amigos de hive, esta es mi primera publicación dentro de esta linda comunidad, quiero compartir con ustedes cómo realice este títere de mono para mi hijo. La historia del monito pichirrin la escribí hace un tiempo para mi hijo tomando la idea de un cuento que me contó una tía, se trata de un mono que no le gustaba compartir y debido a eso vivió una situación graciosa en la que se comió las conchas de las bananas para no dejar nada y luego no pudo comerse las banana porque estaba muy lleno así que tuvo que dárselas a los otros animales.
Me pareció divertido hacer el titere para poder representar esta historia mejor, así que lo primero que hice fue dibujar la idea de cómo quería que se viera el monito y de allí fui creando los patrones que necesitaba.
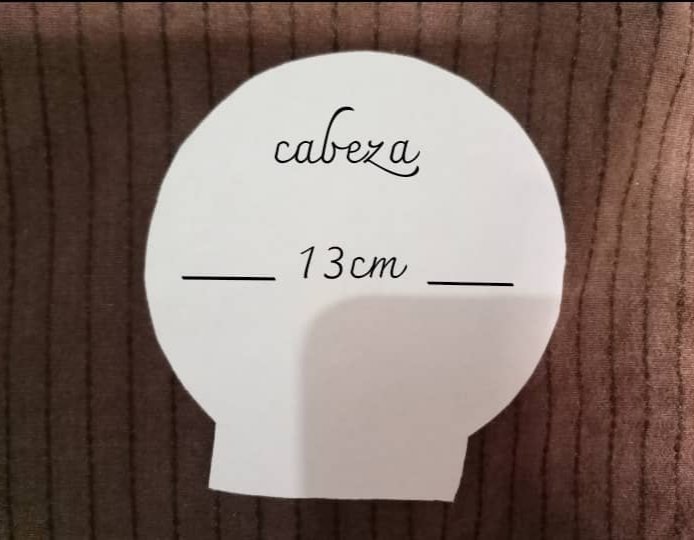
Dibujé el patrón de la cabeza por el reverso de la tela y corte dos partes, la de adelante y atrás de la cabeza, las cosi juntas por el reverso y luego voltee la pieza por el derecho para luego agregar el relleno a la cabeza. La tela que utilice tenía unas líneas negras muy delgadas pero pienso que estas le dieron un toque especial al títere
Hello hello hive friends, this is my first publication in this beautiful community, I want to share with you how I made this monkey puppet for my son. I wrote the story of the little monkey pichirrin some time ago for my son taking the idea of a story that an aunt told me, it is about a monkey that did not like to share and because of that he lived a funny situation in which he ate the shells of the bananas to not leave anything and then he could not eat the bananas because he was too full so he had to give them to the other animals.
I thought it was fun to make the puppet to be able to represent this story better, so the first thing I did was to draw the idea of how I wanted the little monkey to look like and from there I created the patterns I needed.
I drew the pattern of the head on the back of the fabric and cut out two parts, the front and back of the head, sewed them together on the back and then flipped the piece right side out to add the stuffing to the head. The fabric I used had some very thin black lines but I think these gave a special touch to the puppet.
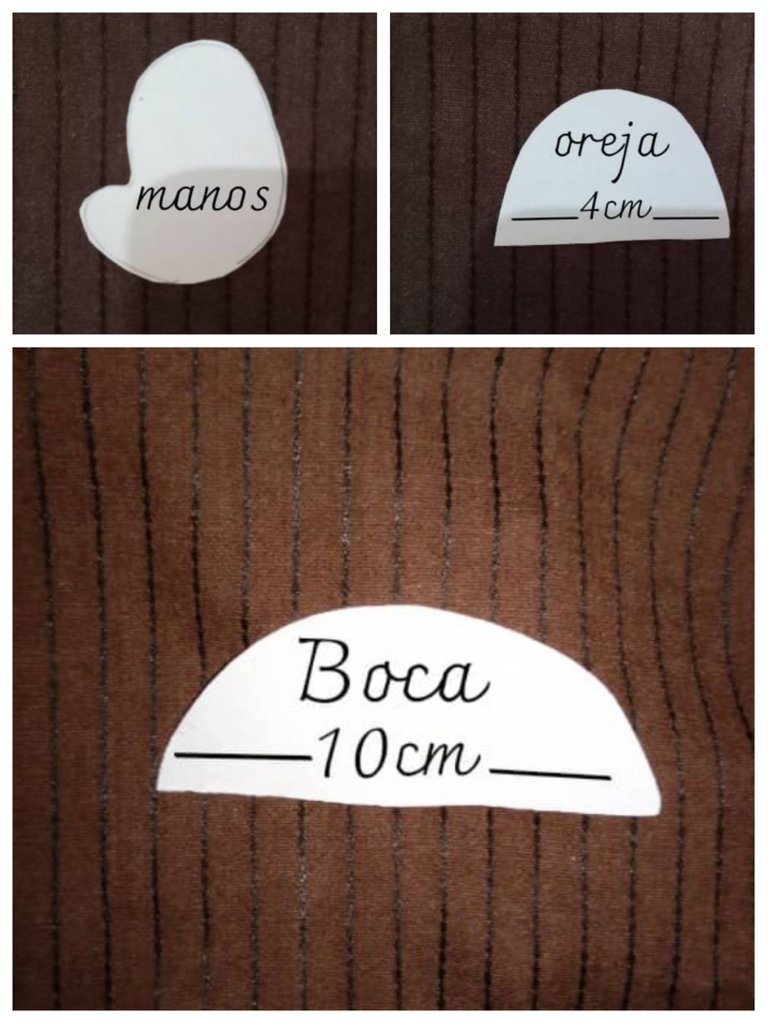
Luego dibujé en la tela las partes de las orejas del monito, las manitas y la boca. Corte dos de cada una y las cosí encaradas por el reverso, luego voltee y rellene estás partes.
Then I drew on the fabric the parts of the monkey's ears, the little hands and the mouth. I cut out two of each and sewed them facing each other on the back, then flipped and stuffed these parts.
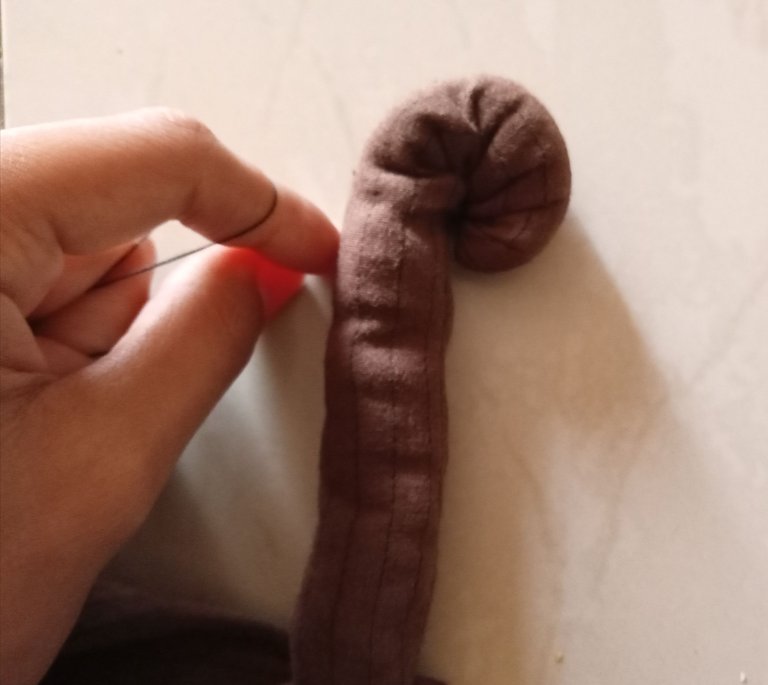
Después corte la pieza de la cola, la cual cosi y rellene, luego por la parte de la costura pase de nuevo el hilo a lo largo y apreté la costura para enrollar la cola y darle ese aspecto de cola de mono.
I then cut out the tail piece, which I sewed and stuffed, then along the seam allowance I ran the thread again lengthwise and tightened the seam to roll the tail and give it that monkey tail look.

Dibujé y corte las dos parte del cuerpo del titere en la tela, el cual es una especie de guante porque es donde se coloca la mano para moverlo, está parte del títere es muy importante así que para sacar bien la medida utilice el tamaño de mi mano, cosi por el reverso y voltee la pieza.
I drew and cut the two parts of the puppet's body in the fabric, which is a kind of glove because it is where the hand is placed to move it, this part of the puppet is very important so to get the right size I used the size of my hand, sewed on the back and flipped the piece.

Al terminar todas las partes del cuerpo del títere de monito comencé a unir cada pieza en su lugar comenzando por la cabeza. Ubique las orejas y la boca cosiendo de manera que el borde de la tela quedara hacia adentro.
After finishing all the body parts of the monkey puppet I started to attach each piece in its place starting with the head. I placed the ears and mouth by sewing so that the edge of the fabric was facing inward.
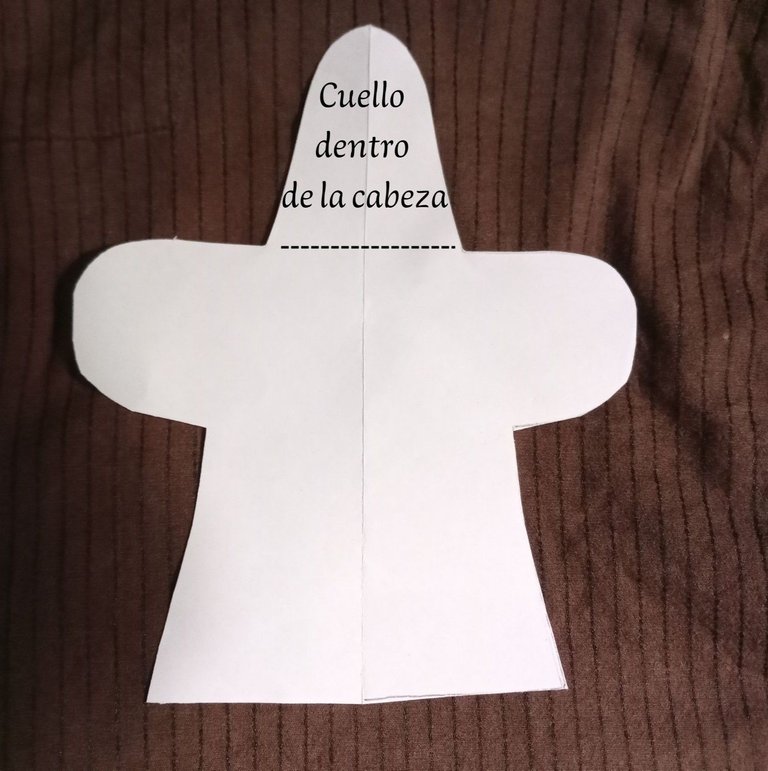
Luego para unir la cabeza con el cuerpo ubique la mano adentro del cuerpo para introducir la parte de arriba del cuerpo dentro de la cabeza y que así está tenga apoyo y pueda moverse. Cosi la cabeza alrededor del cuello, cuidando siempre que el borde de la tela quede hacia adentro.
Then to attach the head to the body I placed the hand inside the body to insert the top part of the body inside the head so that the head has support and can move. Sew the head around the neck, always making sure that the edge of the fabric is facing inwards.
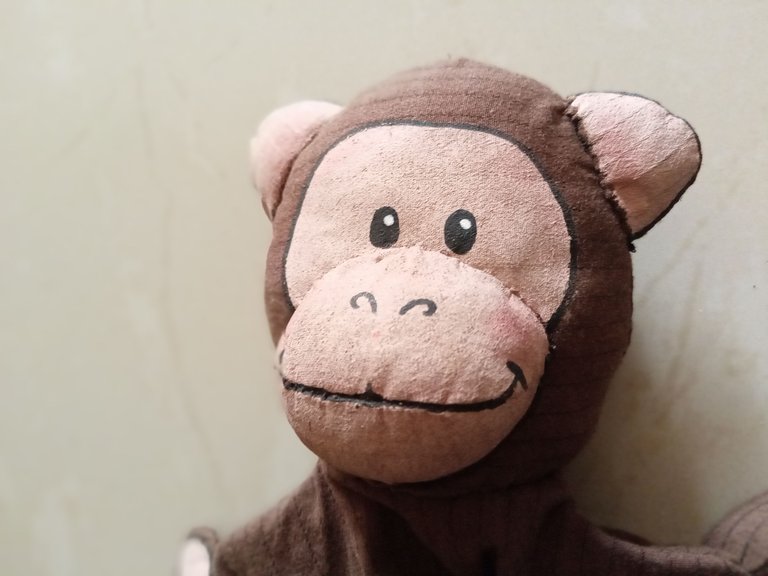
Por último agregue los detalles pintando la cara del mono con pintura color piel, también pinte la parte delantera de las orejas y las manos. Luego con pintura negra agregue los ojos ,la boca y los detalles de las manitas.
Finally add the details by painting the monkey's face with fur colored paint, also paint the front part of the ears and the hands. Then with black paint add the eyes, the mouth and the details of the little hands.
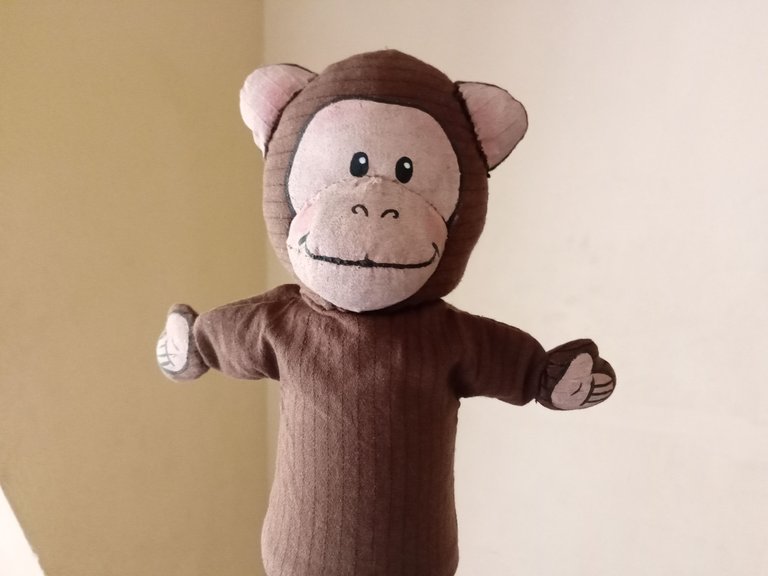
Este fue el resultado, a mi hijo le encantó, es muy divertido contar historias con títeres y tratándose de esta fue aún mejor.
This was the result, my son loved it, it is so much fun to tell stories with puppets and this one was even better.
Muchas gracias por leer.
Thank you very much for reading
Las imágenes fueron editadas en/The images were edited at:
https://www.canva.com/
Muy bien!Me gusto como quedo este titere!
Muchas gracias 😚
Hola querida! me encanta esta iniciativa, gracias por compartirlo.
Gracias a ti, me alegra que te gustará😁
Hermoso y muy adorable, excelente trabajo de costura. No dejes de compartir tus creaciones!
Muchas gracias amiga, aún tengo muchas cosas por compartir. Gracias por leer..
Congratulations @pomboadri! You have completed the following achievement on the Hive blockchain and have been rewarded with new badge(s):
Your next target is to reach 700 upvotes.
You can view your badges on your board and compare yourself to others in the Ranking
If you no longer want to receive notifications, reply to this comment with the word
STOPCheck out the last post from @hivebuzz:
Support the HiveBuzz project. Vote for our proposal!
Hermoso títere!! 😍😍 a mi sobrinito le encantan estas cosas. Gracias por compartir el paso a paso
Muchas gracias, es muy fácil de realizar, espero que te animes a hacer uno para el.
Hello @pomboadri, welcome to the NeedleWorkMonday Community! It’s nice to have you join us. 😊
This is the cutest monkey. What a great idea to add to the fun of storytelling. You did such a great job on the sewing and painting.
Every week needleworkers from around the globe get together to share our work, patterns, tips, ideas and shortcuts as we support one another. Our goal is to inspire the Hive blockchain to give crafting a try.
On Monday’s we use the #needleworkmonday tag and on all other days we use the #needlework tag without the word Monday attached. We share and post our work directly from the Community page.
We encourage our members to share about their needlework life with us. We love hearing stories and what types of things inspired your projects. We challenge you to put some feeling and emotion into your publications and help us get to know the needler behind the fabric.
Feel free to share photos of your work but it’s optional if you choose to share the steps with us (we do require you share the step process in at least one of your posts for validation purposes). If you just want to needle and share about that time we’d love to hear about it. 😊
For more information about what we do and for our posting guidelines please visit our FAQs.
Thank you ~
@crosheille Thank you very much for welcoming me to this very special community, I hope to share much more here and learn from others too....
You're very welcome! I'm sure we will learn from you as well as you learning from others. It will be fun. 😉
Thank you very much again, I am sure it will be so.
😉
Un gusto verte en esta comunidad, estoy segura que aprenderás bastante sobre varios proyectos que comparten los miembros y sobre todo te llevarás amistades virtuales.
Gran mensaje el del mono. A simple vista creí que la tela estaba estampada y cuando supe que esta pintada fue mejor aún. ¡Gran trabajo!.
Muchas gracias, está comunidad es muy creativa, que bueno que te gustará. Gracias por leer☺️