✨Si deseas leer este post en Español da click aquí✨
Hello people of this nice NeedleWorkMonday community 🧵, I wish you all are well, have a nice day🌱✨.

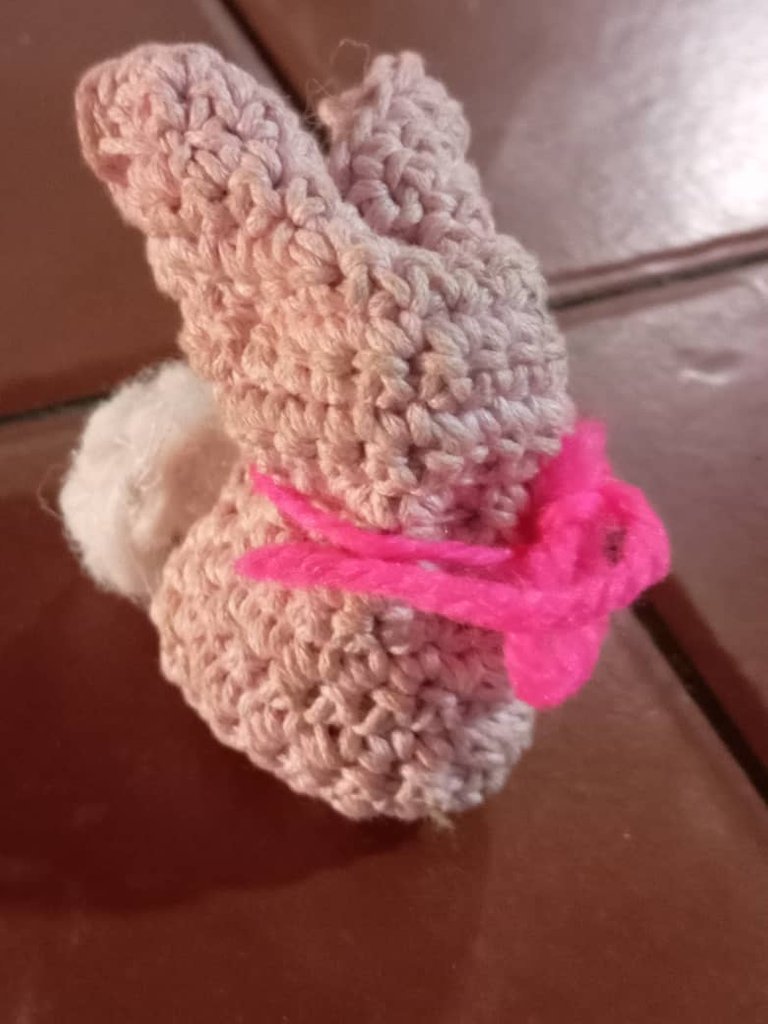
After my first post in this community where I told you that I was learning to make an amigurumi and my progress in crochet. You did not know it but I had promised myself that I would make a commitment to this community where I would share all my progress, projects and evolution that I would have on crochet, but the unexpected happened to me, suddenly I had to make a trip 🧳 and the place where I was had no Internet, I was 4 months disconnected. I also have to tell you that being on my trip I did not stop knitting, I taught my little knowledge to my dear grandmother, I made her a cute rabbit 🐰 that is now in her house as a little souvenir that I made with much love.
I must say that now I am lucky to knit with better yarns that do not hurt my hands, while before it was stressful to knit for me because of the yarn I had that was not at all suitable for knitting, now it is much more fun to knit than before. I am also taking a paid course, which is even better because everything is better explained, this makes me very happy. Since then I have understood that crochet is a talent that I have. It gives me some peace of mind to know that I have found my talent and that it is something I love to do. ଘ(੭ˊᵕˋ)੭ ੈ♡‧₊˚
The materials I used to make this beautiful project, were the following:
- Acrylic crochet thread in pink color 🧶.
- Acrylic yarn in skin color.
- Acrylic yarn in black color.
- Crochet needle number 1.
- Embroidery needle.
- Scissors ✂️.
- Stitch marker.
- Stuffing for stuffed animals 🧸.
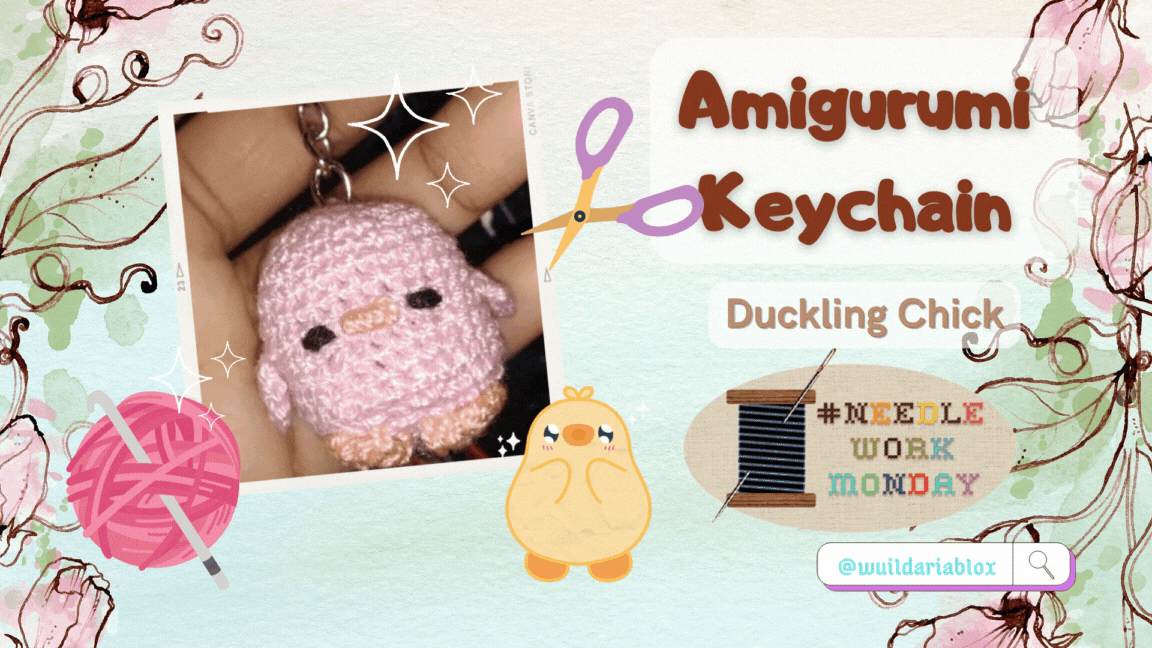
Today I bring for you the creation of a duckling chick 🐥 for keychain, I call it "duckling chick" because it looks like both things, even so I love how cute it looks. I'll explain how this idea came up, I was very excited after seeing my course on how to make amigurumis, so I took advantage of this enthusiasm and quickly looked for something to do, in my search I found this duck keychain (I'll leave the video tutorial from which I was guided at the end of the post, if you like to see:3) then I got down to work.
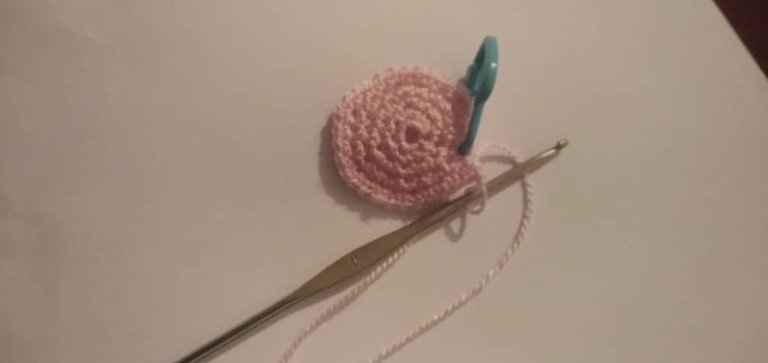
Just as the video indicates I started making a magic ring of 6 single crochet stitches, as I am still learning in the world of crochet and amigurumis I always skipped a stitch or when I was already in the second round where I made increases in the whole round I should have a total of 12 single crochet stitches, it turns out that I had 11 stitches left and I had no idea why. Until I realized the mistake, I wasn't counting right haha. Then I tried again until I got it right.
Then in the 3rd round it told me that I had to make a decrease and an increase, you don't know how many times I had to look up on Youtube what an increase and a decrease were. These two things confused me a lot and how to do them, excuse me for being silly but that's how I am.
Luckily I have written everything down in a notebook where I write down the basic crochet stitches, even so I have been memorizing which is fine because that is what I wanted to achieve after all.
For the third row in the elaboration of this duckling chick I knit one single crochet and one increase, for the fourth row two single crochets and one increase, and for the fifth row three single crochets and one increase. The truth is that in all that time I was knitting I didn't feel tired or tired of the techniques, which I like a lot because it means that this is my passion.
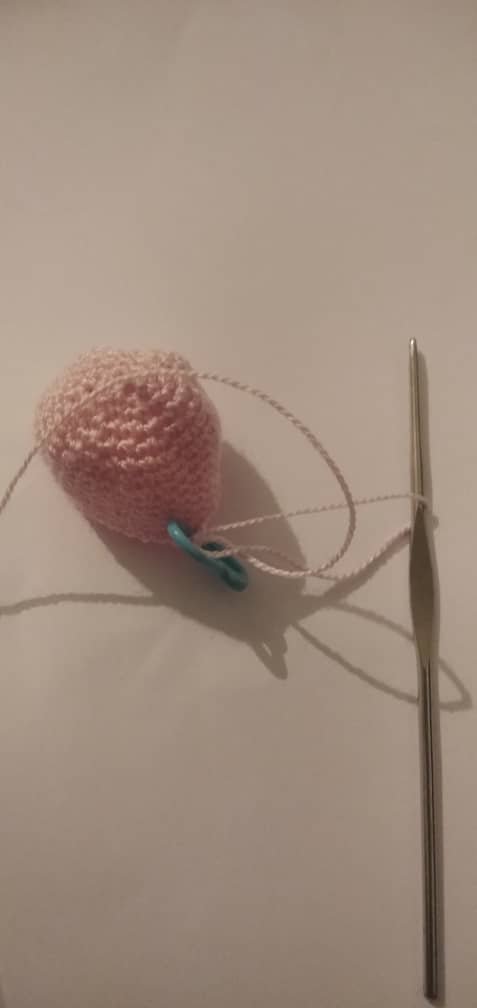
For the 6th row the matter changed because he asked me to knit only single crochet from the 6th row to number 13, here I had to make short pauses because sometimes my eyesight got exhausted and then when I looked to another direction, other than the knitting, I saw everything blurred. (o_O)
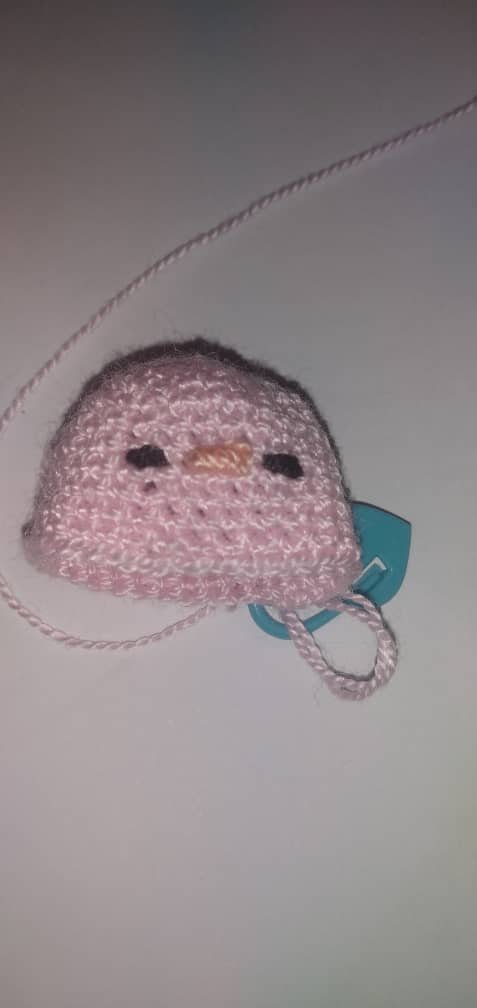
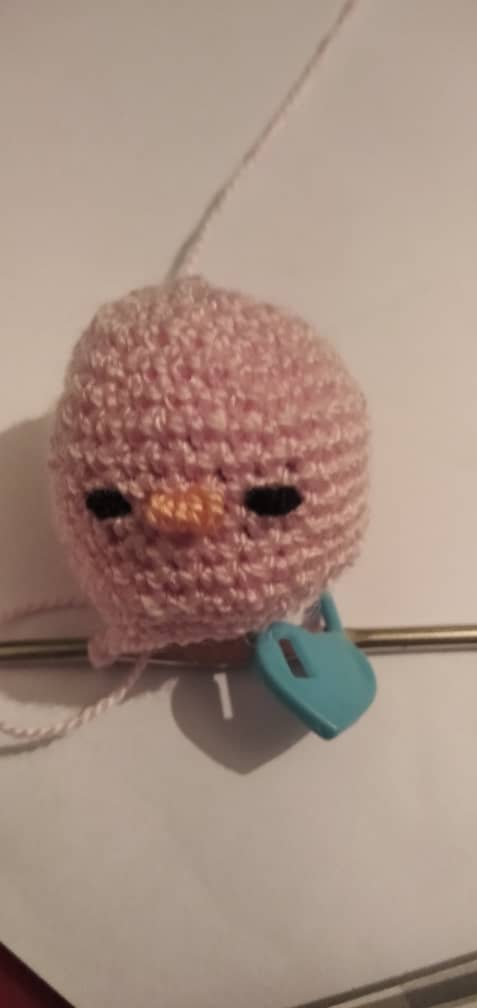
Then when she told me that I should put safety eyes on it, I got a little discouraged because I don't have safety eyes. Then I didn't know how to finish my duckling chick, until out of nowhere came to my mind to embroider the eyes with black thread and so I did, they were cute but not perfect, at least they don't look so different. I did the same with the beak, I embroidered it in the middle of the eyes.
Then I continued knitting to finish making the body of the duckling chick, now I was going backwards, in the 14th row I made three single crochets and a decrease. At this point I was doing well because I was concentrating counting each stitch and trying to make it as perfect as possible, although I felt very tired at the end.
For row 15 I made two single crochets and a decrease, row 16 a single crochet and a decrease. And almost arriving to the end I filled my keychain so that it would be a little chunky, and for the 17th row I made only decreases, all the decreases I did as in the video, only for the front strand, this decrease for amigurumis is called invisible decrease, if I'm not mistaken.
Then I finished closing the body of the chick and continued making the legs and wings. For the wings I made a magic ring of 8 single crochet stitches, closed with a slip stitch and made the legs in the same way, the only thing I changed was the color. I finished by stitching the parts to the body and that's how my duckling chick was finished.
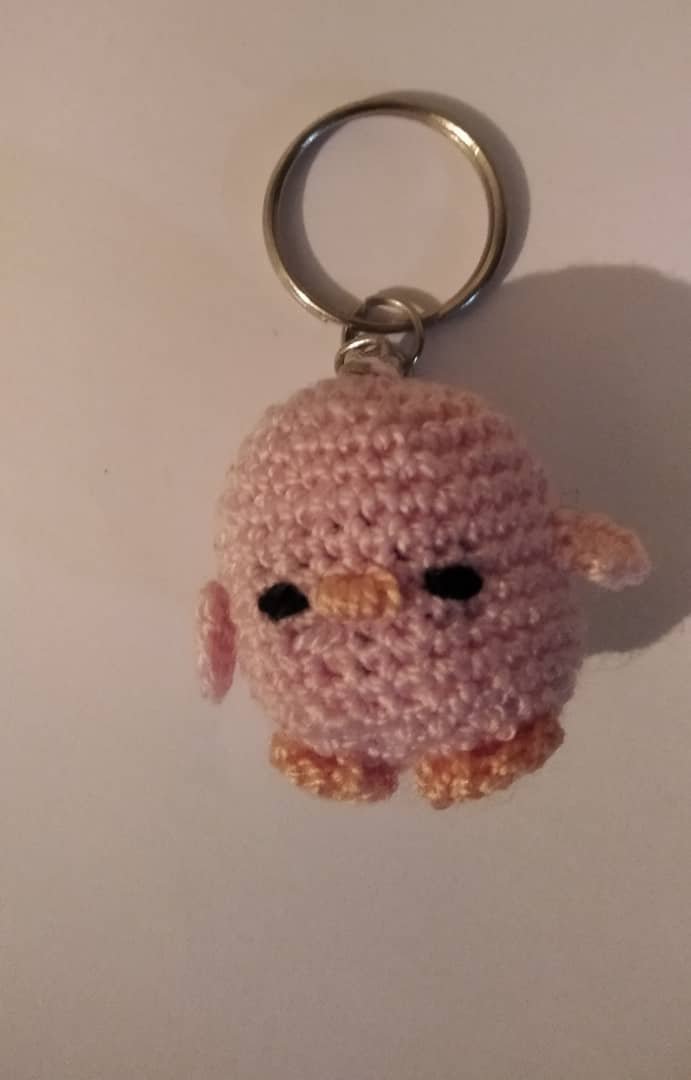
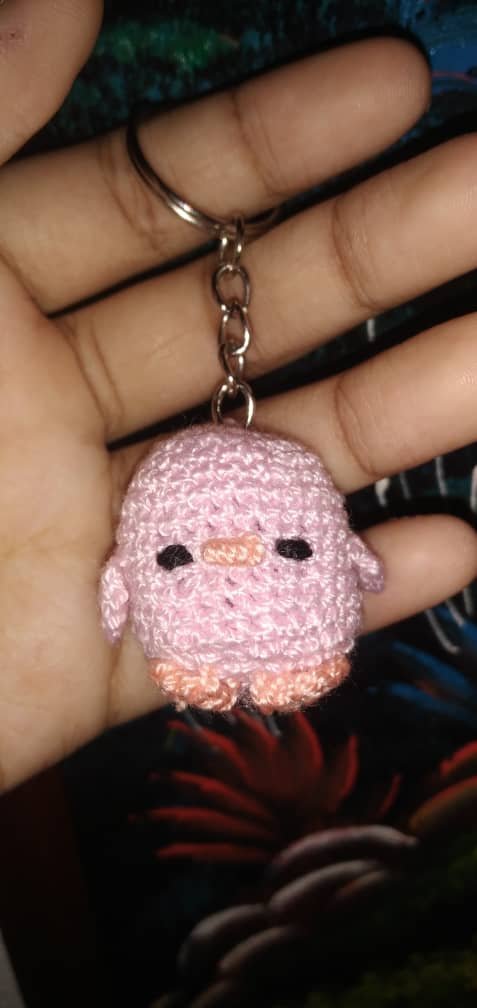
Although I feel that it was a little small and imperfect I feel that it was not bad at all. Once I showed the keychain to my dad and sister they completely fell in love with the ducky chick, so I had to make more keychains for them haha.
I must say that doing this project brought me new ideas and initiatives, one of them is to start my business about crochet and amigurumis. So I will make more keychains and promote them where I study, where possibly someone will be interested in my creations. Just thinking about the idea of starting my business with the crochet world excites me, now that I have the idea I will not let it go so easily.

Well people, this is the end of today's post, I hope you liked it as much as I did, what do you think of my keychain? I will continue to share here every amigurumi thing I make. Don't hesitate to leave me some tips or advice so I can improve, I'll be glad to read them. The pictures were taken by me, thanks for coming this far, see you next time!°˖✧◝(⁰▿⁰)◜✧˖°


Hola gente de esta linda comunidad NeedleWorkMonday 🧵, deseo todos se encuentren bien, tengan un buen día🌱✨.
Después de mi primer post en esta comunidad donde les comenté que estaba aprendiendo a hacer un amigurumi y mis avances en el crochet. Ustedes no lo sabían pero me había prometido a mi misma que asumiría un compromiso con esta comunidad donde compartiría todos mis avances, proyectos y evolución que tendría sobre el crochet, pero me sucedió lo inesperado, de pronto tuve que hacer un viaje 🧳 y el lugar donde estaba no tenía Internet, estuve 4 meses desconectada. También tengo que decirles que estando en mí viaje no deje de tejer, le enseñe mis pocos conocimientos a mí querida abuela, le hice un lindo conejo 🐰 que ahora está en su casa como un pequeño recuerdo que hice con mucho amor.
Debo decir que ahora tengo la suerte de tejer con mejores hilos que no lastiman mis manos, si bien antes era estresante tejer para mí por el hilo que tenía que no era nada adecuado para tejer, ahora es mucho más divertido tejer que antes. También estoy haciendo un curso pago, lo cual es aun mejor porque es todo mejor explicado, esto me pone muy feliz. Desde entonces he entendido que el crochet es un talento que tengo. Me genera un poco de tranquilidad saber que he encontrado mi talento y que es algo que me encanta hacer. ଘ(੭ˊᵕˋ)੭ ੈ♡‧₊˚
Los materiales que utilice para hacer este hermoso proyecto, fueron los siguientes:
- Hilo acrílico para crochet de color rosa 🧶.
- Hilo acrílico en color piel.
- Hilo acrílico color negro.
- Aguja de crochet número 1.
- Aguja para bordar.
- Tijeras ✂️.
- Marcador de puntos.
- Relleno para peluches 🧸.
Hoy traigo para ustedes la creación de un pollito patito 🐥 para llavero, le llamo “pollito patito” ya que parecen ambas cosas, aun así me encanta mucho lo lindo que se ve. Les explico cómo surgió esta idea, estaba muy entusiasmada luego de haber visto mi curso de cómo hacer amigurumis, por lo que aproveche este entusiasmo y rápidamente busque algo que hacer, en mi búsqueda encontré este llaverito de pato (les dejare el video tutorial del cual me guié al final del post, por si gustan ver:3) entonces me puse manos a la obra.
Justo como en el video lo indica comencé haciendo un anillo mágico de 6 puntos bajos, como aun estoy aprendiendo en el mundo del crochet y de los amigurumis siempre me saltaba un punto o cuando ya iba por la segunda vuelta donde hice aumentos en toda la vuelta debía tener un total de 12 puntos bajos, resulta que me quedaban 11 y yo ni idea del porque. Hasta que me di cuenta del fallo, no estaba contando bien jaja. Entonces volví a intentarlo hasta que me saliera bien.
Luego en la 3 vuelta me indicaba que debía hacer un punto bajo y un aumento, no saben las veces que tuve que buscar en Youtube lo que era un aumento y una disminución. Estas dos cosas me confundían mucho y el cómo se hacían, discúlpenme lo tonta pero así soy.
Por suerte he anotado todo en un cuaderno donde anoto los puntos básicos del crochet, aun así he ido memorizando lo cual está bien porque es lo que quería lograr después de todo.
Ya para la tercera vuelta en la elaboración de este pollito patito hice un punto bajo y un aumento, para la cuarto vuelta dos puntos bajos y un aumento, en la quinta vuelta son tres puntos bajos y un aumento. La verdad es que en todo ese rato que estuve tejiendo no me sentí fatigada o fastidiada de las técnicas lo cual me gusta bastante porque quiere decir que ésta es mi pasión.
Ya para la 6 vuelta cambio el asunto ya que me pidió tejer solo puntos bajos desde la 6 vuelta hasta la número 13, aquí tuve que hacer breves pausas ya que a veces la vista se me agotaba y luego cuando veía a otra dirección, que no fuera el tejido, veía todo borroso. (o_O)
Luego cuando me dijo que debía ponerle ojitos de seguridad me desanime un poco porque yo no tengo ojos de seguridad. Entonces no supe cómo hacer para finalizar mi pollito patito, hasta que de la nada vino a mi mente bordarle los ojitos con hilo negro y así hice, quedaron lindos pero no perfectos, por lo menos no se ven tan diferentes. Lo mismo hice con el pico, lo borde en medio de los ojitos.
Luego seguí tejiendo para terminar de hacerle el cuerpo al pollito patito, ahora iba de reversa, en la vuelta 14 hice tres puntos bajos y una disminución. A este punto ya lo estaba haciendo bien ya que estaba concentrada contando cada punto e intentado que quedara lo más perfecto posible, aunque al terminar me sentí muy cansada.
Para la vuelta 15 hice dos puntos bajos y una disminución, vuelta 16 un punto bajo y disminución. Y casi llegando al final rellene mi llavero de manera que quedara pachoncito, ya para la vuelta 17 hice sólo disminuciones, todas las disminuciones las hice tal cuales en el video, solo por la hebra delantera, esta disminución para los amigurumis se llama disminución invisible, si no me equivoco.
Luego termine cerrando el cuerpo del pollito y continúe haciendo las patitas y las alitas. Para las alitas hice un anillo mágico de 8 puntos bajos, cerré con un punto deslizado y de la misma manera hice las patitas lo único que cambie fue el color. Termine cociendo las partes al cuerpo y así quedo mi pollito patito finalizado.
Aunque siento que ha quedado algo pequeño e imperfecto siento que no me ha quedado nada mal. Una vez que le mostré el llavero a mi papa y a mi hermana ellos se enamoraron por completo del pollito patito, por lo que tuve que hacer más llaveros para ellos jaja.
Debo decir que hacer este proyecto me trajo nuevas ideas e iniciativas, una de ellas es empezar a hacer mi negocio sobre crochet y amigurumis. Por lo que hare mas llaveros y los promocionare donde estudio, donde posiblemente a alguien le interesen mis creaciones. Tan solo pensar en la idea de emprender mi negocio con el mundo del crochet me emociona, ahora que tengo la idea no la pienso dejar ir tan fácil.
Bueno gente hasta aquí el post de hoy, espero les haya gustado tanto como a mí, ¿Ustedes que opinan de mi llavero? Yo seguiré compartiendo por acá cada cosa que haga de amigurumis. No duden en dejarme algunos tips o consejos para así yo poder mejorar, con gusto los estaré leyendo. Las fotos fueron tomadas por mí. ¡Gracias por haber llegado hasta aquí, nos vemos la próxima!°˖✧◝(⁰▿⁰)◜✧˖°
No tengo mucho para comentar, pero paso para decir que amo los amigurumis 😍 sigan haciéndolos jejeje quedan preciosos! Buen trabajo 😃👍
Me alegra mucho que estés invirtiendo para mejorar tu técnica. Eso es lo más importante si deseamos avanzar. Yo también necesito hacerlo ya que estoy enganchada con el crochet 😁.
Tu pollito quedó muy tierno. Es un gran avance y que puedas apreciarlo tu misma es aún mejor.
Te felicito.
Te deseo muchos éxitos.
Que lindo 🤩, te felicito amiga @wuildariablox.
Hola que bonito te quedó la figura tejida, es un proceso darle la forma a través del tejido,muchas gracias por compartir en la comunidad.
Congratulations @wuildariablox! You have completed the following achievement on the Hive blockchain And have been rewarded with New badge(s)
Your next target is to reach 9000 upvotes.
You can view your badges on your board and compare yourself to others in the Ranking
If you no longer want to receive notifications, reply to this comment with the word
STOPCheck out our last posts:
Support the HiveBuzz project. Vote for our proposal!
Congratulations @wuildariablox! You received a personal badge!
You can view your badges on your board and compare yourself to others in the Ranking
Check out our last posts:
Support the HiveBuzz project. Vote for our proposal!