
English Version
Tambourine Made from Recycled Material
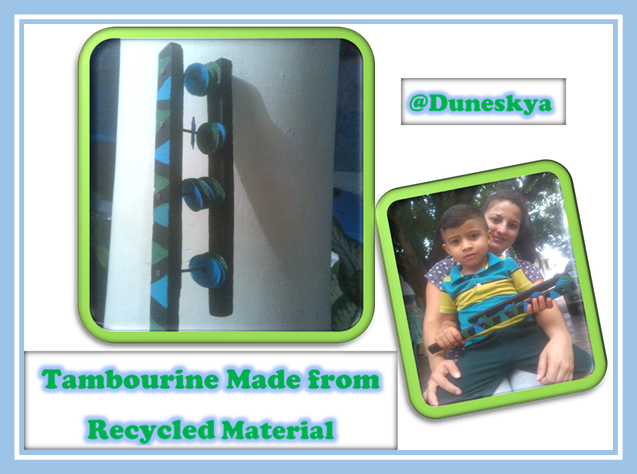
Hello dear friends of this SO creative community, today I want to share with you a tambourine that I made with my son, an activity that was sent to him from the school where he attends his second level. They asked him to make a musical instrument where the child will have to share with the family to play and dance.
My son and I decided on this very well known instrument, and why not share it with you?
We know that the tambourine is a percussion instrument, being one of the best known instruments in the world used in orchestras, schools or churches. Nowadays it is made of materials such as wood, metal, plastic, also using recyclable materials, even cardboard, I have seen them mostly in activities with children in schools.
This is a musical instrument in its structure has a kind of metal rattles that when hit with the hand or with any part of the body produces its sound.
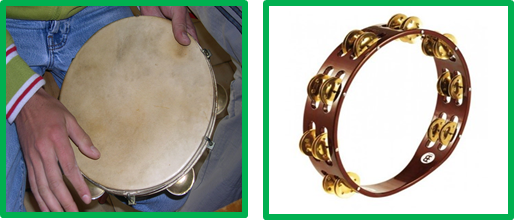
PHOTO TAKEN FROM THE WEB
When it appeared in the XVIII century, great composers used to make compositions integrating it with different instruments. Over the years it has been gaining its place around the world, by the way it carries the rhythm for its comfortable shape besides being light and small.
In ancient times, in different cultures it was said that it was an instrument that kept away evil spirits with its vibration, also gave more importance to the qualities of it to be interpreted than to its mystical abilities. Its name derives from the diminutive of pandera, that is, a pandera but smaller, which carries rattles that go around the edge of it. Another of the festivities in which this musical instrument became very popular especially in churches, also at Christmas it is a symbol of happiness and good vibes, because with it most of the Christmas carols are interpreted.
Ok after reading a little bit about the history of the Tambourine, let's proceed to see the step by step of my tambourine made with useful materials.
Materials to use:
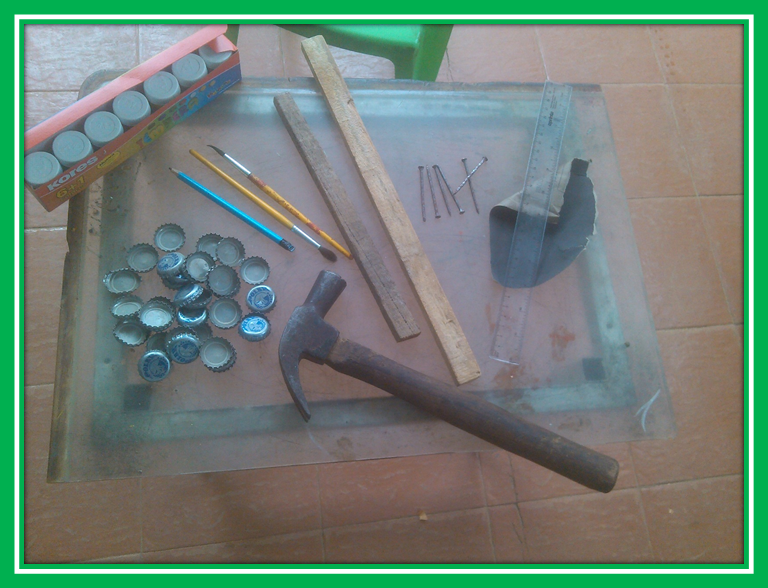
PHOTO OF MY PROPERTY
2 small pieces of wood of the size of your choice (the ones I used, one measures 40 cm and the other 30 cm) (body)
16 light metal lids (rattles)
Cold paint or tempera. Color of your preference.
Paintbrush
Hammer
Screwdriver
Nails (in my case I used 4 nails)
A piece of sandpaper
The tambourine consists of three elements that together make it what it is:
It has a BODY that can be constructed by different materials either wood or plastic or cardboard making use of material of profit as I commented above. Its size and shape can vary, as there are tambourines with semicircular bodies or with anti-slip handles.
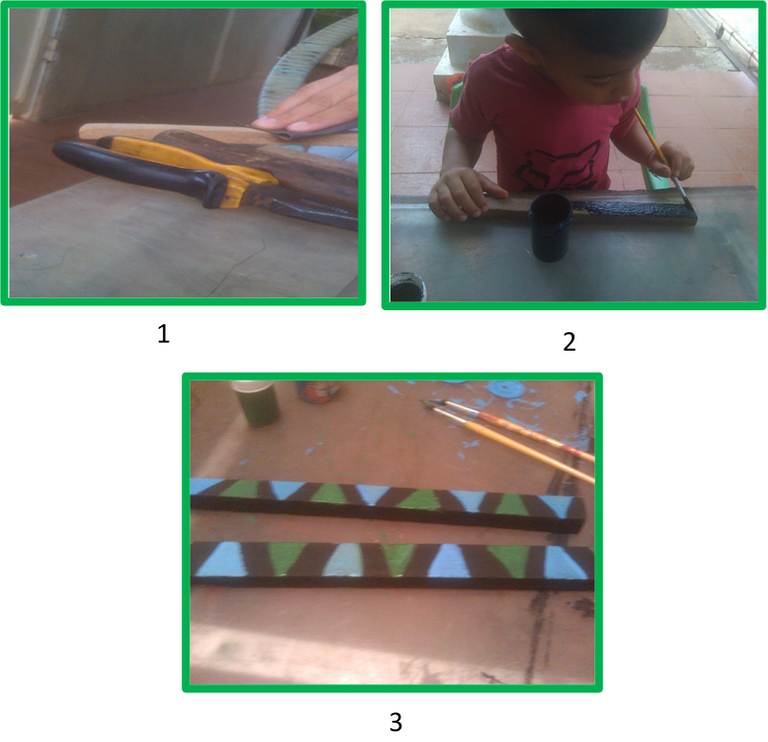
PHOTO OF MY PROPERTY
In this case I used wood and I made it vertically, first we sanded the wood, then we painted it black and when it dried we made some green and blue designs.
The membrane that covers the wooden body is made of leather and the next element that makes up the tambourine called Parche, is a synthetic material or leather, some tambourines do not carry this as it is not usually necessary.
In my tambourine I do not use this patch, as you can read it is not usually necessary.
The Sonajas are made of brass, copper or some light metal, which produce a good sound when shaking, being them the ones that make the characteristic sound.
I used metal caps (plates) of soda and other beverage very well known by all Venezuelans hahahaha.
With a pliers I opened more the edge of the caps so that when hitting it with the hammer it becomes easier to open completely and be as shown in image #4, then with a slotted screwdriver I opened a hole in the center of the lid.
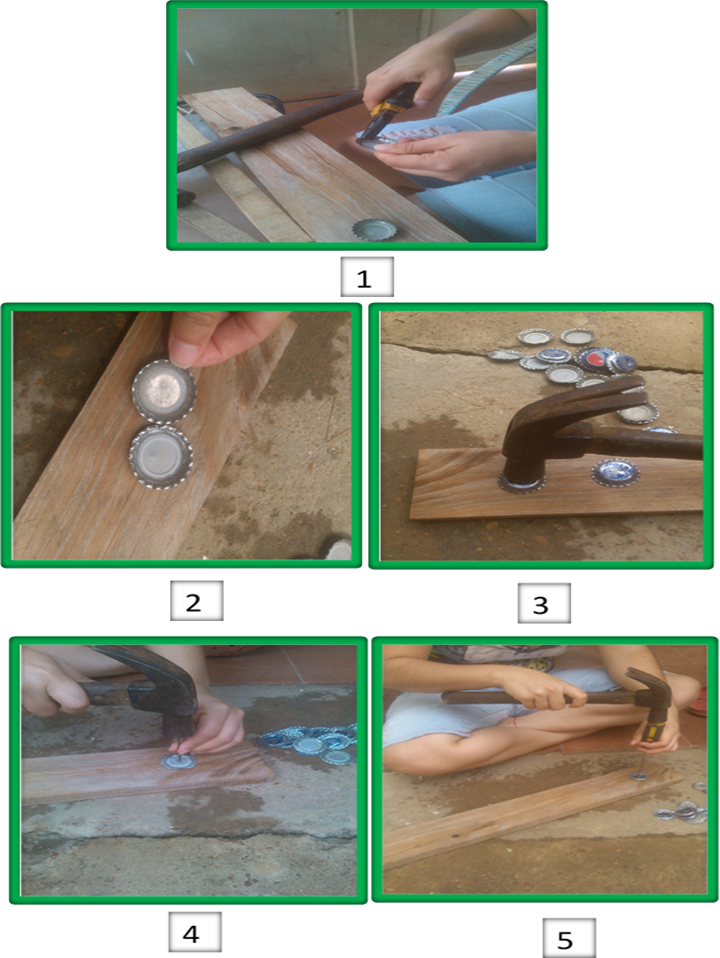
PHOTO OF MY PROPERTY
After that process we proceed to paint the lids, and let dry.
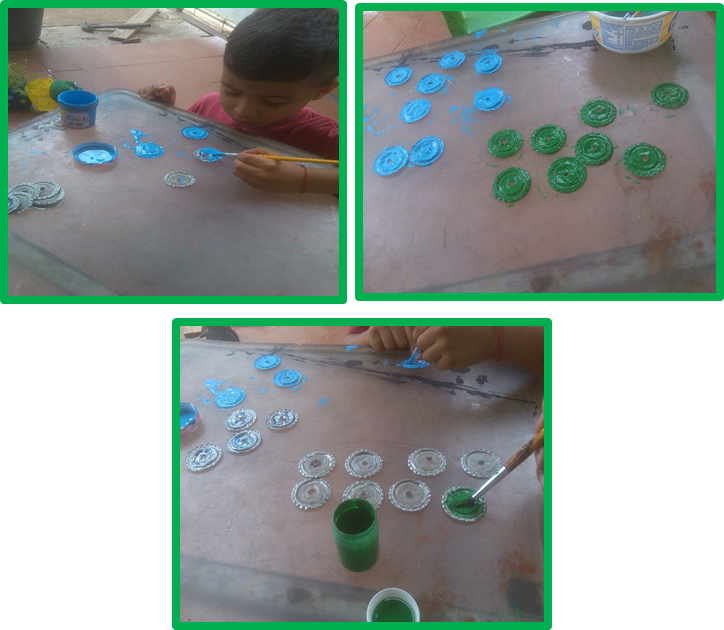
PHOTO OF MY PROPERTY
Here we begin to assemble the tambourine, we pierce the longest board with a nail and every 7 cm approximately we pierce again and place the other nail, and so on until we place the 4 nails. Then we place 4 caps on each nail as you can see in image #5. We take the shortest board to drill it with the 4 nails and close this instrument with recycled material at home.
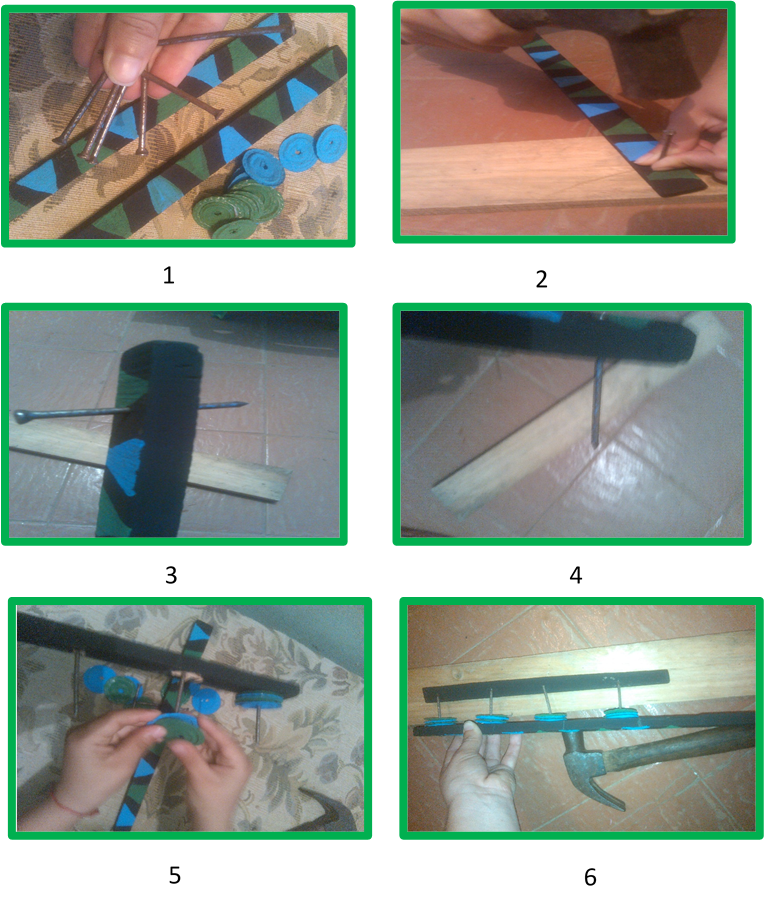
PHOTO OF MY PROPERTY
This instrument can be molded to the colors or tastes of whoever wants it, it is an easy instrument to play.
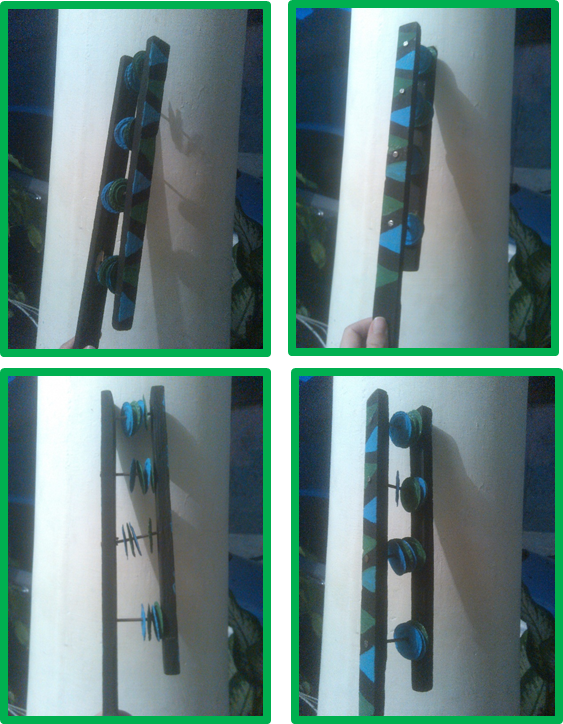
PHOTO OF MY PROPERTY
Here is our homemade tambourine.
I hope you like it friends of Hive. Until a new post.
Translated with www.DeepL.com/Translator (free version)
Version Español
Pandereta Elaborada Con Material Reciclado
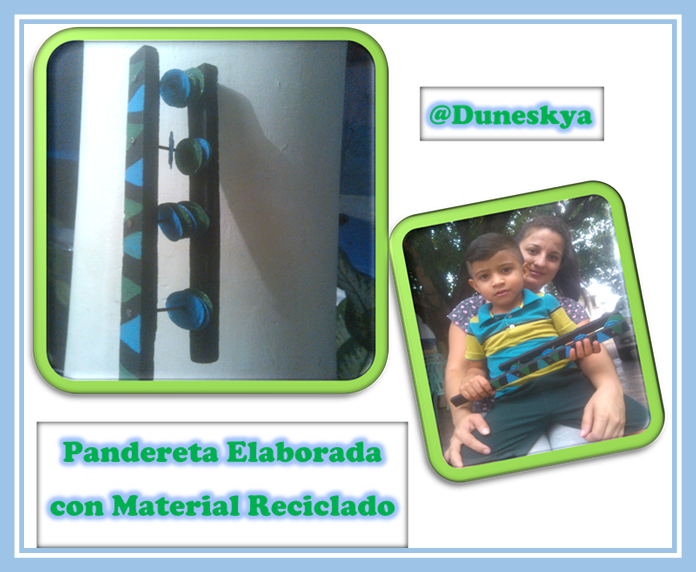
FOTO DE MI PROPIEDAD
Hola queridos amigos de esta comunidad TAN creativa hoy quiero compartir con ustedes una pandereta que hice con mi hijo, actividad que le mandaron desde la escuela donde cursa su segundo nivel. Ellos mandaron a elaborar algún instrumento musical donde después el niño tenga que compartir con la familia tocar y hacer bailes.
Mi hijo y yo nos decidimos por este instrumento muy conocido, y pues porque no compartirlo con ustedes.?
Sabemos que la pandereta es un instrumento de percusión, siendo uno de los más conocidos en todo el mundo usado en orquestas, en las escuelas o en iglesias. Hoy en día se fábrica de materiales como la madera, metal, plástico también haciendo uso de materiales reciclables hasta de cartón las he visto más que todo en actividades con niños en las escuelas.
Este es un instrumento musical en su estructura tiene una especie de sonajas metálicas que al golpearla con la mano o con cualquier partes del cuerpo produce su sonido.
FOTO TOMADA DE LA WEB
En su aparición en el siglo XVIII, grandes compositores realizaban trabajos de composición integrándola junto distintos instrumentos. A pasar de los años se ha ido ganando su puesto en todo el mundo, por la manera en la que lleva el ritmo por su forma cómoda ademas de ser liviana y pequeña.
En la antigüedad, en distintas culturas se decía que era un instrumento que alejaba los malos espíritus con su vibración, además daban más importancia a las cualidades de la misma para ser interpretada que a sus habilidades místicas. su nombre se deriva del diminutivo de pandera, es decir, una pandera pero más pequeña, que lleva unas sonajas que van en todo el borde de la misma. Otra de las festividades en las que se volvió muy popular este instrumento musical sobre todo en las iglesias, también en las navidades es un símbolo de felicidad y buena vibra, porque con él se interpretan mayoría de los villancicos.
Ok después de leer un poco sobre de historia de la Pandereta, procedemos a ver el paso a paso de mi pandereta hecha con material de provecho.
Materiales a usar:
FOTO DE MI PROPIEDAD
2 maderitas del tamaño de ud desee (Las que yo use una mide 40 cm y otra 30 cm) (cuerpo)
16 tapas de metal liviano (sonajas)
Pintura al frio o temperas. Color de su preferencia.
Pincel
Martillo
Destornillador de estría
Clavos (en mi caso use 4 clavos)
Un pedacito de lija
La pandereta consta de tres elementos que en conjunto la hacen lo que es:
Tiene un Cuerpo que puede ser construido por diferentes materiales ya sea de madera o plástico o de cartón haciendo uso de material de provecho como comente anteriormente. Su tamaño y forma puede variar, ya que existen panderetas con cuerpos de semicírculos o con mangos antirresbalantes.
FOTO DE MI PROPIEDAD
En este caso yo usé madera y la hice en forma vertical, en primer lugar lijamos la madera, luego la pintamos de color negro y esta al secar le hicimos unos diseños de color verde y azul.
La membrana que recubre al cuerpo de madera está hecha de piel y el siguiente elemento que conforma a la pandereta llamado Parche, es un material sintético o de cuero, algunas panderetas no lleva esto ya que no suele ser necesario.
En mi pandereta no use este parche, como pueden leer no suele ser necesario.
Las Sonajas están hechas de latón, cobre o algún metal liviano, que produzca un buen sonido al menearse, siendo ellas las que realizan el sonido tan característico.
Yo usé tapas (chapas) de metal de refresco y de otra bebida muy reconocida por todos los venezolanos jajajaja.
Con un alicate le abrí mas el borde a las tapas para que a la hora de golpearla con el martillo se haga mas fácil de abrir completamente y quedar como muestra la imagen #4 , luego con un destornillador de estría le abrí un hueco por el centro de la tapa.
FOTO DE MI PROPIEDAD
Después de ese proceso procedemos a pintar las tapas, y dejamos secar.
FOTO DE MI PROPIEDAD
Aquí comenzamos a armar la pandereta, perforamos la tabla mas larga con un clavo y cada 7 cm aproximadamente volvemos a perforar y colocamos el otro clavo, así sucesivamente hasta colocar los 4 clavos. Luego en cada clavo colocamos 4 tapas como pueden ver en la imagen #5. Tomamos la tabla mas corta para perforarla con los 4 clavos y cerrar este instrumento con material reciclado en casa.
FOTO DE MI PROPIEDAD
Este instrumento puede ser moldeable a los colores o gustos de quien la desee, es un instrumento fácil de tocar.
FOTO DE MI PROPIEDAD
Aquí lista nuestra pandereta hecha en casa.
Espero que les guste amigos de Hive. Hasta un nuevo post.
Hola!! Todo muy chévere, te felicito pero debes colocar la fuente de la web.
Estamos a la orden en el discord de @rutablockchain por si sientes que necesitas aclarar alguna inquietud.
https://discord.gg/syc3dFc
Gracias amiga por la observación.! Creo que la puse antes del subtitulo de "Materiales a usar"
Amiga, colocar "Foto tomada de la web" no es suficiente para citar la fuente. Debes colocar el enlace de la fuente. Así por ejemplo:
[Foto tomada de la web](aquí se coloca el enlace). Entre los corchetes lo que deseas escribir y entre los paréntesis va el link.
Fino.! Gracias