.png)
A warm greeting to all my Hive family, for me it is a great pleasure to participate in this excellent contest since one of my favorite passions is crafts, I love to create with useful materials, today I bring you an idea of a beautiful portrait holder and pencil holder at the same time on the occasion of fathers day, an initiative led by the friend @jennyzer, if you want to join here I will leave the publication, without further ado I will start with my step by step:
.png)
.png)
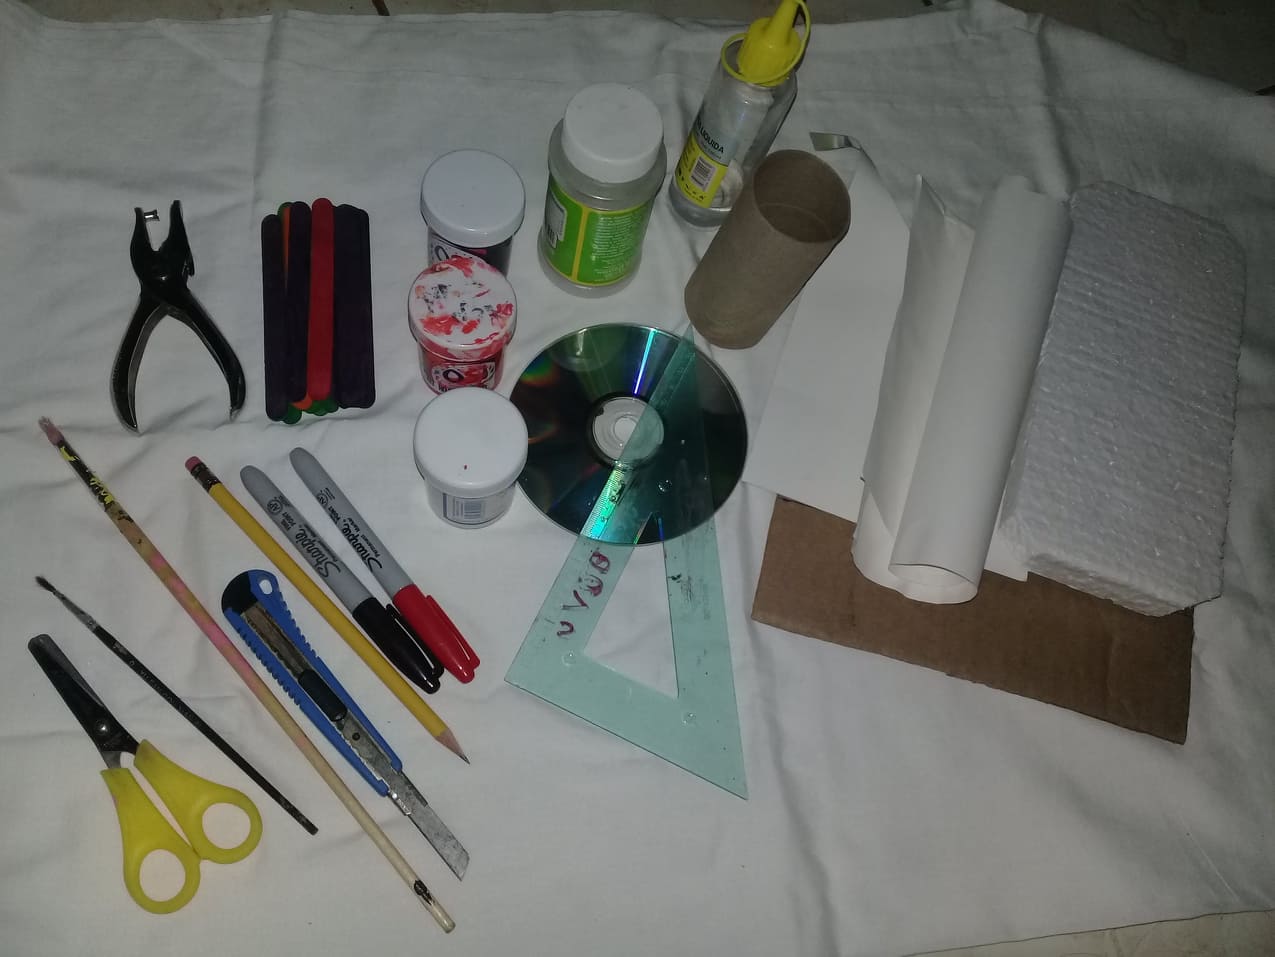
Materiales a utilizar son:
- Anime.
- Cartulina de color blanco y platinado.
- Tubo del papel higiénico.
- Silicon liquido.
- Cartón.
- Cd's.
- Una regla.
- Pintura de color blanco, negro y rojo.
- Paletas de maderas.
- Un cuter.
- Marcador de color negro.
- Un lápiz.
- Tijera.
- Pincel.
- Un envase de plástico.
Materials to be used are:
- Anime.
- White and platinum colored cardboard.
- Toilet paper tube.
- Liquid silicon.
- Cardboard.
- Cd's.
- Ruler.
- White, black and red paint.
- Wooden pallets.
- A cutter.
- Black marker.
- A pencil.
- Scissors.
- Paintbrush.
- A plastic container.

.png)
Paso 1: Lo primero que vamos hacer es picar el anime con las siguientes medidas 24.5 centímetros de ancho y 11.5 centímetros de largo, formando un rectángulo que sera la base de nuestro adorno. Cuando te recortado lo pintamos de color negro y lo dejaremos secar.
Step 1: The first thing we are going to do is to cut the anime with the following measures 24.5 centimeters wide and 11.5 centimeters long, forming a rectangle that will be the base of our ornament. When you cut it out we paint it black and let it dry.
.png)
Paso 2: Para empezar hacer el porta retrato, recortaremos dos laminas cuadradas de 11.5 centímetros de largo y 11.5 centímetros de ancho, que serán la parte de atrás y la parte del frente del porta retrato a una de ellas le dejaremos un margen de 1.5 centímetros en cada uno de sus lados, ayudándonos con el cuter a recortar el cuadro del centro.
Step 2: To start making the portrait holder, cut out two square sheets 11.5 centimeters long and 11.5 centimeters wide, which will be the back and the front of the portrait holder, leaving a margin of 1.5 centimeters on each of its sides, helping us with the cutter to cut out the square in the center.
.png)
Paso 3: Cuando ya tengamos la parte del frente recortada, pintamos de color rojo la parte de atrás y la del frente del porta retrato, la dejamos secar y cuando este seco le pegamos las paletas con silicon liquido a la parte del frente. Luego una de las paletas la picamos por la mitad que la utilizaremos como apoyo de nuestro porta retrato.
Step 3: When we have the front part cut out, we paint the back and the front part of the portrait holder red, let it dry and when it is dry we glue the pallets with liquid silicone to the front part. Then we cut one of the pallets in half and use it as a support for our portrait holder.
.png)
Paso 4: Luego unimos las partes del porta retrato la del frente y la de atrás pegándola con silicon liquido, de esta manera ya tenemos listo nuestro porta retrato.
Step 4: Then we join the front and back parts of the portrait holder by gluing it with liquid silicone, in this way we have our portrait holder ready.
.png)
Paso 5: Para hacer el carro de carrera, vamos a pintar el tubo de papel higiénico por fuera de color rojo o de tu preferencia, lo dejamos secar. Mientras tanto en la cartulina donde vamos hacer las ruedas pintamos el lateral de color negro.
Step 5: To make the race car, we are going to paint the outside of the toilet paper tube in red or any color you prefer, let it dry. Meanwhile on the cardboard where we are going to make the wheels we paint the side in black.
.png)
Paso 6: Cuando ya este seco el tubo, en la parte central del tubo del papel higiénico vamos a dibujar un rectángulo y con un cuter lo recortaremos con muco cuidado sin romper, Sin votar lo que recortamos porque lo vamos a reservar para usarlo como el para brisas del carro.
Step 6: When the tube is dry, in the central part of the toilet paper tube we will draw a rectangle and with a cutter we will cut it very carefully without breaking it, without voting what we cut because we will reserve it to use it as the breezes of the car.
.png)
Paso 7: Para hacer las ruedas, nos vamos a basar al tamaño de una tapa o con que se le haga mas fácil a ustedes, recortamos 4 ruedas. Ahora para hacer la parte del centro de la rueda vamos a utilizar cartulina blanca, estos círculos deben ser un poco mas pequeños que las ruedas, lo pegamos con silicon liquido al terminar.
Step 7: To make the wheels, we are going to base them on the size of a lid or whatever is easiest for you, cut out 4 wheels. Now to make the center part of the wheel we are going to use white cardboard, these circles should be a little smaller than the wheels, we glue it with liquid silicone at the end.
.png)
Paso 8: Al ya tener las ruedas lista la pegamos en el tubo del papel higiénico con mucho cuidado que estén al mismo nivel en forma vertical. Ahora con el rectángulo que reservamos lo doblamos y pegamos la mitad hacia adentro y la otra parte quedara hacia fuera formando así el para brisa de nuestro carro. También en otro circulo mas pequeño dibujamos el volante y con el marcador negro lo rellenamos.
Step 8: Once we have the wheels ready we glue them on the toilet paper tube being very careful that they are at the same level vertically. Now with the rectangle that we reserved we fold it and glue half inward and the other part will be outward thus forming the breeze stop of our car. Also in another smaller circle we draw the steering wheel and with the black marker we fill it.
.png)
Paso 9: Ya terminado el carro lo empezamos adornar a nuestra manera, en mi caso con la pintura blanca le hice dos flechas y con el marcador negro le hice el numero 1 y un rayo.
Step 9: Once the car is finished we start decorating it in our own way, in my case with the white paint I made two arrows and with the black marker I made the number 1 and a lightning bolt.
.png)
Paso 10: Para realizar el portalapices, empezamos picando la parte de arriba del embace de plástico dejándolo de la manera que le muestro en la imagen, luego lo pintamos de color rojo la parte de abajo y el borde de la parte de arriba, dejando un espacio en el centro que lo pintaremos de color negro, al terminar lo dejamos secar muy bien.
Step 10: To make the pencil holder, we start chopping the top of the plastic bag leaving it as shown in the image, then we paint red the bottom and the edge of the top, leaving a space in the center that we will paint it black, at the end we let it dry very well.
.png)
Paso 11: Al ya tener el porta retrato, el portalapices y el carro de carrera listo, empezamos armar nuestro adorno pegándolos cada unos de ellos en la base, luego lo adornamos a nuestra manera en mi caso recorte unos bigotes, un banderín, unas estrellas de color negro y platinado, varios pedazos de Cd's.
Step 11: Once we have the portrait holder, the pencil holder and the race car ready, we start assembling our ornament by gluing each of them on the base, then we decorate it in our own way, in my case I cut out some mustaches, a pennant, some black and platinum stars, several pieces of CDs.
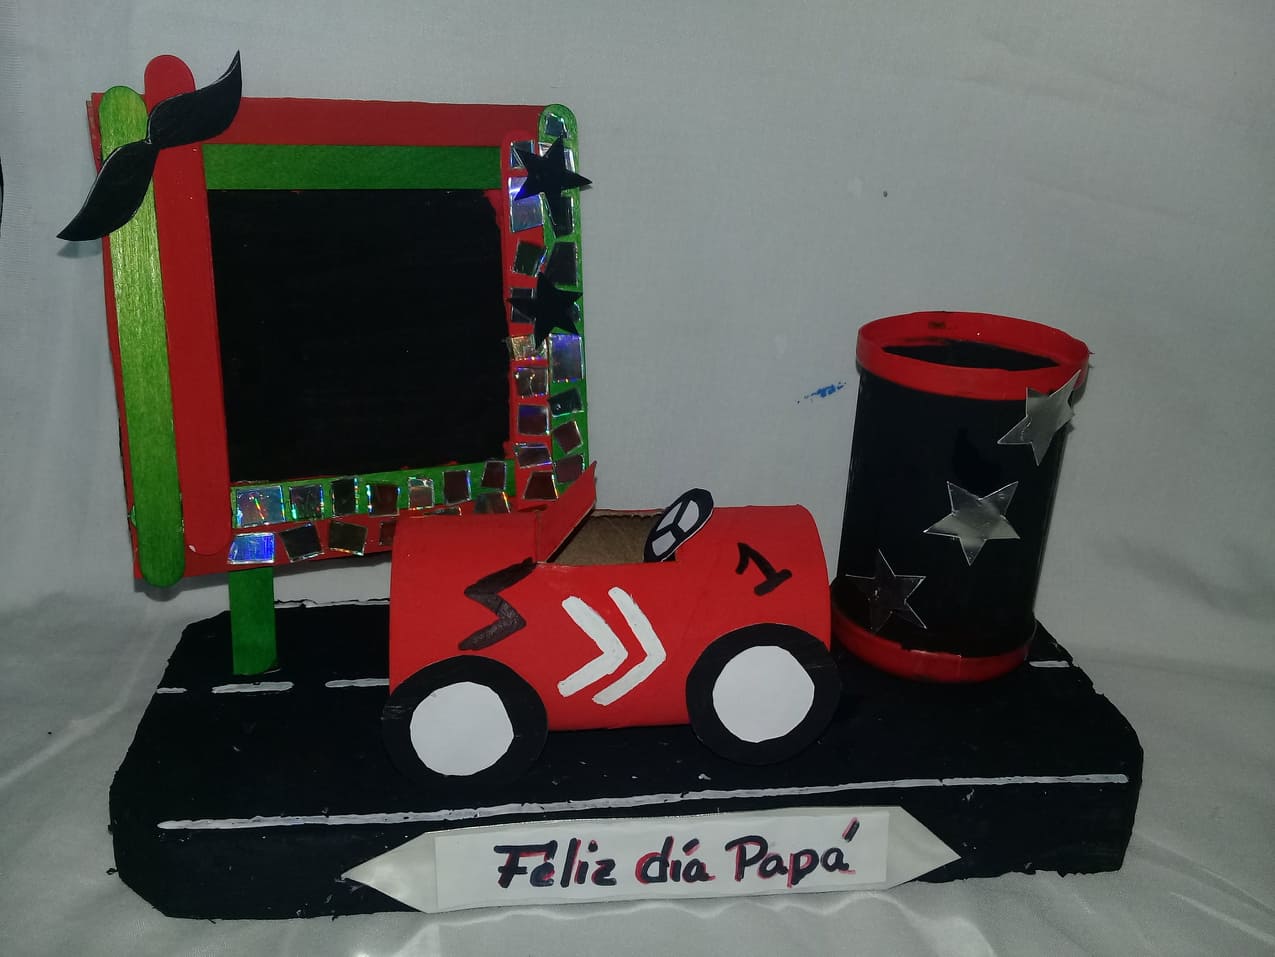
Friends this was my result a beautiful pencil holder and portrait holder at the same time for those fathers fighters, is perfect for multiple use to give that special day, I hope you liked it there as much or more than me, thanks for reading my post, greetings and blessings until a next publication.

Cuanta creatividad, algo que me encanta de tus tutoriales es la gran cantidad de materiales de provecho que utilizas, esa es la finalidad de esta iniciativa reutilizar lo más que podamos, una manualidad bien pensada y realizada, agradezco tu participación.
Muchas gracias amiga @jennyzer, estoy de acuerdo contigo la idea es esa mientra mas materiales de provecho utilizamos es mucho mejor.
Excelente trabajo amiga, concuerdo con la opinión de @jennyzer. Hemos visto con preocupación una cantidad importante de publicaciones de este tipo que no muestran el compromiso que amerita montar un blog en Hive. Tu trabajo demuestra empeño, preparación y planificación en el desarrollo del proyecto. Te felicito por eso!
Por cierto, cualquier papá estaría feliz de recibir este tremendo regalo.
Gracias amigo @yannathag, para mi es un placer hacer este tipo de arte.
Un abrazo.