¡Saludos queridos compañeros artesanos! Hoy les queremos compartir una mañera fácil y rápida de realizar un bouquet de flores hecho mediante distintos frutos, hojas, flores y semillas secas los cuales gracias a las pinturas y otros materiales este se pudo moldear hasta tomar la forma de un colorido ramo de flores acompañado con pequeñas mariquitas de diversos colores.
Greetings dear fellow artisans! Today we want to share with you a quick and easy way to make a bouquet of flowers made from different fruits, leaves, flowers and dried seeds which, thanks to paints and other materials, could be molded into a colorful bouquet of flowers accompanied by with small ladybugs of different colors.
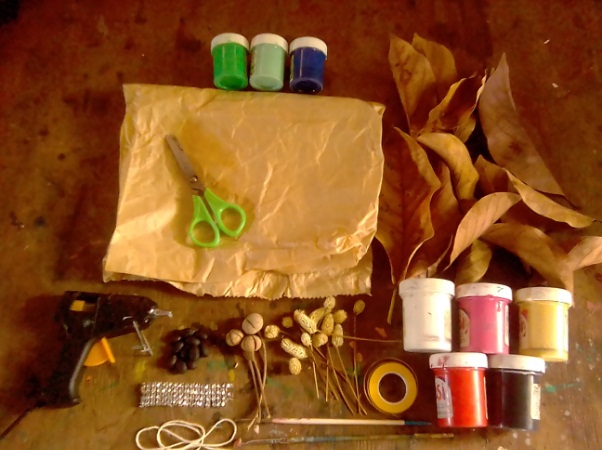
Materiales:
- Pinturas al frio en os colores verde neón, turquesa, azul, blanco, rosa, amarillo, rojo y negro.
- Bolsa de papel.
- Tijera.
- Hojas de árbol secas (aguacate)
- Pistola de silicón.
- Semillas.
- Cadena de lentejuelas.
- Cordel.
- Pinceles.
- Cinta de color amarillo.
- Palitos.
- Flores secas (espigas)
- Frutos de Caobo.
Materials:
- Cold paints in the colors neon green, turquoise, blue, white, pink, yellow, red and black.
- Paper bag.
- Scissor.
- Dried tree leaves (avocado)
- Silicone gun.
- Seeds.
- Chain of sequins.
- Twine.
- Brushes.
- Yellow ribbon.
- Sticks.
- Dried flowers (spikes)
- Mahogany Fruits.
Elaboración:
Elaboration:
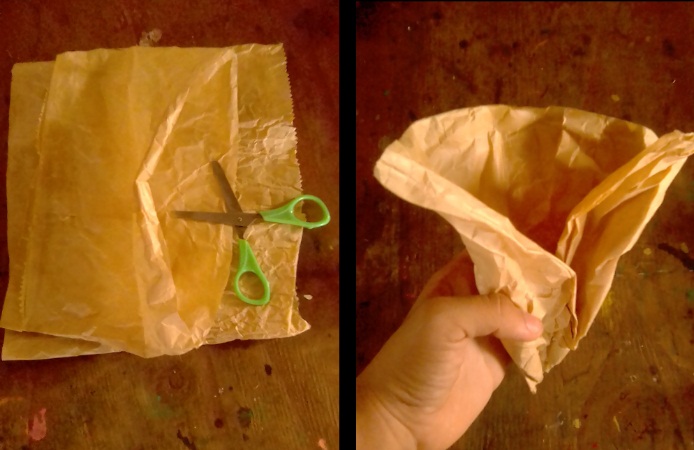
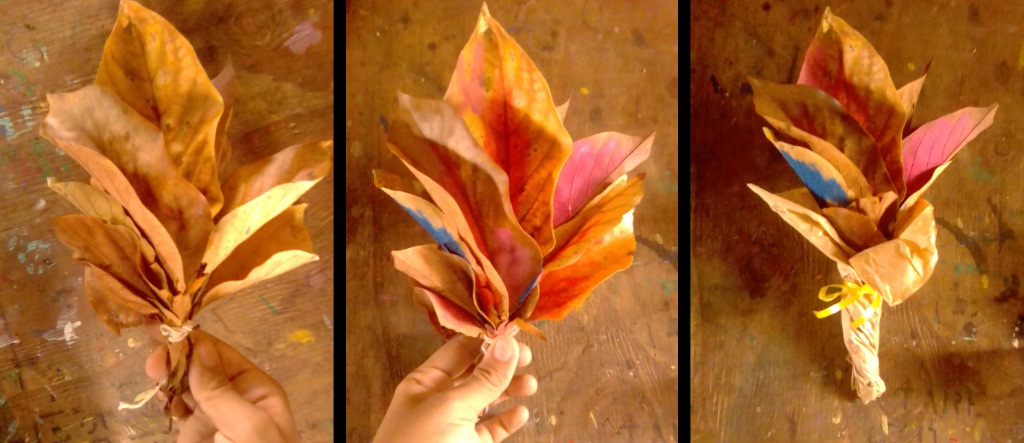
Iniciamos recortando a la mitad la bolsa de papel, luego la doblamos y le daremos la forma del envoltorio donde colocaremos las flores que armaremos más adelante.
We start by cutting the paper bag in half, then we fold it and we will give it the shape of the wrapper where we will place the flowers that we will assemble later.
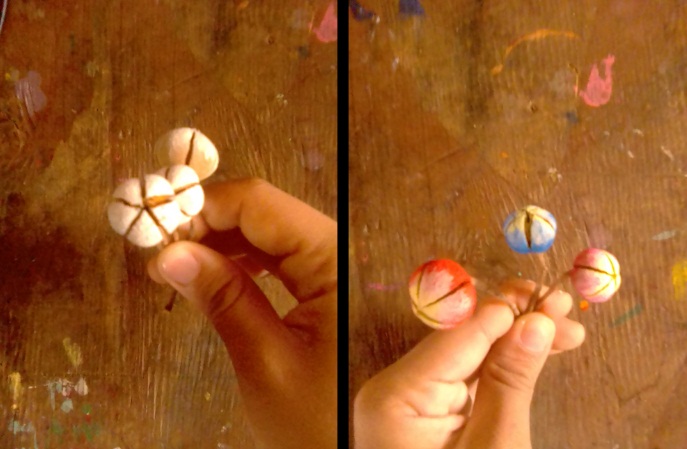
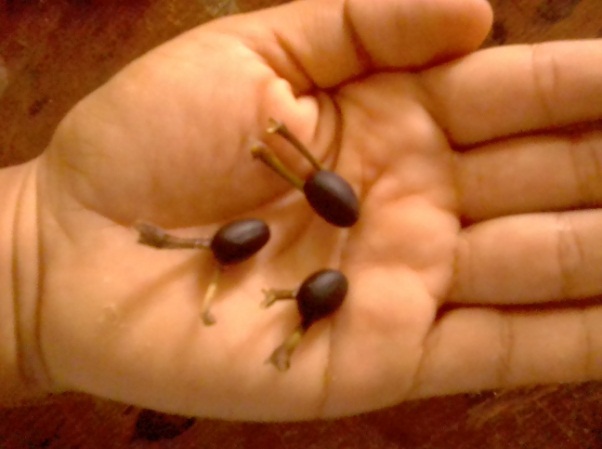
Ahora utilizaremos los frutos de los Caobos, las cuales tienen un gran parecido a unas pequeñas florecillas, primero las pintamos en blanco luego le agregamos a cada una distintos matices en azul, rojo y rosa con el dicho centro en amarillo.
Now we will use the fruits of the Caobos, which have a great resemblance to small flowers, first we paint them white then we add different shades of blue, red and pink to each one with the said center in yellow.
A continuación uniremos cierta cantidad de hojas y las ajustamos con el cordel, este arreglo de hojas secas serán la base de nuestro ramo natural, luego matizamos las hojas entre los colores azul, rojo y rosa, esto lo hará más colorido y vistoso al mismo tiempo, después le colocaremos la envoltura junto con la cinta para que se vea bonito.
Next we will join a certain amount of leaves and adjust them with the string, this arrangement of dry leaves will be the base of our natural bouquet, then we will shade the leaves between the colors blue, red and pink, this will make it more colorful and eye-catching at the same time , then we will put the wrapper along with the ribbon to make it look nice.
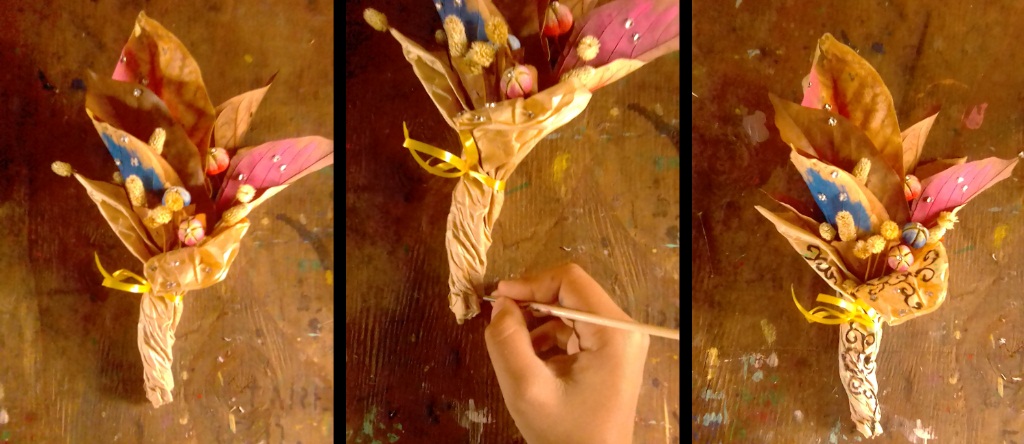
Para este paso utilizaremos algunas semillas para pegarle dos palitos en forma de antenas, de esta forma tendremos listos los cuerpos de las mariquitas.
For this step we will use some seeds to stick two sticks in the shape of antennas, in this way we will have the bodies of the ladybugs ready.
Ya finalizado el paso anterior, desarmamos la cadena de lentejuelas y las pegamos en diferentes zonas del arreglo, después le agregaremos las florecillas de caobo y las flores secas que teníamos reservadas para ello, con la pintura negra decoramos la envoltura con un diseño de “arabescos”.
Once the previous step is finished, we disassemble the chain of sequins and paste them in different areas of the arrangement, then we will add the mahogany flowers and the dried flowers that we had reserved for it, with the black paint we decorate the wrapper with an "arabesque" design.
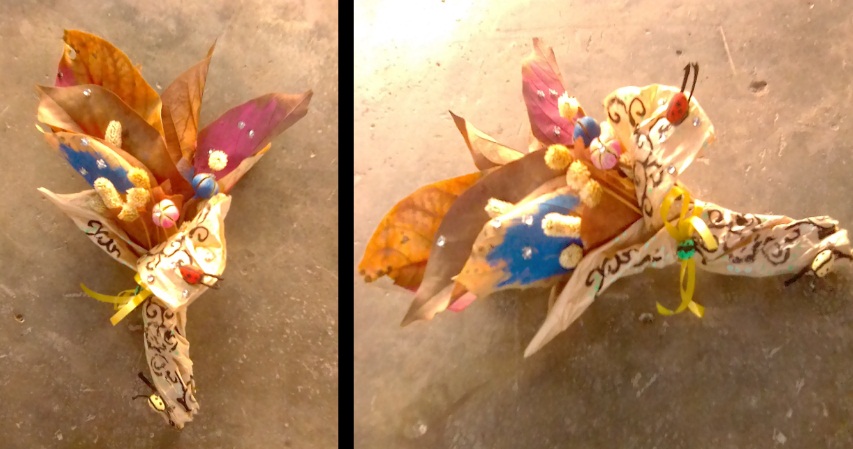
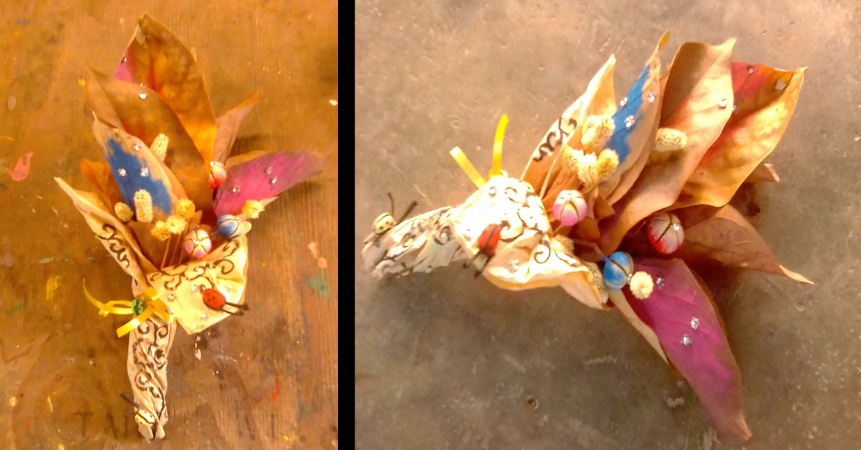
Con las pinturas verde neón, rojo, amarillo y negro, teñimos las mariquitas y las colocaremos en el envoltorio ¡Y este sería el resultado final! 😉 Ahora podemos regalar o bien decorar nuestro hogar con este original y natural arreglo de flores y semillas.
With the neon green, red, yellow and black paints, we dye the ladybugs and place them in the wrapper. And this would be the final result! 😉 Now we can give or decorate our home with this original and natural arrangement of flowers and seeds.
Espero que les haya gustado el post del día de hoy, les agradezco por visitarnos y darnos su apoyo y nos vemos en una nueva y fascinante publicación ¡que tengan un feliz día!
I hope you liked today's post, I thank you for visiting us and giving us your support and see you in a new and fascinating publication, have a happy day!
.jpg)
💜 Las fotografías 📷 son de nuestra autoria y fueron tomadas con un teléfono inteligente (ZTE Blade L130) y editadas en Paint y Paint Tool SAI por @albakriz.
💜 The photographs 📷 are of our authorship and were taken with a smartphone (ZTE Blade L130) and edited in Paint and Paint Tool SAI by @albakriz.
💜 Traducción: traductor de Google.
💜 Translation: translate Google.
Thank you for sharing this amazing post on HIVE!
Your content got selected by our fellow curator @rezoanulvibes & you just received a little thank you via an upvote from our non-profit curation initiative!
You will be featured in one of our recurring curation compilations and on our pinterest boards! Both are aiming to offer you a stage to widen your audience within and outside of the DIY scene of hive.
Join the official DIYHub community on HIVE and show us more of your amazing work and feel free to connect with us and other DIYers via our discord server: https://discord.gg/mY5uCfQ !
If you want to support our goal to motivate other DIY/art/music/homesteading/... creators just delegate to us and earn 100% of your curation rewards!
Stay creative & hive on!