Hola amigos amantes de la creatividad!.🍄🍄
Hello friends who love creativity!.🍄🍄
Welcome to my blog!.
Feliz día para todos! Les envio un gran saludo desde mi hogar, deseandoles que puedan tener un feliz día lleno de muchas bendiciones.
Dandole las gracias a Dios por regalarme un nuevo día y así poder compartir con todos ustedes a través de esta gran plataforma. Hoy quiero presentarles un tutorial donde haremos un lindo topper.
Happy day for everyone! I send you a big greeting from my home, wishing you a happy day full of many blessings.😊 Thanking God for giving me a new day so I can share it with all of you through this great platform. Today I want to present you a tutorial where we will make a cute topper.
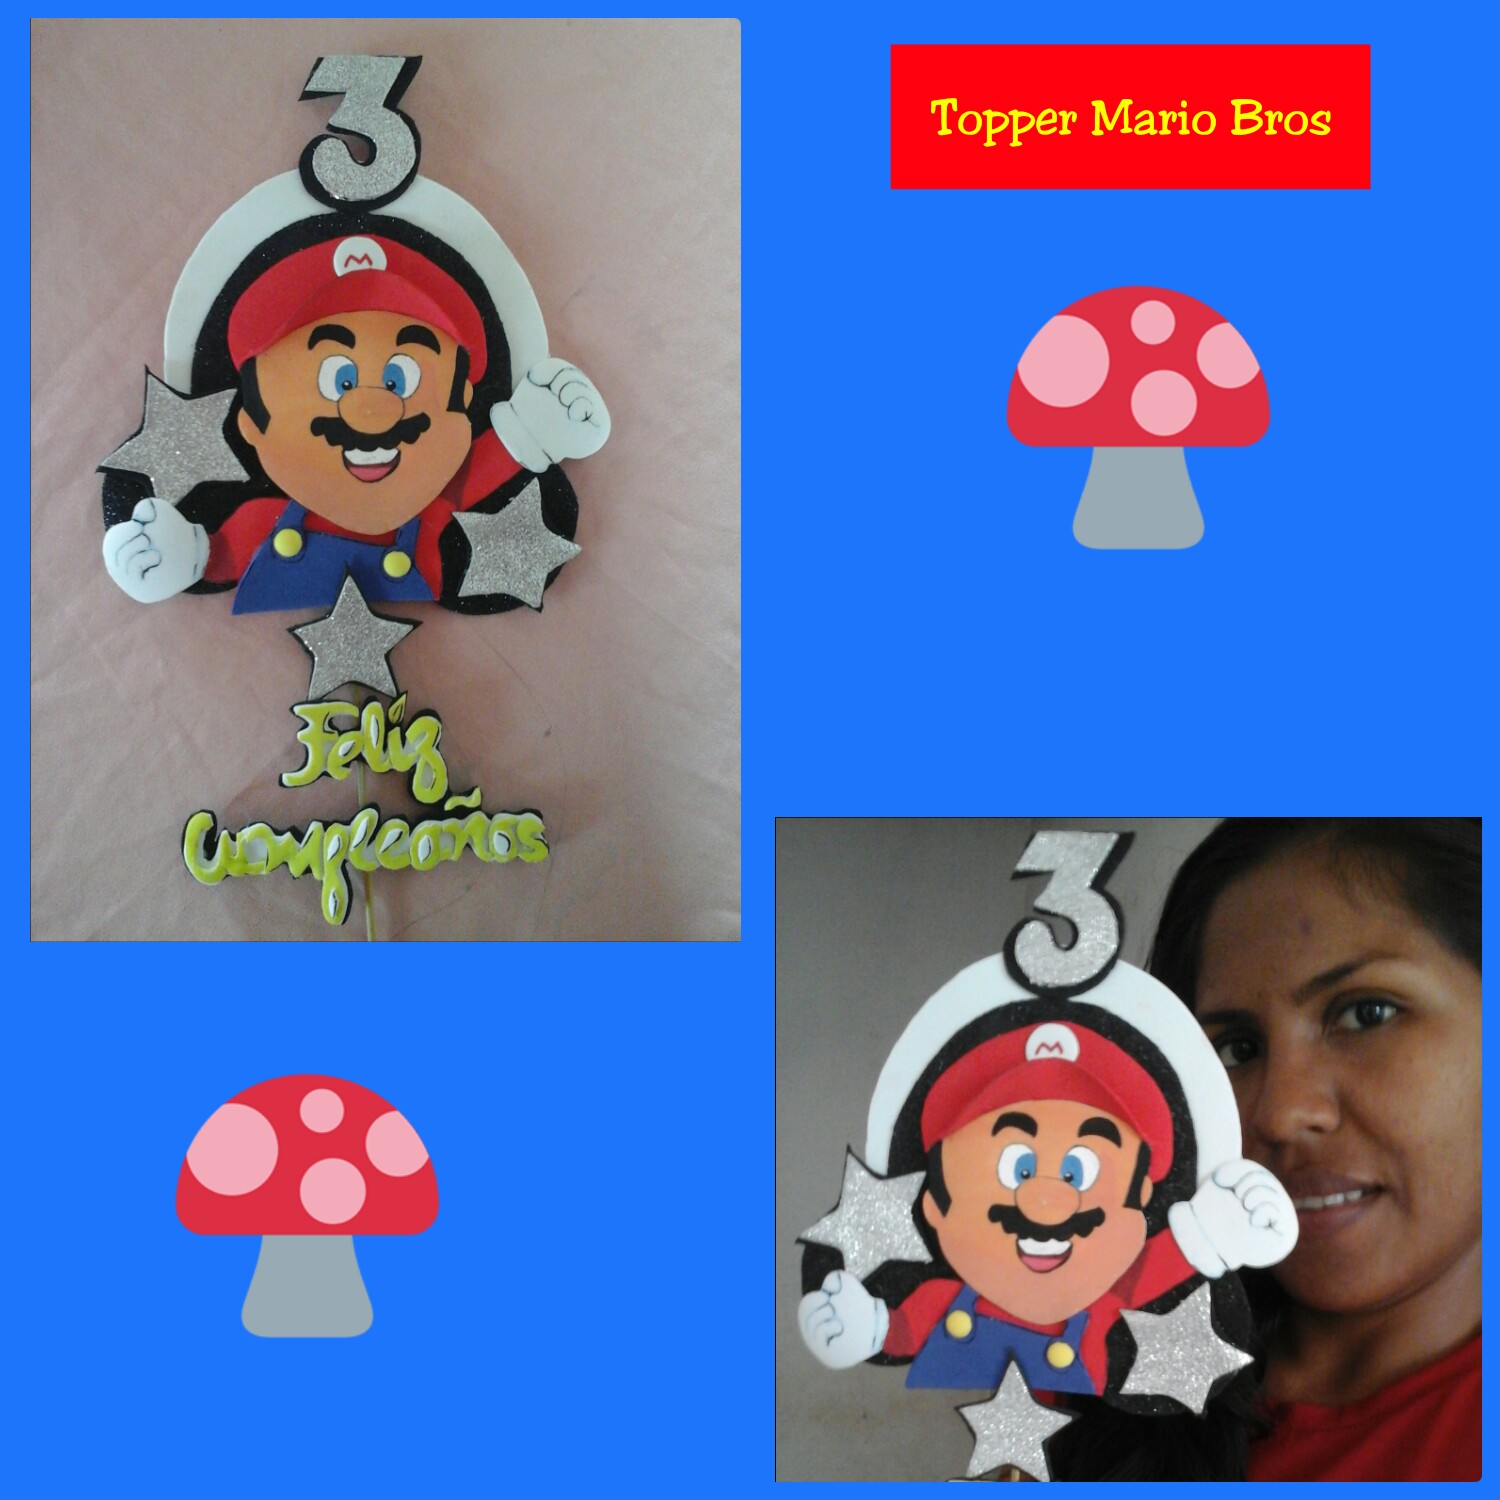
Como se acerca el cumpleaños de mi principito quise hacer un lindo topper de este personaje de videojuegos como lo es Mario Bros. En lo personal me encanta, ya que es un clásico que todos recordamos, hoy en día gracias a la tecnología es una versión mejorada.
As my little prince's birthday is coming up, I wanted to make a nice topper of this video game character like Mario Bros. Personally, I love it, since it is a classic that we all remember, today thanks to technology it is an improved version .
Es por eso que hoy les quiero presentar mi trabajo donde les mostraré el paso a paso para hacer este lindo topper de Mario Bros. Si también te gusta para los cumpleaños de tus hijos, puedes tomar mi idea y hacerlo en casa y poner tu toque personal. Los invito a seguirme hasta el final de mi trabajo.
That is why today I want to present you my work where I will show you the step by step to make this cute Mario Bros topper. If you also like it for your children's birthdays, you can take my idea and do it at home and put your personal touch . I invite you to follow me until the end of my work.
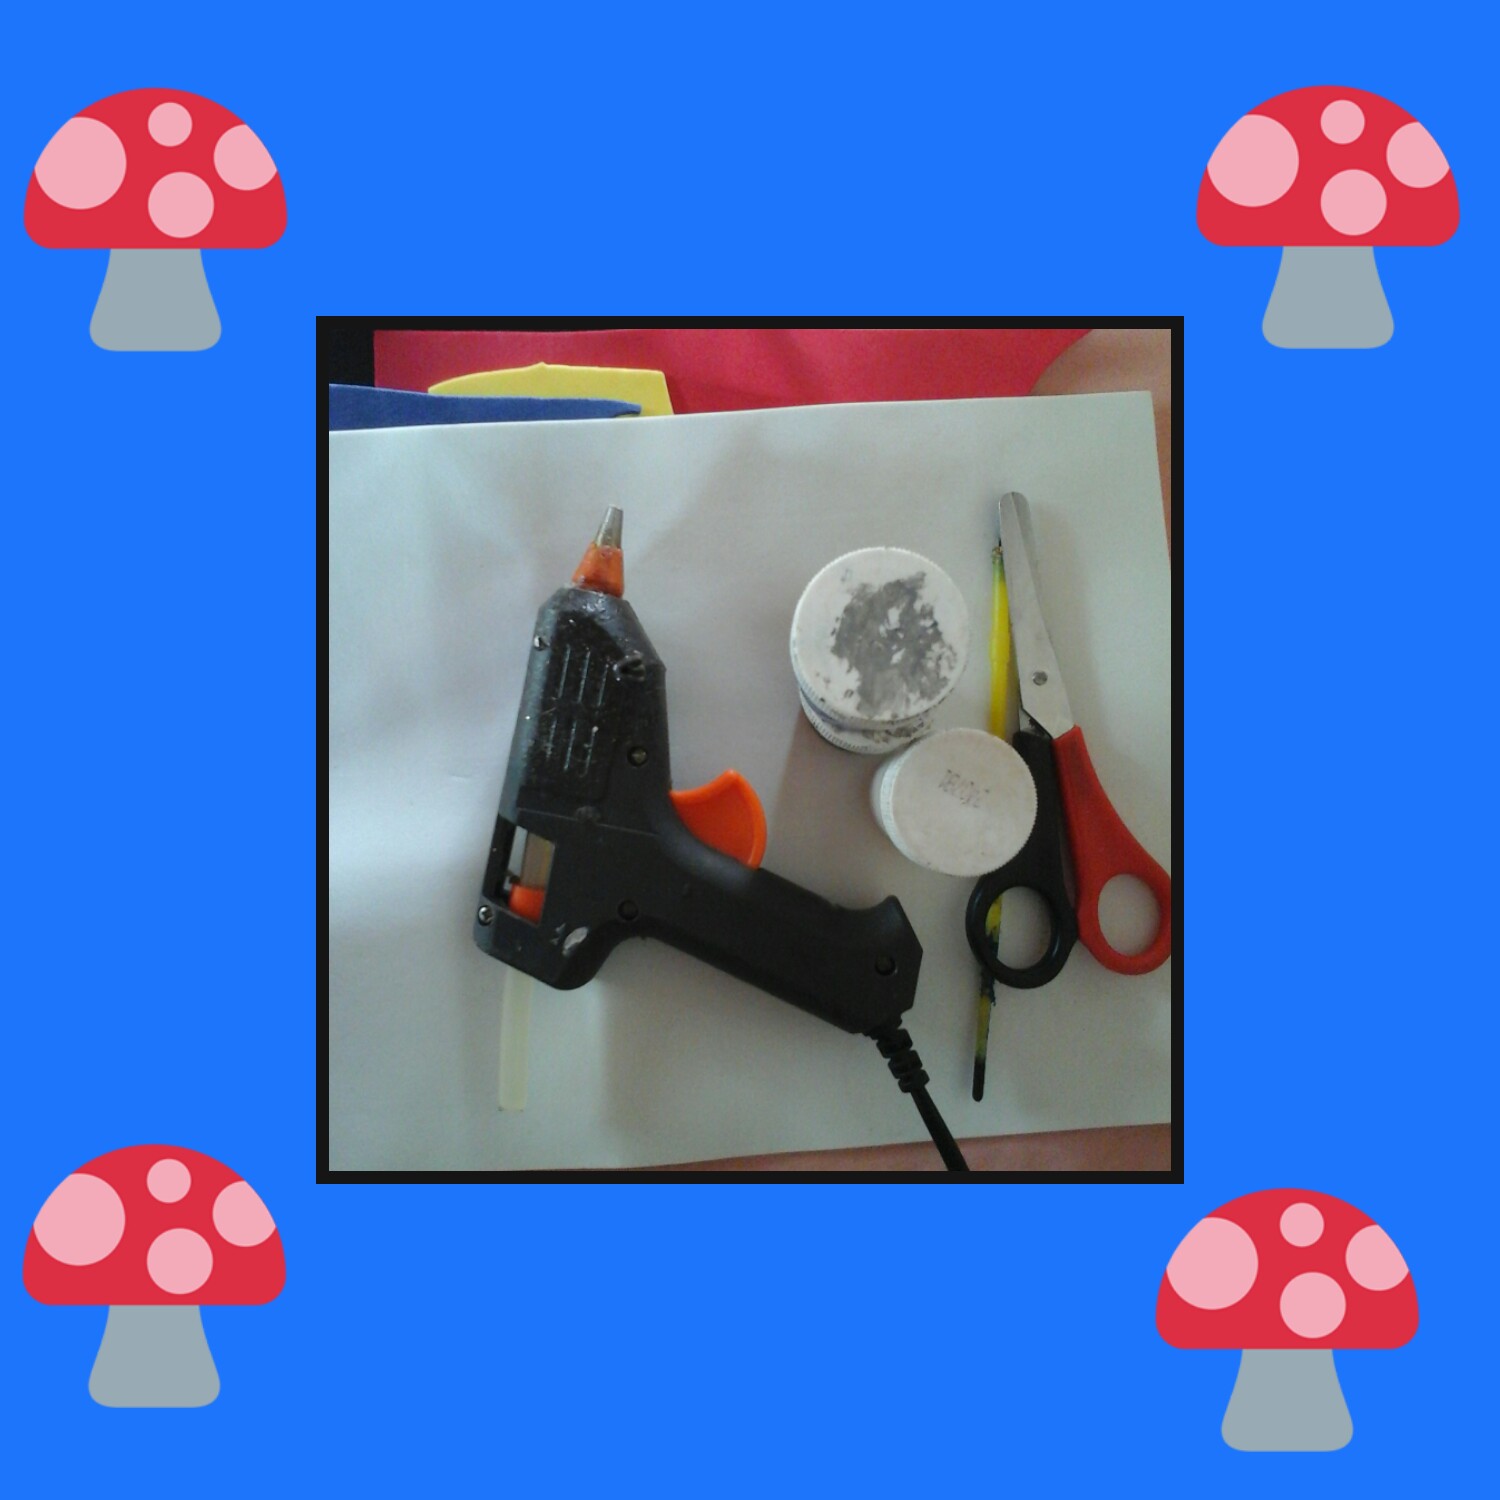
Para elaborar este lindo topper necesitaremos los siguientes materiales.
To make this cute topper we will need the following materials.
Materiales:
- Foami color (piel, rojo, blanco, amarillo, negro, azul y plateado).
- Pistola y barra de silicon.
- Tijera.
- Lápiz.
- Pintura y pincel.
- Palillo de madera.
- Hoja de papel.
Materials:
- Foami color (skin, red, white, yellow, black, blue and silver).
- Gun and silicone bar.
- Pair of scissors.
- Pencil.
- Paint and brush.
- Wooden stick.
- Paper sheet.
Comencemos.
let's start.
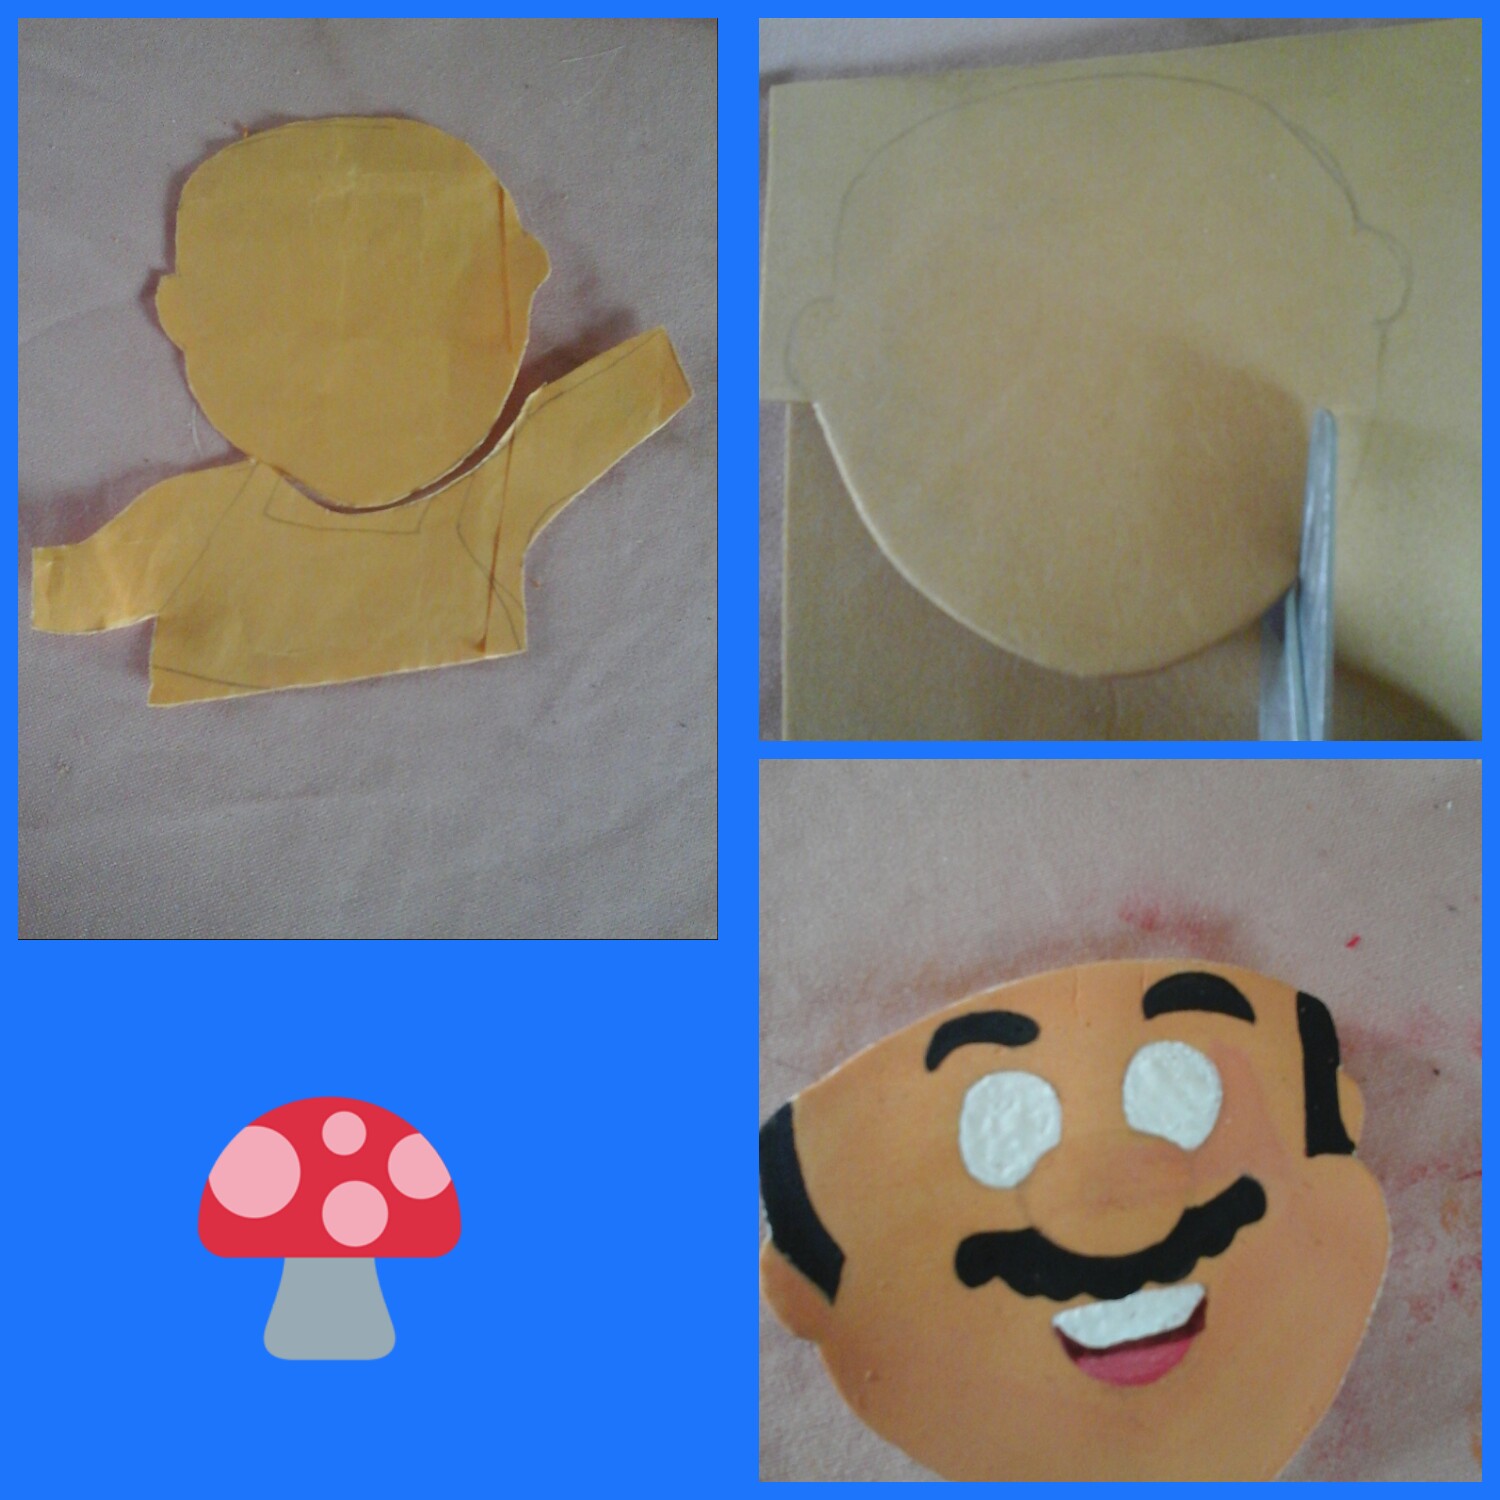
Primer paso.
Para comensar tomamos un pedazo de hoja de papel, dibujamos el rostro y el busto de Mario, recortamos, este servirá como patrón. Sobre un pedazo de foami color piel colocamos el patrón, marcamos y recortamos. De esta manera obtenemos el rostro.
Una vez que tengamos lista nuestra pieza, procedemos a pintar los ojos, nariz, boca, cejas y bigote.
First step.
To start we take a piece of paper, draw Mario's face and bust, cut it out, this will serve as a pattern. On a piece of skin-colored foami we place the pattern, mark it and cut it out. In this way we get the face. Once we have our piece ready, we proceed to paint the eyes, nose, mouth, eyebrows and mustache.
Segundo paso.
Second step.
En este paso tomamos un trozo de papel y dibujamos el gorro haciendo un pequeño arco y una media luna, colocamos estos patrones sobre foami rojo para marcarlos y recortarlos, así tendremos las piezas para armar el gorro.
In this step we take a piece of paper and draw the hat making a small arc and a crescent, we place these patterns on red foami to mark and cut them out, so we will have the pieces to assemble the hat.
Para hacer la braguita y el sweater rojo tomamos el patrón y lo colocamos sobre foami rojo y azul hacemos el mismo procedimiento, marcamos y recortamos así obtenemos estas piezas.
To make the red panties and sweater we take the pattern and place it on red and blue foami we do the same procedure, we mark and cut out so we obtain these pieces.
Como podrás observar la pieza que ira debajo de la braga, le deje unos centímetro que sobra para poder pegar la cabeza de este personaje. Finalmente recorta un par de guantes de foami blanco.
As you can see the piece that will go under the panties, I left a few centimeters left over to be able to glue the head of this character. Finally cut out a pair of white foami gloves.

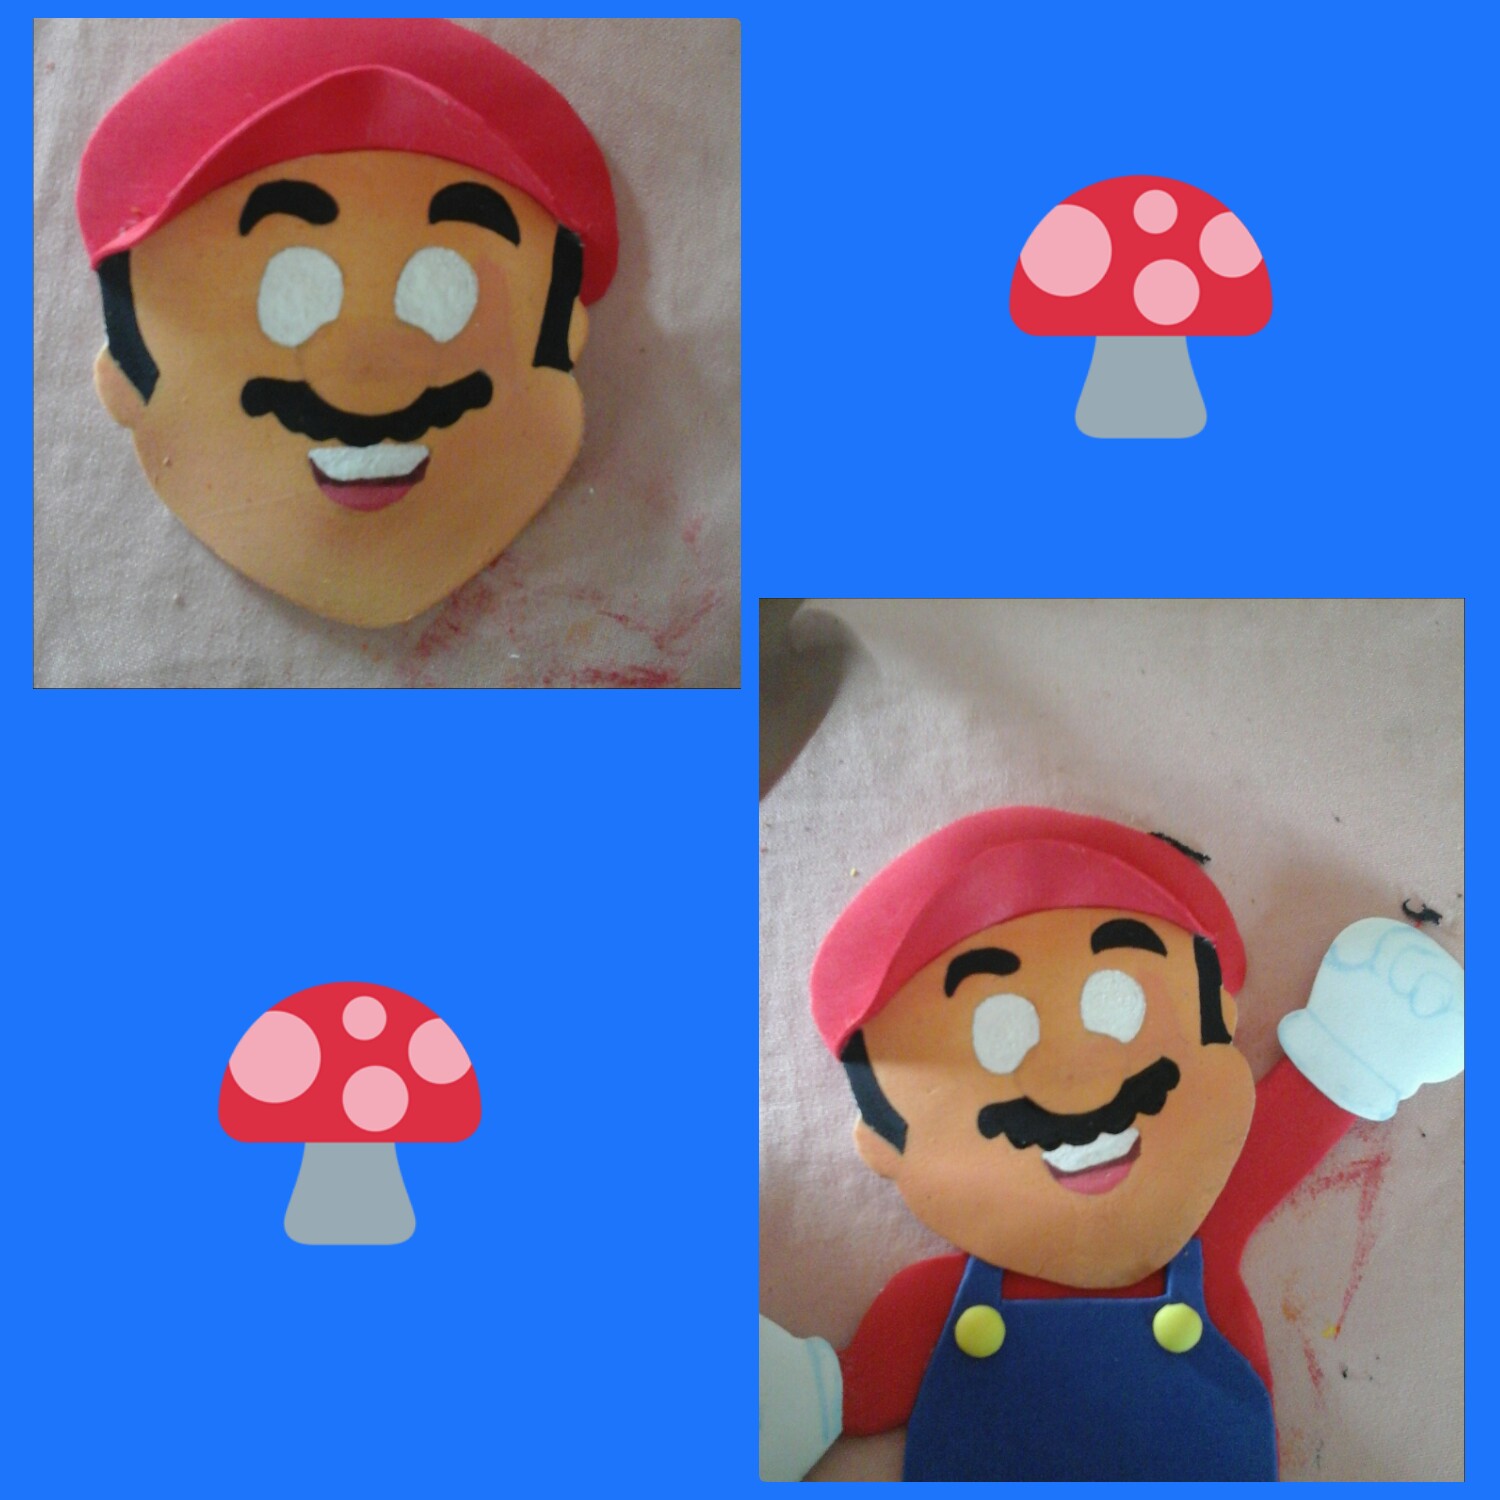
Tercer paso.
Armamos nuestras piezas, comenzamos haciendo el gorro con su visera y pegamos a la cabeza de Mario. Asi tambien armamos y pegamos la braga sobre la pieza de foami rojo y finalizamos pegando nuestra pieza la cual es la cabeza a la parte superior de la braga, coloca unos botones de foami amarillo y pega los guantes.
Third step.
We put together our pieces, we start by making the hat with its visor and glue it to Mario's head. So we also put together and glue the panty on the piece of red foami and we finish by gluing our piece which is the head to the top of the panty, place some yellow foami buttons and glue the gloves.
Cuarto paso.
Fourth step.
En este paso terminamos de delinear los ojos y los guantes utilizando pintura negra.
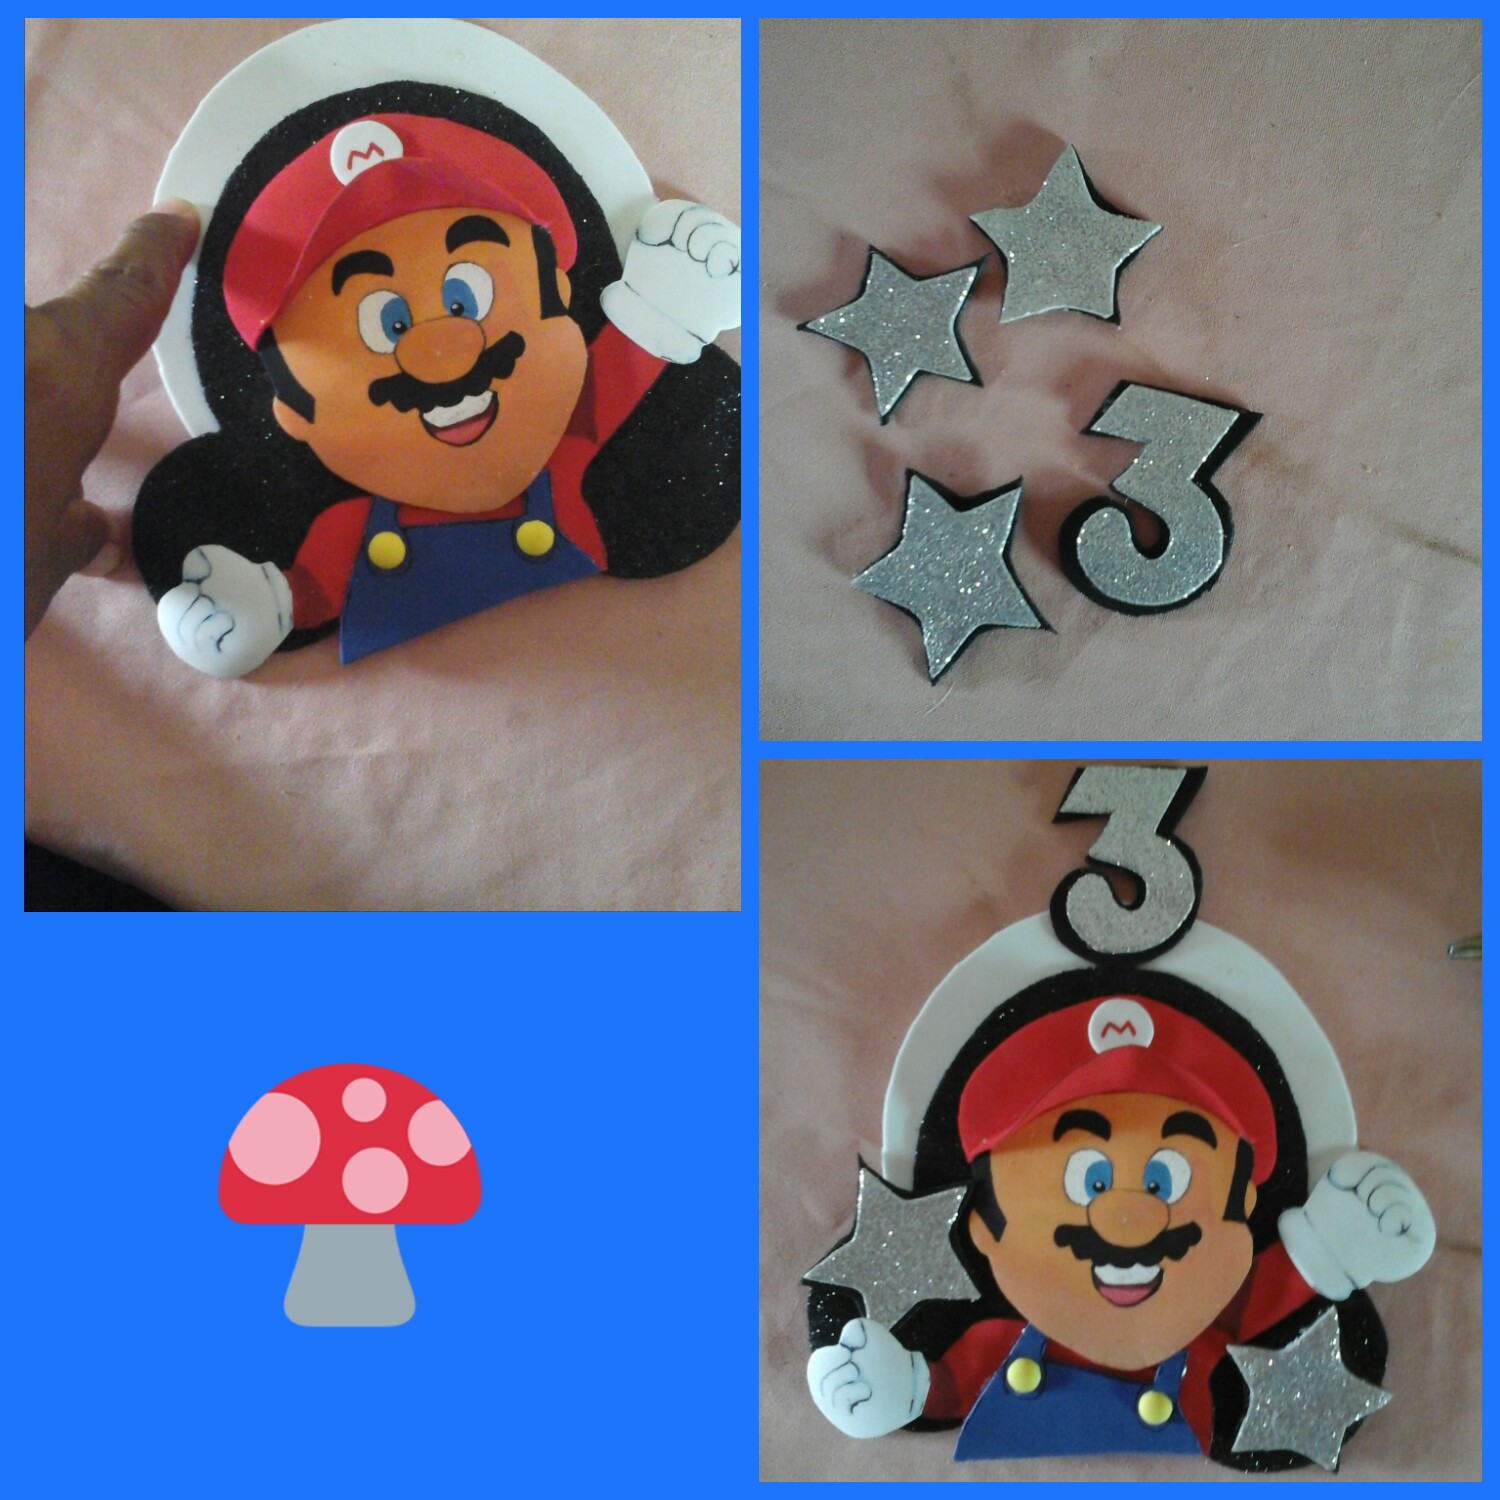
Con foami blanco y negro hacemos unas piezas en forma de arcos y pegamos una sobre otra. Puedes colocar de fondo la figura de tu preferencia como una estrella o simplemente un círculo.
In this step we finish outlining the eyes and the gloves using black paint. With black and white foami we make some pieces in the shape of arches and glue one on top of the other. You can place the figure of your choice in the background, such as a star or simply a circle.
Luego pega nuestro personaje Mario bros sobre estas piezas. finaliza recortando unas estrellas y el número de tu preferencia con foami plateado o gris con brillo, recortamos y pegamos sobre foami negro para hacerle un fondo.
Una vez que terminemos de elaborar estas piezas pegamos al topper para decorarlo.
Then glue our Mario bros character on these pieces. finish by cutting out some stars and the number you choose with silver or gray foami with glitter, cut and paste on black foami to make a background. Once we finish making these pieces, we glue the topper to decorate it.
Quinto paso.
En este último paso pega un palillo de madera a la parte trasera del topper y
si es de tu preferencia colocarle feliz cumpleaños puedes hacerlo con letras del color que prefieras.
Fifth step.
In this last step, stick a wooden toothpick to the back of the topper and if you prefer to place happy birthday on it, you can do it with letters of the color you prefer.
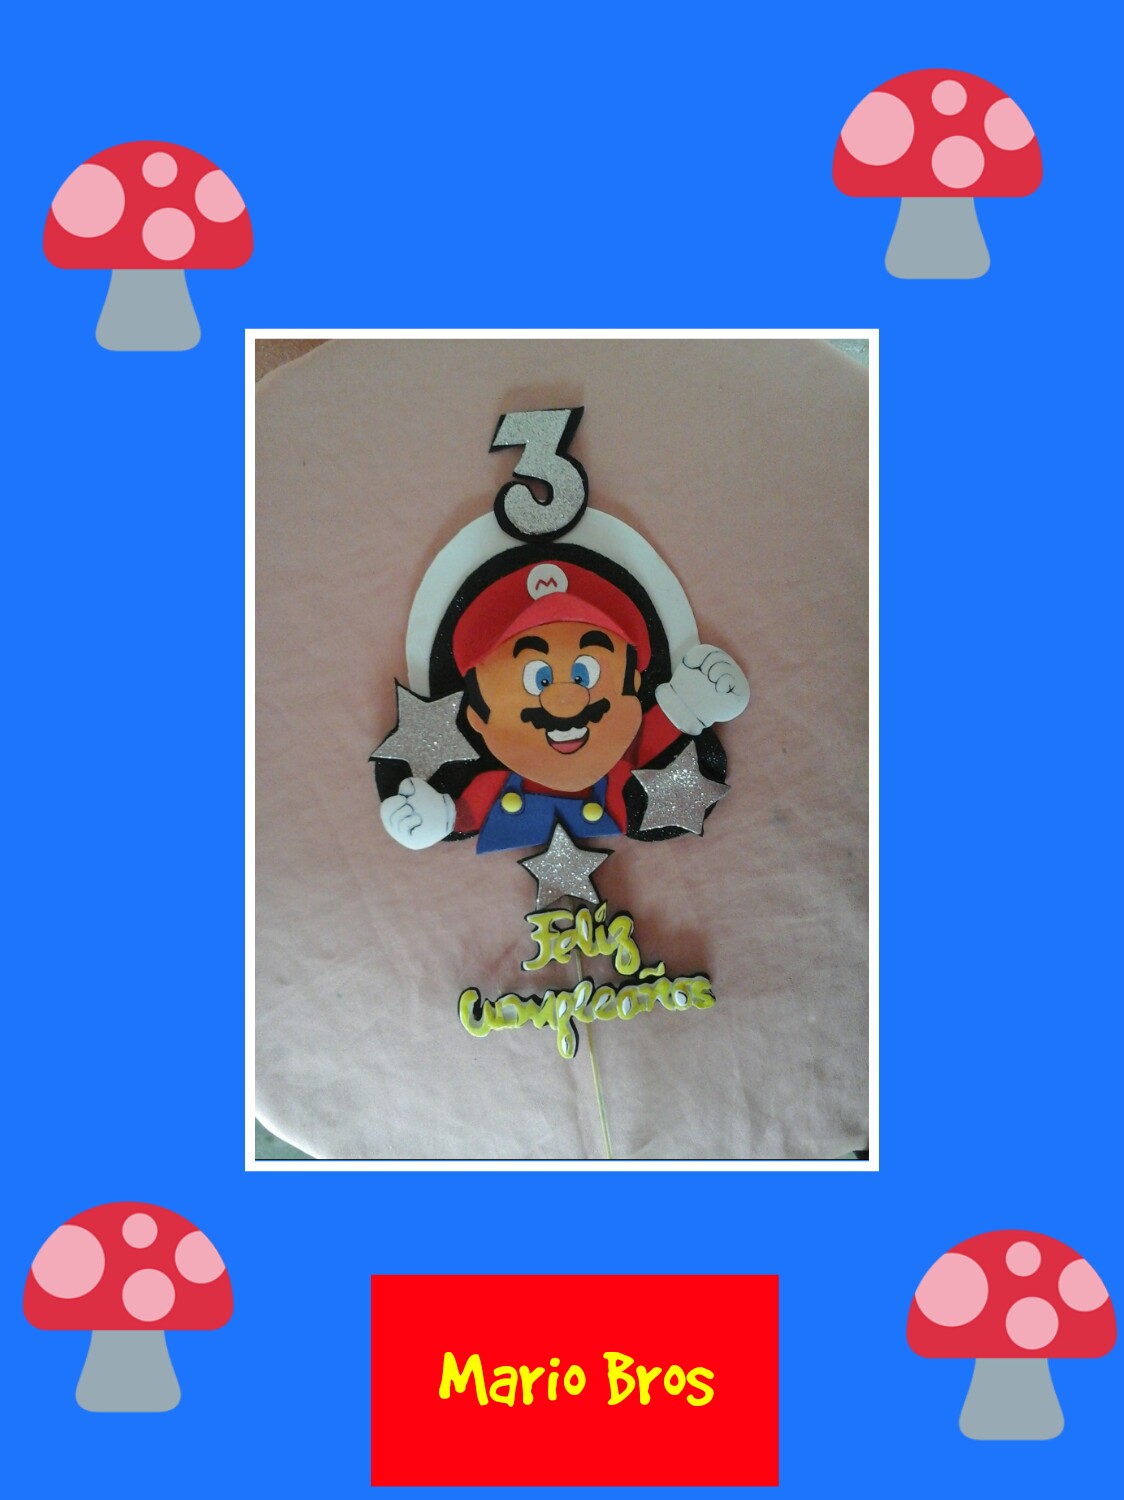
De esta manera hemos culminado este lindo trabajo, espero que te haya gustado esta propuesta para hacer un lindo topper infantil de Mario Bros.
Gracias por tomar unos minutos de tu tiempo y ver mi trabajo hasta el final.
Me despido de todos deseandoles un excelente día, nos vemos pronto.
In this way we have completed this beautiful work, I hope you liked this proposal to make a cute Mario Bros. children's topper. Thank you for taking a few minutes of your time and seeing my work until the end. I say goodbye to everyone wishing you a great day, see you soon.
Until next time take care.!👋 Fotos de mi autoria capturadas por mi tablet Samsung galaxy.
Editor utilizado; Collage_maker.
Fuente que utilice para traducir cada párrafo (google.com).Photos of my authorship captured by my Samsung galaxy tablet.
Publisher used; Collage_maker.
Source used to translate each paragraph (google.com
Esta lindo tu trabajo, me gusta la idea genial para colocarlo en una torta y despues sirve de decoración para el cuarto del niño. Saludos