
Saludos, mis colegas artesanos y amantes de las manualidades. Bienvenidos de vuelta a otra entrega de miércoles de carpintería. Este proyecto se acerca a su fase final. Antes de ello hay que redondear el mástil y preparar la base para el acabado.
Hi there, my fellow artisans and handcrafts lovers. Welcome back to another instalment of Woodworking Wednesdays. This project is almost through. However, we need to address some details like a rounded neck and sealing the grain of the wood.
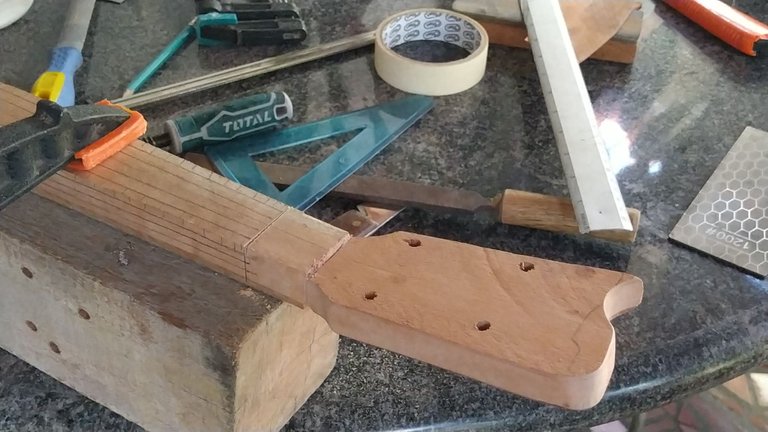
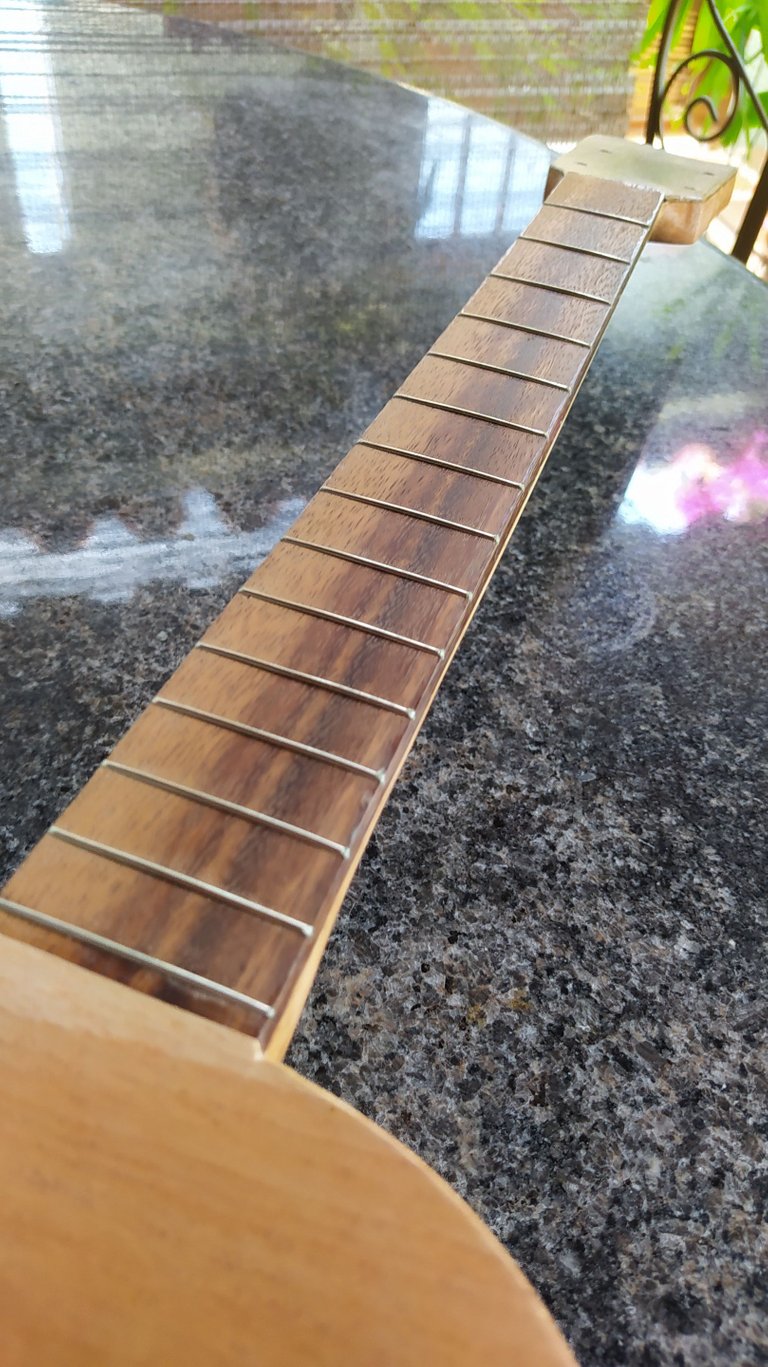
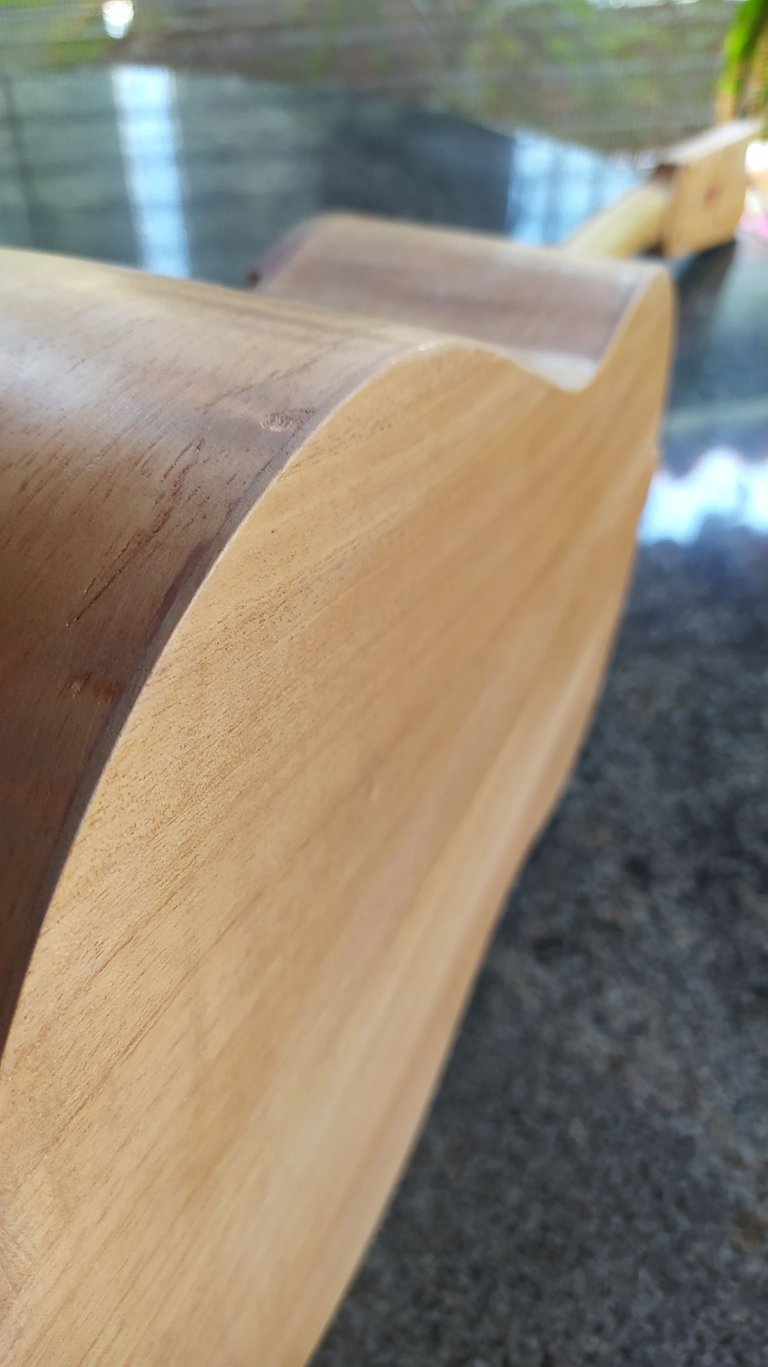
Redondear el mástil.
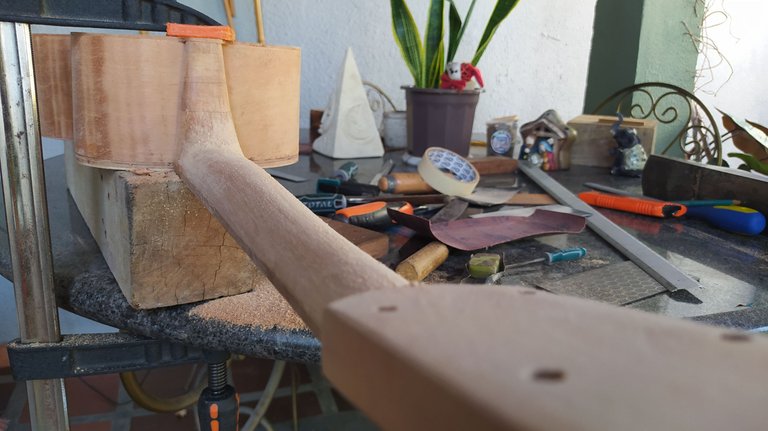
Una vez que los trastes están en su lugar, podemos proceder a darle forma a la parte posterior del mástil. Aquí hay para todos los gustos. Se puede hacer un mástil más delgado o más grueso de acuerdo a las especificaciones del instrumento. A la hora de decidir cómo hacer esto, siempre me baso en lo que considero cómodo como músico.
Teniendo en cuenta la forma curva que va a tener está pieza, hay que tomar varias medidas para asegurarnos de rebajar la cantidad correcta de material en cada sección del mástil. Está pieza es más ancha hacia la caja del instrumento y más delgada hacia la cabeza.
Lo mismo es cierto para el espesor del mástil. Se hace más grande entre más cerca está de la caja.
Luego de marcar las líneas para rebajar el material, el resto se hace a mano. Hay dos cortes guía para marcar la altura mínima y máxima a los extremos de la pieza. Aquí también tenemos que delimitar la zona del clavijero.
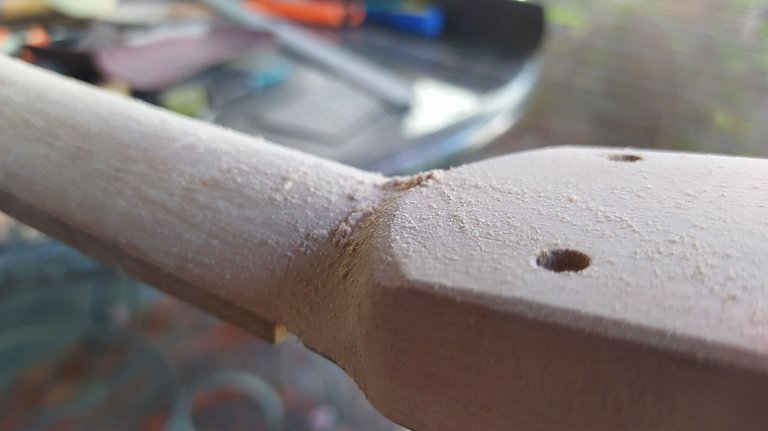
Todo lo demás es trabajo manual. Puede resultar paradójico, pero se redondea el mástil creando esquinas. Entre más esquinas formamos, más redonda queda la pieza. Para terminar de dar la forma, completamos el trabajo haciendo uso de papel de lija.
Rounding the Neck.
Once the frets are in place we can make the back of the neck round. There's lots of way of doing this. Some necks are thicker than others. That's something that comes from the specifics of each commission. When I have the liberty to decide, I always go with what I feel is comfortable.
Considering the curvature we need to achieve on this this piece, we need to measure how much material we need to remove, as we can only do it once. The important thing to keep in mind is that we need to make sure it's that the section that is closer to the body is thicker than the one near the headstock.
This is the same principle we apply to the width of the neck.
After marking the guides for the job, the rest is done by hand with the help of a rasp. We make two cuts with a saw at the ends of the neck. This is to mark the highest and lowest points. This also serves to delimit the area of the headstock.
Then, we just need a huge amount of elbow grease. It might sound weird, but we make the neck round by creating corners on the wood. As we make new corners, the piece gets every closer to being round. Once we have done enough, we use sandpaper to complete the rounded shape.
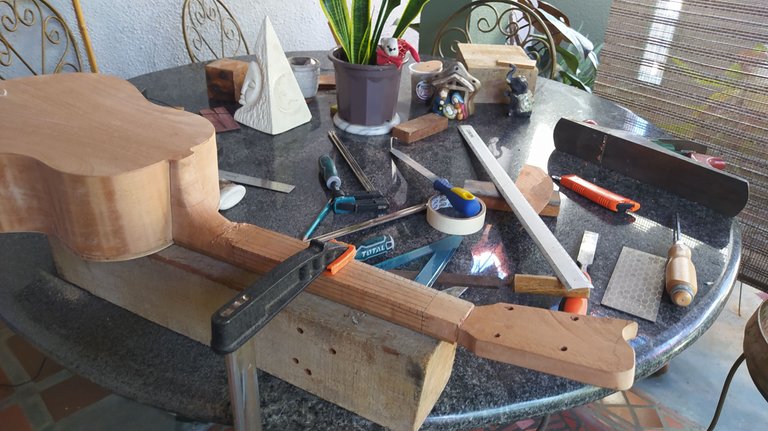
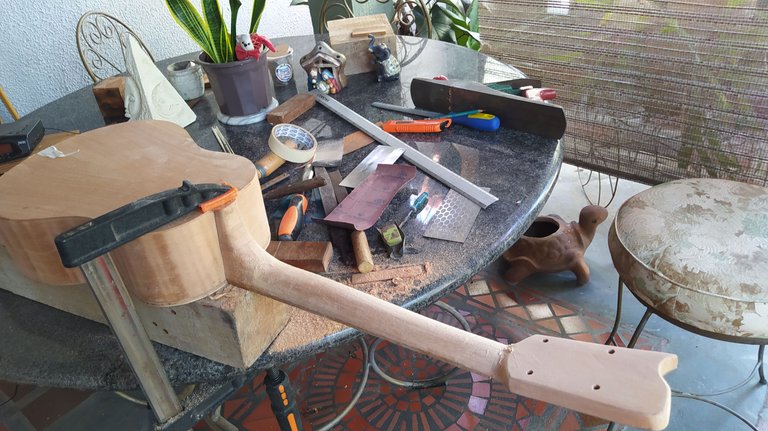
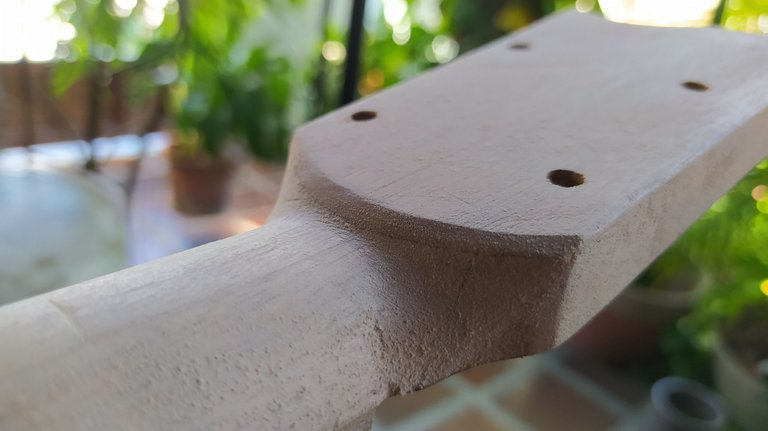
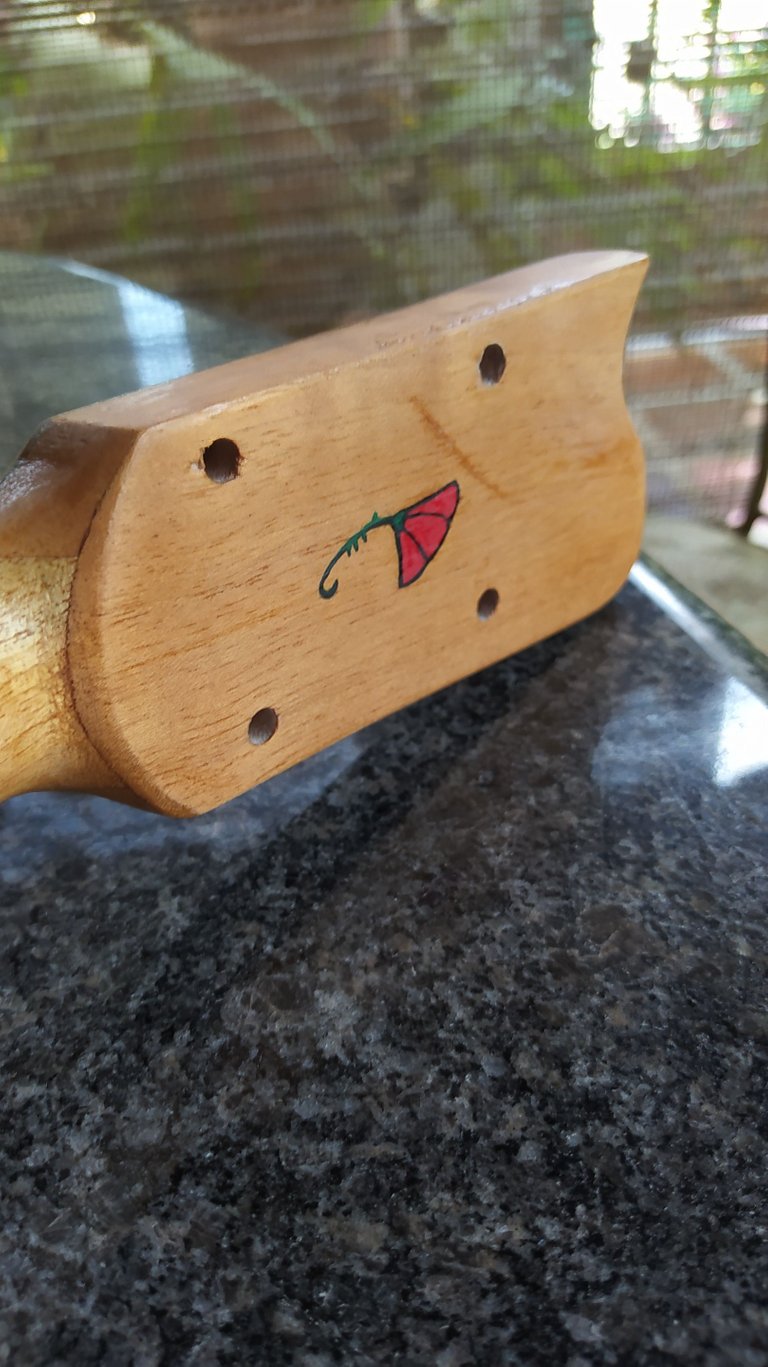
Voluta
Esto es un adorno que podemos hacer en el límite del mástil y el clavijero. Su función es meramente estética, pero además brinda comodidad a la hora de sujetar el instrumento en esa parte.
Para hacerlo, utilizamos alguna forma simple y tallamos la madera hasta conseguir dicha forma. Luego completamos el trabajo con papel de lija.
Volute
This is an ornament we can create at the border of the neck and head stock. It brings some comfort while holding the instrument over that part. Besides that, it's a thing of aesthetics.
We just need to find a shape we like, draw a guide and carve out the shape. Then we finish with some sandpaper.

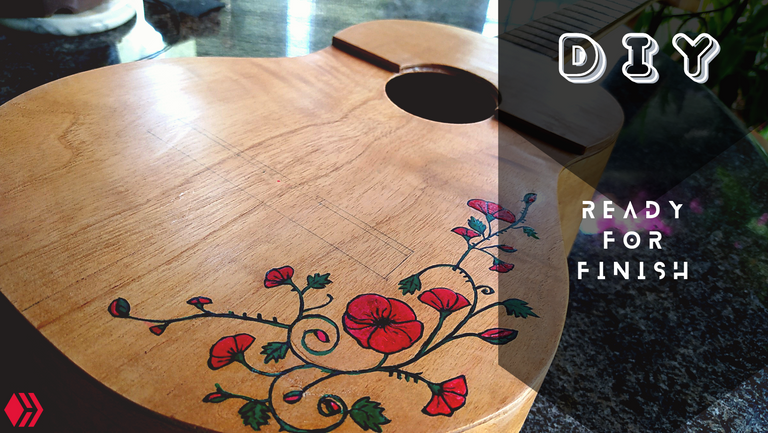
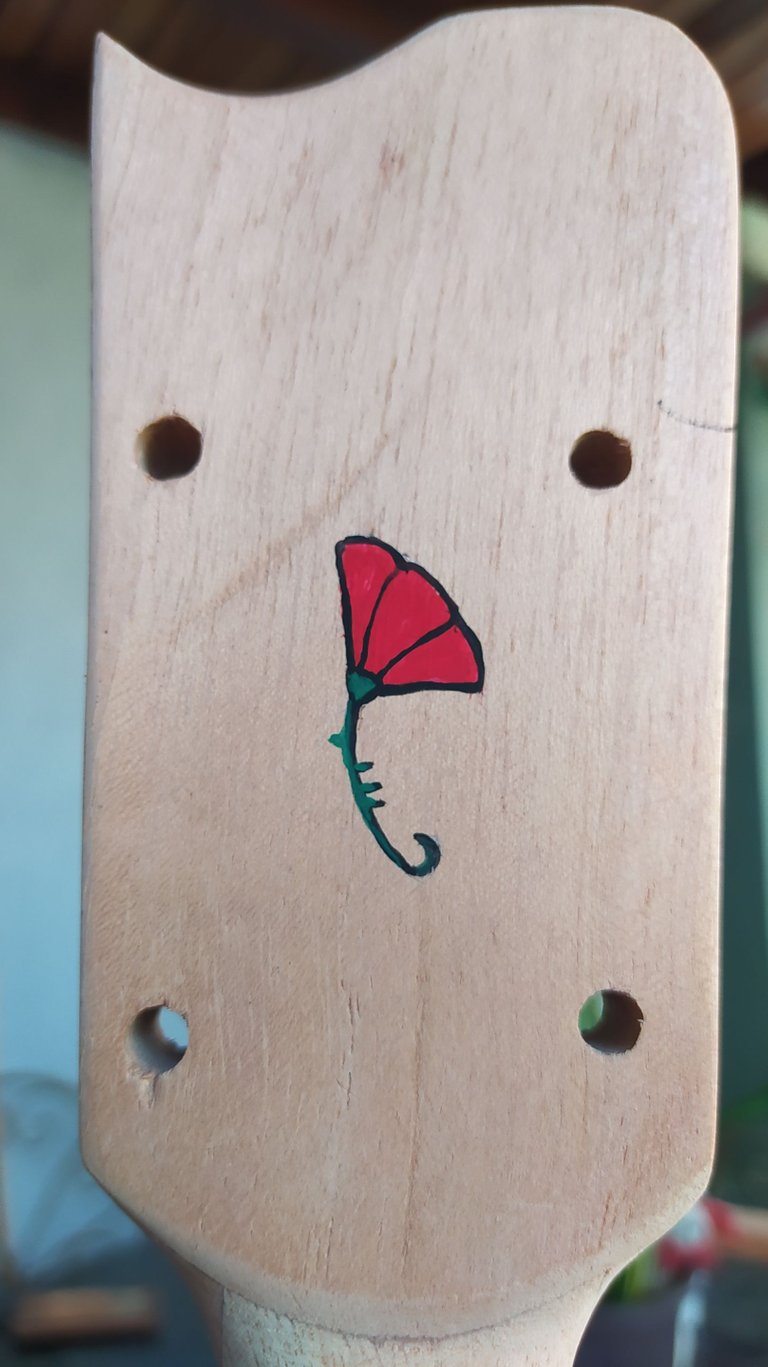
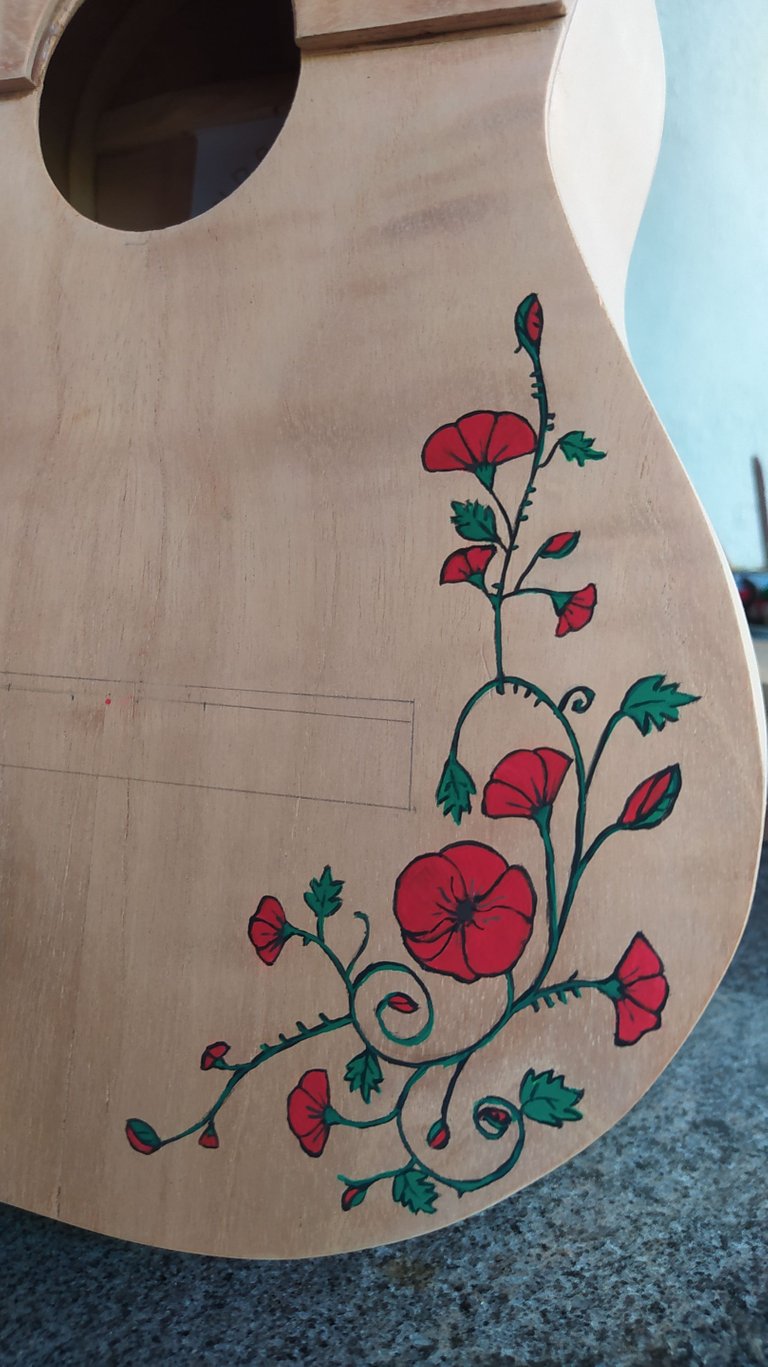
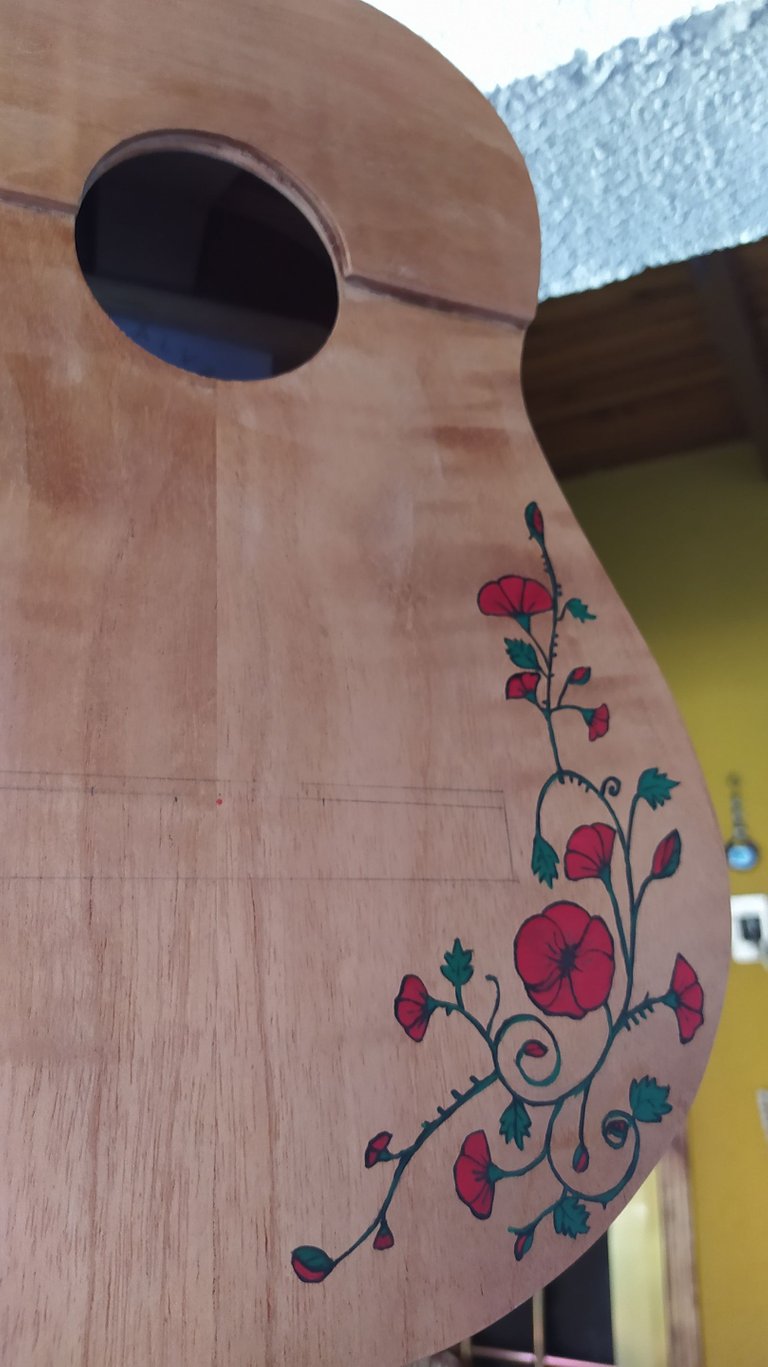
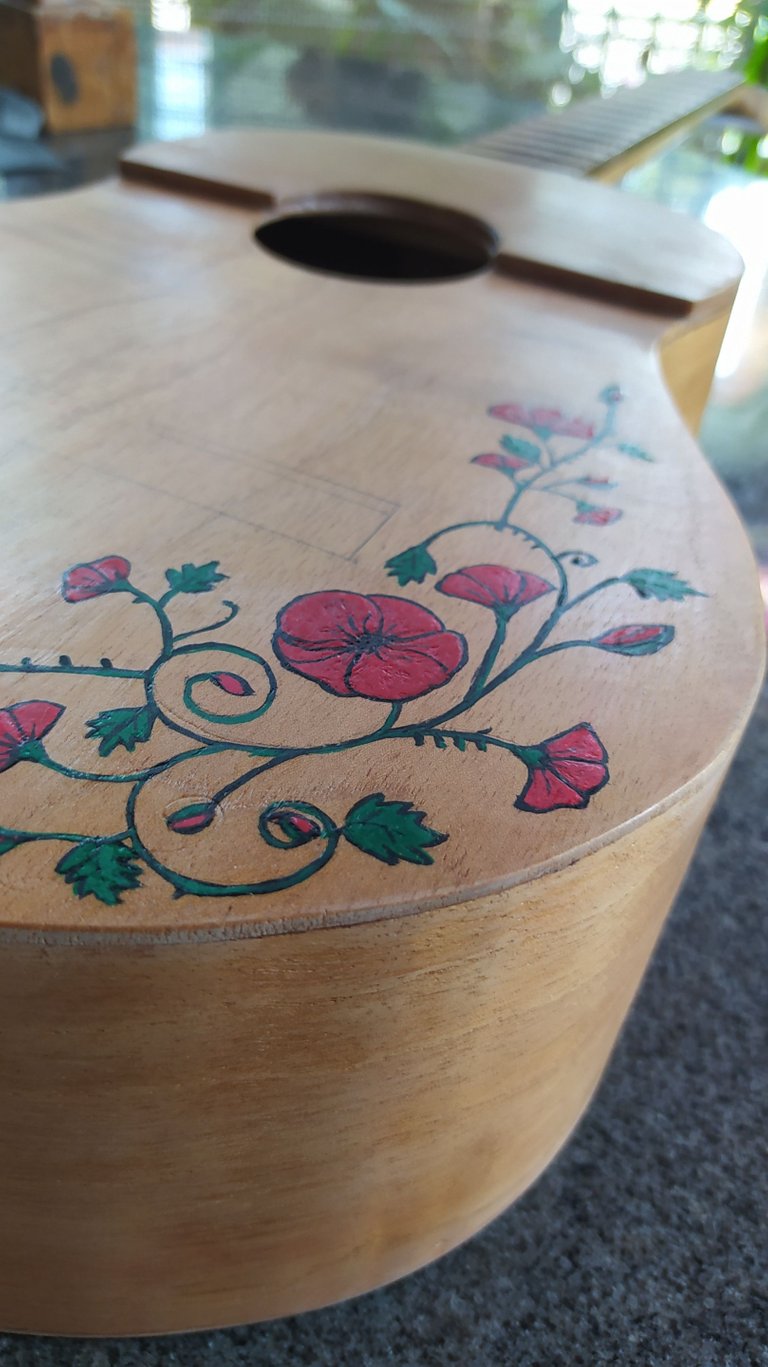
Detalle
Uno de los detalles importantes de este instrumento es un diseño floral que se hizo a petición de su dueña. Para esto tuve la ayuda de @adncabrera quien realizó esta obra de arte.
Hace unas semanas, publiqué un corto sobre eso. De todas maneras, les comparto una fotos para que puedan apreciar el diseño.
Details
One of the highlights of this instrument is the inclusion of this floral design. It was something requested by the owner. She wanted some red flowers on her cuatro. Fortunately, @adncabrera helped me out with this since I can't do this.
I published a short about it some weeks ago. However, I'll drop some photos so you can appreciate it better.
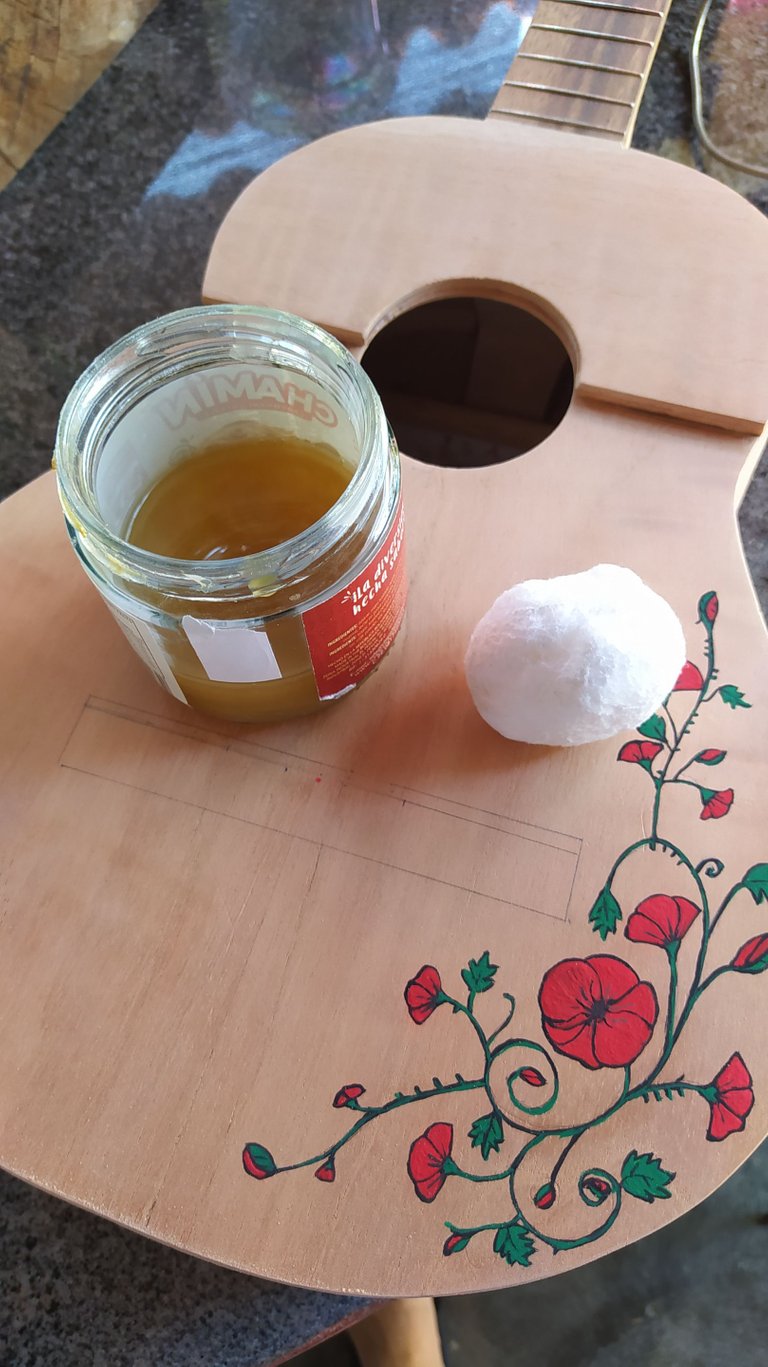
Sellador
La última parte por el momento es aplicar el sellador. No hay fotos del maratón de lijado previo a sellar porque el cuarto tenía que estar lijado antes de que se hicieran las flores.
Las capas de sellador se aplican en intervalos de 30 minutos entre cada una. Hay que esperar a que una capa esté seca al tacto para continuar con la siguiente. Así vamos aplicado capas hasta rellenar los poros de la madera. Esto protege el instrumento de la humedad y nos da la base para que el acabado quede parejo.
Aplicar el sellador no es todo. Al terminar de colocar todas las capas hay que nivelar todo. Así que se lija bien todo para lograr emparejar todo. Así el instrumento queda listo para aplicar el laqueado.
Con esto, llegamos al final de esta publicación. Espero que haya sido de su agrado. En la próxima seguro veremos estre proyecto llegar a su conclusión. Nos veremos entonces.
¡Qué tengan un buen día!
¡Manténgase creativos!
Sealant
The last bit for today is applying the sealant. There are no photos of the sanding marathon because the instrument was sanded before handing it over for the painting.
We apply the coat of sealant in intervals of 30 minutes. We need to make sure each layer has dried properly before applying the next. Once all the grain is sealed the instrument is protected from humidity. This is also the base for a for a good finish.
But applying the sealant is not all. We need to sand all the layers of sealant to make them even. That way when we spray the lacquer, all the coats will be even as well.
With this we have reached the end of this entry. I hope you have enjoyed the process so far. This one will be ready in no time and I'll make sure to show you the last bits of progress on this build. Until then.
Have a great day.
Stay creative!

- Fotos/Photos 📷: by me, taken with my Redmi Note 8 smartphone.
- Portada/Thumbnail 🖼️: by me, created with Canva.
Follow me on Instagram for enquires and commission.
If you'd like to help the workshop grow, you can make a donation here. You can find me at discord as bertrayo#1763
Se ve hermoso, @bertrayo. Mi admiración total.
Gracias por colaborar en este proyecto.
The rewards earned on this comment will go directly to the people( @bertrayo ) sharing the post on Twitter as long as they are registered with @poshtoken. Sign up at https://hiveposh.com.
Congratulations @bertrayo! You received a personal badge!
Wait until the end of Power Up Day to find out the size of your Power-Bee.
May the Hive Power be with you!
You can view your badges on your board and compare yourself to others in the Ranking
Check out our last posts:
Congratulations @bertrayo! You have completed the following achievement on the Hive blockchain And have been rewarded with New badge(s)
You can view your badges on your board and compare yourself to others in the Ranking
If you no longer want to receive notifications, reply to this comment with the word
STOPCheck out our last posts:
I love the finish on that guitar and especially the flower touch. I commented on twitter but thought to also leave it here! great job Andres!
Hey, comments on Hive are needed, Mac. Otherwise, how would keep getting those badges? Thanks a lot. That was something the owner wanted to have on the instrument.
Sin duda tienes talento, quedó precioso y listo para deleitar a los oídos y el corazón. Saludos 🤗
Todavía le faltan unas cosas, pero pronto estará listo. Gracias por comentar.
Virtuoso woodworker with another masterpiece.
That touch of flower is briiant 🙌🏾
Hey, thanks, buddy. I try my best to make good instruments. The flower touch was done by a professor that has awesome drawing skills.
Loved it 🙏🏾
✨
Thank you for sharing this post on HIVE!
Your content got selected by our fellow curator stevenson7 & you just received a little thank you upvote from us for your great work! Your post will be featured in one of our recurring compilations which are aiming to offer you a stage to widen your audience within the DIY scene of Hive. Stay creative & HIVE ON!
Please vote for our hive witness <3
Oh, these details, the flowers are cute. I don't remember you would draw before on your instruments, but I might be wrong. A nice one it will be when you finish it :))
I have never drawn on my instruments because I don't have the skills. That's why I let other people do it. 🤣
This is the second one with flowers. The first was this:
Excelente trabajo como siempre Bro. Cuanto me cobras por una customizada de Jon Snow jejeje. Seguimos.
Ja, ja, ja, ja. Eso dependería de las especificaciones.
Maaaan, increíble, yo ví varios cursos de carpintería y se lo difícil que es hacer estas cosas, la delicadeza que debes tener es mucha, aparte de todo eso al momento de hacer instrumentos también debes tener en cuenta aspectos fisicos para que el sonido sea exelente, mis respetos, quedó está quedando muy muy bonita
Es todo un trabajo de hormiguita lograr que todo quede tan bien. Gracias por tus palabras.
Que belleza, te está quedando tan delicado, tan hermoso el trabajo. Gran artista @bertrayo. Me encanta ver arte y este es del bueno. Gracias Andrés!❤️
Gracias, ha sido un trabajo bien interesante. Ahora solo queda terminar el proyecto.
Ya quiero verlo terminado, quedará precioso!
Sí que sí. ✨
😁
✨
@bertrayo admiro a las personas que pueden hacer maravillas con sus manos. Te felicito Amigo por las cosas que puedes hacer.
Muchas gracias. Estas son las palabras que animan a continuar el trabajo.
Pues continúa amigo. Y espero que logres el reto de organizate3. Bueno yo también jaja
En eso estoy. Y descuida, que llevo desde agosto publicando todos los días.
@bertrayo o sea vas a buscar el año. Mía respetos amigo.
Vamos a ver si lo logro.
Congratulations @bertrayo! You received a personal badge!
Participate in the next Power Up Day and try to power-up more HIVE to get a bigger Power-Bee.
May the Hive Power be with you!
You can view your badges on your board and compare yourself to others in the Ranking
Check out our last posts:
Que trabajo tan hermoso, se ve que es un gran proceso, pero el resultado vale la pena.
Exacto. Ya estoy cerca de tener los resultados. ✨
Cada vez se ve más bonito este Cuatro, ya quiero ver cómo va a quedar cuando lo termines, va a ser una belleza, estoy segura de que su dueña lo va a amar, y más con esas flores tan bellas que pintaste 👀😘😘
Y si no lo ama lo entendería porque es una preadolescente. Ya veremos.
Qué aguado 🥺😔
Ja, ja, ja, ja, ja. Dudo que haya porblemas. Ella misma eligió el diseño.
Ah bueno, eso está bien, solo falta que cuando crezca le siga gustando, si no, siempre puede encargarte otro 🤣
Exacto, pensando en el futuro. 😂
Jajajajajajaja, stonks 🤣
Ah! La continuación del proyecto! Qué genial! Me gusta como vas explicando todo... ¿te imaginas grabar todo el proceso de la creación de este cuatro desde 0?
El proceso de este cuatro está grabado y lo he publicado en cortos.
wow hermano que gran trabajo vale.
Muchas gracias.
Me sigue sorprendiendo muchísimo el trabajo de los artesanos, la habilidad que tiene para crear cosas tan hermosas. De convertir ideas en realidad.
Este trabajo está hermosísimo ❤️
Todo está en visualizar. La cosa es hacer realidad la visión, ahí vamos. Muchas gracias ✨
Es increíble la dedicación y la paciencia para elaborar un instrumento, yo sinceramente no podría, está quedando muy bien, ansio el resultado ❤✨
Por eso hay tan pocas personas que hacen este trabajo. Gracias por tus palabras. ✨🥰
I love your diy project. Looks like a lot of work, but the effect is beautiful 😍
Hey, thanks. Yes, there's a lot of effort on it, but the results are awesome!