Hello friends!!
Hola Amigos!!
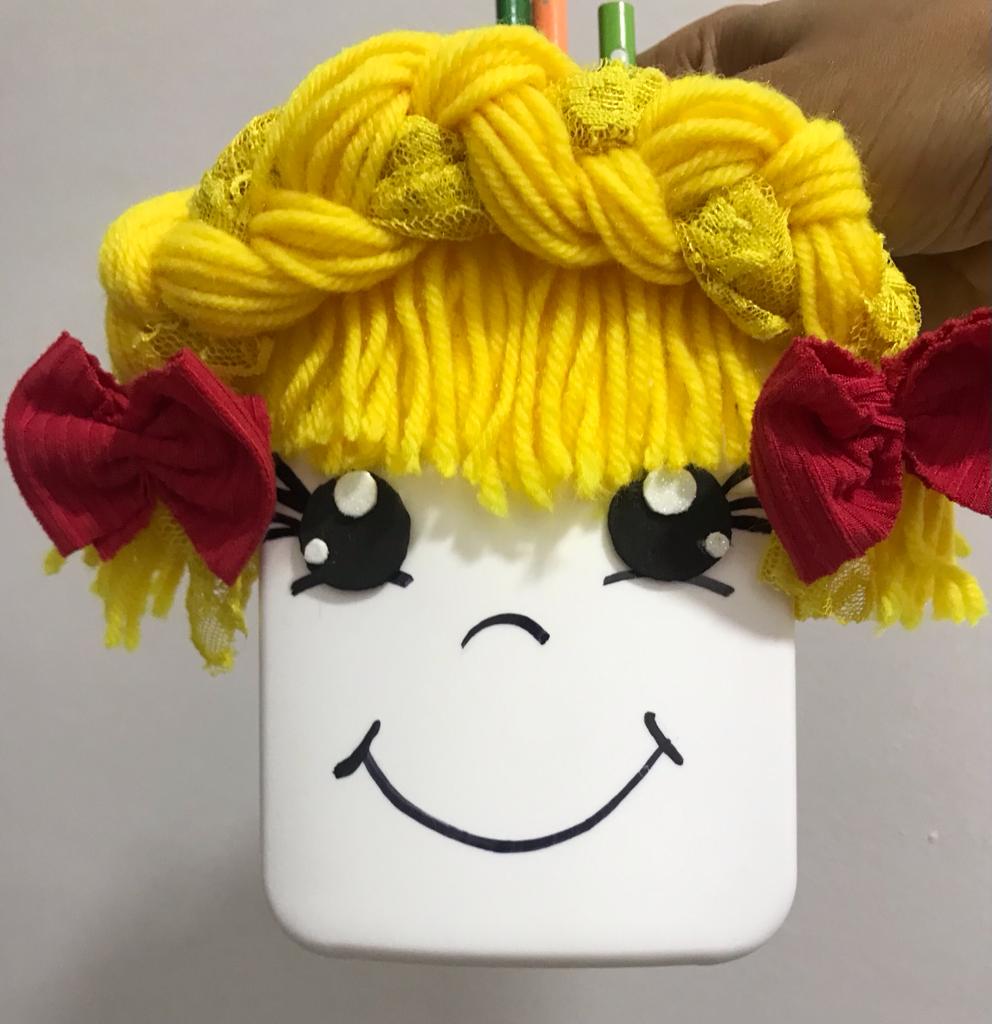
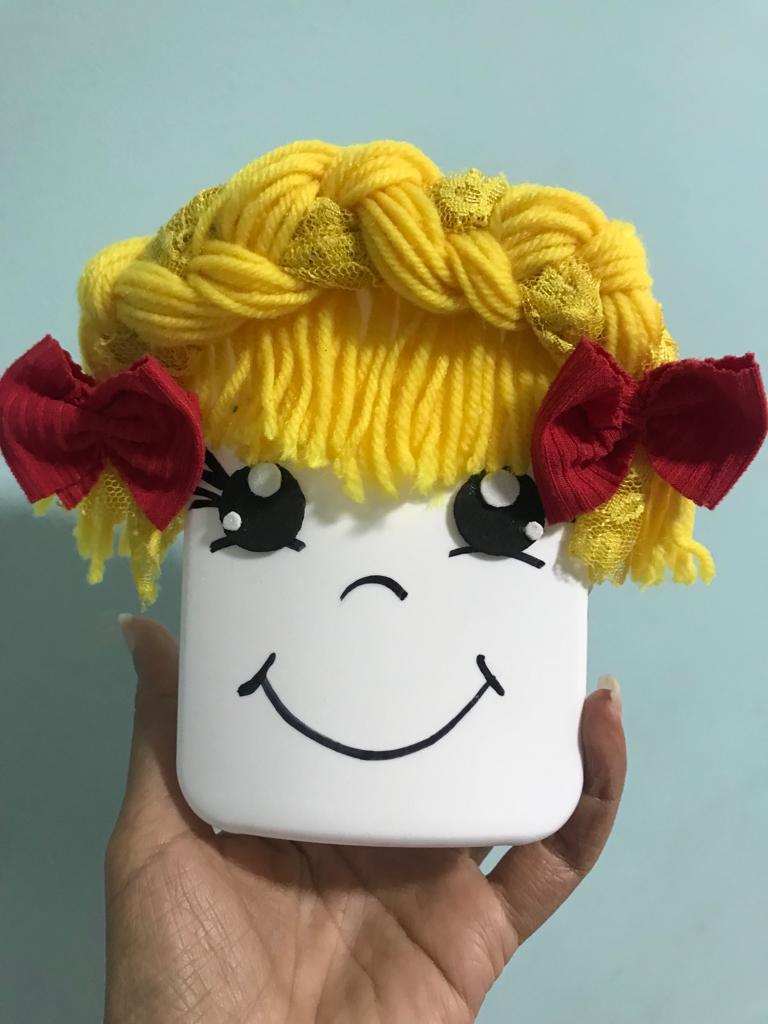
Happy and wonderful day everyone!! Creativity allows us to give life to beautiful and flirty crafts. Today I am going to show you again how using recycled material and following this simple tutorial step by step, you will be able to make a beautiful and original organizer for pencils with the face of a braided doll. It is an easy and cheap idea where to store pencils and other supplies; in this beautiful and very useful decorative craft.
Feliz y maravilloso día tengan todos!! La creatividad nos permite dar vida a lindas y coquetas manualidades. Hoy voy a mostrarles nuevamente como usando material de reciclaje y siguiendo paso a paso este sencillo tutorial ;podrán realizar un hermoso y original organizador para lápices con cara de muñequita de trenzas. Es una idea fácil y económica donde guardar los lápices y otros útiles; en esta bella y muy útil manualidad decorativa.
You will need to develop the craft the following materials:
Necesitarás para desarrollar la manualidad los siguientes materiales:
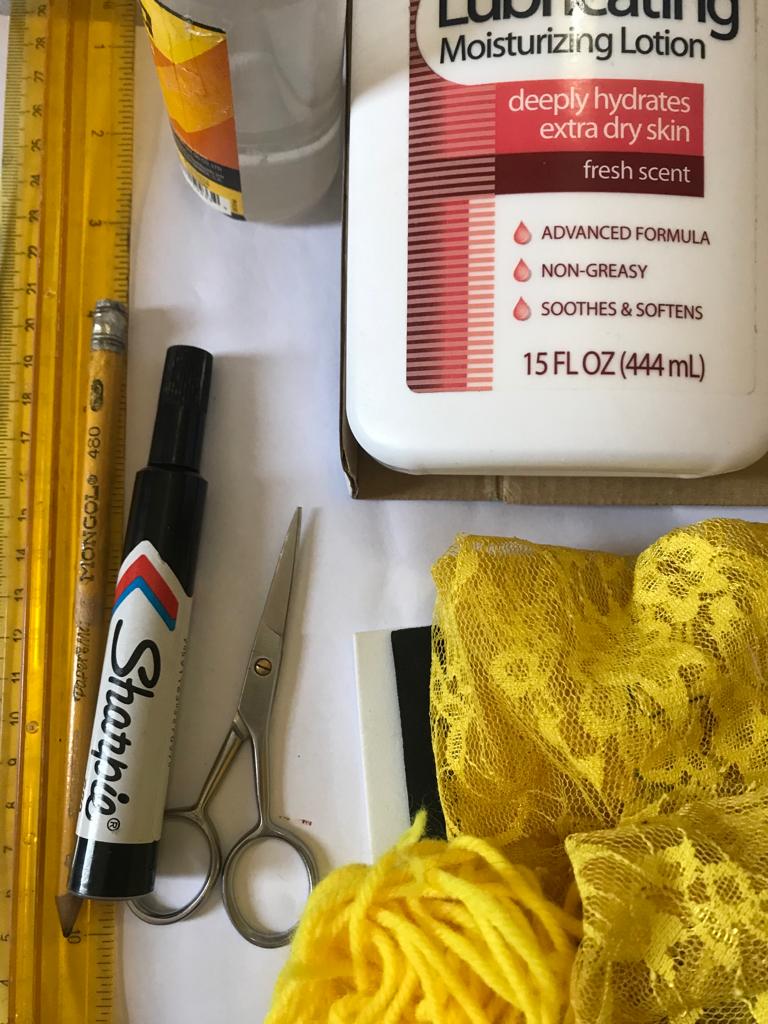
•Medium plastic container (white).
•Yellow stamen.
•Yellow cloth.
•Red cloth patch.
•Black and white foamy pieces.
•Black marker.
•Pencil.
•Scissors.
•Glue.
•Needle and thread.
•Envase mediano plástico (de color blanco).
•Estambre amarillo.
•Tela amarilla.
•Retazo de tela roja.
•Retazos de foamy negro y blanco.
•Marcador negro.
•Lápiz.
•Tijera.
•Pegamento.
•Aguja e hilo.
He began by cutting the upper end of the container (as seen in the figure) evenly. Then clean and remove the labels from the container; I proceed to use the pencil to paint the mouth; nose, cheeks, eyelashes. Subsequently, he outlined each of the parts of the face with the black marker until the details were ready.
Inició cortando el extremo superior del envase( tal como se observa en la figura) de forma pareja. Luego limpiar y quitar las etiquetas del envase; procedo a utilizar el lápiz para pintar la boca; nariz, mejillas, pestañas. Posteriormente remarcó cada una de las partes del rostro con el marcador negro hasta tener listos los detalles .
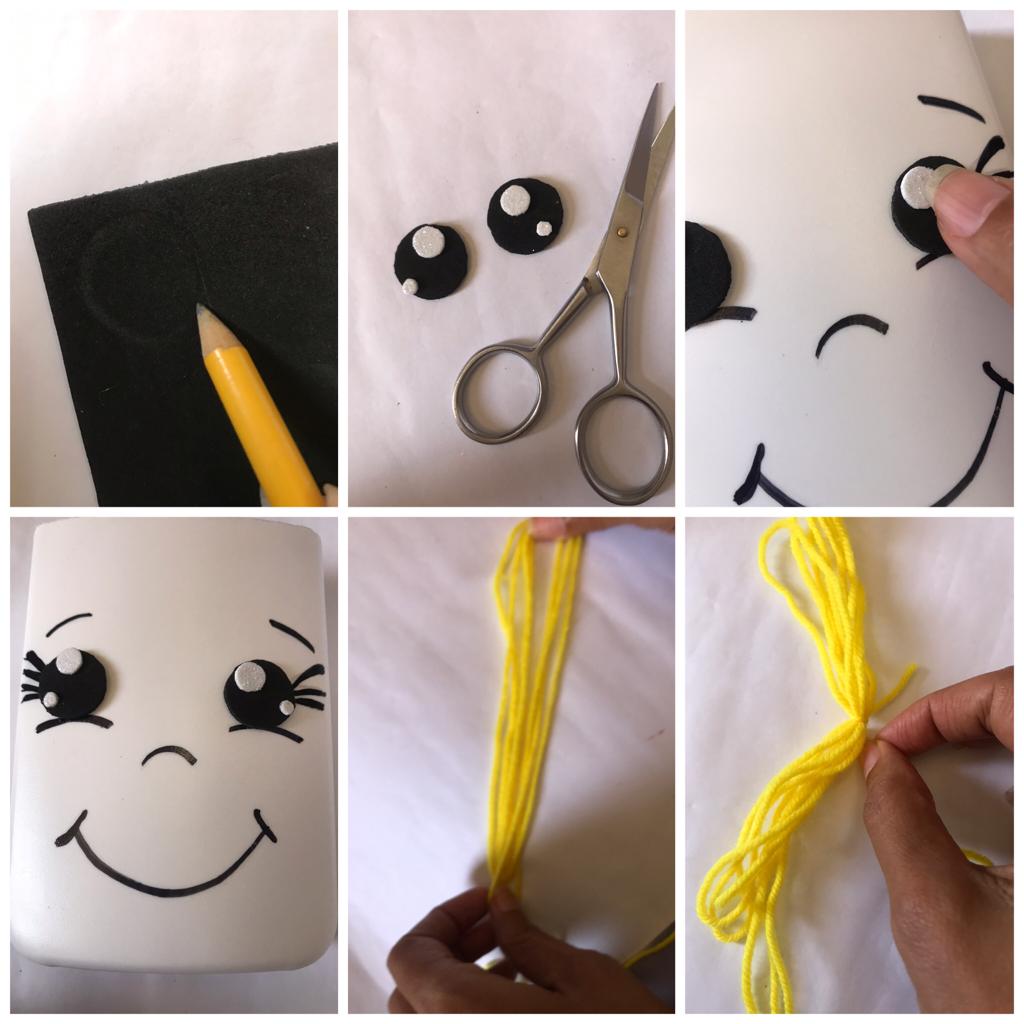
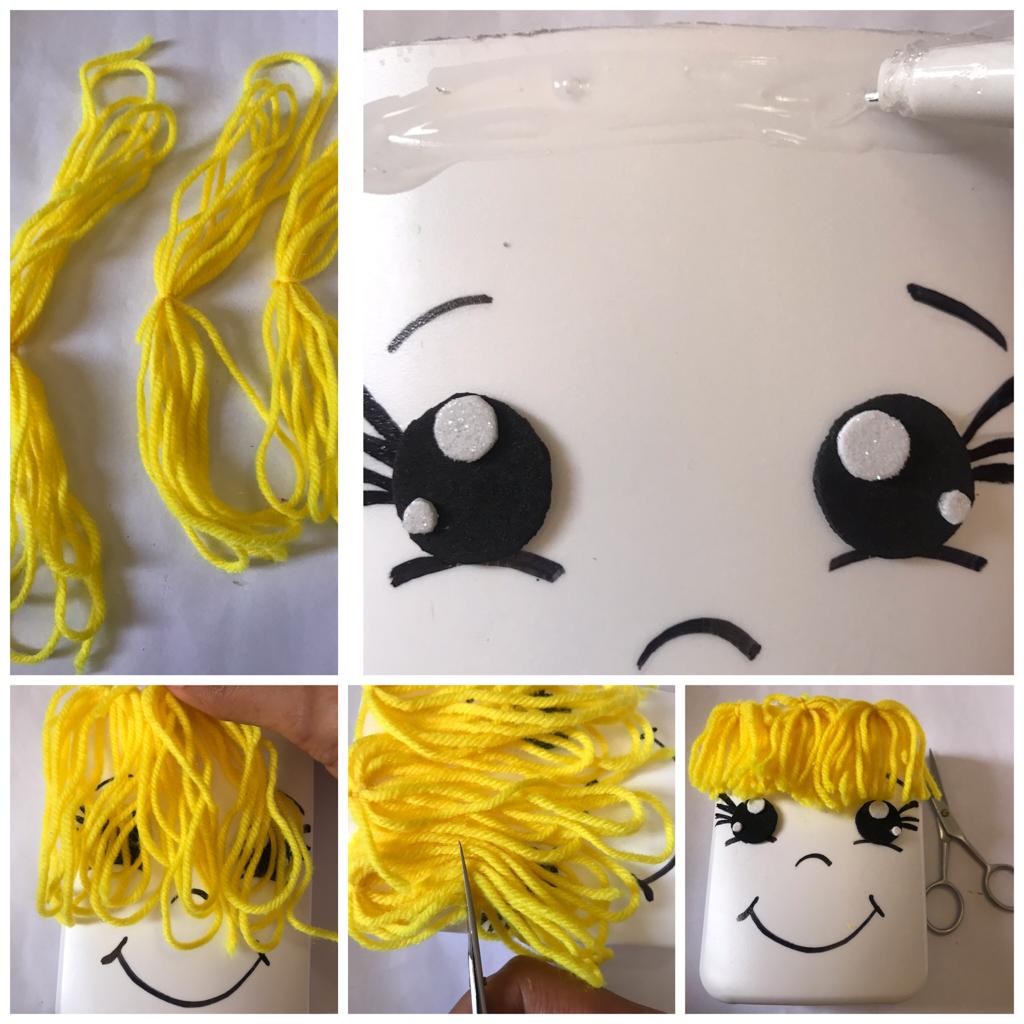
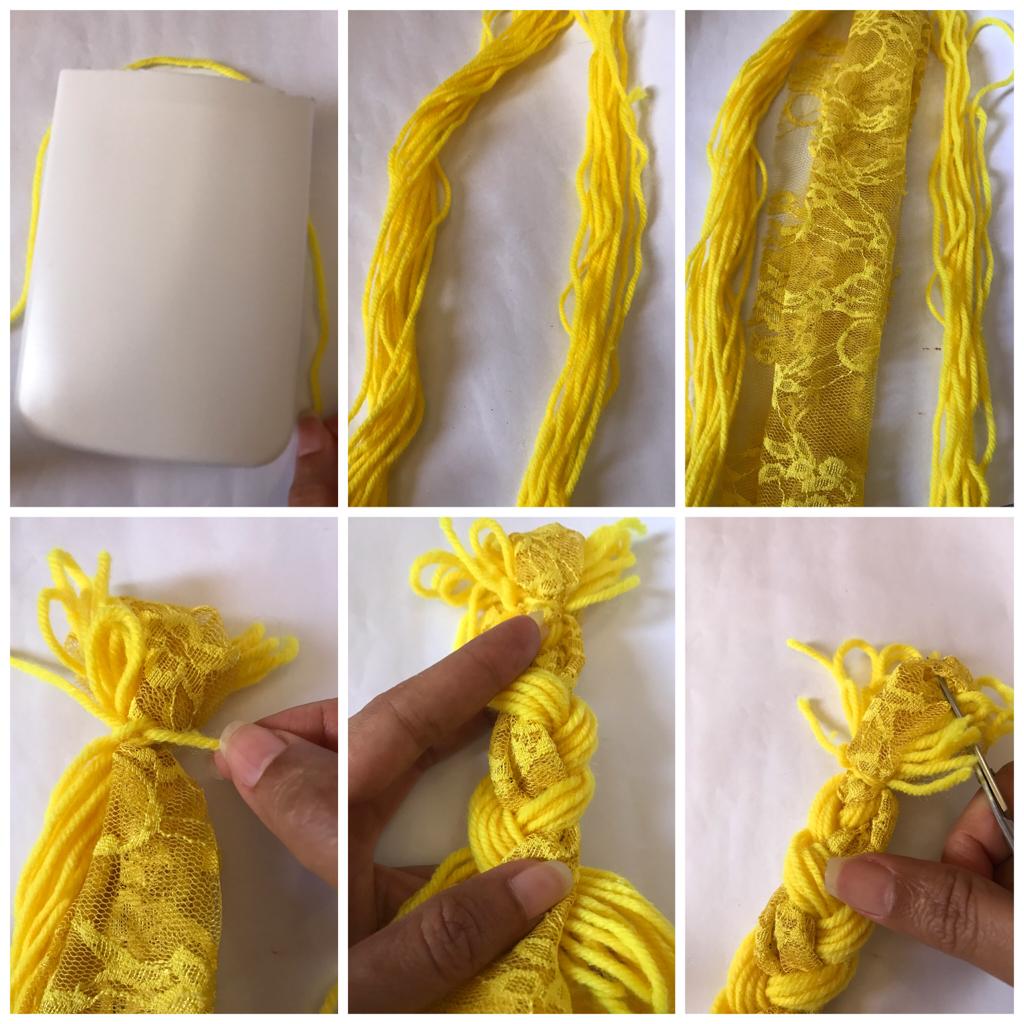
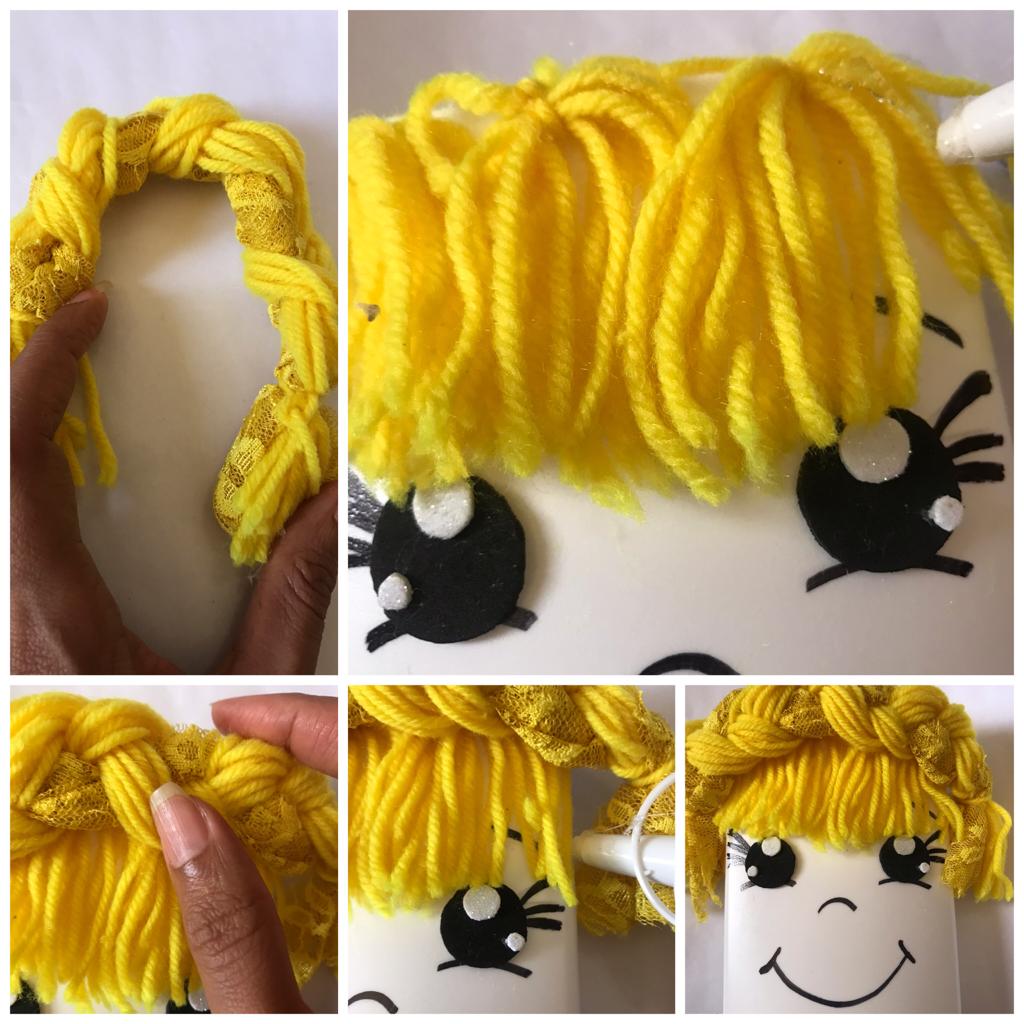
Marked a couple of ovals on the black foam (the size should be related to the doll's face) and cut out 2 pairs of small white circles, one smaller than the other, to shape the eyes. Glued these to the doll's face. He continued making an elongated roll of yellow thread (approximately 10 turns) in the center he tied a piece of thread (as seen in the figure).
Marcó en el foamy negro un par de óvalos ( el tamaño debe guardar relación con el rostro de la muñeca) además recortó 2 pares de pequeños círculos blancos uno más pequeño que el otro y así darle forma a los ojos. Pegó estos a la cara de la muñeca. Continuó realizando rollo alargado de hilo amarillo ( aproximadamente de 10 vueltas) en el centro anudó un trozo de hilo ( tal como se observa en la figura).
I follow the same procedure and I did 2 in the same way. He applied glue to the upper end of the container on the face of the doll and fixed the three rolls of yellow thread in the center where the small knot was made (as seen in the figure). She trimmed the excess to shape a bangs.
Sigo el mismo procedimiento y realicé 2 de igual forma. Aplicó pegamento al extremo superior del envase sobre la cara de la muñeca y fijo por el centro donde se realizó el pequeño nudo los tres rollos de hilo amarillo ( tal como se observa en la figura). Recortó el excedente para dar forma a un flequillo.
Then I measure with a piece of thread (upper end and on the sides of the container) to have an idea of the length that I will make the braid. Formed 2 rolls of yellow thread of the desired length (as seen in the figure); I cut a strip of yellow cloth the same length. He continued knotting one of the ends (he left one centimeter from the tip to the knot). Weave a braid to later cut and match the ends of the braid. (Follow the procedure on the other side).
Luego mido con un trozo de hilo ( extremo superior y a los lados del envase ) para tener idea del largo que realizaré la trenza. Formó 2 rollos hilo amarillo del largo deseado ( tal como se observa en la figura); corto una tira de tela amarilla del mismo largo. Continuó anudado uno de los extremos (dejó uno centímetros de la punta al nudo). Tejer una trenza para posteriormente cortar y emparejar las puntas de la trenza. (Seguir el procedimiento del otro lado).
At the end of the yellow thread braid. I proceed to apply glue to the upper end of the doll's bangs and fix the braid (in such a way that the braids are even); place glue on each side to fix the braid and prevent it from shifting.
Al terminar la trenza amarilla de hilo. Procedo aplicar pegamento al extremo superior del flequillo de la muñeca y fijo la trenza ( de tal forma que las trenzas queden parejas ); colocar pegamentoa cada lado para fijar la trenza y evitar que se desplace.
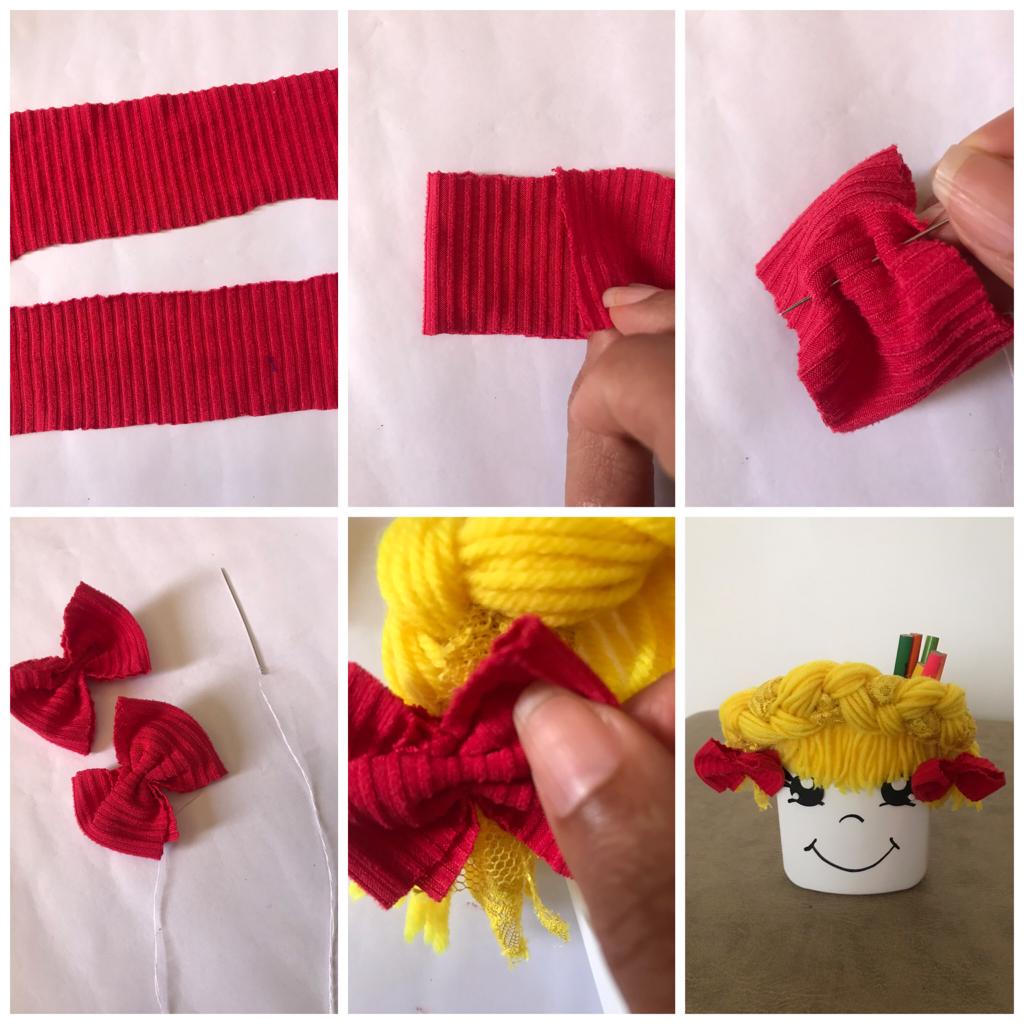
Finally he cut 2 strips of red cloth of equal size. I keep bringing both sides to the center (as seen in the figure) a vertical seam passed through the center and gather to shape the loop; I will do the other one in the same way. To finish sticking to each side of the braids of the doll and give a flirtatious touch of color, as seen in the figure.
Finalmente cortó 2 tiras de tela roja de igual tamaño. Sigo llevando ambos lados al centro (tal como se observa en la figura) pasó por el centro una costura vertical y fruncir para dar forma a el lazo; realizaré el otro de igual forma. Para culminar pegando a cada lado de las trenzas de la muñeca y dar un toque coqueto de color,tal como se observa en la figura.
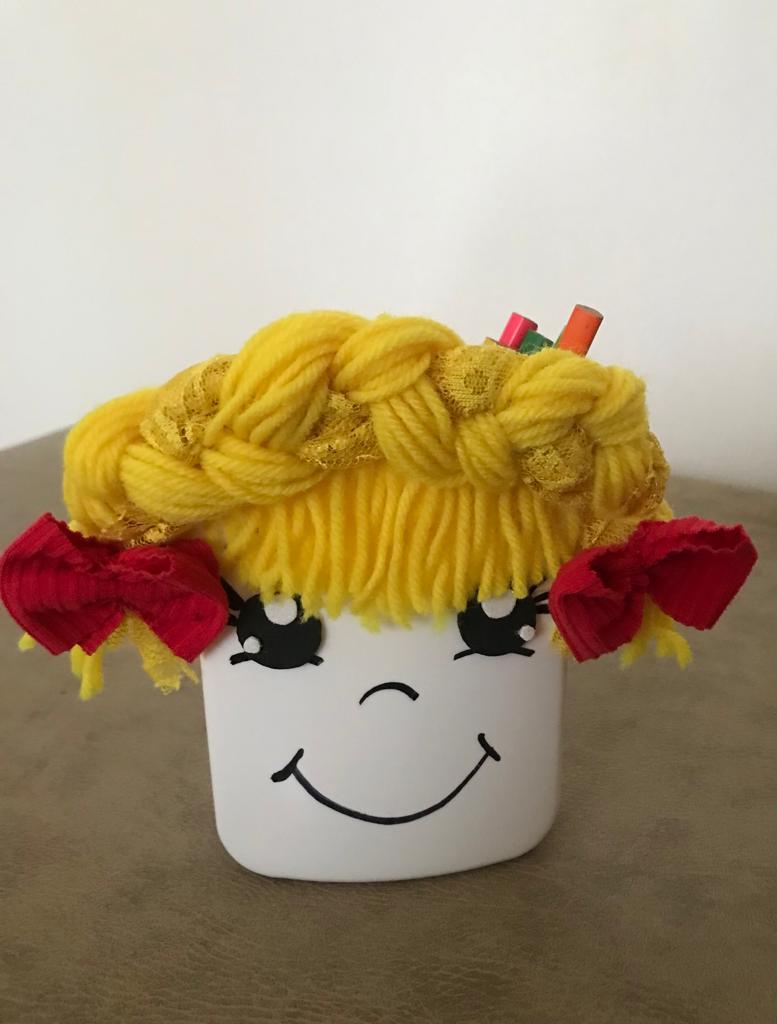
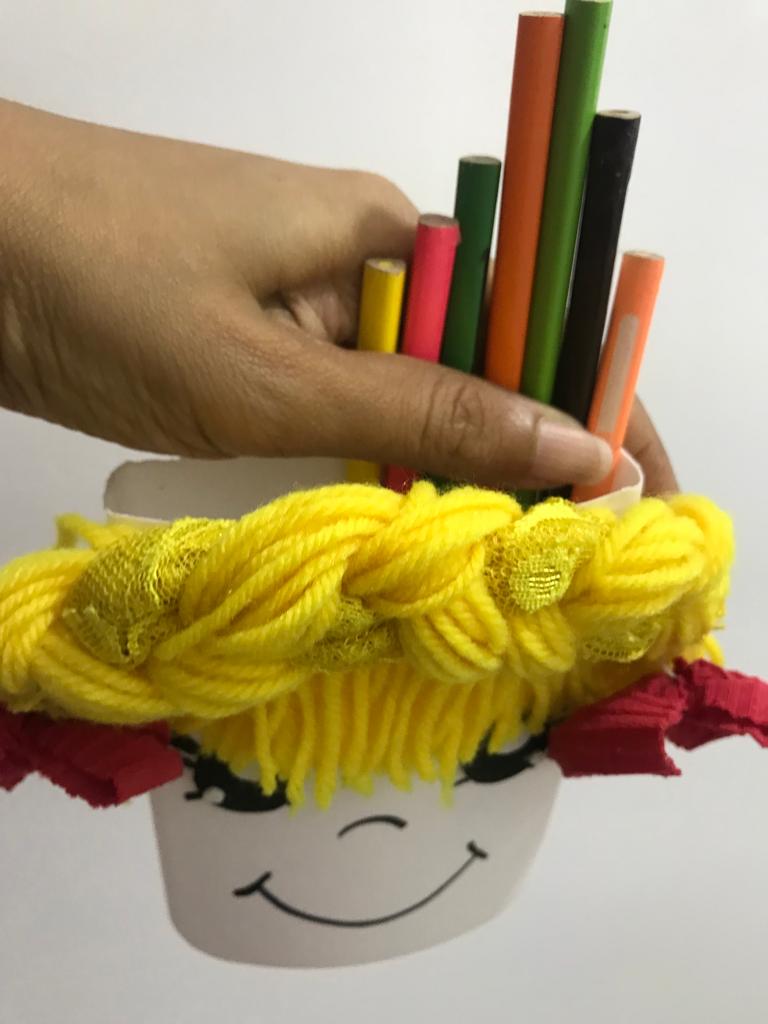
This beautiful and original organizer for pencils with a braided doll's face. It is a beautiful and decorative manual work that you can do at home, with simple materials and spite. And give it multiple uses (organizer, as a party favor, to store, among others) everyone will love this flirty and striking design.
Este hermoso y original organizador para lápices con cara de muñeca de trenzas. Es un lindo y decorativo trabajo manual que podrás hacer en su hogar;con materiales sencillos y de despecho. Y darle múltiples usos ( organizador, como cotillón , para almacenar, entre otros) a todos les encantará este coqueto y llamativo diseño .

Until a next opportunity.
Hasta una próxima oportunidad.
The photographs in this article are my own and the grids were made using the incollage application; translation using google translate.
Las fotografías de este artículo son de mi autoría y las cuadrículas fueron realizadas utilizando la aplicación incollage; la traducción usando el traductor de Google.
~~~ embed:1646111516524187648 twitter metadata:MTI2MDIxMTM3NTg4MTgxNDAxNnx8aHR0cHM6Ly90d2l0dGVyLmNvbS8xMjYwMjExMzc1ODgxODE0MDE2L3N0YXR1cy8xNjQ2MTExNTE2NTI0MTg3NjQ4fA== ~~~
The rewards earned on this comment will go directly to the people( @lileisabel, @madushanka, @muneeb487 ) sharing the post on Twitter as long as they are registered with @poshtoken. Sign up at https://hiveposh.com.
Gracias por su apoyo!!!
Te quedó hermoso amiga,me encanta, es muy creativo.
Gracias!! Lo mejor es que esta hecho con materiales reciclables… saludos
Te quedó muy lindo, intentaré hacer uno de esos.
Gracias por compartir! 😊
Espero te quede muy lindo!!! Puedes personalizarla con los colores de tu preferencia