Hey dear artist friends!!
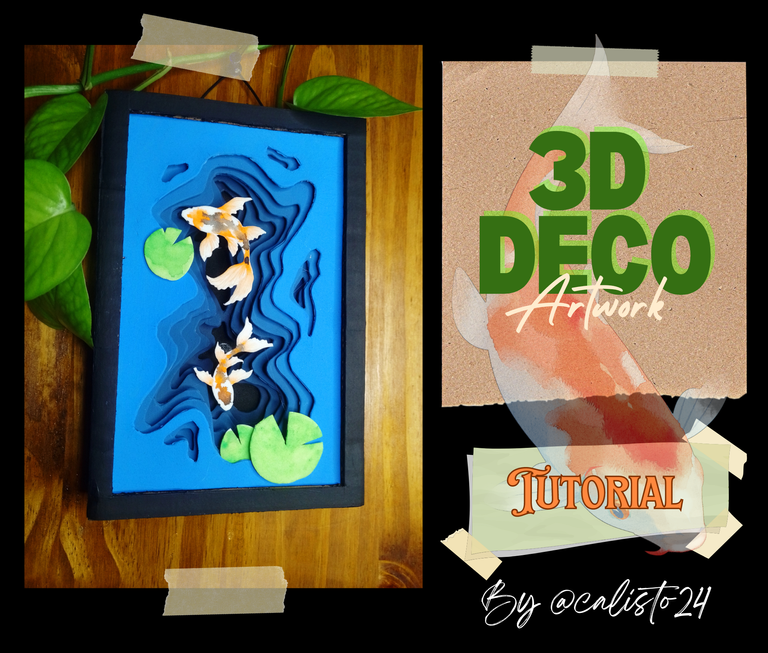
Today I return to this beautiful community to share with you the step by step of how I made this creative decorative painting. I hope you like it!
Hey queridos amigos artistas!!
Hoy vuelvo a esta bella comunidad para compartirles el paso a paso de cómo hice este creativo cuadro decorativo. Espero les guste!
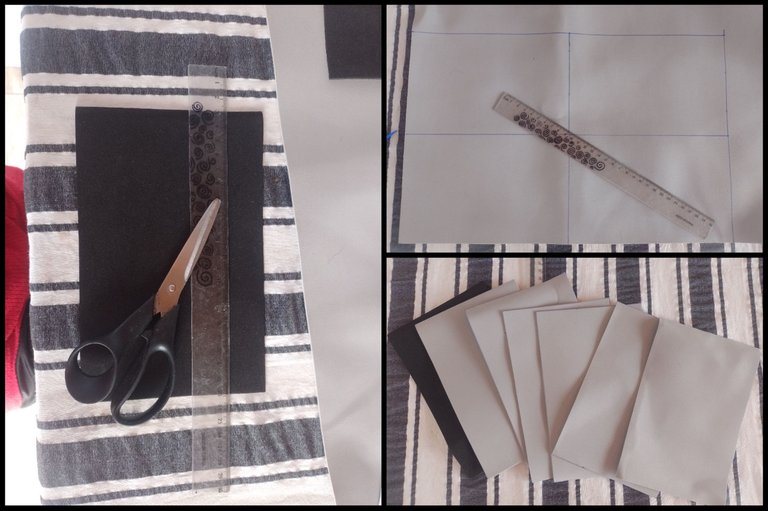
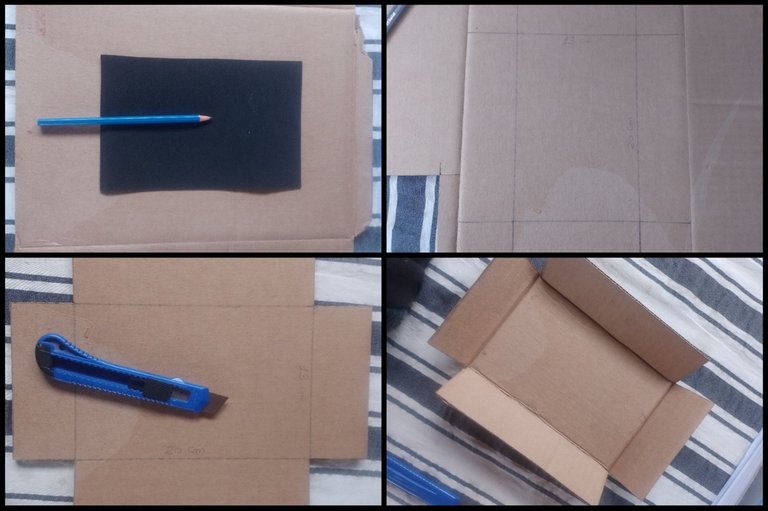
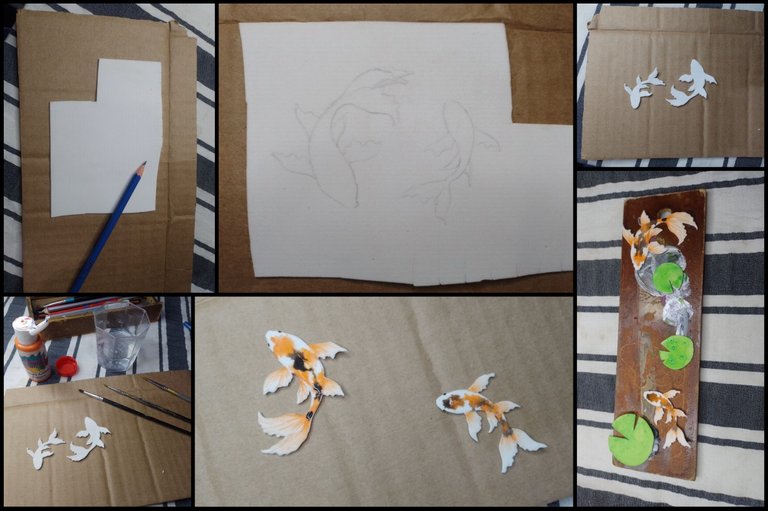
To carry out this work we will need some sheets of EVA foam (also known as foam), cardboard, liquid silicone or the quick-drying glue of your choice, acrylic paints, brushes, scissors, a ruler and a cutter.
On a sheet of black EVA or foam, I am going to mark a rectangle measuring 20 centimeters high by 13 centimeters wide. Later I'm going to cut it out with scissors. This black rectangle will be the base and, at the same time, the background of our square.
Then, on a sheet of EVA or foam of a much lighter color (so that I can paint it later with acrylic paints in a practical way), I am going to cut out 6 more rectangles, with the same measurements as the previous one.
Para realizar este trabajo vamos a necesitar algunas planchas de goma eva (también conocidas como foamy), cartón, silicona liquida o el pegamento de secado rápido de tu preferencia, pinturas acrílicas, pinceles, tijeras, una regla y un cutter.En una plancha de goma eva o foamy de color negro, voy a marcar un rectángulo con las medidas de 20 centímetros de alto, por 13 centímetros de ancho. posteriormente lo voy a recortar con unas tijeras. Este rectángulo de color negro será la base y, al mismo tiempo, el fondo de nuestro cuadrito.
Luego, en una plancha de goma eva o foamy de un color bastante mas claro (para poder pintarlo luego con pinturas acrílicas de manera practica), voy a recortar 6 rectángulos más, con las mismas medidas que el anterior.
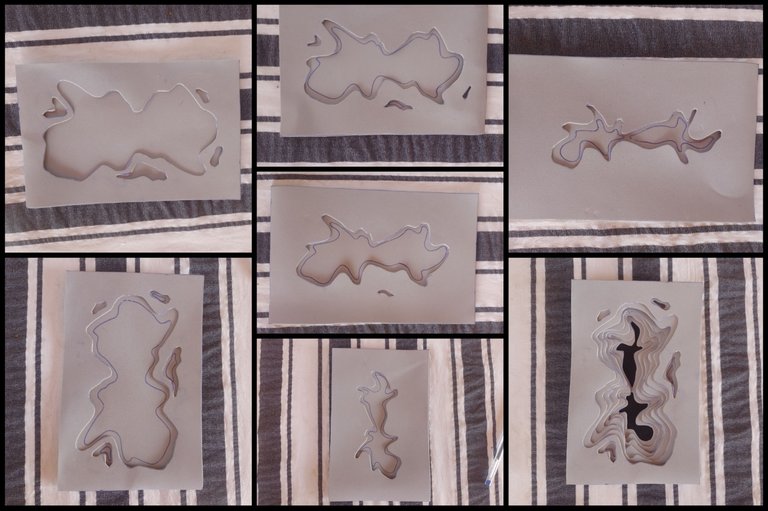
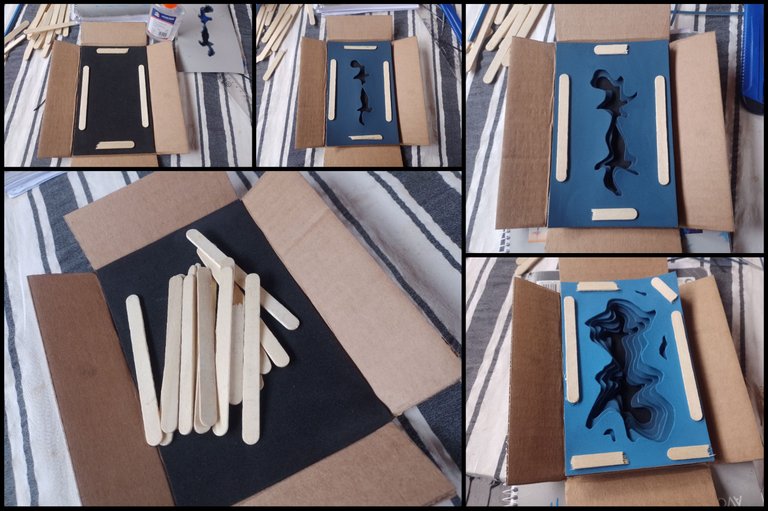
When we have the 6 lighter colored rectangles ready, we will start drawing the doodles. The thing is this, since it is a layered painting, the idea is that the layers below can be seen perfectly.
That's why I started by drawing a fairly large and open scribble on what would be the surface layer of the painting. Then I cut it out with the help of a cutter.
I placed the next layer below the previous layer, to use the silhouette of the previous layer as a reference. Then I made a silhouette similar to the previous one, but a little smaller, and I also cut it out. And so I carried out the same procedure with the rest of the layers, except for the black one, which would be the background.
Cuando tengamos los 6 rectángulos de color mas claro listos, empezaremos a dibujar los garabatos. El asunto es el siguiente, al ser un cuadro en capas, la idea es que las capas de abajo se logren ver a la perfección.Por eso yo comencé dibujando un garabato bastante grande y abierto en lo que sería la capa superficial del cuadro. luego lo recorté con la ayuda de un cutter.
La siguiente capa la situé por debajo de la capa anterior, para utilizar la silueta de la capa anterior como referencia. Entonces realice una silueta similar a la anterior, pero un poco mas pequeña, y también la recorté. Y así realicé el mismo procedimiento con el resto de las capas, excepto con la negra que sería el fondo.
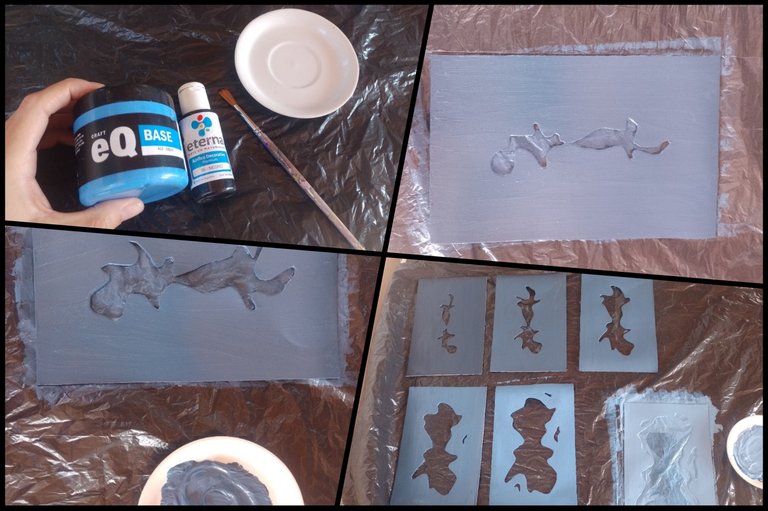
Well, it's time to paint them.
For this I used sky blue acrylic paint and a little black. We must darken the tone a little more between layers, adding a pinch of black to the base color, which would be blue. The superficial layer being the lightest and sharpest blue color, and the deeper the rest of the layers are located, the darker they will be.
Bien, llegó la hora de pintarlas.Para ello utilicé pintura acrílica de color azul cielo y un poco de color negro. Debemos ir oscureciendo un poco mas el tono entre capa y capa, agregando una pizca de negro al color base que sería el azul. Siendo la capa superficial la del color azul mas claro y nítido, y mientras mas profundo estén ubicadas el resto de las capas, mas oscuras serán.
While we wait for the blue layers to dry, we will continue with what will be the base and frame of our painting.
To do this, using a large cardboard sheet, we will place the black foam rectangle in the center of it.
With a pencil we will mark the outline of the rectangle on the cardboard and we will also mark 4 flaps that extend 5 centimeters from the outline of the rectangle, then we will cut it out.
We will help ourselves with a ruler to fold the four flaps straight, towards the center.
Mientras esperamos que las capas azules se sequen, continuaremos con lo que será la base y el marco de nuestro cuadro.para ello, utilizando una plancha de cartón grande, ubicaremos en el centro del mismo, el rectángulo de foamy negro.
con un lápiz marcaremos sobre el cartón, el contorno del rectángulo y también marcaremos 4 solapas que se extiendan a 5 centímetros desde el contorno del rectángulo, luego lo recortaremos.
Nos ayudaremos con una regla para doblar de manera recta las cuatro solapas, hacia el centro.
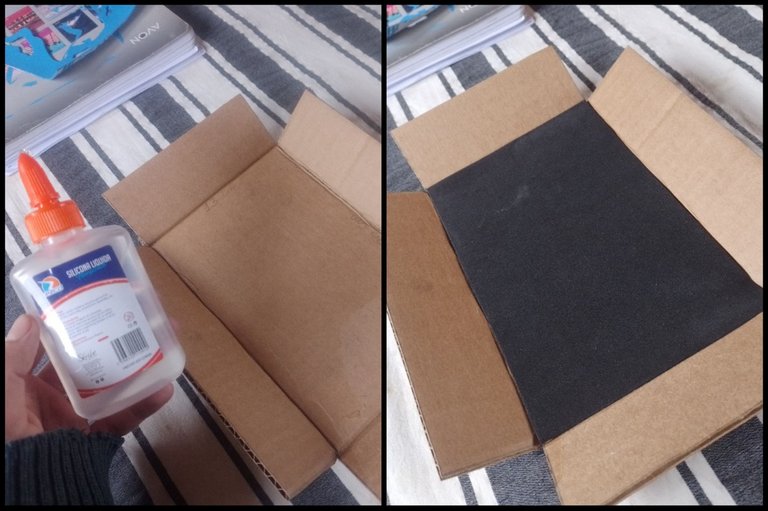
We will glue the black foam rectangle in the center of the cardboard frame with a little liquid silicone and let it dry completely.
Pegaremos el rectángulo de foamy negro en el centro del marco de cartón con un poco de silicona liquida y dejaremos que seque completamente.
We will use ice cream sticks to give even more volume to the layers (they do not necessarily have to be ice cream sticks, with small strips of cardboard you can also achieve a very similar result. I used toothpicks because it gives a little more stability to the work).
So what we will do is stick some toothpicks at the ends of each rectangle, and then put the next layer on top and we will repeat the same procedure until the last layer.
Utilizaremos palillos de helado para darle aun mas volumen a las capas (no necesariamente deben ser palillos de helado, con pequeñas tiras de cartón también se logra un resultado muy similar. yo usé palillos porque le da un poquito mas de estabilidad al trabajo).Entonces lo que haremos será pegar algunos palillos en los extremos de cada rectángulo, para luego encimar la siguiente capa y repetiremos el mismo procedimiento hasta la ultima capa.
With all the layers in place, what we will do now is measure the height left by overlapping them. To then mark that same measurement on the side flaps and we will cut out the excess.
With liquid silicone we will glue the flaps to the sides of the foam, forming a kind of box or frame. We will hold everything together with some elastic bands to keep everything together and keep the flaps firmly glued in place.
Con todas las capas ubicadas en su lugar, lo que haremos ahora será medir el alto que quedó de la superposición de las mismas. Para luego marcar esa misma medida sobre las solapas de los lados y recortaremos el sobrante.Con silicona liquida pegaremos las solapas a los lados del foamy formando una especie de caja o marco. sujetaremos todo con algunas ligas elásticas para que mantener todo unido y que las solapas queden bien pegadas en su lugar.

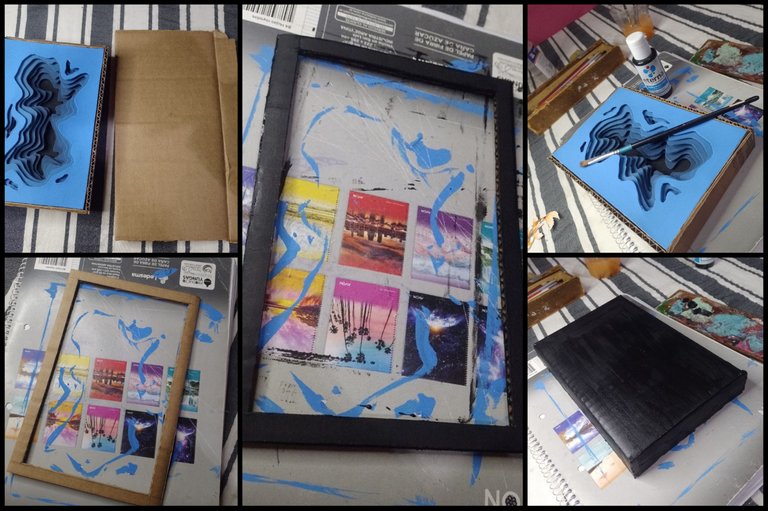
Then, on another sheet of cardboard, we will mark the outline of our painting and with that reference, we will mark an edge of 1 centimeter on each side inward, forming a frame that we will also cut out and then paint with black acrylic paint.
We will also paint the exposed part of the frame that we made previously in the same color. including the back of it.
Luego, en otra plancha de cartón, marcaremos el contorno de nuestro cuadro y con esa referencia, marcaremos un borde de 1 centímetro de cada lado hacia adentro, formando un marco que también recortaremos y luego pintaremos con pintura acrílica de color negro.También pintaremos del mismo color, la parte expuesta del marco que realizamos anteriormente. incluyendo la parte de atrás del mismo.
The time has come for the important figures in this decorative painting. fish and aquatic plants.
To do this, I drew the silhouette of two fish and three aquatic plants of different sizes, on scraps or leftover foam. Then I cut them out neatly and painted each figure with acrylic paints. I used some photos of coi fish as reference.
Llegó el momento de las figuras importantes de este cuadro decorativo. los peces y las plantas acuáticas.Para ello, dibujé la silueta de dos peces y de tres plantas acuáticas de diferentes tamaños, sobre retazos o sobrantes de foamy. luego los recorté de forma prolija y pinte cada figura con pinturas acrílicas. Utilicé algunas fotografías de peces coi como referencia.
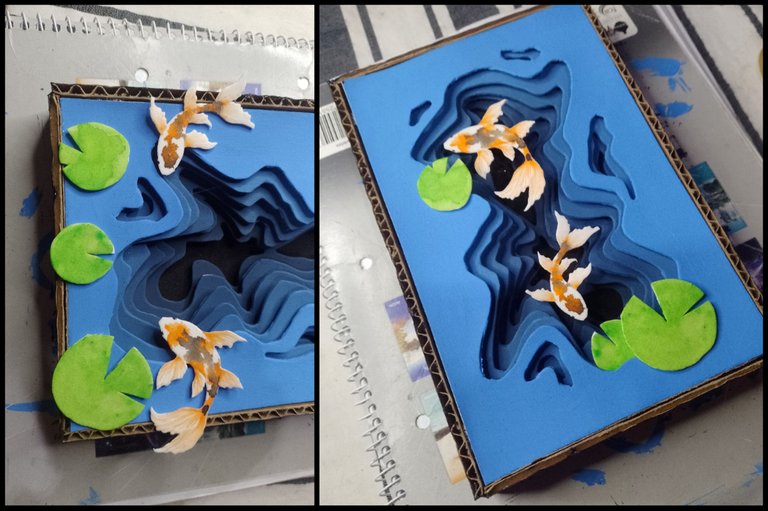
Once the figures are dry, we are going to place them in the painting.
The aquatic plants are supposed to float, so we are going to place them on the surface of the painting and glue them with a little liquid silicone.
The fish should be located in the center of the doodles that we drew and cut out, since these would represent the depth layers of the water.
To give an even more three-dimensional effect, I formed small foam rolls about a centimeter high and glued them on the deepest layer of the painting (the black one) and above the rolls, I glued the fish. Being in the center without touching the blue layers, it generates a much more beautiful optical illusion.
Una vez secas las figuras, las vamos a ubicar en el cuadro.las plantas acuáticas, se supone que flotas, por lo que las vamos a ubicar en la superficie del cuadro y las pegaremos con un poquito de silicona liquida.
Los peces deben estar ubicados en el centro de los garabatos que fuimos dibujando y recortando, ya que estos representarían las capas de profundidad del agua.
Para dar un efecto aun mas tridimensional, formé pequeños rollitos de foamy de un centímetro de alto y los pegué sobre la capa mas profunda del cuadro (la negra) y por encima de los rollitos, pegué los peces. al estar en el centro sin tocar las capas azules, genera un ilusión óptica mucho mas bonita.
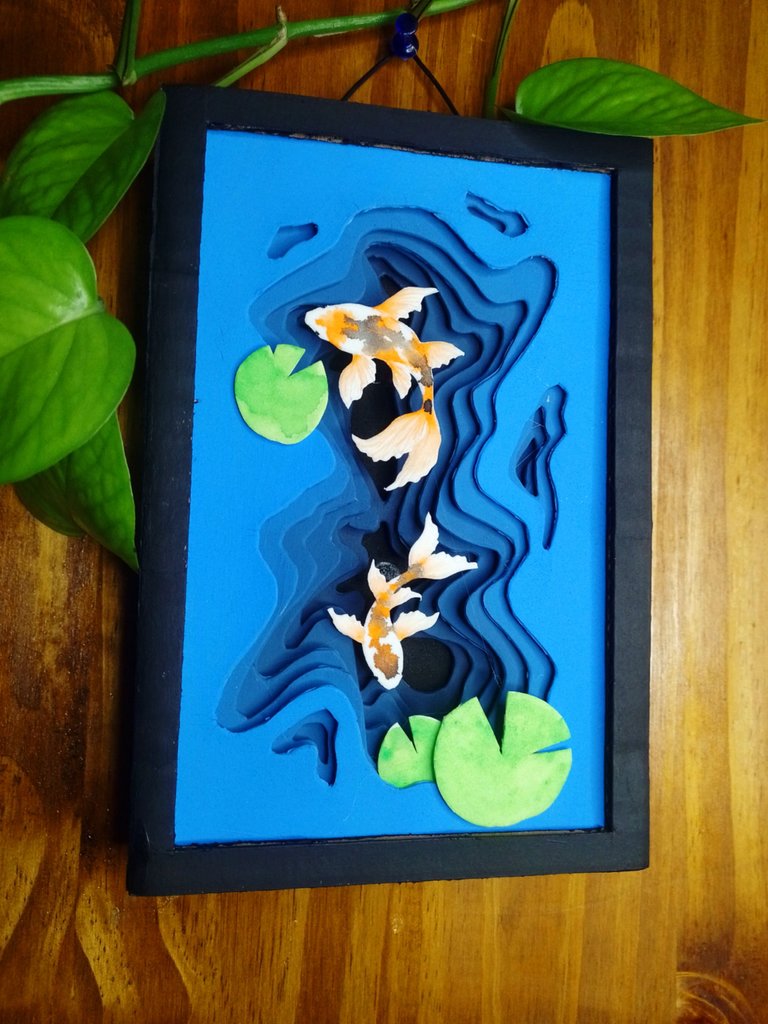
Finally, the only thing left to do is glue the cardboard frame that we had reserved on the surface of the painting and we will also glue a thread on the back so we can then hang it on the wall. and that's it friends!!
I love how with some simple elements to obtain (in fact they can even be recycled such as the cardboard that I used, the foam that I had left over from another job, and the ice cream sticks) and with a little creativity, we can create works that fill with life our home or serve as gifts to whoever we love most.
Para finalizar, lo único que resta por hacer es pegar el marco de cartón que teníamos reservado, en la superficie del cuadro y también pegaremos un hilo por la parte de atrás para luego poder colgarlo en la pared. y listo amigos!!Me encanta como con algunos elementos simples de conseguir (hasta de hecho pueden ser reciclados como el cartón que utilicé, el foamy que me sobró de otro trabajo, y los palillos de helado) y con un poquito de creatividad, podemos crear obras que llenan de vida nuestro hogar o sirven como para hacer regalos a quien mas queramos.
Thank you for reading my content. a big hug for everyone
Gracias por leer mi contenido. Un abrazo grande para todos
Todas las fotografías y ediciones son de mi autoría. Realizado con la aplicación picsart y canva.

Quedó muy original y hermoso, se percibe la profundidad y ese efecto tridimensional lo conseguiste, me encantó 😍
Por favor, pero que preciosidad❤️🔥
El cuidado en el detalle y la transición de colores para el efecto 3D es una pasada.
Estuve esperando tu siguiente post (este). Debo decir que, me dejas con las espectativas de qué traerás de hermoso la próxima vez.
Feliz noche, un abrazo y mucho arte✨🧚♂️
Que trabajo tan precioso, te botaste con este cuadro en 3D, me encanto tu proceso creativo tan impecable y este resultado final simplemente espectacular. Te felicito @calisto24
!discovery 45
This post was shared and voted inside the discord by the curators team of discovery-it
Join our Community and follow our Curation Trail
Discovery-it is also a Witness, vote for us here
Delegate to us for passive income. Check our 80% fee-back Program
Talento puro, admiro a todo el que puede hacer arte con sus manos, un saludo 🍀
Que buen efecto 3D, esta muy divertido y original 👌 parece sencillo peroe stoy segura que no lo debe ser jaja mucha paciencia y concentracion, muy buen trabajo 🦉
a community encouraging first-hand content, and each individual living their best life.
Impresionante el efecto que da.