¡Saludos a todos los amantes de las artes manuales! Se acerca navidad, mi época favorita del año y para darle la bienvenida vamos a hacer un árbol de deseos**. Acompáñenme en este paso a paso.
Para la realización de este proyecto, aplicaremos la técnica del cartonaje que consiste en tomar una pieza de cartón para cubrirla con otro material, en este caso será papel de reciclaje y pegamento para simular piezas de madera.
Greetings to all handmade craft lovers! Christmas is coming, my favorite time of the year and to welcome it we are going to make a wish tree. Join me in this step by step.
For the realization of this project, we will apply the cardboard technique that consists of taking a piece of cardboard to cover it with another material, in this case it will be recycled paper and glue to simulate pieces of wood.

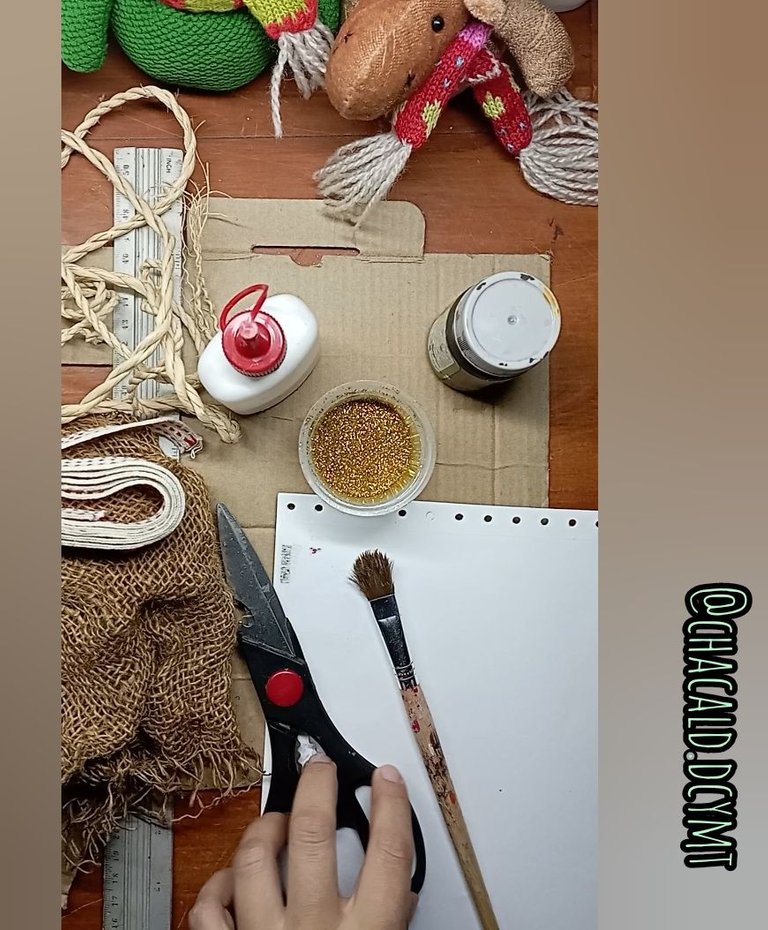
Cartón
Pegamento escolar
Tijera
Marcadores
Perforador
Hojas blancas
Escarcha
Pincel viejo
Pinturas acrílicas
Tela de yute, cinta y cuerda
DIY Wishing Tree
Maretials:
Cardboard
School glue
Scissors
Markers
Hole punch
White sheets
Frosting
Old paintbrush
Acrylic paints
Jute cloth, ribbon and string

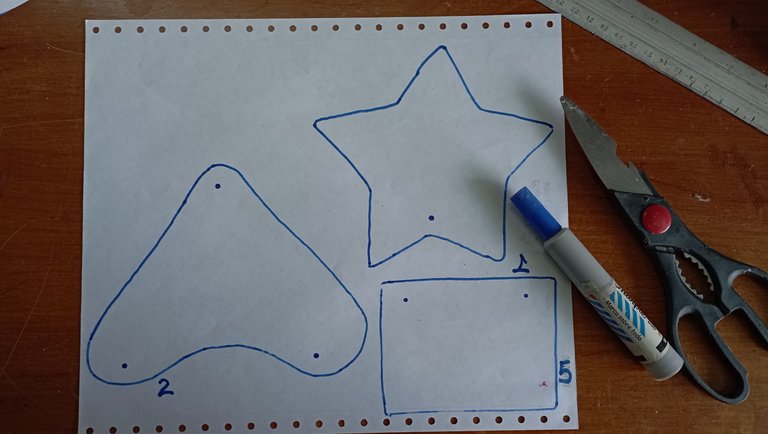
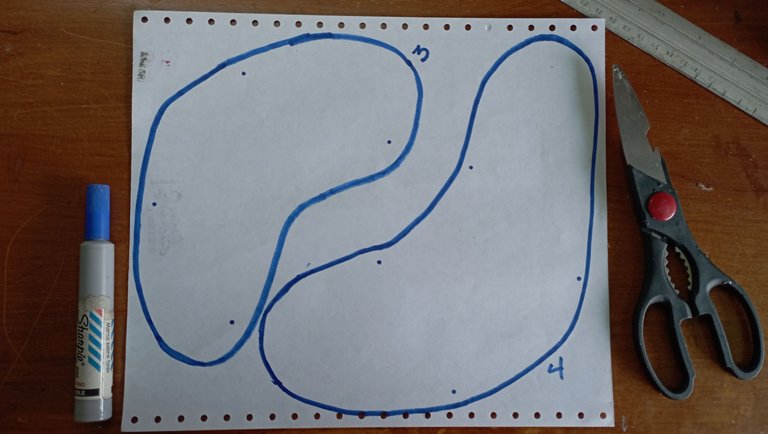
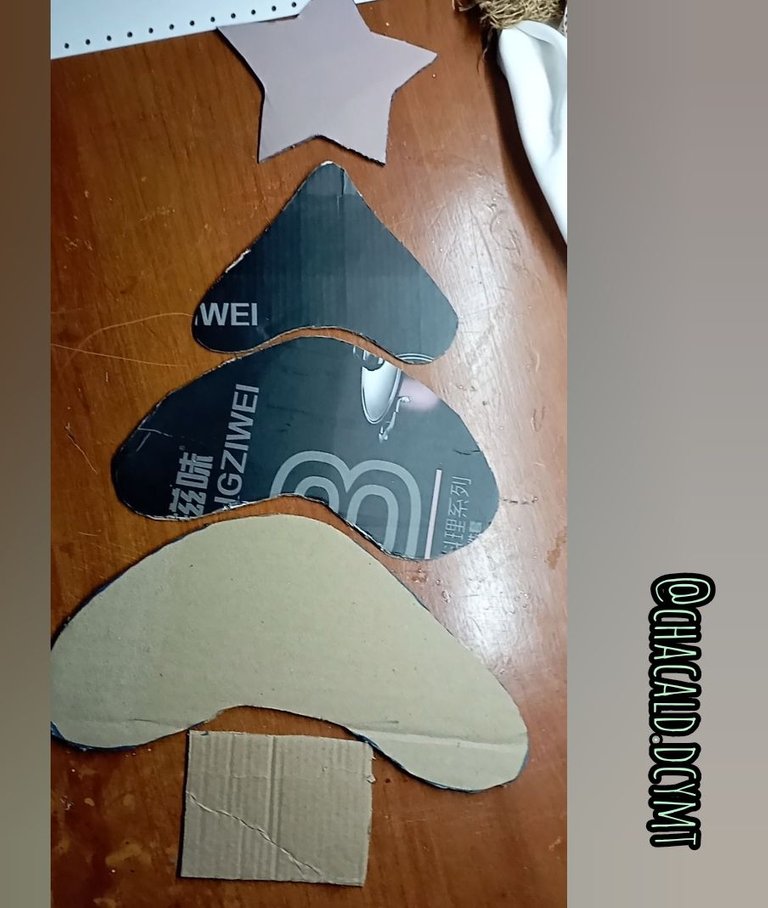
-Una vez que tenemos los materiales, vamos a iniciar haciendo los moldes en una hoja de papel. Necesitamos 5 piezas separadas: la estrella, la copa del árbol y 2 partes una más grande que la otra y el tronco.
Elaboration process:
-Once we have the materials, we will start by making the molds on a sheet of paper. We need 5 separate pieces: the star, the top of the tree and 2 parts one bigger than the other and the trunk.
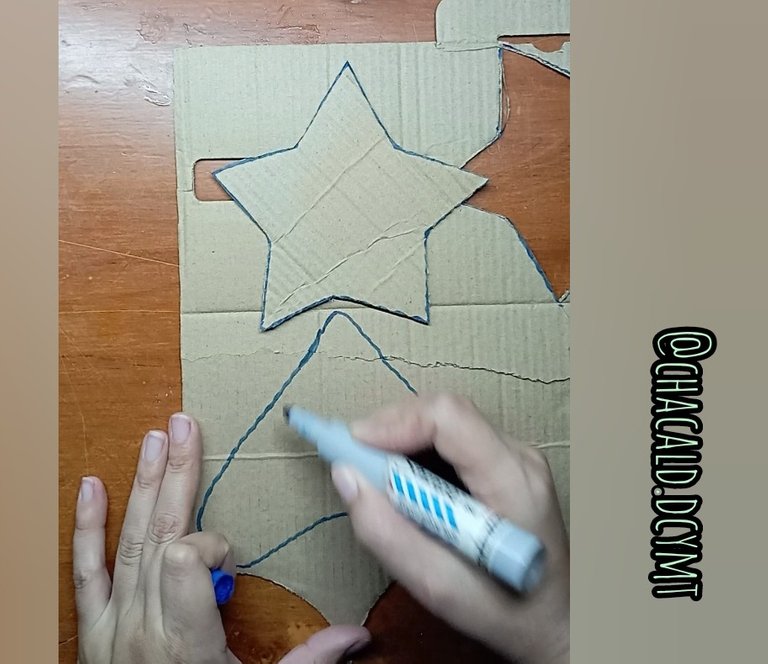
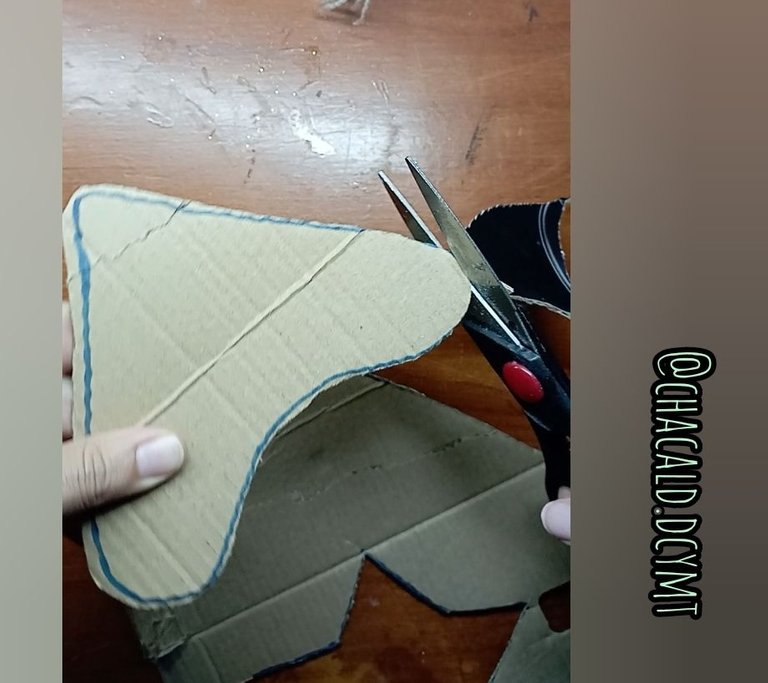
-Transferimos los moldes al cartón y recortamos.
-We transfer the molds to cardboard and cut them out.
 |  |
|---|
Nos deben quedar las siguientes piezas:
We should be left with the following pieces:
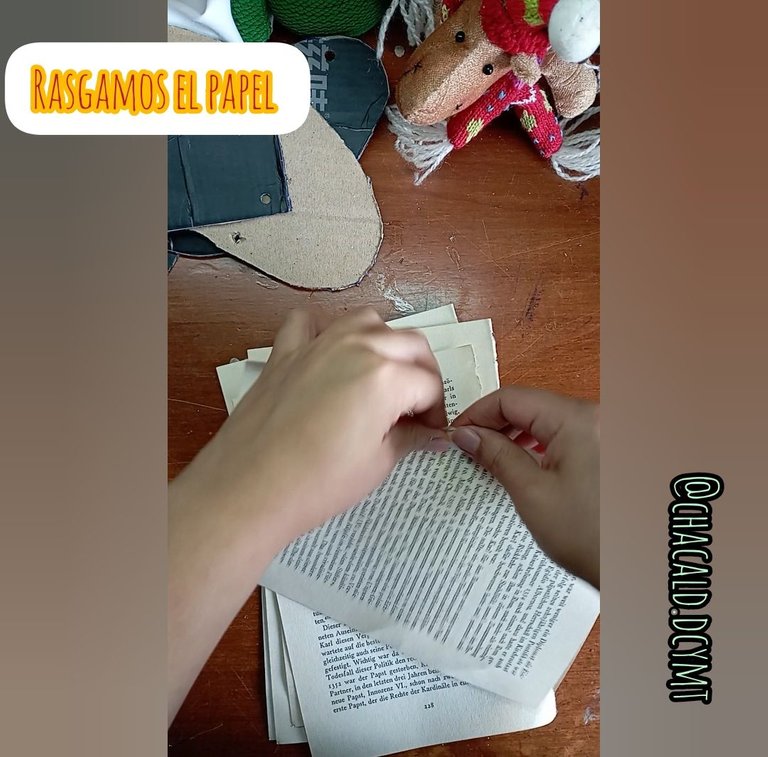
-Rasgamos el papel en cuadros. Tratamos que queden del mismo tamaño para que al sobre ponerlos se vea parejo.
-We cut the paper into squares. We try to make them the same size so that when we overlap them they look even.
-Colocamos pegamento sobre cada pieza, incluyendo los bordes para que el papel se pegue bien. Podemos ayudar a correr el pegamento con un poco de agua.
-We put glue on each piece, including the edges so that the paper sticks well. We can help the glue to run with a little water.
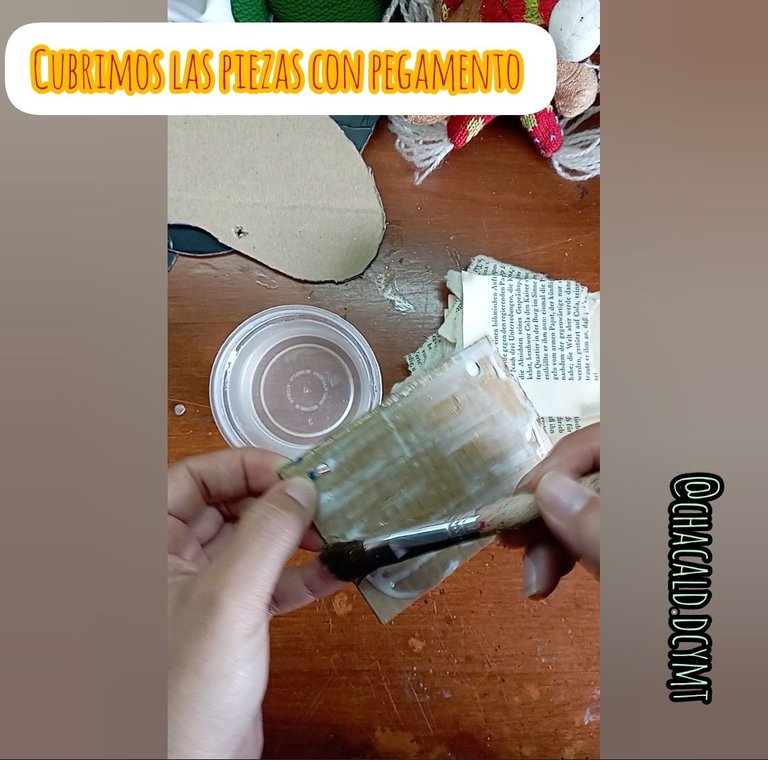
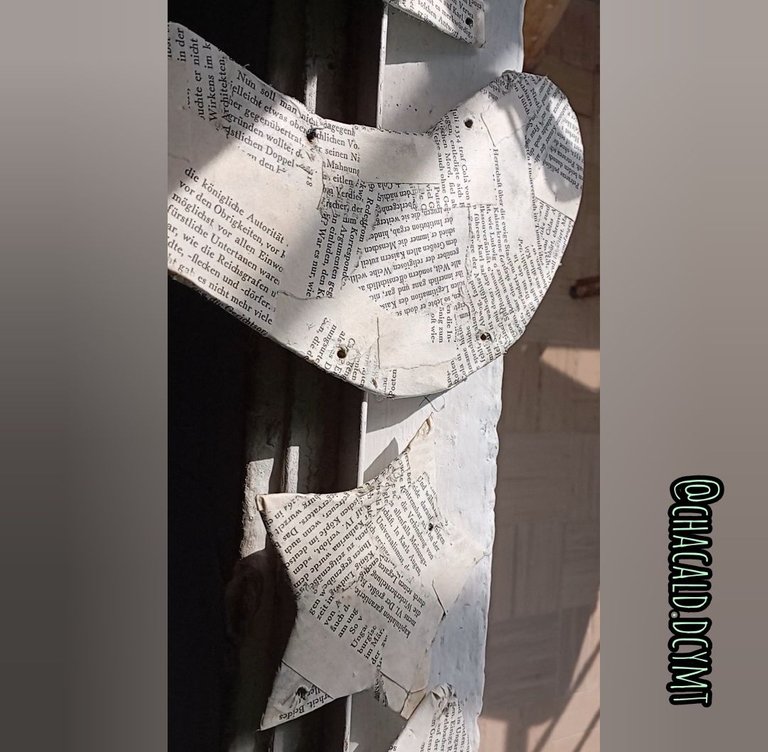
-Cubrimos muy bien cada pieza con el papel tratando de cubrir los bordes. Hacemos presión con los dedos y así evitamos que queden burbujas de aire.
-We cover each piece very well with the paper, trying to cover the edges. We make pressure with our fingers to avoid air bubbles.

-Dejamos secar, si es posible al sol para que quede bien solido. Es posible que en 4 horas las piezas estén secas, pero depende del tamaño delas piezas y del grosor del papel. Sabemos que estan secas cuando se endurecen totalmente.
-Let dry, if possible in the sun to make it solid. It is possible that in 4 hours the pieces are dry, but it depends on the size of the pieces and the thickness of the paper. We know they are dry when they harden completely.
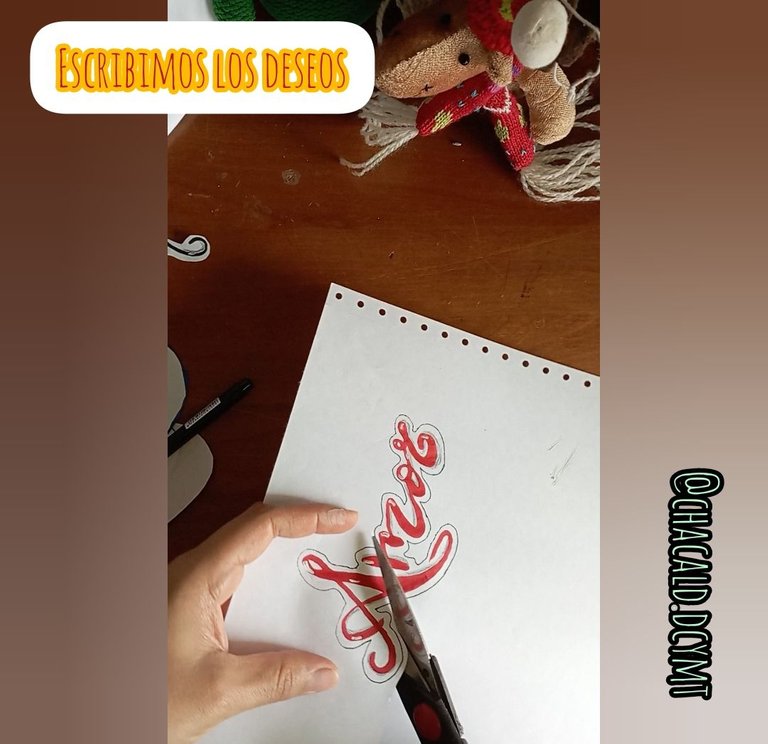
-Mientras que secan las piezas, vamos a escribir los deseos en una hoja blanca y recortamos. Escribimos un deseo por cada pieza del árbol. Podemos utilizar los marcadores de diferentes colores para que sea más llamativo el árbol.
-While the pieces are drying, we will write the wishes on a white sheet of paper and cut them out. We write one wish for each piece of the tree. We can use the markers of different colors to make the tree more eye-catching.
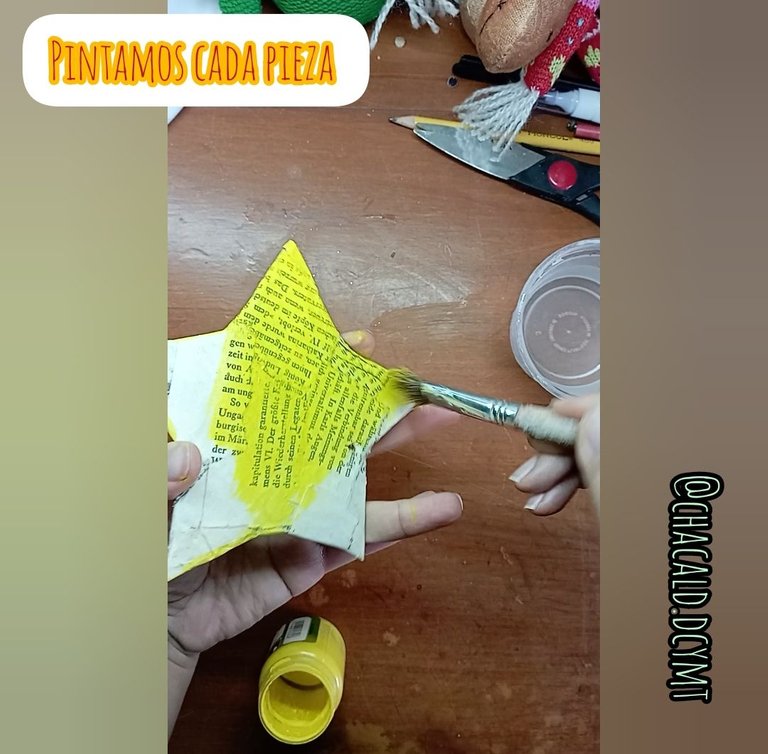
-Una vez secas las piezas vamos a pintar. Debemos pintar ambos lados, tanto el frente como el reverso deben quedar bien cubiertos de pintura. Podemos dar varias capas si vemos que es necesario.
-Once the pieces are dry we are going to paint. We must paint both sides, both the front and back should be well covered with paint. We can give several coats if we see that it is necessary.
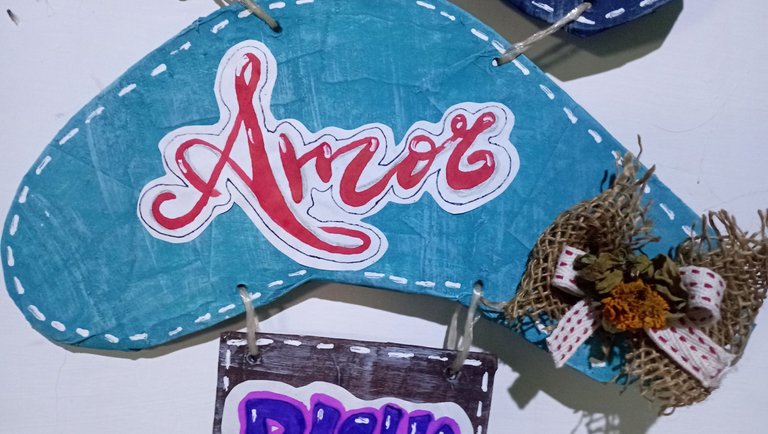
-Decoramos cada pieza con un borde, podemos agregar un lazo con la tela de yute y la cinta. Podemos colocar escarcha dorada a la estrella.
-Y terminamos uniendo las piezas con un trozo de cuerda.
-We decorate each piece with a border, we can add a bow with the jute fabric and ribbon. We can put gold frosting on the star.
-And we finish by joining the pieces with a piece of string.
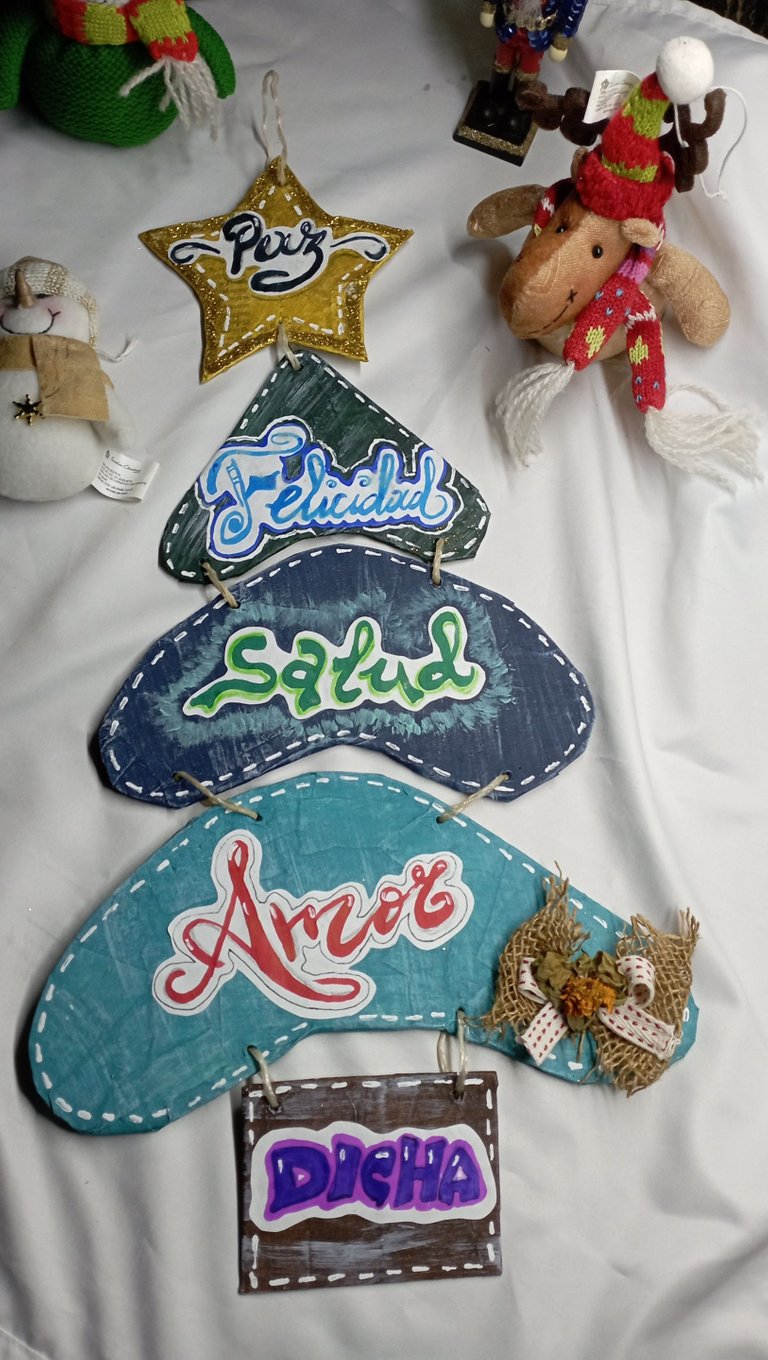
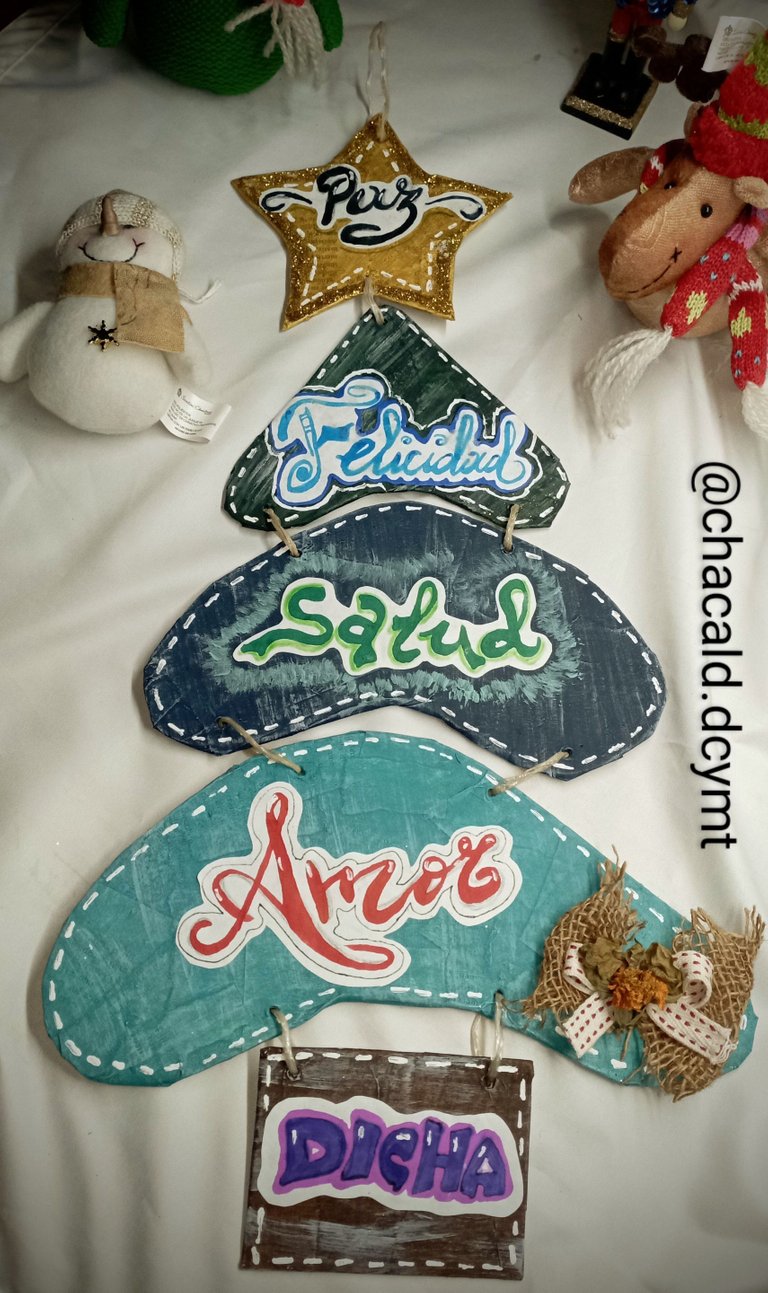
Y así queda nuestro árbol de deseos** listo para
nuestro ambiente navideño. Este trabajo es muy fácil de realizar, económico, podemos usar los materiales que tengamos a la mano y vamos a reciclar el cartón y el papel. Les invito a ver el video para tener más claro cada paso.
And that's our wishing tree ready for our Christmas
our christmas environment. This work is very easy to do, economical, we can use the materials we have at hand and we will recycle cardboard and paper. I invite you to watch the video to have a better understanding of each step.
Espero que les guste esta idea navideña y que se anime a realizarla. Gracias por visitar mi publicación. Nos vemos en una próxima oportunidad.
I hope you like this Christmas idea and that you are encouraged to make it. Thanks for visiting my publication. See you next time.
Taller Bricolaje DC
Colección navideña 2022
Contenido original del autor.
Recursos: App: Canva / Giphy / Inshot
📷 Redmi 10 Smartphone
Traducido con Deepl.com
✿ Todos los Derechos Reservados || © @chacald.dcymt // 2020-2022 ✿
💌 Discord: chacald.dcymt#3549
_
Bricolaje DC Workshop
Christmas Collection 2022
Original content by the author.
Resources: App: Canva / Giphy / Inshot
📷 Redmi 10 Smartphone
Translation done with Deepl.com
✿ All Rights Reserved || © @chacald.dcymt // 2020-2022 ✿
💌 Discord: chacald.dcymt#3549
▶️ 3Speak
Magnifico, me parece que estoy viendo ArteMania jajaj
🤭 arteMania como olvidarlo, de ese programa salieron muchas ideas geniales que repliqué de niña 💜...
Gracias por el apoyo.
🎆🎇🎉🎊🌧️💐✨🌾🌱🌹🌙🌿🍃🥀⚡🌺☘️🍀🌈🌷⭐🪴🌵🌸🌟💮🌴🌳💫☀️💮☔🌲🌳🌍🌌🌠☄️🏵️🐝🌻🌼🍄🐞🦋💙☕💜🍍🎆🎇🎉🎊🎆🎇🎉🎊🌧️💐✨🌾🌱🌹🌙🌿🍃🥀⚡🌺☘️🍀🌈🌷⭐🪴🌵🌸🌟💮🌴🌳💫☀️💮☔🌲🌳🌍🌌🌠☄️🏵️🐝🌻🌼🍄🐞🦋💙☕💜🍍🎆🎇🎉🎊
Que bello ese árbol de deseos, magnífico tutorial amiga 😘😘
Muchas gracias 😊. Un abrazo 😘
🎆🎇🎉🎊🌧️💐✨🌾🌱🌹🌙🌿🍃🥀⚡🌺☘️🍀🌈🌷⭐🪴🌵🌸🌟💮🌴🌳💫☀️💮☔🌲🌳🌍🌌🌠☄️🏵️🐝🌻🌼🍄🐞🦋💙☕💜🍍🎆🎇🎉🎊🎆🎇🎉🎊🌧️💐✨🌾🌱🌹🌙🌿🍃🥀⚡🌺☘️🍀🌈🌷⭐🪴🌵🌸🌟💮🌴🌳💫☀️💮☔🌲🌳🌍🌌🌠☄️🏵️🐝🌻🌼🍄🐞🦋💙☕💜🍍🎆🎇🎉🎊
Excelente explicación, me encantó el paso a paso, materiales sencillos y es realmente fácil de hacer. Te quedó hermoso.
Muchas gracias 😊. Oficialmente bienvenida la navidad!!
Gracias por pasarte.😘
🎆🎇🎉🎊🌧️💐✨🌾🌱🌹🌙🌿🍃🥀⚡🌺☘️🍀🌈🌷⭐🪴🌵🌸🌟💮🌴🌳💫☀️💮☔🌲🌳🌍🌌🌠☄️🏵️🐝🌻🌼🍄🐞🦋💙☕💜🍍🎆🎇🎉🎊🎆🎇🎉🎊🌧️💐✨🌾🌱🌹🌙🌿🍃🥀⚡🌺☘️🍀🌈🌷⭐🪴🌵🌸🌟💮🌴🌳💫☀️💮☔🌲🌳🌍🌌🌠☄️🏵️🐝🌻🌼🍄🐞🦋💙☕💜🍍🎆🎇🎉🎊
Te quedó genial, se ve bastante significativo y alusivo a la navidad, que hermosos deseos. Me gustó el video y como explicaste el proceso, excelente 😊❤️
Besos y abrazos 🍃🌸💕
Muchas gracias ☺️. Lo práctico de este proyecto es que podemos personalizarlo con nuestros deseos.
Gracias por el apoyo.
🎆🎇🎉🎊🌧️💐✨🌾🌱🌹🌙🌿🍃🥀⚡🌺☘️🍀🌈🌷⭐🪴🌵🌸🌟💮🌴🌳💫☀️💮☔🌲🌳🌍🌌🌠☄️🏵️🐝🌻🌼🍄🐞🦋💙☕💜🍍🎆🎇🎉🎊🎆🎇🎉🎊🌧️💐✨🌾🌱🌹🌙🌿🍃🥀⚡🌺☘️🍀🌈🌷⭐🪴🌵🌸🌟💮🌴🌳💫☀️💮☔🌲🌳🌍🌌🌠☄️🏵️🐝🌻🌼🍄🐞🦋💙☕💜🍍🎆🎇🎉🎊
Gracias por el apoyo 😃👍🏼
🎆🎇🎉🎊🌧️💐✨🌾🌱🌹🌙🌿🍃🥀⚡🌺☘️🍀🌈🌷⭐🪴🌵🌸🌟💮🌴🌳💫☀️💮☔🌲🌳🌍🌌🌠☄️🏵️🐝🌻🌼🍄🐞🦋💙☕💜🍍🎆🎇🎉🎊🎆🎇🎉🎊🌧️💐✨🌾🌱🌹🌙🌿🍃🥀⚡🌺☘️🍀🌈🌷⭐🪴🌵🌸🌟💮🌴🌳💫☀️💮☔🌲🌳🌍🌌🌠☄️🏵️🐝🌻🌼🍄🐞🦋💙☕💜🍍🎆🎇🎉🎊
Thank you for sharing this post on HIVE!
Your content got selected by our fellow curator jasonmunapasee & you just received a little thank you upvote from us for your great work! Your post will be featured in one of our recurring compilations which are aiming to offer you a stage to widen your audience within the DIY scene of Hive. Next time make sure to post / cross-post your creation within the DIYHub community on HIVE and you will receive a higher upvote ;) Stay creative & HIVE ON!
Please vote for our hive witness <3
Thank you very much for the support 😊.
🎆🎇🎉🎊🌧️💐✨🌾🌱🌹🌙🌿🍃🥀⚡🌺☘️🍀🌈🌷⭐🪴🌵🌸🌟💮🌴🌳💫☀️💮☔🌲🌳🌍🌌🌠☄️🏵️🐝🌻🌼🍄🐞🦋💙☕💜🍍🎆🎇🎉🎊🎆🎇🎉🎊🌧️💐✨🌾🌱🌹🌙🌿🍃🥀⚡🌺☘️🍀🌈🌷⭐🪴🌵🌸🌟💮🌴🌳💫☀️💮☔🌲🌳🌍🌌🌠☄️🏵️🐝🌻🌼🍄🐞🦋💙☕💜🍍🎆🎇🎉🎊
Your paperwork looks gorgeous. Thanks for showing your creation and keep up the good work.
Pero que bellezaaaaaaaaaa. Este trabajo lo ame 💕😍. Siempre me han enamorado ese tipo de colgantes con los mensajes que transmiten. Que hermososura tienes para decorar tu casa y auguro que cada palabra que esta plasmada alli este presente en tu vida hoy, mañana y siempre. Que bello el arte y creatividad que tienes en tus manos.
Grandioso tutorial y lo mejor con materiales que todas tenemos a la mano.
Bendiciones mi bella miga @chacald.dcymt 💕
!LADY 🌹
Amén hermosa 🙏🏼...
Gracias por el apoyo. Me encanta la navidad y decorar con manualidades propias es algo que hago desde hace años ☺️🎇🎆 gracias por el apoyo. Un abrazo infinito y los deseos de mi árbol para ti y tu familia en 2023.
🎆🎇🎉🎊🌧️💐✨🌾🌱🌹🌙🌿🍃🥀⚡🌺☘️🍀🌈🌷⭐🪴🌵🌸🌟💮🌴🌳💫☀️💮☔🌲🌳🌍🌌🌠☄️🏵️🐝🌻🌼🍄🐞🦋💙☕💜🍍🎆🎇🎉🎊🎆🎇🎉🎊🌧️💐✨🌾🌱🌹🌙🌿🍃🥀⚡🌺☘️🍀🌈🌷⭐🪴🌵🌸🌟💮🌴🌳💫☀️💮☔🌲🌳🌍🌌🌠☄️🏵️🐝🌻🌼🍄🐞🦋💙☕💜🍍🎆🎇🎉🎊
~~~ embed:1597610797718720513 twitter metadata:MTMyNzA3MDM4MTIxNjMwOTI0OXx8aHR0cHM6Ly90d2l0dGVyLmNvbS8xMzI3MDcwMzgxMjE2MzA5MjQ5L3N0YXR1cy8xNTk3NjEwNzk3NzE4NzIwNTEzfA== ~~~
The rewards earned on this comment will go directly to the people( @dayadam, @edwing357 ) sharing the post on Twitter as long as they are registered with @poshtoken. Sign up at https://hiveposh.com.
Bellísimo me encantan tus post y los trabajos que haces el vídeo esta súper bien explicado y agradable la música de fondo
Un abrazo 🤗
Muchas gracias por tu apreciación, me divertí mucho editando este vídeo, es el primero que describo paso a paso con mi voz 😊. Feliz con el resultado 😃.
Gracias por tu visita. Saludos!
🎆🎇🎉🎊🌧️💐✨🌾🌱🌹🌙🌿🍃🥀⚡🌺☘️🍀🌈🌷⭐🪴🌵🌸🌟💮🌴🌳💫☀️💮☔🌲🌳🌍🌌🌠☄️🏵️🐝🌻🌼🍄🐞🦋💙☕💜🍍🎆🎇🎉🎊🎆🎇🎉🎊🌧️💐✨🌾🌱🌹🌙🌿🍃🥀⚡🌺☘️🍀🌈🌷⭐🪴🌵🌸🌟💮🌴🌳💫☀️💮☔🌲🌳🌍🌌🌠☄️🏵️🐝🌻🌼🍄🐞🦋💙☕💜🍍🎆🎇🎉🎊
🎆🎇🎉🎊🌧️💐✨🌾🌱🌹🌙🌿🍃🥀⚡🌺☘️🍀🌈🌷⭐🪴🌵🌸🌟💮🌴🌳💫☀️💮☔🌲🌳🌍🌌🌠☄️🏵️🐝🌻🌼🍄🐞🦋💙☕💜🍍🎆🎇🎉🎊
Gracias por el apoyo 😊👍🏻
🎆🎇🎉🎊🌧️💐✨🌾🌱🌹🌙🌿🍃🥀⚡🌺☘️🍀🌈🌷⭐🪴🌵🌸🌟💮🌴🌳💫☀️💮☔🌲🌳🌍🌌🌠☄️🏵️🐝🌻🌼🍄🐞🦋💙☕💜🍍🎆🎇🎉🎊🎆🎇🎉🎊🌧️💐✨🌾🌱🌹🌙🌿🍃🥀⚡🌺☘️🍀🌈🌷⭐🪴🌵🌸🌟💮🌴🌳💫☀️💮☔🌲🌳🌍🌌🌠☄️🏵️🐝🌻🌼🍄🐞🦋💙☕💜🍍🎆🎇🎉🎊
Que buena propuesta se lo mostré a mi mama y le encanto!!! te felicito amiga @chacald.dcymt
Graciasss!!! Me alegra que les gustara. Lo bonito es que se puede personalizar con los deseos de cada quien. Gracias por la visita hermosa. Un abrazo 😘 y todos los deseos de mi arbolito para ustedes.
🎆🎇🎉🎊🌧️💐✨🌾🌱🌹🌙🌿🍃🥀⚡🌺☘️🍀🌈🌷⭐🪴🌵🌸🌟💮🌴🌳💫☀️💮☔🌲🌳🌍🌌🌠☄️🏵️🐝🌻🌼🍄🐞🦋💙☕💜🍍🎆🎇🎉🎊🎆🎇🎉🎊🌧️💐✨🌾🌱🌹🌙🌿🍃🥀⚡🌺☘️🍀🌈🌷⭐🪴🌵🌸🌟💮🌴🌳💫☀️💮☔🌲🌳🌍🌌🌠☄️🏵️🐝🌻🌼🍄🐞🦋💙☕💜🍍🎆🎇🎉🎊
Que hermoso motivo navideño nos acabas de presentar amiga @chacald.dcymt, De hecho este trabajo todo me llega en el momento preciso para hacerlo para mí niña para una actividad que tiene el día lunes en su escuela.
Que Dios bendiga tu ingenio y tus manos
Me alegra que te sea útil este paso a paso. Espero ver tu proyecto. Un abrazo infinito 😘💜 muchas gracias por pasar y por el apoyo. Por aquí eres siempre bienvenida 😊.
🎆🎇🎉🎊🌧️💐✨🌾🌱🌹🌙🌿🍃🥀⚡🌺☘️🍀🌈🌷⭐🪴🌵🌸🌟💮🌴🌳💫☀️💮☔🌲🌳🌍🌌🌠☄️🏵️🐝🌻🌼🍄🐞🦋💙☕💜🍍🎆🎇🎉🎊🎆🎇🎉🎊🌧️💐✨🌾🌱🌹🌙🌿🍃🥀⚡🌺☘️🍀🌈🌷⭐🪴🌵🌸🌟💮🌴🌳💫☀️💮☔🌲🌳🌍🌌🌠☄️🏵️🐝🌻🌼🍄🐞🦋💙☕💜🍍🎆🎇🎉🎊🎆🎇🎉🎊🌧️💐✨🌾🌱🌹🌙🌿🍃🥀⚡🌺☘️🍀🌈🌷⭐🪴🌵🌸🌟💮🌴🌳💫☀️💮☔🌲🌳🌍🌌🌠☄️🏵️🐝🌻🌼🍄🐞🦋💙☕💜🍍🎆🎇🎉🎊
Me encantó la forma cómo cuelgan las piezas, me inspiró un móvil.
Voy a intentar hacer el mío y luego te cuento cómo me fue. 🌷🤗
Que bueno que te gustó 😊... Espero ver el tuyo pronto. Un abrazo infinito 😘 gracias por el apoyo.
🎆🎇🎉🎊🌧️💐✨🌾🌱🌹🌙🌿🍃🥀⚡🌺☘️🍀🌈🌷⭐🪴🌵🌸🌟💮🌴🌳💫☀️💮☔🌲🌳🌍🌌🌠☄️🏵️🐝🌻🌼🍄🐞🦋💙☕💜🍍🎆🎇🎉🎊🎆🎇🎉🎊🌧️💐✨🌾🌱🌹🌙🌿🍃🥀⚡🌺☘️🍀🌈🌷⭐🪴🌵🌸🌟💮🌴🌳💫☀️💮☔🌲🌳🌍🌌🌠☄️🏵️🐝🌻🌼🍄🐞🦋💙☕💜🍍🎆🎇🎉🎊