


Hola amigos de Hive Diy ayer me di a la tarea de hacerle mantenimiento a mi maquina de coser porque con el arreglo de los jeans empezó a coser feo y recorde que ya tenía como 6 meses sin hacerle un cariñito.
Mi maquina de coser es mi mano derecha, no me imagino sin ella, esta me la regalo mi mamá hace como 8 años y la máquina como tal tiene más de 20 años, ella la compró en su segundo viaje a Atlanta, es una máquina brother y a pesar del maltrato sufrido por unas personas a las que ella se la presto sin saber que era para coser grandes cantidades de cuero y semicuero, no es que no se pueda hacer pero se debe hacer con mucho cuidado y al parecer no lo hicieron porque la descalibraron toda y partía las agujas y sonaba muy feo, así que yo me tuve que dar a la tarea de hacerla funcionar bien, yo solo la usaba para lo que mi mamá necesitará porque esa era de ella, hasta que un día me dijo Chira quedate con ella, yo no la uso y tú si.
Así es como esta hermosa maquina brother llego a mis manos y yo siempre la cuido mucho.
Este es un trabajo de paciencia, sino sabe como hacerlo, vaya tomando fotos para que todo quede igual al final.
Hi friends of Hive Diy yesterday I took the task of doing some maintenance to my sewing machine because with the repair of the jeans it started to sew ugly and I remembered that I already had about 6 months without giving it a little care.
My sewing machine is my right hand, I can't imagine myself without it, my mom gave it to me about 8 years ago and the machine as such is more than 20 years old, she bought it on her second trip to Atlanta, it is a brother machine and despite the mistreatment suffered by some people to whom she lent it without knowing that it was for sewing large quantities of leather and semi leather, it is not that it can not be done but it must be done very carefully and apparently they did not do it because it was out of calibration and the needles split and sounded very ugly, so I had to give me the task of making it work well, I only used it for what my mom needed because that was hers, until one day she told me Chira stay with her, I do not use it and you do.
That is how this beautiful brother machine came to my hands and I always take good care of it.
This is a work of patience, if you don't know how to do it, go taking pictures so that everything looks the same at the end.
Herramientas usadas para desarmar y limpiar
2 destornilladores (1 de pala y 1 de estria)
2 cepillos y una brocha
Un alicate
Grasa
Tools used for disassembling and cleaning
2 screwdrivers (1 blade and 1 flute).
2 brushes and a brush
Pliers
Grease

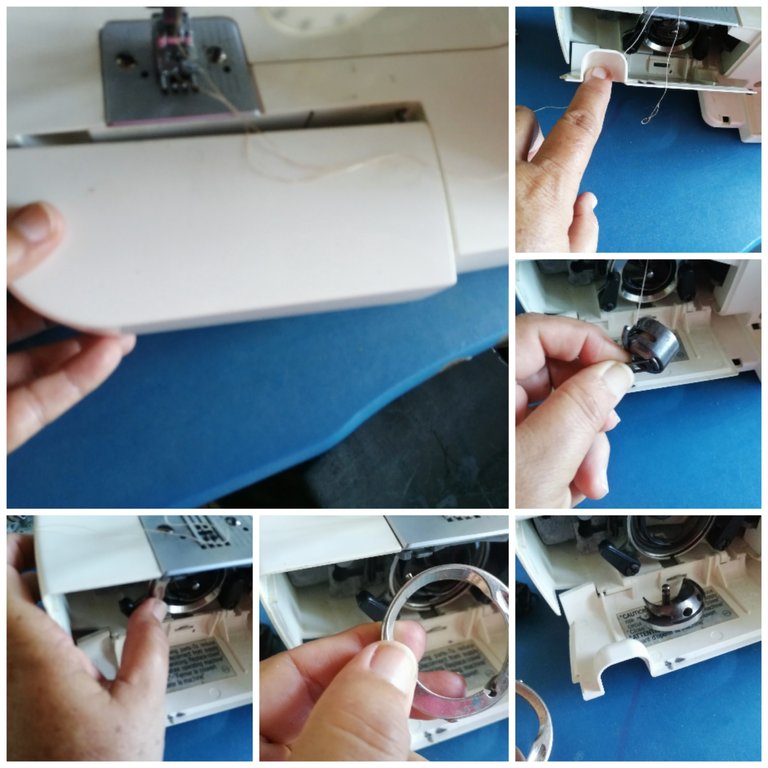
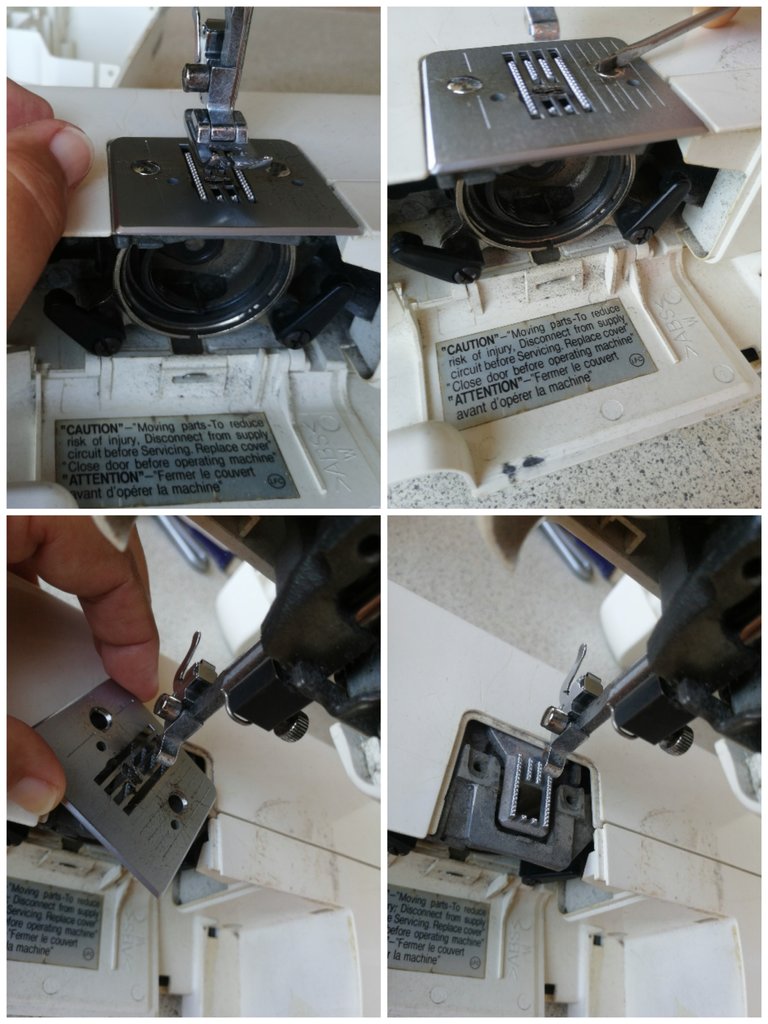
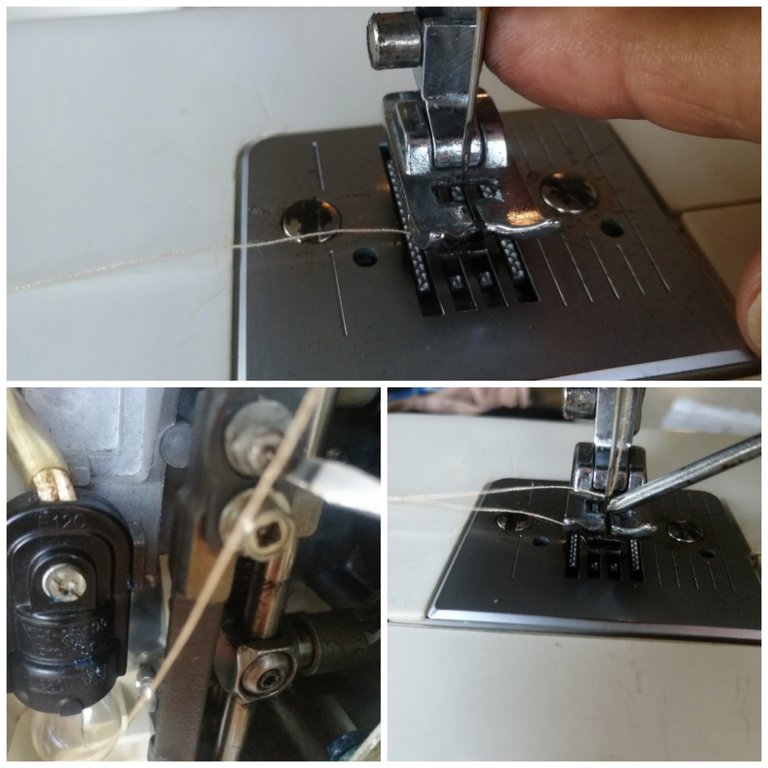
Procedo a sacar la caja para desarmar el portabobinas, saco la bobina, suelto los ganchos y saco las 2 piezas que forman el portabobinas, saco los 2 tornillos que sujetan la placa de la aguja y el pie de la máquina, bajo la palanca del prensa telas y procedo a sacar cada uno de los tornillos de la carcasa de la máquina, saco primero la de adelante y luego la de atras, hasta dejarla solo en el hierro, debemos quitar todos los tornillos extermos para que salga con facilidad la carcasa.Guarde en un envase todos los tornillos, aguja, pie y platina para que no se extraviara nada.
I proceed to remove the box todis assemble the bobbin holder, remove the bobbin, release the hooks and remove the 2 pieces that form the bobbin holder, remove the 2 screws that hold the needle plate and the foot of the machine, lower the lever of the fabric press and proceed to remove each of the screws of the housing of the machine, remove first the front and then the back, to leave it only in the iron, we must remove all the screws extermos to easily get out the housing.Keep in a container all the screws, needle, foot and platen so that nothing is lost.
Estaban super sucias así que procedí a limpiarlas con un cepillo pero como estaban tan sucia decide lavarlas con agua y detergente, no hay ningún problema por que todas las piezas son plásticas, las cepille bien con el agua con detergente y cuando estuvieron limpias las enguaje bien y las puse a secar al sol.
They were super dirty so I proceeded to clean them with a brush but as they were so dirty I decided to wash them with water and detergent, there is no problem because all the pieces are plastic, I brushed them well with water and detergent and when they were clean I rinsed them well and put them to dry in the sun.

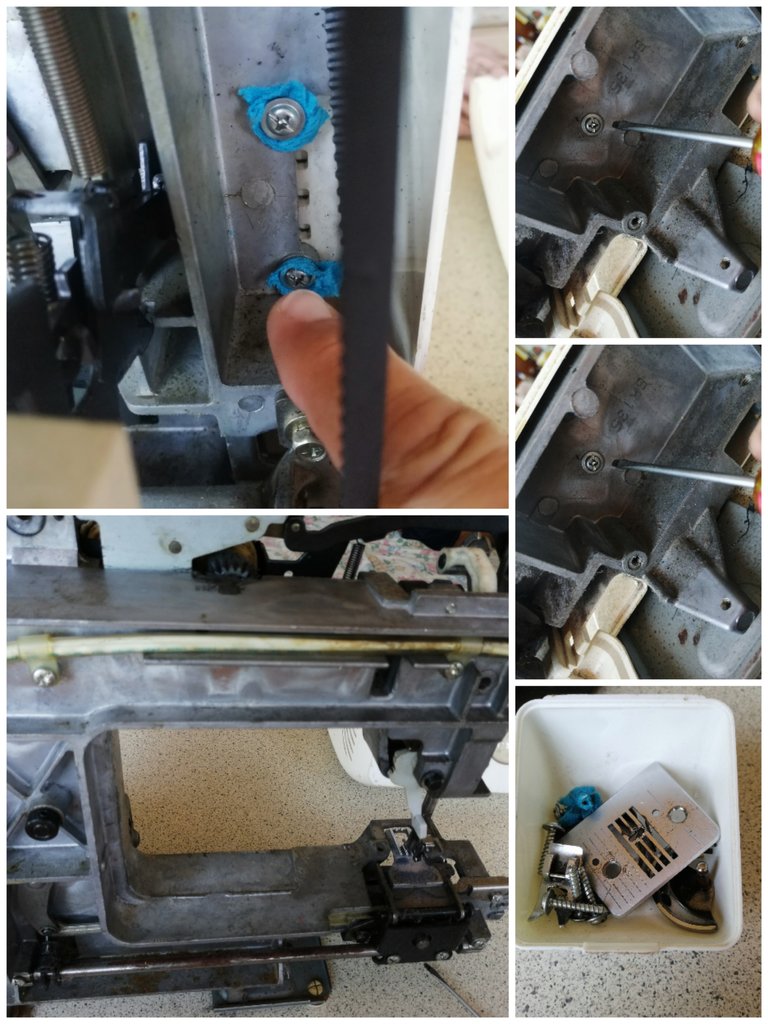
Luego limpie la maquina con el cepillo de dientes y el otro cepillo para que no le quedara nada de polvo, con un trapito limpio quite los restos de grasa en todos los engranajes y con la brochita le volví a echar grasa, lo que no hice fue aceitarla por que no me di cuenta que no tenía aceite y no quise echarle otro tipo de aceite.
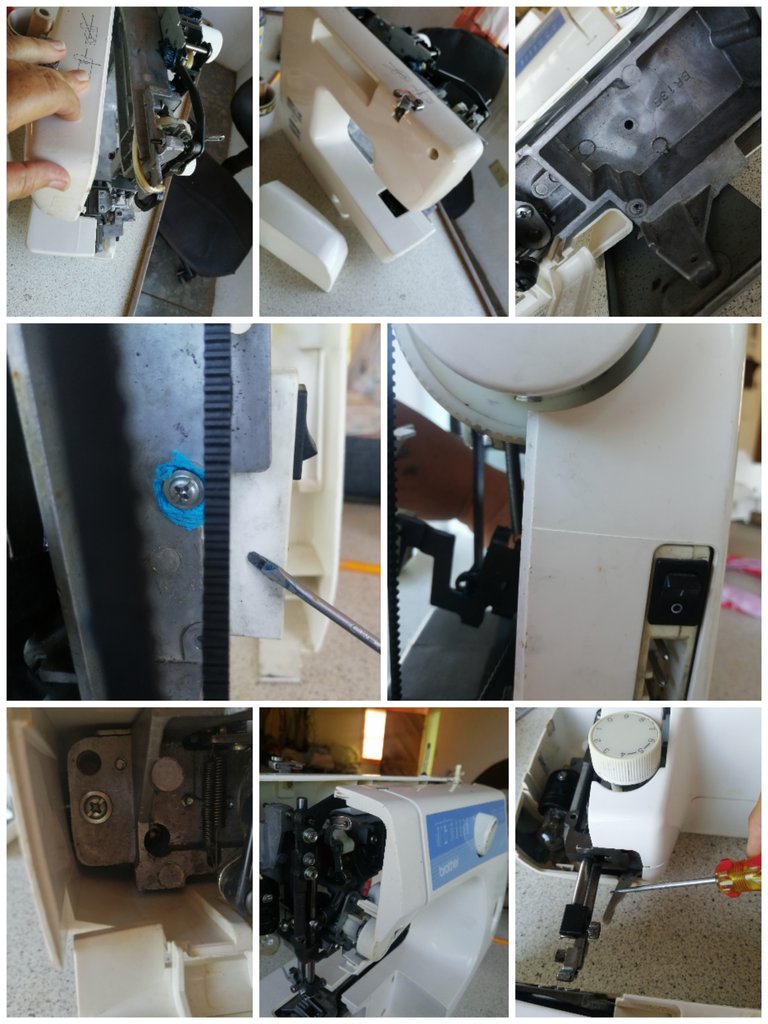
Listo esto busque las piezas de plástico que ya estaban secas y procedí a armar nuevamente mi máquina, primero puse la pieza plástica de atrás y sus respectivos tornillos menos el que aguanta la tapa donde va la luz, de echo ese no lo pongo porque a esa pieza le pongo teipe para poder abrirla y cerrarla fácilmente cada vez que quiero.
Then I cleaned the machine with the toothbrush and the other brush so that there was no dust, with a clean cloth I removed the remains of grease in all the gears and with the brush I put grease again, what I did not do was to oil it because I did not realize that I had no oil and I did not want to pour another type of oil.
After this I looked for the plastic parts that were already dry and proceeded to reassemble my machine, first I put the back plastic piece and their respective screws except the one that holds the cover where the light goes, in fact I don't put that one because I put teipe on that piece to be able to open and close it easily every time I want.


Antes de poner la pieza del frente pongo los tornillos(lo azul es un pedacito de tela que le puse hace tiempo porque se aisló donde enrrosca el tornillo) de la caja donde se enchufa el cable del motor y el suiche de la luz para que no se mueva cuando le conecte el cable.
Pongo la pieza del frente cuidando que la palanca del prensa telas este abajo sino no se puede poner y pongo la pieza que tapa el bombillo y la aseguro con teipe.
Before putting the front piece I put the screws (the blue is a little piece of cloth that I put some time ago because it was isolated where the screw is screwed) of the box where the motor cable and the light socket are plugged in so that it does not move when I connect the cable.
I put the piece of the front taking care that the lever of the cloth press is below but it can not be put and put the piece that covers the bulb and secure it with teipe.

Armo el portabobinas, pongo la bobina. Cierro la tapa, pongo la placa de la aguja y el pie y la caja que tapa el portabobina.
Cuando termine me di cuenta que la aguja no quedaba centrada así que abrí la tapa donde va el bombillo y afloje el tornillo del medio que esta en la barra prensa telas y procedí a poner la aguja en el medio apreté el tornillo y listo.
I assemble the bobbin holder, put the bobbin in. I close the cover, put the needle plate and the foot and the box that covers the spool holder.
When I finished I realized that the needle was not centered so I opened the cover where the bulb goes and loosened the middle screw that is in the fabric press bar and proceeded to put the needle in the middle, tightened the screw and that was it.

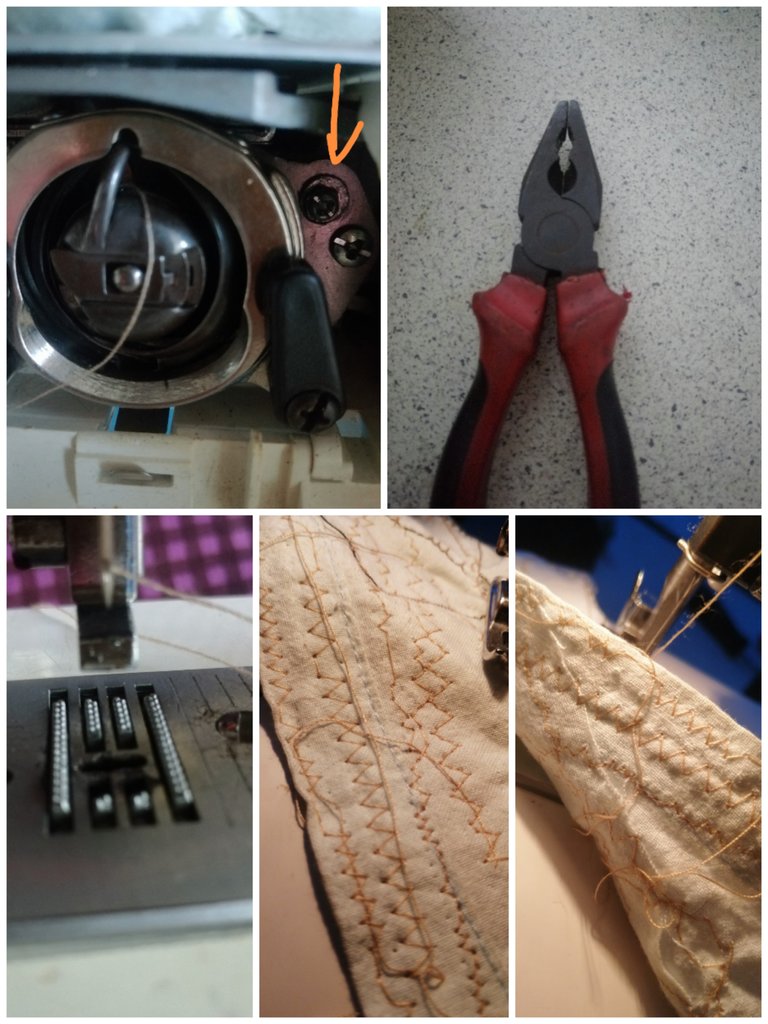
Luego me di cuenta que los dientes estaban muy abajo destape donde va la bobina y afloje los 2 tornillos del lado izquierdo al de arriba para subir los dientes se le debe dar un poquito la vuelta a la tuerca pero como yo lo estaba haciendo con una pinza no lograba hacerlo y cuando estaba por darme por vencida recorde se hacía con un alicate y le dije a mi esposo me prestara uno y en unos segundos ya los dientes estaban arriba aprete los dos tornillos, cerre la tapa y puse la caja y probe la maquina cosiendo sobre un pedazo de tela y quede muy satisfecha con los resultados.
Nota: hay que trabajar con las herramientas necesarias para facilitar el trabajo.
Then I realized that the teeth were too low I uncovered where the bobbin goes and loosened the 2 screws from the left side to the top to raise the teeth you have to turn the nut a little bit but as I was doing it with pliers I could not do it and when I was about to give up I remembered to do it with pliers and I told my husband to lend me one and in a few seconds and the teeth were up and I tightened the two screws, I closed the lid and put the box on and tested the machine by sewing on a piece of fabric and I was very satisfied with the results.
Note: You have to work with the necessary tools to make the work easier.
Hasta aquí mi post de hoy, espero les guste, gracias por su visita y apoyo.
Fotos tomadas por mi con mi celular huawei mate lite20 use Deelp traductor imagen editada en canva, use cool text.
So far my post today, I hope you like it, thank you for your visit and support.
Photos taken by me with my cell phone huawei mate lite20 use Deelp translator image edited in canva, use cool text.
Muy buen post, es bueno recordar que le tenemos que dar mantenimiento a nuestra máquina, recuerdo que mi madre lo hacía, con mucha paciencia desarmaba, aceptaba, ajustaba y volvía a armar para poder continuar con su trabajo.
Así es amiga, debemos estar pendiente para su óptimo funcionamiento, saludos
Wow buenísimo que usted se anima a hacer este trabajo. A mí me daría miedo no poder volver a armar jeje
Que bueno que tiene ya la experiencia y se ahorra en técnico
Si amiga es fácil, sino buscas tutoriales en Internet hay para todos los modelos, saludos
Hola amiga, leo tu post e inmediatamente recordé a mi mamá, ella también me regaló una máquina que tiene también más de 20 años , es americana y pesa muchísimooo jajaja es una Winston 555 , se que ahora hay máquinas de coser mucho más livianas , pero solo por el hecho que mi mamá me la regaló la guardo y cuido como un valioso tesoro. Muy importante lo que hiciste, el mantenimiento es muy importante, buenísimo que ya saben hacerlo .
Si amiga el simple echo de ser un regalo de mi madre me hace apreciarla más, es muy importante saber hacerlo así le hacemos mantenimiento y siempre está en buen estado, me alegra saber que también cuidas la que te regalo tu mamá, saludos
Un excelente mantenimiento.
!discovery 40
Gracias ☺️
This post was shared and voted inside the discord by the curators team of discovery-it
Join our Community and follow our Curation Trail
Discovery-it is also a Witness, vote for us here
Delegate to us for passive income. Check our 80% fee-back Program
Thank you @discovery-it
¡¡¡Buen trabajo!!! Gracias por publicar tu excelente contenido en Hive Diy, excelente tutorial para poder hacerle un buen mantenimiento general a estas máquinas, eres la primera que veo que les hace un mantenimiento tan profundo.
Tu comunidad artesana ahora es testigo

Gracias!!! , es muy importante hacerlo así por lo menos una vez al año o 2 si como yo cosen muchas telas que boten pelusas, gracias por sus palabras, me motivan a hacerlo cada vez mejor, saludos 🤗