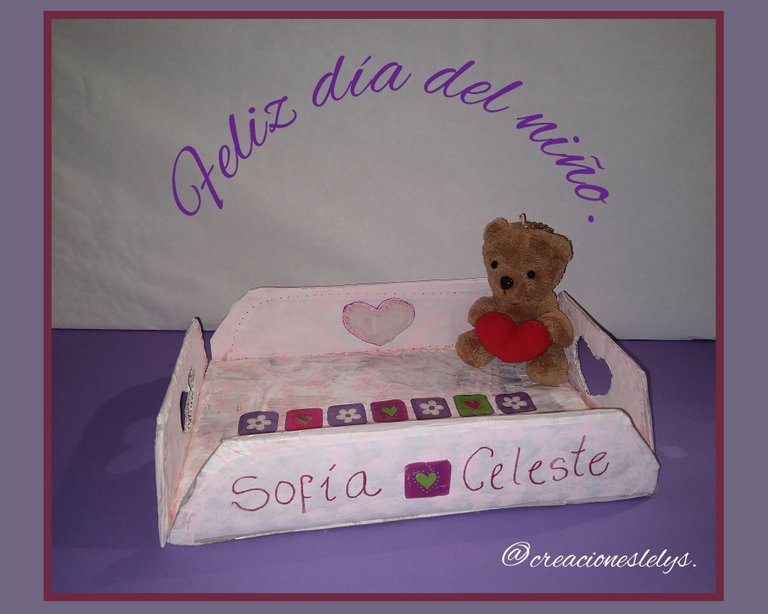
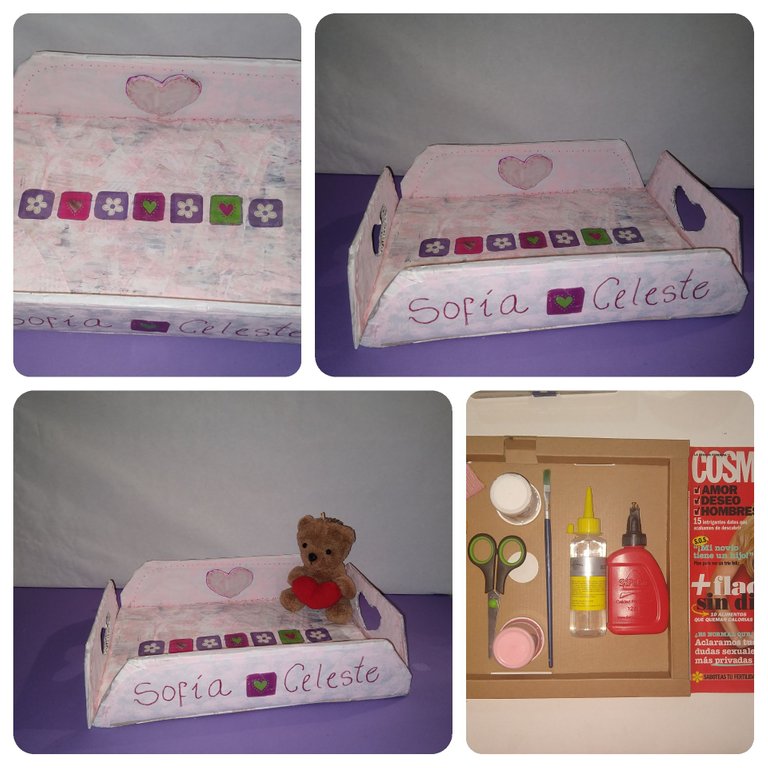
Es tiempo de reciclar. Nueva oportunidad para participar en los acostumbrados concursos promocionados por la amiga @jennyzer, esta vez haremos un trabajo creativo en honor a los niños en su día. Mi creación será para mi nieta Sofía, haré para ella una bandeja con material reciclado, para que juegue y sirva sus meriendas. Yo soy Lelys y te invito a leer el paso a paso. Empecemos.
It's time to recycle. New opportunity to participate in the usual contests promoted by friend @jennyzer, this time we will do a creative work in honor of children on their day. My creation will be for my granddaughter Sofia, I will make for her a tray with recycled material, for her to play and serve her snacks. I am Lelys and I invite you to read the step by step. Let's start.
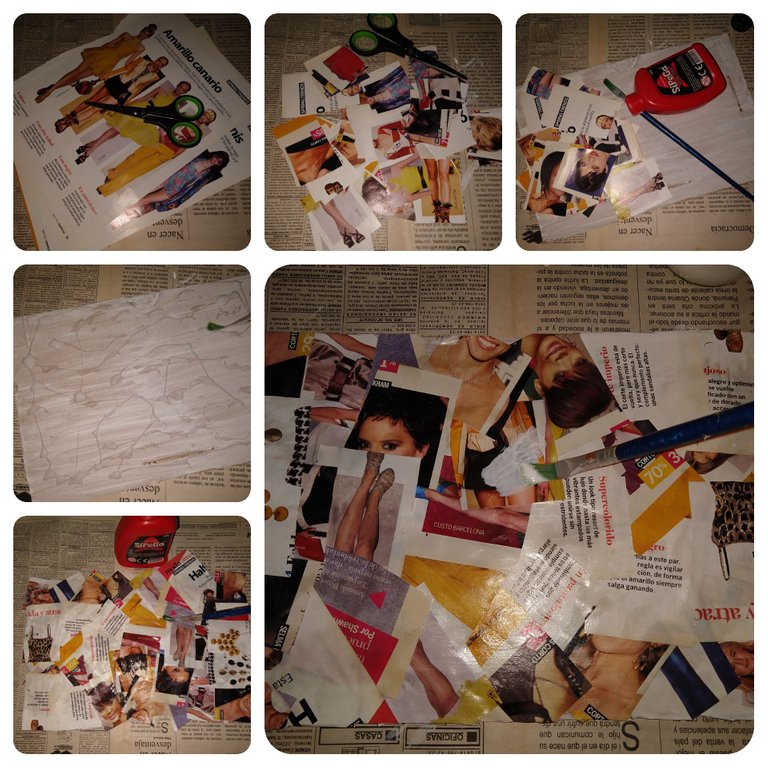
MATERIALES A UTILIZAR.
*Cartón grueso. *Tijeras. *Pegamento. *Pintura al frío. *Pincel. *Revista. *Esponja u algodón. *Marcador. *Exacto. *Pega blanca. *Pegatinas. *Regla.
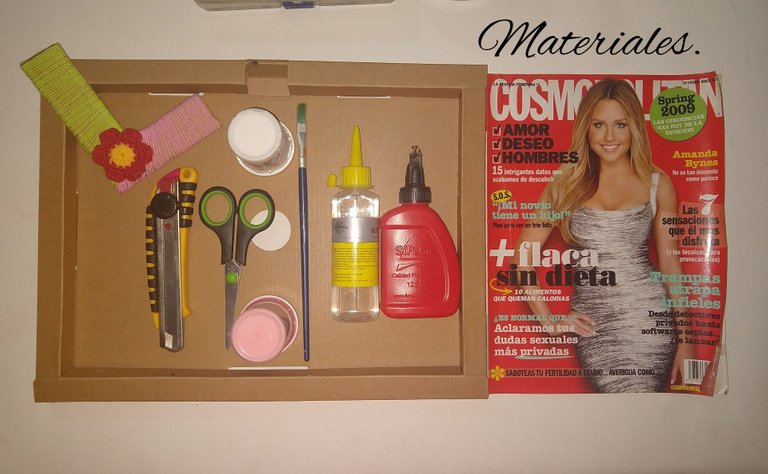
MATERIALS TO BE USED.
*Thick cardboard. *Scissors. *Glue. *Cold paint. *Paintbrush. *Magazine. *Sponge or cotton. *Marker. *Exact. *White glue. *Stickers. *Ruler.

PROCEDIMIENTO.
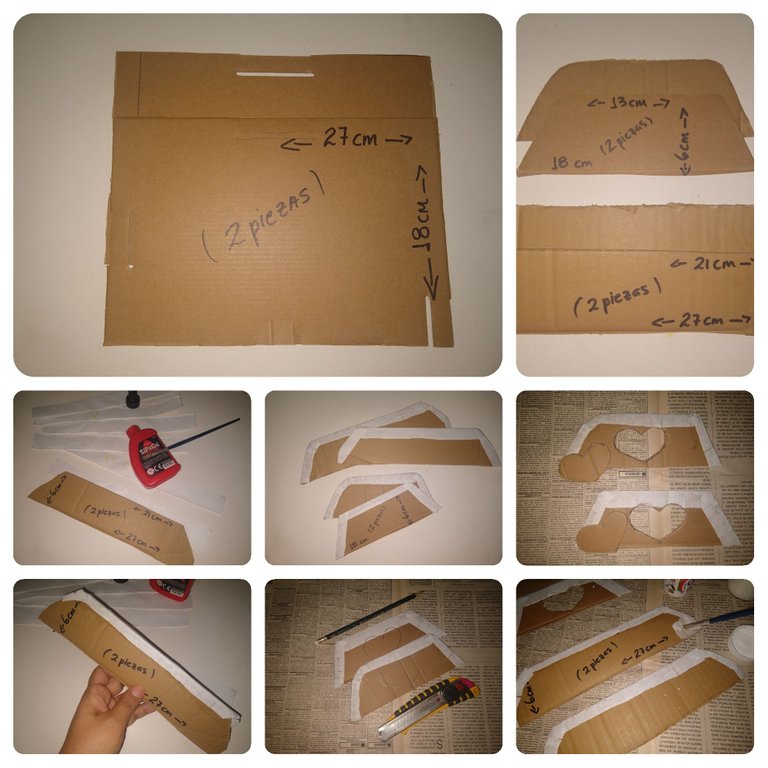
PASO 1.
- Empezamos decidiendo las medidas que tendrá la bandeja.
- Medimos y recortamos.
- Un cartón para la base de 27 cm por 18 cm. Si el cartón no es muy grueso hazlo doble.
- Para las asas: Dos piezas de 27 cm por 21 cm. Dos piezas de 18 cm por 13 cm. Todas con una altura de 6 cm.
- Para tapar la orilla del corte usé papel bond blanco. Luego apliqué una capa de pintura al frío color blanco en todo el cartón.
PROCEDURE.
STEP 1.
- We start by deciding the measures that the tray will have.
- Measure and cut out.
- A cardboard for the base of 27 cm by 18 cm. If the cardboard is not very thick, double it.
- For the handles: Two pieces of 27 cm by 21 cm. Two pieces of 18 cm by 13 cm. All with a height of 6 cm.
- To cover the edge of the cut I used white bond paper. Then I applied a coat of white cold paint all over the cardboard.
PASO 2.
- Pinta en color blanco el cartón de la base. Deja secar.
- Recorta en trozos pequeños una hoja de revista.
- Coloca una base de pegamento blanco sobre la base pintada de blanco.
- Coloca algunos recortes de revista y vuelve a cubrir con pegamento blanco. Déjalo secar muy bien.
- Al cabo de un rato pinta de color blanco, con dos capas si es posible.
STEP 2.
- Paint in white color the cardboard of the base. Let dry.
- Cut in small pieces a sheet of magazine.
- Place a base of white glue on the white painted base.
- Place some magazine clippings and cover again with white glue. Let it dry very well.
- After a while paint it white, with two coats if possible.
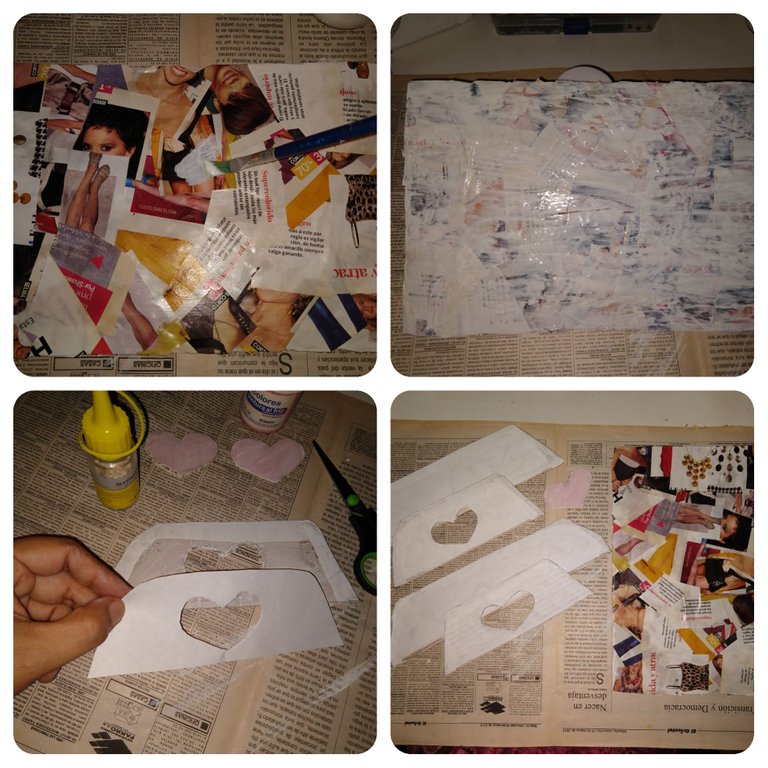
PASO 3.
- Acabados y decoración. Puedes usar para cubrir los laterales o asas papel bond blanco o foami.
- Marqué y recorté con el exacto la figura de un corazón en cada una de las asas pequeñas. Pinté los corazones.
STEP 3.
- Finishing and decoration. You can use white bond paper or foami to cover the sides or handles.
- I marked and cut out a heart shape on each of the small handles. I painted the hearts.
- Con la mota de algodón realicé unas manchitas con pintura al frío color rosado sobre todas las piezas.
- Los dos corazones los pegué en la parte interna de cada asa larga de la bandeja.
- Con silicón caliente pegué cada una de las asas en los laterales de la base de la bandeja. Reforcé con pegamento en la parte interna.
- With the cotton ball I made some small spots with pink cold paint on all the pieces.
- I glued the two hearts on the inside of each long handle of the tray.
- With hot silicone I glued each of the handles on the sides of the base of the tray. I reinforced with glue on the inside.
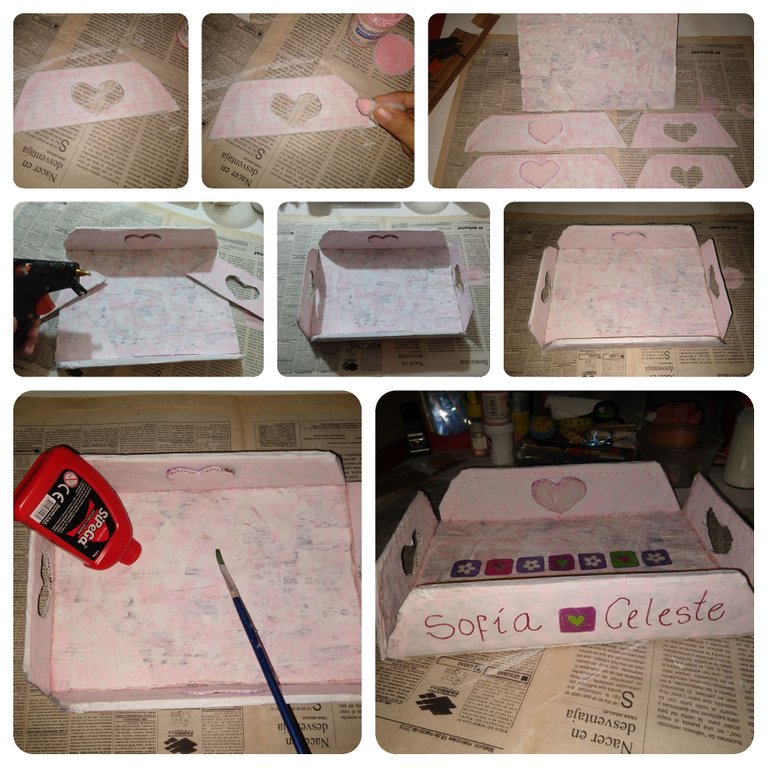
- Para finalizar cubrimos con pegamento blanco todos los bordes de las asas y totalmente la base de la bandeja.
- Identifiqué y decoré con algunos recortes de papel de regalo.
- To finish we covered with white glue all the edges of the handles and completely the base of the tray.
- I identified and decorated with some gift wrapping paper cutouts.
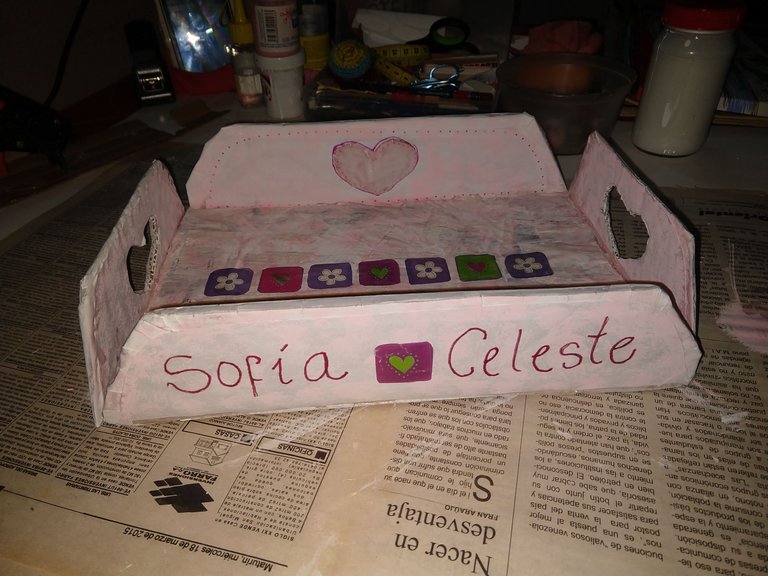
Todo el material empleado ha sido reciclado. A excepción del pegamento y la pintura al frío. Ya ves como con tan poco material he podido realizar un lindo obsequio para dar a mi nieta. Reforcé muy bien las asas para que con el agarre no las vaya a desprender. La base quedó fortalecida porque usé doble cartón, coloqué los recortes de revistas más las capas de pintura y pegamento extra. Será para que juegue y sirva sus meriendas.
All the material used has been recycled. Except for the glue and the cold paint. You can see how with so little material I have been able to make a nice gift to give to my granddaughter. I reinforced the handles very well so that they won't come off with the grip. The base was strengthened because I used double cardboard, placed the magazine cutouts plus layers of paint and extra glue. It will be for him to play and serve his snacks.
Disfruté mucho haciendo este proyecto. Un poquito impaciente ya que debí esperar el secado de la pintura y del pegamento. El resultado ha valido la espera, me gusta mucho como se ve y como se siente. Espero que todos participen y aprovechen de realizar algún obsequio para los niños de su familia o comunidad. Invito a @maria1835 a unirse al reto.
I really enjoyed making this project. A little impatient as I had to wait for the paint and glue to dry. The result was worth the wait, I really like the way it looks and feels. I hope you all participate and take the opportunity to make a gift for the children in your family or community. I invite @maria1835 to join the challenge.
Todas las fotos son de mi propiedad. Edité con Polish y TexgramX. Gracias a @eve66 por el separador. Usé traductor DeepL. Hasta la próxima.
All photos are my property. I edited with Polish and TexgramX. Thanks to @eve66 for the separator. I used translator DeepL. See you next time.
The rewards earned on this comment will go directly to the person sharing the post on Twitter as long as they are registered with @poshtoken.
Muy lindo y muy útil. Que lo disfrute?
Hola @nathylieth te invito a participar en el concurso, aún hay tiempo. Muchas gracias por visitar mi blog.
Your content has been voted as a part of Encouragement program. Keep up the good work!
Use Ecency daily to boost your growth on platform!
Support Ecency
Vote for Proposal
Delegate HP and earn more
Hola @creacioneslelys, este es un proyecto muy bonito, y la técnica que has usado es muy práctica. Estoy segura que a Sofía le va a encantar.
Saludos.
Muchas gracias!
Congratulations, your post has been upvoted by @dsc-r2cornell, which is the curating account for @R2cornell's Discord Community.
Seguro le gustó mucho a tu nieta, el proceso fue un poco laborioso te esforzaste y lograste crear algo hermoso.
Hola, seguro que le gustará, mañana voy a entregárselo. Me encantó hacerla. Saludos y muchas gracias por tu valoración.