Hola amigos, Feliz día para todos. Desde hace un tiempo he estado realizando amigurumis de plantas, aún me quedan muchísimos patrones por crear. Estoy haciendo este trabajo porque unas maestras están interesadas en adquirir varios modelos de estos para decorar sus espacios laborales. Esta es la razón por la que hoy he decidido escribir el patrón de la maceta que estoy tejiendo.
Ya les he mostrado algunos de los cactus que he tejido, las macetas en todos es igual, pero no he dejado por aquí el patrón. Aprovecharé de compartirlo y de una vez por aquí lo guardo. Hay muchos proyectos que he tejido, pero los patrones se me extraviaron porque los escribo en una hoja y al cabo del tiempo en la limpieza los boto. En mi blog estarán más seguros.
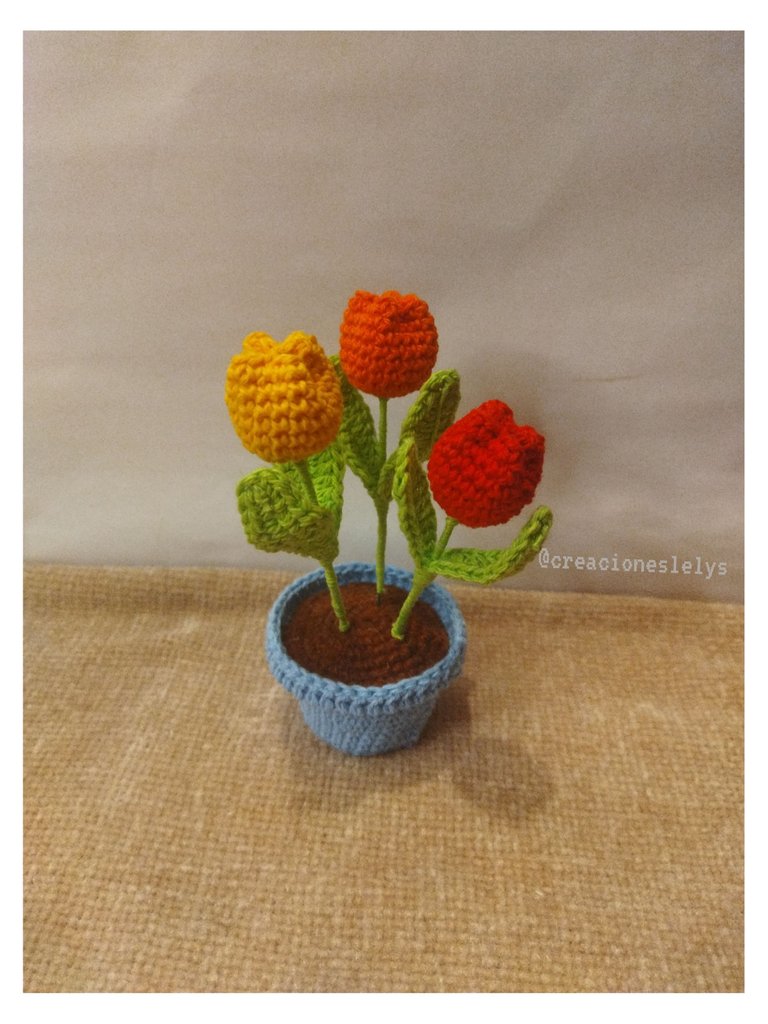
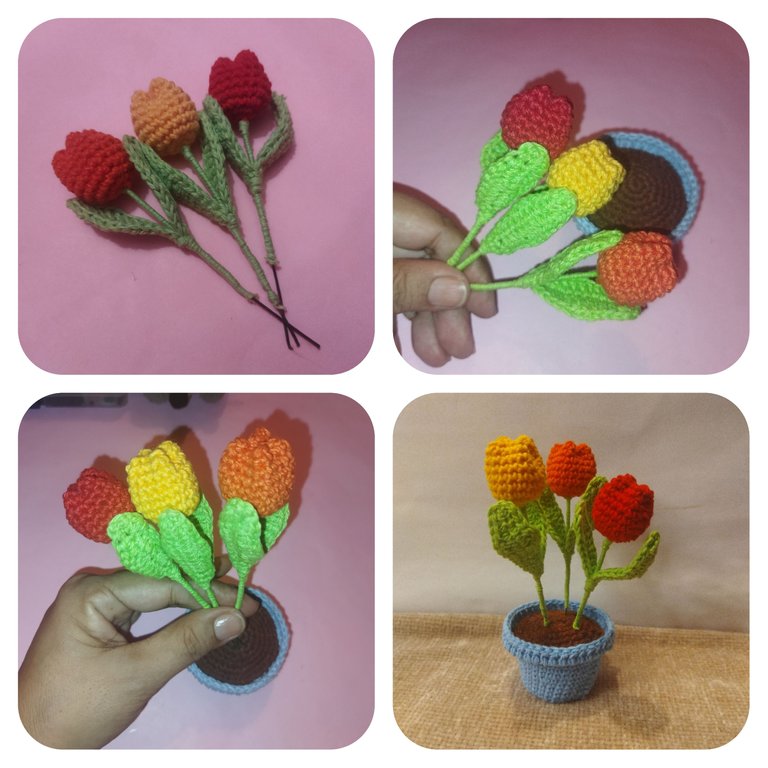
En esta oportunidad tejí un arreglo de tulipanes. Empezaré explicando cómo hice la maceta.
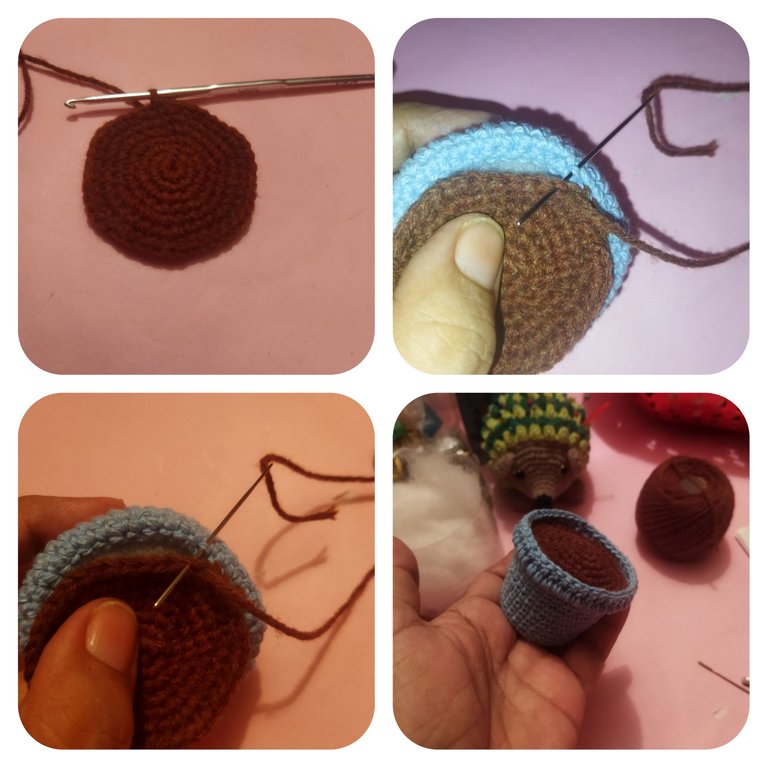
Maceta tejida.
Debo destacar que todos estos amigurumis de plantas que estoy tejiendo deben tener una altura máxima de 12 cm. Uso en la mayoría de ellos hilo pabilo y la aguja de crochet de 2,25 mm. Si sigues este patrón tu planta debería medir 12 cm. Para este modelo lograremos la altura más fácil porque usaremos alambres.
✅ Iniciamos con un am de 6 pb. En la siguiente vuelta tejemos solo aumentos. En la tercera vuelta tejemos 1pb-1aum. Después 2pb-1aum. Luego 3pb-1aum. Subimos con una vuelta sin aumentos tomando solo la hebra de atrás del punto. Seguimos tejiendo sin aumentos 3 vueltas más. Después tejemos una vuelta de 4pb-1aum. Seguimos con 4 vueltas sin aumentos. Seguidamente tejemos una vuelta de 5pb-1aum. Luego hacemos una vuelta de solo pb y para finalizar hacemos una vuelta de pa. Antes de comenzar esta vuelta giramos el tejido.

✅ Para tejer la parte de la tierra que irá en la maceta tejeremos desde un am de 6pb, haremos los aumentos hasta la vuelta de 5pb-1aum. Vamos a dejar la hebra larga para luego coser a la maceta. Para hacer la unión primero colocamos una base plástica dentro de la maceta y un poco de algodón para rellenar. Doblamos hacía afuera la vuelta de pa. Tomamos un bucle del punto del tejido de la tierra y lo cosemos con la aguja lanera por los puntos que se ven dentro de la maceta por el doblez. Ver imagen.
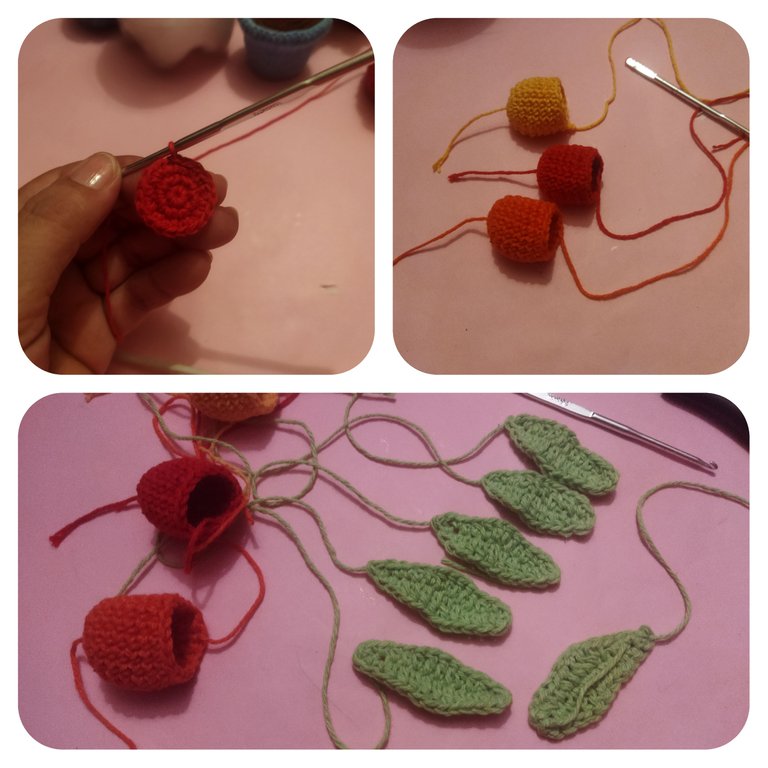
Tulipanes tejidos.
✅ Los tulipanes que realicé son idénticos a los que mostré hace un tiempo en el siguiente tutorial de tulipanes puedes pasar a dar un vistazo. Para que me quedaran más pequeños solo disminuí la cantidad de vueltas al empezar a tejer. Inicié con un am de 6pb. Luego tejí hasta la vuelta de 1p-1aum. Subí luego 6 vueltas sin aumentos. Igualmente hice para tejer las hojas. Inicié con una cadeneta de 14 puntos y fui tejiendo puntos bajos, medios puntos y puntos altos para dar la forma.
🌷 Estoy disfrutando mucho hacer estas plantas ya que en mi trayectoria como tejedora (muy corta por cierto) aún no me había enfocado en ellas. Me llaman la atención, son muy lindas, decorativas, le dan una vista hermosa a los ambientes y son fáciles de realizar. Hacerlas representa una nueva experiencia y un gran aprendizaje. En la actualidad muchas personas admiran este tipo de plantas. Espero aprender a tejer suculentas para mostrarles el paso a paso.
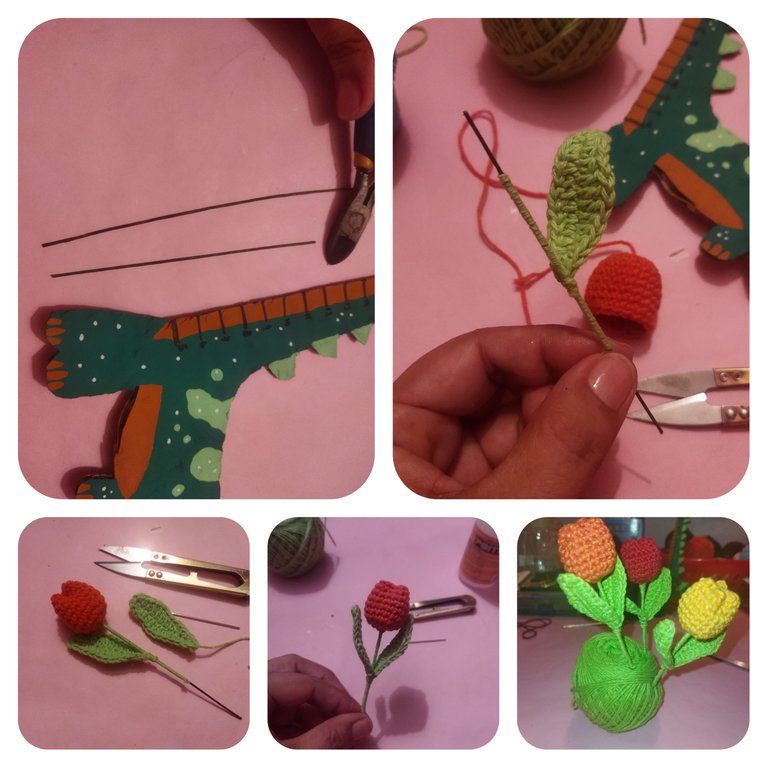
✅ Una vez terminadas todas las flores y las hojas procedemos a armar la planta. Todo este proceso está explicado con mucho detalle en el vídeo. Yo usé alambre de floristería. Antes de meterlo por la tierra coloqué una capa de pegamento en la punta del alambre, así estará más seguro.
Planta terminada.
Como pueden ver yo le coloqué a esta planta solo tres tulipanes. Es importante verificar si con la cantidad que elegimos se logra el equilibrio y que no se vea recargado. Quizá con cuatro se vería bien también ¿Qué opinan?
🌷 Espero que les guste este proyecto. Mi intención principalmente es guardar el patrón de la maceta. Es un patrón sencillo, pero para lograr el tamaño de las plantas que quieren las maestras este es el ideal.
Todas las fotos son de mi propiedad. Edité con Polish. Usé el traductor de DeepL. Hasta luego.
English.
Hello friends, Happy day to all. I have been making plant amigurumis for a while now, I still have many, many patterns to create. I am doing this work because some teachers are interested in acquiring several models of these to decorate their work spaces. This is the reason why today I have decided to write the pattern of the flowerpot I am knitting.
I have already shown you some of the cactus I have knitted, the pots are all the same, but I have not left the pattern here. I'll take the opportunity to share it and keep it here once and for all. There are many projects that I have knitted, but the patterns got lost because I write them on a sheet of paper and after a while I throw them away when cleaning. In my blog they will be safer.
This time I knitted a tulip arrangement. I'll start by explaining how I made the pot.
Woven flowerpot.
I must emphasize that all these plant amigurumis that I am knitting must have a maximum height of 12 cm. I use in most of them pabilo yarn and the 2.25 mm crochet needle. If you follow this pattern your plant should measure 12 cm. For this pattern we will achieve the height easier because we will use wires.
✅ We start with an am of 6 sts. In the next round we knit only increases. In the third round we knit 1pb-1aum. Then 2pb-1aum. Then 3pb-1aum. We go up with a single crochet without increases, taking only the yarn from the back of the stitch. We continue knitting without increases 3 more rows. Then we knit one row of 4pb-1aum. We continue with 4 rows without increases. Then we knit a row of 5pb-1aum. Then we make a single crochet row and to finish we make a single crochet row. Before starting this row we turn the fabric.
✅ To knit the part of the soil that will go in the pot we will knit from an am of 6pb, we will make increases up to the round of 5pb-1aum. We are going to leave the long strand and then sew it to the pot. To make the join we first place a plastic base inside the pot and some cotton to fill it. We fold out the round of the pa. We take a loop of the stitch of the ground fabric and sew it with the wool needle through the stitches that are seen inside the pot by the fold. See image.
Woven tulips.
✅ The tulips I made are identical to the ones I showed a while ago in the following tulip tutorial you can stop by and take a look. To make them smaller for me I just decreased the number of rounds when I started knitting. I started with an am of 6pb. Then I knitted up to the 1p-1aum round. I then went up 6 rows without increases. I did the same to knit the leaves. I started with a chain of 14 stitches and knitted in single crochet, double crochet and double crochet to give the shape.
🌷 These I am really enjoying making these plants as in my knitting career (very short by the way) I had not yet focused on them. They catch my eye, they are very pretty, decorative, give a beautiful view to the environments and are easy to make. Making them represents a new experience and a great learning experience. Nowadays many people admire this type of plants. I hope to learn how to weave succulents to show you the step by step.
✅ Once all the flowers and leaves are finished we proceed to assemble the plant. This whole process is explained in great detail in the video. I used florist's wire. Before putting it in the ground I put a layer of glue on the tip of the wire, so it will be more secure.
Finished plant.
As you can see I put only three tulips on this plant. It is important to verify if the amount of tulips we choose achieves the balance and does not look overloaded. Maybe with four it would look good too. What do you think?
🌷 I hope you like this project. My intention mainly is to keep the pot pattern. It is a simple pattern, but to achieve the size of the plants that the teachers want this is the ideal one.
All photos are my property. I edited with Polish. I used the translator of DeepL. See you later.
~~~ embed:1590333501173563393 twitter metadata:MTI2MDIxMTM3NTg4MTgxNDAxNnx8aHR0cHM6Ly90d2l0dGVyLmNvbS8xMjYwMjExMzc1ODgxODE0MDE2L3N0YXR1cy8xNTkwMzMzNTAxMTczNTYzMzkzfA== ~~~
The rewards earned on this comment will go directly to the people( @creacioneslelys, @madushanka ) sharing the post on Twitter as long as they are registered with @poshtoken. Sign up at https://hiveposh.com.
Congratulations, your post has been upvoted by @dsc-r2cornell, which is the curating account for @R2cornell's Discord Community.
Hola. Gracias por el apoyo.
Thanks you 🤗
Que hermoso amiga, me he quedado sin palabras, están bellísimo.🌷🌷🌷🌷🌷🌷🌷🌷🌷🌷🌷🌷🌷🌷🌷🌷
Hola..muchas gracias 🌷
🌷🌷
very creative
Hola. Gracias por apreciar mi labor.
you are welcome friend
Whenever I look at your crocheting skills, I'm always moved by them. This paves way for me to start doing unique things.
Hello, Thank you for appreciating my work. I am glad to know that you are inspired my friend.
que hermoso talento tienes! para eso se requiere talento y paciencia para dominar ese tipo de tejido.
!ESPIZZA
¡@creacioneslelys! Te he enviado un trozo de $PIZZA de parte de @rosmiapure.
Más información sobre la ficha de $PIZZA at hive.pizza (2/5)
Hola. Gracias por tu comentario. A mí me encanta hacer esto, también influye que te guste lo que haces. Feliz día! 🙋🤗💙😉👏🤭🌷🤶👆🙏🐝😁
Que talento...me encantaron, quisiera tener unas así en casa. Te quedaron muy lindas... felicitaciones.
Hola amiga. Se hacen rápido y no es complicado el punto. Anímate y haces para tí y para regalar 😁🌷👆🙏🐝😉🤗💙🥳🎂
que tejido más brutal, esas flores quedaron muy frondosas. Hermosas!
Hola @fixie gracias por apreciarlo. 😁👆🤗
Qué cosa más bonita esas flores!!! con sus macetas y todo, siempre me ha gustado tejer pero últimamente me he dedicado a hacer varios tipos de muñecos y le he cogido cariño a todo este mundo, estoy intentando coger más práctica para exponer mejores cosas aquí, es un mundo que me fascina, que me lleva mucho tiempo. Estos tulipanes quedaron espectaculares, me encantaron, muy hermosos❤️🌸🌼
Hola. Muchas gracias. Me alegro que te hayan gustado los tulipanes.
Espero ver pronto todas tus creaciones, aprender lo que nos gusta es gratificante, sé que lo estás haciendo muy bien...