
ESPAÑOL
Hola mis amigos, saludos y buenas vibras para todos. Hoy quiero transmitir mis experiencias durante la solución de unos de los problemas comunes que se pueden presentar en casa con un equipo electrodoméstico, particularmente hablo de la olla arrocera, esa que nos facilita la vida en la cocina al elaborar el arroz, que por lo menos acá en Cuba ese plato no pude faltar en la mesa.

A quien no le ha pasado que cuando se dispone a elaborar la comida se lleva una sorpresa al darse cuenta que su cocina no funciona o sufre algún tipo de avería durante el proceso de elaboración?😲
Bueno precisamente eso le sucedió a una amiga a la que se le averió la olla arrocera, la misma encendía el bombillo que indica que está calentando, pero al presionar la tecla que pone la olla a cocinar el arroz, la resistencia no calentaba ,y el bombillo que indica que está cocinando no encendia. Inmediatamente esta amiga me contactó para que la ayudara y así lo hice.
La reparación fue sencilla, y es por eso que compartiré con ustedes cómo pueden reparar su olla arrocera( en este caso es una Hamilton Beach Modelo: 37542 pero muchas son similares) si presentara el problema que describo y se animaran a hacerlo ustedes mismos.
Síntoma de la olla arrocera durante la falla.
Bueno les expliqué que está olla encendía el indicador de Calentando pero al pasarla al modo Cocinando esta no hacia absolutamente nada.
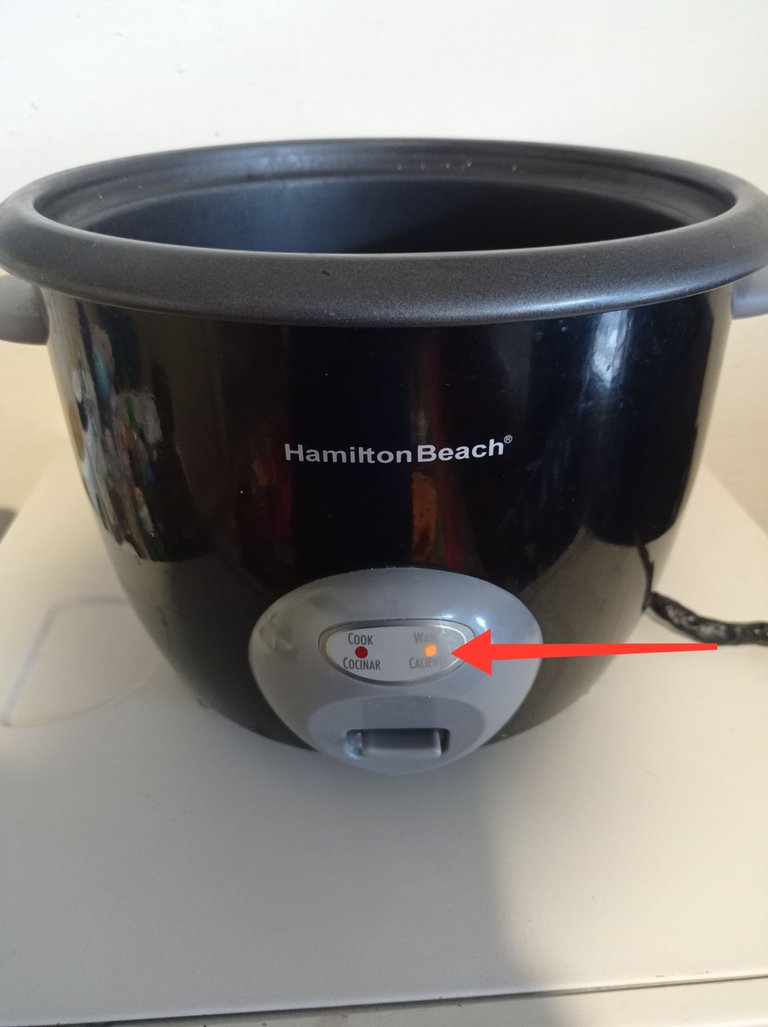
Aquí la olla está con la tecla activa para cocinar pero solo se mantiene prendido el indicador amarillo y no calienta la resistencia principal
A continuación describo como solucionar este problema.
Retirar la tapa del fondo de la olla , con la ayuda de un destornillador para extraer los tornillos que la sujetan.
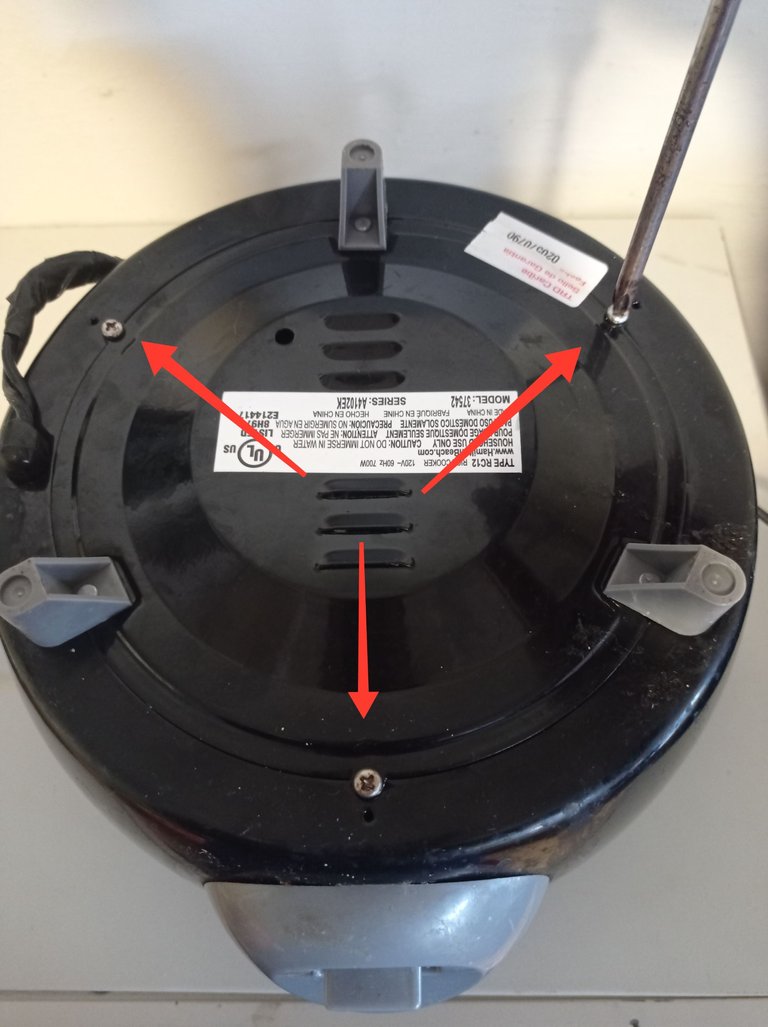
Retirar los tornillos señalados
Al retirar la tapa, se observan las conexiones por dónde ingresa la corriente alterna, la cual llega a través del cable de Linea luego pasa por un fusible Térmico, continúa por la resistencia de cocinar entrando por el punto de conexión No. 1 y saliendo por el punto de conexión No.2, para luego continuar hacia el interruptor que cierra el circuito cuando se activa la palanca de cocinar, finalmente la corriente retorna por el cable Neutro para regresar a la fuente que la originó.
En las siguientes imágenes se aprecian las principales partes del circuito de la olla y el recorrido de la corriente principal por dicho circuito. Las flechas rojas describen el recorrido de la corriente por el circuito y las negras corresponde a la suma total de todas las corrientes retornando por el cable neutro hacia la fuente que la originó.
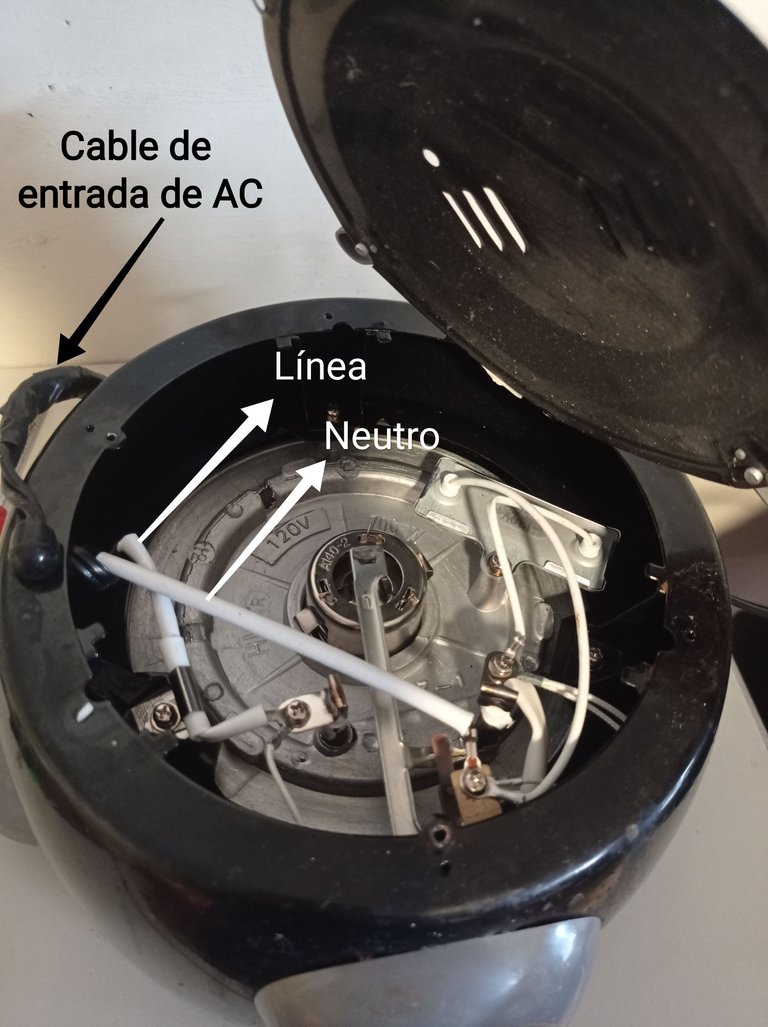
Cable de entrada de corriente alterna (AC)
Línea y neutro
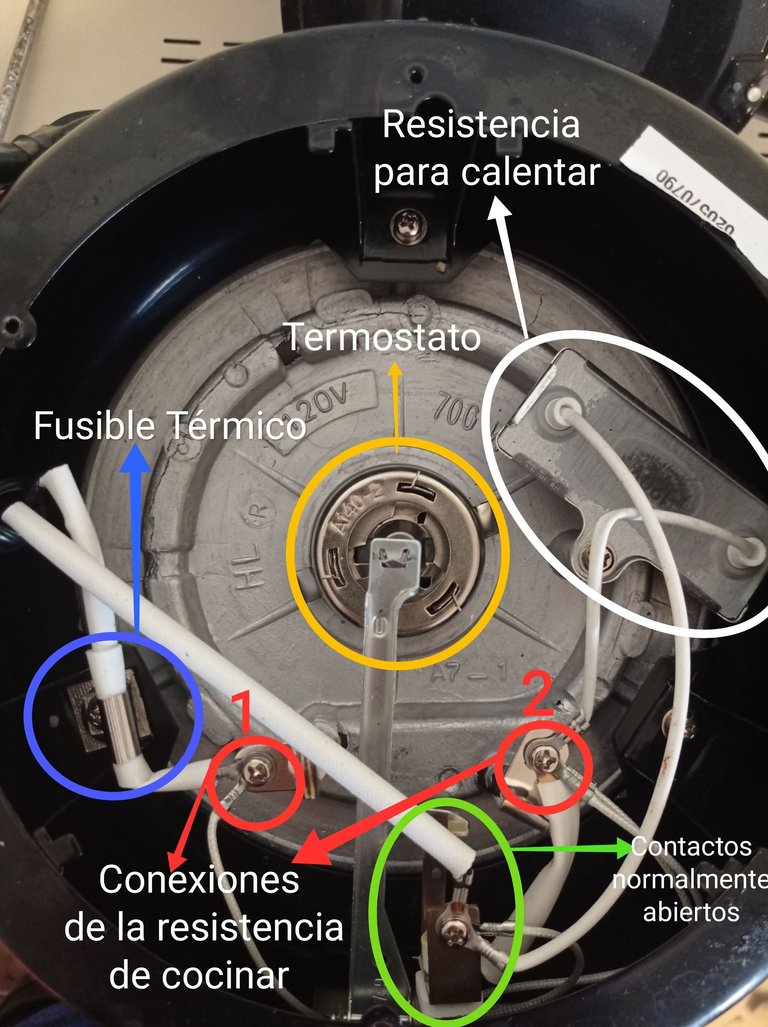
Señalado en un círculo azul se encuentra debajo del aislante , el fusible Térmico, el cual es un elemento de protección.
Los círculos rojos 1 y 2 corresponden a las conexiones de la resistencia de cocinar.
El círculo verde señala el interruptor normalmente abierto que cierra el circuito al presionar la palanca de cocinar.
El círculo amarillo señala el Termostato. (Este se encarga de mantener la palanca en la posición de "cocinando" hasta una determinada temperatura que como mínimo sería por encima de los 100°C , que se alcanzan cuando se ha evaporado el agua en interior de la olla).
El círculo blanco señala la resistencia de mantenimiento o "calentado", su función es calentar y mantener la temperatura del arroz sin llegar a quemarlo.
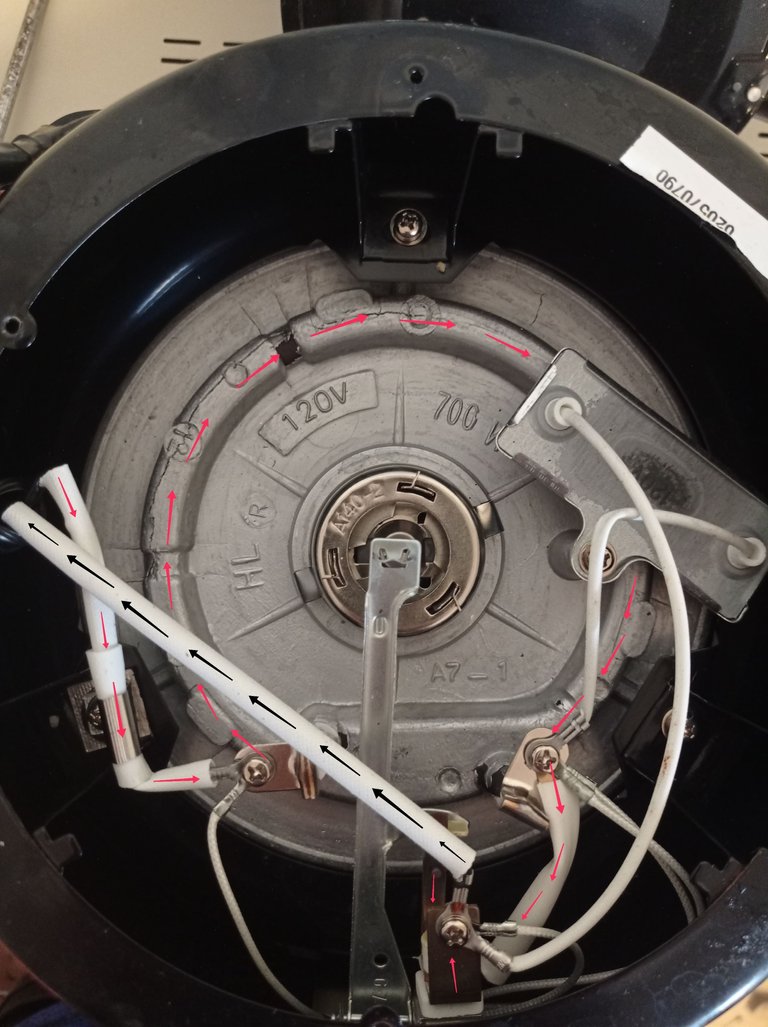
En esta imagen se aprecia el recorrido de la corriente en la resistencia principal cuando se está cocinando el arroz. Las flechas rojas corresponden a la corriente en la resistencia de cocinar y las negras representa el total de las corrientes del consumo de todos los componentes de la olla, retornando a través del cable neutro a la fuente que la originó, este sentido de circulación de la corriente corresponde a uno de sus semiciclos, en el otro semiciclo, la circulación será en el sentido opuesto al representado, de esta forma la corriente fluye en un sentido y luego en el sentido opuesto de forma repetitiva. En la imagen solo represento la corriente principal, pero existen otros consumos de corriente por los demás componentes (Resistencia de calentar y bombillos indicadores) que no están representadas en la imagen.
La información anterior la doy para una mayor comprensión, si se te dificulta comprender estos temas de electrónica, no importa, de igual manera podrás reparar este tipo de ollas si te sucede algo similar a lo descrito anteriormente, solo sigue los siguientes pasos.
Detectando el orígen de la falla.
- Primeramente se hace una inspección visual al circuito para detectar cualquier desperfecto que se manifieste físicamente, recuerda desconectar el cable de la toma de corriente si vas a manipular cualquier parte del circuito.
Al realizar una inspección visual, aparentemente no existían problemas, sin embargo descarté que el problema se debiera al Fusible Térmico, pues la olla encendía el bombillo del modo Calentando.
- Continué con una inspección visual más profunda, ya que por experiencia conozco que este tipo de fallas cuando se manifiestan de la forma que describí inicialmente, y teniendo en cuenta que la olla no tiene tanto tiempo de uso como para sospechar de la resistencia, fui directo al interruptor que cierra el circuito al presionar la palanca, ya que el mismo suele dañarse y provocar este tipo de fallas.
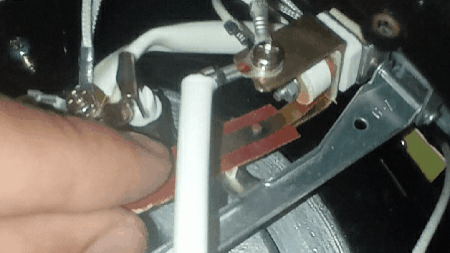
Pues bien, al observar los contactos metálicos del interruptor me percaté de que poseía una capa tipo escoria producto al calentamiento y las chispas que se generan entre estos dos contactos al activar o desactivar la palanca de cocinar. Esta escoria aumenta la resistencia entre los puntos de contacto del interruptor, lo que impide el paso idóneo de la corriente para poner a funcionar la resistencia de la olla. En la siguientes imágenes les muestro la escoria de las que les hablo.
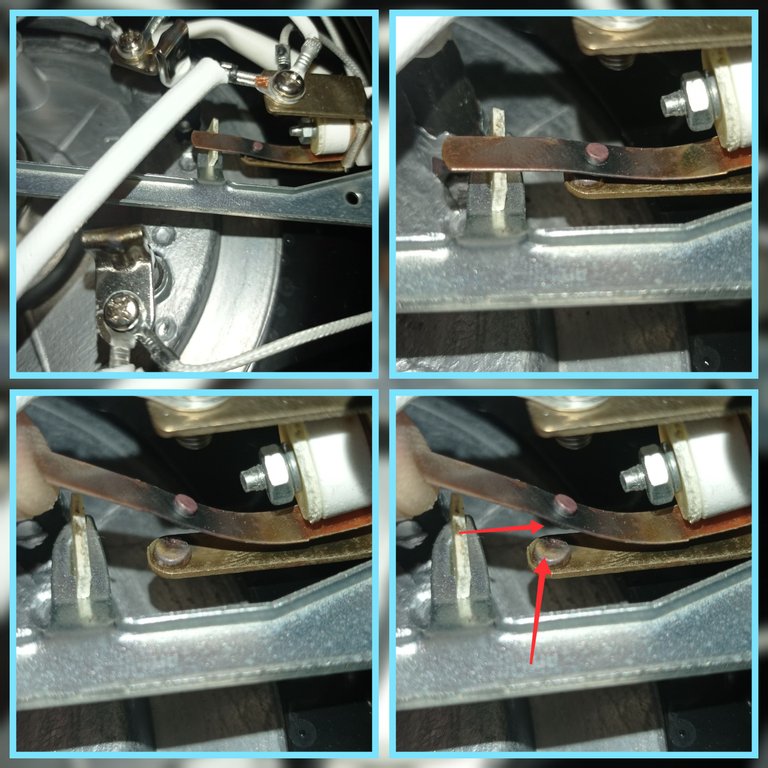
Interruptor que cierra el circuito al activar la palanca de cocinar, en la foto se aprecia que están algo quemados por el calentamiento y el uso
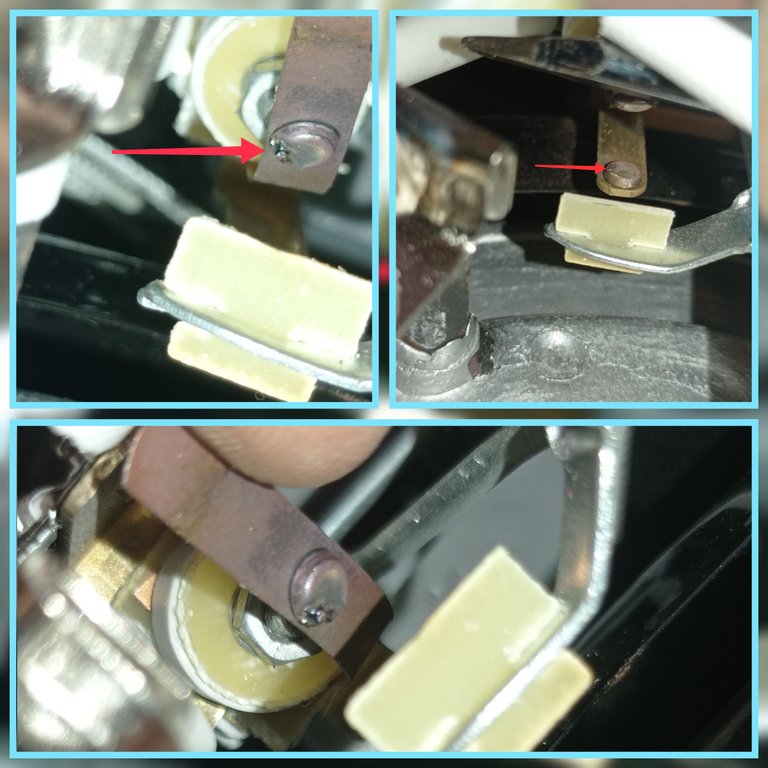
Contactos quemados y con escoria producto al calentamiento y las chispas
Solucionando el orígen de la falla.
Para solucionar esto es necesario limpiar los contactos lo mejor posible, para ello utilicé un trozo de lija, la cual introduje entre los dos contactos y mediante pequeños movimientos fui raspando y eliminando la escoria.
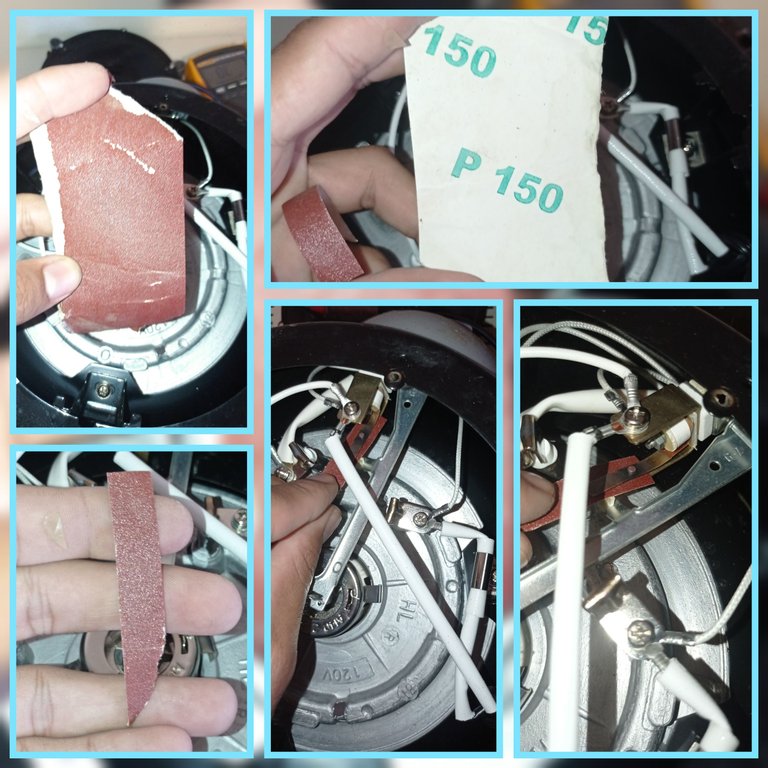
Lija utilizada para limpiar los contactos del interruptor.
Raspado de los contactos, es necesario raspar tanto el de arriba como el de abajo
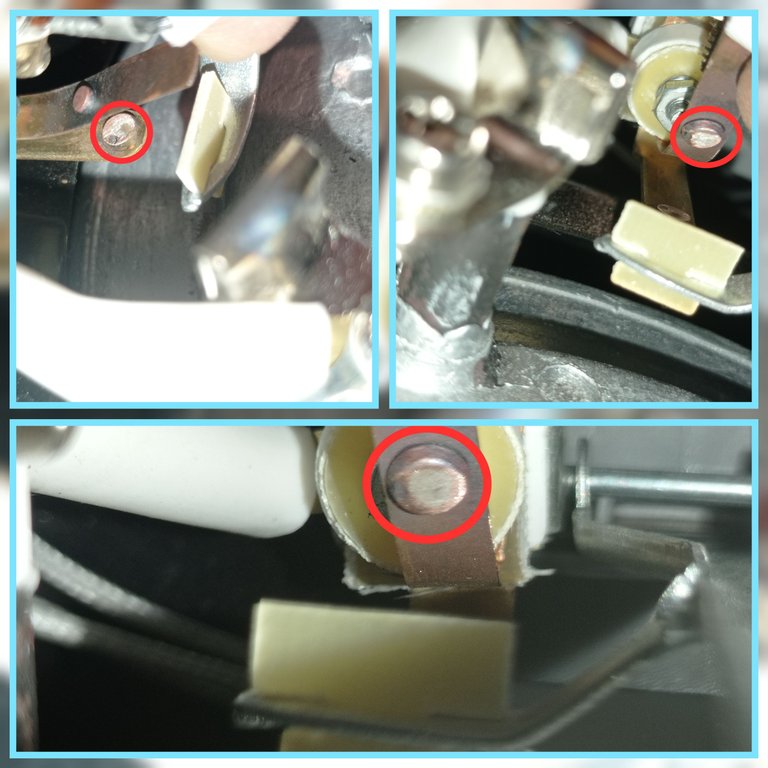
Contactos limpios después de raspar con la lija.
Luego de tener bien limpios los contactos es hora de probar la olla, para ello le coloco el recipiente y activo la palanca de cocinar, y felizmente se resolvió el problema. Como se observa en la imagen, al presionar la palanca hizo un cambio de señalización al encender el bombillo que señaliza el modo Cocinando.
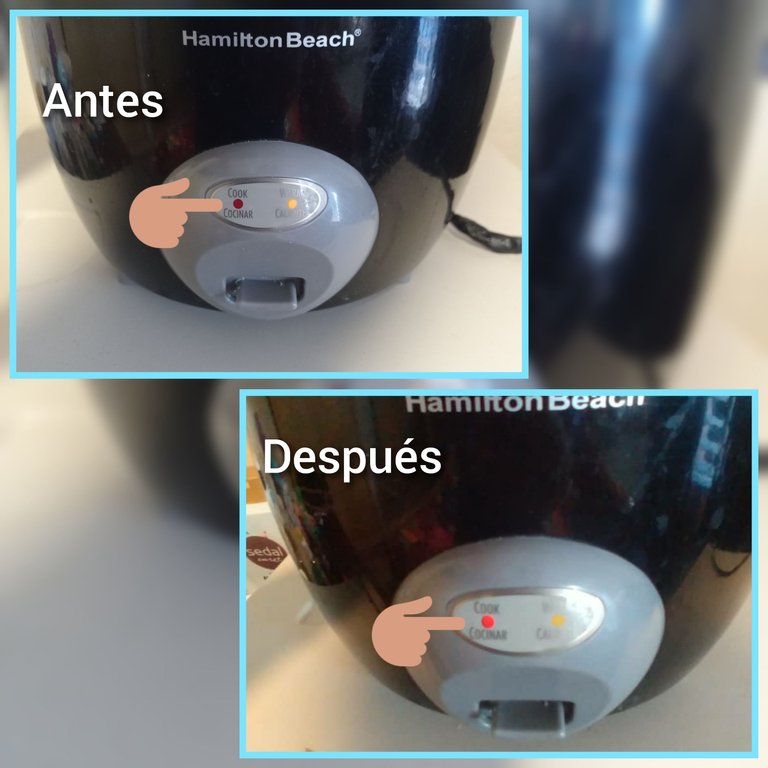
Antes y Después.
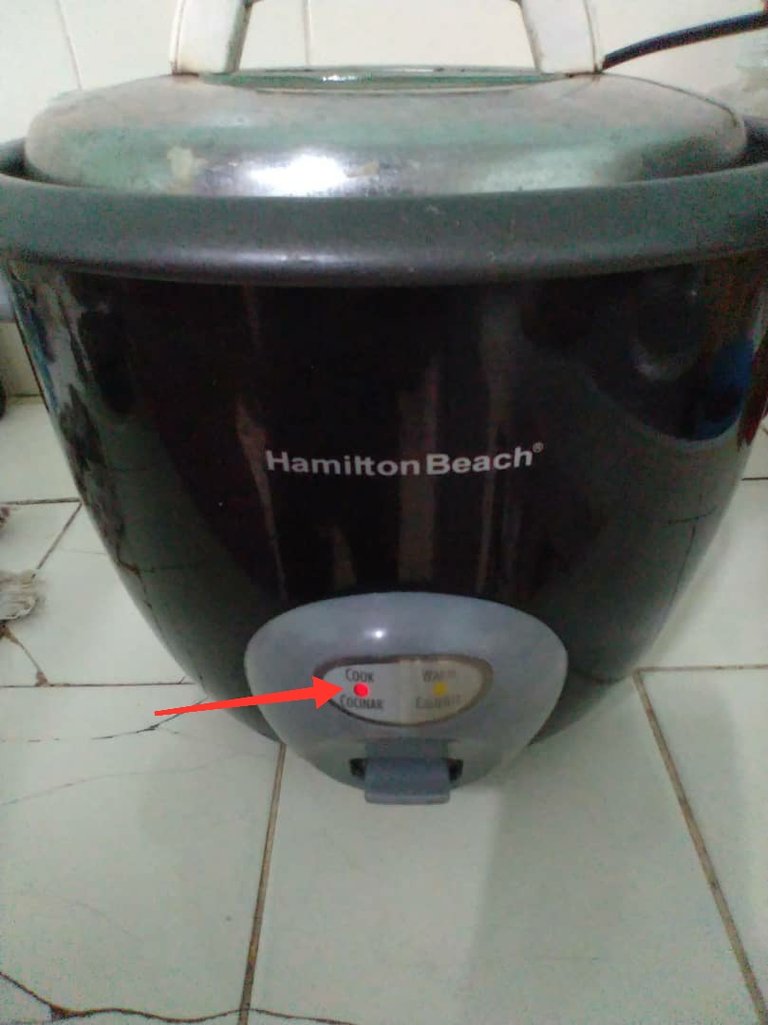
Aquí muestro ya la olla totalmente funcional
De esta forma quedó resuelto el problema, es común que suceda esto en este tipo de ollas ,en otros modelos el interruptor no es como el que les mostré anteriormente, pues emplean un micro interruptor, el cual también suele fallar por el uso y el calentamiento, y en ocasiones se pueden recuperar y darles un poco más de vida útil, sin embargo llega un punto en el que hay que sustituirlo.
Si llegaste hasta aquí, gracias por tomarte el tiempo de leer, espero que mi escrito te sirva de ayuda.
Un saludo, y hasta el próximo post 😉.
Las imágenes son de mi autoría y fueron tomadas con un celular Xiaomi Redmi Note 9.
Imágenes editadas en la aplicación "Galería" del teléfono, Foto Collage-GridArt y "GIF MAKER"
Imágen de la portada editada en Canva
Puedes verme en Facebook
ENGLISH
Hello my friends, greetings and good vibes to all. Today I want to transmit my experiences during the solution of some of the common problems that can occur at home with a household appliance, particularly I speak of the rice cooker, that which makes life easier in the kitchen when preparing rice, at least here in Cuba that dish could not miss on the table.
Who hasn't been surprised to find out that their kitchen doesn't work or suffers some kind of malfunction during the cooking process?
Well, that's precisely what happened to a friend of mine who had a rice cooker that broke down, it turned on the bulb that indicates that it is heating, but when she pressed the key that puts the pot to cook the rice, the resistance did not heat, and the bulb that indicates that it is cooking did not turn on. Immediately this friend contacted me for help and I did.
The repair was simple, and that is why I will share with you how you can repair your rice cooker (in this case it is a Hamilton Beach Model: 37542 but many are similar) if it has the problem I describe and you are encouraged to do it yourself.
Symptom of the rice cooker during the breakdown.
Well I already explained that this rice cooker would turn on the Heating indicator but when I switched it to Cooking mode it did absolutely nothing.
Here the cooker is with the cooking key active but only the yellow indicator remains lit and does not heat the main heating element.
Here is how to solve this problem.
Remove the lid from the bottom of the pot, using a screwdriver to remove the screws that hold it in place.
Remove the indicated screws.
When removing the cover, you can see the connections where the alternating current enters, which arrives through the Line cable then passes through a Thermal fuse, continues through the cooking resistor entering through the connection point No. 1 and leaving through the connection point No.2, and then continues to the switch that closes the circuit when the cooking lever is activated, finally the current returns through the Neutral cable to return to the source that originated it.
The following pictures show the main parts of the pot circuit and the path of the main current through the circuit. The red arrows describe the path of the current through the circuit and the black arrows correspond to the sum total of all the currents returning through the neutral wire to the source that originated it.
Alternating current (AC) input cable
Line and neutral
Marked in a blue circle below the insulator is the thermal fuse, which is a protection element.
The red circles 1 and 2 correspond to the cooking resistor connections.
The green circle marks the normally open switch that closes the circuit when the cooking lever is pressed.
The yellow circle indicates the thermostat (this is responsible for keeping the lever in the "cooking" position until a certain temperature, which would be at least above 100°C, which is reached when the water inside the pot has evaporated).
The white circle indicates the maintenance or "heating" resistance, its function is to heat and maintain the temperature of the rice without burning it.
This image shows the current path in the main resistor when the rice is being cooked. The red arrows correspond to the current in the cooking resistor and the black ones represent the total of the currents of the consumption of all the components of the pot, returning through the neutral wire to the source that originated it, this sense of circulation of the current corresponds to one of its semicicles, in the other semicicle, the circulation will be in the opposite sense to the represented one, this way the current flows in a sense and then in the opposite sense in a repetitive way. In the image I only represent the main current, but there are other current consumptions by the other components (heating resistor and indicator bulbs) that are not represented in the image..
The above information I give it for a better understanding, if it is difficult for you to understand these issues of electronics, it does not matter, you can still repair this type of pots if something similar to the above described happens to you, just follow the following steps.
Detecting the origin of the fault.
- First of all, a visual inspection of the circuit is made to detect any physical malfunction, remember to disconnect the cable from the power outlet if you are going to manipulate any part of the circuit.
Upon visual inspection, there were apparently no problems, however I ruled out that the problem was due to the Thermal Fuse, as the pot was lighting the Heating mode bulb.
- I continued with a deeper visual inspection, since from experience I know that this type of failures when they manifest in the way I initially described, and taking into account that the pot has not had so much time of use to suspect the resistance, I went straight to the switch that closes the circuit by pressing the lever, since it is usually damaged and cause this type of failures.
Well, when I looked at the metal contacts of the switch I noticed that it had a slag-like layer due to the heating and sparks that are generated between these two contacts when activating or deactivating the cooking lever. This slag increases the resistance between the contact points of the switch, which prevents the ideal passage of current to operate the pot's heating element. In the following images I show you the slag I am talking about.
Switch that closes the circuit when activating the cooking lever, in the photo it can be seen that they are somewhat burned by heating and use.
Burned and slagged contacts due to heating and sparking
Troubleshooting the source of the fault.
To solve this it is necessary to clean the contacts as well as possible, for this I used a piece of sandpaper, which I introduced between the two contacts and by small movements I was scraping and removing the slag.
Sandpaper used to clean the switch contacts.
Scraping of the contacts, it is necessary to scrape both the top and the bottom one.
Clean contacts after scraping with sandpaper.
After having the contacts well cleaned it is time to test the pot, for it I place the container and activate the cooking lever, and happily the problem was solved. As it is observed in the image, when pressing the lever it made a change of signaling when turning on the light bulb that signals the Cooking mode.
Before and After.
Here I show the fully functional pot
In this way the problem was solved, it is common that this happens in this type of pots, in other models the switch is not like the one I showed above, because they use a micro switch, which also tends to fail by use and heating, and sometimes you can recover and give them a little more life, however there comes a point where you have to replace it.
If you made it this far, thank you for taking the time to read, I hope you find my writing helpful.
Best regards, and see you next post 😉.
The images are of my authorship and were taken with a Xiaomi Redmi Note 9 cell phone.
Images edited in the "Gallery" application of the phone, Photo Collage-GridArt and "GIF MAKER ".
Cover image edited in Canva
Text translated to English in Deepl translator.
You can see me at Facebook
Congratulations @darknapol! You have completed the following achievement on the Hive blockchain And have been rewarded with New badge(s)
Your next target is to reach 700 upvotes.
You can view your badges on your board and compare yourself to others in the Ranking
If you no longer want to receive notifications, reply to this comment with the word
STOPTo support your work, I also upvoted your post!
Check out our last posts:
Wow, I've never had a rice cooker. Rice is common in Europe, but not a daily dish as in other continents. Anyway, good thing you have been able to solve the problem as buying a new one means extra expenses and who needs that, right?
Hello friend, it is as you say, we already have enough problems, so there is no need for more extra expenses as you say jjjj.... Here if it is common to have rice as a daily dish, although sometimes it varies for another, but it is always present. Thanks for reading and commenting. Greetings and blessings.
Excelente, hice el paso a paso y rescaté mi arrocera. No fue difícil, solo que algunos tornillos muy oxidados me dieron problemas. Gracias!
Hola hermano, que bueno que pudiste rescatar la olla me alegra saberlo, en estos tiempos tan difíciles es de vital importancia resolver los problemas lo más económico posible. Saludos hermano
Que bien que haya solucionado con facilidad, por lo general cuando veo fallas en equipos de resistencias, es el fusible térmico. Esa falla de los contactos es algo que encuentro en planchas de ropa, cocinas eléctricas de resistencias. Me recuerda a los platinos de los carros viejos, la gente solía bañarlos con algún material para hacerlos más resistentes, pero no creo que hoy día sea rentable, creo que sale más barato repararlo o cambiarlo.
Hola hermano, si, otras veces la falla ha sido por el fusible térmico, acá no es muy común remplazarlo principalmente por la falta de repuestos, así que la solución que se le da es ponerla sin fusibles asumiendo el riesgo jjj. Saludos hermano gracias por comentar.