Hello everyone... 💙
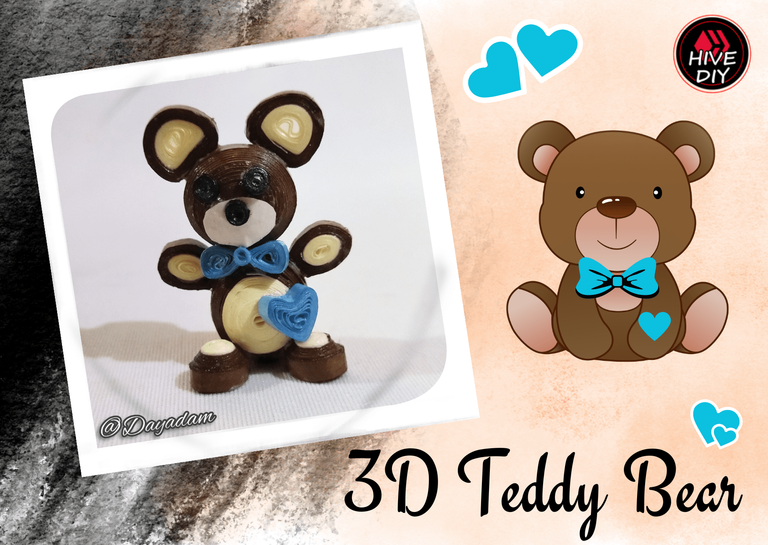
Hello to my dear Hivers and the dear community of artists #HiveDIY, as always very pleased and excited to be here again, showing you my work made with love and especially for you.
We are about to end the month of January, next February is the day of Love and Friendship. Well, I wanted to start before time to elaborate details that many could make to give that gift to that special person.
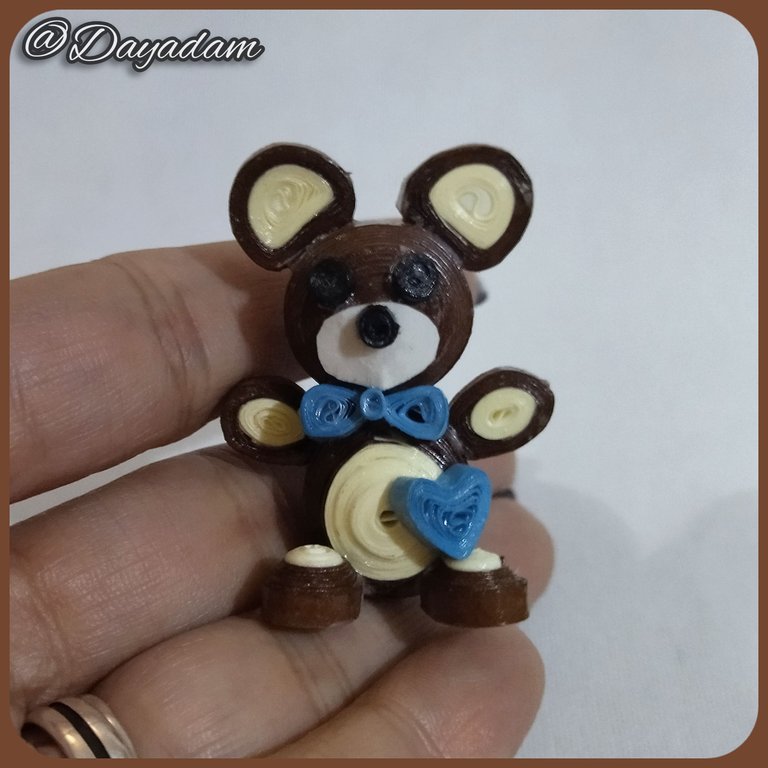
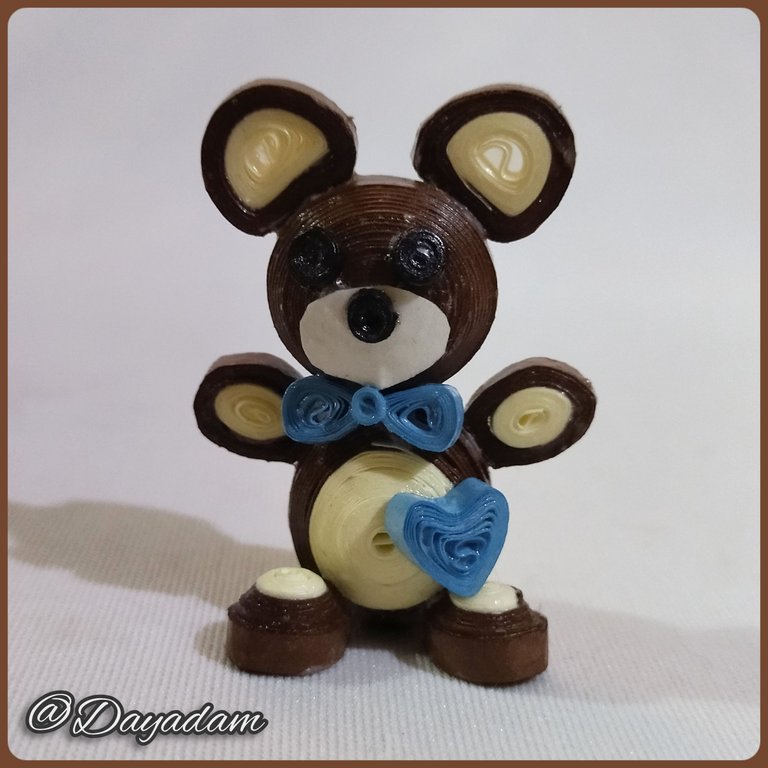
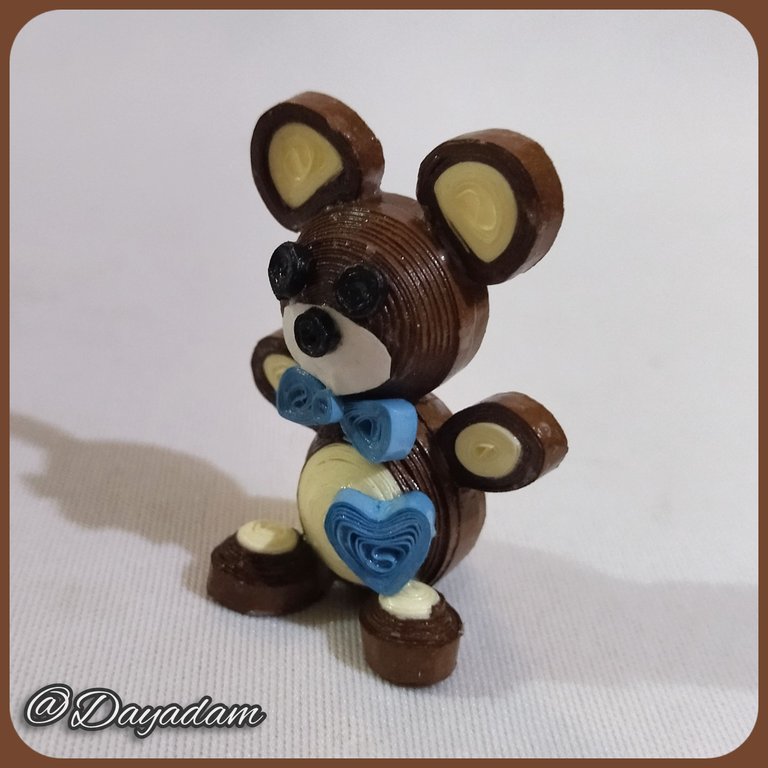
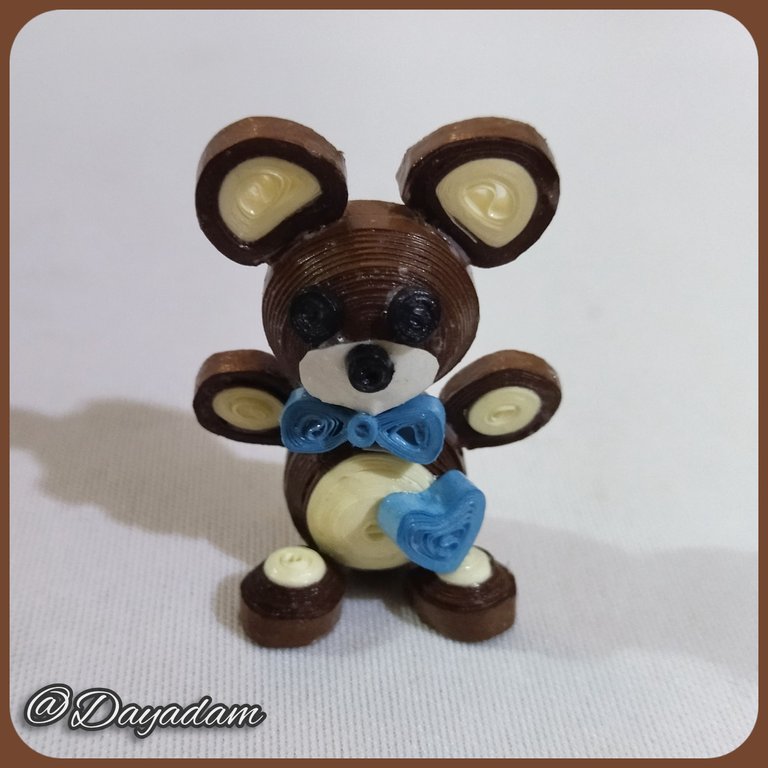
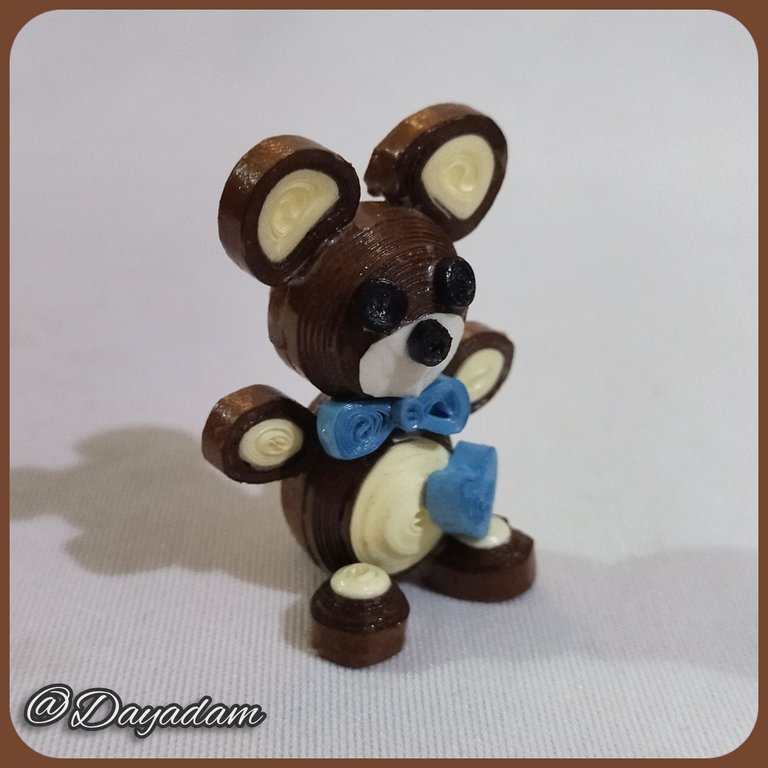
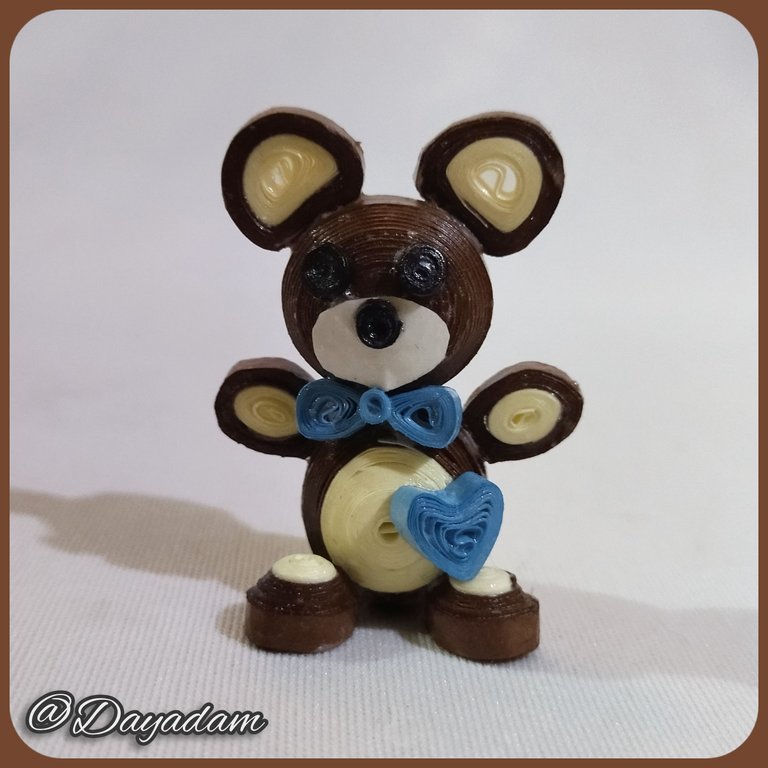
Many people love teddy bears, these are very characteristic for these dates, some people tenderly call their partner a teddy bear, in my case I do not bring you a traditional teddy bear made of fabric or furry, but a small decorative 3D teddy bear in the quilling technique which is where I specialize.
I made this one for a very special person in my life, it doesn't matter if he is ahead of me, because love is celebrated in every moment, with every breath, as long as there are true, beautiful and sincere feelings in our hearts... (T.A💙)
Hoping that you like it, and are encouraged to carry it out, without further ado I leave here my creative process.
Let's get started:😃

Hola a Todos... 💙
Hola a mis queridos Hivers y a la querida comunidad de artistas #HiveDIY, como siempre muy complacida y emocionada de encontrarme por acá nuevamente, mostrándole mi trabajo hecho con mucho amor y especialmente para ustedes.
Estamos por finalizar el mes de Enero, para el próximo mes de Febrero se conmemora el día del Amor y la Amistad. Pues yo quise comenzar antes de tiempo a elaborar detalles que muchos pudieran hacer para dar ese obsequio a esa personita especial.
A muchos le encantan los ositos de peluche, estos son muy característicos para esas fechas, algunos tiernamente a su pareja les dicen osito, pues en mi caso no les traigo un tradicional osito de peluche de tela o peludito, si no, un pequeño osito en 3D decorativo en la técnica de quilling que es donde me especializo.
Este lo elabore para una persona muy especial en mi vida, no importa que este adelantado, ya que el amor se celebra en cada momento, con cada respiro, mientras existan sentimientos verdaderos, hermosos y sinceros en nuestros corazones... (T.A💙)
Esperando que sea de su agrado, y se animen a llevarlo a cabo, sin más preámbulos les dejo por acá mi proceso creativo.
Comencemos:😃

• Cintas de quilling de diversas medidas y colores .
• Aguja para quilling.
• Plantilla para moldear círculos.
• Pega blanca extra fuerte (de carpintería).
• Tijera.
• Pincel.
- Quilling ribbons of different sizes and colors.
- Needle for quilling.
- Template to mold circles.
- Extra strong white glue (carpentry glue).
- Scissors.
- Paintbrush.


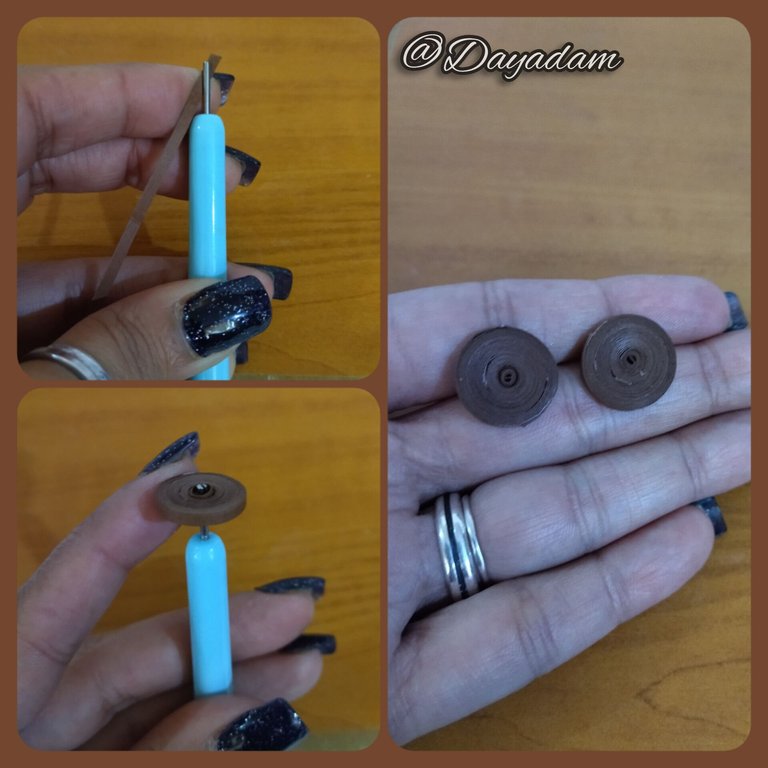
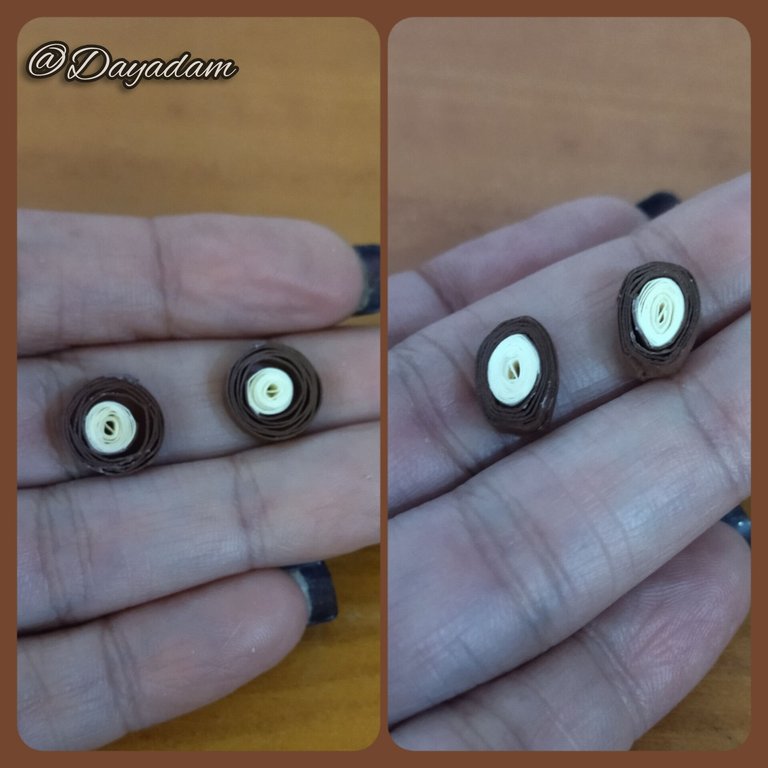
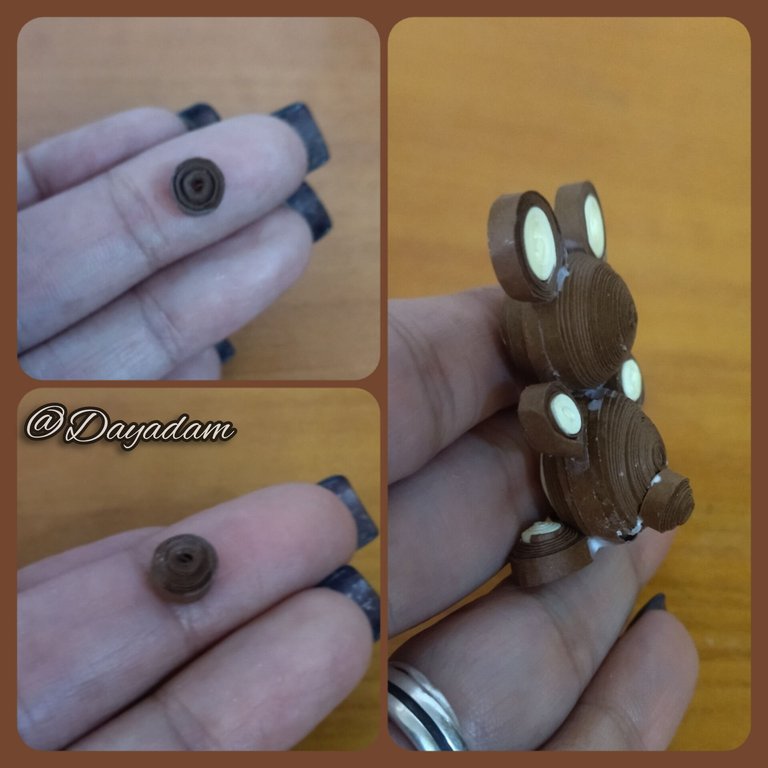
Head:
- We take 2 brown quilling ribbons of 60cms long each strip, with each one we will make a closed circle which we will measure in a template to mold circles in the measure number 15mm, we will add glue in the back so that they are not deformed and then we will join both. This will be the face of the bear.
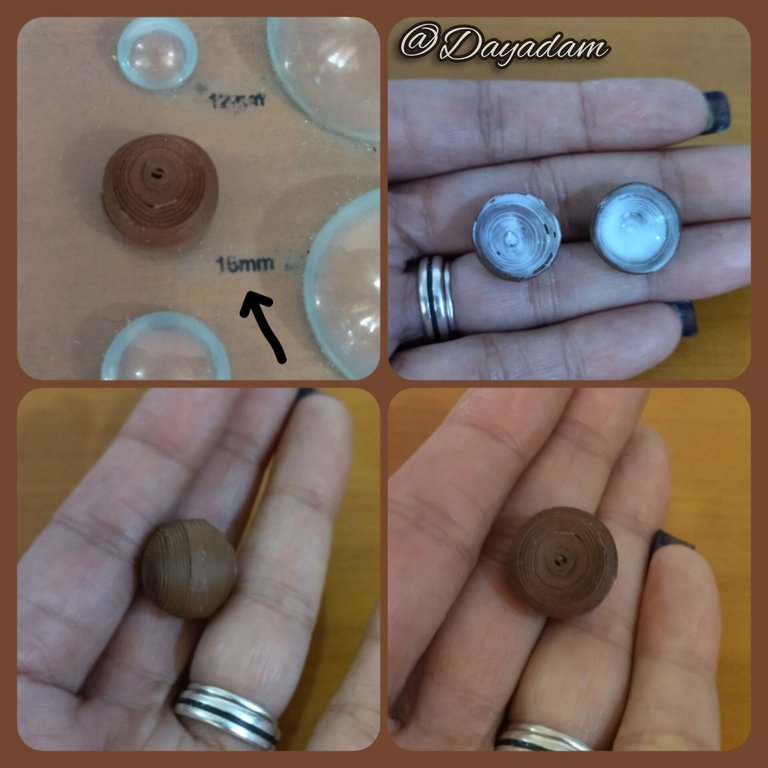
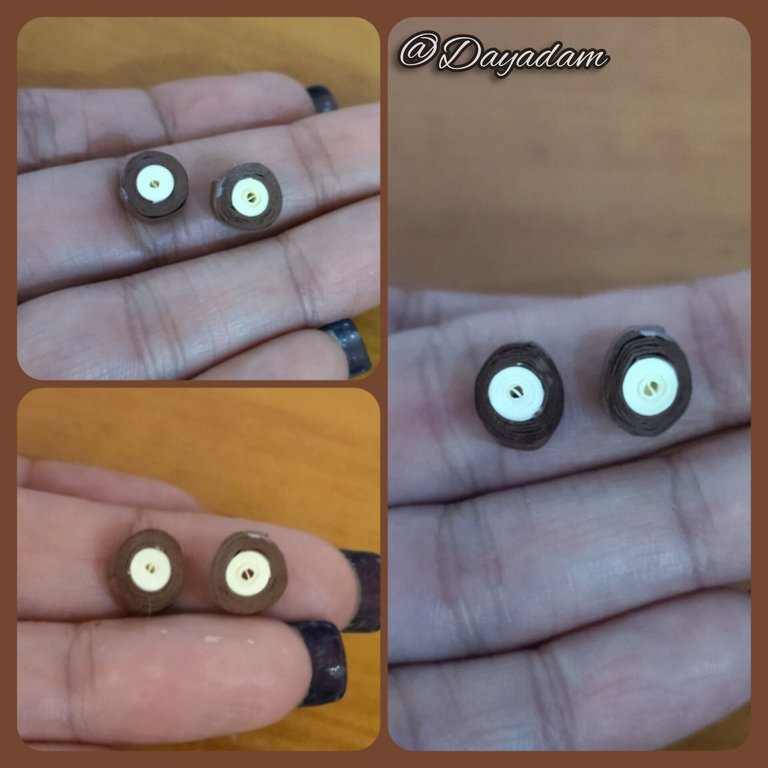
Body:
- We will take 3 quilling ribbons of 3mm wide, one brown and one combined brown and beige of 3mm wide, with each ribbon we will make a closed circle which we will mold in the template for circles in the measure number 17mm. Ready we will mold the circles in the shape of a drop, we will join both by passing around them black tape, this will be the body of the teddy bear.

Cabeza:
• Vamos a tomar 2 cintas para quilling color marrón de 60cms de largo cada tira, con cada una haremos un circulo cerrado el cual mediremos en una plantilla para moldear círculos en la medida numero 15mm, añadiremos pega en la parte de atrás para que no se deformen y luego uniremos ambos. Esta será la cara del osito.
Cuerpo:
• Vamos a tomar 3 cintas para quilling de 3mm de ancho, una de color marrón y otra combinada de color marrón con beige de 3mm de ancho, con cada cinta haremos un circulo cerrado los cuales moldearemos en la plantilla para círculos en la medida numero 17mm. Listos lo círculos moldearemos en forma de gota, uniremos ambos pasando a su alrededor cinta color negra, este será el cuerpo del osito.

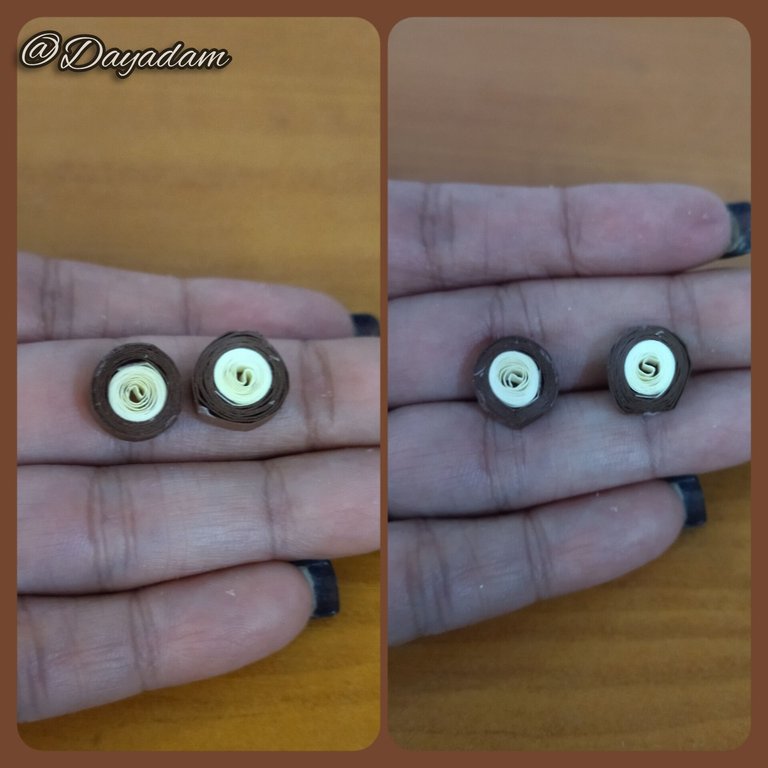
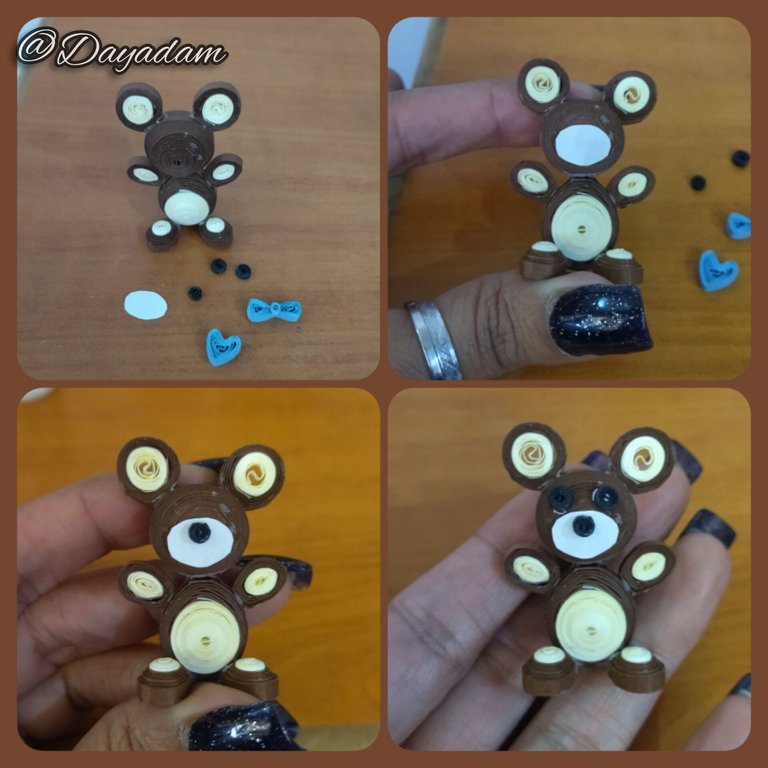
Arms:
- For these make 2 small open circles with combined brown and beige ribbons of 3mm wide, which mold in the shape of a flattened drop.
Legs:
- We are going to make 2 closed circles also with brown and beige combined ribbons, which we will mold in a slightly rounded and elongated shape. then we will take out a little bit to give it a small 3D effect.
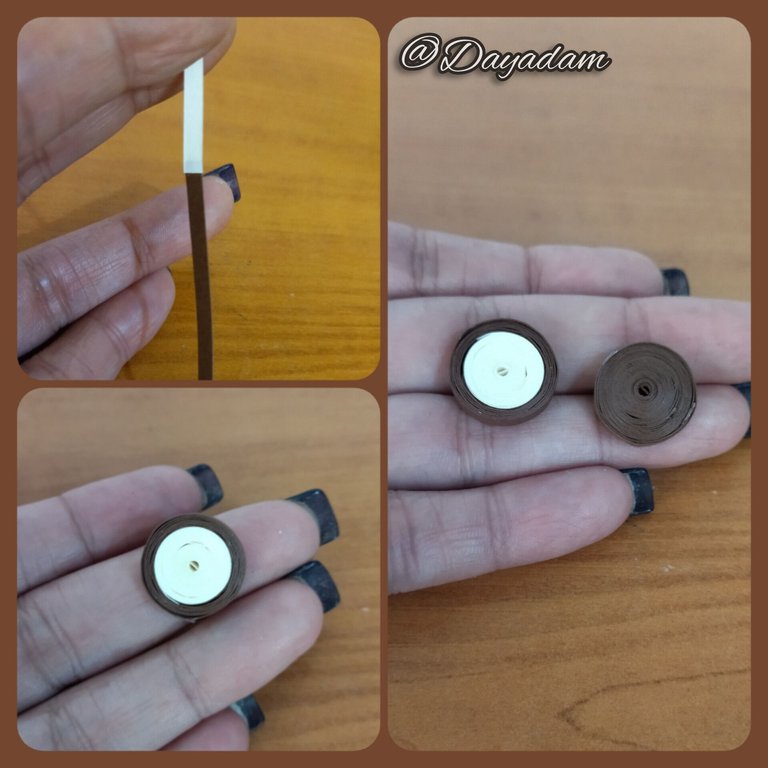
Ears:
- These we will also make by making 2 closed circles of the same mixed colors, and molding a little flattened at one end.
- We will glue the pieces we have ready to then finish the remaining details.
Brazos:
• Para estos realice 2 pequeños círculos abiertos con cintas combinadas marrón y beige de 3mm de ancho, las cuales moldee en forma de gota aplanada.
Patas:
• Vamos a realizar 2 círculos cerrados también con cintas combinadas marrón y beige, las cuales moldearemos de forma un poco redondeada y alargada. luego sacaremos un poco para darle un pequeño efecto en 3D.
Orejas:
• Estas también las realizaremos haciendo 2 círculos cerrados de los mismos colores mixtos, y moldeando un poco aplanados en una punta.
• Vamos a pegar las piezas que tenemos listas para luego terminar los detalles restantes.
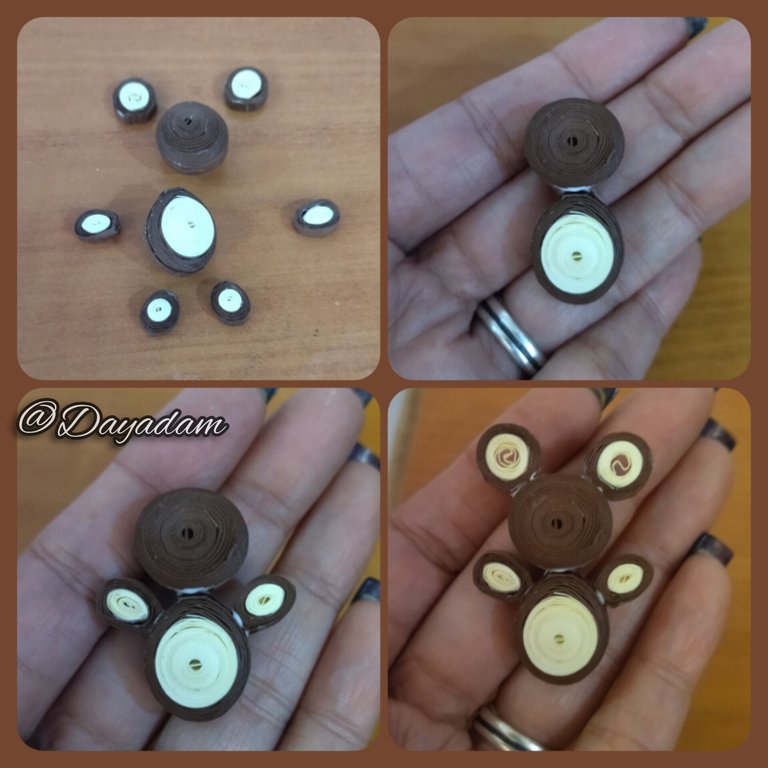
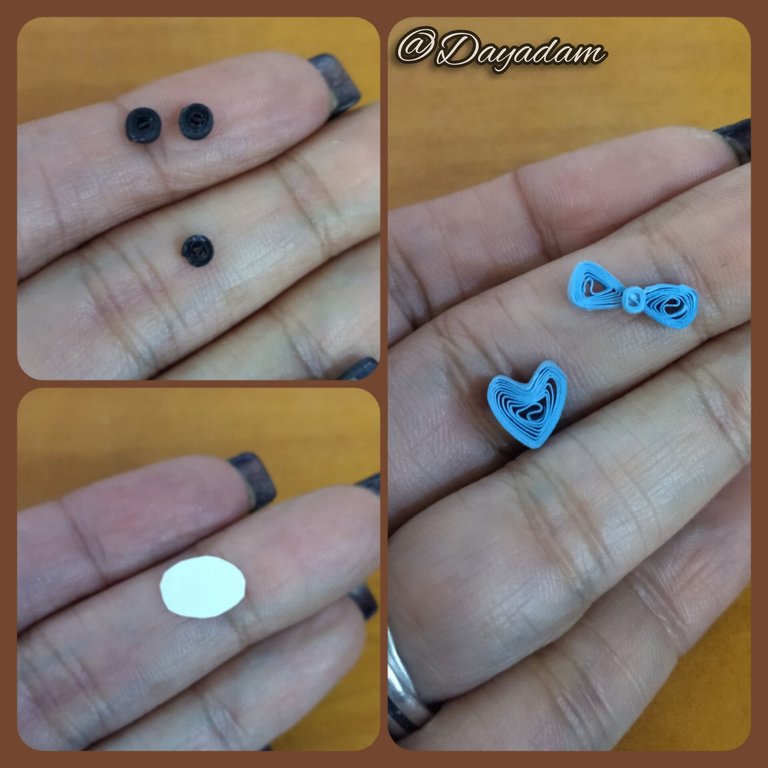
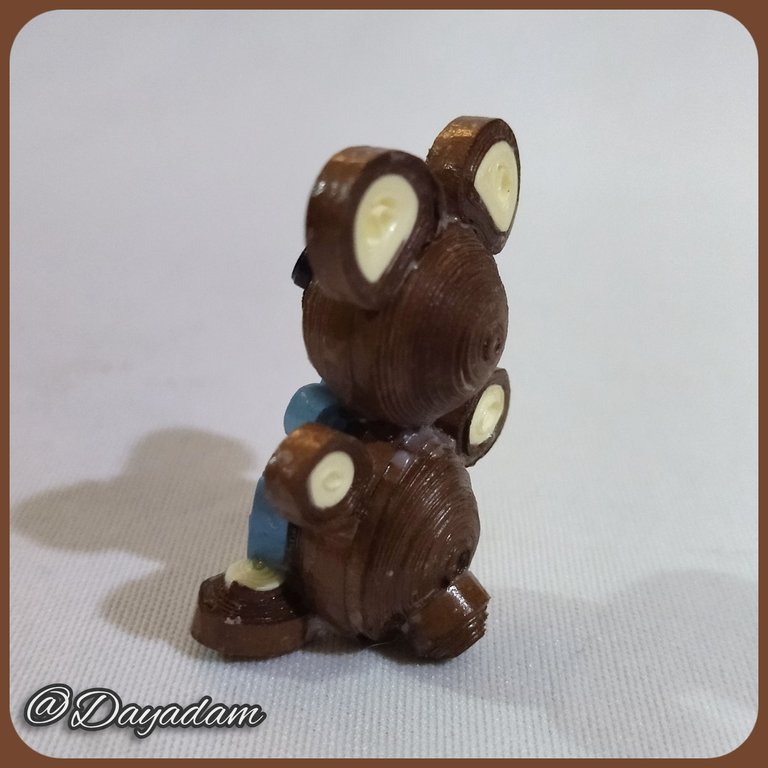
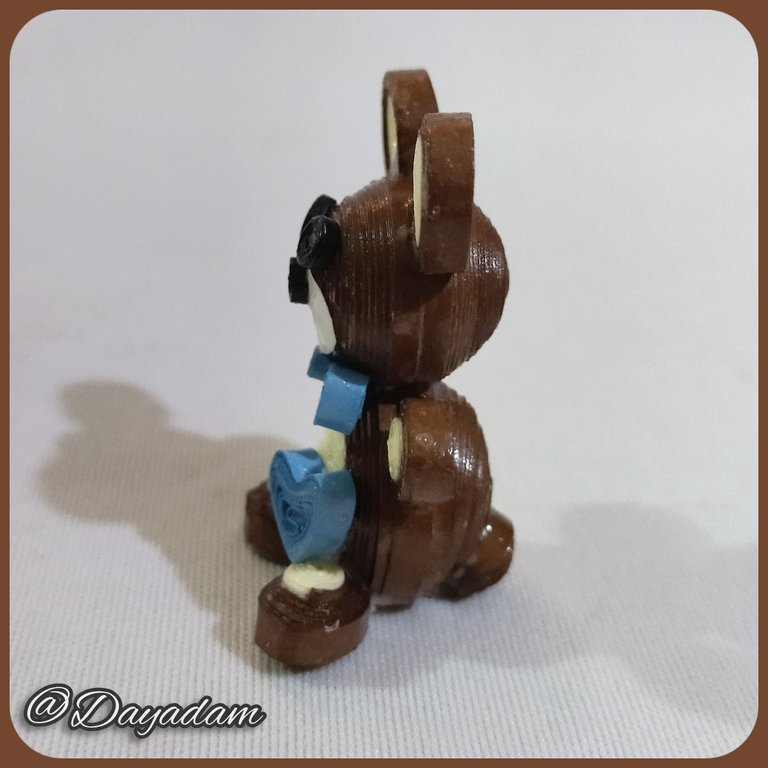
Tail:
- For the tail, make a small closed brown circle and glue it on the back of the bear.
- Finally, make the eyes and nose by making small closed circles of black quilling 1mm wide.
- Cut a small oval of beige quilling.
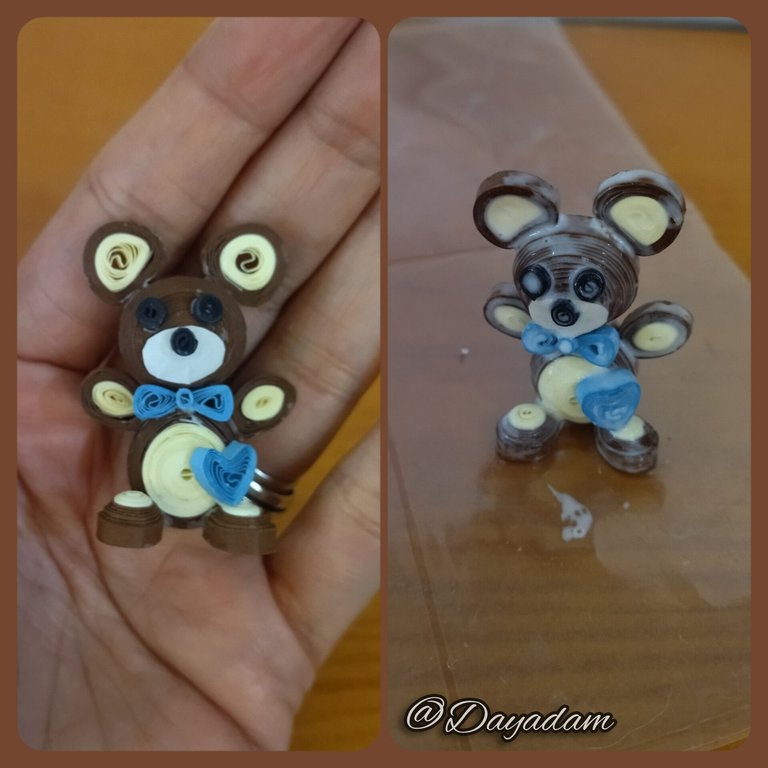
- Make a small bow and a heart with blue quilling 3mm wide. All these details I incorporated into the bear.
- Finally I applied a layer of extra strong white glue, to give shine and protection to the little bear.
So you have this little 3D bear that you can also make as I did, for a special person.
Cola:
• Para la colita realice un pequeño circulo cerrado color marrón, pegue en la parte de atrás del osito.
• Para finalizar realice los ojitos y nariz realizando pequeños círculos cerrados de quilling negro de 1mm de ancho.
• Corte un pequeño ovalo de quilling color beige.
• Realice un pequeño lazo, y un corazón con quilling de color azul de 3mm de ancho. Todos estos detalles los incorpore al osito.
• Por ultimo aplique una capa de pega blanca extra fuerte, para darle brillo, y protección al pequeño oso.
De esta manera tienen este pequeño osito en 3D que también pueden elaborar al igual que yo, para una personita especial.


What did you think, did you like it?
I hope you did, I hope you liked my explanation, procedure and photos, I made them with love for you.
"Let out that muse that inspires you, and let your imagination fly".
Thank you all, see you next time.
¿Qué les pareció, les gustó?
Espero que sí, que les haya gustado mi explicación, procedimiento y fotos, los hice con mucho cariño por y para ustedes.
"Deja salir esa musa que te inspira, y deja volar tu imaginación".
Gracias a todos, nos vemos en la próxima.

Ay! qué cuchitura. Demasiado adorable amiga, Sería un hermoso obsequio para San Valentín acompañado de algunas cositas. Excelente paso a paso amiga, como siempre.
Ainsss amiga bella gracias por tu lindo comentario, me alegra que te gustara este osito que realice para una persona de gran valor en mi vida y compartí con ustedes para que puedan hacer un bonito detalle de Amor para su persona especial. Abrazos mi hermosa...
Gracias por el apoyo...
Muy bonito el oso que has hecho, nunca dejas de sorprenderme con tus preciosos trabajos 🌹🌷🌼💮🌸🌺🥀🪷🌻🌻🌻☘️
Gracias mi linda. Muchísimas bendiciones para ti...
You are really talented.. The teddy bear looks like a chocolate bear hehe.. So cute..
Ainsssss so cute I'm glad you liked it, the truth yes, it looks like a chocolate bear. A hug my dear...
!LADY
View or trade
LOHtokens.@dayadam, you successfully shared 0.1000 LOH with @jane1289 and you earned 0.1000 LOH as tips. (1/3 calls)
Use !LADY command to share LOH! More details available in this post.
Qué tierno y adorable te quedó el osito, los detalles muy bien trabajados, aprendí ahora un poco de esa técnica, pues he visto varias figuras de ese tipo, pero no conocía ni su nombre (quilling), me gustó mucho, saludos 🤗
Me alegra mucho que te hayas interesado en la técnica y que te haya gustado. Gracias por pasar, a la orden por acá ante cualquier duda. Saludos...
https://reddit.com/r/crafts/comments/1aefixy/for_those_who_want_to_start_with_those_little/
The rewards earned on this comment will go directly to the people( @dayadam ) sharing the post on Reddit as long as they are registered with @poshtoken. Sign up at https://hiveposh.com.
Que hermoso trabajo querida, como siempre , me encantó el osito ❤️
Gracias mi bella por tus palabras, me alegra que te gustara el osito. Abrazos...
Muy lindo tu osito del amor y la amistad.
Gracias cariño me alegra que te haya gustado...
Que ternurita este teddy, me encanta como queda el lazo y el corazón un detalle hermoso amiga 💕 ♥️
Gracias mi linda amiga, un placer que te haya gustado. Un abrazote para ti...
Saludos @dayadam, que cuchitura de osito, como siempre un lindo trabajo, parece de chocolate y está perfecto para obsequiar en san Valentín, es adorable.
!DIY
Saludos mi bella. Gracias por tu comentario, me alegra mucho que te gustara este osito cuchi de San Valentín. Abrazos...
You can query your personal balance by
!DIYSTATSCongratulations @dayadam! You received a personal badge!
Wait until the end of Power Up Day to find out the size of your Power-Bee.
May the Hive Power be with you!
You can view your badges on your board and compare yourself to others in the Ranking
Check out our last posts:
Congratulations @dayadam! You received a personal badge!
You can view your badges on your board and compare yourself to others in the Ranking
Check out our last posts: