Hello everyone... 🐱🐾💕
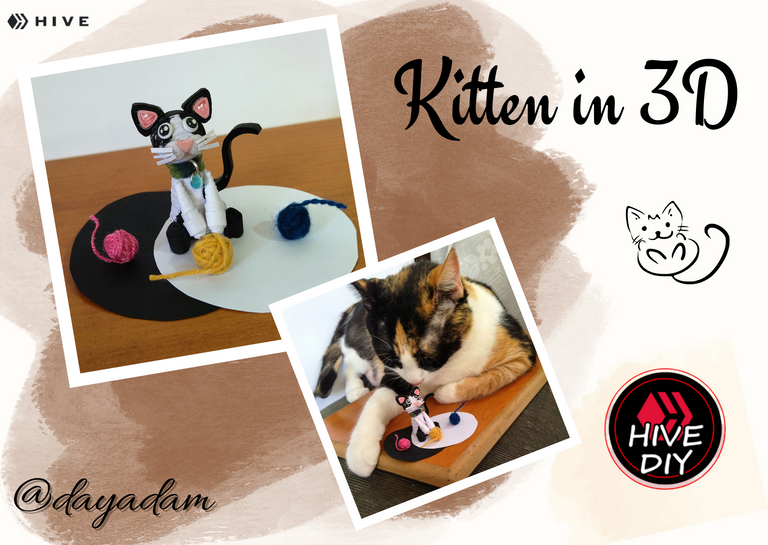
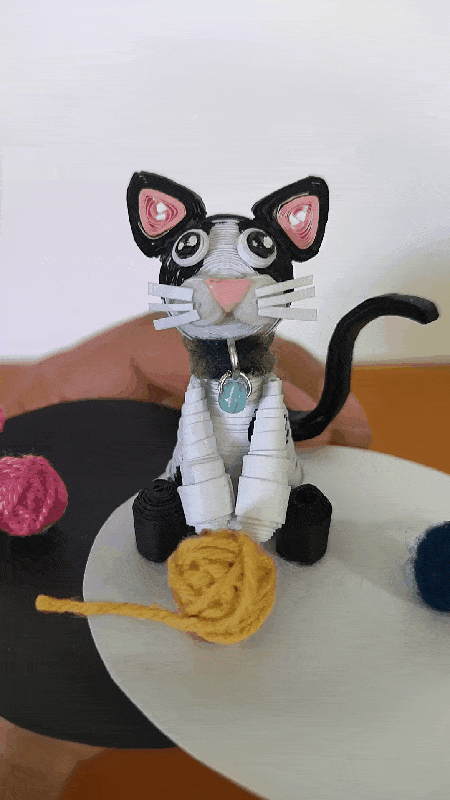
Hello to my dear Hivers and the beloved community of artists #HiveDiy, as always very pleased and excited to be here again, showing you my work made with love and especially for you.
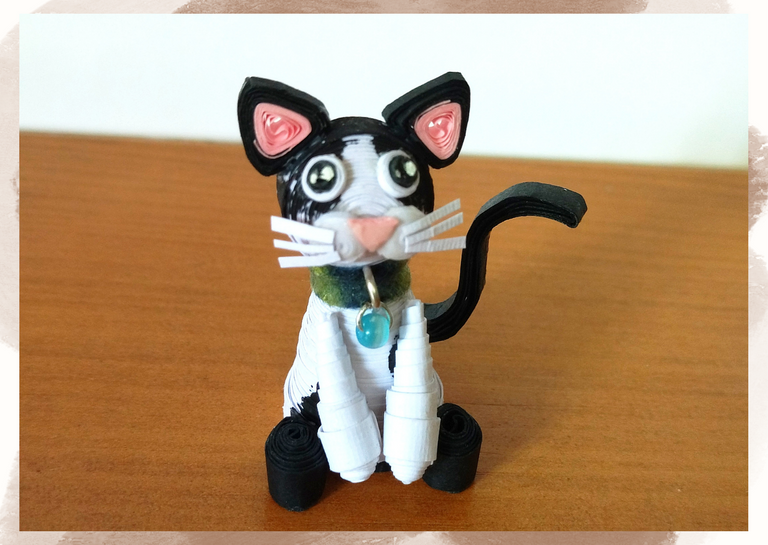
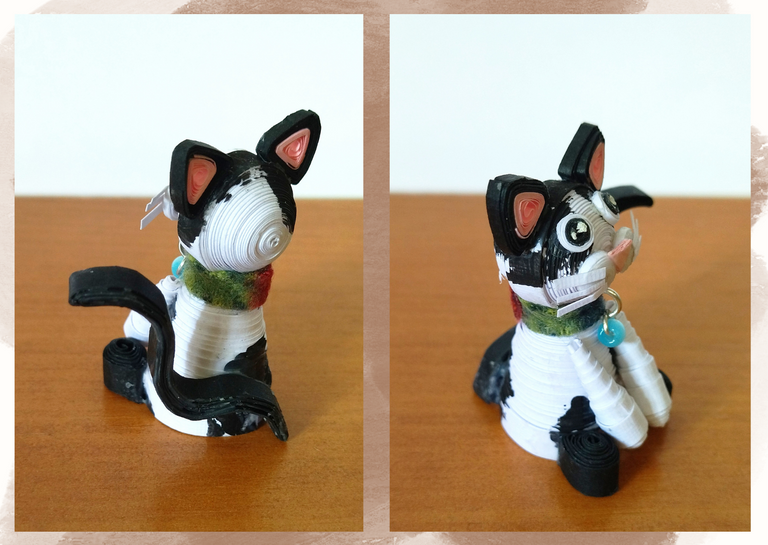
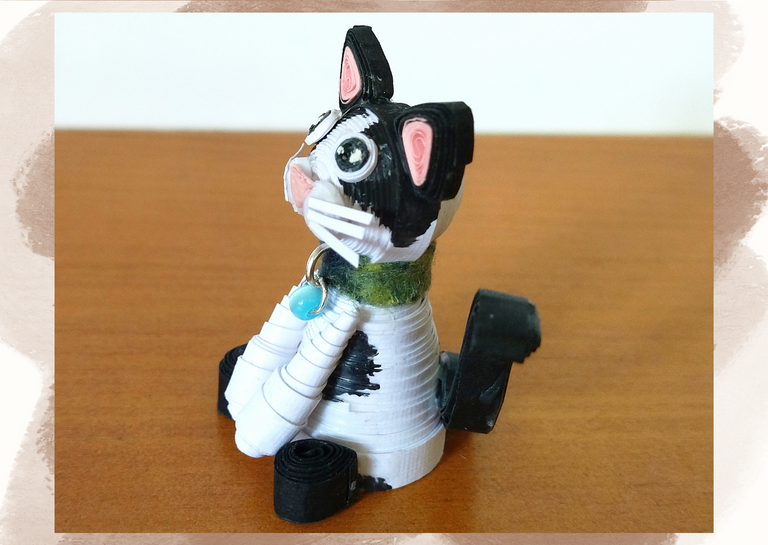
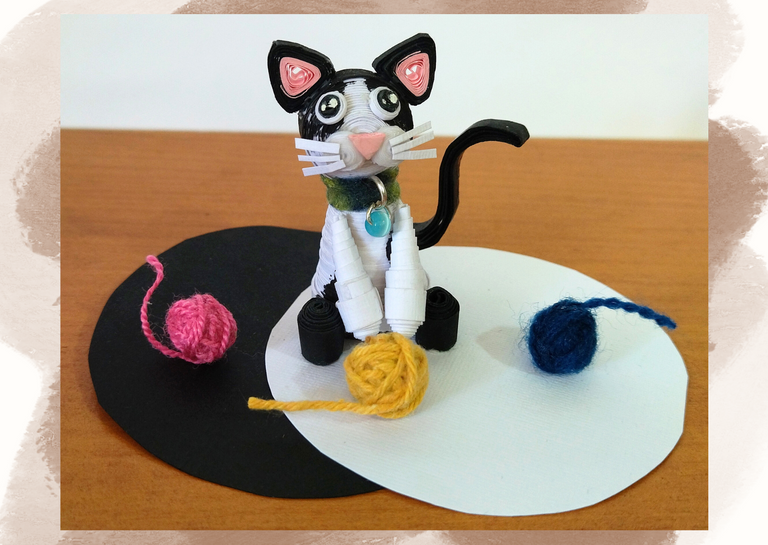
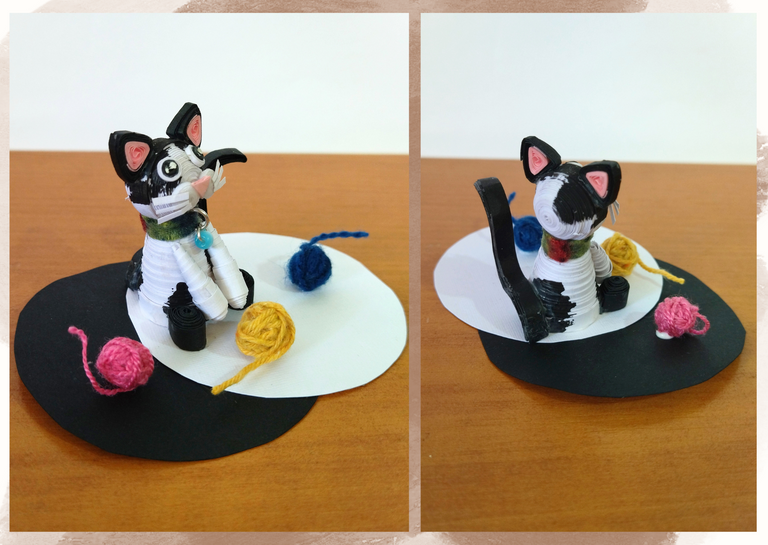
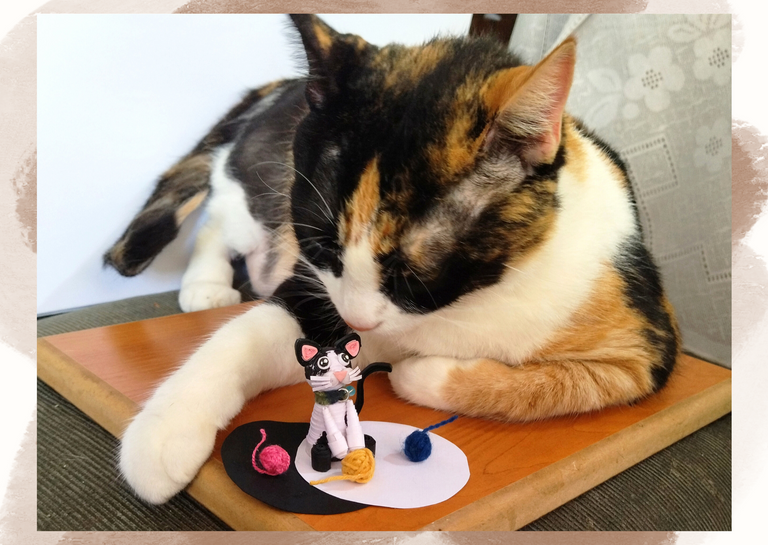
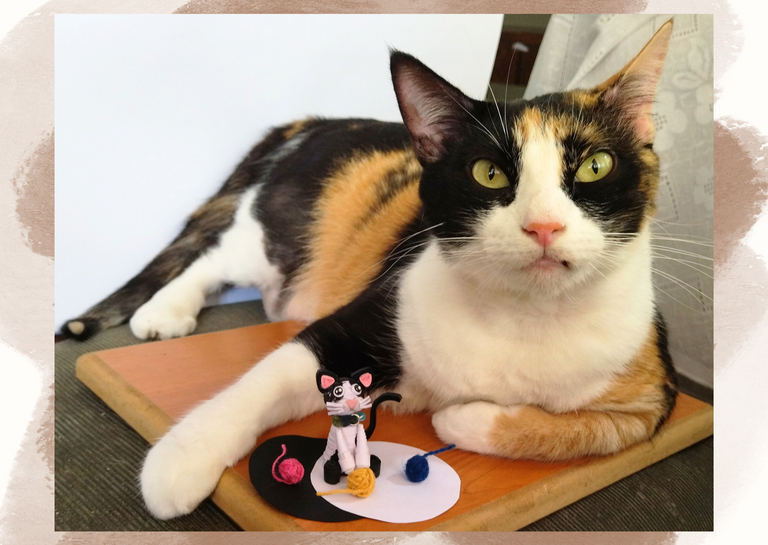
For this opportunity, as a faithful lover of kittens being the human mommy of a beautiful furry that fills my life and my day to day of love, company and happiness. I bring you a 3D decorative kitten, which I made for me in the quilling technique, although my plans were to keep it to place it as an ornament on my desk, I will have to carry out another one since my daughter saw it and told me mom, that kitten is mine and she even named it hahahaha. My cat girl and assistant Michi also served me as a model in the pictures posing with this new friend.
I have rarely done this kind of 3D sculpture type of work, seeing that it looks very good I will surely soon be encouraged to make other figures in this style.
I hope you like the work, join me in this creative process.
Let's begin:😃

Hola a todos... 🐱🐾💕
Hola a mis queridos Hivers y a la querida comunidad de artistas #HiveDiy, como siempre muy complacida y emocionada de encontrarme por acá nuevamente, mostrándole mi trabajo hecho con mucho amor y especialmente para ustedes.
Para esta oportunidad, como fiel amante de los gatitos siendo la mami humana de una hermosa peludita que llena mi vida y mi día a día de amor, compañía y felicidad. Les traigo un gatito decorativo en 3D, que elabore para mí en la técnica de quilling, aunque mis planes era conservarlo para colocarlo de adorno en mi mesa de trabajo, me va a tocar llevar a cabo otro ya que mi hija lo vio y me dijo mama, ese gatito es mío y le puso hasta nombre jajajaja. Mi niña gatuna y asistente michi también me sirvió de modelo en las fotografías posando con este nuevo amiguito.
Pocas veces he realizado este tipo de trabajo tipo escultura en 3D, al ver que luce muy bien seguramente próximamente me anime a realizar otras figuras de este estilo.
Espero sea de su agrado el trabajo, acompáñenme en este proceso creativo.
Comencemos:😃

• Cartulina blanca y negra.
• Cintas de quilling de diversos mm de ancho blancas, negras.
• Aguja para quilling.
• Pega blanca extra fuerte (de carpintería).
• Pintura al agua blanca y negra.
• 2 argollas pequeña de bisutería.
• 1 Perla del color de tu preferencia.
• Trozo de tela del color de tu preferencia.
• Tijera.
• Aguja de coser o alfiler.
• Palito de altura.
• Pincel.
• Alicate punta fina.
• Perla mediana.
• Trozos de hilos de colores varios.
- Black and white cardboard.
- Black and white quilling ribbons of different widths.
- Quilling needle.
- Extra strong white glue (woodworking glue).
- Black and white water-based paint.
- 2 small costume jewelry rings.
- 1 pearl of the color of your choice.
- Piece of fabric in the color of your choice.
- Scissors.
- Sewing needle or pin.
- Height stick.
- Brush.
- Needle-nose pliers.
- Medium pearl.
- Pieces of threads of various colors.

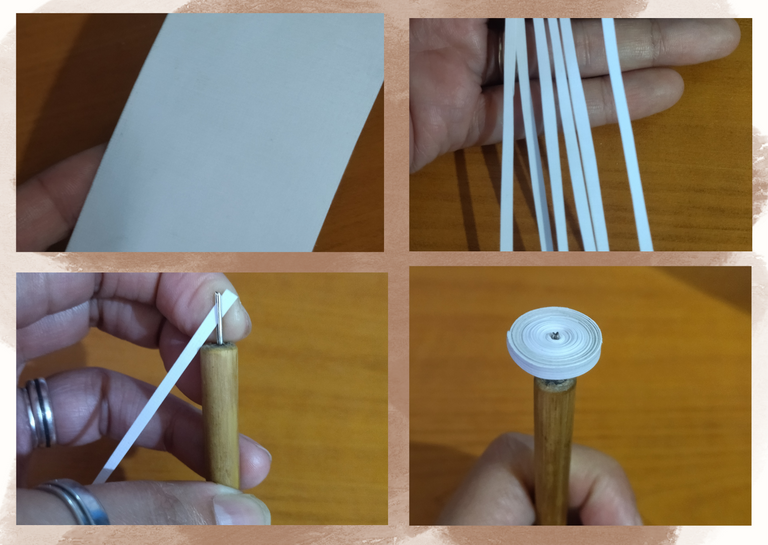
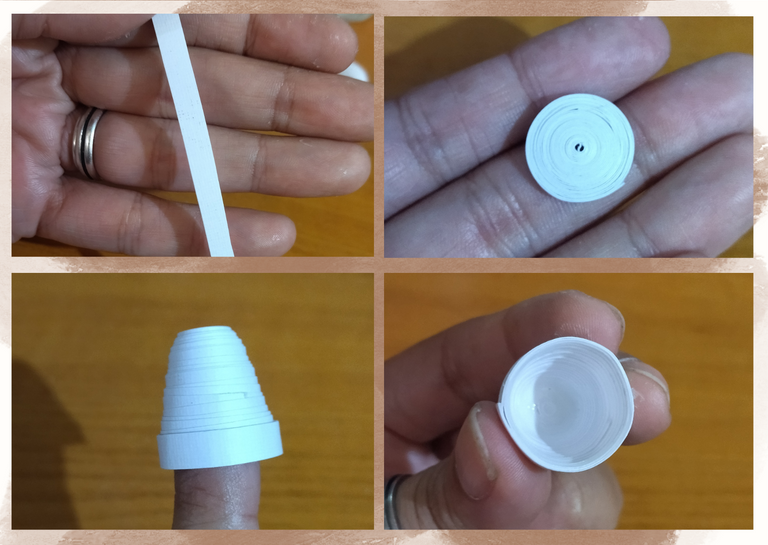
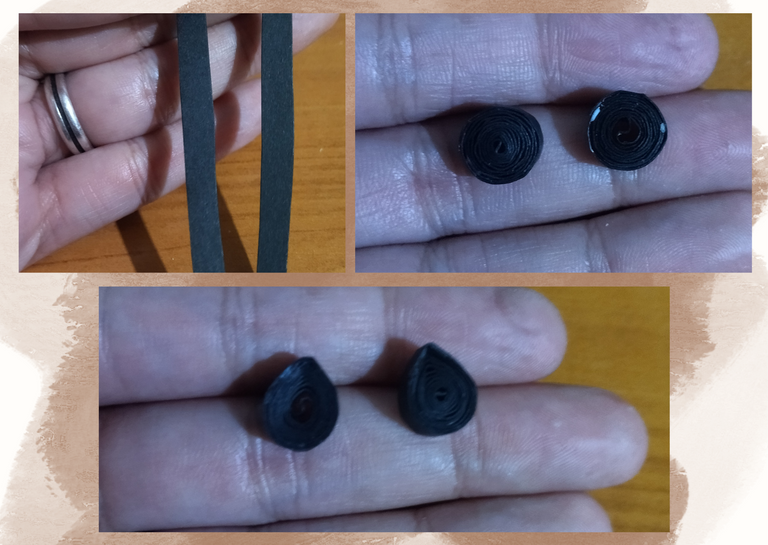
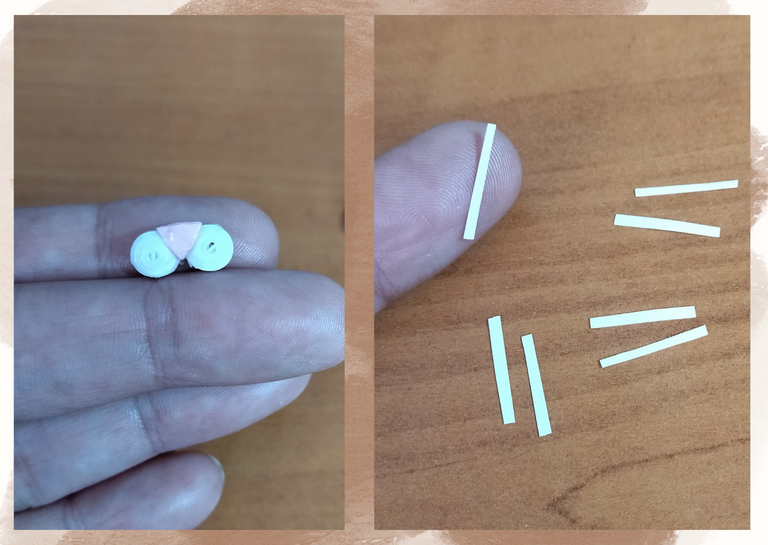
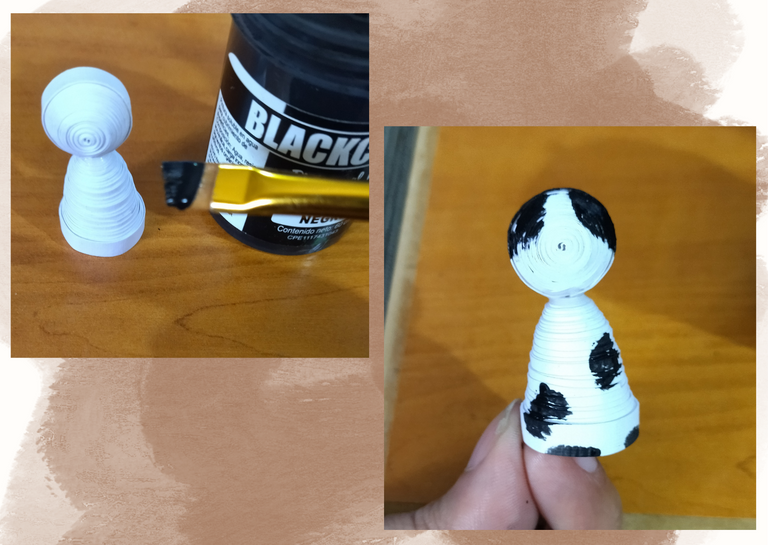
- We start by taking white cardboard (recyclable) and we will cut a strip of 3mm wide x 100cms long, we roll it with the quilling needle until we reach the end of the ribbon, we seal it with extra strong white glue, we take it out of the needle, we will obtain a closed circle, we will need another one just like it. For each charm we want to make we will repeat the same process.
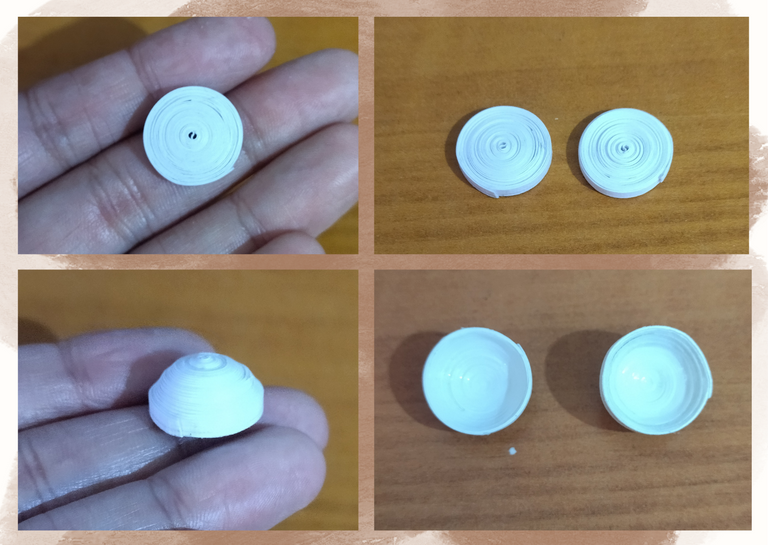
- We are going to mold the circles, with the help of our fingers we are going to push outwards until we get the necessary shape for the kitten's head, on the inside we add a little glue and let it dry to prevent the pieces from moving.
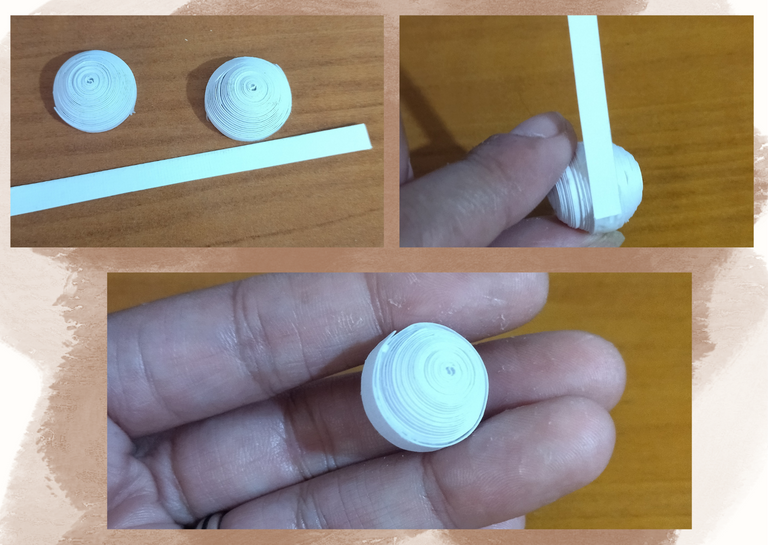
- We are going to take a small piece of white quilling tape, (I also made it by cutting a cardboard), of approximately 5mm wide to join the pieces we made, we join both pieces passing the tape through the middle with extra strong white glue (reserve).

• Comenzamos tomando cartulina blanca (reciclable) y vamos a picar una tira de 3mm de ancho x 100cms de largo, enrollamos con la aguja para quilling hasta llegar al final de la cinta, sellamos con pega blanca extra fuerte, sacamos de la aguja, obtendremos un círculo cerrado, vamos a necesitar otro igual. Por cada dije que queramos hacer vamos a repetir el mismo proceso.
• Vamos a moldear los círculos, con la ayuda de los dedos vamos a empujar hacia afuera hasta conseguir la forma necesaria para la cabeza del gatito, en la parte de adentro agregamos un poco de pega y dejamos secar para evitar que se muevan las piezas.
• Vamos a tomar un pequeño trozo de cinta de quilling blanca, (también lo realice cortando una cartulina), de aproximadamente 5mm de ancho para unir las piezas que elaboramos, acoplamos ambas pasando la cinta por el medio con pega blanca extra fuerte (reservamos).
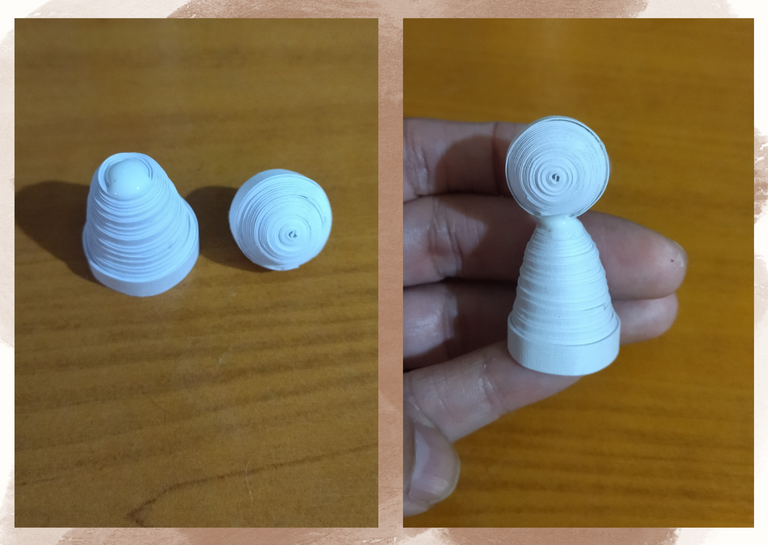
- Now we will proceed to cut a 5mm wide x 150cms long white strip, we roll it with the quilling needle until we reach the end of the ribbon, we seal it with extra strong white glue, we take it out of the needle, we will obtain a closed circle.
- We will also mold this closed circle, taking it outwards to form the body of the kitten, as we did with the previous piece we will put glue in the hollow part to prevent it from moving or deforming. Then we will glue the head to it.
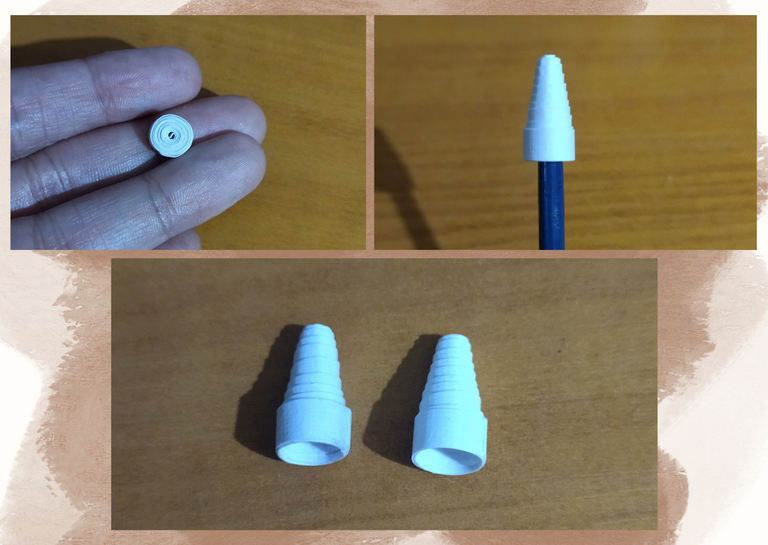
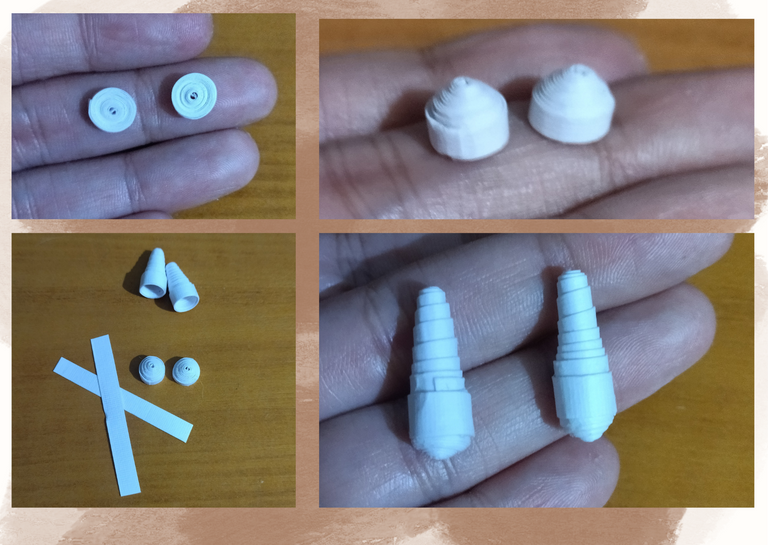
- Now we go with the front paws, for that we will need to cut a strip of quilling 5mm wide x 15cms long, we will roll it with the quilling needle to form a closed circle, we seal at the end with glue, we will mold it in the shape of a cone taking it out with a brush or high stick, in the inside we will also put glue so that the piece does not deform. We will need 2 pieces like this one.
- For the other part of the front legs, we will cut a quilling strip 3mm wide x 15cms long, roll it with the needle to form a small closed circle, seal it with glue, just push it out a little bit to mold it and give it a rounded shape, add glue so it doesn't deform. We will join the other piece in the shape of a cone by gluing around it a piece of cardboard about 4mm wide.
• Ahora vamos a proceder a picar una tira de 5mm de ancho x 150cms de largo color blanca, enrollamos con la aguja para quilling hasta llegar al final de la cinta, sellamos con pega blanca extra fuerte, sacamos de la aguja, obtendremos un círculo cerrado.
• Este círculo cerrado también lo moldearemos, sacando hacia afuera para formar el cuerpo del gatito, tal como hicimos con la pieza anterior le colocaremos pega en la parte hueca para evitar que la misma se mueva o deforme. Luego pegaremos la cabeza a la misma.
• Ahora vamos con las patas delanteras, para eso necesitaremos cortar una tira de quilling de 5mm de ancho x 15cms de largo enrollaremos con la aguja para quilling para formar un círculo cerrado, sellamos al finalizar con pega, moldearemos en forma de cono sacando hacia afuera con un pincel o palito de altura, en la parte de adentro también colocaremos pega para que la pieza no se deforme. Necesitaremos 2 piezas como esta.
• Para la otra parte de las patas delanteras, cortaremos una tira para quilling de 3mm de ancho x 15cms de largo, enrollamos con la aguja para formar un pequeño círculo cerrado, sellamos con pega, solo empujaremos un poco hacia afuera para moldearlo y darle una forma algo redondeada, añadimos pega para que no se deforme. Uniremos a la otra pieza en forma de cono pegando alrededor un trozo de cartulina más o menos de 4mm de ancho.
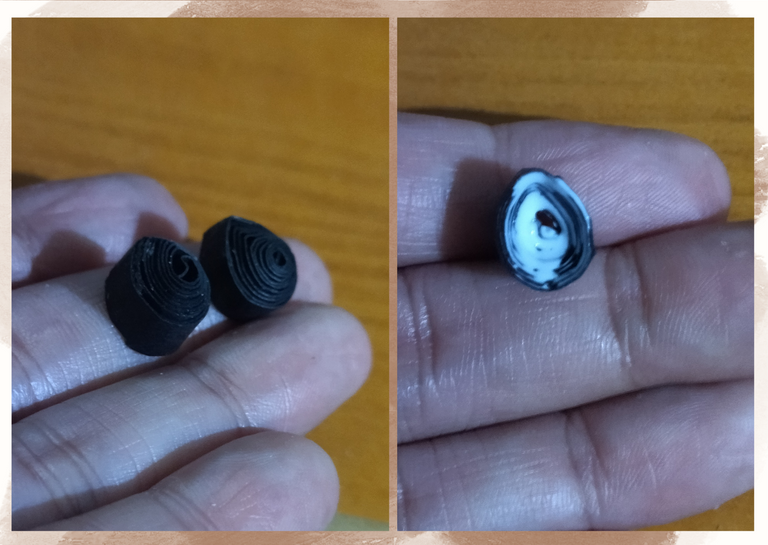
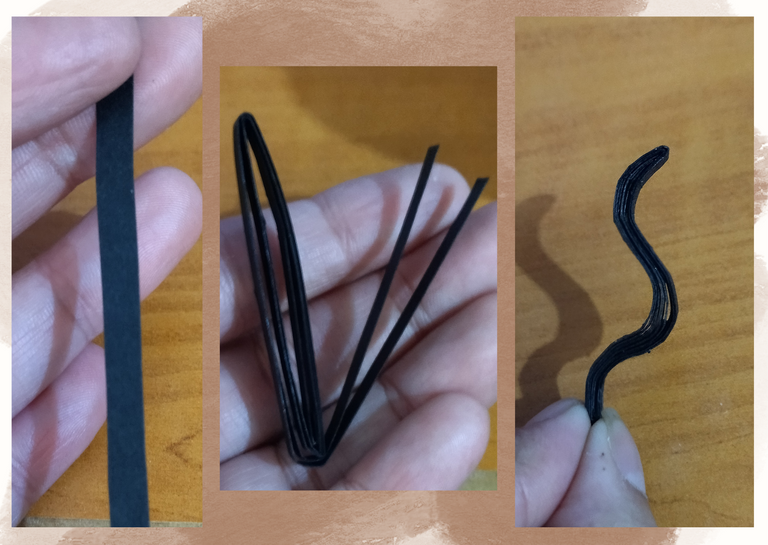
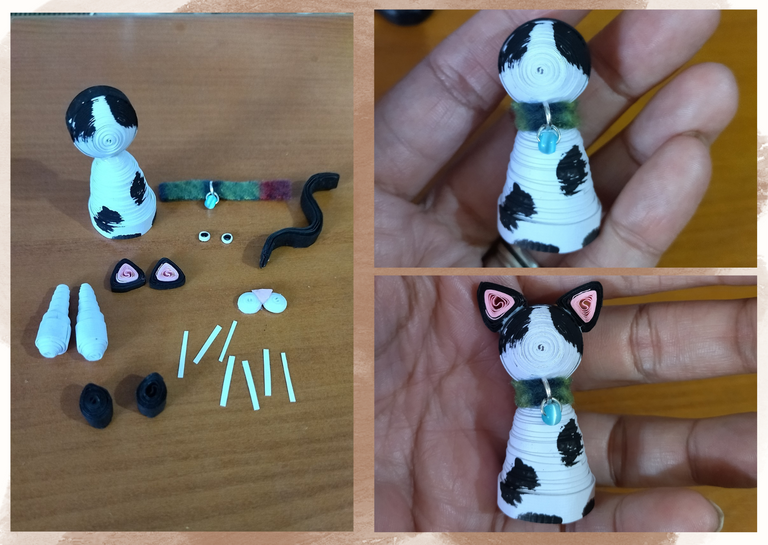
- Let's go with the hind legs of the kitten, these I decided to make them in black, cut 2 strips of black cardboard 5mm wide x 20cms long, roll with the needle, but try not to squeeze too much, at the end we seal with glue, remove the needle and pinch the tip to give it a drop shape, then with the help of the fingers we will mold taking a little outward, add a little glue to the hollow part so that it does not deform.
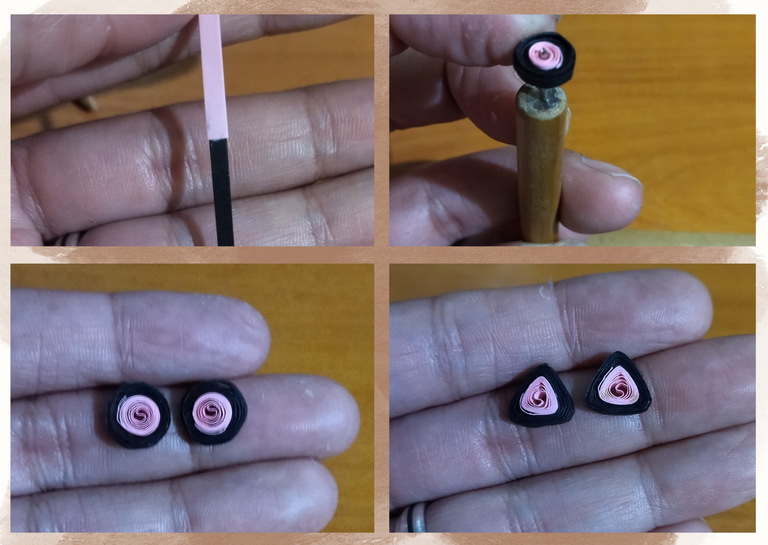
- To make the ears I cut two pieces of cardboard 3mm wide x 10cms long and joined it with a pink ribbon 3mm wide x 10cms long, roll it with the needle and made a circle not too tight, then mold it in the shape of a triangle.
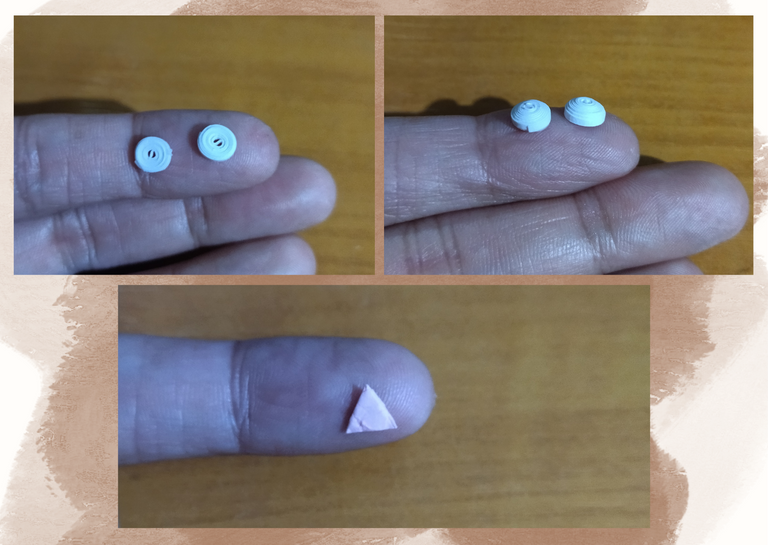
- Let's go with the kitty's cheeks and nose. Cut two small pieces of cardboard 1mm wide x 5cms long, roll with the needle, seal with glue, take a little bit out to give a little 3D effect, put a little glue so that the piece does not move and let dry. We will need two equal pieces.
- For the nose, cut a small piece of pink cardboard in the shape of a triangle, if you don't have it available, just paint a white one. Take the two circles of the nose, join them together and glue the small pink triangle on the top.
- Let's make the whiskers by cutting 6 small strips of white cardboard 1mm wide.
• Vamos con las patas traseras del gatito, estas decidí hacerlas de color negro, cortaremos 2 tiras de cartulina negra de 5mm de ancho x 20cms de largo, enrollamos con la aguja, pero tratamos de no apretar en exceso, al culminar sellamos con pega, sacamos de la aguja y pellizcaremos la punta para darle forma de gota, luego con la ayuda de los dedos moldearemos sacando un poco hacia afuera, agregamos un poco de pega a la parte hueca para que no se deforme.
• Para hacer las orejitas pique dos trocitos de cartulina de 3mm de ancho x 10cms de largo y la uní con una cinta rosada de 3mm de ancho x 10cms de largo, enrolle con la aguja e hice un circulo no muy apretado, luego moldee en forma de triángulo.
• Vamos con los cachetitos y nariz del gatito. Cortamos dos trocitos de cartulina de 1mm de ancho x 5cms de largo, enrollamos con la aguja, sellamos con pega, sacamos un poquito hacia afuera para darle un pequeño efecto en 3D, colocamos un poquito de pega para que no se mueve la pieza dejamos secar. Necesitaremos dos pizas iguales.
• Para la nariz pique un trocito de cartulina rosada en forma de triángulo, si no tienen disponible solo pinten una blanca. Tomamos los dos círculos de la nariz los unimos y en la parte de arriba le pegamos el pequeño triangulo rosado.
• Hagamos los bigotes cortando 6 pequeñas tiras de cartulina blanca de 1mm de ancho.
- For the tail we will cut a long strip of black cardboard 4mm wide, fold it and mold it in the way we want the tail of the cat, it can be straight, S-shaped, work to our liking.
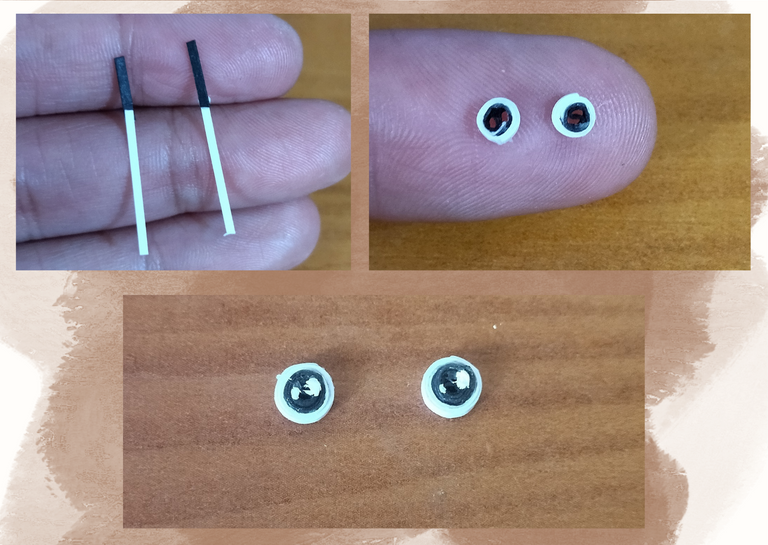
- Let's make the eyes by taking two small pieces of black and white ribbon, 1mm wide, we roll it with the needle and in this way we will obtain a tight circle for this purpose, with white water paint I painted two little shines to the eyes.
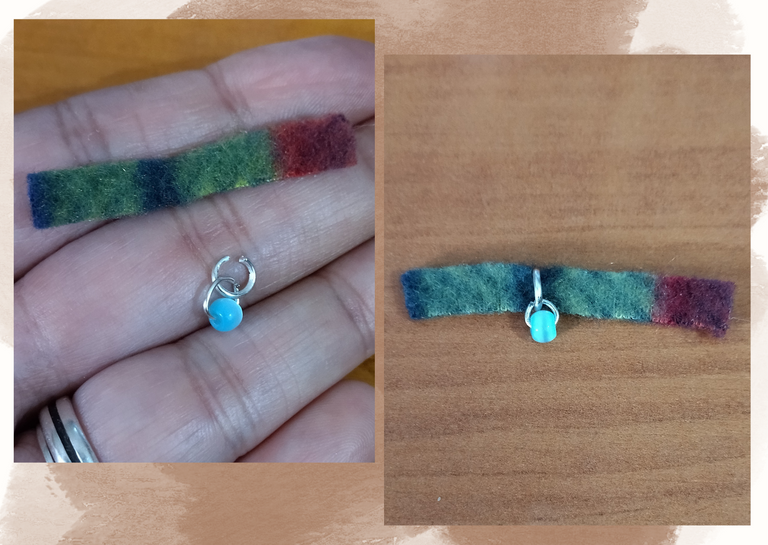
- For the necklace take a piece of fabric 4mm wide, and put 2 rings with a small pearl to decorate. This can also be done with quilling by wrapping a piece of the color of your choice around the neck.
• Para la cola vamos a cortar una tira larga de cartulina negra de 4mm de ancho, la doblaremos y moldearemos de la forma que deseamos quede la colita del gato, puede ser recta, en forma de S, trabajemos a nuestro gusto.
• Hagamos los ojos tomando dos pequeños trozos de cinta blanca y negra, de 1mm de ancho lo enrollamos con la aguja y de esta manera obtendremos un circulo apretado para este fin, con pintura blanca al agua les pinte dos brillitos a los ojitos.
• Para el collar tome un trozo de tela de 4mm de ancho, y le coloque 2 argollas con una pequeña perla para decorar. Esto también lo puedes hacer con quilling enrollando alrededor del cuello un pedazo del color que desees.
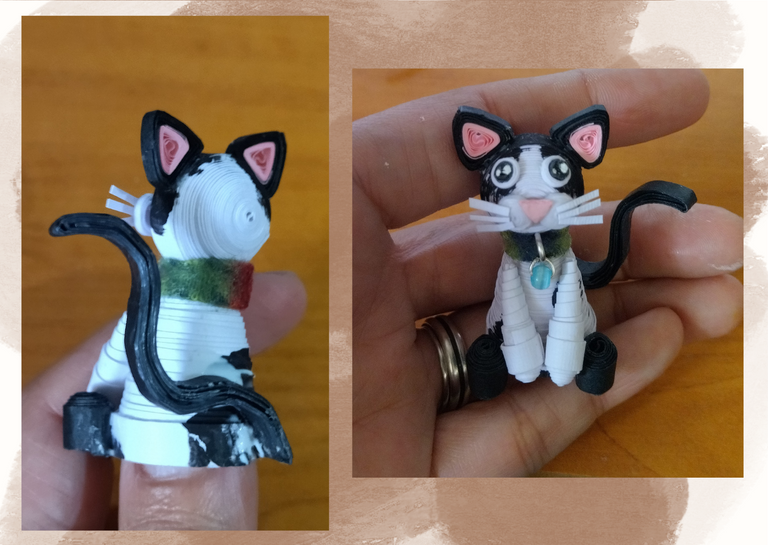
- Before joining the pieces together, take the body of the cat and with black water-based paint and a brush make some stains, let the paint dry very well.
- We are going to assemble our kitten, we will begin by placing the collar around the neck and seal it with glue.
- We continue with the ears, then with the front and back paws, then the nose that is previously attached to the cheeks, followed by the eyes, whiskers, and finally we glue the tail.
- Optionally, I cut a piece of white cardboard and another black one and joined them together to make a base to place the kitten. You can do it as you wish.
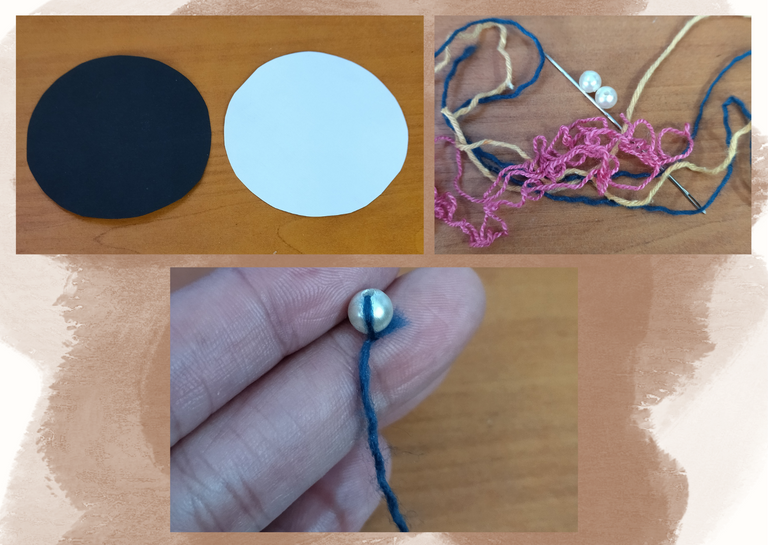
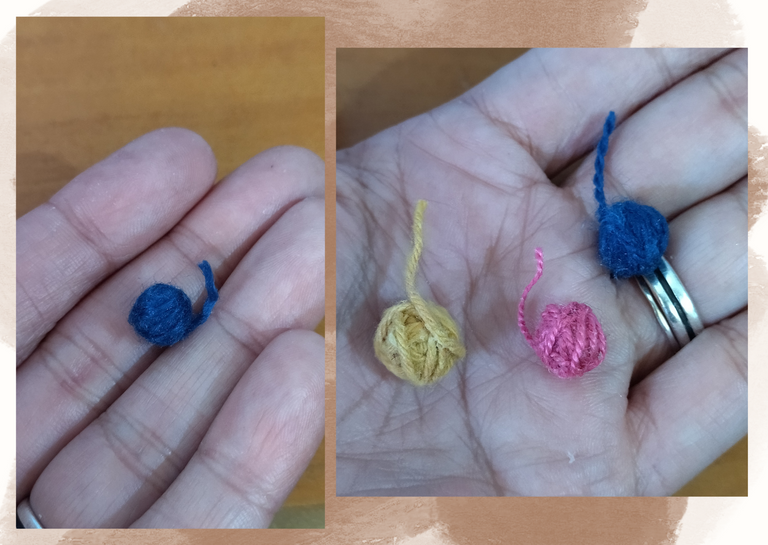
- Take a medium pearl and a piece of yarn, which I wrapped around the pearl to make a yarn roll to place it next to the kitten, I repeated the process with other pearls and pieces of yarn of other colors.
- Place the cardboard to form a floor or platform and place my kitty, decorate with the yarn rolls around it, and in this way I had my 3D decorative kitty ready.
• Antes de unir las piezas tome el cuerpo del gato y con pintura al agua negra y un pincel realice algunas manchas, deje secar muy bien la pintura.
• Vamos a armar nuestro gatito, comenzaremos colocando el collar alrededor del cuello sellamos con pega.
• Seguimos con las orejas, luego con las patitas delanteras y traseras, luego la nariz que esta previamente unida a los cachetitos, seguido de los ojos, bigotes, y por ultimo pegamos la colita.
• De manera opcional corte un trozo de cartulina blanca y otro negro los uní, eso para hacer una base para colocar al gatito. Lo puedes hacer como desees.
• Tome una perla mediana y un trozo de hilo, el cual enrolle alrededor de la perla para hacer las veces de un rollito de estambre para colocarlo junto al gatito, repetí el proceso con otras perlas y trozos de hilos de otros colores.
• Coloque las cartulinas para formar un piso o plataforma y poner a mi gatito, decore con los rollitos de estambre alrededor del mismo, y de esta manera tuve listo mi gatito decorativo en 3D.


What did you think, did you like it?
I hope you did, I hope you liked my explanation, procedure and photos, I made them with love for you.
"Let out that muse that inspires you, and let your imagination fly".
Thank you all, see you next time ✨
¿Que les pareció, les gustó?
Espero que sí, que les haya gustado mi explicación, procedimiento y fotos, los hice con mucho cariño por y para ustedes.
"Deja salir esa musa que te inspira, y deja volar tu imaginación".
Gracias a todos, nos vemos en la próxima.✨
Todas las fotos usadas en este post son de mi autoría y han sido sacadas en mi celular personal un Redmi 9T y editadas Canva Banner y separador hecho por mí en Canva Traducido con la ayuda de DeepL

https://leofinance.io/threads/dayadam/re-leothreads-yynd66la
The rewards earned on this comment will go directly to the people ( dayadam ) sharing the post on LeoThreads,LikeTu,dBuzz.
Thanks @poshthreads 😺🐾💕
que cuchi me encanto el gatito
Gracias amigo @m16uellop 😺🐾💕
That's too cute . You always come up with a creative idea
!LADY
View or trade
LOHtokens.@jane1289, you successfully shared 0.1000 LOH with @dayadam and you earned 0.1000 LOH as tips. (2/6 calls)
Use !LADY command to share LOH! More details available in this post.
Thanks honey I'm glad you will like it. Thank you for your words and presence. Have a nice Sunday @jane1289 😺🐾💕
¡¡¡Te quedó hermosísimo ese gatito!!! ¡Y me encantaron las fotos con tu gatita! ¡En especial esta!
Parece que estuviera diciendo, ¡no te metas con mi hija! ¡Ja, ja, ja! ¡Hermosísimo trabajo como siempre! !PIZZA !PGM !CTP
Ainsss tan lindo amigo @cpol me alegra que te haya gustado. No fue tan fácil fotografiarla, cada ves se molestaba más, parecía que lo protegía y decía como piensas, pero ya en la última con la patita con que se ve que lo pretendía abrazar, lo lanzó en el piso 😂😂😂🤣🤣🤣
Esa Shira no es fácil. Tan bella mi niña jajajajaj
Gracias por pasar, y por el apoyo 😺🐾💕
¡Ja, ja, ja! ¡Ya me imagino la malcriada! ¡Igual quedaron muy lindas las fotos! !PIZZA !PGM !CTP
BUY AND STAKE THE PGM TO SEND A LOT OF TOKENS!
The tokens that the command sends are: 0.1 PGM-0.1 LVL-0.1 THGAMING-0.05 DEC-15 SBT-1 STARBITS-[0.00000001 BTC (SWAP.BTC) only if you have 2500 PGM in stake or more ]
5000 PGM IN STAKE = 2x rewards!
Discord
Support the curation account @ pgm-curator with a delegation 10 HP - 50 HP - 100 HP - 500 HP - 1000 HP
Get potential votes from @ pgm-curator by paying in PGM, here is a guide
I'm a bot, if you want a hand ask @ zottone444
🤣🤣🤣
BUY AND STAKE THE PGM TO SEND A LOT OF TOKENS!
The tokens that the command sends are: 0.1 PGM-0.1 LVL-0.1 THGAMING-0.05 DEC-15 SBT-1 STARBITS-[0.00000001 BTC (SWAP.BTC) only if you have 2500 PGM in stake or more ]
5000 PGM IN STAKE = 2x rewards!
Discord
Support the curation account @ pgm-curator with a delegation 10 HP - 50 HP - 100 HP - 500 HP - 1000 HP
Get potential votes from @ pgm-curator by paying in PGM, here is a guide
I'm a bot, if you want a hand ask @ zottone444
$PIZZA slices delivered:
@cpol(6/15) tipped @dayadam (x2)
Waooo una figura de Michigan en 3D que belleza amiga, con razón tu hija se enamoró jejeje, te quedo genial me gustó mucho, eres una artista del quilling 😍
Me encantó el detalle de la piedra en el collar.
Gracias mi bella. Me alegra muchísimo que te haya gustado @yolimarag. Si, mi hija me expropio el gato 🤣🤣🤣
Es muy tierno!!! me mori de amor con la foto de tu michi al lado del gatito que hiiste, es hermoso ❤️
Tu gatita esta preciosa, me encantan los michis tricolor y pareciera que se hizo amiga del mini michi jeje
Esta muy bonito el trabajo que has hecho, es entendible que a tu hija le haya encantado y se lo haya quedado jejeje
Saludos ❤️
Gracias mi linda por tus bellas palabras. Me alegra verte por aquí y que te haya gustado mí trabajo.
Mi gatita intento congeniar con el amiguito, hasta que lo pateó 🤣🤣🤣 Así es ella tierna pero con arranque de locura jajaja
Y bueno si, mi hija se apropió del gatito me toca hacer otro.
Saluditos que tengas bello domingo @elbuhito 😺🐾💕
Lo amé tantooo, ahora me dieron ganas de inventar también😅 eres espectacular 💖💖💖
Gracias hermosa por tus lindas palabras. A verrrr quiero ver ese invento, seguro te quedará hermoso.
Abrazos, que pases bello día @sylregne 😺🐾💕
Que cosita tan hermosa 😍, y el modelo espectacular.
Gracias cariño. Si, una modelo única y espectacular jajaja Ella es mi inspiración 😺🐾💕
Saludos @emmaris ✨
Que bello este trabajo. Los detalles pequeños son los que me gustan en este caso la nariz y los bigotes. Pero el collar lo amé 🥰
Te felicito por tu creatividad. Un abrazo infinito y bendeciones para tus manos creadoras 😘💜.
!discovery 50
Gracias mi hermosa por tus bellas palabras hacia mi trabajo y el apoyo. Me alegra muchísimo que te gustará el Michi.
Que tengas un bellísimo día @chacald.dcymt 😺🐾💕
This post was shared and voted inside the discord by the curators team of discovery-it
Join our Community and follow our Curation Trail
Discovery-it is also a Witness, vote for us here
Delegate to us for passive income. Check our 80% fee-back Program
Yay! 🤗
Your content has been boosted with Ecency Points, by @dayadam.
Use Ecency daily to boost your growth on platform!
Support Ecency
Vote for new Proposal
Delegate HP and earn more
Thanks @ecency 😺🐾💕
Si quieres formar parte de nuestro trail de curación, ingresa a HIVEVOTE, haciendo clic en la imagen del capybara aristocratico. Capybaraexchange tu casa de cambio, rapida, confiable y segura
Gracias por el apoyo @capybaraexchange 😺🐾💕
Gracias por unirte a nuestra iniciativa de Celf radio y la curación en vivo "Espacio de apertura"
Gracias por el espacio y su apoyo. Siempre es un gusto acompañarlos @celf.magazine 😺🐾💕
Contáctenos para saber más del proyecto a nuestro servidor de Discord.
Si deseas delegar HP al proyecto: Delegue 5 HP - Delegue 10 HP - Delegue 20 HP - Delegue 30 HP - Delegue 50 HP - Delegue 100 HP.
Muero de amor, que termura de gatito. Lo amé. Excelente trabajo 👏 👍🏻 🖤💕
Ainsss gracias mi linda. Un compañerito que quedara en casa para mi cosita 🐱🐾💕. Me alegro mucho que te haya gustado. Ojala aparezcan mas ideas gatunas jajajaja. Abrazos que tengas una hermosa semana amiga @irenenavarroart 🌈
Congratulations @dayadam! You have completed the following achievement on the Hive blockchain And have been rewarded with New badge(s)
Your next target is to reach 9000 upvotes.
You can view your badges on your board and compare yourself to others in the Ranking
If you no longer want to receive notifications, reply to this comment with the word
STOPCheck out our last posts:
Wow
esta bastante interesante
digo la ver la imagen pense que era porcelanicron
que es la masilla que endurece para dichas figurillas como llaveros
pero no sabia que era con otro material
da un efecto como de impresion 3D
como modelado por computador
asi que esta interesante para intentar y sacar diseños
y no caer en el intento
digo las recinas valen mucho y pues practicar
o hacerlo asi, sale muchisimo mejor para cosas pequeñas.
Ainsss gracias. Que lindo que te haya llamado la atención mi trabajo de esa manera, y me enorgullece saber que esta bien hecho ya que parece una figura impresa en 3D, es complicado hacer ciertas cosas, pero da gusto obtener este tipo de resultado final y el comentario.
Que tengas bello día @janusmolinovsky 💕
Thanks for the support @kgakakillerg 😺🐾💕
Upvoted 👌 (Mana: 11/41) Liquid rewards.