🐾🐾🐾
Hola a todos... 🐱🐾💕
Hola mis queridos Hivers, y a todas esas bellas personas que hacen comunidad en esta gran familia como lo es #HiveDiy, deseándoles un día de infinitas bendiciones, les presento mi trabajo del día, realizado como en todas las ocasiones con gran amor y cariño.
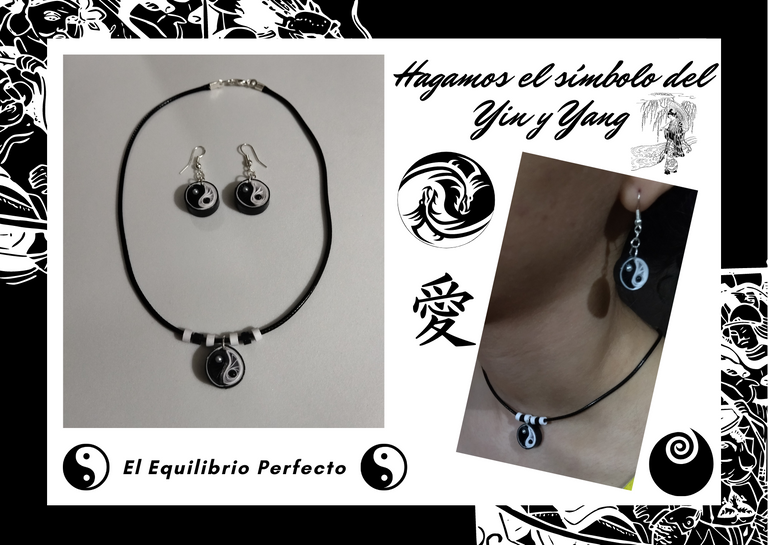
Para hoy les traigo un dije de Yin y Yang en colores blanco y negro, que pueden utilizar para colocarlo en unos zarcillos fijos, colgantes, una bonita pulsera o collar como todos los accesorios de bisutería bajo el arte y técnica de quilling que realizo. En este día voy a colocar los dijes en unas bases para zarcillos colgantes, y un sencillo collar de piel de serpiente que ya tengo hecho en casa.
Que significa el yin y el yang, son fuerzas totalmente opuestas pero que se complementan para crear el equilibrio perfecto. Como ejemplo les puedo dar, el día y la noche, el frio y el calor, la lluvia y el sol, lo masculino y lo femenino, pero estas fuerzas así se digan que son totalmente opuestas deben existir y se compenetran en su totalidad creando una armonía en el universo y en nuestras vidas, una es parte de la otra.
Estos dijes se pueden realizar de la combinación de tu preferencia no necesariamente deben ser solo blancas y negras, ya que el ying se relaciona con la tierra, el frío, la noche y lo femenino y el yang es la luz, el sol, la energía, lo masculino. Cada uno tiene un punto del color opuesto para simbolizar la presencia de la fuerza opuesta.
Dada esta introducían del significado de la pieza que les voy a presentar hoy, vamos a iniciar.
Hello everyone... 🐱🐾💕
Hello my dear Hivers, and to all those beautiful people who make community in this great family as it is #HiveDiy, wishing you a day of infinite blessings, I present my work of the day, made as on all occasions with great love and affection.
For today I bring you a Yin and Yang pendant in black and white colors, which you can use to place it in a fixed tendrils, pendants, a beautiful bracelet or necklace as all jewelry accessories under the art and technique of quilling that I do. Today I am going to place the charms in some bases for hanging tendrils, and a simple snakeskin necklace that I have already made at home.
What does yin and yang mean, they are totally opposite forces but they complement each other to create the perfect balance. As an example I can give you, day and night, cold and heat, rain and sun, masculine and feminine, but these forces even if they are said to be totally opposite must exist and interpenetrate as a whole creating harmony in the universe and in our lives, one is part of the other.
These pendants can be made with the combination of your preference, they do not necessarily have to be only black and white, since the ying is related to the earth, the cold, the night and the feminine and the yang is the light, the sun, the energy, the masculine. Each has a dot of the opposite color to symbolize the presence of the opposite force.
Given this introduction of the meaning of the piece that I am going to present to you today, let's start.
🐾🐾🐾
Comencemos:😃
Materiales:📏✏️✂️
• Cintas de quilling de 6mm de ancho, blancas, y negras, (o del color de tu preferencia).
• Aguja para quilling.
• Pega blanca.
• Tijera.
• Regla con diversas medidas de circunferencia.
• Perlas blancas y negras.
• Pinza punta fina.
• Base para zarcillos colgantes (anzuelos).
• Argollas pequeñas y medianas de bisutería.
• Alicate punta fina.
• Solvente X.
• Resina Artística.
• Frasco de vidrio.
• Pincel.
Let's get started: 😃
Materials:📏✏️✂️
- 6mm wide quilling ribbons, white and black, (or the color of your choice).
- Quilling needle.
- White glue.
- Scissors.
- Ruler with different circumference measures.
- Black and white beads.
- Fine tip tweezers.
- Base for hanging tendrils (hooks).
- Small and medium-sized costume jewelry earrings.
- Fine-nosed pliers.
- Solvent X.
- Artistic resin.
- Glass flask.
- Brush.
🐾🐾🐾

🐾🐾🐾
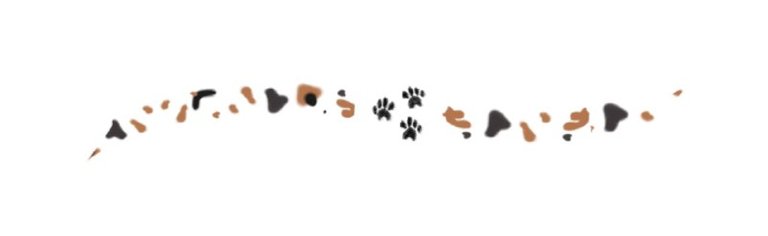
Medidas de las cintas:🌈
• Vamos a necesitar cintas de quilling de 6mm de ancho de color blanco y negro, como indica en la foto, para la parte interna que son dos piezas vamos a necesitar cinta una blanca de 6mm de ancho x 28cms de largo, y una negra con las mismas medidas que la de color blanco y para la parte externa que es para unir las piezas y darle firmeza, vamos a necesitar una cinta blanca de 6mm de ancho x 14 de largo y otra negra con las mismas medidas. Tomemos en cuenta que las medidas y el número de cintas que les estoy mencionando es para cada pieza. Para el conjunto que voy a elaborar voy a realizar 3 piezas, 2 para unos zarcillos colgantes y una para un dije para collar.
Measurements of the ribbons:🌈
- We are going to need 6mm wide black and white quilling ribbons, as indicated in the photo, for the internal part which are two pieces we are going to need a white ribbon 6mm wide x 28cms long, and a black one with the same measures as the white one and for the external part which is to join the pieces and give it firmness, we are going to need a white ribbon 6mm wide x 14 long and another black one with the same measures. Let's take into account that the measures and the number of ribbons I am mentioning is for each piece. For the set I am going to make, I am going to make 3 pieces, 2 for some hanging tendrils and one for a pendant for a necklace.
🐾🐾🐾
🐾🐾🐾
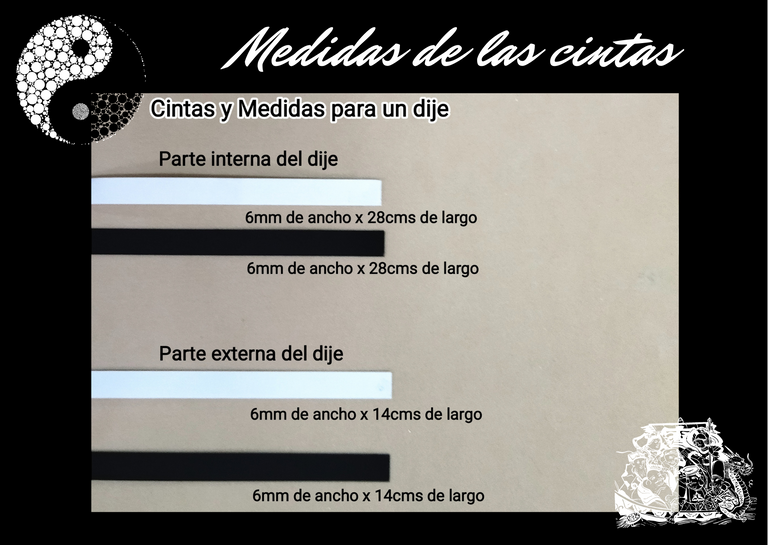
Paso a paso:💖
Comencemos a elaborar las piezas para los dijes.✨
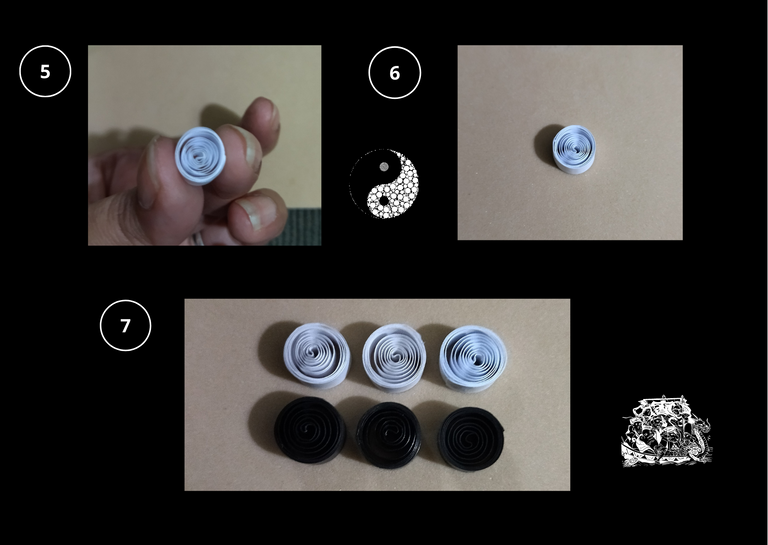
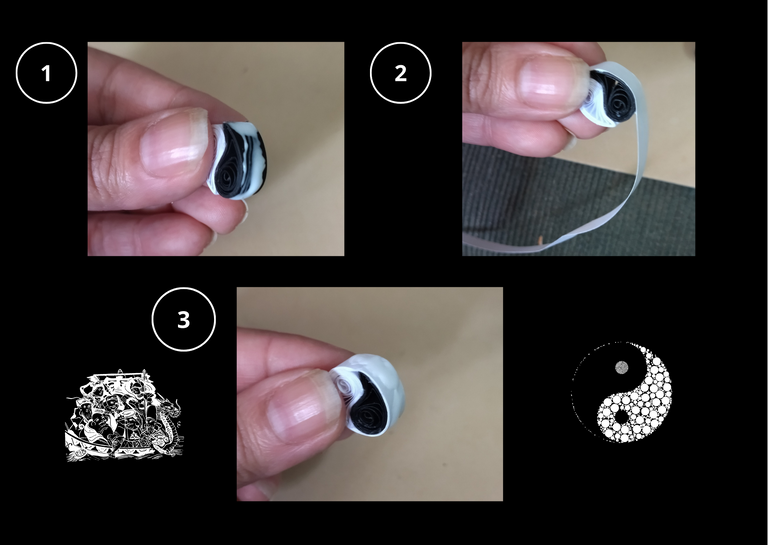
• Tomemos unas de las cintas de 6mm de largo x 28cms de largo, voy a comenzar con la blanca, con la aguja de quilling procedemos a enrollar la cinta hasta llegar al final, sacamos de la aguja y colocamos en la regla de circunferencia en el círculo número 10, sacamos con sumo cuidado y colocamos un punto de pega para sellar nuestra cinta con la cual estamos obteniendo un circulo abierto. Vamos a repetir el mismo procedimiento con la cinta negra. Haremos tres círculos abiertos negros y tres blancos.
Step by step:💖
Let's start making the pieces for the charms.✨
- Let's take some of the 6mm long x 28cms long ribbons, I'm going to start with the white one, with the quilling needle we proceed to roll the ribbon until we reach the end, we take it out of the needle and place it on the circumference ruler in the circle number 10, we take it out very carefully and place a glue stitch to seal our ribbon with which we are obtaining an open circle. We will repeat the same procedure with the black ribbon. We will make three black and three white open circles.
🐾🐾🐾
🐾🐾🐾
🐾🐾🐾
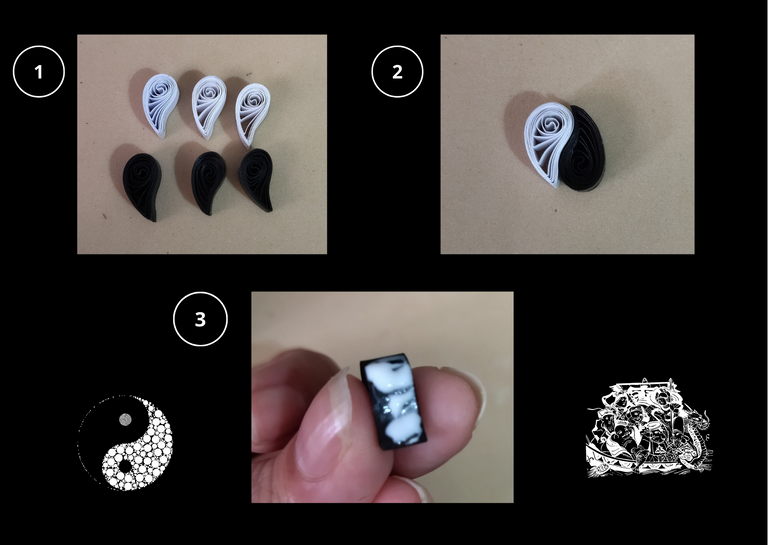
• Vamos a darle forma a nuestros círculos abiertos, en este caso vamos a formar unas gotas o lagrimas con forma, con la ayuda de nuestros dedos índice y pulgar pellizcamos una de las puntas y luego esa punta la curveamos un poco hacia un lado. Repetimos el mismo procedimiento con los 5 círculos restantes.
- We are going to shape our open circles, in this case we are going to form some shaped drops or tears, with the help of our index finger and thumb we pinch one of the tips and then we curve that tip a little to one side. Repeat the same procedure with the remaining 5 circles.
🐾🐾🐾
🐾🐾🐾
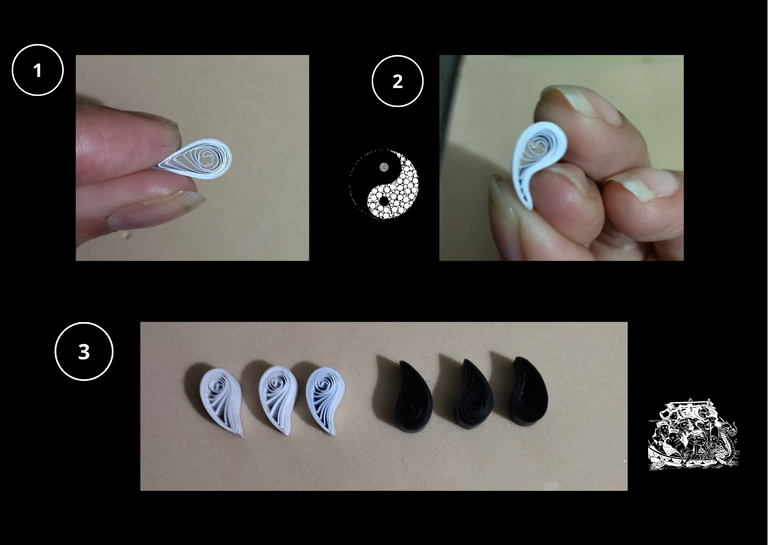
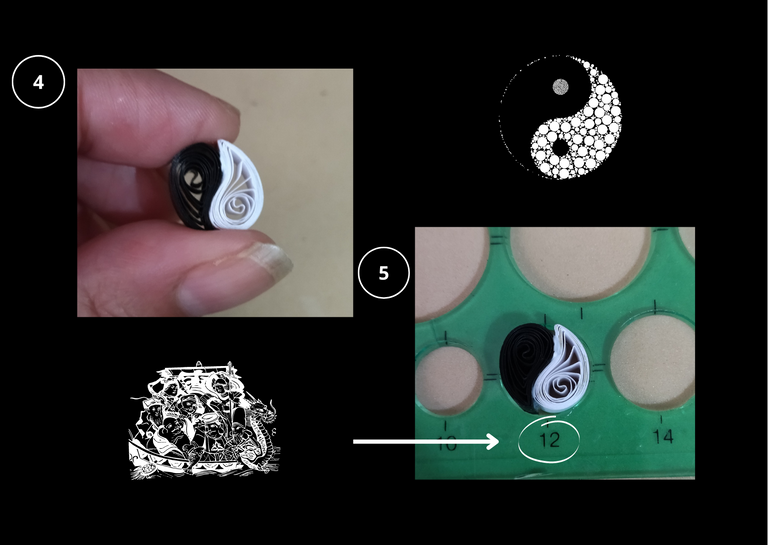
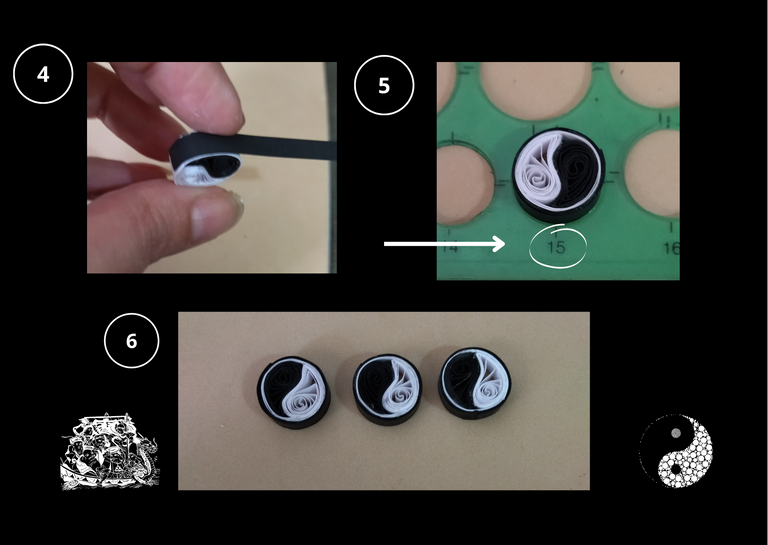
• Ahora vamos a unir nuestras piezas para formar el yin y el yang, este es un proceso más delicado ya que tenemos que unir ambas piezas en armonía, lograr darles una forma circular y que no se deformen, unamos muestras piezas en lados inversos como lo muestra en la foto agregando una línea de pega, luego trataremos de darles un poco de forma circular con los dedos y metemos en la regla de circunferencia en el círculo que vean es adecuado para que estas se moldeen, en mi caso lo hice en el círculo número 12 , y las deje una tato para que selle la pega y tomen la forma redonda. Me había costado un poco darles la forma hasta que me llego la idea de colocarlas en la regla de circunferencia 😁.
- Now we are going to join our pieces to form the yin and yang, this is a more delicate process because we have to join both pieces in harmony, achieve give them a circular shape and do not deform, join samples pieces in reverse sides as shown in the photo by adding a line of glue, then try to give them a little circular shape with your fingers and put them in the circumference ruler in the circle that you see is suitable for these are molded, in my case I did it in the circle number 12, and leave a tato to seal the glue and take the round shape. It had cost me a little to give them the shape until I got the idea of placing them on the circumference ruler.
🐾🐾🐾
🐾🐾🐾
🐾🐾🐾
• Vamos a utilizar las cintas que teníamos reservadas, esas cintas las vamos a usar para reforzar nuestras piezas y darles una forma más redondeadas las vamos a colocar alrededor de nuestros dijes, vamos a comenzar por la blanca colocamos pega alrededor y vamos poco a poco pasándola alrededor hasta llegar al final, vamos a repetir el mismo procedimiento con la cinta negra, una vez terminada de pasar la cinta, volvemos a colocar en el círculo de la regla de circunferencia que más se adecue para darle su forma redondeada, en mi caso la coloque en el círculo número 15. De esta manera ya tenesmo nuestras 3 piezas listas.
- We are going to use the ribbons that we had reserved, we are going to use those ribbons to reinforce our pieces and give them a more rounded shape, we are going to place them around our charms, we are going to start with the white ribbon, place the glue around it and little by little pass it around until we reach the end, we are going to repeat the same procedure with the black ribbon, once we have finished passing the ribbon, we return to place it in the circle of the circumference ruler that best suits to give it its rounded shape, in my case I placed it in the circle number 15. This way we have our 3 pieces ready.
🐾🐾🐾
🐾🐾🐾
🐾🐾🐾
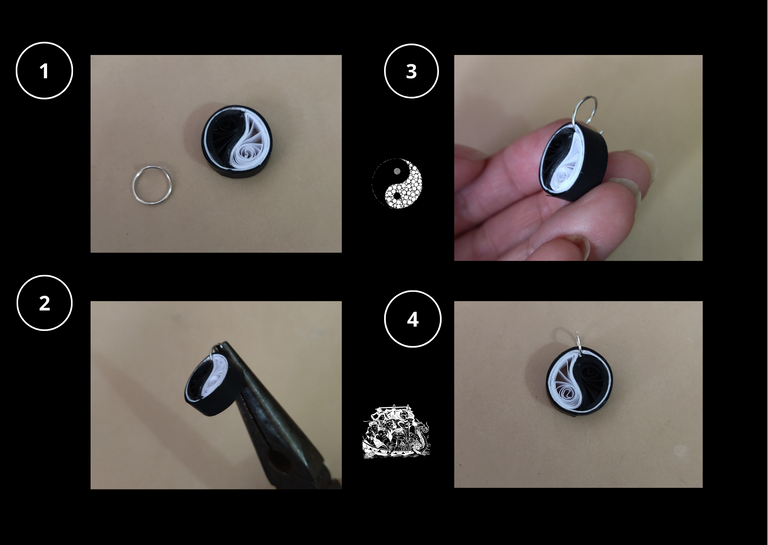
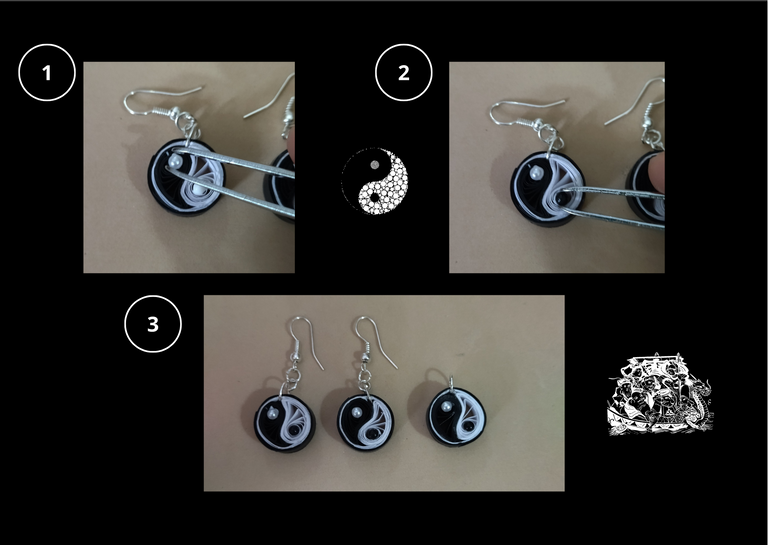
• Ahora vamos a colocar los aros de bisutería a nuestras piezas, para el dije que vamos a colocar en el collar colocaremos un aro mediano justo como lo indica en la foto, cerramos con la ayuda del alicate punta fina.
- Now we are going to place the costume jewelry rings to our pieces, for the pendant that we are going to place on the necklace we will place a medium ring just as indicated in the photo, we close it with the help of the fine tip pliers.
🐾🐾🐾
🐾🐾🐾
• Para los zarcillos tomamos los dos dijes restantes y le colocamos una argolla mediana tal cual como hicimos con la del collar, y vamos a añadir dos aros pequeños más, en el último aro pequeño colocaremos la base de zarcillos colgante (anzuelo), cerramos con la ayuda del alicate punta fina.
- For the tendrils we take the two remaining charms and we place a medium size ring as we did with the one of the necklace, and we are going to add two more small rings, in the last small ring we will place the base of the hanging tendrils (hook), we close it with the help of the fine tip pliers.
🐾🐾🐾
🐾🐾🐾
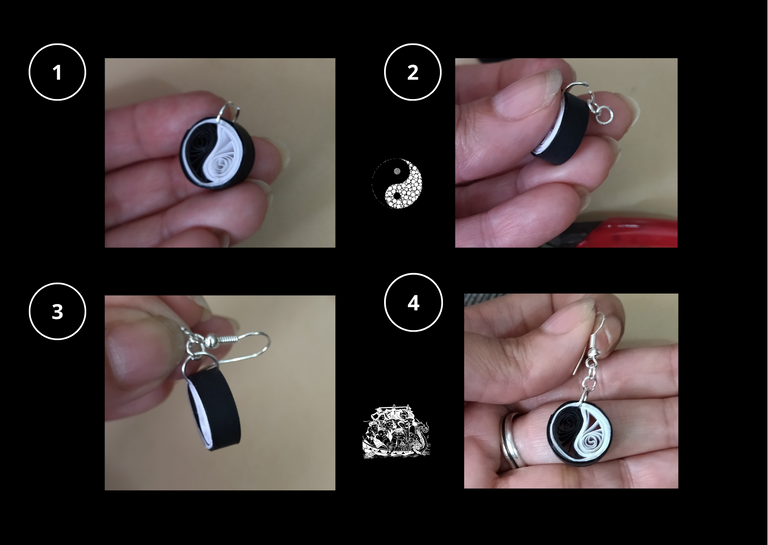
• Ahora vamos a darle el detalle a nuestras piezas añadiendo dos perlitas a cada uno, una negra y una blanca, añadimos un punto de pega justo en el centro del yin y el yang y con la ayuda de la pinza punta fina colocamos las perlas en color inverso.
- Now we are going to give the detail to our pieces by adding two beads to each one, one black and one white, we add a glue dot right in the center of the yin and yang and with the help of the fine tip tweezers we place the beads in reverse color.
🐾🐾🐾
🐾🐾🐾
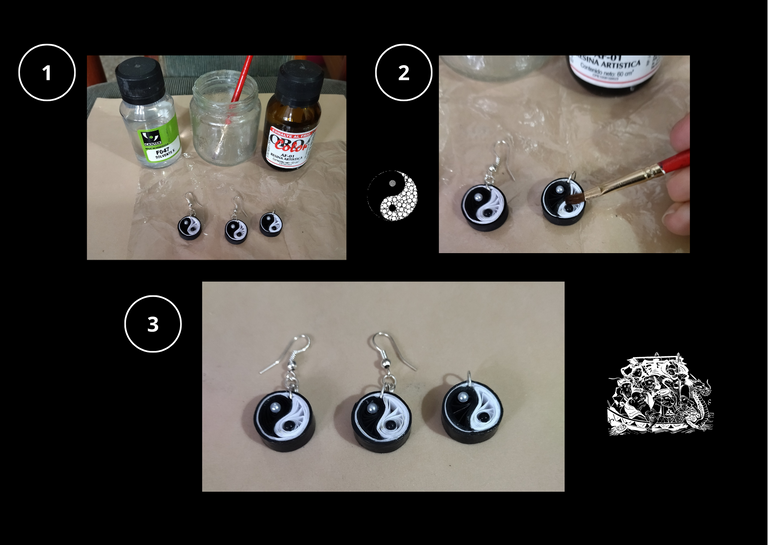
• Culminemos colocando la protección liquida a las piezas, tomamos una parte de resina artística, solvente x, y la colocamos en el frasco de vidrio, removemos con el pincel y añadimos uniformemente a nuestras piezas, dejamos secar de un día para otro, de esta manera ya tenemos nuestros zarcillos y dije listos para su uso.
- Let's finish placing the liquid protection to the pieces, we take a part of artistic resin, solvent x, and place it in the glass bottle, stir with the brush and add it uniformly to our pieces, let it dry from one day to another, in this way we already have our tendrils and I said ready for use.
🐾🐾🐾
🐾🐾🐾
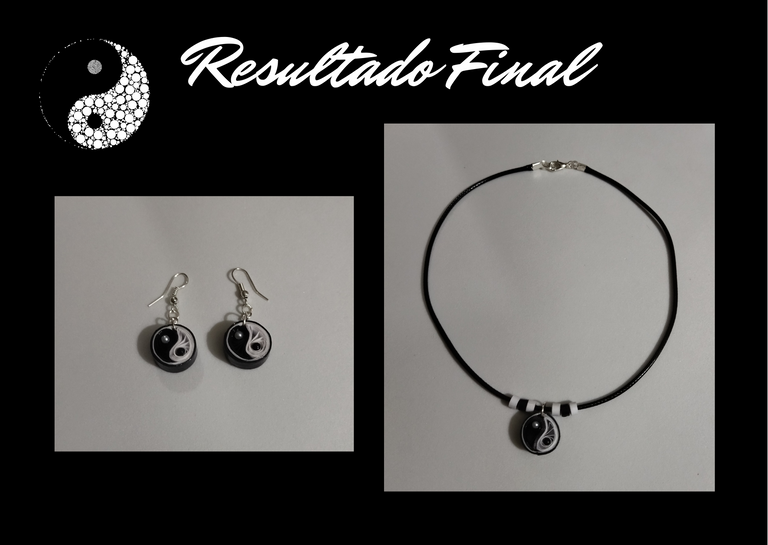
Resultado Final:💕
• Para este dije Yin Yang, decidí realizar un sencillo collar de piel de serpiente gruesa, hice unos pequeños círculos de quilling blancos y negros, como para recrear unas perlas y se lo añadí al collar junto al dije para darle mayor vistosidad al colocar esos detalles.
Final Result:💕
- For this Yin Yang pendant, I decided to make a simple thick snakeskin necklace, I made some small black and white quilling circles, as if to recreate pearls, and I added them to the necklace next to the pendant to give it more colorful details.
🐾🐾🐾
🐾🐾🐾
¿Que les pareció, les gustó?
Espero que sí, que les haya gustado mi explicación, procedimiento y fotos, los hice con mucho cariño por y para ustedes.
"Deja salir esa musa que te inspira, y deja volar tu imaginación".
Gracias a todos, nos vemos en la próxima. 🐾🐱💕
What did you think, did you like it?
I hope you did, I hope you liked my explanation, procedure and photos, I made them with love for you.
"Let out that muse that inspires you, and let your imagination fly".
Thank you all, see you next time. 🐾🐱💕
🐾🐾🐾
All photos used in this post are of my authorship and have been taken on my personal cell phone a Redmi 9T and edited in Canva Dividers and banner made by me in Paint Tool Sai Translated with the help of DeepL


The rewards earned on this comment will go directly to the person sharing the post on Twitter as long as they are registered with @poshtoken. Sign up at https://hiveposh.com.
Thanks 💕
Congratulations @dayadam! You have completed the following achievement on the Hive blockchain and have been rewarded with new badge(s):
Your next target is to reach 2500 upvotes.
You can view your badges on your board and compare yourself to others in the Ranking
If you no longer want to receive notifications, reply to this comment with the word
STOPCheck out the last post from @hivebuzz:
Support the HiveBuzz project. Vote for our proposal!
That's really pretty 🤩 loved the finished product,wouldn't mind having one of those myself.
I am delighted that you liked them. Thank you for stopping by, for reading me and for your nice comment. I'd be happy to make you any others you want. Greetings and blessings @princessj190 💖
Te quedaron hermositos ♥
Gracias mi corazón. Me alegra que te gusten @estefania3 . Besitos. 💖
mucho ingenio y creatividad amiga, te felicito! Te quedo genial y lleno de energía cosmica.
Gracias por pasar por acá amigo @kadoshmenorah . Me alegro que te haya gustado. Gracias por tu comentario lleno de tan buena vibra. Besos y bendiciones... 💖
demasiada belleza... Y tan tierno detalle.. me gusta muchisimo como quedó!
Gracias amigo @fixie por tan bello comentario. Me encanta que te haya gustado. Besos y mil bendiciones... 💖
You are really talented
The pendant is beautiful and the color can go with any dressing
Thank you very much for your comment @prechidi. How beautiful. I love that you liked it. Thank you for visiting me. Blessings, have a beautiful day..... 🌈💖
You are welcome dear friend
Have a lovely weekend
Hola amiga, como siempre bello trabajo.
Gracias mi corazón @lilianap15 Feliz de verte pasar por aquí, gracias por visitarme. Abrazos, besos y bendiciones. 💖
Un trabajo muy fino y con un resultado impecable... gracias por compartir tu técnica de trabajo.
💖💜🏵️🎶🌹🎵🌸🍂🌼🍄🌈🌷💋💮🥀🌻🌺💐💙
Mil gracias mi bella @chacald.dcymt, hermoso comentario. Son las cosas que me llenan, me dan impulso a seguir adelante y mejorar cada día mas. Gracias por visitarme, leerme y comentar cosas tan hermosas. Besos y mil bendiciones... 😘💖✨
Bendiciones para ti 🙏🏼...sigue creando estas maravillas.
Thank you for sharing this amazing post on HIVE!
Your content got selected by our fellow curator @priyanarc & you just received a little thank you via an upvote from our non-profit curation initiative!
You will be featured in one of our recurring curation compilations and on our pinterest boards! Both are aiming to offer you a stage to widen your audience within and outside of the DIY scene of hive.
Join the official DIYHub community on HIVE and show us more of your amazing work and feel free to connect with us and other DIYers via our discord server: https://discord.gg/mY5uCfQ !
If you want to support our goal to motivate other DIY/art/music/homesteading/... creators just delegate to us and earn 100% of your curation rewards!
Stay creative & hive on!
Thank you very much for your support @priyanarc and DIYHub. It is an honor for me... 💖