Hola amigos de la Comunidad Hive Diy, esta es mi participación en el concurso: Porta cosméticos, gracias a @equipodelta por esta gran iniciativa.
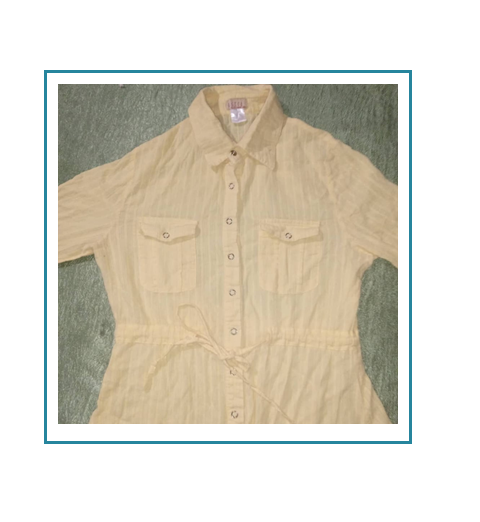
Para participar de este concurso, aproveché que tenía guardada una blusa de mi hija que ya no usará porque no le queda y utilicé todas sus partes: tela, botones, trabillas y bolsillos. Me imagino la cara de mi hija 😮, jajaja cuando vea en lo que transforme su blusa.
Hello friends of the Hive Diy Community, this is my participation in the contest: Cosmetics holder, thanks to @equipodelta for this great initiative.
To participate in this contest, I took advantage of the fact that I had saved a blouse of my daughter that she will no longer use because it does not fit her and I used all its parts: fabric, buttons, belt loops and pockets. I imagine my daughter's face 😮, hahaha when I see what her blouse transforms into.
Materiales:
- Blusa
- Hilo
- Máquina de coser
- Tijera
Materials:
- Blouse
- Thread
- Sewing machine
- Scissor
1. Paso
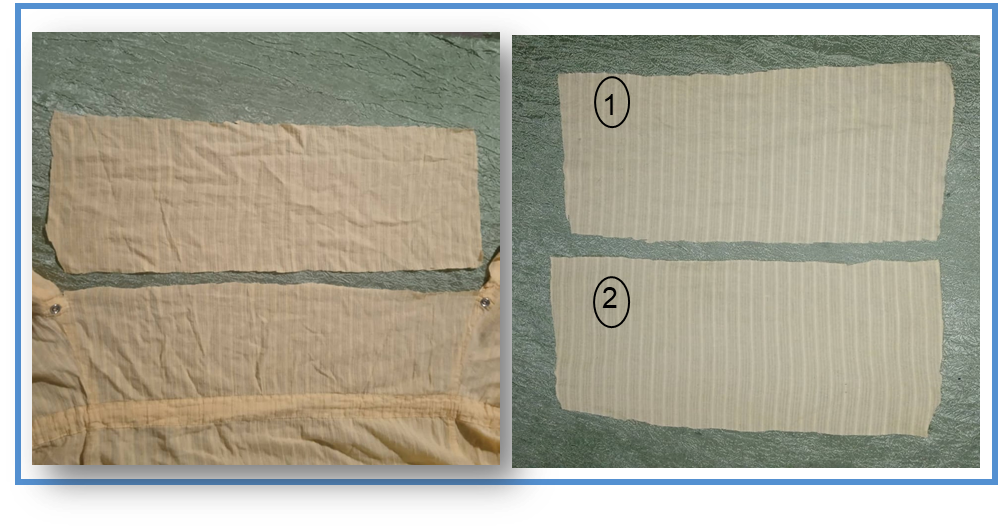
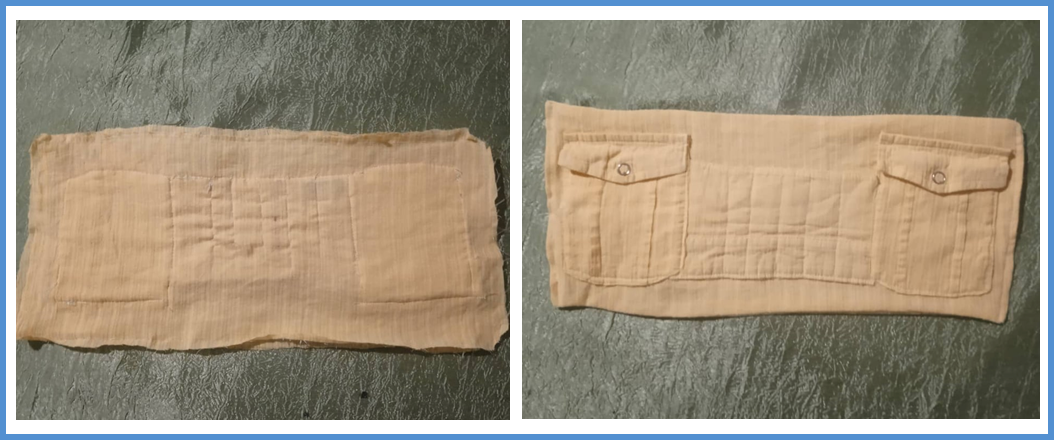
- El primer paso fue recortar dos rectángulos de la parte de atrás de la blusa, que voy a marcar como los números 1 y 2.
1. Step
- The first step was to cut out two rectangles from the back of the blouse, which I am going to mark as numbers 1 and 2.
2. Paso
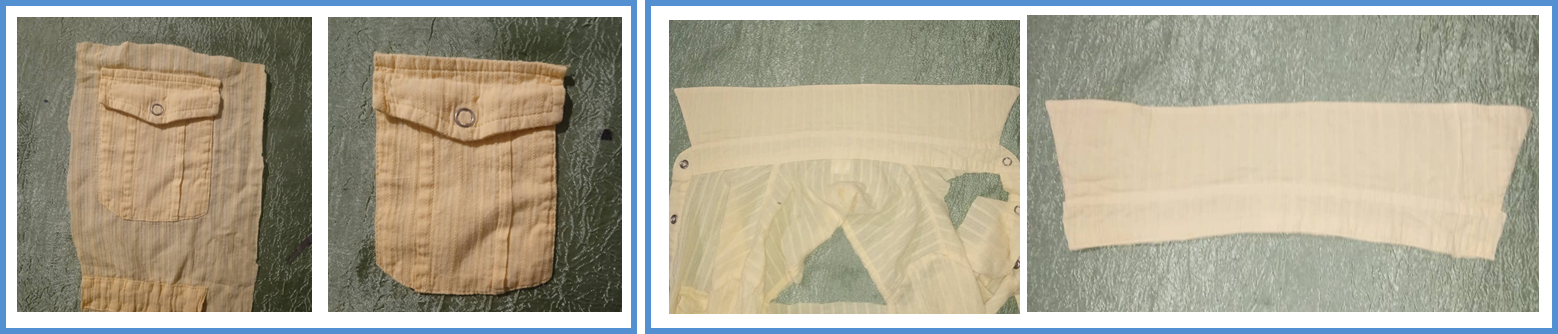
- Luego descoso los dos bolsillos y el cuello de la blusa, ya tengo las tres piezas que formaran el interior del porta cosméticos.
2. Step
- Then I undo the two pockets and the collar of the blouse, I already have the three pieces that will make up the inside of the cosmetic holder.
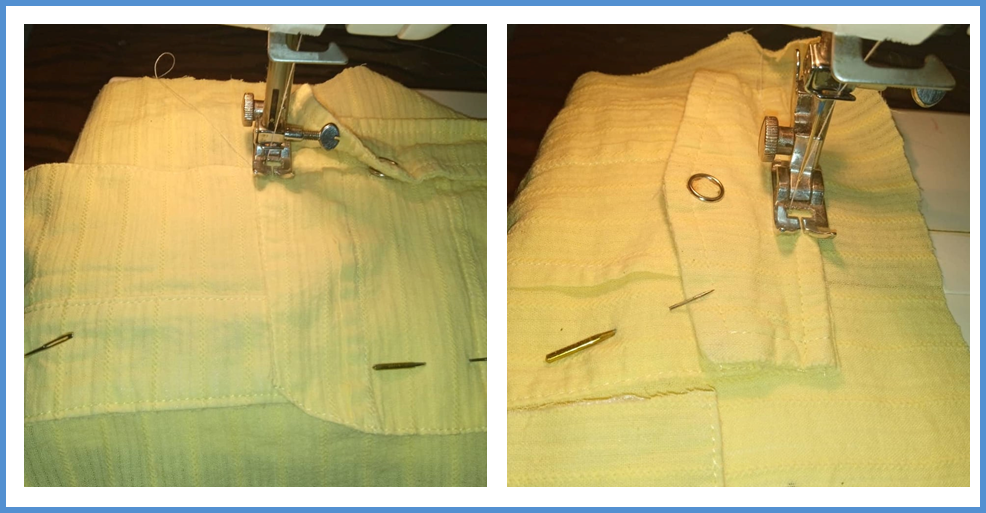
3. Paso
- En el rectángulo número 1 coloco los dos bolsillos y un rectángulo que hice con el cuello de la blusa y los sostengo con unos alfileres para poder coserlos más fácilmente.
3. Step
- In rectangle number 1 I place the two pockets and a rectangle that I made with the neck of the blouse and I hold them with some pins to be able to sew them more easily.

4. Paso
- Luego coso los bolsillos a la pieza.
4. Step
- Then I sew the pockets to the piece.
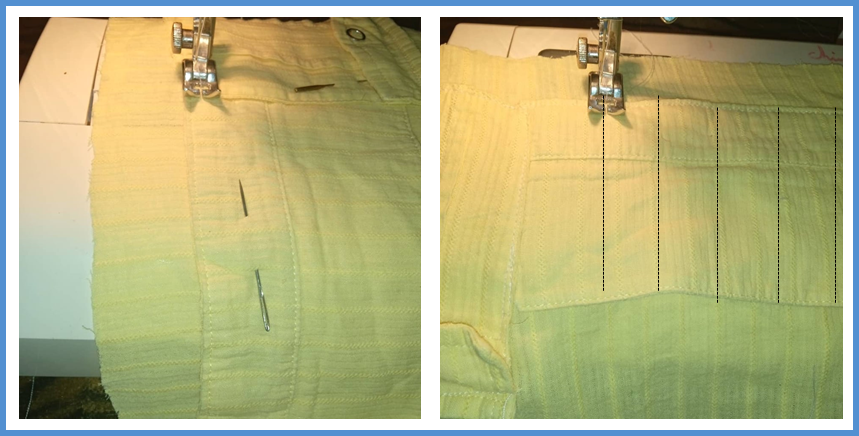
5. Paso
- En este paso, hago una costura recta en la parte inferior del rectángulo para cerrar la pieza y evitar que se caigan los lápices y pinceles. Luego hago 5 costuras rectas en la pieza como se muestra en la imagen, para que sirvan de separación entre un lápiz y otro.
5. Step
- In this step, I make a straight seam at the bottom of the rectangle to close the piece and prevent the pencils and brushes from falling out. Then I make 5 straight seams in the piece as shown in the image, so that they serve as a separation between one pencil and another.
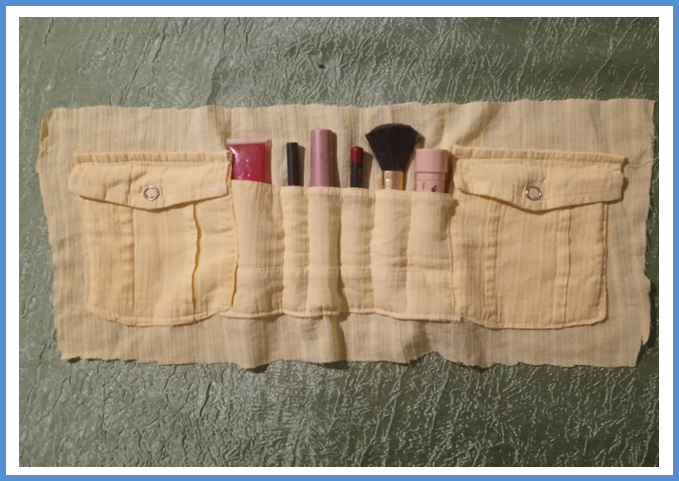
6. Paso
- Así queda mi estuche para cosmético en la parte de adentro. con los diferentes compartimientos para los lápices, brochas y los bolcillos para compactos y sombras.
6. Step
- This is how my cosmetic case looks on the inside. with the different compartments for pencils, brushes and the pens for compacts and shadows.
7. Paso
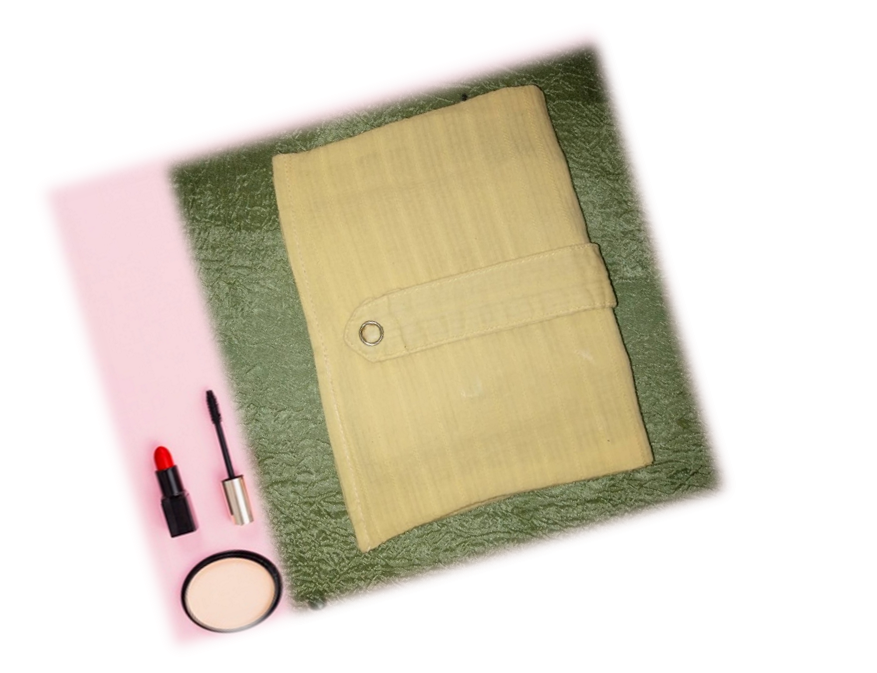
- Coloqué los dos rectángulos 1 y 2 con el lado derecho hacia adentro y pasé una costura en la parte inferior, para unir las dos piezas, luego abrí la pieza y cosí el botón y el lazo en el rectángulo 2, que me permitirá cerrar eso .
7. Step
- I placed the two rectangles 1 and 2 with the right side inwards and passed a seam at the bottom, to join the two pieces, then I opened the piece and sewed the button and the loop in rectangle 2, which will allow me to close it .
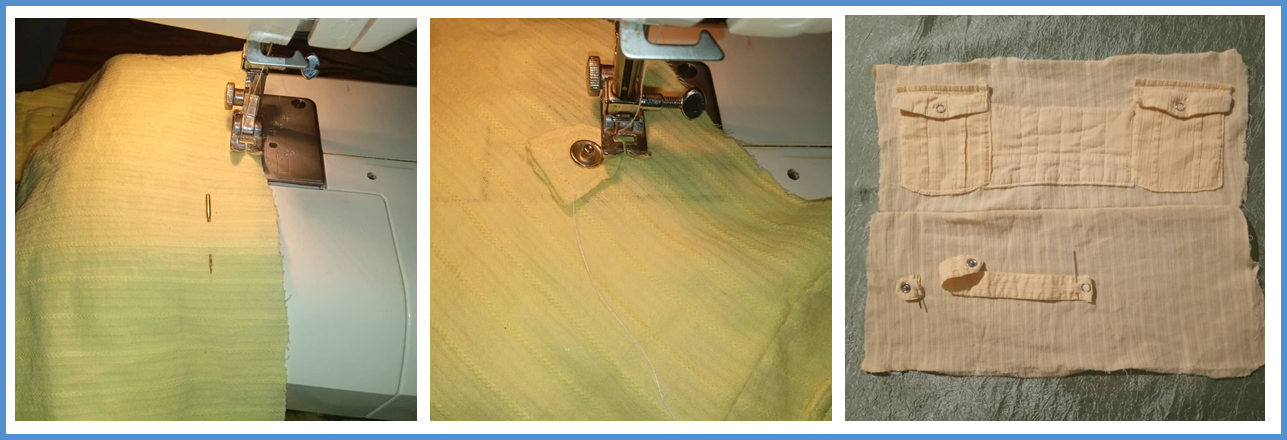
7. Paso
- Luego puse las dos piezas del lado derecho y pasé una costura para cerrarla, dejando una pequeña abertura para darle la vuelta, finalmente cerré la abertura. Si quieres que quede más firme, puedes rellenarlo con gomaespuma o cartón, yo lo prefiero así para que sea más fácil de lavar.
7. Step
- Then I put the two pieces on the right side and passed a seam to close it, leaving a small opening to turn it over, finally I closed the opening. If you want it to be firmer, you can fill it with foam rubber or cardboard, I prefer it that way to make it easier to wash.
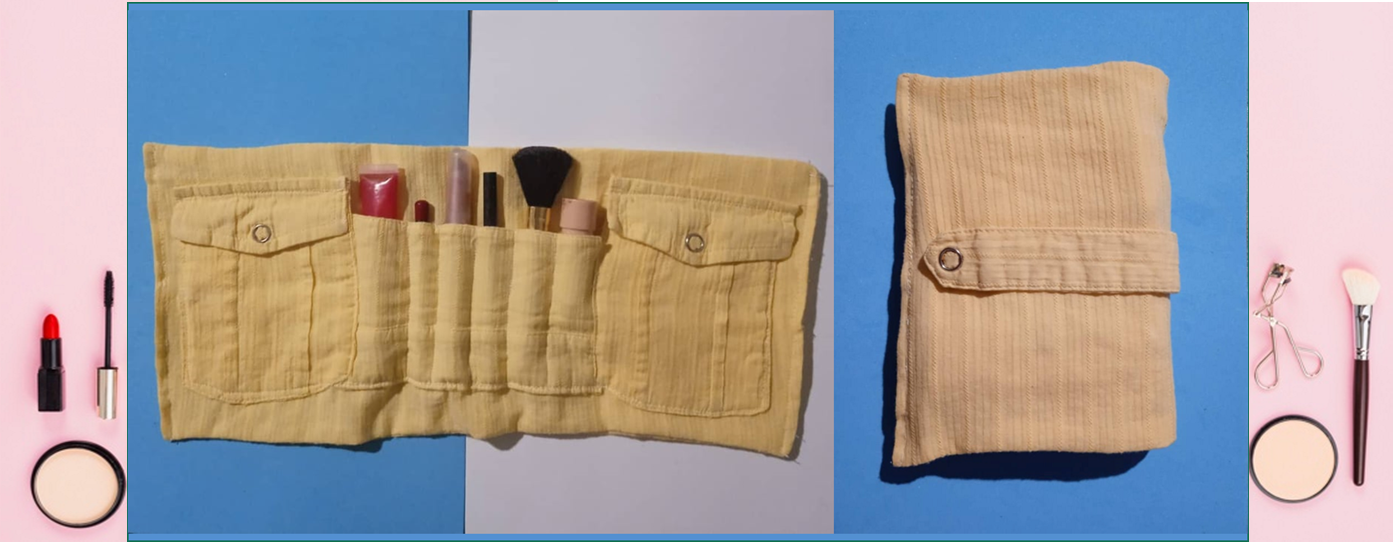
Así fue como quedo mi porta cosmético. // This is how my Cosmetics holder.
💄💄💄
ediciones de imagenes fueron realizadas con Powerpoint.
Image edits were made with Powerpoint.
I invite @Creacioneslelys , to join the challenge. // Invito a @Creacioneslelys, para que se una al reto.

Join the Hive Diy community and create quality content.
Que original y divertido tu creación hay que dejar volar la imaginación👍👍
Hola amiga, gracias por tu comentario. Si a veces no sabemos que hacer, pero sólo te paseas por la comunidad y las ideas empiezan a fluir.
El que reciclaras una camisa ha quedado genial pues además integraste partes de la misma como los bolsillos para que fueran compartimientos, definitivamente un trabajo muy creativo, gracias por compartir con nosotros.
Gracias @equipodelta, por el apoyo y por tus palabras. De verdad me siento contenta aquí, y cuando uno se siente bien en algún sitio empieza a fluir las ideas.
Gracias por el apoyo.