
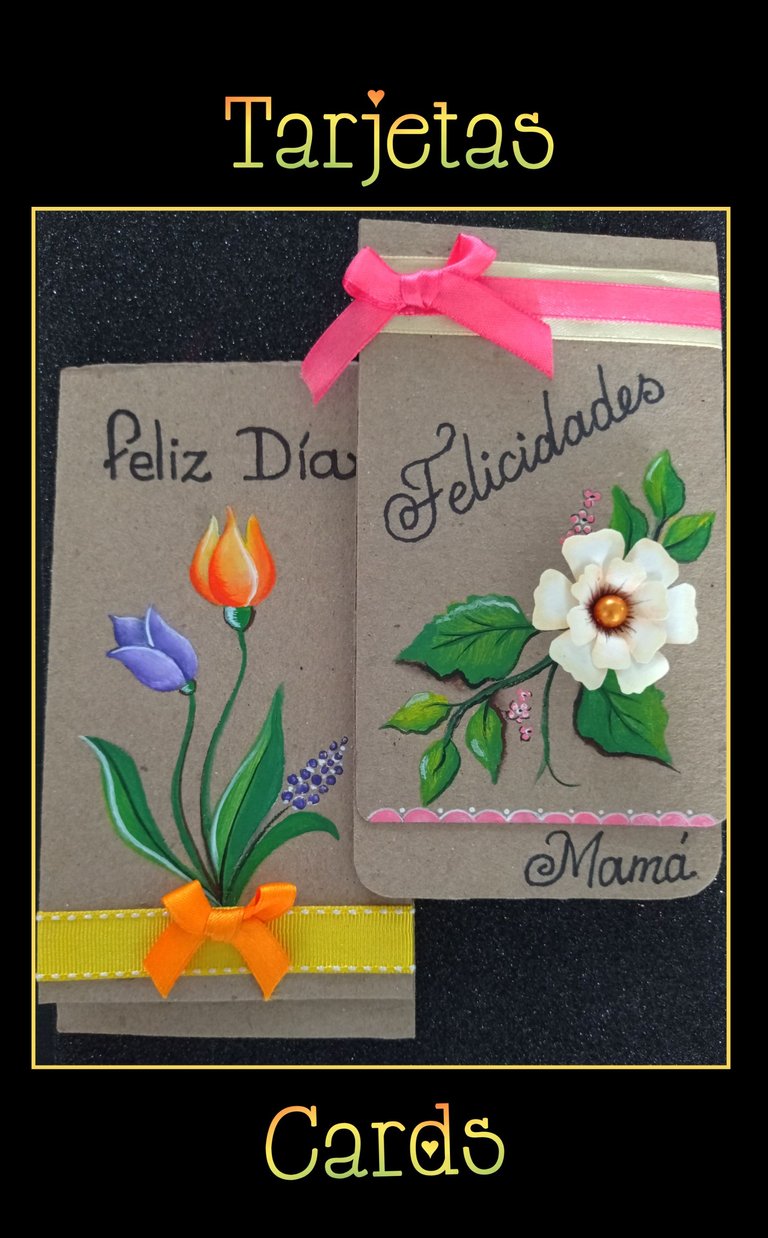
Buenas noches queridos amigos y artesanos que hoy me visitan.
Me vino como anillo al dedo ya que tengo muchas amigas que son mamá y decidí hacerles con mucho cariño unas tarjetas usando de base cartón ya que tengo muchos recortes, así que te invito a que me acompañes y veas el procedimiento y si te gustan y animas, puedas también hacer y obsequiar ya que no son nada difíciles de realizar y si no te sale bien pintar, puedes hacer con impresiones de flores, recortar, pegar y decorar, todo es poner un poquito de creatividad y verás que si puedes.
Entonces comencemos.
Vas a utilizar:

| Cartón o cartulina | Pinturas y pinceles | Dibujo o impresión |
|---|---|---|
| Lápiz y marcador | Tijera y cuchilla | Regla |
| Cinta de tela | Perla | Silicón |
Paso 1:
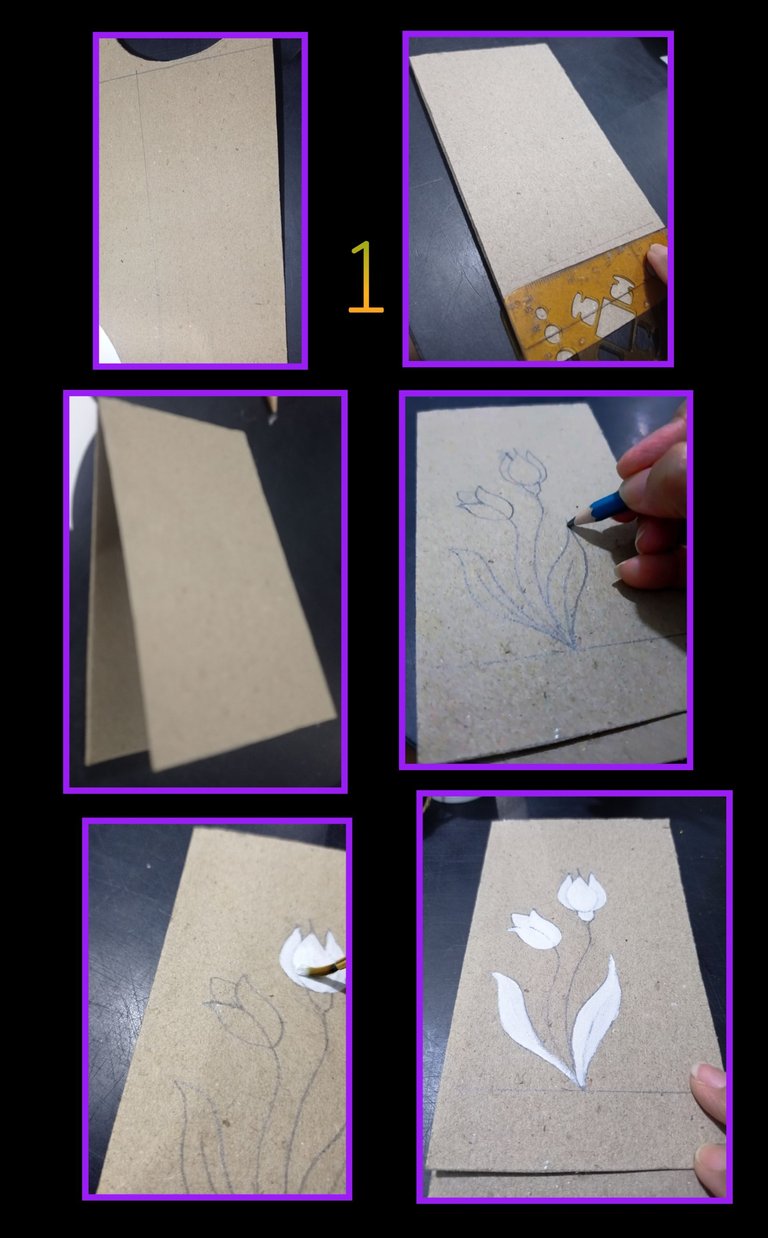
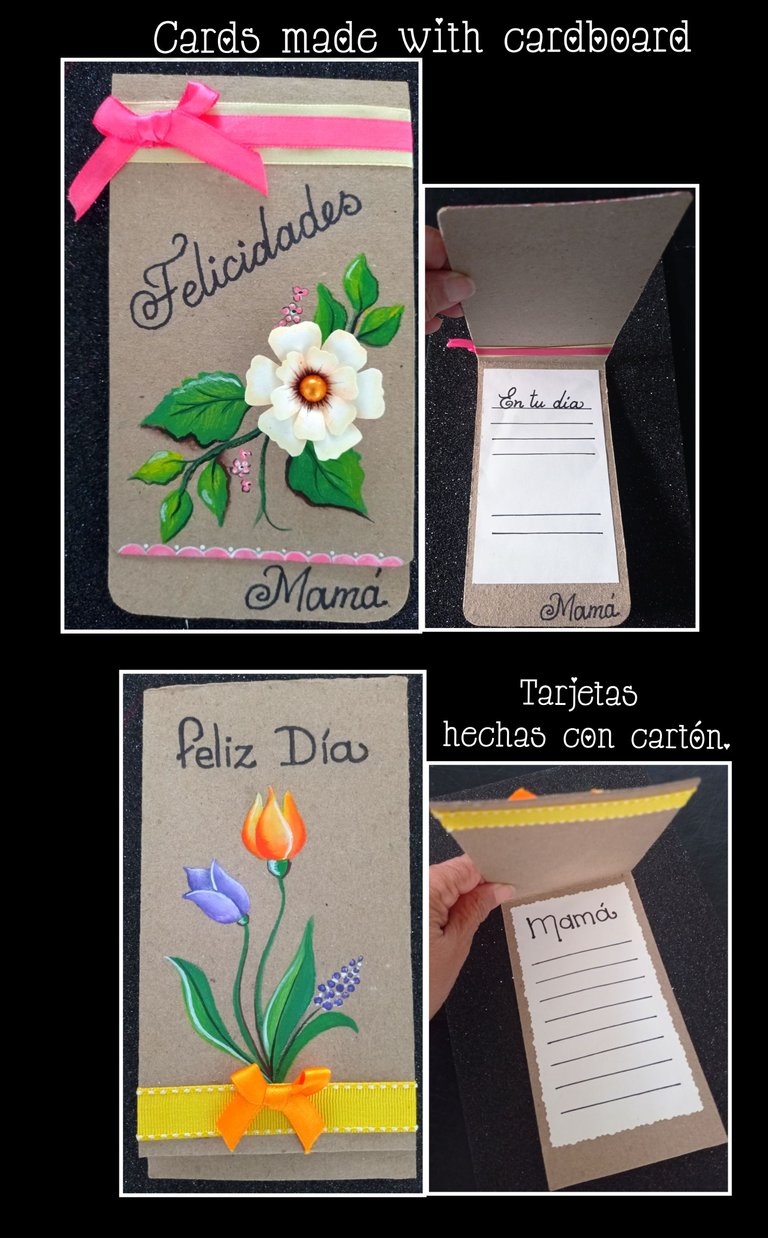
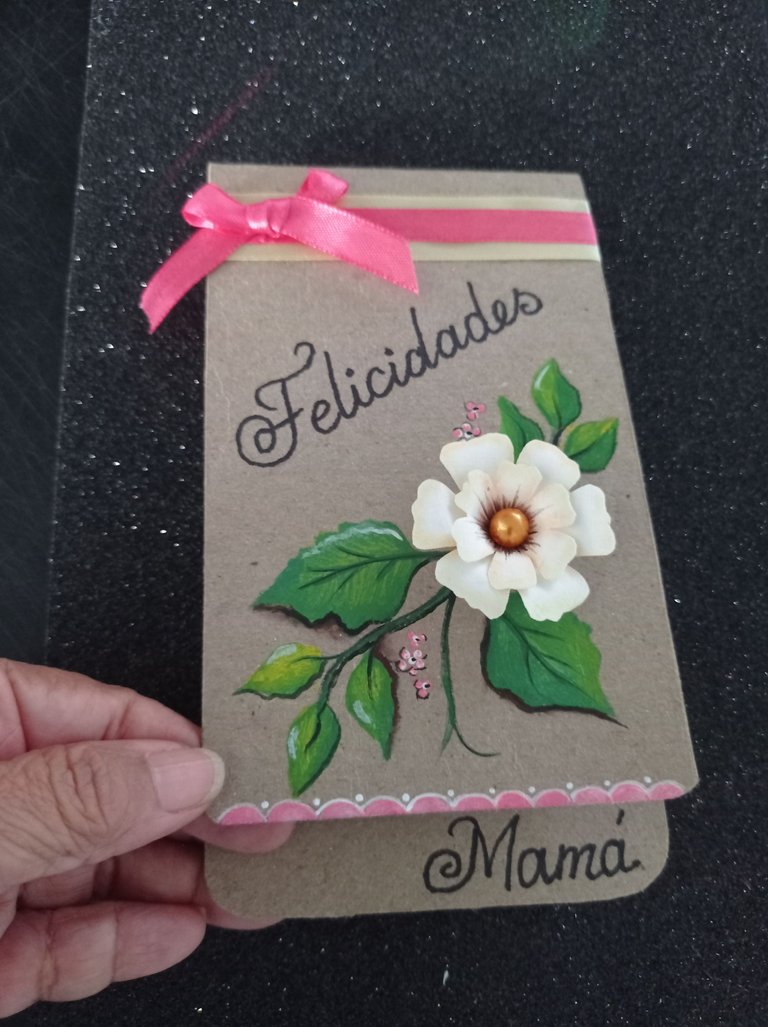
- Marca un rectángulo de 28cm x9cm sobre el cartón y recorta con la tijera o cuchilla, luego dobla por la mitad o deja la parte delantera 1cm más corta que la trasera, después traza una línea en la parte inferior como a 3cm del borde y comienza a pintar el diseño que quieras o transfiere el dibujo usando papel carbón.
- Comienza dando una capa de pintura blanca a las flores y hojas.
Nota: esto se hace cuando vamos a pintar sobre fondos oscuros para que al usar colores claros se vean tal como son ya que si lo pintas directo, no quedará el color real.
Paso 2:

- Ahora comienza a rellenar con pintura amarilla una flor y la mitad de las hojas y sin dejar secar coloca pintura naranja sobre la amarilla y difumina de abajo hacia arriba, deja secar y luego pinta con blanco un lado del centro para darle luz, después pinta con morado y lila y por último rellena sépalo y hojas.
Paso 3:
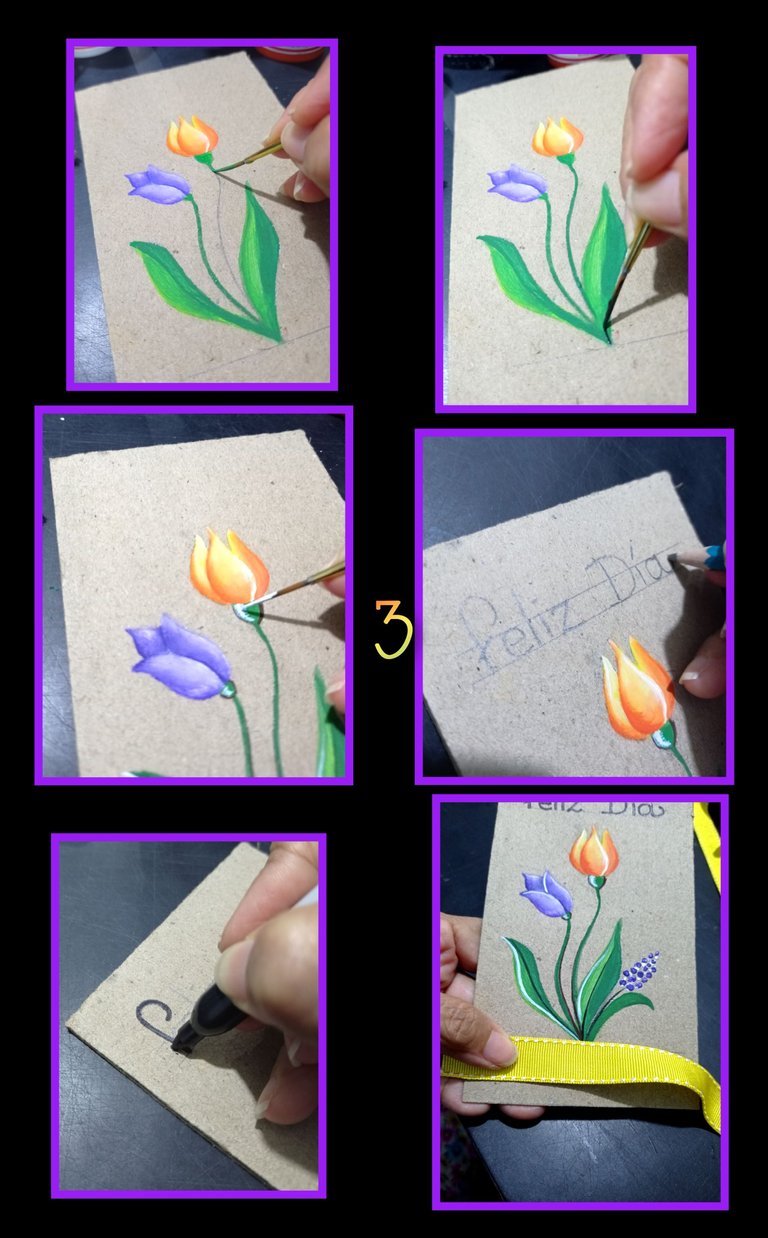
- Pinta los tallos en verde y luego delinea con pincel punta fina o marcador con negro y blanco.
- Luego traza líneas y escribe lo que desees y remarca con marcador punta fina.
- Ahora en la parte de abajo pega una cinta alrededor de la parte delantera y recorta el sobrante.
Paso 4:

- Haz un lazo y pega en el centro.
- Después recorta una cartulina, pega en el centro, haz líneas divisorias para escribir tu dedicatoria con marcador.
Paso 5:

-Ahora marca el molde de la flor sobre cartulina y recorta, pinta con tiza o colores y haz líneas marrones en el centro.
- Repite los pasos para pintar las hojas en la otra tarjeta.
Paso 6:

- Aplica silicón en la pestaña y cierra la capa más grande de pétalos y pega al cartón, luego haz lo propio con la segunda capa, después pega la perlita haciendo un poco de presión.
- Para decorar también puedes pintar ondas en la parte inferior y pegar cintas.
- Después con lápiz haz un borrador de tu dedicatoria.
Paso 7:
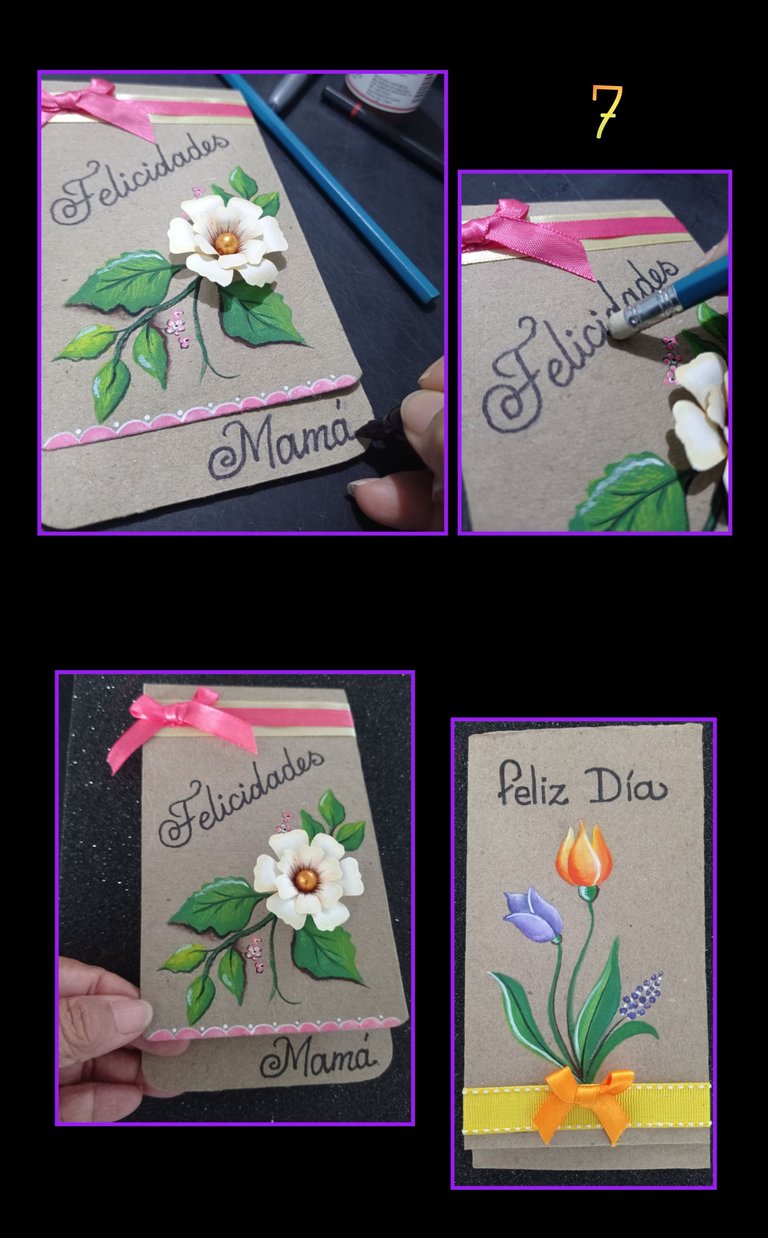
- Por último remarca con marcador y borra la marca del lápiz, pega dentro un rectángulo de cartulina igual como se hizo en la anterior y listo.
Ahora te muestro el resultado.
Use Etiquetas HTML
Mi teléfono Redmi Note 9
Editor de fotos: GridArt.
Fuente:https://www.pinterest.es/pin/476255729361370074/
Me despido esperando les guste mi tutorial dedicado a las madres.
Saludos, actívate y no se olviden de participar.
English
Good evening dear friends and artisans who visit me today.
It came to me like a glove since I have many friends who are moms and I decided to make them with love some cards using cardboard as a base since I have many cuttings, so I invite you to join me and see the procedure and if you like and encourage you, you can also make and give as a gift since they are not difficult to make and if you do not do well painting, you can do with flower prints, cut, paste and decorate, everything is to put a little creativity and you will see that if you can.
So let's get started.
You are going to use:
| Cardboard or cardboard | Paints and brushes | Drawing or print |
|---|---|---|
| Pencil and marker | Scissors and razor blade | Ruler |
| Fabric tape | Pearl | Silicone |
Step 1:
- Mark a 28cm x 9cm rectangle on the cardboard and cut out with the scissors or knife, then fold in half or leave the front part 1cm shorter than the back, then draw a line at the bottom about 3cm from the edge and start painting the design you want or transfer the drawing using carbon paper.
- Start by giving a coat of white paint to the flowers and leaves.
Note: this is done when we are going to paint on dark backgrounds so that when using light colors they will look as they are because if you paint it directly, it will not be the real color.
Step 2:
- Now start to fill with yellow paint a flower and half of the leaves and without letting dry put orange paint over the yellow and blur from bottom to top, let dry and then paint with white one side of the center to give light, then paint with purple and lilac and finally fill sepals and leaves.
Step 3:
- Paint the stems in green and then outline with a fine tip brush or marker with black and white.
- Then draw lines and write what you want and outline with fine tip marker.
- Now on the bottom glue a ribbon around the front and trim the excess.
Step 4:
- Make a bow and glue in the center.
- Then cut out a piece of cardstock, glue in the center, make dividing lines to write your dedication with marker.
Step 5:
- Now mark the flower shape on cardstock and cut out, paint with chalk or colors and make brown lines in the center.
- Repeat the steps to paint the leaves on the other card.
Step 6:
- Apply silicone on the flap and close the largest layer of petals and glue to the cardboard, then do the same with the second layer, then glue the pearlite making a little pressure.
- To decorate you can also paint waves on the bottom and glue ribbons.
- Then with a pencil make a draft of your dedication.
Step 7:
- Finally, mark with a marker and erase the pencil mark, paste inside a rectangle of cardboard as in the previous one and that's it.
Now I show you the result.
Use HTML Tags
My phone Redmi Note 9
Photo Editor: GridArt.
Source:https://www.pinterest.es/pin/476255729361370074/
I say goodbye hoping you like my tutorial dedicated to mothers.
Greetings, be active and do not forget to participate.
These are gorgeous and creative. The personal touch and individuality of handmade cards like this would touch any heart:)
Hola Milli, gracias por tu comentario, que bueno que te gustaron y sí, creo que los detalles hechos por nosotros tienen mucho valor.🌹
Estan muy lindas, me gusto mucho la decoracion y el dibujo, a mi no me sale muy bien pintar, pero las impresiones de flores son una buena opcion tambien jaja genial idea ❤️
Hola buhito, me siento feliz de saber que te gustaron y bueno te aseguro que si practicas te saldrá muy bien la pintura ya que tienes muchas habilidades y haces trabajos lindos.
Jajajaja, bueno es una opción fácil y también quedará muy linda.
Gracias por comentar.
Está precioso este detalle!
Hola amiga, muchas gracias por pasar por aquí y comentar.
Me alegro te hayan gustado.
Un detalle hermoso, quizás me anime a hacerle uno a la mía. Gracias por compartir.
Hola amigo, que bueno que te gustaron, y ojalá te animaras e hicieras una, si lo haces me encantaría que me la compartieras, sé que te quedaría muy linda.
A tí por comentar.
Hermosa creación de tarjetas en honor a las madres, te felicito.
Saludos amiga, que bueno que te gustaron.
Muchas gracias.
Hola amiga, una carta muy bonita y perfecta para un gran regalo, donde es increíble los materiales que usas, ya que son fáciles y no se tiene que gastar tanto. Además muy bonitas las flores y cada uno de los detalles que le pones para que así sea única. Esto es toda una obra de arte y espero que le gusten mucho.
Hola David, gracias por tan buen comentario, y sí a veces tenemos materiales guardados y no sabemos en que utilizar y bueno esto es una idea.
Gracias por apreciar mi trabajo si eso espero!😊
Te quedo muy asombrosa tu manualidad, muchas gracias por participar en nuestro concurso, mucha suerte
Tu comunidad artesana ahora es testigo

Gracias a ustedes por el apoyo y por siempre estar pendientes en tener nuestra comunidad Activa!
Mil Gracias.