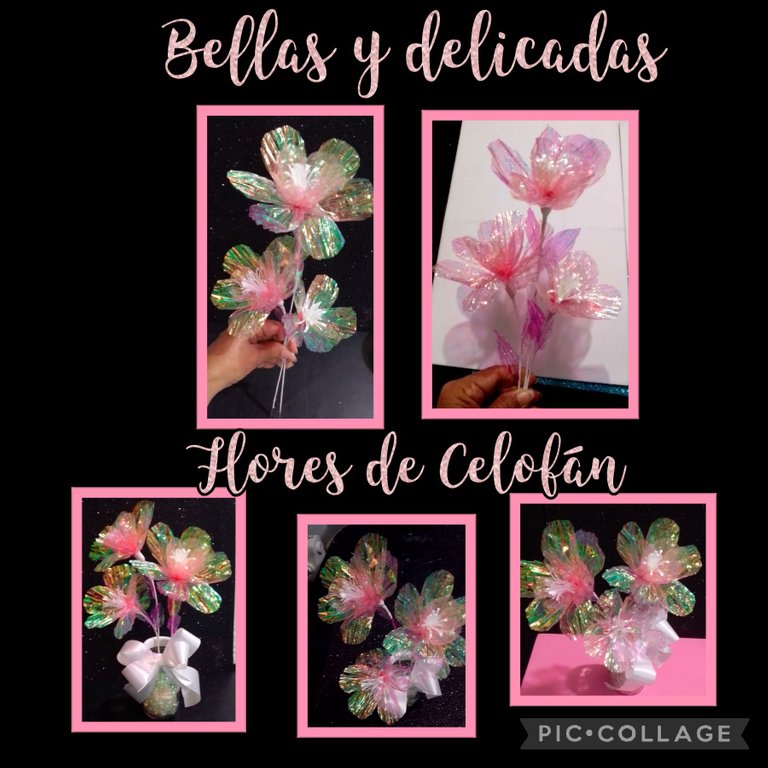
Hola, hola... mis queridos amigos.
Cómo están?
Para este tutorial necesitas estos materiales:
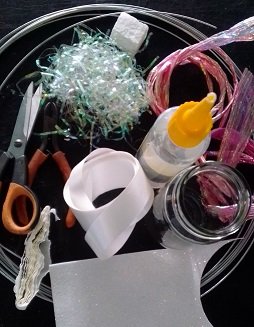
| Papel tornasol celofán (cinta) | Cinta blanca de regalo |
|---|---|
| Foami blanco | Viruta |
| Trozo de anime | Frasco de vidrio (reciclado) |
| Alambre | Tenaza |
| Tijera | Papel crepé blanco |
| Hilo | Lápiz |
Ya es hora de comenzar:
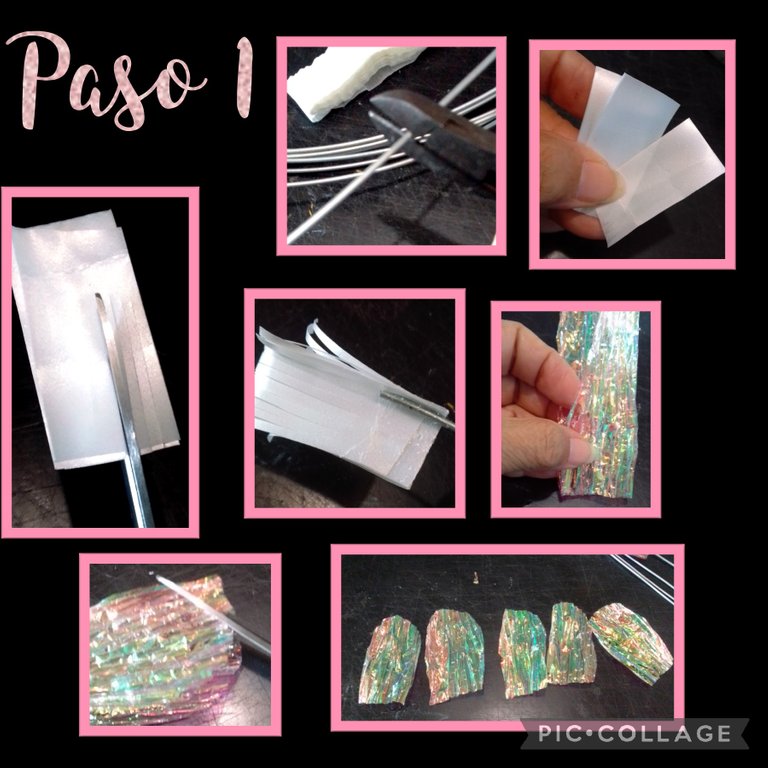
Paso 1:
- Recorta 3 pedazos de alambre de 24 cms aproximados, luego recorta 3 pedazos de cinta blanca de 3cms de largo, coloca uno sobre otro para recortar en tiritas dejando 1cm sin recortar, aplica silicón en esta parte para unirlos, luego aplica silicón y pega el alambre y enrolla para formar los pistilos.
- Ahora recorta 5 rectángulos de celofán de 3,5cms de ancho por 5cm de alto y recorta dando forma de pétalo.
Paso 2:
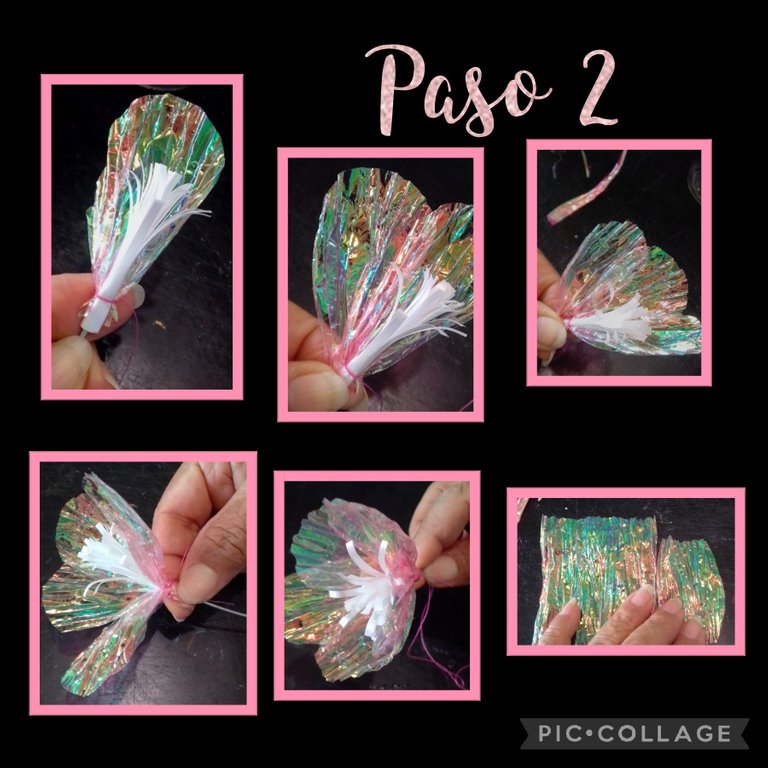
- Coloca (1) pétalo a un lado del pistilo y amarra con hilo dando 2 ó 3 vueltas, luego coloca el segundo pegado al primero y vuelve a amarrar, repite este paso hasta cerrar con los 5 pétalos.
- Aparte recorta 6 rectángulos pero 1 cm más largo y recorta en los bordes para formar los pétalos.
¡Como ves es muy fácil!
Paso 3:
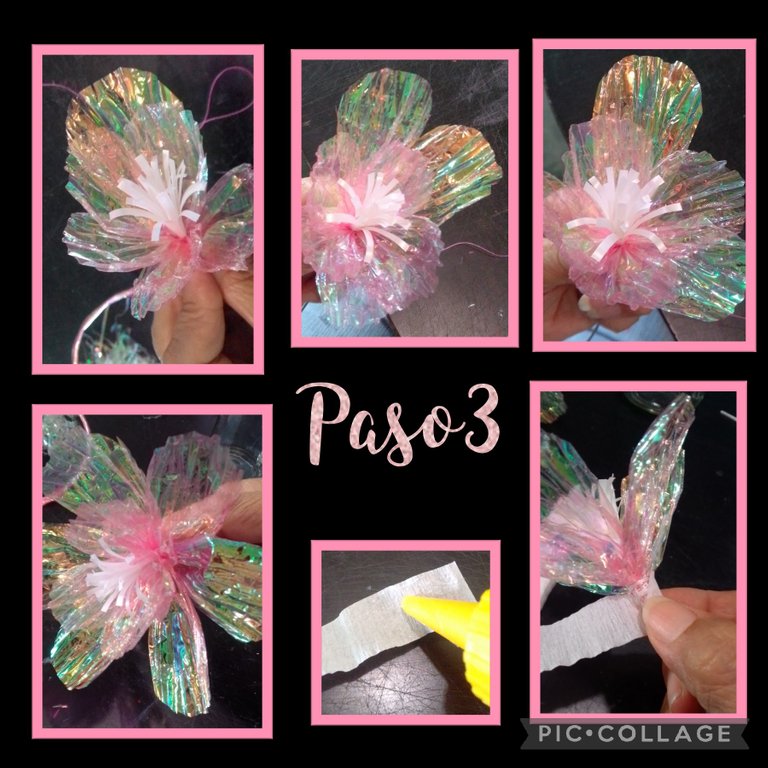
- Coloca el pétalo más largo en el medio de dos pétalos y amarra dando vueltas y aunando, hasta completar los 6 pétalos.
- Ahora recorta una tira de papel crepé blanco y aplica silicón en un extremo y pega en la base de la flor, dá dos o tres vueltas para tapar los hilos, también puedes hacer unas con solo 5 pétalos, solo tienes que repetir estos pasos para hacer las que quieras.
Paso 4:
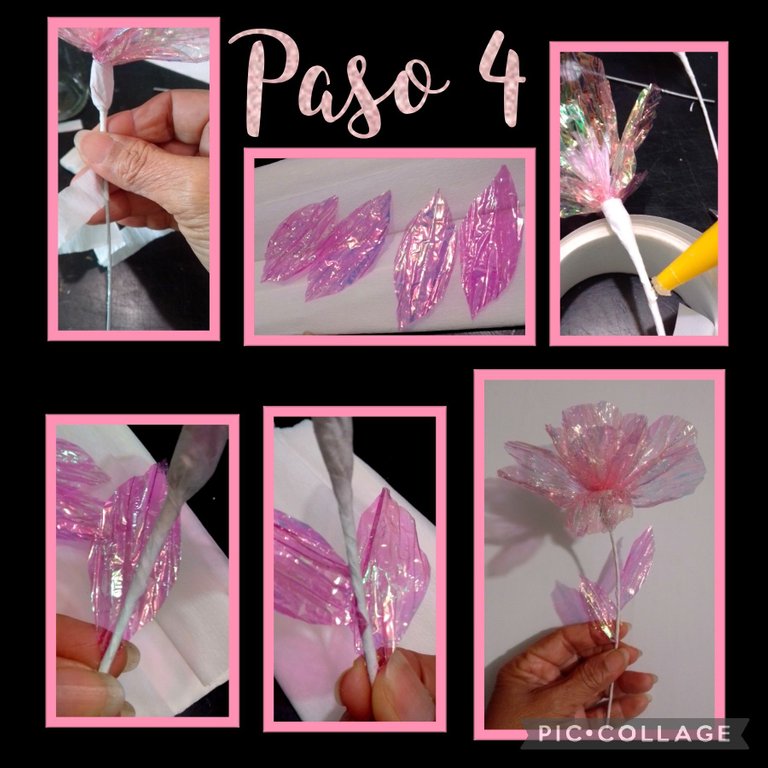
- Forra el alambre hasta abajo, luego recorta hojas en papel celofán y pega 2 hojas a cada flor.
Paso 5:

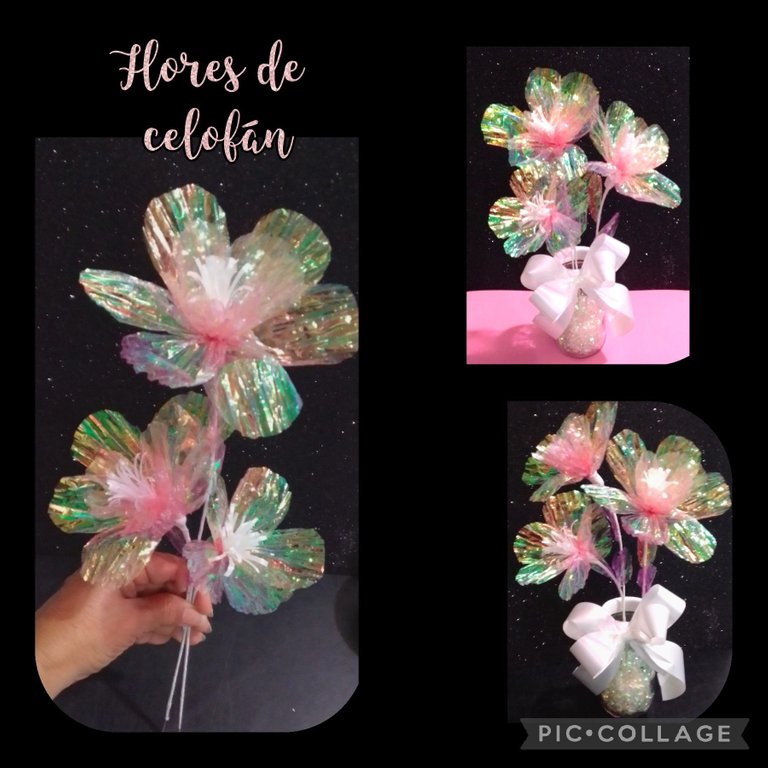
Y así quedan ya listas!.
- Ahora recorta una tira en foami blanco del ancho de la boca del frasco de vidrio, aplica silicón y pega en el borde haciendo un poco de presión hasta que pegue.
- Aparte aplica silicón al trocito de anime, inserta un palito o alambre para pegar en el centro del frasco.
Paso 6:
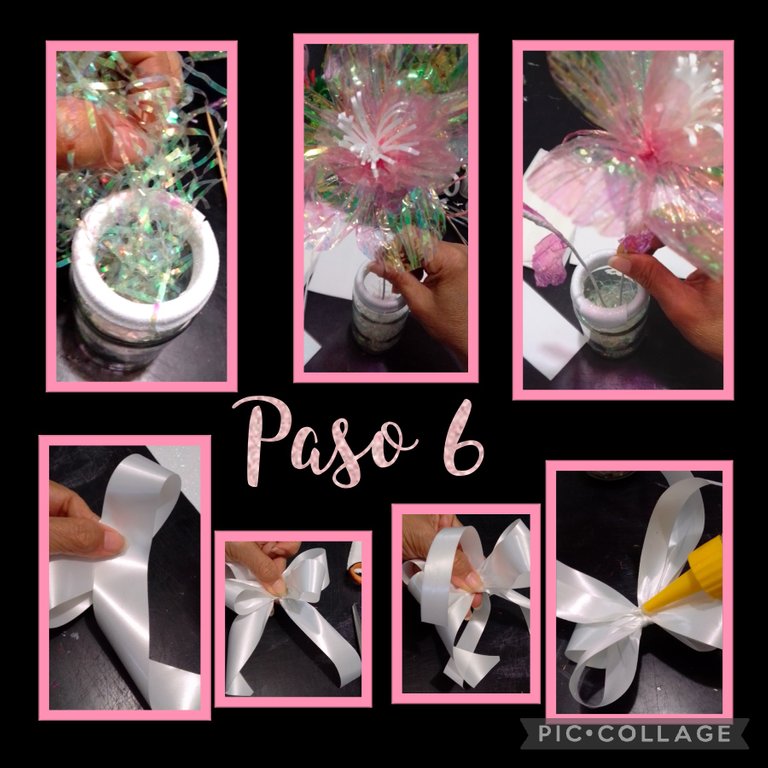
- Rellena con viruta para tapar el anime e introduce una a una las flores y arma un lazo en cinta blanca haciendo cuatro lazadas que queden en forma de cruz y amarra en el medio con otro pedazo de cinta y aplica silicón en la parte posterior y pega para decorar a un lado o al frente del frasco y así armamos este lindo florero.
Espero les gusten y se animen a realizar!

Esta publicación es de contenido original, está traducida con DeepL, las fotos las capturé con mi Blu G5 y las edité con Pic Collage, también utilicé etiquetas HTML.
De verdad quedan hermosas, me puse a inventar y creo que quedó muy bonito el resultado.
Ahora me despido deseando que les guste mi tutorial y agradeciendo tu visita, apoyo y si es de tu agrado, me encantará ver tu comentario.
Saludos y bendiciones.
English:
Hola, hola... mis queridos amigos.
Cómo están?
Para este tutorial necesitas estos materiales:
| Papel tornasol celofán (cinta) | Cinta blanca de regalo |
|---|---|
| Foami blanco | Viruta |
| Trozo de anime | Frasco de vidrio (reciclado) |
| Alambre | Tenaza |
| Tijera | Papel crepé blanco |
| Hilo | Lápiz |
Ya es hora de comenzar:
Paso 1:
- Cut 3 pieces of wire of approximately 24 cm, then cut 3 pieces of white ribbon 3 cm long, place one on top of the other to cut into strips leaving 1 cm untrimmed, apply silicone on this part to join them, then apply silicone and glue the wire and roll to form the pistils.
- Now cut out 5 rectangles of cellophane 3.5 cm wide by 5 cm high and cut into petal shapes.
Step 2:
- Place (1) petal on one side of the pistil and tie with thread giving 2 or 3 turns, then place the second one attached to the first one and tie again, repeat this step until closing with the 5 petals.
- Separately cut 6 rectangles but 1 cm longer and trim the edges to form the petals.
As you can see it is very easy!
Step 3:
- Place the longest petal in the middle of the two petals and tie it together until the 6 petals are complete.
- Now cut a strip of white crepe paper and apply silicone on one end and glue at the base of the flower, give two or three turns to cover the threads, you can also make some with only 5 petals, just repeat these steps to make as many as you want.
Step 4:
- Line the wire all the way down, then cut leaves out of cellophane paper and glue 2 leaves to each flower.
Step 5:
And that's it!
- Now cut out a strip of white foami the width of the mouth of the glass jar, apply silicone and glue it to the edge, pressing a little until it sticks.
- Apply silicone to the anime piece, insert a stick or wire to glue in the center of the jar.
Step 6:
- Fill with shavings to cover the anime and introduce one by one the flowers and make a loop in white ribbon making four loops in the shape of a cross and tie in the middle with another piece of ribbon and apply silicone on the back and glue to decorate the side or front of the jar and so we assemble this pretty vase.
I hope you like them and are encouraged to make them!
This post is original content, it is translated with DeepL, I captured the photos with my Blu G5 and edited them with Pic Collage, I also used HTML tags.
They are really beautiful, I started to invent and I think the result was very nice.
Now I say goodbye wishing you like my tutorial and thanking you for your visit, support and if you like it, I will love to see your comment.
Greetings and blessings.
Demasiado bello.
Es muy difícil moldear el papel celofán y usted ha logrado una flor muy bella y delicada. Le agradezco haber compartido el paso a paso.
Es un adorno muy bonito, ideal para centro de mesa en fiestas de 15 años. Es mi opinión. Felicidades.
Muchas gracias amiga @creacioneslelys.
Es un gusto para mí compartir con ustedes.
Sí esas flores quedarían perfectas para centros de mesa de 15 años.
De nuevo gracias por comentar...
Saludos.
Gracias por el apoyo!
Buen día.
Buenas tardes @pardostories muchas gracias por el apoyo!
Thank you for sharing this amazing post on HIVE!
Your content got selected by our fellow curator @stevenson7 & you just received a little thank you via an upvote from our non-profit curation initiative!
You will be featured in one of our recurring curation compilations and on our pinterest boards! Both are aiming to offer you a stage to widen your audience within and outside of the DIY scene of hive.
Join the official DIYHub community on HIVE and show us more of your amazing work and feel free to connect with us and other DIYers via our discord server: https://discord.gg/mY5uCfQ !
If you want to support our goal to motivate other DIY/art/music/homesteading/... creators just delegate to us and earn 100% of your curation rewards!
Stay creative & hive on!
Muchas gracias por el apoyo!
Saludos y bendiciones.