

Buenas noches mis queridos visitantes, amigos y creadores de contenido.
Por aquí vengo como siempre feliz de compartir con ustedes un tutorial donde les mostraré como realizar fácilmente un cuadro decorativo con uno de los personajes más famosos de anime Goku, de la serie de Dragon Ball, recuerdo que desde pequeños mis sobrinos se sentaban muy emocionados a ver la serie por televisión; ya son unos hombres y cuando se recuerdan de sus tiempos de infancia se emocionan contando entre ellos los capítulos que más le gustaron. De verdad que su autor Akira Toriyama lamentablemente fallecido hace poco, hizo que muchos niños y no tan niños se divirtieran.
Y hace poco vino uno de mis sobrinos y me pidió que le realizara un cuadrito para decorar un espacio en el cuarto de su niño por eso aquí te quiero compartir este paso a paso por si te animas a realizar uno.
Entonces acompáñame y busca lo siguiente:

| Foami mate y escarchado | Dibujo o impresión |
|---|---|
| Pinturas y pinceles | Lápiz y marcadores negros |
| Pañito de algodón | Tijera y compás |
| Silicón | Cartulina blanca |
| Cinta |
Procedimiento:

- Remarca el dibujo y traza una circunferencia con un compás o algún objeto redondo.
- Luego coloca el dibujo de cara al foami y frota con los anillos de la tijera para transferir el dibujo y recorta el círculo.
- Ahora humedece un pañito y coloca envolviendo tu dedo, moja un poquito en pintura blanca y comienza a dar toques a un lado del círculo y frota de arriba hacia abajo hasta ir difuminando el color.
- Repite al otro lado con pintura naranja y haz igual procedimiento, para oscurecer pon un poco de pintura roja.

- Para bajar la intensidad del color, humedece el pañito en agua y sin rastro de pintura frota el color.
- Luego con el marcador pasa por todo el contorno de los dibujos y luego rellena.
- Ahora con pintura negra pinta todo lo marcado para unificar el color negro y deja secar.
- Ahora remarca el nombre y transfiere igual al paso 1 y recorta.
- Aplica silicón y pega al foami negro escarchado.

- Recorta 4 tiras en cartulina blanca y pega a los cuatro lados, después ubica las letras, aplica silicón y pega debajo del círculo.
- Recorta en foami escarchado las estrellas de la esfera y pega al rededor de la nube.
- Por último recorta un pedacito de cinta y pega en la parte central de la parte posterior del cuadro.
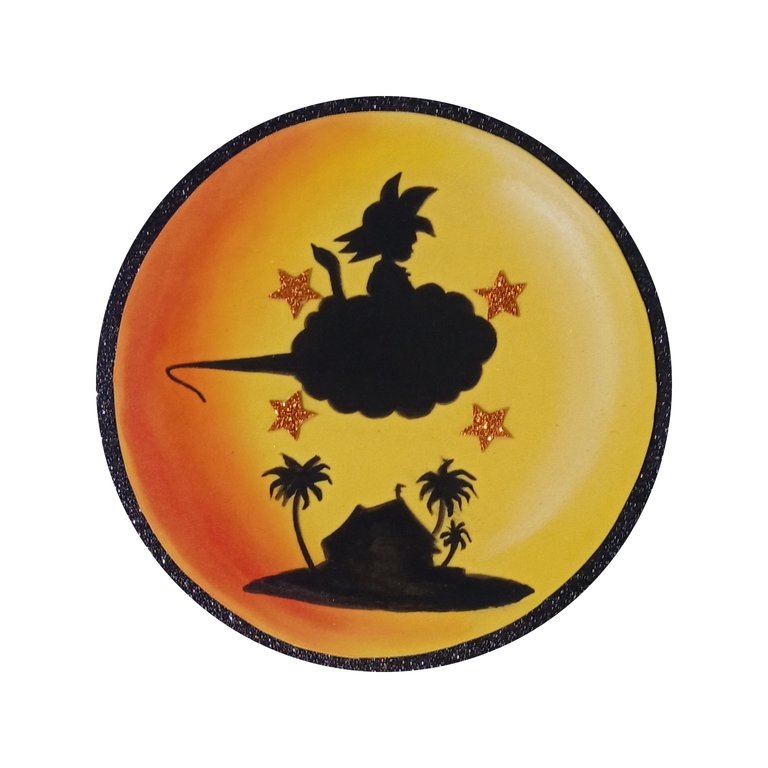
Y así queda terminado este lindo Cuadro Decorativo de "Goku"
Mira el resultado!

Fuente:
https://www.pinterest.es/pin/476255729361050068/
Mi publicación está traducida con DeepL.
Editada con etiquetas HTML y las fotos las capturé con mi Redmi Note 9 y las edité con GridArt.
Y llegó la hora de despedirme, esperando sea de tu agrado este bonito tutorial dedicado a todas las personas amantes de este personaje.
Un agradecimiento a todos los que me visitan y apoyan.
Saludos.
English
Buenas noches mis queridos visitantes, amigos y creadores de contenido.
And recently one of my nephews came and asked me to make a little picture to decorate a space in his child's room so here I want to share this step by step in case you dare to make one.
Then join me and look for the following:
| Foami matte and frosted | Drawing or print |
|---|---|
| Paints and brushes | Pencil and black markers |
| Cotton cloth | Scissors and compass |
| Silicone | White cardboard |
| Tape |
Procedure:
- Highlight the drawing and trace a circumference with a compass or some round object.
- Then place the drawing face up on the foami and rub with the rings of the scissors to transfer the drawing and cut out the circle.
- Now wet a tissue and place it around your finger, dip a little bit of white paint and start dabbing on one side of the circle and rub from top to bottom until the color is blurred.
- Repeat on the other side with orange paint and do the same procedure, to darken put a little red paint.
- To lower the intensity of the color, moisten the tissue in water and without a trace of paint rub the color.
- Then with the marker go all around the outline of the drawings and then fill in.
- Now with black paint paint everything marked to unify the black color and let it dry.
- Now highlight the name and transfer the same as in step 1 and cut out.
- Apply silicone and glue to the frosted black foami.
- Cut out 4 strips on white cardstock and glue to the four sides, then place the letters, apply silicone and glue under the circle.
- Cut out the stars of the sphere from frosted foami and glue around the cloud.
- Finally, cut out a small piece of ribbon and glue it in the central part of the back of the frame.
And that's it for this cute "Goku" decorative frame.
Look at the result!
Source:
https://www.pinterest.es/pin/476255729361050068/
My post is translated with DeepL.
Edited with HTML tags and the photos were captured with my Redmi Note 9 and edited with GridArt.
And it's time to say goodbye, I hope you like this nice tutorial dedicated to all the people who love this character.
A thank you to all who visit and support me.
Greetings.
Muchas gracias por el apoyo @qurator.
Gracias @hive-130560 por el apoyo que siempre me brindan.
wiii me encanta el anime
!HUESO
Click on this banner, to be directed to the Virtual World Discord and learn more about the curation project.
!PGM
@bot-bdbhueso Gracias por el apoyo!
Saludos y muchas gracias. Que bueno que te gusta.
¡¡¡Buen trabajo!!! Gracias por publicar tu excelente contenido en Hive Diy, que impresionante técnica nos compartiste para poder degradar las tonalidades de la esfera, lo tendré en cuenta cuando haga un dibujo con pinturas.
Tu comunidad artesana ahora es testigo

Mil gracias @hive-130560 a ustedes por crear este medio donde puedo compartir con ustedes mis trabajos y aún más que les sirva de guía en alguna ocasión, de verdad que es un placer para mi.
Muchas gracias por el apoyo y por tan buen comentario.
Saludos.