Buenas noches mis queridos amigos.
Cómo están?
Bienvenidos sean todos y gracias por visitarme.
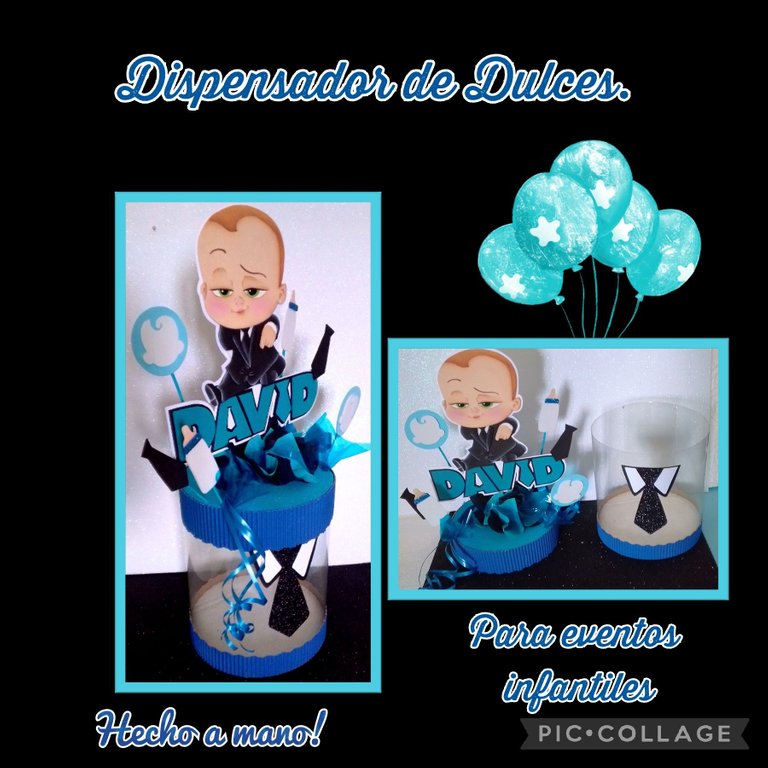
Está hecho con materiales económicos y fáciles de conseguir.
Vas a necesitar estos materiales:
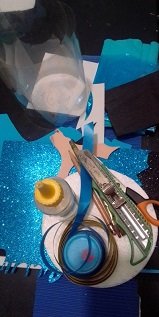
| Acetato | Foami mate y escarchado |
|---|---|
| Cartulina escolar y corrugada | Círculos de anime |
| Cinta de regalo | Palitos y palillos de mdf |
| Papel celofán y crepé | Pinturas y pinceles |
| Silicón líquido | Tijera y cuchilla |
| Lápiz | Cinta de regalo |
| Dibujos o impresiones |
Ahora sí empecemos:
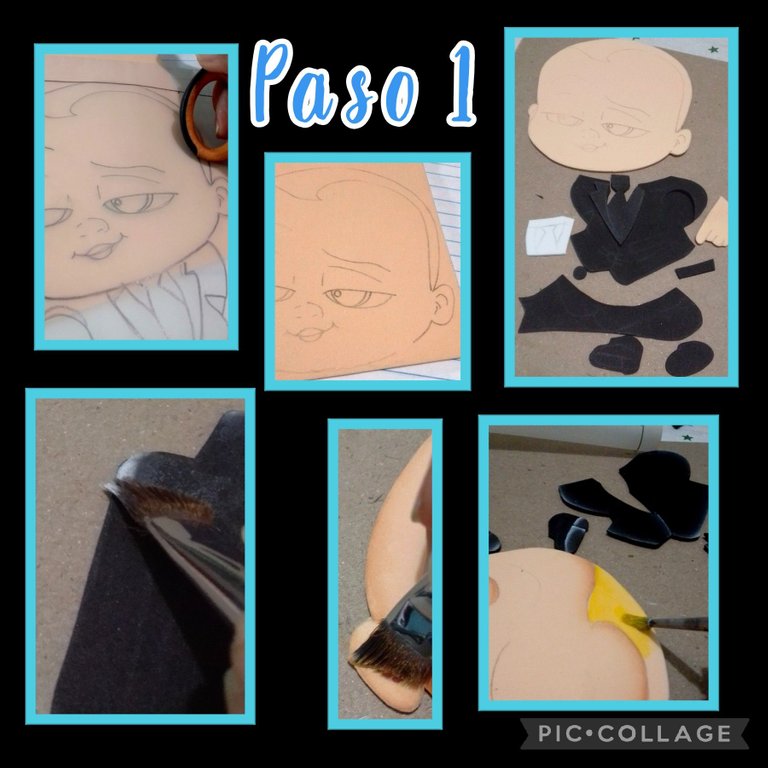
- Remarca o calca el dibujo en papel cebolla y con la ayuda de la tijera, frota el dibujo sobre el foami para que se transfiera, esto lo harás con todas las piezas de foami en sus respectivos colores y recorta.
- Luego sumerge el pincel en agua, pasa por un pañito y quita el exceso de agua, y moja la punta en pintura blanca y comienza a pasar por todo el contorno y rellenando las partes de las piezas (ver fotos)
- Aparte comienza a rellenar el cabello del bebe con pintura amarilla y deja secar.
- Luego rellena los ojos y delinea con marcador o pincel para pintar ojos y deja secar.
- Y comienza a armar pegando primero la cabeza al cuerpo y luego los zapatos y manito, así queda listo el bebé.
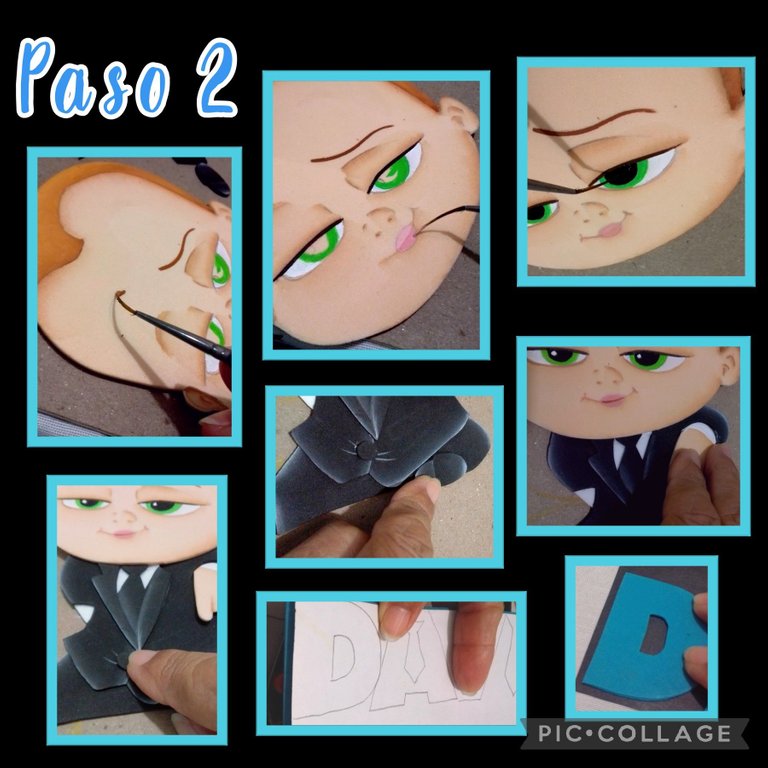
- Aparte dibuja o imprime el nombre que quieras y recorta en foami y luego pega en cartulina negra.
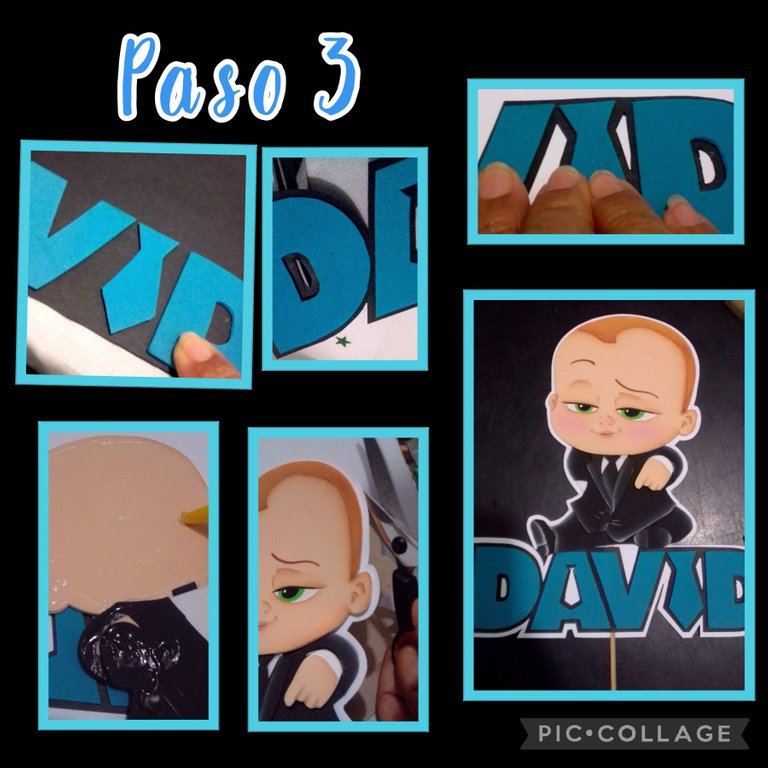
- Después de recortar y pegar todo el nombre, recorta y deja un borde de 3 milímetros aproximadamente.
- Y repite este procedimiento sobre la cartulina blanca después de pegar el bebé, recorta e inserta un palito en la parte inferior del nombre y así queda listo.
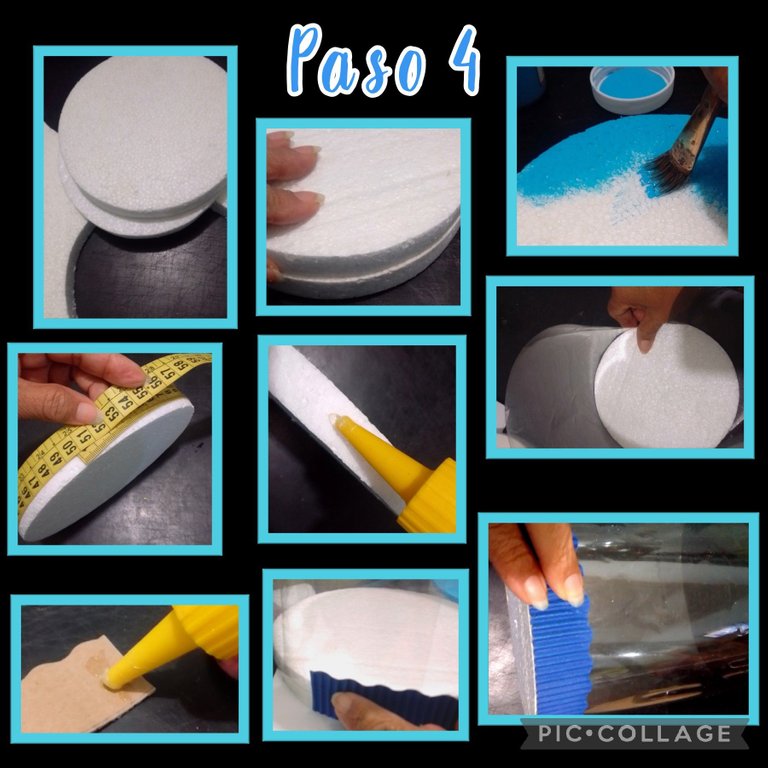
- Recorta 2 círculos al tamaño de tu preferencia pero uno 3 ó 4 milímetros mas grande que será la tapa.
- Pinta el círculo más grande y deja secar.
- Mide la circunferencia y recorta el acetato 5cms más ancho para que cierre bien al momento de pegar aplicando silicón por todo el borde.
- Aparte mide la base y la tapa de anime y marca en cartulina corrugada 2 listas una de 2,5 cms y la otra de 4cms de ancho para la tapa.
- Pega la tira de cartulina corrugada en la parte inferior del anime y haz presión hasta que pegue.
Ahora aplica silicón a la tira de cartulina de la tapa y pega al anime pintado.
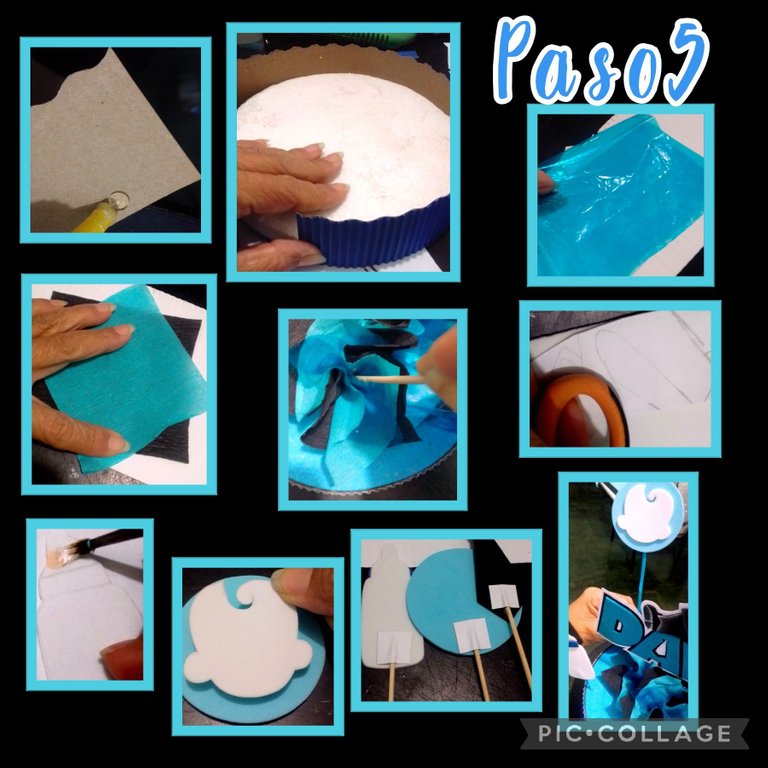
- Ahora recorta cuadros en papel celofán, y papel crepé negro y azul y coloca como se ve en la foto que no coincidan las puntas y con la ayuda de un palito de madera, inserta en el centro del anime, puedes colocar los que quieras, eso queda a tu gusto.
- Ahora si quieres puedes decorar con figuras alusivas a tu proyecto, y transfiere los dibujos al foami como aparece en el primer paso, aquí recorta el tetero el logo, corbatas y pinta la tetina del tetero y deja secar.
- Pega palillos en la parte posterior y pinta los palitos de azul para darle un mejor acabado y comienza a insertar estas figuras a la tapa.
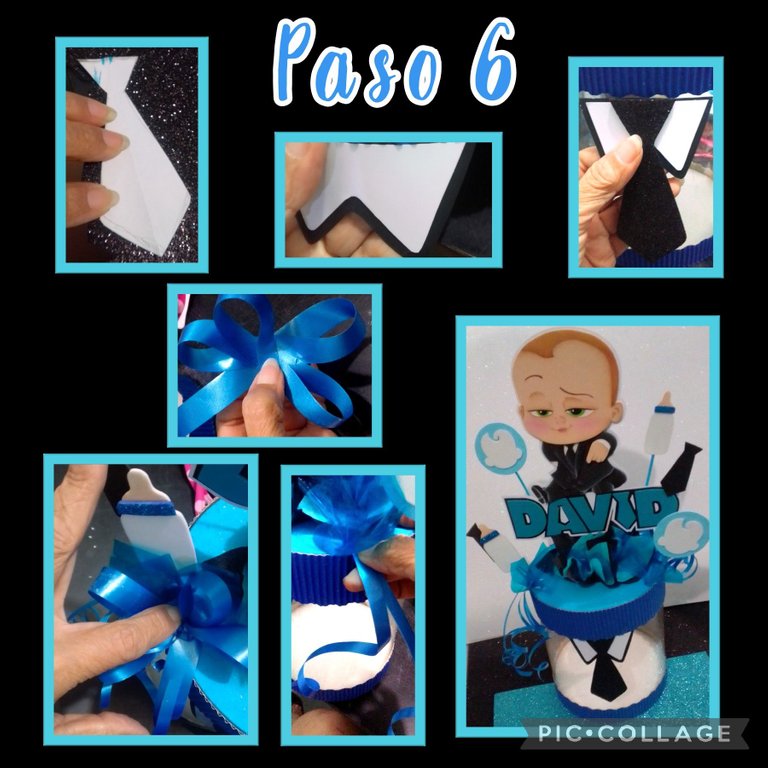
- Dibuja una corbata de 8cms y recorta en foami escarchado negro
también recorta el cuello de la camisa en foami blanco y en negro y arma pegando ambos en el acetato, justo debajo de la tapa. - Luego arma en cinta de regalo 4 lazadas y amarra en el centro con un pedacito cinta y pega a un lado para decorar y al otro extremo también puedes pegar cinta y riza con la tijera.
Y ya está terminado este hermoso Dispensador de dulces.

Fuente de la imagen:
https://www.google.com/search?q=jefe+en+pa%C3%B1ales&rlz=1C1OKWM_esVE972VE972&source=lnms&tbm=isch&sa=X&ved=2ahUKEwimzNPt0sn1AhWwaDABHSs1CTAQ_AUoAXoECAIQAw&biw=1360&bih=625&dpr=1
El resto de mi trabajo es de contenido original.
Y ya me toca despedirme no sin antes mencionarles que mi publicación es traducida con DeepL, editada con etiquetas HTML, y las fotos son capturadas con mi Blu G5 y editadas con Pic Collage.
Espero te guste mi publicación y de ser así me encantará ver tu comentario.
Muchas gracias por el apoyo!
Saludos y bendiciones.
English:
Buenas noches mis queridos amigos.
Cómo están?
Bienvenidos sean todos y gracias por visitarme.
Está hecho con materiales económicos y fáciles de conseguir.
Vas a necesitar estos materiales:
| Acetato | Foami mate y escarchado |
|---|---|
| Cartulina escolar y corrugada | Círculos de anime |
| Cinta de regalo | Palitos y palillos de mdf |
| Papel celofán y crepé | Pinturas y pinceles |
| Silicón líquido | Tijera y cuchilla |
| Lápiz | Cinta de regalo |
| Dibujos o impresiones |
Now let's get started.
- Trace the drawing on onion paper and with the help of the scissors, rub the drawing on the foami so that it will transfer, you will do this with all the foami pieces in their respective colors and cut them out.
- Then dip the brush in water, pass through a tissue and remove the excess water, and dip the tip in white paint and begin to pass around the contour and filling in the parts of the pieces (see photos).
- Then start filling in the baby's hair with yellow paint and let it dry.
- Then fill in the eyes and outline with marker or eye paint brush and let dry.
- And start assembling by gluing first the head to the body and then the shoes and the little hand, so the baby is ready.
- Then draw or print the name you want and cut it out in foami and glue it on black cardboard.
- After cutting out and pasting the whole name, cut it out and leave a border of approximately 3 millimeters.
- And repeat this procedure on the white cardboard after gluing the baby, cut out and insert a stick at the bottom of the name and it is ready.
- Cut out 2 circles to the size of your choice, but one 3 or 4 millimeters larger, which will be the lid.
- Paint the larger circle and let it dry.
- Measure the circumference and cut the acetate 5 centimeters wider so that it closes well when gluing by applying silicone all around the edge.
- Measure the base and the lid of the anime and mark 2 strips on corrugated cardboard, one 2.5 cm wide and the other 4 cm wide for the lid.
- Glue the strip of corrugated cardboard on the bottom of the anime and press until it sticks.
Now apply silicone to the cardboard strip for the lid and glue to the painted anime.
- Now cut out squares in cellophane paper, and black and blue crepe paper and place them as shown in the photo and with the help of a wooden stick, insert them in the center of the anime, you can place as many as you want, it is up to your taste.
- Now if you want you can decorate with figures allusive to your project, and transfer the drawings to the foami as shown in the first step, here cut out the teapot, the logo, ties and paint the teat of the teapot and let it dry.
- Glue toothpicks on the back and paint the sticks blue to give it a better finish and start inserting these figures to the lid.
- Draw an 8 cm tie and cut it out in black frosted foami.
Also cut out the collar of the shirt in white and black foami and glue both to the acetate, just under the lid. - Then make 4 loops of gift ribbon and tie in the center with a little piece of ribbon and glue on one side to decorate and at the other end you can also glue ribbon and curl with the scissors.
And you are done with this beautiful candy dispenser.
Image source:
https://www.google.com/search?q=jefe+en+pa%C3%B1ales&rlz=1C1OKWM_esVE972VE972&source=lnms&tbm=isch&sa=X&ved=2ahUKEwimzNPt0sn1AhWwaDABHSs1CTAQ_AUoAXoECAIQAw&biw=1360&bih=625&dpr=1
The rest of my work is original content.
And now it's my turn to say goodbye, but not before mentioning that my post is translated with DeepL, edited with HTML tags, and the photos are captured with my Blu G5 and edited with Pic Collage.
I hope you like my post and if so I'd love to see your comment.
Thank you very much for the support!
Greetings and blessings.
Me encanta este personaje te quedo divino, felicidades.
Hola @maryoris.marcano,muchas gracias... y que bueno que te gustó.
Feliz día.