
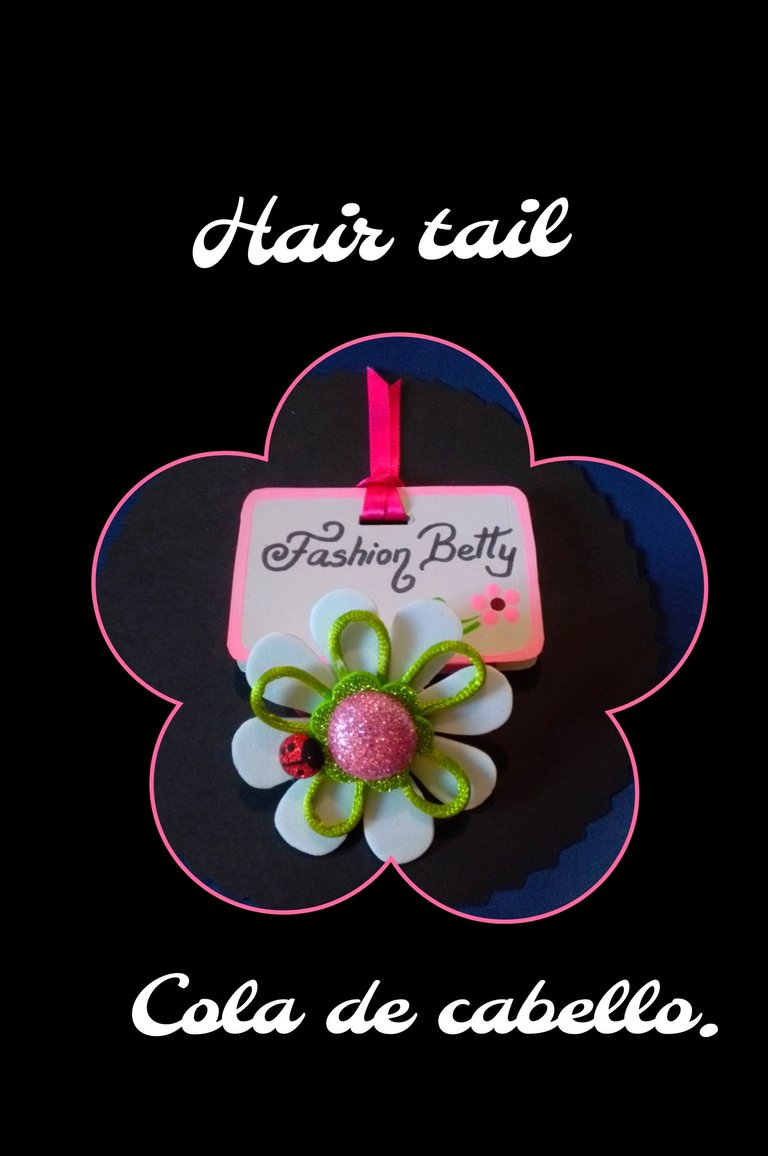
Hola amigos, cómo están?
Bienvenidos todos a mi Blog.
Para esto vas a necesitar:
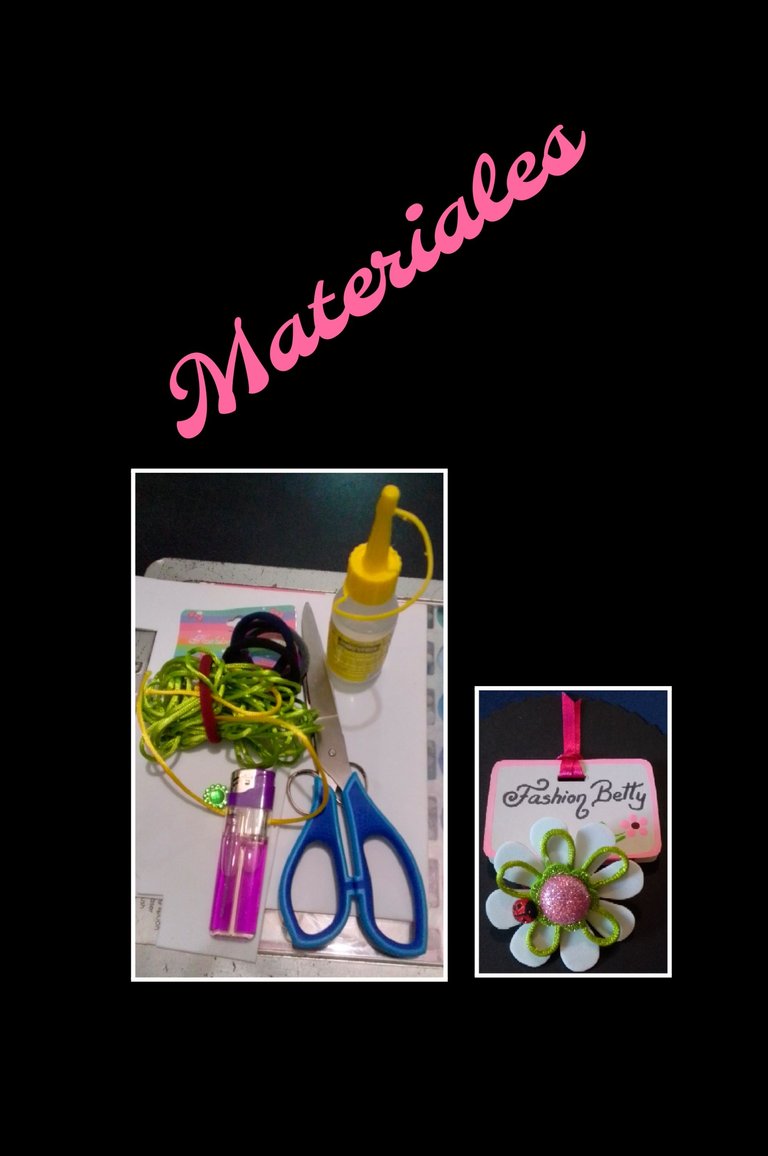
| Colas, ligas o moñeras | Foami mate y escarchado |
|---|---|
| Rabo de ratón o cordón | Cinta de raso |
| Gema | Silicón |
| Tijeras | Cuchilla |
| Pinturas y pinceles | Marcador |
| Molde | Encendedor |
| Cartulina | Plancha eléctrica |
Ahora comencemos:
Paso 1:
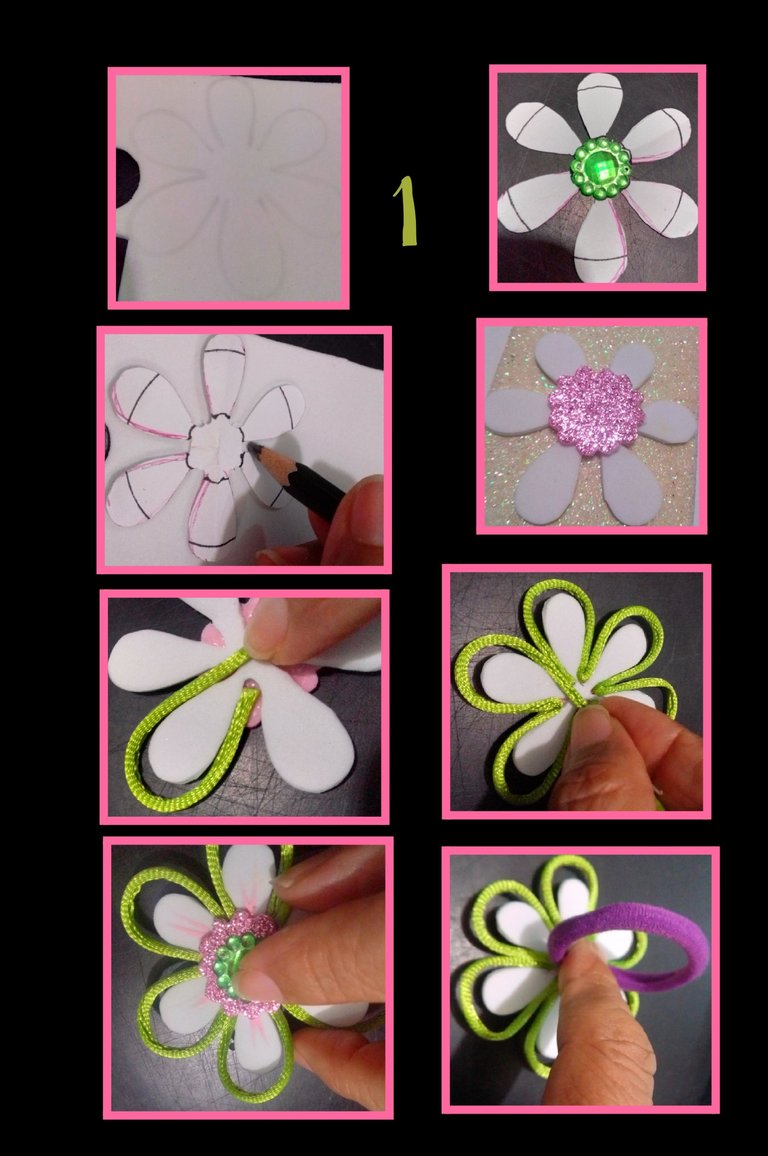
- Haz o calca el dibujo en papel o cartulina, recorta y marca sobre el foami.
-Recorta la flor y luego recorta con tijera de ondas el centro en foami rosado escarchado, pega en la flor de fondo y deja secar. - Ahora pega el rabo de ratón dando la forma del pétalo pero un poco más grande y aplica silicón en cada unión de los pétalos hasta formar otra flor.
- Aplica silicón en la parte posterior de la flor y pega la liga, haciendo presión hasta que fije bien y seque.
Paso 2:
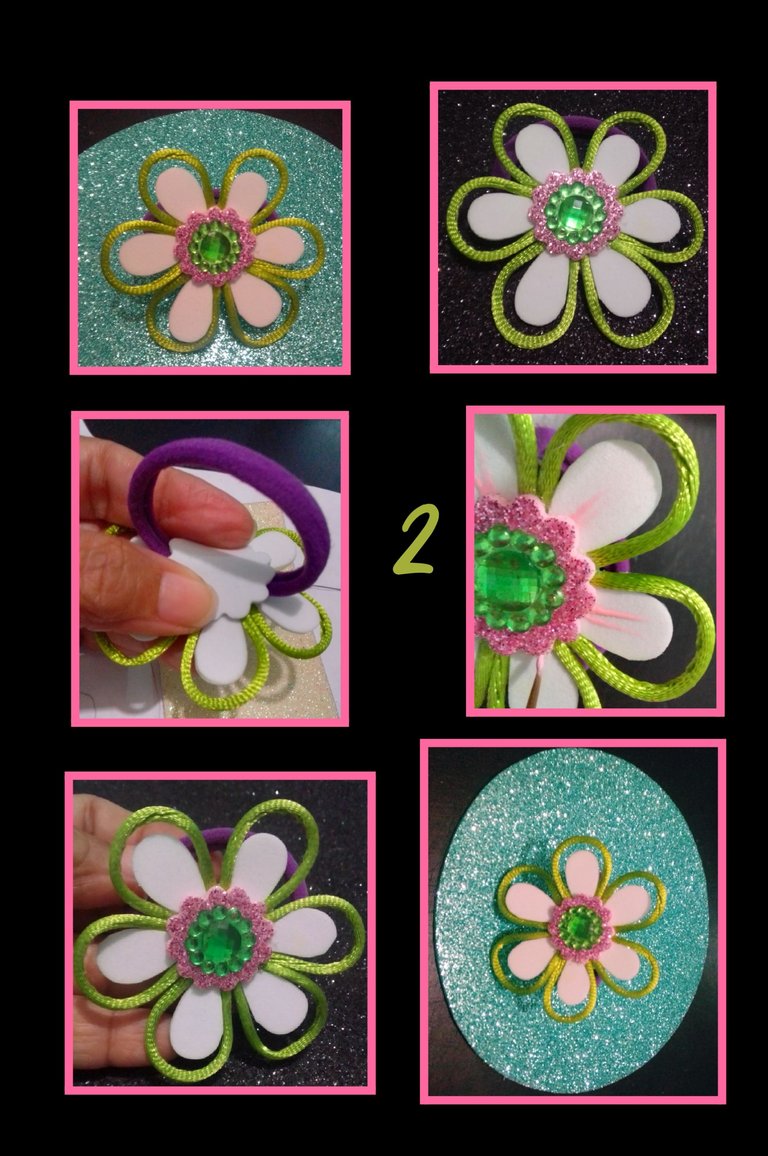
- Después de pegar la liga o cola, recorta otro círculo con la tijera de ondas y aplica silicón y pega para tapar y reforzar.
Así quedará lista la primera cola, puedes ver que es muy fácil de realizar.
Paso 3:

- Para la segunda cola, recorta igual una flor en foami, ahora aplica un poco de silicón en la parte central y ve armando uno a uno los 5 pétalos.
- Igual recorta el centro pero en verde escarchado y pega en el centro, deja secar.
- Aparte recorta un círculo en foami rosado y coloca sobre la plancha caliente para que tome volumen y pega en el centro.
- Luego aplica silicón en la parte posterior y pega la liga, deja secar, recorta otro círculo y pega en la parte posterior para asegurar la liga.
Paso 4:
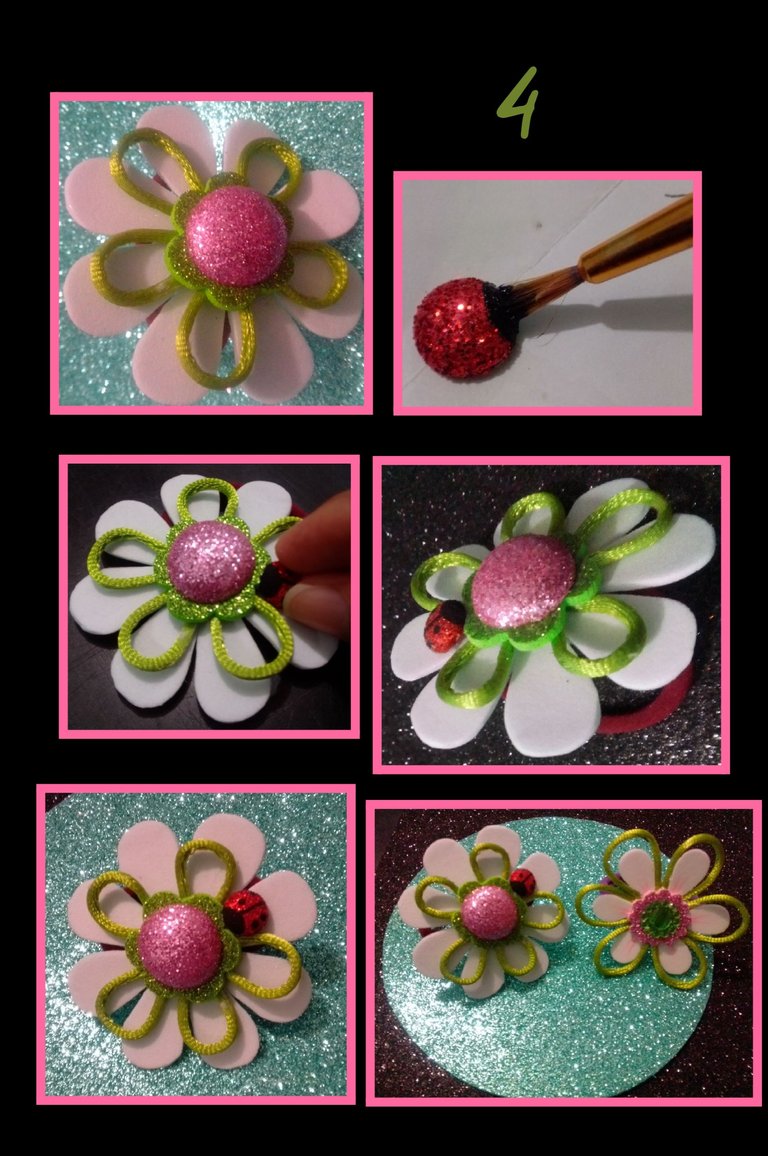
- Lista la cola, recorta otro círculo en rojo y dale forma con la plancha, pinta una media luna y pon lunares en la parte de arriba para para hacer un coquito o mariquita, deja secar y pega a un lado del centro.
Así quedaron ya listas.
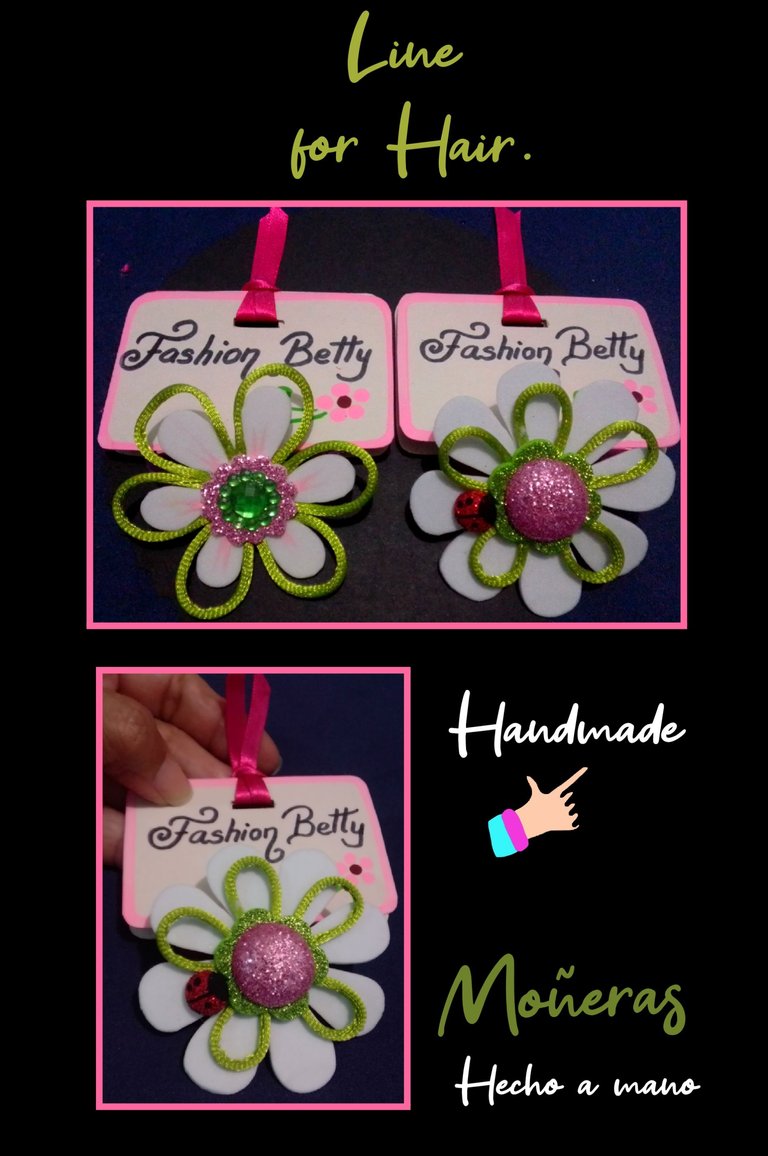
Paso 5:

- Vamos a elaborar unas bonitas etiquetas personalizadas para nuestras colas, jajajaja yo le dí mi toque personal colocando por nombre "Fashion Betty" y así quedarán listas para obsequiar o vender.
- Recorta dos rectángulos o elabora tu propio diseño en cartulina y haz cortes en el centro, dobla como ves en la foto y en el centro en la parte de arriba de cada lado haz una pequeña abertura con la ayuda de una cuchilla o saca bocados para insertar la cinta.
- Pinta la orilla de la etiqueta y coloca el nombre que prefieras y decora a tu gusto.
Paso 6:

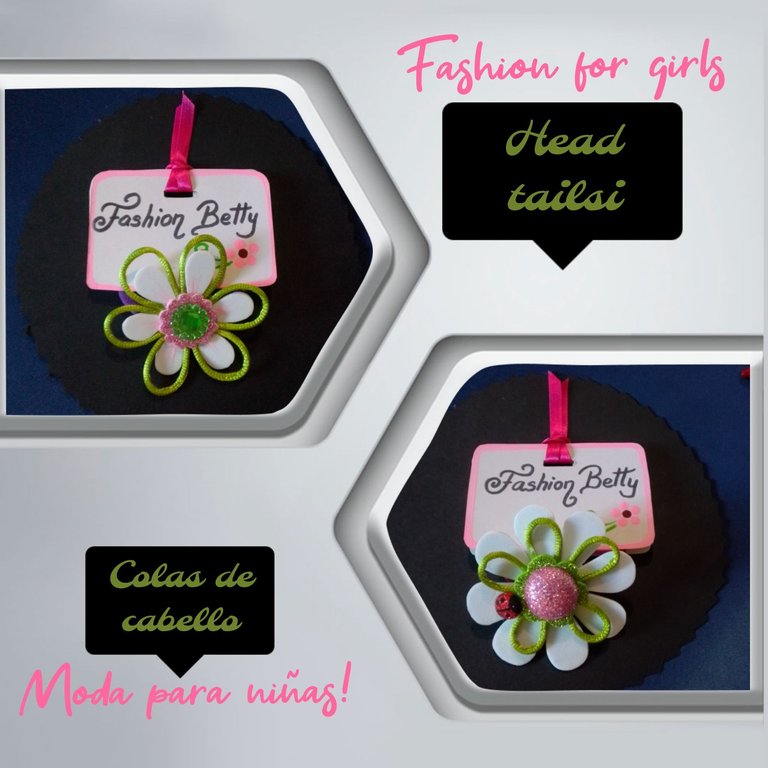
- Estira la cola y mete en el medio de la etiqueta, luego inserta un pedacito de cinta y anuda, así harás con la otra.
Espero te gusten!
Aquí te dejo unas fotos para que veas como lucen.
Traductor usado: DeepL
Etiquetas: HTLM
Teléfono: BLU G5
Editor de fotos: GridArt
Solo queda despedirme esperando haya sido de tu agrado mi publicación y deseando te sirva de guía.
Muchas gracias a todos los que me visitan, por leerme y apoyarme.
Saludos y hasta mi próximo tutorial.
Hello friends, how are you?
Welcome to my Blog.
For this you will need:
| Colas, rubber bands or bows | Matte and frosted foami |
|---|---|
| Mouse tail or string | Satin ribbon |
| Gem | Silicone |
| Scissors | Blade |
| Paints and paintbrushes | Marker |
| Mold | Lighter |
| Cardboard | Electric Iron |
Now let's get started:
Step 1:
- Make or trace the drawing on paper or cardboard, cut out and mark on the foami.
-Cut out the flower and then cut out the center with wave scissors in frosted pink foami, glue on the background flower and let it dry. - Now glue the mouse tail giving the shape of the petal but a little bigger and apply silicone on each union of the petals to form another flower.
- Apply silicone on the back of the flower and glue the rubber band, pressing until it sets well and dries.
Step 2:
- After gluing the garter or glue, cut out another circle with the wave scissors and apply silicone and glue to cover and reinforce.
This is how the first glue will be ready, you can see that it is very easy to do.
Step 3:
- For the second tail, cut out a flower in foami, now apply a little silicone in the central part and one by one assemble the 5 petals.
- Cut out the center but in frosted green and glue it in the center, let it dry.
- Cut out a circle in pink foami and place it on the hot plate so that it takes volume and glue it in the center.
- Then apply silicone on the back and glue the rubber band, let dry, cut out another circle and glue on the back to secure the rubber band.
Step 4:
- Ready the glue, cut out another circle in red and shape it with the iron, paint a half moon and put polka dots on the top to make a pussy or ladybug, let dry and glue to one side of the center.
This way they are ready.
Step 5:
- We are going to make some nice personalized tags for our tails, hahaha I gave it my personal touch by placing the name "Fashion Betty" and so they will be ready to give away or sell.
- Cut out two rectangles or make your own design on cardboard and make cuts in the center, fold as you see in the photo and in the center at the top of each side make a small opening with the help of a knife or punch to insert the ribbon.
- Paint the edge of the label and place the name of your choice and decorate to your liking.
Step 6:
- Stretch the tail and tuck it in the middle of the tag, then insert a small piece of ribbon and tie a knot, and so will you do with the other one.
Hope you like them!
Here are some pictures so you can see what they look like
Translator used: DeepL
Tags: HTLM
Phone: BLU G5
Photo editor: GridArt
It only remains to say goodbye hoping you liked my publication and wishing it will serve you as a guide.
Thank you very much to all who visit me, for reading and supporting me.
Greetings and until my next tutorial.
Hola @elmundodebetty, que colitas tan cuchis para las princesas de la casa, los colores están geniales , además una gran idea para trabajar con rabo de ratón, gracias por compartir.
Saludos!
Hola amiga, me alegro mucho que te hayan gustado y gracias a ti por comentar.
Saludos.
Lindísimas. Los dos diseños de ven preciosos. Me encantó esa idea de presentación. Muchas gracias por compartir 😊
Gracias amiga Lelys, por pasar por aquí.
Y que bueno que te gustaron.
Un placer para mi compartir con ustedes.
Hermosa manualidad @elmundodebetty felicidades, cada detalle la hacen más hermosas. Buen trabajo. Saludos y gracias por compartir.
Hola amiga @mariela-b muchas gracias por tu comentario.
Y a tí por comentar.
Saludos.
Amiga te quedaron Bellas estás colitas,ideales para las princesas de la casa.
Congratulations @elmundodebetty! You have completed the following achievement on the Hive blockchain And have been rewarded with New badge(s)
Your next target is to reach 40000 upvotes.
You can view your badges on your board and compare yourself to others in the Ranking
If you no longer want to receive notifications, reply to this comment with the word
STOPCheck out our last posts:
Muy útiles y hermosas. Los materiales son sencillos de conseguir, muy buena tu idea de creación. Muchas gracias por compartir.
Una vez más la sacas de jonron como dicen, están hermosas estás colas que hiciste mi amiga, que Dios te bendiga
Muchas gracias.