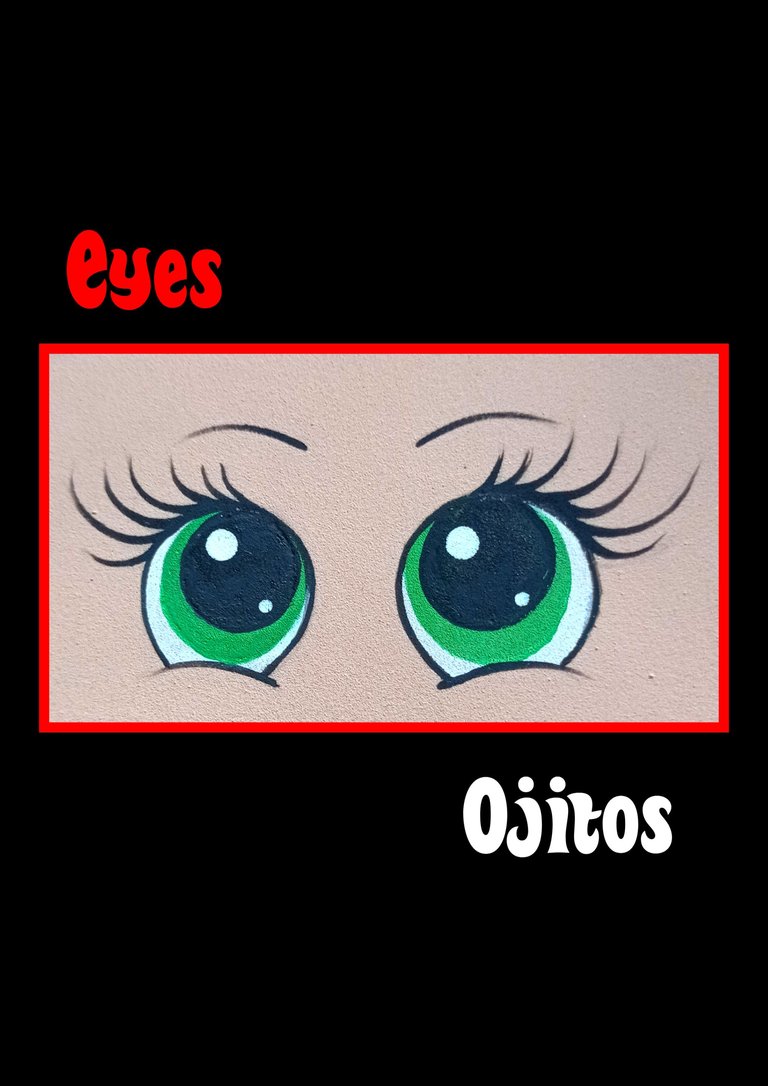
Feliz inicio de semana mis queridos amigos que me visitan, cómo están?
Lo primero que tendrás que buscar son los materiales.
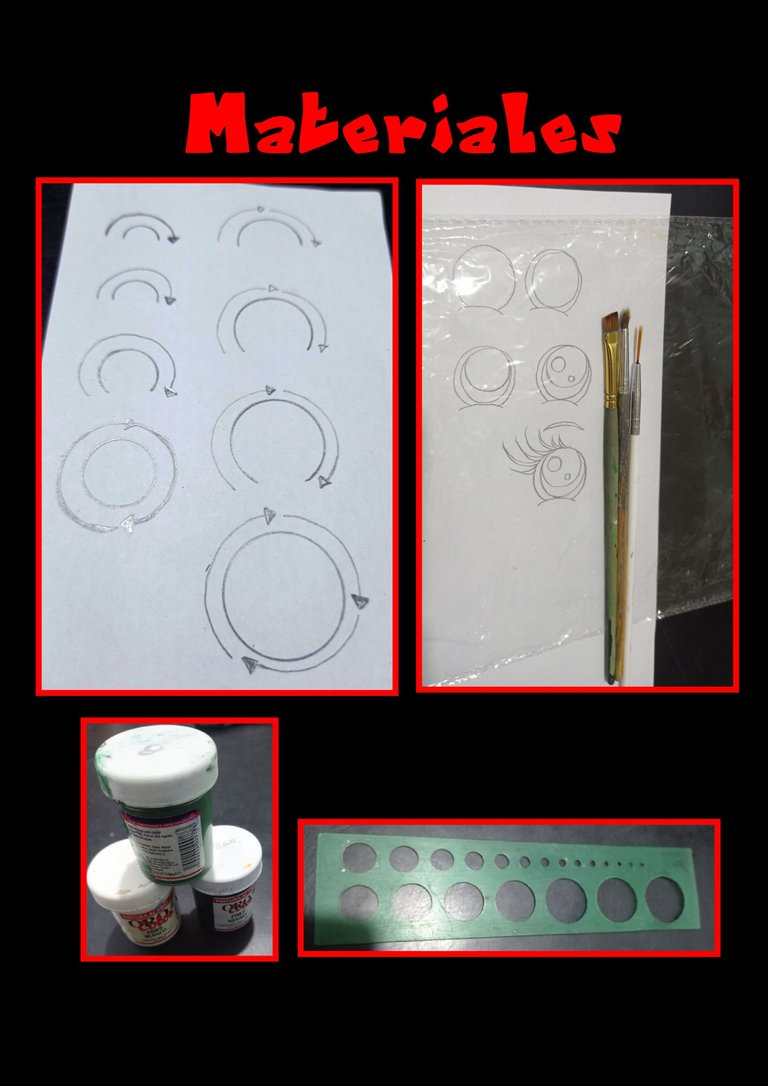
| Regla de círculos | Pinturas al agua |
|---|---|
| Pincel plano o angular | Pincel liner largo o corto |
| Papel bond | Lámina de acetato o papel celofan transparente |
| Pinturas |
Nota: el pincel liner se usa para delinear o hacer trazos muy delgados, pero también puedes usar pinceles 00 ó 000.
Si no tienes plantilla de círculos, puedes usar monedas, botones u algún objeto circular.
Comencemos:
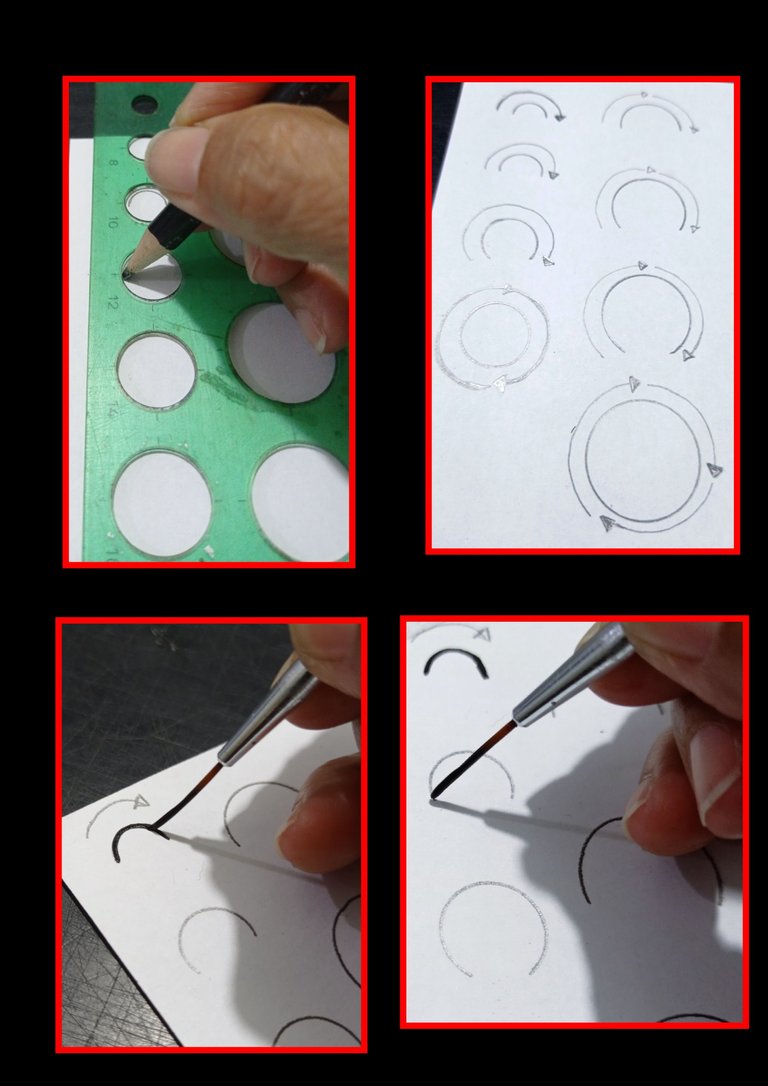
- Lo primero que harás usando la regla y el lápiz será trazar o dibujar 1/4 del círculo pequeño.
- Luego dibujas la mitad del círculo.
- Después 3/4 del círculo y por último la circunferencia completa.
- Ahora toma el otro lado de la regla pero con los círculos más grandes y repite el paso anterior, pero como puedes observar en la segunda foto tienes sobre cada trazo unas flechas que te van indicando el movimiento que le darás con el pincel.
- Ahora, moja el pincel en la pintura negra y comienza a pintar de izquierda a derecha tratando en lo posible de seguir la línea marcada y en un solo trazo, esto lo harás hasta llegar al tercer dibujo de la parte izquierda.
- Ya para pintar el círculo completo debes comenzar de izquierda a derecha y llegar hasta donde puedas, luego moja nuevamente el pincel y sigue el recorrido hasta cerrar el círculo.
- Nuevamente moja el pincel con pintura y comienza a pintar el otro lado pero, como los círculos son más grandes, tendrás que hacer dos trazos, el primero llegando justo a la mitad, luego moja nuevamente el pincel y completa hasta donde esté marcado como indican las flechas.
- Para hacer el círculo grande, tendrás que hacer 3 trazos siguiendo uno del otro como en los pasos anteriores.
(Estos pinceles largos, son muy buenos para hacer estos trazos ya que absorben o retienen más la pintura y el trazo lo podemos hacer más largo.)
Recomendación: Estos pasos, los puedes realizar varias veces como tarea diaria, verás como cada día se te harán menos difícil e irás dominando tu pulso y pincel.
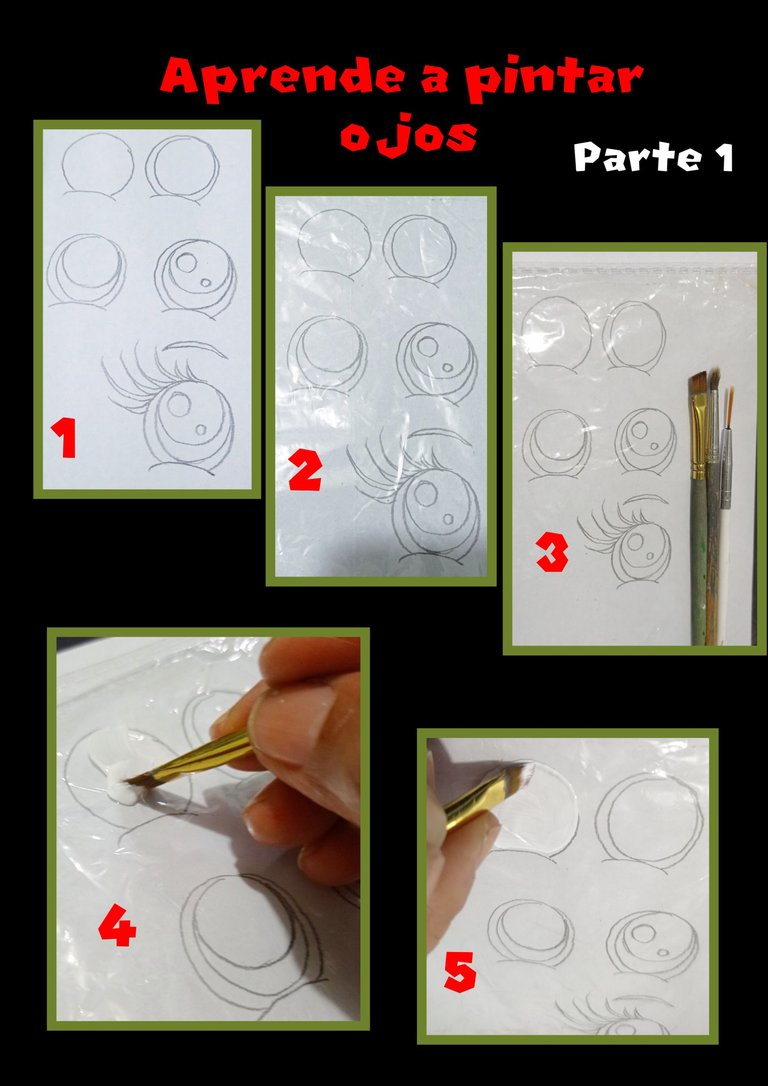
- Después que hayas practicado los primeros pasos y tengas más dominio con el pincel, puedes dibujar, calcar o imprimir unos ojitos fáciles de pintar.
- Luego coloca una lámina de acetato o papel celofan transparente sobre el dibujo.
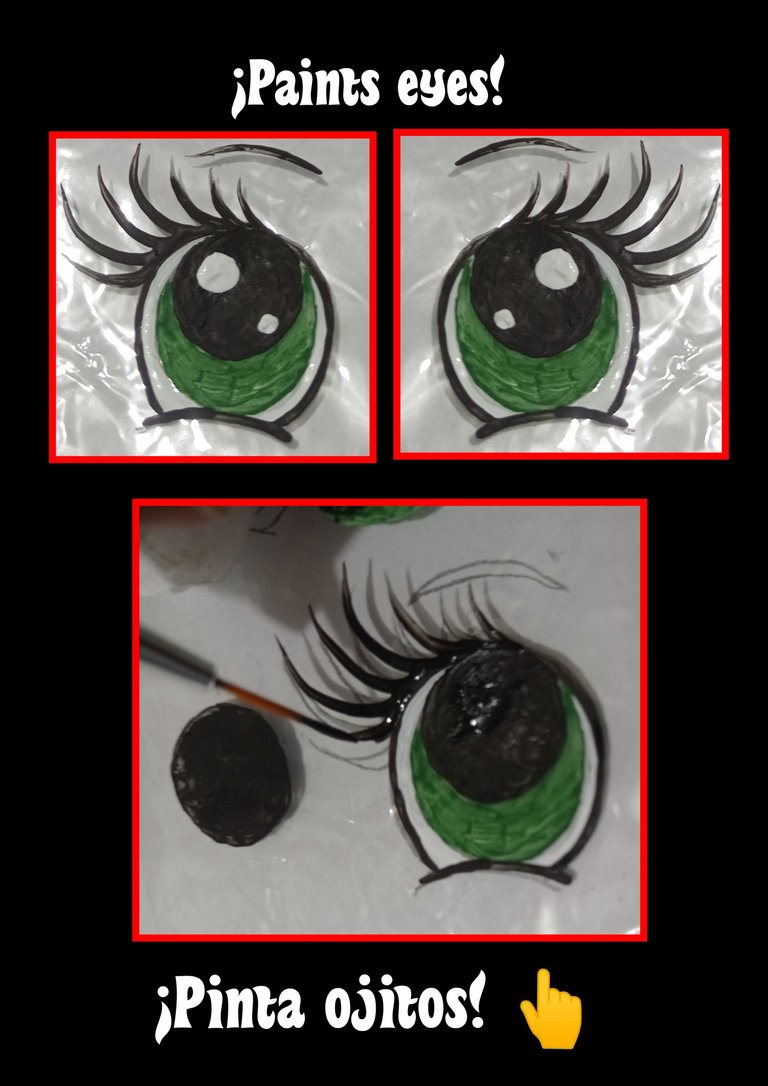
- Ahora busca tus pinceles y comienza a rellenar con pintura blanca todo el ojo usando un pincel plano o angular de cerda suave y deja secar.(foto 5)
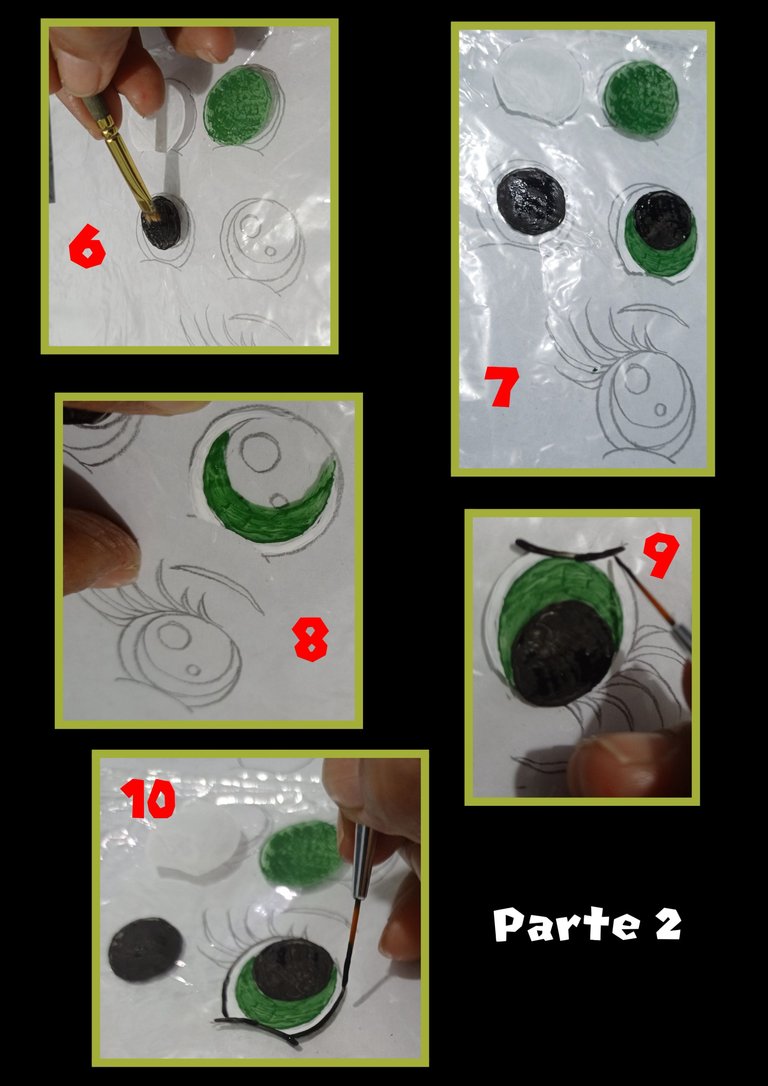
- Ahora rellena el otro círculo con pintura verde y deja secar, repite el procedimiento con el círculo más pequeño y rellena con negro. (esto para ir practicando).
- Luego con el pincel liner puedes rellenar con pintura blanca la orilla del ojo, luego con el pincel plano o uno más ancho que el liner, rellena con verde y seguido con negro.
- Hecho esto, delinea la parte baja del ojo, a mí me es más fácil voltear el ojo y hacer el trazo, pero todo es cuestión de costumbre, luego pinta todo el borde del ojo con el pincel liner.
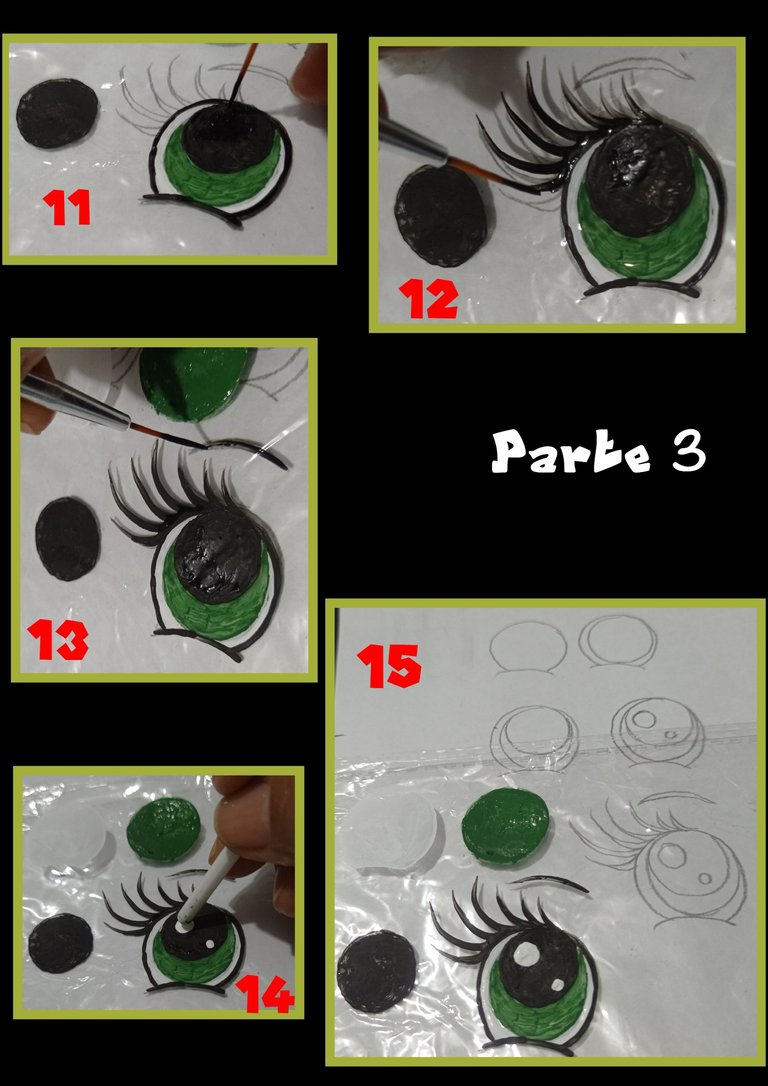
- Después de cerrar y pintar todo el borde, comienza a hacer trazos en forma de coma, para hacer las pestañas, las primeras más cortas y las últimas más largas.
- Luego pinta la ceja y por último pon unos puntos de luz con la parte trasera del pincel, así quedará listo este ojito.

(Te recomiendo uses la lámina de acetato ya que puedes colocar varias veces sobre el dibujo y pintar, practicar y luego lavar y así quedará lista para practicar las veces que quieras.)
Recuerda que debes dejar secar bien la pintura para aplicar otra capa, esto para el foami, tela, cartulina, cartón y otros pero, para el acetato, papel celofán o vidrio la pintura a base de agua no se adhiere, si le aplicas otra capa encima se puede despegar la primera así que,para practicar debes hacerlo con cuidado.
Mi teléfono es un Redmi Note 9
El editor de fotos de collage es GridArt
Mis redes sociales: X elmundodebetty
instagram: elmundodebetty.
Bueno espero que aunque largo mi tutorial, te sirva de guía y puedas practicar hasta dominar tu pincel y pintes hermosos ojitos.
Ahora me despido, fué muy grato compartirles este paso a paso.
Si tienes alguna duda, con gusto te puedo ayudar.
Hasta mi próximo tutorial, espero verte por aquí y muchas gracias por tu apoyo y comentario.
Saludos.
ENGLISH:


Happy beginning of the week my dear friends who visit me, how are you?
The first thing you will have to look for are the materials.

| Circle ruler | Water-based paints |
|---|---|
| Flat or angled brush | Long or short liner brush |
| Bond paper | Acetate foil or transparent cellophane paper |
| Paints |
Note: the liner brush is used for outlining or making very thin strokes, but you can also use 00 or 000 brushes.
If you don't have a circle stencil, you can use coins, buttons or some circular object.
Let's start:

- The first thing you will do using the ruler and pencil will be to trace or draw 1/4 of the small circle.
- Then you draw half of the circle.
- Then 3/4 of the circle and finally the entire circumference.
- Now take the other side of the ruler but with the larger circles and repeat the previous step, but as you can see in the second picture you have arrows on each stroke indicating the movement you will give with the brush.
- Now, dip the brush in the black paint and start painting from left to right trying as much as possible to follow the marked line and in a single stroke, this you will do until you reach the third drawing on the left side.
- Now to paint the complete circle you must start from left to right and go as far as you can, then wet the brush again and follow the path until you close the circle.
- Again wet the brush with paint and start painting the other side but, as the circles are bigger, you will have to make two strokes, the first one reaching right to the middle, then wet the brush again and complete until the circle is marked as indicated by the arrows.
- To make the large circle, you will have to make 3 strokes following each other as in the previous steps.
(These long brushes are very good to make these strokes because they absorb or retain more paint and we can make the stroke longer).
Recommendation: These steps can be done several times as a daily task, you will see how each day will become less difficult and you will be mastering your pulse and brush.

- After you have practiced the first steps and have more mastery with the brush, you can draw, trace or print some easy to paint eyes.
- Then place a sheet of acetate or transparent cellophane paper over the drawing.
- Now find your brushes and begin to fill the whole eye with white paint using a flat or angled soft bristle brush and let it dry (photo 5).

- Now fill in the other circle with green paint and let it dry, repeat the procedure with the smaller circle and fill in with black (this is for practice).
- Then with the liner brush you can fill with white paint the edge of the eye, then with the flat brush or one wider than the liner brush, fill with green and then with black.
- Once this is done, outline the lower part of the eye, I find it easier to turn the eye and make the line, but it's all a matter of habit, then paint the entire edge of the eye with the liner brush.

- After closing and painting the entire edge, start making comma-shaped strokes to make the eyelashes, the first ones shorter and the last ones longer.
- Then paint the eyebrow and finally put some points of light with the back of the brush, this way this little eye will be ready.

(I recommend you to use the acetate sheet because you can place it several times over the drawing and paint, practice and then wash it and it will be ready to practice as many times as you want).
Remember to let the paint dry well to apply another layer, this for foami, fabric, cardboard, cardboard and others, but for acetate, cellophane paper or glass the water based paint does not adhere, if you apply another layer on top it can peel off the first so, to practice you must do it carefully.
My phone is a Redmi Note 9
The collage photo editor is GridArt
My social networks: X elmundodedebetty
instagram: elmundodedebetty.
Well I hope that although my tutorial is long, it will serve as a guide and you can practice until you master your brush and paint beautiful eyes.
Now I say goodbye, it was very nice to share with you this step by step.
If you have any questions, I'll be glad to help you.
Until my next tutorial, I hope to see you here and thank you very much for your support and comments.
Greetings.
Has sido votado por
PROYECTO ENLACE
'Conectando Ideas y Comunidades'
PROYECTO ENLACE es un proyecto de curación de habla hispana enfocado en recompensar contenido de calidad y apoyar autores en su proceso de crecimiento en HIVE.
Creemos y apostamos por el futuro de esta gran plataforma, y estamos muy emocionados de poder hacerla crecer junto a esta comunidad. Así que te invitamos a publicar en nuestra COMUNIDAD y estar atento a todas las actividades que tenemos preparadas y que estaremos publicando en breve.
¿QUIERES AUTOMATIZAR TUS GANANCIAS DE CURACIÓN? SE PARTE DEL PROYECTO ENLACE APOYANDO A NUESTRO TRAIL EN HIVE.VOTE INGRESA AQUÍ PARA CONOCER LOS DETALLES.
¿QUIERES INVERTIR ENLACE? DESCUBRE COMO HACERLO Y GENERAR INGRESOS DE FORMA SEMANAL MEDIANTE TU DELEGACIÓN DE HP AQUÍ TE EXPLICAMOS COMO.
Te invitamos a participar en nuestro servidor de Discord: https://discord.gg/3S9y7BbWfS
Atentamente
EQUIPO ENLACE 2024
Muchas gracias @enlace por apoyar mi publicación y por la invitación.
Saludos.
Esto es un excelente aporte mi querida Betty, recordé mis clases de esto cuando estaba aprendiendo cerámica, creo que mi profesora no fue tan explícita como tú en cuanto a la técnica, me encantó toda tu explicación
Hola querida amiga, habia quedado sin internet y publiqué pero me faltó subir la foto de inicio, pero bueno ya ahorita la edité y no sé si salió ya que no soy experta en eso de editar jajajaja, pero bueno vale es la explicación y me alegra mucho que te haya gustado.
Muchas gracias por siempre apoyar mi trabajo.
Saludos y bendiciones.
¿ᴺᵉᶜᵉˢᶦᵗᵃˢ ᴴᴮᴰ? ᵀᵉ ˡᵒ ᵖʳᵉˢᵗᵃᵐᵒˢ ᶜᵒⁿ @ruta.loans
Hola, @rutablockchain!
¡Que bueno verte por aquí!