Hola queridos amigos.
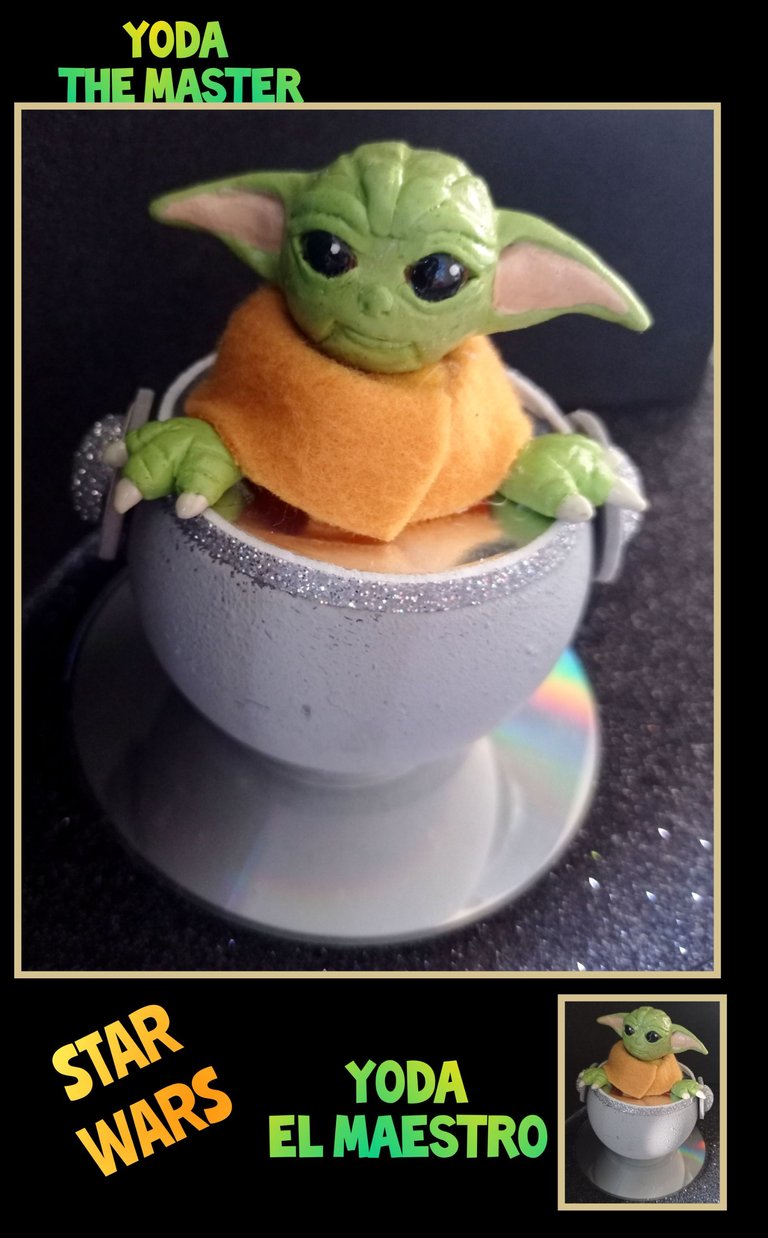
Me atreví a realizar modelando plastilina, demás está decirle que siempre he admirado las esculturas del creador @gaboamc2393, de verdad que es un artista a la hora de elaborar sus piezas ya que es un trabajo de paciencia, destreza, habilidad y conocimiento... bueno decidí hacerle a mi sobrino un obsequio para mañana que estará de cumpleaños (10) ya que le gusta mucho este personaje.
Ahora les diré que no me fue fácil ya que ustedes saben que me encanta trabajar con foami y otros materiales y son muy pocas las cosas que he realizado con masa y plastilina, y la última es blanda y aceitosa, jajajaja...pero viendo también se aprende y espero con el tiempo ir mejorando.
Así que elaboré Cabeza y manitos ya que él quería a Yoda montado en una nave y bueno tenía un bombillo dañado y un cd y le hice un simulacro de nave... jajajajaja espero le guste.
Ahora sí ya es hora de comenzar:
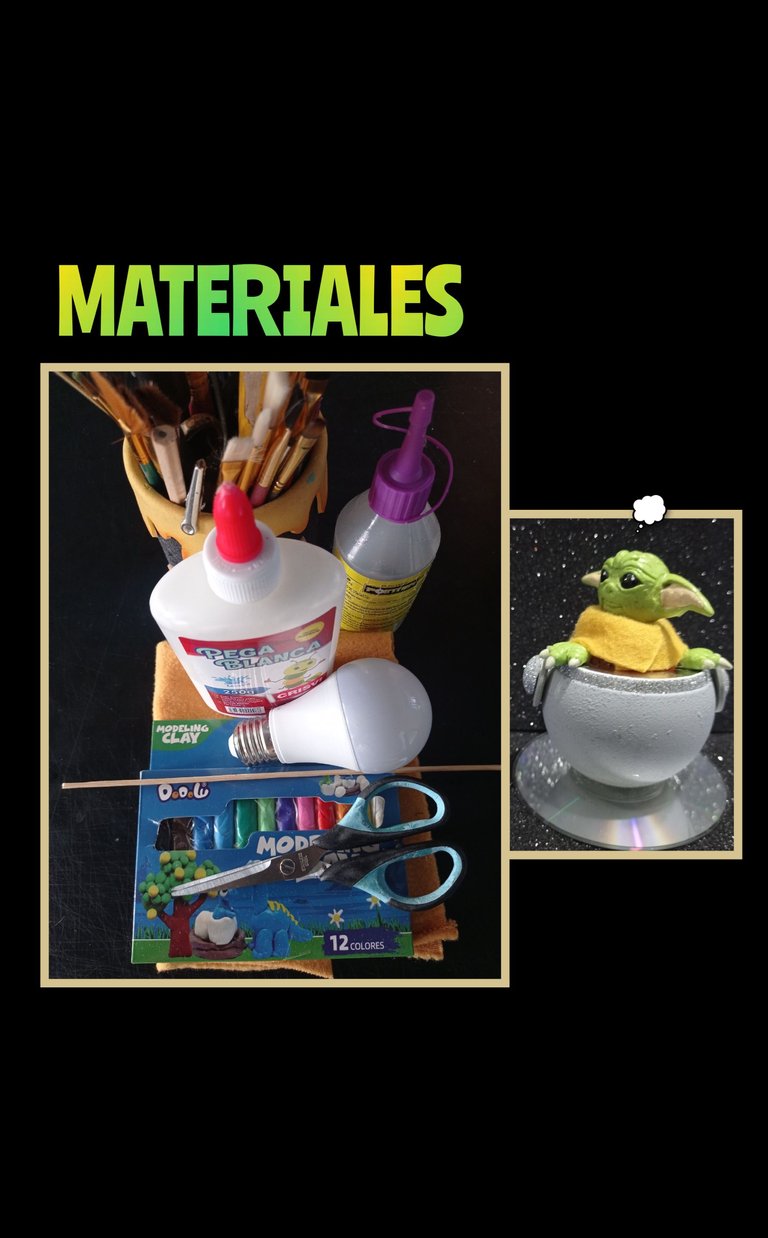
Plastilina de colores
Bombilla dañada (reciclada)
Cd. dañado.
Retazo de tela
Cola blanca
Silicon
Anime (icopor)
Cuchilla y tijera
Palito de madera
Paso 1:
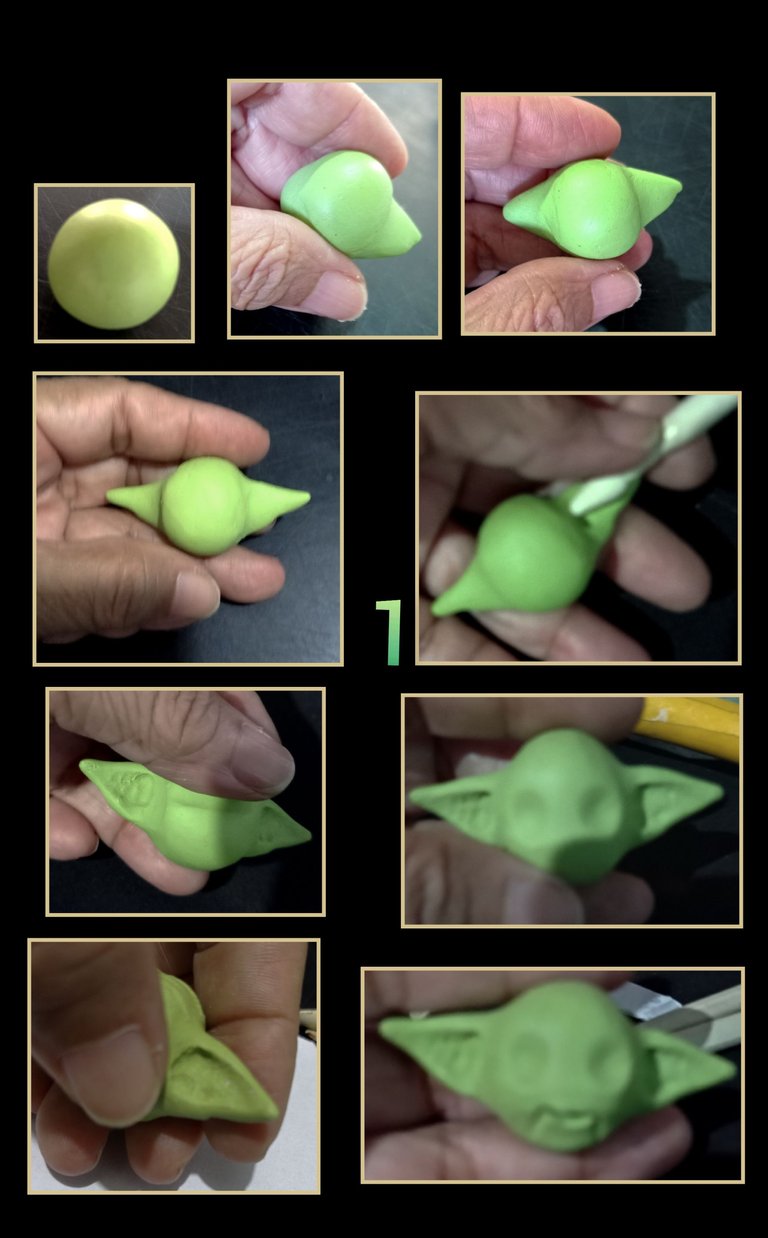
- Primero haz una bolita con la plastilina verde, luego presiona a los lados con ambas manos para ir dando la forma a las orejas.
- Luego ve estirando y haciendo como especie de conos, después con un palito o buril vas presionando para dar profundidad en la parte de adentro de las orejas y luego on las yemas de los dedos alisa.
- Ahora haz presión en medio de la carita para luego con un objeto redondo marcar los ojos y luego con una cuchilla u objeto delgado (palito de madera) haz una pequeña incisión para hacer la boca, siempre guiándote y viendo los rasgos de Yoda en una foto.
Paso 2:
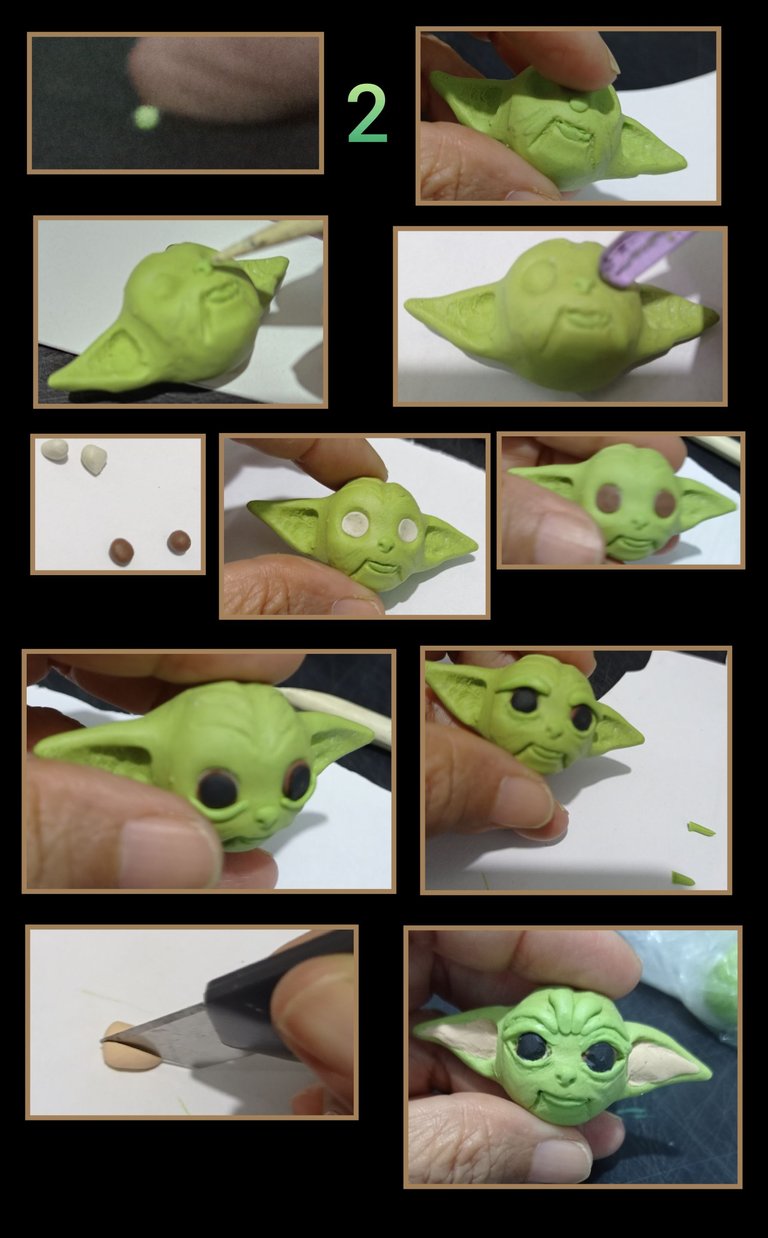
- Haz una pequeña bolita y pega como nariz, haz un poco de presión y luego con el palito de madera haz los orificios de la nariz, nuevamente profundiza la fosa de los ojos.
- Ahora haz 3 pares de bolitas para los ojos e introduce primero las blancas, luego las marrones y por último las negras, aplana un poco, aparte haz los parpados y la parte de la frente como se ven en la foto.
- Luego con color piel haz un triángulo, recorta a la mitad y estira en las orejas.
Así va la carita.
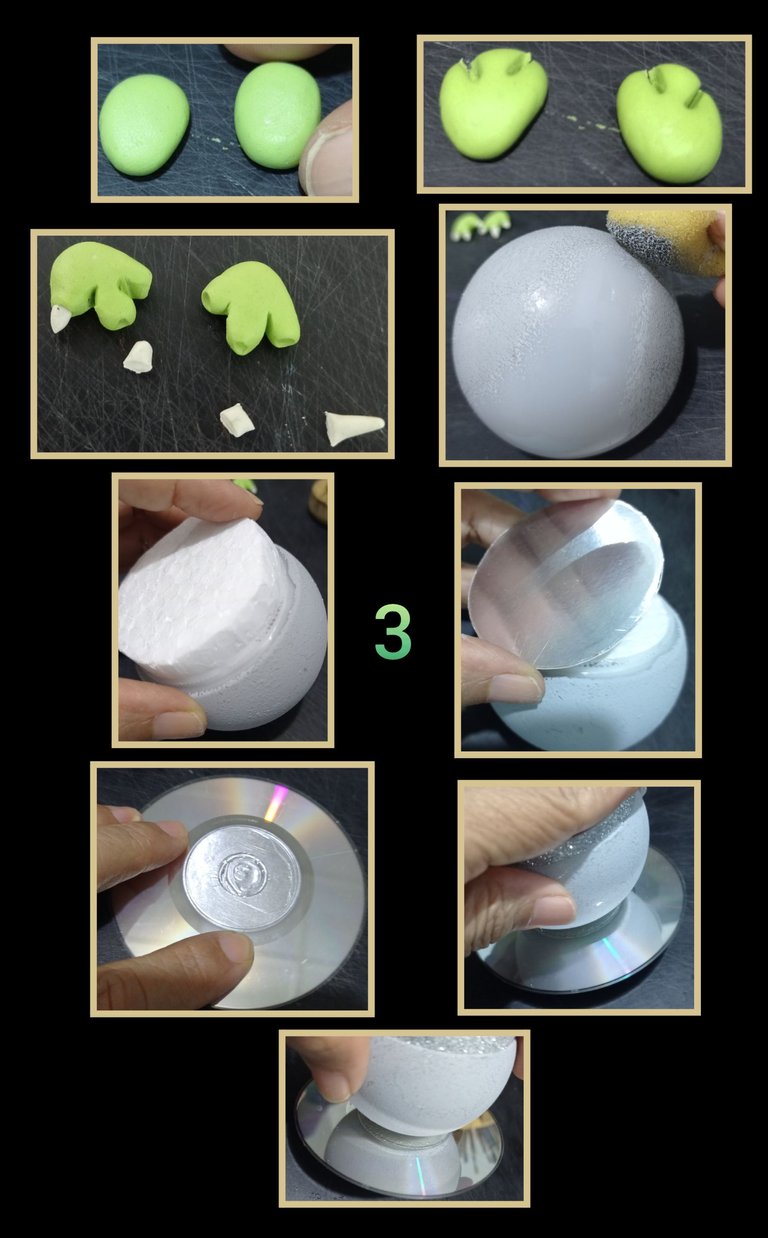
- Ahora has dos bolitas ovaladas y haz dos cortes en cada una para armar las manos.
- Ve redondeando los dedos y luego con un palito presiona las puntas para pegar e insertar las uñas y haz líneas como falanges.
- Ahora con una esponja o pincel pinta la bombilla y deja secar, después recorta un pedazo de anime e inserta dentro de la bombilla, luego recorta un pedazo de cartulina o foami plateado y pega sobre el anime.
- Luego aplica silicón en el centro del cd y pega.

- Aplica un poco de cola blanca a las manos y cara después riega con un pincel y deja secar, esto es para endurecer la plastilina.
- Luego recorta un retazo de tela y haz una media luna tipo cuello y pega sobre la bombilla, se me olvidó mencionar que debes pegar una tapita o pedacito de anime en el centro para formar el busto y luego pegar la tela.
- Puedes decorar con una tira de foami plateado.
- Pega las manitos y por último inserta un palito en la parte baja de la cabeza, aplica silicón y pega haciendo un poquito de presión.
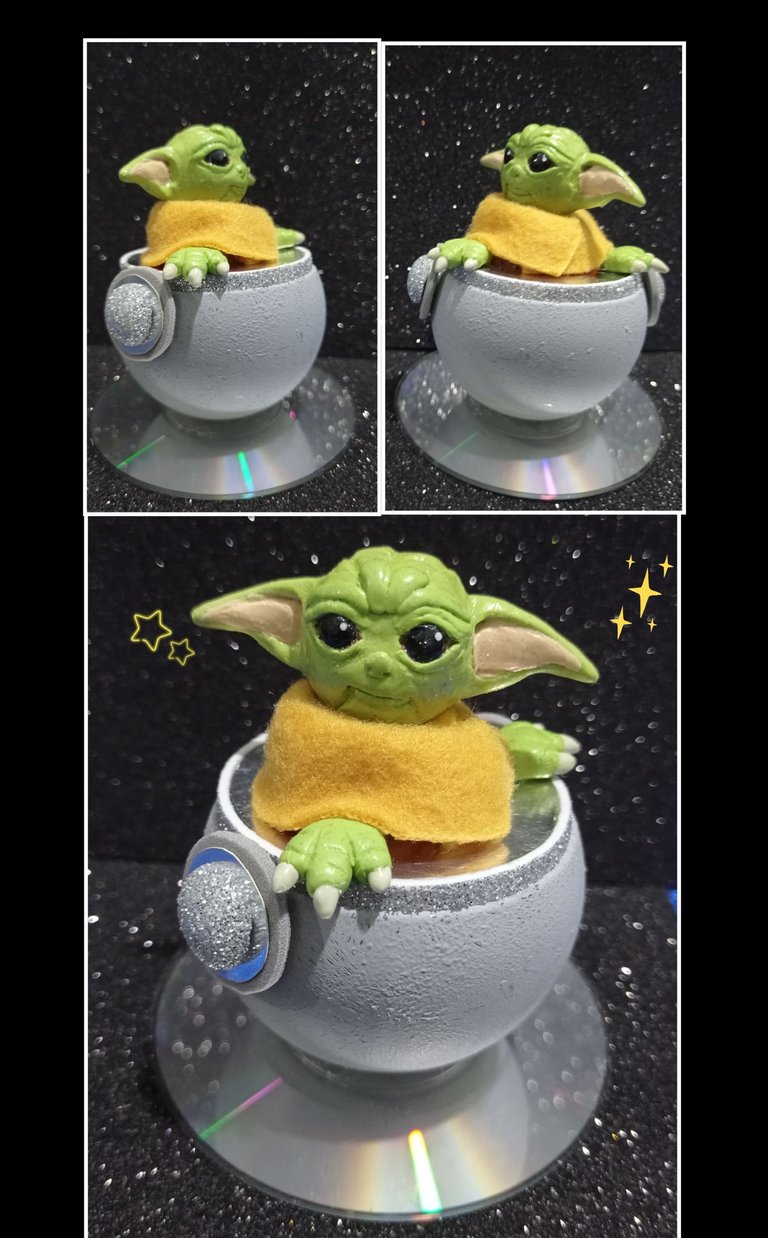
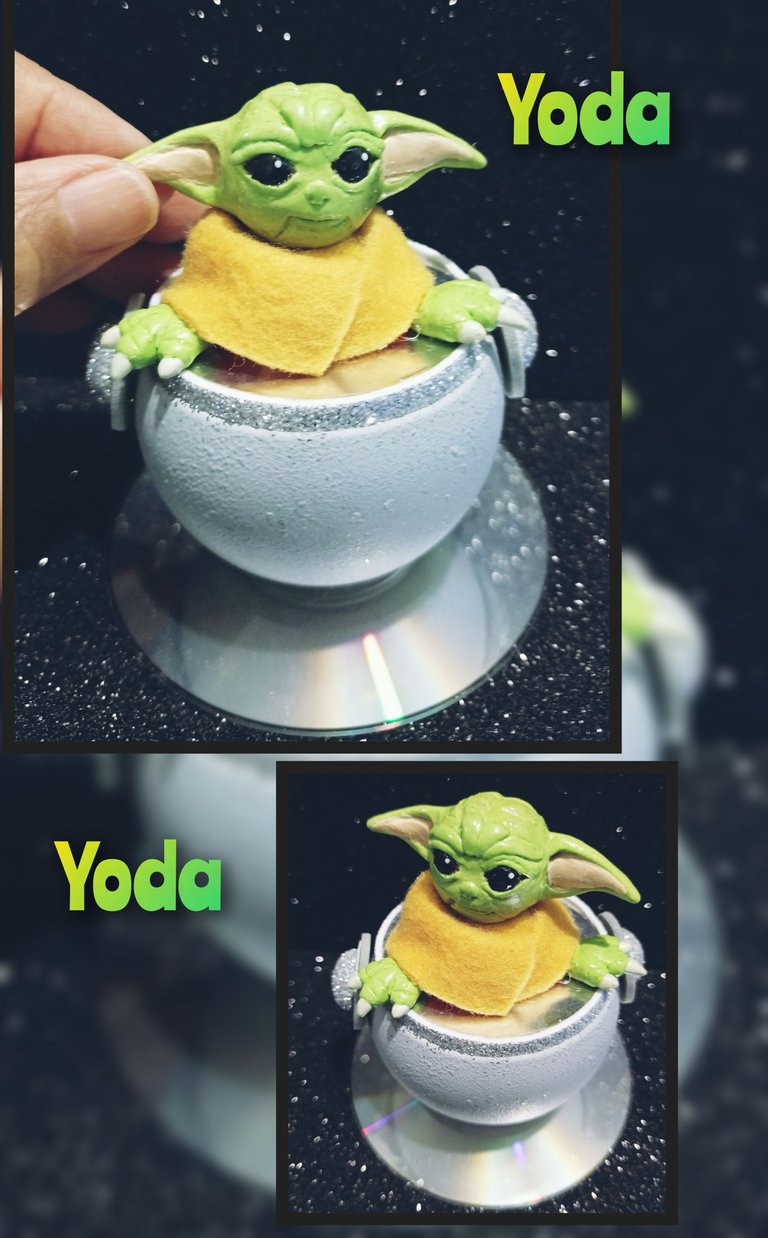
Te muestro unas fotos de mi Yoda!
fuente:
https://www.pinterest.es/pin/476255729361485031/
Mi traductor: DeepL
Etiquetas HTML
Teléfono Redmi Note 9
Editor de fotos: GridArt
Y llegó la hora de despedirme no sin antes agradecer su tiempo, visita y si deseas dejar algún comentario, me encantará responderte, muchas gracias por tu apoyo.

Espero te guste mi publicación!.
Saludos
English:
Hello dear friends.
I made this little character Yoda, from Star Wars that I dared to make modeling plasticine, it is not necessary to tell you that I have always admired the sculptures of the creator @gaboamc2393, he really is an artist when it comes to making his pieces because it is a work of patience, skill, skill and knowledge .... Well, I decided to make my nephew a gift for his birthday tomorrow (10) since he likes this character very much.
Now I will tell you that it was not easy because you know that I love working with foami and other materials and there are very few things I have done with dough and plasticine, and the latter is soft and oily, hahahaha ... but watching you also learn and I hope to get better with time.
So I made Head and little hands because he wanted Yoda mounted on a ship and well I had a damaged light bulb and a cd and I made him a mock ship..... hahahahahaha I hope he likes it.
Now it's time to get started:
Colored Plasticine
Damaged light bulb (recycle)
Damaged cd.
Piece of cloth
White glue
Silicon
Anime (icopor)
Knife and scissors
Wooden stick
Step 1:
- First make a little ball with the green plasticine, then press the sides with both hands to give the shape of the ears.
- Then go stretching and making sort of cones, then with a stick or burin you are pressing to give depth in the inside of the ears and then with your fingertips smooth.
- Now make pressure in the middle of the face and then with a round object mark the eyes and then with a blade or thin object (wooden stick) make a small incision to make the mouth, always guiding you and seeing the features of Yoda in a photo.
Step 2:
- Make a small ball and glue as a nose, make a little pressure and then with the wooden stick make the nostrils, again deepen the eye socket.
- Now make 3 pairs of little balls for the eyes and insert first the white ones, then the brown ones and finally the black ones, flatten a little, apart make the eyelids and the part of the forehead as shown in the picture.
- Then with skin color make a triangle, cut it in half and stretch it on the ears.
This is how the face looks like.
- Now make two little oval balls and make two cuts in each one to make the hands.
- Round the fingers and then with a stick press the tips to glue and insert the nails and make lines like phalanges.
- Now with a sponge or brush paint the bulb and let it dry, then cut out a piece of anime and insert it inside the bulb, then cut out a piece of cardboard or silver foami and glue it over the anime.
- Then apply silicone to the center of the cd and glue.
- Apply some white glue to the hands and face then water with a brush and let dry, this is to harden the plasticine.
- Then cut out a piece of fabric and make a half-moon type neck and paste over the bulb, I forgot to mention that you must paste a cap or piece of anime in the center to form the bust and then glue the fabric.
- You can decorate with a strip of silver foami.
- Glue the little hands and finally insert a stick in the lower part of the head, apply silicone and glue with a little pressure.
Here are some pictures of my Yoda!
source:
https://www.pinterest.es/pin/476255729361485031/
My translator: DeepL
HTML tags
Redmi Note 9 phone
Photo editor: GridArt
And it's time to say goodbye, but not before thanking you for your time, visit and if you want to leave a comment, I will be happy to answer you, thank you very much for your support.
I hope you like my publication!
Greetings
Hola! Esto quedó bellísimo, gracias por mencionarme. Ciertamente es agradable ver cómo otros autores crean sus obras con materiales moldeables y mas agradable es que lo publiques en la comunidad.
Tienes mucho talento, si gustas puedes ver algunos de mis videos donde doy algunos tips y consejos que te puedes ser de utilidad.
https://peakd.com/created/lwgabo
!discovery 45
¡Hola Gabo!
Saludos, bendiciones y feliz tarde.😊 🙏
This post was shared and voted inside the discord by the curators team of discovery-it
Join our Community and follow our Curation Trail
Discovery-it is also a Witness, vote for us here
Delegate to us for passive income. Check our 80% fee-back Program
Muchas gracias por su apoyo @discovery-it
Nicely done!
Who doesn't love Baby Yoda, eh?
This made me smile:)
Gracias por comentar mi publicación!
Que bueno!
Saludos.
@yennysferm71 muchas gracias por el apoyo.
Esta espectacular ✨ tienes talento para trabajar esos materiales, no es nada facil moldear y tener la paciencia para realizar estos trabajos, por eso te felicito por ese resultado final genial ❤️
Hola Buhito, feliz me haces con tu comentario, que bueno que te gustó el resultado final.🌹
Que lindo trabajo no sabía se podía hacer eso del pegamento sobre plastilina muy buen trabajo me encanta la peli de star wars todo un clásico 😊
Hola amiga, sí cada día aprendemos algo, y si te animas a realizar algo con plastilina, te recomiendo visites al amigo Gabo https://peakd.com/created/lwgabo
el te enseñará mucho con sus tutoriales.
Si amiga.
@elmundodebetty gracias amiga hermosa por la recomendación ☺️
Waoooo que genial te quedo este baby yoda amiga, parece que ya lo habías hecho antes quedo increíble un trabajo bellísima, seguro tu sobrino lo amará.
Gracias amiga, no! ojalá me hubiera animado antes, pero bueno seguiré practicando.
Si, le gustó mucho!
Wuaoooo que lindo . Te felicito, te quedó muy lindo
Que bueno que te gustó amiga.
Y muchas gracias por comentar.
Asombroso trabajo! Que bueno ver a otros buenísimos artistas moldeadores, gracias por compartir
Tu comunidad artesana ahora es testigo

Muchas gracias por el apoyo y buen comentario.
Feliz de pertenecer a esta Comunidad @hive-130560
Que lindo te quedo el baby yoda , se agradece las fotos con el paso a paso , muy hermoso.
Muchas gracias @tecnotronics por tu comentario.
Hecho y compartido con mucho cariño.
Muy bonita tu escultura de Baby Yoda, de verdad te quedó el trabajo prolijo. Saludos