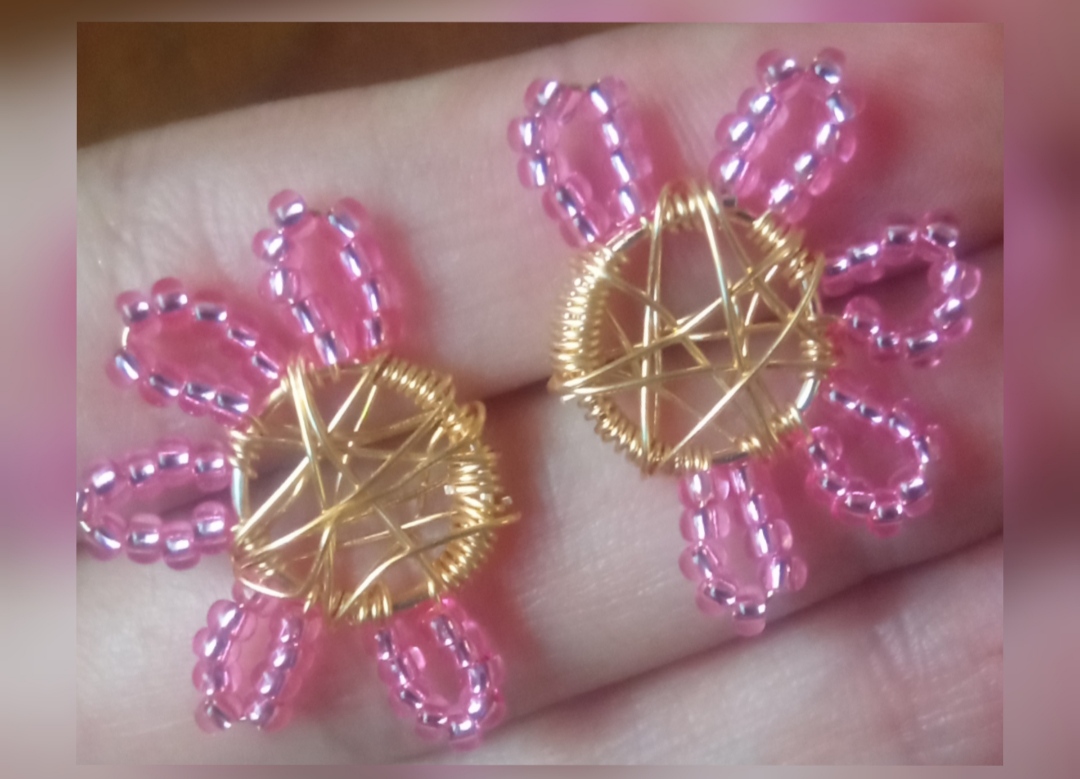
Feliz noche y bendecido día tengan todos ustedes, para mí es muy gratificante el pasar por esta comunidad y disfrutar de todas sus creaciones, la verdad hay mucho talento, en esta oportunidad quiero aprovechar de compartir con todos ustedes mi última creación. Se tratan de unos sencillos pero muy hermosos Zarcillos elaborados en Alambrismo, este diseño me encanta porque además de ser muy sencillo de elaborar también son muy económicos, ya que utilizaremos muy pocos materiales, pero les aseguro que el resultado les encantará.
Happy night and a blessed day to all of you, for me it is very gratifying to go through this community and enjoy all its creations, the truth is there is a lot of talent, in this opportunity I want to take the opportunity to share my latest creation with all of you.
They are simple but very beautiful tendrils made in wire mesh, I love this design because in addition to being very easy to make, they are also very cheap, since we will use very few materials, but I assure you that you will love the result.
This is a small size design, and very comfortable to use, here I share a simple tutorial where I show you my elaboration process step by step for all of you.
- Alambre de bisutería calibre 20.
- alambre de bisutería calibre 26.
- Mostacillas rosadas.
- tubo circular pequeño.
- Pinza de bisutería.
- 20 gauge jewelry wire.
- 26 gauge jewelry wire.
- Pink beads.
- small circular tube.
- Jewelry tweezers.
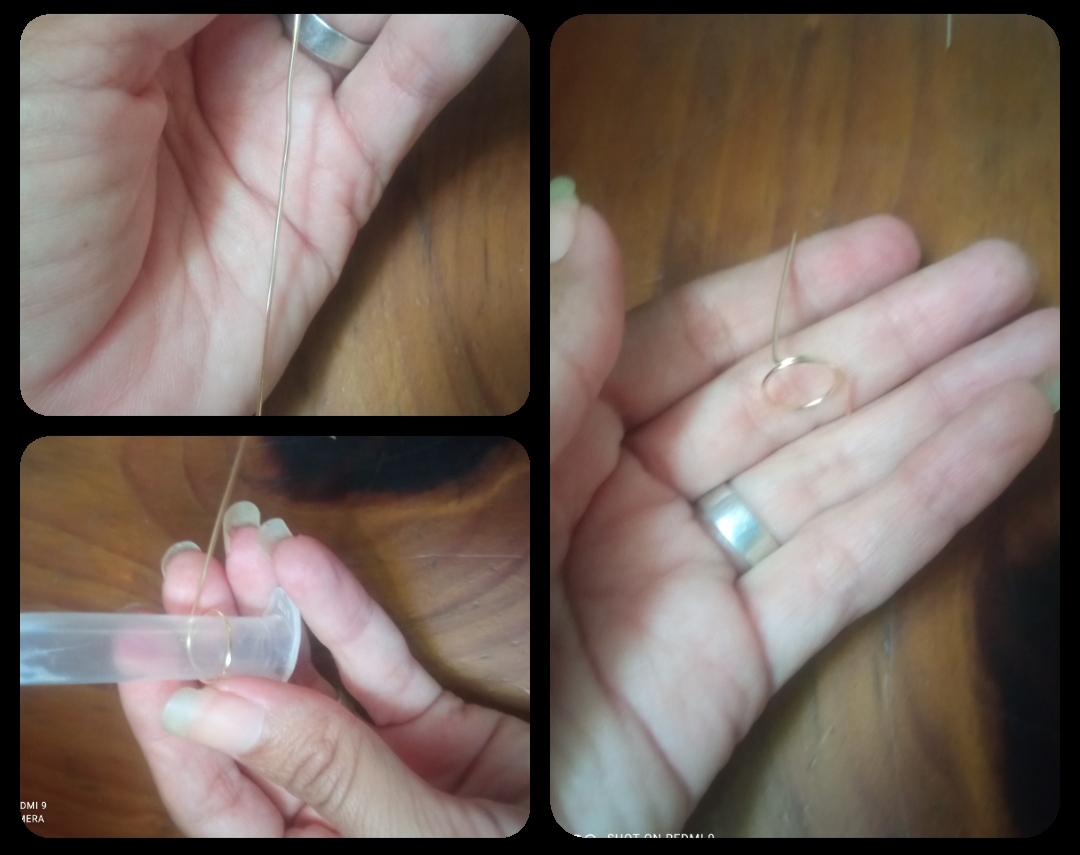
✴️ Paso 1: lo primero que debemos hacer picar un pedazo de alambre de bisutería calibre 20 de aproximadamente 6cm, el cual usaremos para realizar la base de nuestro zarcillo. Para ello tomaremos el tubito, en mi caso tome de molde una geringa pequeña de esas de 3cc y con ella pude moldear una pequeña forma circular, iniciando en uno de los extremos del alambre, una vez elaborado el circulo lo que nos sobra de este alambre lo doblaremos hacia la parte de atrás de él circulo, si es muy largo podemos cortar un poco ya que este será el clavito para colocar nuestro zarcillo.
✴️ Step 1: the first thing we must do is chop a piece of 20-gauge jewelry wire of approximately 6cm, which we will use to make the base of our tendril.
For this we will take the tube, in my case I took a small syringe of those 3cc as a mold and with it I was able to mold a small circular shape, starting at one of the ends of the wire, once the circle has been made what is left of this wire we will fold it towards the back of the circle, if it is very long we can cut a little since this will be the nail to place our tendril.
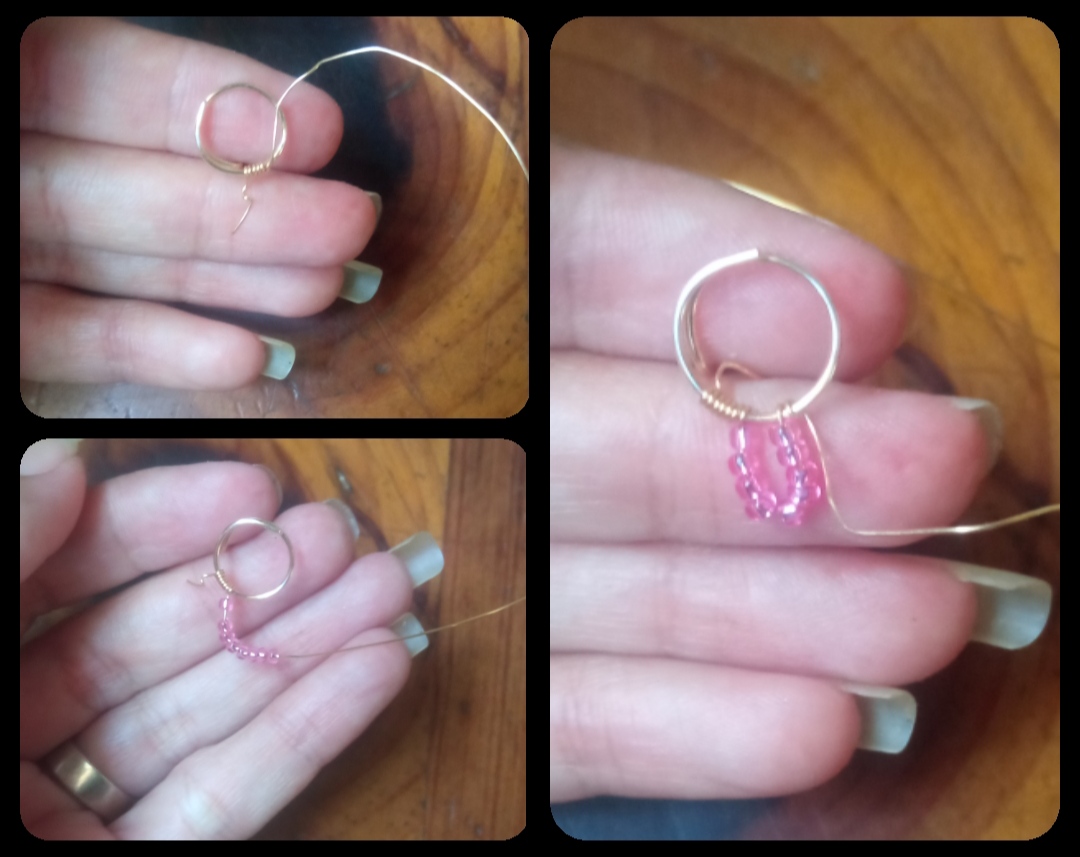
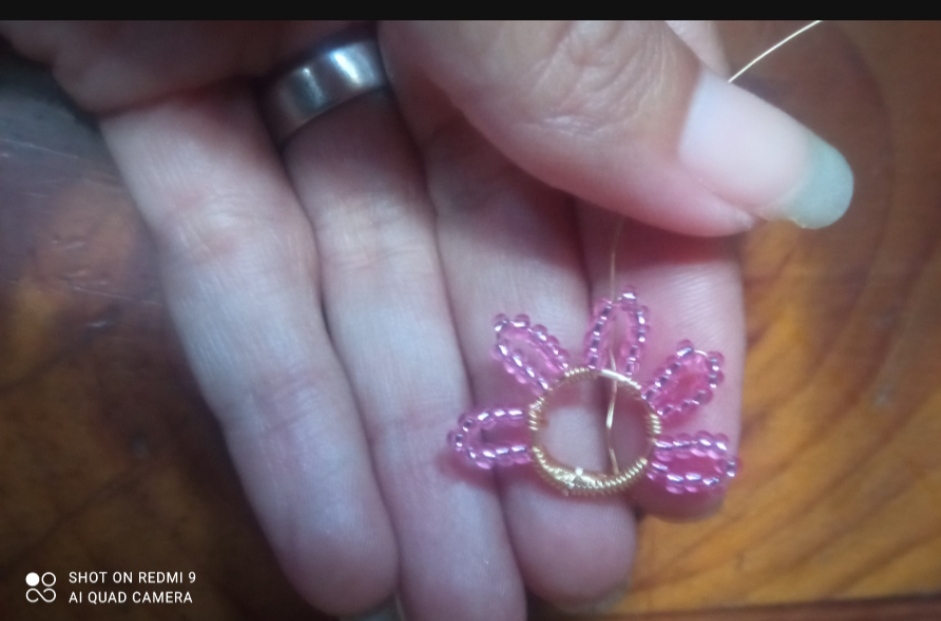
✴️ Paso 2: Seguidamente tomaremos un pedazo de alambre de bisutería calibre 26 más o menos largo y colocando la base de lado comenzamos a enrrollar este alambre fino en nuestro círculo base partiendo de el alambre doblado hacia atrás. Cubriremos un espacio pequeño solo con alambre y luego Introducimos por este las pequeñas mostacillas, yo introduje 9, ustedes puedes colocar más si desean los pétalos más grandes, Seguidamente moldeamos el alambre con la mostacillas en forma de pétalo y volvemos el alambre a la base circular.
✴️ Step 2: Next, we will take a piece of 26-gauge costume jewelry, more or less long, and placing the base on its side, we begin to wind this fine wire around our base circle, starting from the wire bent backwards.
We will cover a small space only with wire and then we introduce the small beads through it, I introduced 9, you can place more if you want larger petals, then we mold the wire with the petal-shaped beads and return the wire to the circular base .
✴️ Paso 3: el procedimiento anterior lo repetimos 4 veces más, enrrollando alambre que cubra la separación y luego elaboramos el pequeño pétalo de mostacillas. Recuerden que elaboraremos media flor por lo que no cubriremos todo el circulo de pétalos, yo elabore exactamente 5 pétalos.
✴️ Step 3: we repeat the previous procedure 4 more times, winding wire that covers the separation and then we make the small petal of mostacillas.
Remember that we will make half a flower so we will not cover the entire circle of petals, I made exactly 5 petals.
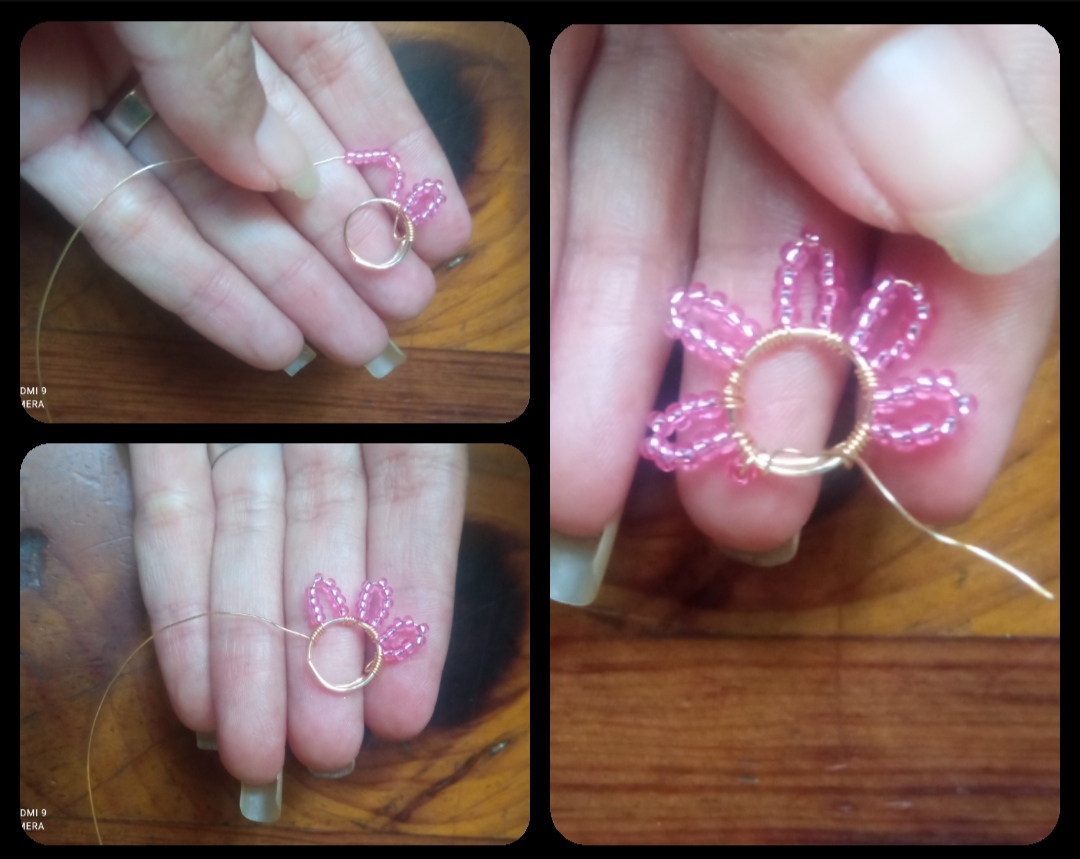
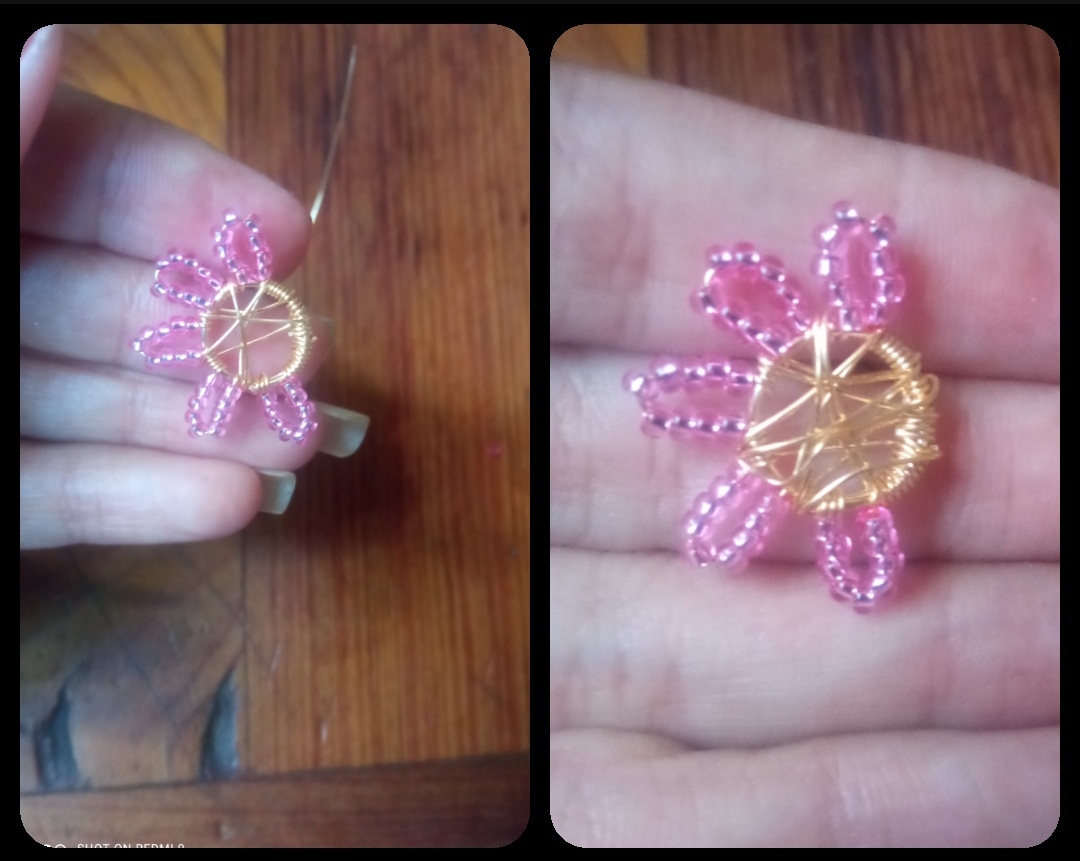
✴️ Paso 4: al culminar los pétalos seguí enrrollando el alambre cubriendo el circulo base hasta unirlo al punto de partida.
✴️ Step 4: when the petals were finished, I continued winding the wire covering the base circle until joining it to the starting point.
✴️ Paso 5: por último con lo que nos sobra del alambre de bisutería calibre 26 decoramos nuestro centro del circulo, cruzando este alambre de un lugar a otro en forma de tela de araña hasta que nos quede como pueden observar en las imágenes. Y así culminamos muestra primera pieza y sólo nos queda repetir los procedimientos para elaborar la pieza par.
✴️ Step 5: finally, with what we have left over from the 26 gauge jewelry wire, we decorate our center of the circle, crossing this wire from one place to another in the form of a spider web until it fits as you can see in the images .
And so we culminate the first piece and we only have to repeat the procedures to make the paired piece.
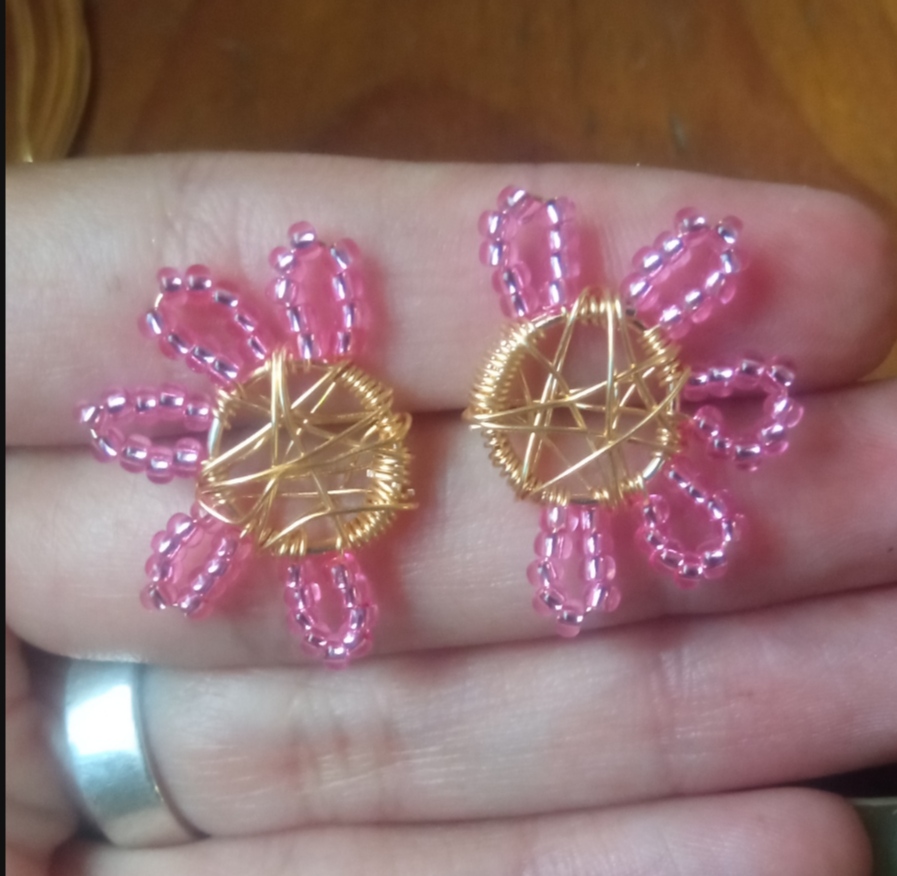
y así mis queridos visitantes de manera muy fácil elaboraremos estos lindos acsesorios ideales para lucir en nuestro día a día, o para realizar un bonito detalle, son super cómodos de usar y pueden elaborarlos en el color y tamaño de su preferencia. Está a Sido mi creación para todos ustedes el día de hoy, me despido por esta oportunidad esperando está sea del agrado de ustedes y mi post les sea de utilidad, agradezco mucho por su visita. Saludos y bendiciones.
Todas las Fotos son de mi autoría y fueron tomadas con mi Celular Redmi 9and so my dear visitors, we will very easily make these beautiful accessories, ideal to wear in our day to day, or to make a nice detail, they are super comfortable to use and can be made in the color and size of your choice.
It has been my creation for all of you today, I say goodbye for this opportunity hoping you like it and my post is useful to you, I thank you very much for your visit.
Greetings and blessings.
All Photos are my authorship and were taken with my Redmi 9 Cellphone
Que bello trabajo, muy elegante y con su diseño particular. Buen trabajo
🎆🎇🎉🎊🌧️💐✨🌾🌱🌹🌙🌿🍃🥀⚡🌺☘️🍀🌈🌷⭐🪴🌵🌸🌟💮🌴🌳💫☀️💮☔🌲🌳🌍🌌🌠☄️🏵️🐝🌻🌼🍄🐞🦋💙☕💜🍍🎆🎇🎉🎊🎆🎇🎉🎊🌧️💐✨🌾🌱🌹🌙🌿🍃🥀⚡🌺☘️🍀🌈🌷⭐🪴🌵🌸🌟💮🌴🌳💫☀️💮☔🌲🌳🌍🌌🌠☄️🏵️🐝🌻🌼🍄🐞🦋💙☕💜🍍🎆🎇🎉🎊
Gracias 😊, me alegra mucho que sea de su agrado.
The rewards earned on this comment will go directly to the people( @chacald.dcymt ) sharing the post on Twitter as long as they are registered with @poshtoken. Sign up at https://hiveposh.com.