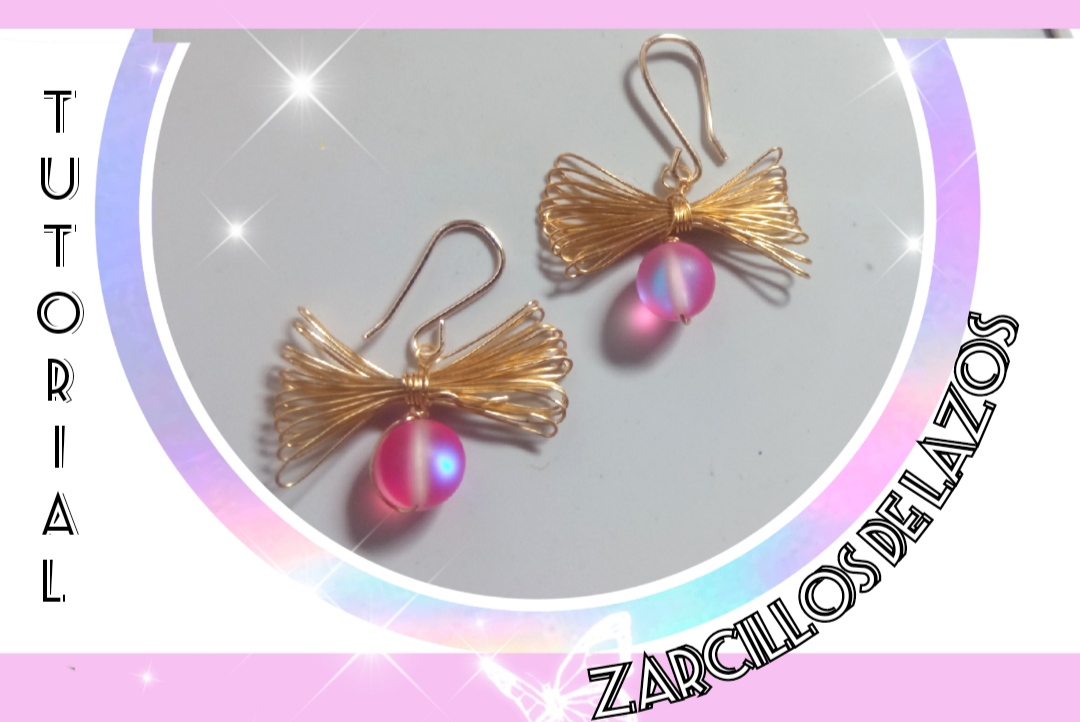
Feliz y bendecido día tengan todos ustedes mis queridos creativos de esta hermosa comunidad el día de hoy tengo el gran placer de pasar por acá para compartir con ustedes una vez más, en esta oportunidad les quiero compartir un muy sencillo tutorial donde juntos elaboraremos unos hermosos zarcillos de lazos elaborados en alambrismo. Este es un diseño súper creativo pero también muy fácil y sencillo de elaborar pues si nos estamos iniciando con la técnica del alambrismo este nos puede servir como práctica pues el proceso de elaboración no es muy complicado.
Happy and blessed day to all of you, my dear creatives from this beautiful community, today I have the great pleasure of stopping by to share with you once again, on this occasion I want to share with you a very simple tutorial where together we will create some beautiful tendrils of bows made of wire.
This is a super creative design but also very easy and simple to make because if we are starting with the wire technique this can serve as practice since the making process is not very complicated.
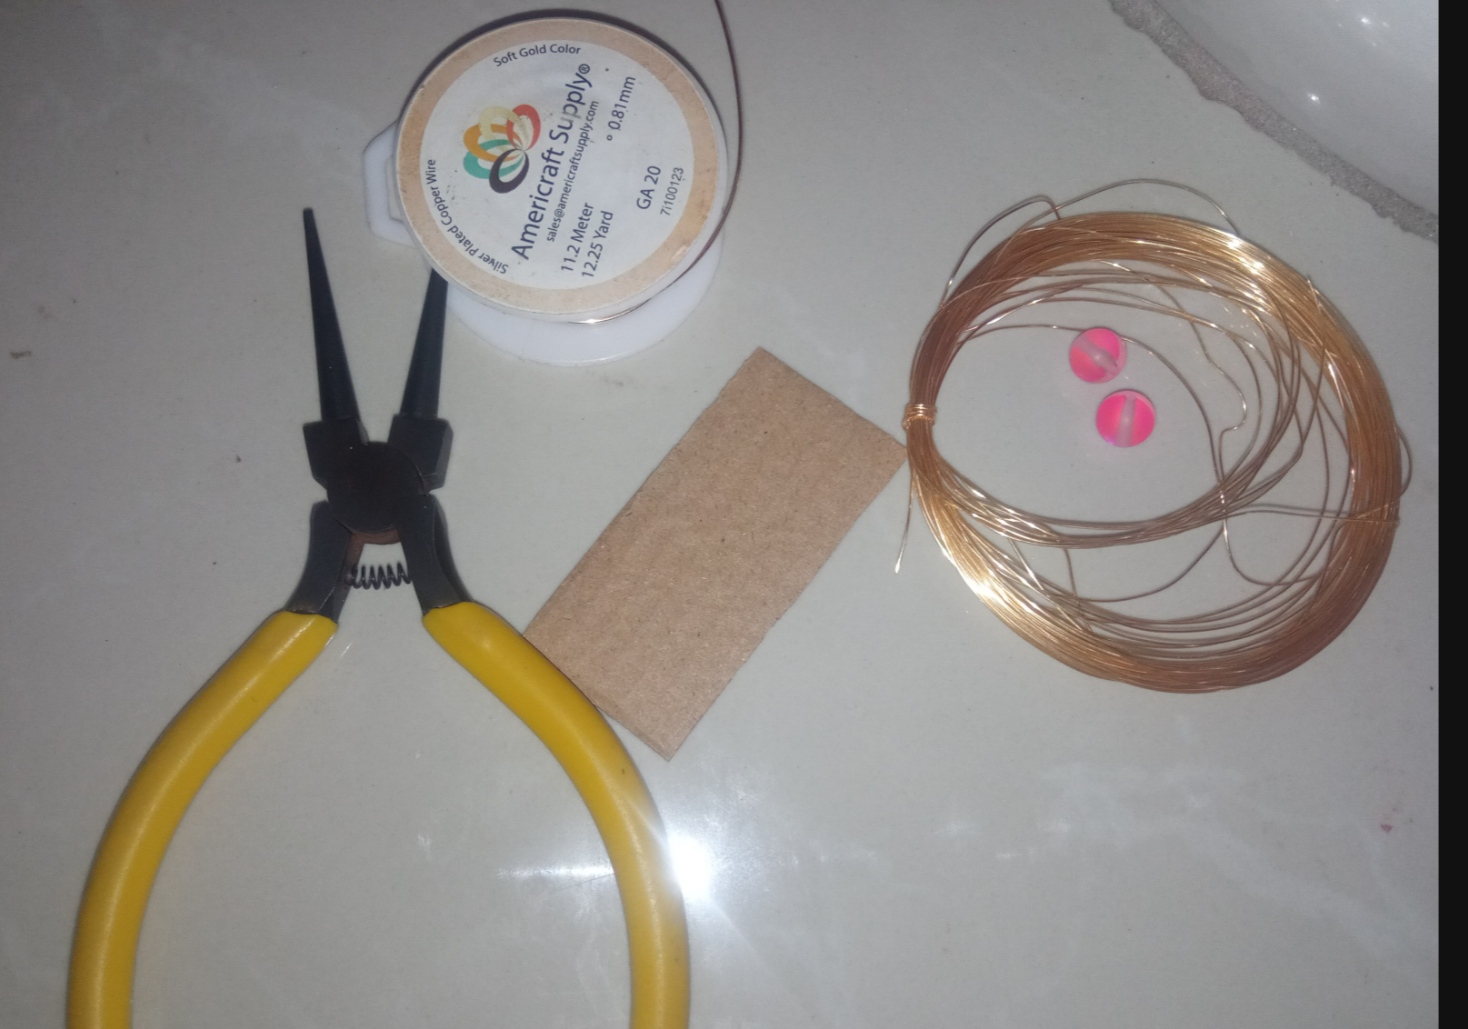
- Alambre de bisutería calibre 20.
- Alambre de bisutería calibre 26.
- piedra lunar pequeña.
- un pedazo de cartón.
- pinza de bisutería.
- 20 gauge jewelry wire.
- 26 gauge jewelry wire.
- small moonstone.
- a piece of cardboard.
- jewelry clamp.
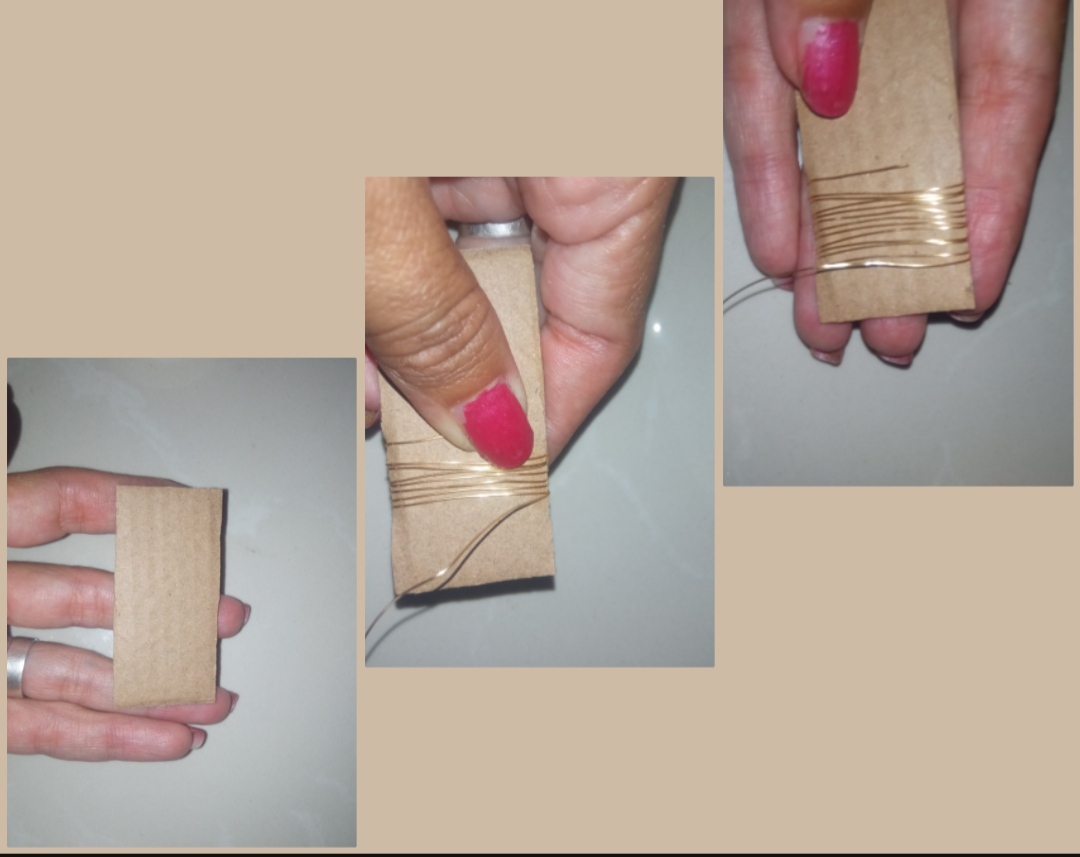
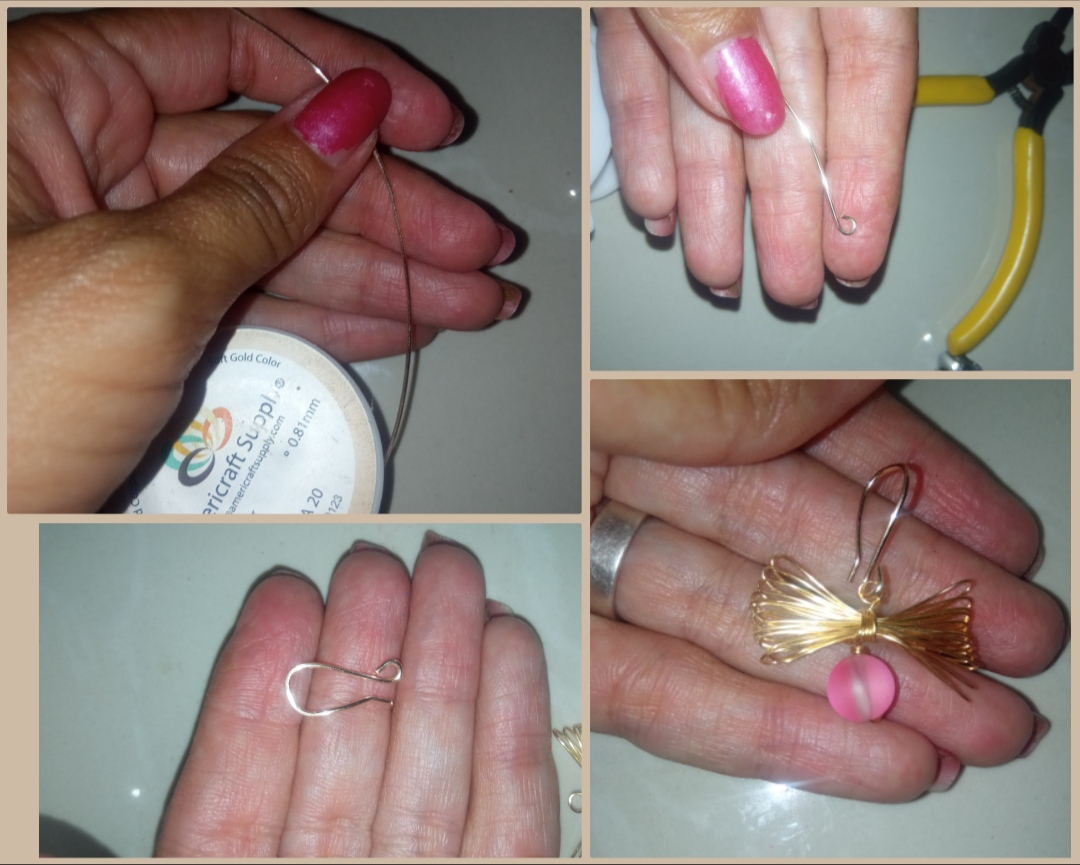
✴️ Paso 1: para iniciar la elaboración de este hermoso diseño lo primero que debemos realizar es tomar el cartón y cortar una tira de aproximadamente dos y medio a 3 cm según sea nuestro gusto pues este será la base para la elaboración de nuestro hermoso lazo. Una vez tengamos nuestra base de cartón tomaremos el alambre de bisutería calibre 26 y comenzaremos a enrollarlo en la base dando vueltas como pueden observar en las imágenes a continuación, yo elaboré aproximadamente 15 vueltas.
✴️ Step 1: to start making this beautiful design, the first thing we must do is take the cardboard and cut a strip of approximately two and a half to 3 cm depending on our taste, as this will be the basis for making our beautiful bow Once we have our cardboard base, we will take the 26 gauge jewelry wire and begin to wind it around the base in turns as you can see in the images below, I made approximately 15 turns.
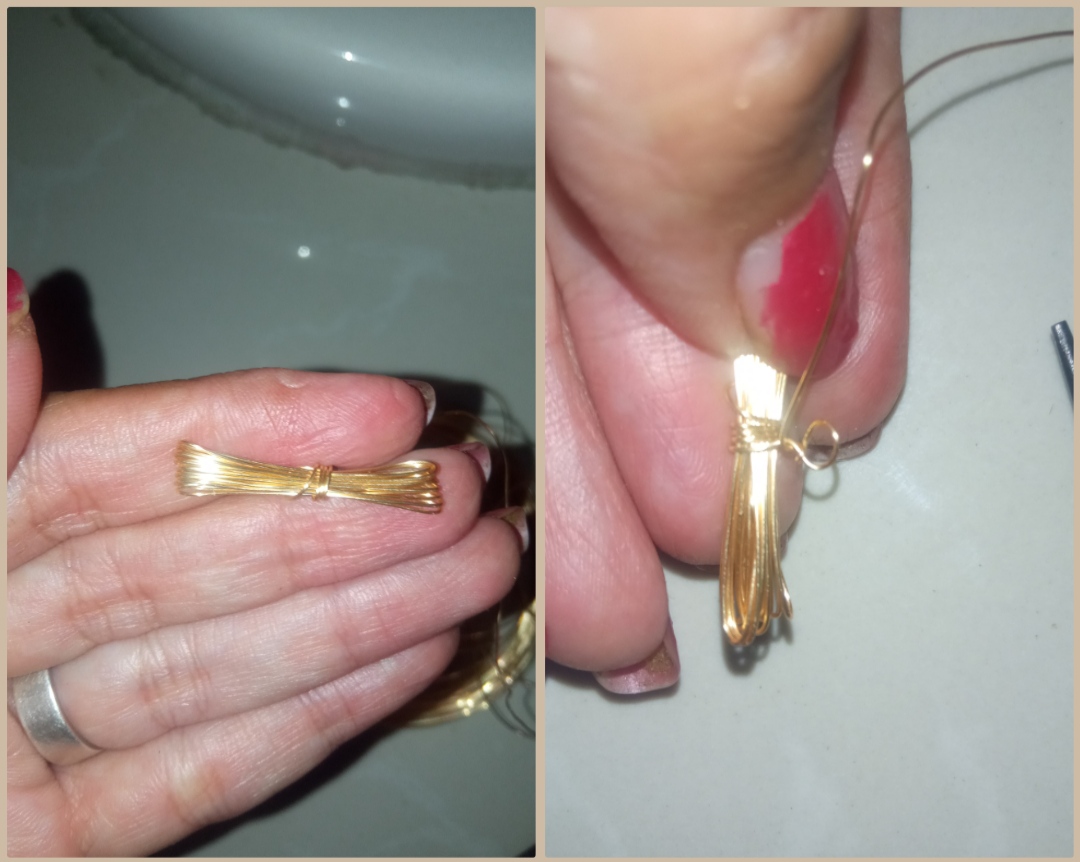
✴️ Step 2: Next, without cutting the wire, we will remove our doors from the base cardboard and with the same wire we will make a couple of turns in the central part of the creation made to hold the shape.
Once firmly secured in the central part with this wire and with the help of the tip of the tweezers, we will make a small ring at the top.
✴️ Paso 3: luego daremos una vuelta nuevamente por el centro de las tiras de alambre y bajaremos el alambre Ahora sí cortaremos dejando un trozo largo por el cual introduciremos la hermosa piedra lunar rosada y el mismo alambre lo doblaremos hacia arriba enrollándolo en la parte superior de la piedra para sujetar esta a nuestro hermosa elaboración y así cortaremos el exceso del alambre.
✴️ Step 3: then we will go around the center of the wire strips again and lower the wire. Now we will cut, leaving a long piece through which we will introduce the beautiful pink moonstone and we will bend the same wire upwards, winding it in the upper part of the stone to attach it to our beautiful craftsmanship and thus we will cut off the excess wire.

✴️ Paso 4: ahora para darle forma a nuestro lazo separaremos cada uno de las tiritas de alambre de cada lado del lazo como pueden observarlo a continuación unas hacia arriba otras hacia abajo dándole la forma de lazo deseado.
✴️ Step 4: now to shape our bow we will separate each of the wire strips on each side of the bow as you can see below, some upwards and others downwards, giving it the desired bow shape.
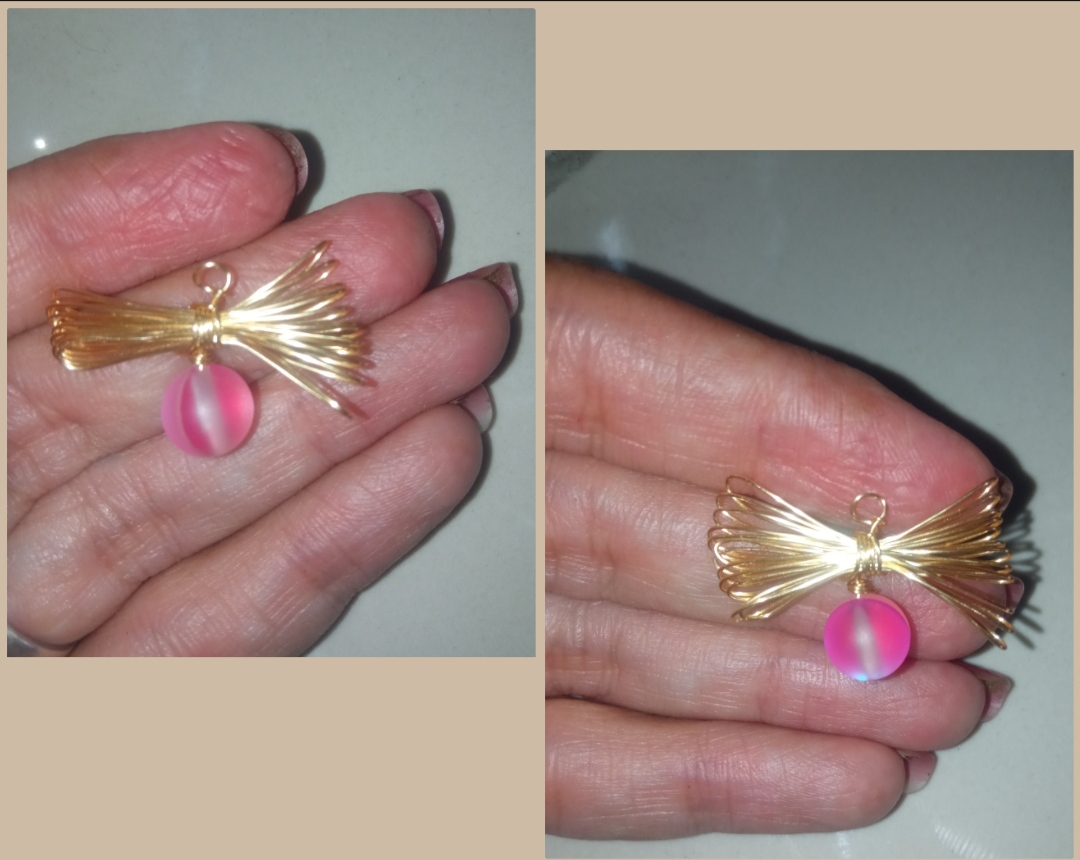
✴️ Paso 5: por último tomaremos un pedazo de alambre de bisutería calibre 20 y con ayuda de la pinza elaboraremos el anzuelo para guindar nuestro zarcillo este lo engancharemos en la pequeña forma circular que elaboramos en la parte central y así culminaremos nuestra hermosa elaboración y debemos proceder a elaborar la segunda pieza de este bello par.
✴️ Step 5: finally we will take a piece of 20 gauge jewelry wire and with the help of the tweezers we will make the hook to attach our tendril, we will hook it in the small circular shape that we made in the central part and thus we will complete our beautiful elaboration and we must proceed to make the second piece of this beautiful pair.
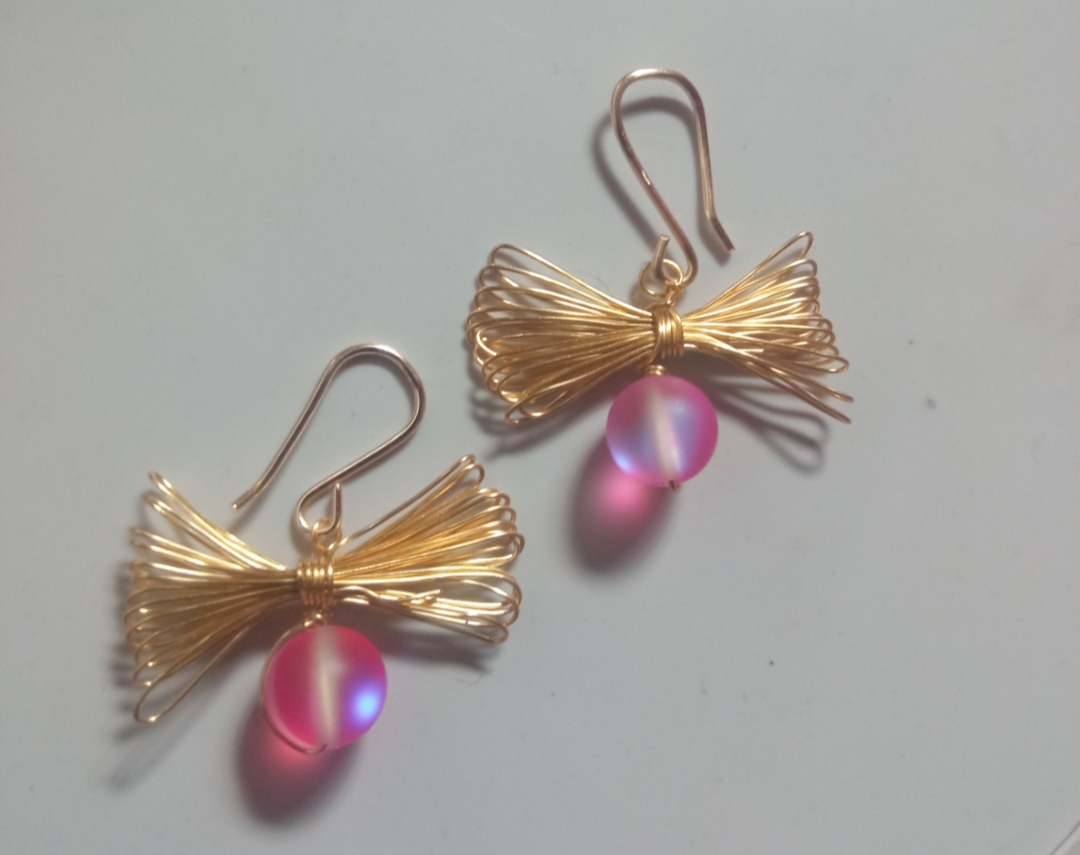
Ahora mis queridos amigos debo despedirme por esta oportunidad deseando que este hermoso diseño y este sencillo tutorial les puede hacer de utilidad y provecho también les agradezco Por acompañarme y estaré ansiosa de recibir sus comentarios y sugerencias. Que pasen un excelente fin de semana.And so, dear friends, in this quick, economical and very simple way we will be able to make this very beautiful design of bow-shaped tendrils that we can combine and wear on the desired occasion. If it is to your liking, you can make them by placing some other accessory or another type of stone that they like it.
I really love moonstones because they have a very interesting color and can reflect different colors and lights depending on the way you can see the stone, it is totally beautiful.
Todas las Fotos son de mi autoría y fueron tomadas con mi Celular Redmi 9Now, my dear friends, I must say goodbye to this opportunity, hoping that this beautiful design and this simple tutorial can be useful and beneficial. I also thank you for joining me and I will be eager to receive your comments and suggestions.
Have a great weekend.
All Photos are my authorship and were taken with my Redmi 9 Cellphone
Hermoso, se ve muy delicado
Gracias amiga, me alegra que te haya gustado 😊
Estos zarcillos son una verdadera belleza, están muy coquetos y elegantes 😊 Me gustan esos zarcillos que son sencillos pero lucen bastante como estos, ¡una belleza!
Gracias amiga me alegra que te haya gustado, y son súper fácil de elaborar.
Que hermoooosos 💕
Gracias amiga, me alegra que te hayan gustado ☺️
Que hermosos zarcillos al estilo Coquette. Gran trabajo 👏
What beautiful tendrils in the Coquette style. Great job 👏
Hola amiga se ve muy bien tus zarcillos esa combinación se ve espectacular
Muchas gracias amigo.
Los veo y tranquilamente me los imagino en alguna serie o anime de magia ¿No te da esa sensación de que parezcan mágicos? jajaja realmente me encantan hiciste un buen trabajo explicando el proceso y dando la lista de materiales
Gracias amigo me alegra mucho que te haya gustado.
Saludos
¡¡¡Buen trabajo!!! Gracias por publicar tu excelente contenido en Hive Diy, me gustaron mucho estos zarcillos, combinan bastante bien con el color del alambre
Tu comunidad artesana ahora es testigo

Gracias, me alegra que haya Sido de su agrado 😃
Me gusta mucho su sencillez, nada extravagante, pero muy hermosos!
Creo que irían muy bien con un vestido elegante!
Si amiga algo sencillo pero elegante
¡Felicitaciones!
Estás participando para optar a la mención especial que se efectuará el domingo 28 de abril del 2024 a las 8:00 pm (hora de Venezuela), gracias a la cual el autor del artículo seleccionado recibirá la cantidad de 1 HIVE transferida a su cuenta.
¡También has recibido 1 ENTROKEN! El token del PROYECTO ENTROPÍA impulsado por la plataforma Steem-Engine.
1. Invierte en el PROYECTO ENTROPÍA y recibe ganancias semanalmente. Entra aquí para más información.
2. Contáctanos en Discord: https://discord.gg/hkCjFeb
3. Suscríbete a nuestra COMUNIDAD y apoya al trail de @Entropia y así podrás ganar recompensas de curación de forma automática. Entra aquí para más información sobre nuestro trail.
4. Visita nuestro canal de Youtube.
Atentamente
El equipo de curación del PROYECTO ENTROPÍA
Wow, it's gorgeous