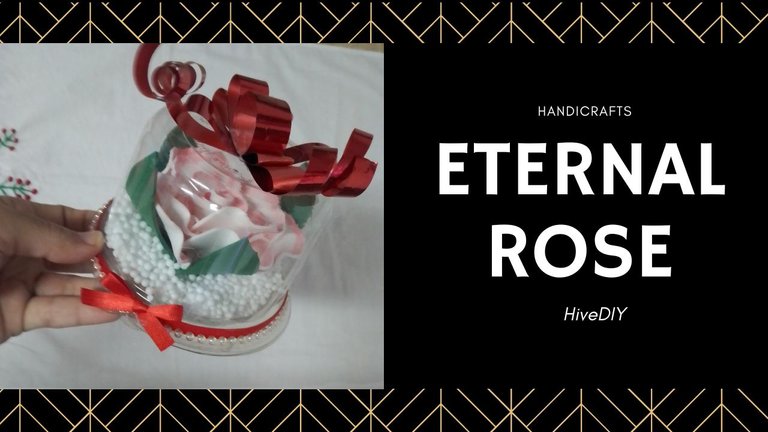


Greetings community! Today I bring you a simple craft that you can apply for different purposes such as: Souvenirs, decoration, ornaments.
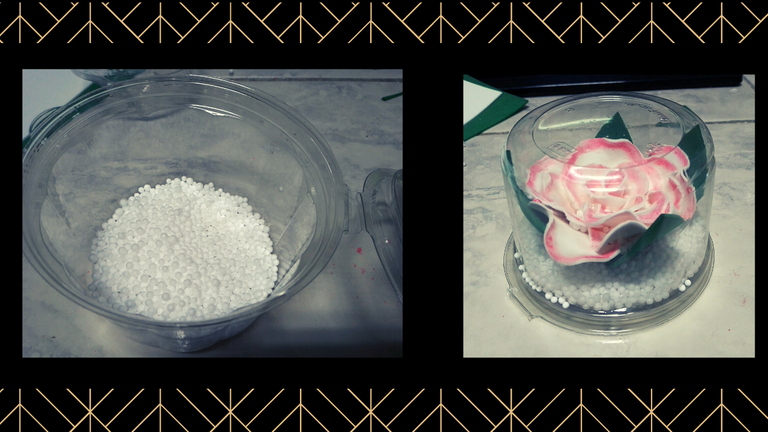
It is fun because I placed inside it filled with polyethylene, very small anime balls and they move at will inside the plastic container.
I'm a big fan of ornaments inside containers of all kinds, that are inside water, oils in glass balls where they also put frosting or glitter. That's why I wanted to recreate a version with the materials I have available at home.
I thought it was a good idea to make a thermoformed rose, since the undulations on the leaves could give it a better look, the ideal would have been to use another color of fomi but it would be something very typical, so I thought of coloring the edges of the petals with a wax crayon, this way we could make it a little more the imitation of a real rose.
The plastic container is something that makes me laugh a lot, because they are one of those normal ones that we find in supermarkets, I loved its perfect transparency and finishes, there were several models but at that time I could not buy all I wanted, this one in particular, I thought it was perfect to recreate the eternal rose. The good thing about the fact that it is inside the container is that the white flower will not get dirty with dust.


¡Saludos comunidad! Hoy te traigo una sencilla manualidad que puedes aplicar para diferentes propósitos como: Recuerditos, decoración, adornos.
Es divertido pues coloqué en su interior relleno de polietileno, unas bolitas de anime muy pequeñas y se mueven a voluntad dentro del recipiente de plástico.
Soy muy fan de adornos dentro de recipientes de todo tipo, que estén dentro de agua, aceites en bolas de cristal donde también le ponen escarcha o purpurina. Por eso quise recrear una versión con los materiales que tengo disponibles en casa.
Me pareció buena idea hacer una rosa termoformada, ya que las ondulaciones en las hojas podría darle mayor realce, lo ideal sería haber usado otro color de fomi pero sería algo muy típico, así que me ingenié en darle coloración a los bordes de los pétalos con un creyón de cera, de esta manera podríamos hacerla un poco más la imitación de una rosa real.
El recipiente de plástico es algo que me causa mucha risa, pues son de esos normales que encontramos en los supermercados, me encantó su perfecta transparencia y acabados, habían varios modelos pero en ese momento no pude comprar todos los que quise, este en particular, me pareció perfecto para recrear la rosa eterna. Lo bueno de que esté dentro del recipiente además es que la flor blanca no va a ensuciarse con el polvo.

| |
|---|---|
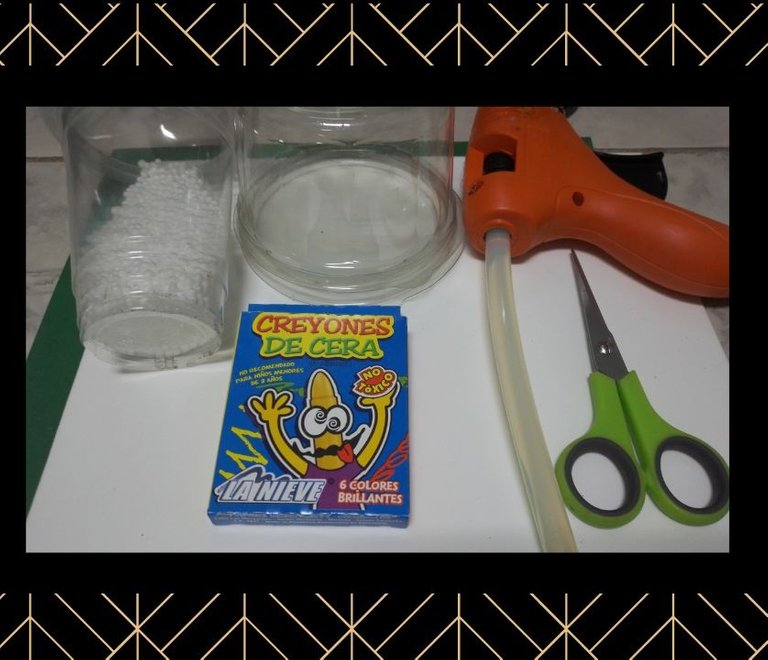
| - Polyethylene filling. | - Relleno de polietileno. |
| - Scissors. | - Tijera. |
| - Hot Silicone. | - Silicón caliente. |
| - Plastic container. | - Recipiente plástico. |
| - Colored fomi. | - Fomi de colores. |
| - Wax creyons. | - Creyones de cera |

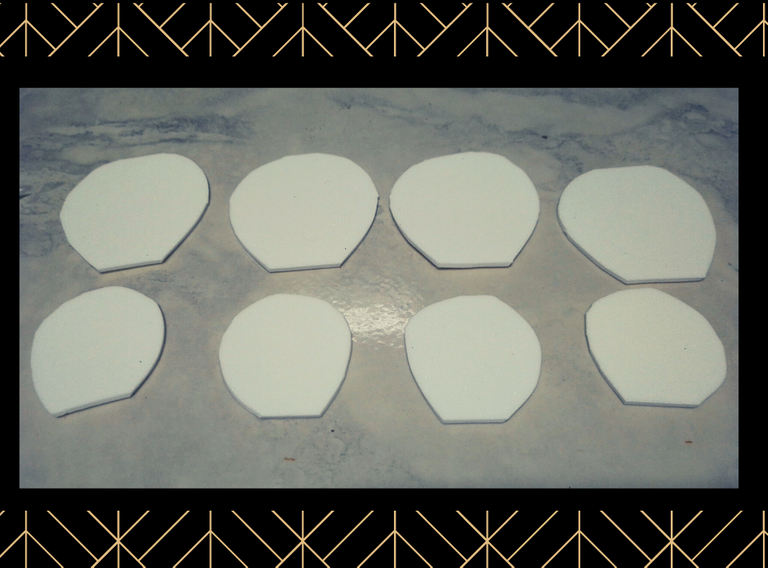
Step 1️⃣
To make the flower, you can choose the color of fomi that you like, in my case I used white fomi.
Cut out the shape of a petal and then use it as a mold for the rest. You have to make two different sizes, a small one for the petals in the center and then larger ones for the petals on the outside.
Paso 1️⃣
Para hacer la flor, puedes elegir el color de fomi que más te guste, en mi caso yo usé fomi de color blanco.
Recorta la forma de un pétalo y luego lo usas de molde para el resto. Tienes que hacer dos tamaños distintos, uno pequeño que son para los pétalos del centro y luego unos más grandes para los pétalos de afuera.
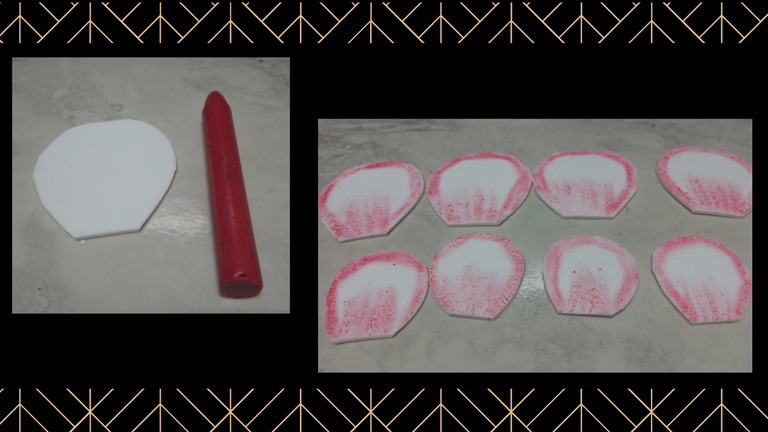
Step 2️⃣
I preferred to use wax crayons so as not to stain the white fomi or my hands. With the crayon border each petal and color a little in the center.
Paso 2️⃣
Preferí usar creyones de cera para no manchar el fomi blanco ni mancharme las manos. Con el creyón bordea cada pétalo y colorea un poco el centro.
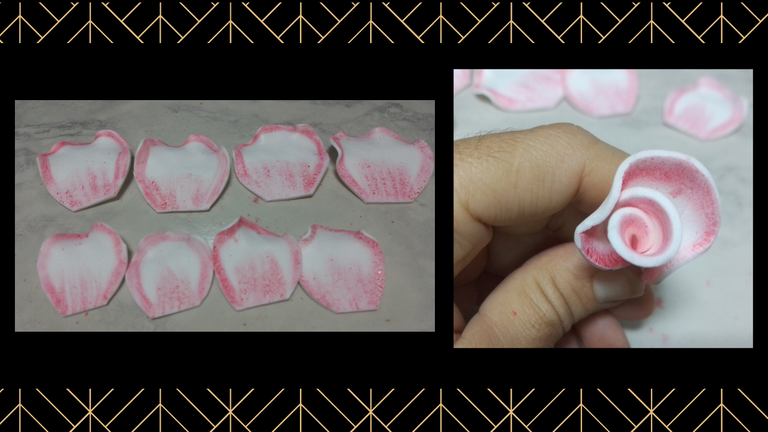
Step 3️⃣
With the iron at a warm temperature and very careful not to burn yourself, place each petal on it for a few seconds, then shape it with your fingers.
Reserve one petal without thermoforming, this same petal is the one that will be the center of the flower.
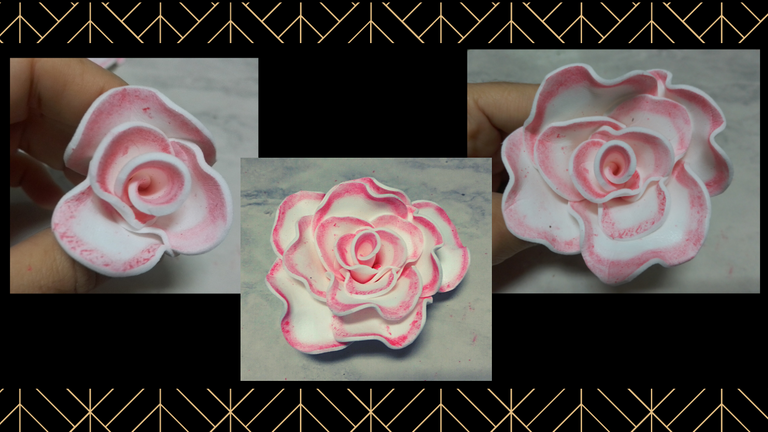
Begin to assemble the flower, first with the inner petal that must be glued by rolling it on itself, then glue each of the petals in an intercalary way covering spaces, until the flower is assembled and finished.
You must take care that your flower is not bigger than your container.
Paso 3️⃣
Con la plancha a una temperatura tibia y con mucho cuidado de no quemarte, coloca cada pétalo en ella por unos segundos, luego das forma con tus dedos.
Reserva un pétalo sin termoformar, este mismo pétalo es el que será el centro de la flor.
Comienza a armar la flor, primero con el pétalo interno al que se debe pegar enrollándolo sobre sí, seguidamente ve pegando cada uno de los pétalos de forma intercalada cubriendo espacios, hasta armar y culminar la flor.
Debes cuidar que tu flor no quede más grande que tu recipiente.
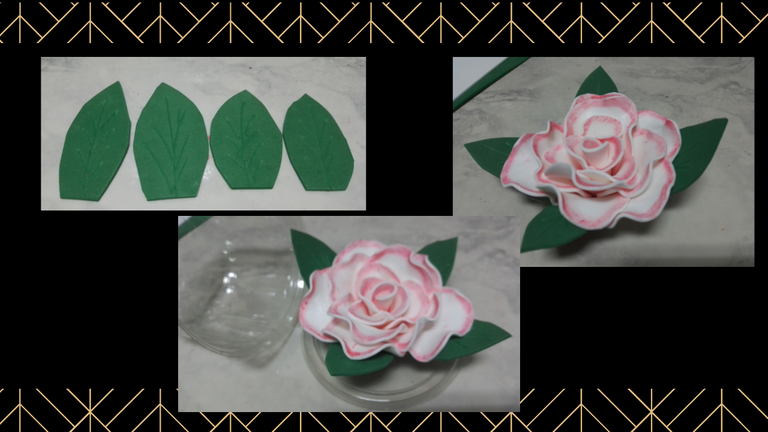
Step 4️⃣
Cut out the shape of the leaves with the green fomi, with the tip of the scissors make marks to resemble the veins of the leaves.
Glue them on the flower in the same way as the previous one, intercalating and covering the spaces.
It is time to glue the flower on the lid of the container, use the hot silicone very carefully because the heat can melt the material.
Paso 4️⃣
Recorta la forma de las hojas con el fomi verde, con la punta de la tijera realiza una marcas para semejar las vetas de las hojas.
Procede a pegarlas en la flor de la misma forma que la anterior, intercalando y cubriendo los espacios.
Es hora de pegar la flor en la tapa del recipiente, utiliza el silicón caliente con mucho cuidado pues el calor puede derretir el material.
Step 5️⃣
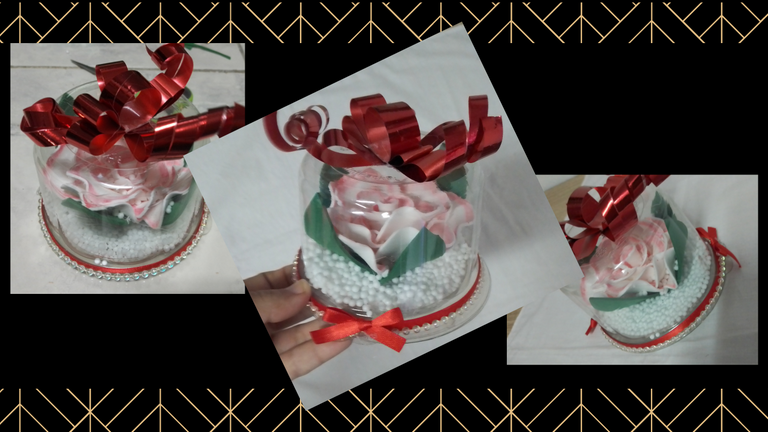
Carefully insert the polyethylene filling into the plastic container, now cover it, I had no need to apply glue because the container closes perfectly, but in your case if it is necessary to reinforce, apply a little.
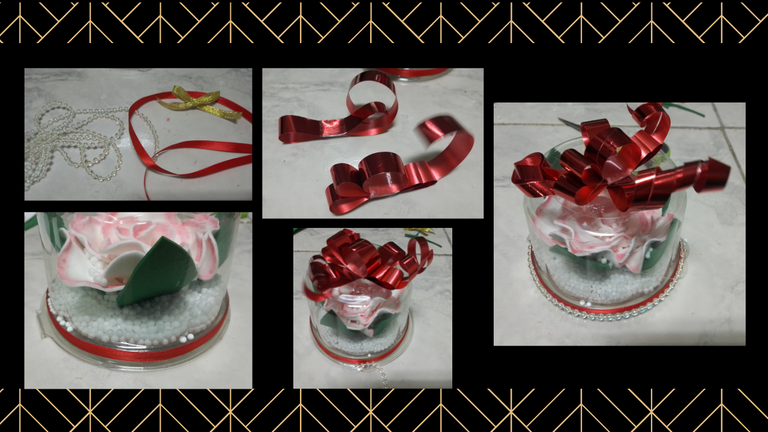
Now it's time to decorate the outside of the container.
Use whatever you have available to decorate, I had some ribbons and pearl beads that will work well.
I made some ribbons to place on top of the container and glued them on.
I then bordered the container with red ribbon and then pearl runner.
Paso 5️⃣
Introduce con cuidado el relleno de polietileno en el recipiente de plástico, ahora tapa el mismo, no tuve necesidad de aplicar pegamento pues el recipiente cierra perfectamente, pero en tu caso si es necesario reforzar, aplica un poco.
Es hora de decorar la parte externa del recipiente.
Utiliza lo que tengas disponible para decorar, yo tenía unas cintas y perla corrida que funcionarán bien.
Hice unos lacitos para colocarlos sobre el recipiente y los pegué.
Luego bordeé el recipiente con cinta roja y seguidamente perla corrida.
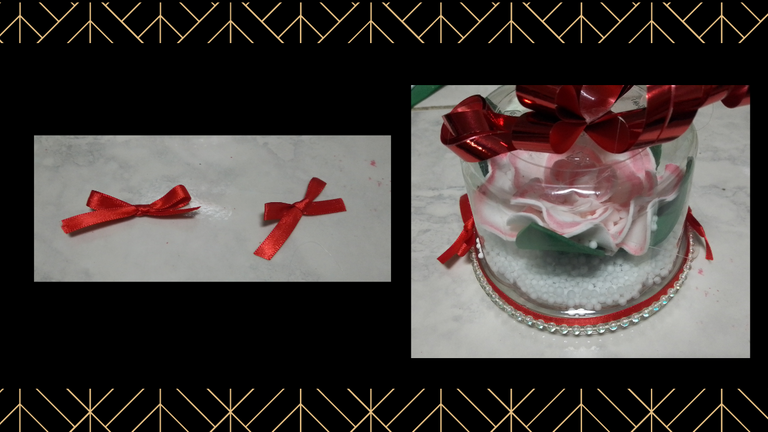
To cover some ties, I made some bows and placed them on the sides, with this we are done.
I hope you like it and I encourage you to do it, it's fun.
What did you think?
Para cubrir algunos empates, hice unos lacitos y los coloqué a los lados, con esto hemos terminado.
Espero que te guste y te animes hacerlo, es divertido.
¿Qué te pareció?
Credits / Créditos

Hacks, DIY, Crafts, handmade arts Community
![]() 👉
👉 ![]() 👉
👉 ![]() 👉
👉  👉
👉 ![]()

The rewards earned on this comment will go directly to the people( @equipodelta ) sharing the post on Twitter as long as they are registered with @poshtoken. Sign up at https://hiveposh.com.
Hey, te quedó fabulosa esa rosa y el adorno muy lindo. Felicidades amiga. Un abrazo.
Hola amiga querida, ando entreteniendome mucho con las manualidades estos días, Dios te bendiga.
Amiga. Te quedo muy bonita, y a mi me encanto que tu le hayas dado el detalle de sombreado a la rosa con el creyón de cera. Tuviste una maravillosa idea y creatividad. Bellísima tu rosa eterna creada por tus manos creativas. Abrazos @equipodelta 🌹💕
Hola amiga muchísimas gracias. Es mejor tener la mente ocupada con algo, ayuda bastante, un abrazo para ti.
This post has been manually curated by @steemflow from Indiaunited community. Join us on our Discord Server.
Do you know that you can earn a passive income by delegating to @indiaunited. We share 100 % of the curation rewards with the delegators.
Here are some handy links for delegations: 100HP, 250HP, 500HP, 1000HP.
Read our latest announcement post to get more information.
Please contribute to the community by upvoting this comment and posts made by @indiaunited.
Thanks you so much.
Amiga la rosa te ha quedado bastante real y se ve bien linda en el recipiente, buena idea para hacer unos centros de mesa. Felicidades.
Hola amiga, tienes razón quedan espectaculares como centros de mesa, aquí mi familia se pelea por tener uno, muchas gracias, bendiciones para ti.
Te quedó hermoso 😍... Una bella decoración para el cuarto de la princesa de la casa... gracias por la idea.
🎆🎇🎉🎊🌧️💐✨🌾🌱🌹🌙🌿🍃🥀⚡🌺☘️🍀🌈🌷⭐🪴🌵🌸🌟💮🌴🌳💫☀️💮☔🌲🌳🌍🌌🌠☄️🏵️🐝🌻🌼🍄🐞🦋💙☕💜🍍🎆🎇🎉🎊🎆🎇🎉🎊🌧️💐✨🌾🌱🌹🌙🌿🍃🥀⚡🌺☘️🍀🌈🌷⭐🪴🌵🌸🌟💮🌴🌳💫☀️💮☔🌲🌳🌍🌌🌠☄️🏵️🐝🌻🌼🍄🐞🦋💙☕💜🍍🎆🎇🎉🎊🎆🎇🎉🎊🌧️💐✨🌾🌱🌹🌙🌿🍃🥀⚡🌺☘️🍀🌈🌷⭐🪴🌵🌸🌟💮🌴🌳💫☀️💮☔🌲🌳🌍🌌🌠☄️🏵️🐝🌻🌼🍄🐞🦋💙☕💜🍍🎆🎇🎉🎊
!PIZZA
Hola amiga, muchas gracias por tu visita y la pizza!!!! genial
Se ve muy práctico y fácil de hacer, muy lindo para un presente. Gracias por compartir.
Hola amiga es fácil de hacer no me llevó mucho tiempo tampoco. Gracia spor visitarme.
Hola, te quedo muy lindo ese detalle ideal para obsequiar, me gusto como quedo la rosa coloreada con el creyón de cera se ve hermosa, muy buena técnica. Saludos.
Hola Coromoto, tienes razón queda bien para obsequiar el día de las madres o a la novia. Muchas gracia spor visitarme.
Este tipo de decoraciones me encanta sería un lindo regalo y utilizar crayones es algo nuevo para mí, seguro lo voy implementar en un futuro ✨💗
Hola amiga, es que antes lo hacía con tizas y marcadores y terminaba toda manchada, se me ocurrió usar esto y fue funcional.
Es un detalle muy bonito, las bolitas de anime se ven muy cool 🥰
Gracias amiga, esa es la parte divertida, mis familia no hace sino moverla para ver las pelotitas por doquier dentro del recipiente, es hasta relajante.
que precioso y delicado trabajo 👏🏻👏🏻
Gracias Dloreant.
Incredible
Thanks you.
Hola @equipodelta, wow esa rosa está muy linda.

Congratulations, your post has been upvoted by @dsc-r2cornell, which is the curating account for @R2cornell's Discord Community.
Enhorabuena, su "post" ha sido "up-voted" por @dsc-r2cornell, que es la "cuenta curating" de la Comunidad de la Discordia de @R2cornell.
PIZZA Holders sent $PIZZA tips in this post's comments:
@chacald.dcymt(1/5) tipped @equipodelta (x1)
Please vote for pizza.witness!