Hola hola amigos de Hive, que la bendición de Dios nos acompañe siempre, muchas felicidades y bendiciones en ocasión al tercer aniversario de nuestra plataforma HIVE💪, estoy extremadamente feliz y quiero compartir con ustedes el motivo, desde hace meses, empecé a ilusionarme con la idea de elaborar macetas en arcilla o cualquier material resistente, económico pero de calidad, para reproducir mis plantas y comercializarlas con una presentación única, hecha a mano, a una de mis hermanas que se encuentra en España le gustó la idea y me compro moldes de silicón y hace 2 meses aproximadamente me envió un paquete desde España, con los moldes y algunas otras cositas para hacer las macetas(amo las macetas😍) y apenas la semana pasada por fin llegaron a Venezuela y me siento muy emocionada porque voy a iniciar mi nuevo emprendimiento, es tanta mi felicidad que apenas llegaron los moldes hice mi primer lote de macetas y acá les mostraré todos los detalles desde los materiales que utilicé hasta el proceso de elaboración, aquí vamos...
Hello hello friends of Hive, may God's blessing be with us always, many congratulations and blessings on the occasion of the third anniversary of our platform HIVE💪, I am extremely happy and I want to share with you the reason, for months, I started to get excited with the idea of making pots in clay or any resistant material, economic but of quality, to reproduce my plants and market them with a unique presentation, handmade, One of my sisters who is in Spain liked the idea and bought me silicone molds and about 2 months ago she sent me a package from Spain, with the molds and some other little things to make the pots (I love pots😍) and just last week they finally arrived to Venezuela and I am very excited because I am going to start my new venture, I am so happy that as soon as the molds arrived I made my first batch of pots and here I will show you all the details from the materials I used to the process of elaboration, here we go.
Materiales utilizados:
- 1 Taza de cemento blanco.
- 3/4 Taza de yeso.
- 1 Taza de agua.
- 1 Cucharada de Aceite vegetal.
- 1 Envase plástico.
- 1 paleta plástica o de madera.
- Mis hermosos moldes de silicón.
Materials used:
1 Cup of white cement.
3/4 cup of plaster.
1 cup of water.
1 tablespoon of vegetable oil.
1 plastic container.
1 plastic or wooden trowel.
My beautiful silicone molds.

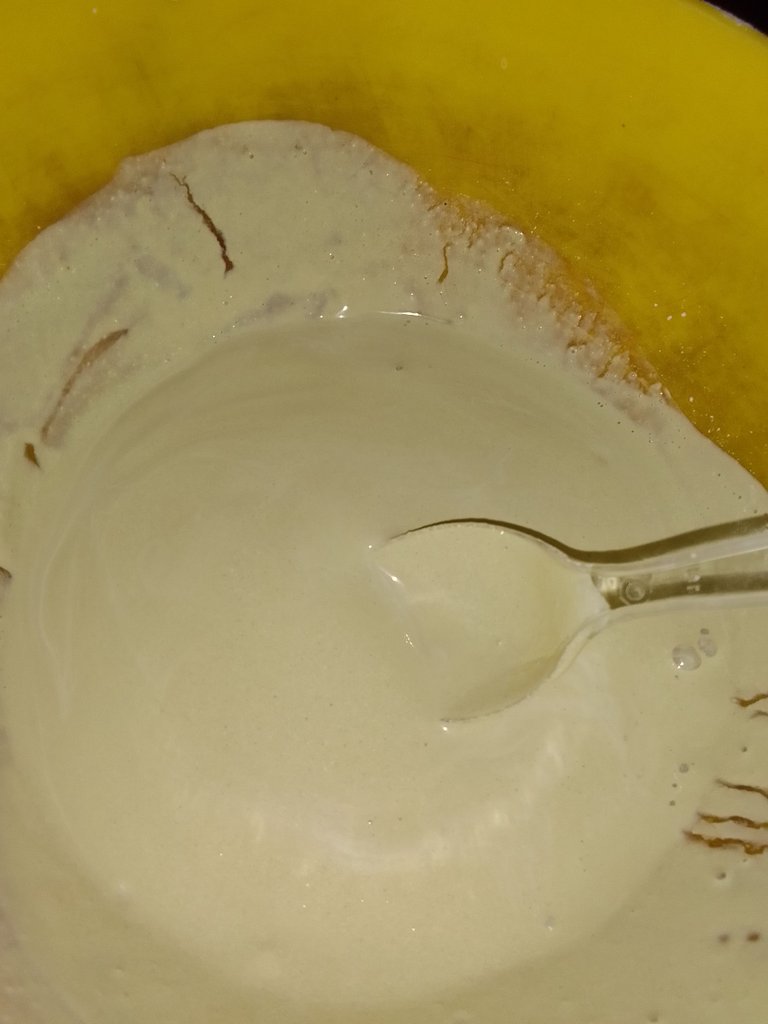
Paso 1: Preparación de la mezcla.
Primero agregué el agua en un envase plastico para tener un mejor control de la viscosidad de la mezcla, no quiero que la misma sea muy viscosa porque mientras más líquida más fácilmente puedo llenar los moldes, tampoco es recomendable que sea demasiado líquida porque el tiempo de secado sería muy largo y se corre el riesgo que una vez seca la pieza se rompa fácilmente por la falta de material sólido. Es importante cernir el yeso y el cemento blanco antes de agregarlos, pues, generalmente tienen grumos o pequeñas rocas que no favorecen nuestra preparación, una vez cernidos los agregué lentamente en el envase con agua, mientras iba mezclando con una paleta hasta que se formó una solución homogénea.
Step 1: Preparation of the mixture.
First I added the water in a plastic container to have a better control of the viscosity of the mixture, I do not want it to be very viscous because the more liquid the easier I can fill the molds, it is not recommended to be too liquid because the drying time would be very long and there is a risk that once dry the piece breaks easily due to lack of solid material. It is important to sift the gypsum and white cement before adding them, because they usually have lumps or small rocks that do not favor our preparation, once sifted I added them slowly in the container with water, while I was mixing with a paddle until a homogeneous solution was formed.
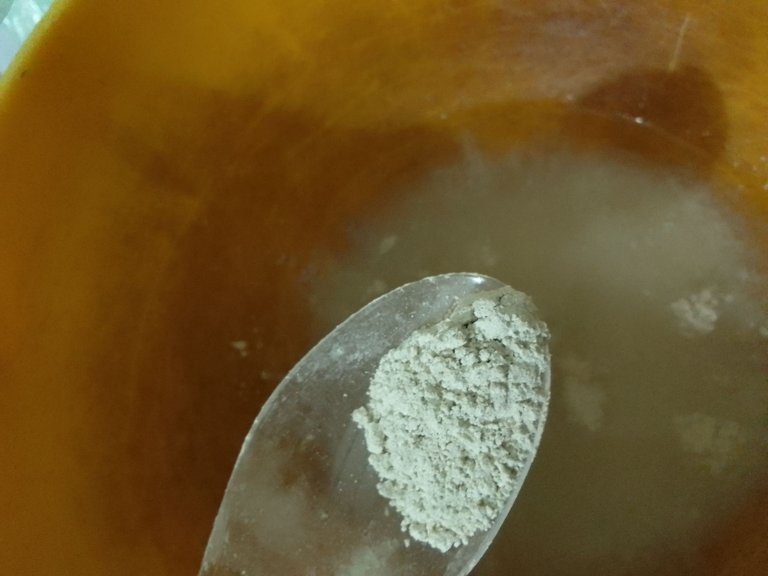
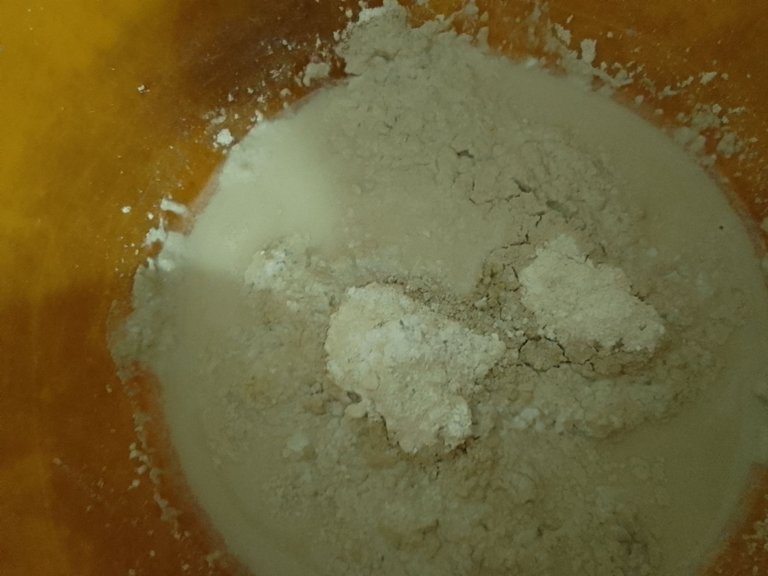
Nota: Utilicé cemento blanco y yeso conjuntamente para alcanzar un resultado conforme a mis necesidades (una maceta no tan pesada con acabado liso) cuando hice la prueba solo con cemento blanco la maceta quedó muy rígida y con grietas laterales, también pude notar que la superficie era áspera y a la hora de desmoldar aún cuando lubrique muy bien mis moldes el roce erosionó un poco el molde de silicón. Cuando probé con el yeso inmediatamente noté que la maceta poco a poco se iba deteriorando aún en mis manos, el yeso se comportaba como una tiza y al contacto con cualquier superficie se deformaba, hasta el punto que se fracturaba la pieza.
Note: I used white cement and plaster together to achieve a result according to my needs (a pot not so heavy with a smooth finish) when I tested only with white cement the pot was very rigid and with lateral cracks, I could also notice that the surface was rough and at the time of unmolding even when I lubricated my molds very well the friction eroded a little the silicone mold. When I tried with the plaster I immediately noticed that the pot was deteriorating little by little even in my hands, the plaster behaved like chalk and when in contact with any surface it deformed, to the point that the piece fractured.
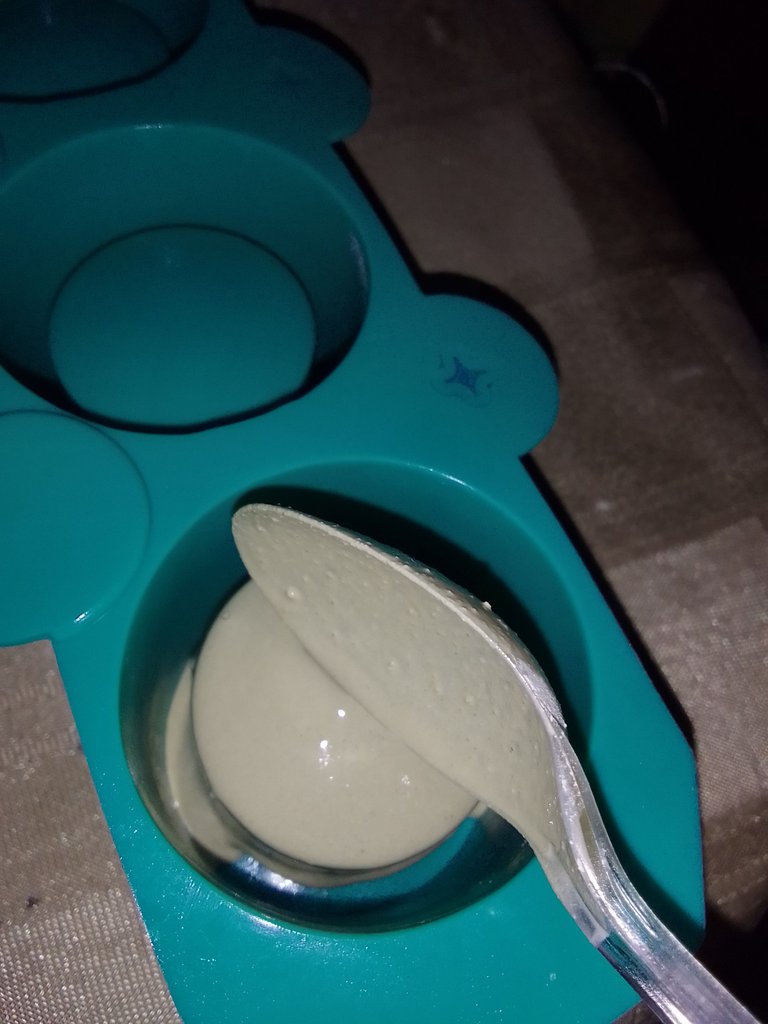
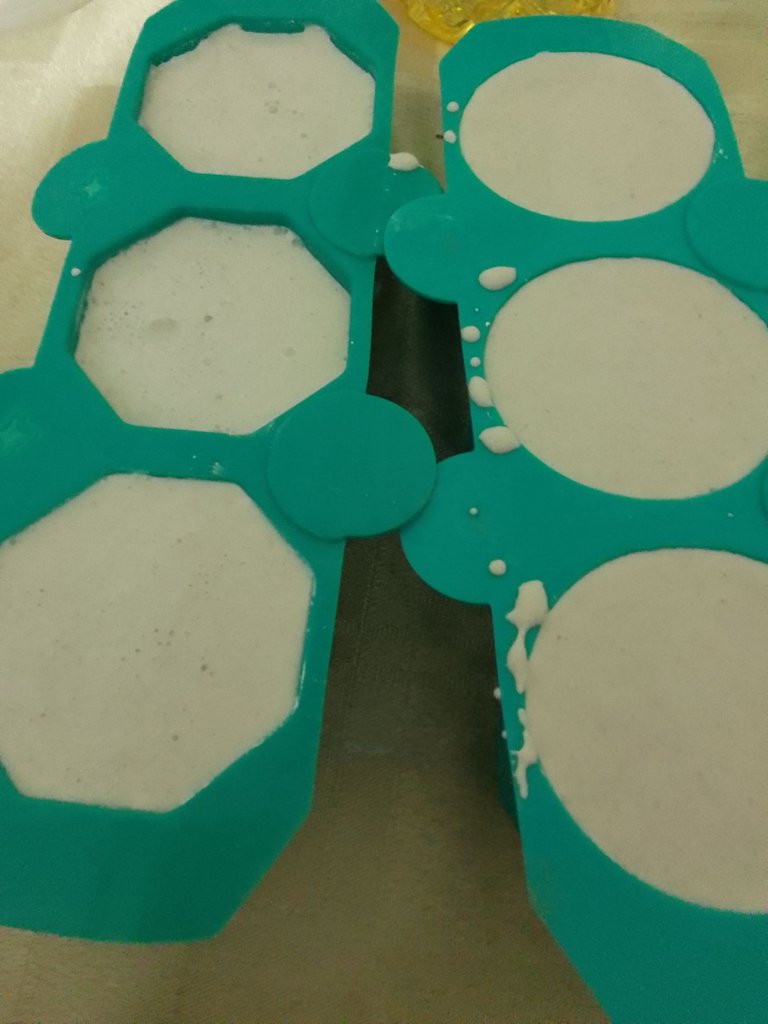
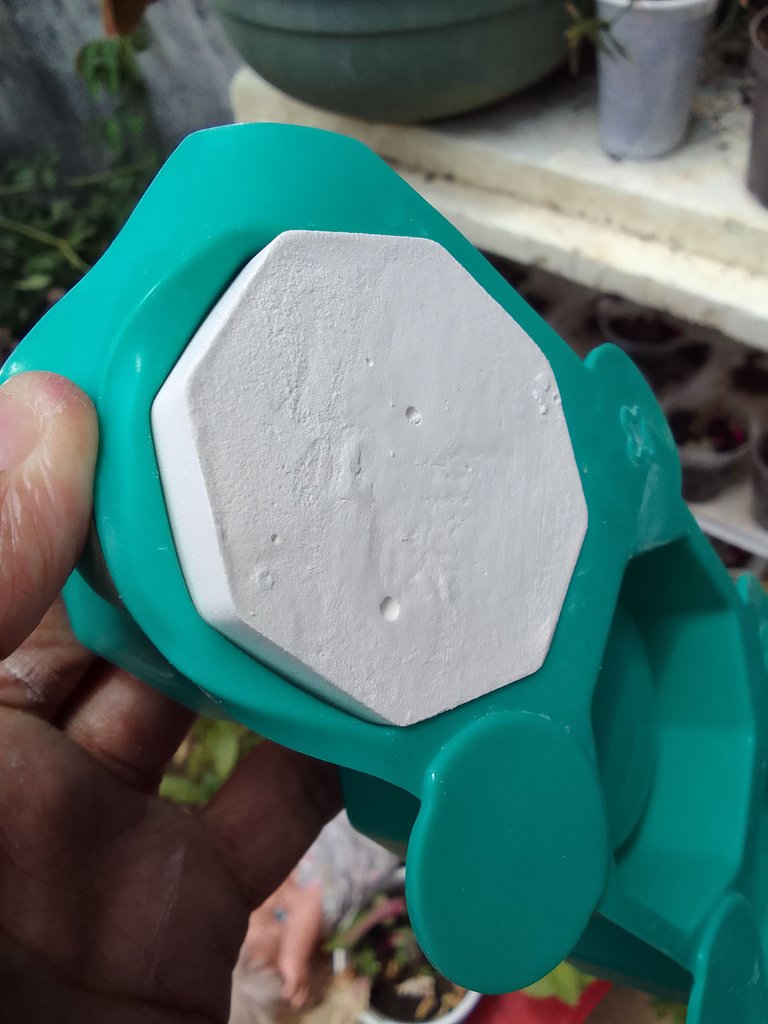
Paso 2: lubricación y llenado de los moldes con la mezcla.
Por insignificante que parezca es sumamente importante que los moldes esten bien lubricados, para evitar que la mezcla se adhiera a la superficie de los moldes y a la hora de desmoldar sea más fácil, en este caso apliqué aceite vegetal en la cara interna de cada uno de los moldes y luego agregué la mezcla hasta llenar completamente cada molde, dando pequeños golpes sobre una superficie lisa para que salieran las burbujas de aire.
Step 2: lubrication and filling the molds with the mixture.
As insignificant as it may seem it is extremely important that the molds are well lubricated, to prevent the mixture from sticking to the surface of the molds and to make unmolding easier, in this case I applied vegetable oil on the inner side of each of the molds and then I added the mixture until completely filling each mold, giving small blows on a smooth surface so that the air bubbles would come out.
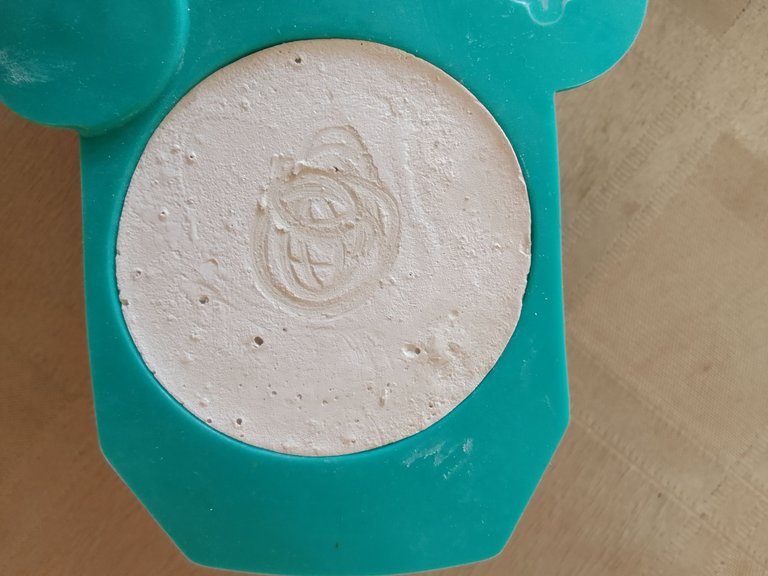
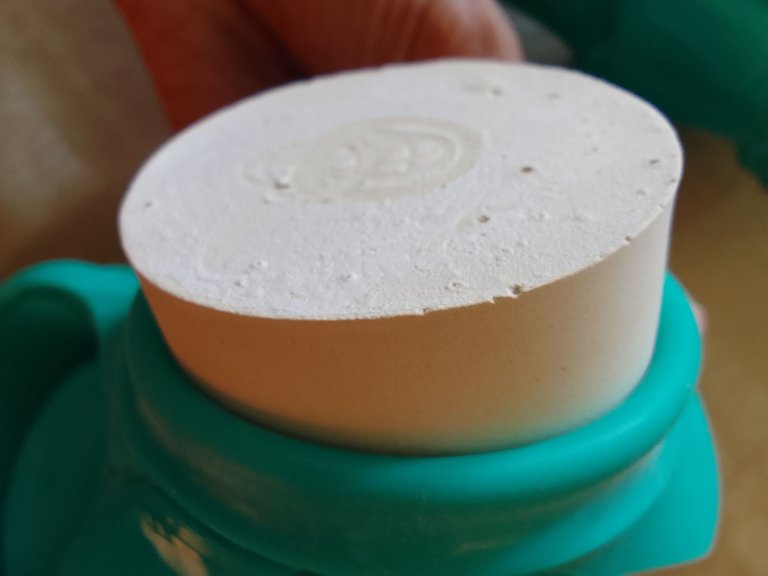
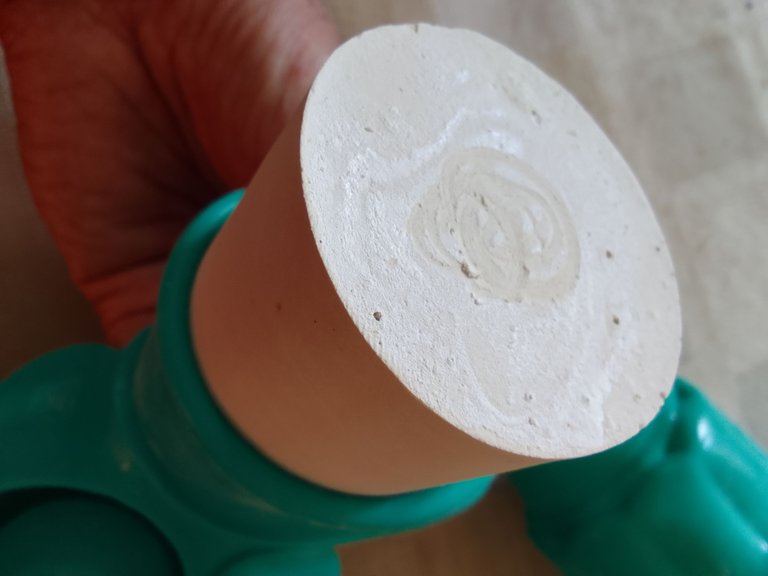
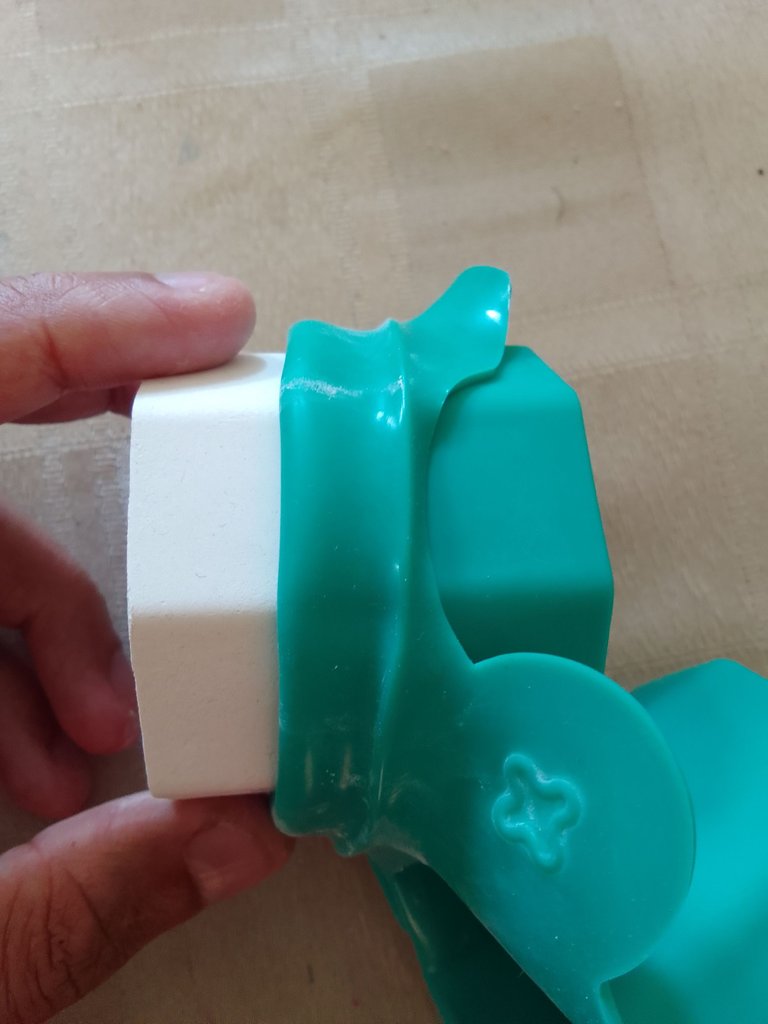
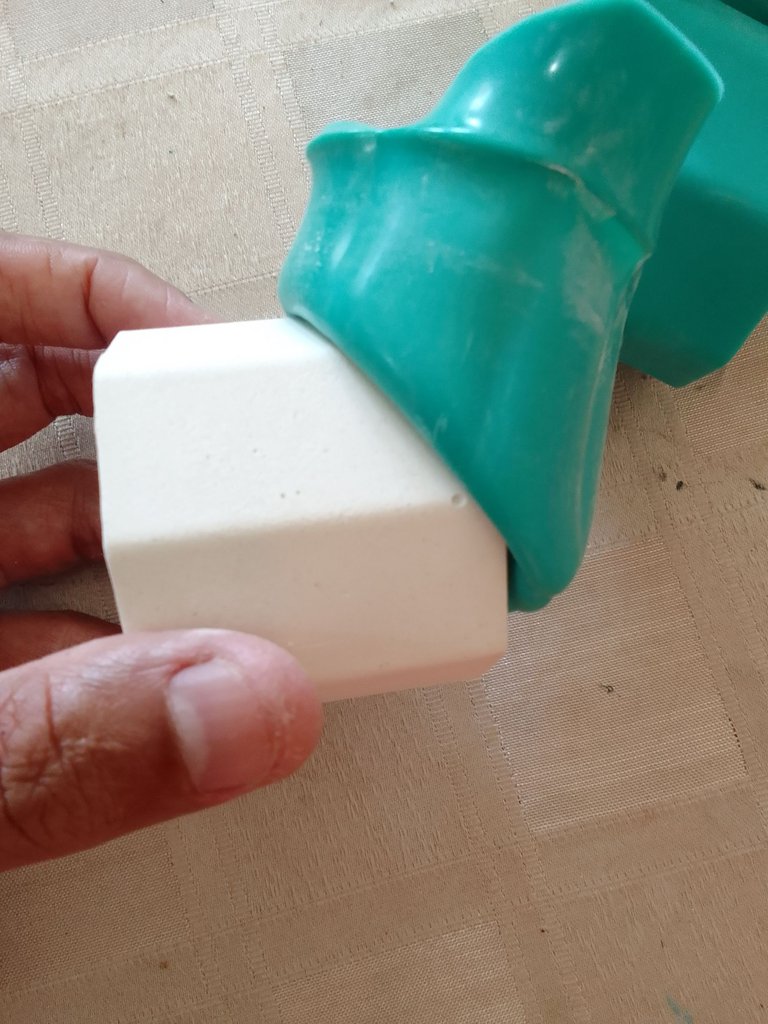
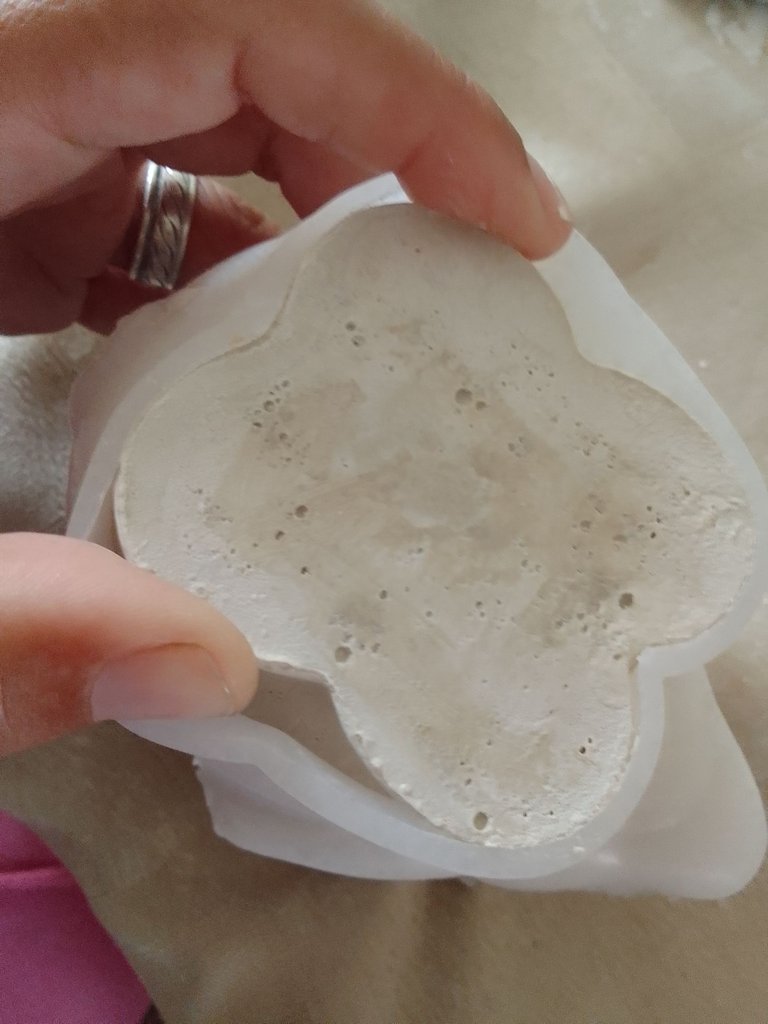
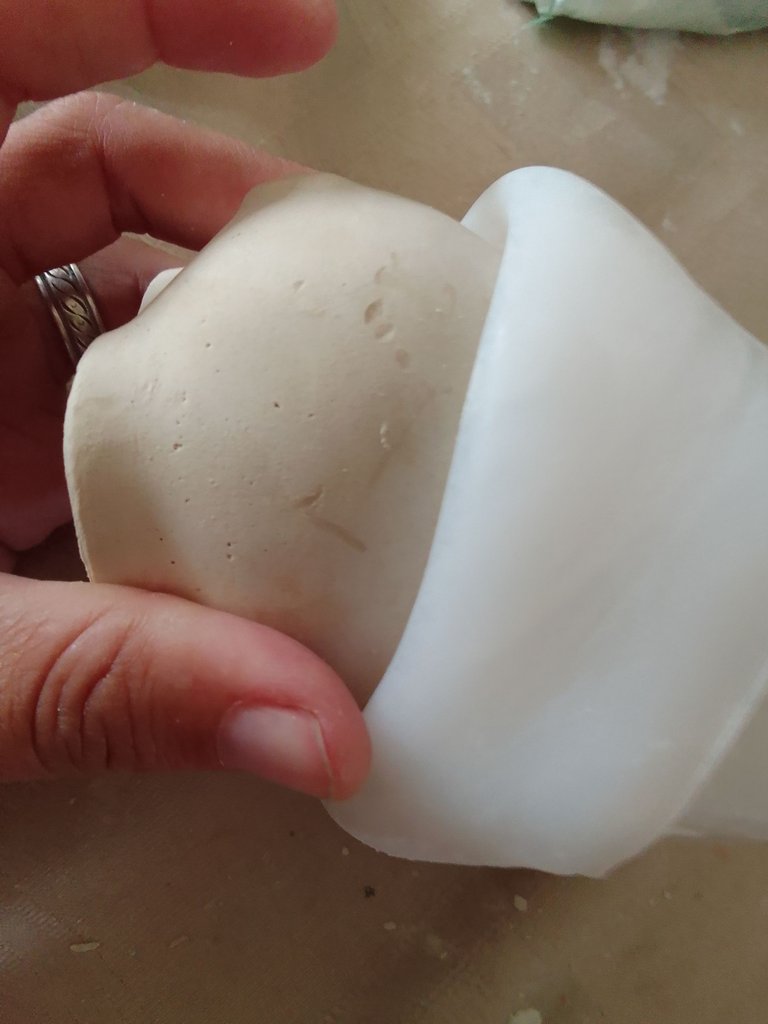
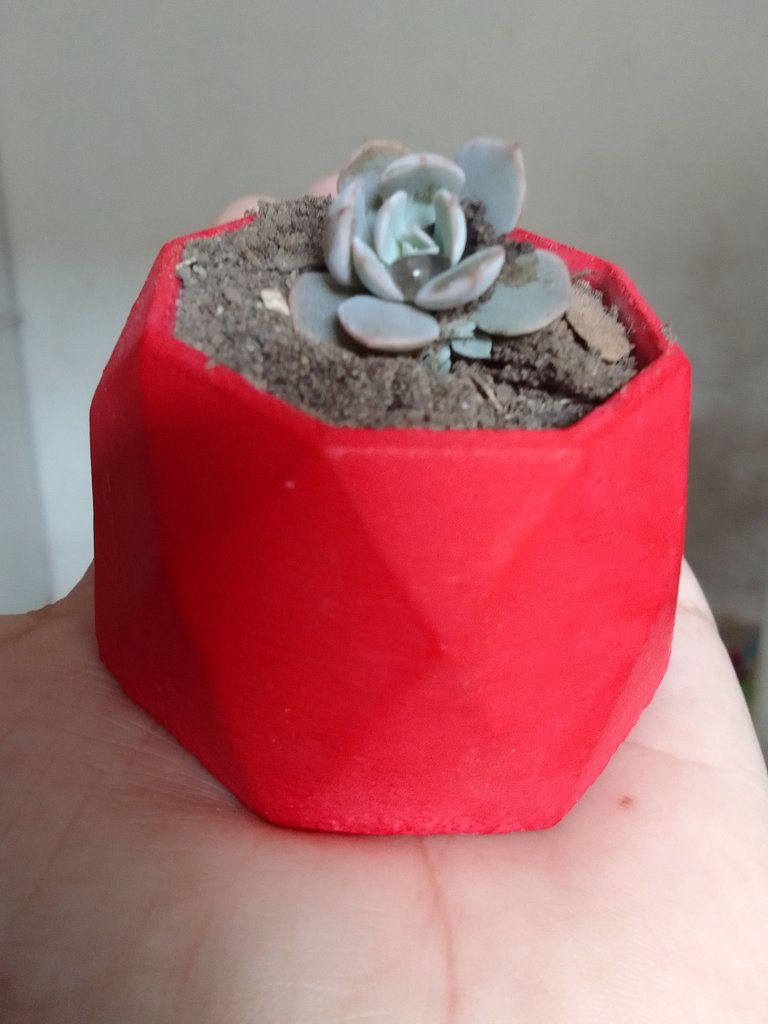
Paso 3-1: Desmolde de las macetas cilíndricas y biseladas.
Después de 2 horas de secado procedí a desmoldar las macetas con mucho cuidado porque es probable que aún no esté totalmente seca y puedan romperse, es el paso más complicado, pues, hay que tener buen pulso para sacar la pieza sin que está se rompa y a la vez sin dañar el molde. Primero tomé los extremos superiores del molde e hice presión hacia abajo con firmeza una vez descubierta la base de las macetas la sostuve con la mano izquierda mientras continúe haciendo presión hasta descubrir completamente la maceta.
Step 3-1: Unmolding of the cylindrical and beveled pots.
After 2 hours of drying I proceeded to unmold the pots with great care because it is likely that it is not yet completely dry and may break, it is the most complicated step, because you have to have a good pulse to remove the piece without breaking it and at the same time without damaging the mold. First I took the upper ends of the mold and pressed down firmly, once the base of the pots was uncovered I held it with my left hand while continuing to press down until the pot was completely uncovered.
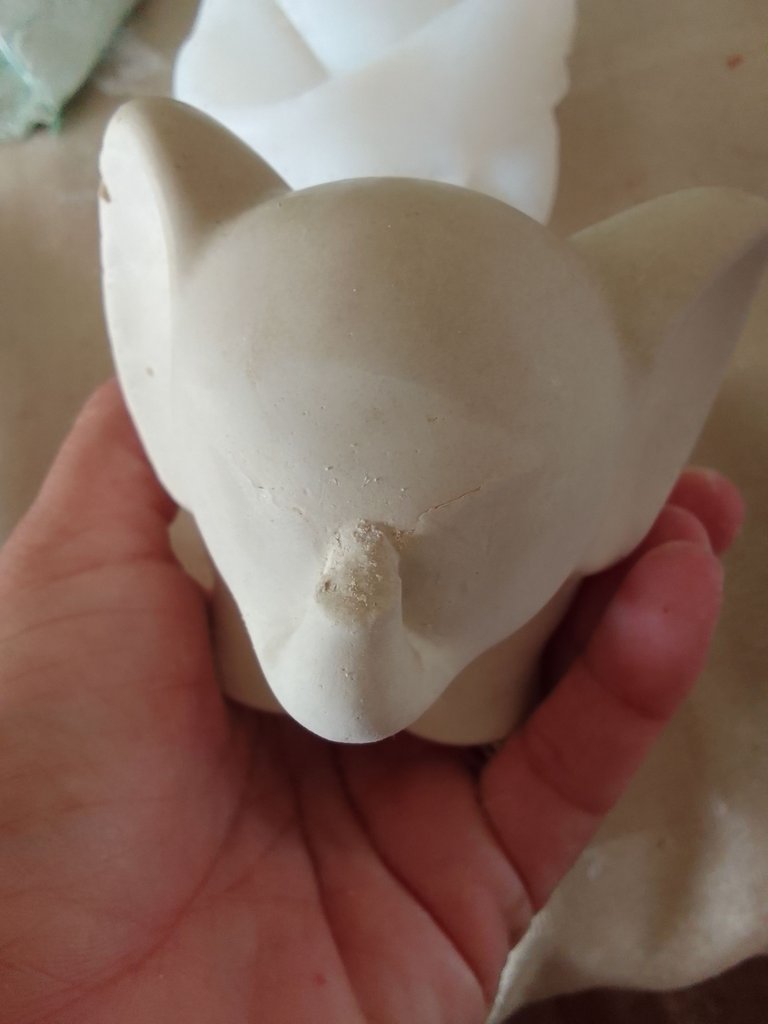
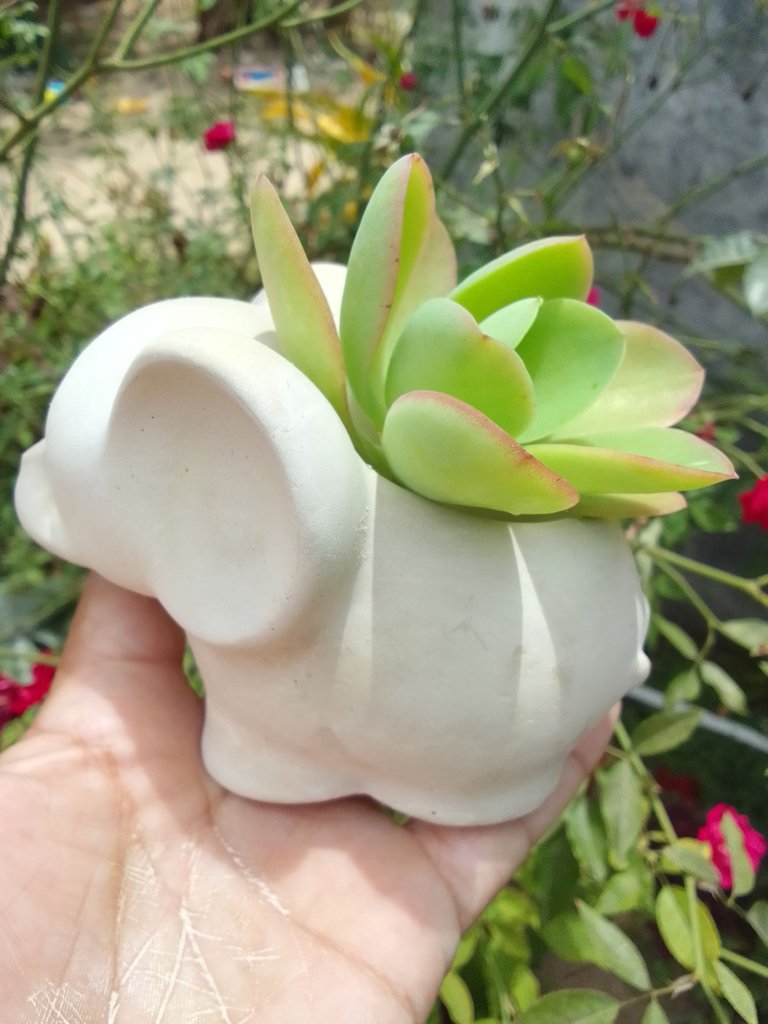
Paso 3-2: Desmolde de la maceta en forma de elefante.
Para desmoldar está maceta fue necesario dejar secar la mezcla por 5 horas y en este caso al intentar desmoldar le rompí la trompa al elefante en 2 ocasiones. Luego mi hermana me sugirió que le diera 2 días de secado a la pieza para evaluar el resultado, utilizamos la técnica de ensayo y error y en este caso si funcionó, llegando a la conclusión que es necesario que la pieza seque completamente para ser desmoldada, sobretodo en las áreas críticas de las pieza dónde la figura presenta partes delgadas que son frágiles y que pueden romperse fácilmente.
Step 3-2: Unmolding the elephant-shaped pot.
To unmold this pot it was necessary to let the mixture dry for 5 hours and in this case when I tried to unmold it I broke the elephant's trunk twice. Then my sister suggested me to give the piece 2 days to dry to evaluate the result, we used the trial and error technique and in this case it worked, reaching the conclusion that it is necessary that the piece dries completely to be unmolded, especially in the critical areas of the piece where the figure has thin parts that are fragile and can break easily.
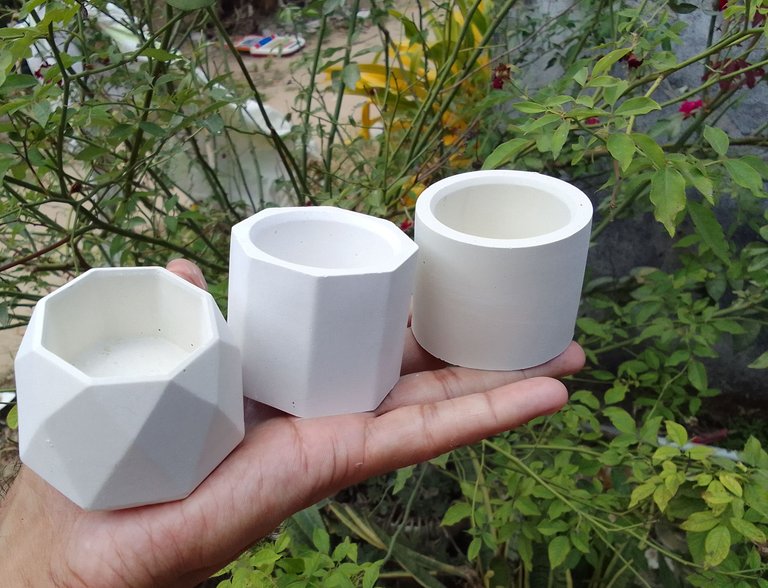
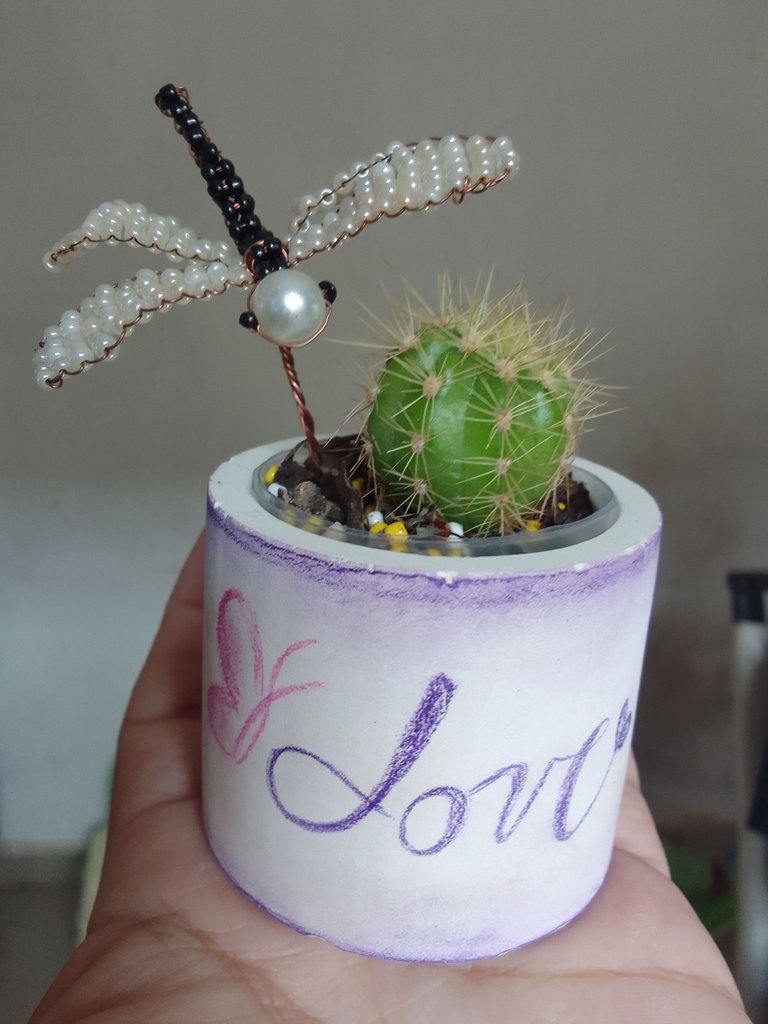
Una vez finalizado el paso anterior ya las macetas están listas para ser utilizadas, pero en mi caso para darle un toque personal decidí pintarlas y realizar diseños variados alusivos a cualquier ocasión especial y aquí les muestro el resultado final.
Once the previous step is finished the pots are ready to be used, but in my case to give them a personal touch I decided to paint them and make various designs alluding to any special occasion and here I show you the final result.
Espero que le haya gustado este tutorial. Que la bendición de Dios les acompañe siempre. Gracias por leer..!
I hope you liked this tutorial. May God's blessing be with you always. Thanks for reading...!

Las fotos de esta publicación son de mi propiedad.
Las ediciones de Foto y el Banner lo realice con las aplicaciones: Poster Maker y Text Art, descargadas desde Play Store.
The photos in this publication are my property.
The Banner was made with the applications: Poster Maker and Text Art, downloaded from Play Store.
Congratulations, your post has been upvoted by @dsc-r2cornell, which is a curating account for @R2cornell's Discord Community. We can also be found on our hive community & peakd as well as on my Discord Server
Felicitaciones, su publication ha sido votado por @dsc-r2cornell. También puedo ser encontrado en nuestra comunidad de colmena y Peakd así como en mi servidor de discordia
Muchas gracias por el apoyo. 🤗
Congratulations @ferguis-ve! You have completed the following achievement on the Hive blockchain And have been rewarded with New badge(s)
Your next target is to reach 20 posts.
You can view your badges on your board and compare yourself to others in the Ranking
If you no longer want to receive notifications, reply to this comment with the word
STOPTo support your work, I also upvoted your post!
Check out our last posts:
Support the HiveBuzz project. Vote for our proposal!
Te quedaron muy bonitas las macetas, estoy segura que tú emprendimiento será exitoso. 👏👆🎉🙋👍
Muchas gracias @creacioneslelys. Espero que sea así Dios mediante, tengo muchas ideas en mente que espero poder llevar a cabo. Gracias por leer🤗
Amén! @ferguis-ve
Muy lindas tus macetas, Yenifer💜 Éxitos en tu emprendimiento 😊😊
Amen. Graciassss @milindasblog. Son las más lindas macetas que he creado, gracias por leer. 🤗😁
Te quedaron bonitas y se ven lindas con las suculentas. Suerte con tu emprendimiento!
Muchas gracias @coquicoin espero sea todo un éxito. Gracias por leer🤗🤗
Me encanta tu emprendimiento, una pregunta, es suficiente dos horas de secado?, Qué pasa si lo dejas más tiempo se adhiere mucho al Silicón? Me encanta la forma de las macetas!
Muchas gracias🤗 Si, con dos horas es suficiente, así optimiza el tiempo (la de elefante necesita más tiempo). Si lo dejas más tiempo no ocurre nada, pero perderás tiempo que podrías invertir pintando las macetas por ejemplo. si lubricas bien el molde con aceite no debe adherirse al silicon. Gracias por leer 🤗