Bienvenidos Queridos Amantes de la Artes Manuales
Welcome Dear Manual Arts Lovers
Greetings dear friends who love arts and crafts, it's always great to be back with you to show you my creations. If you remember, with the approaching start of the new school year, I am looking for options to make hair ornaments for my youngest girl. While browsing the web, I found a super simple and very nice crochet project, I decided to make it, and of course I couldn't help but share it with you.


Como pueden ver en la imagen de portada, se trata de una bella flor tejida a crochet, debo destacar que la que les muestro es la prueba inicial. Por supuesto, ahora me toca tejer otras, con colores más acorde con el uniforme del colegio, para así decorar con ellas unos cintillos o algunos moños. Pero, también se me ocurre que se verían geniales decorando un sombrero, un gorrito, una cartera, una blusa en fin son muchísimas las opciones, porque quedan realmente hermosas.
As you can see in the cover image, it is a beautiful crocheted flower, I must emphasize that the one I show you is the initial test. Of course, now I have to knit others, with colors more in accordance with the school uniform, in order to decorate with them some headbands or some bows. But it also occurs to me that they would look great decorating a hat, a cap, a purse, a blouse, in short, there are many options, because they are really beautiful.
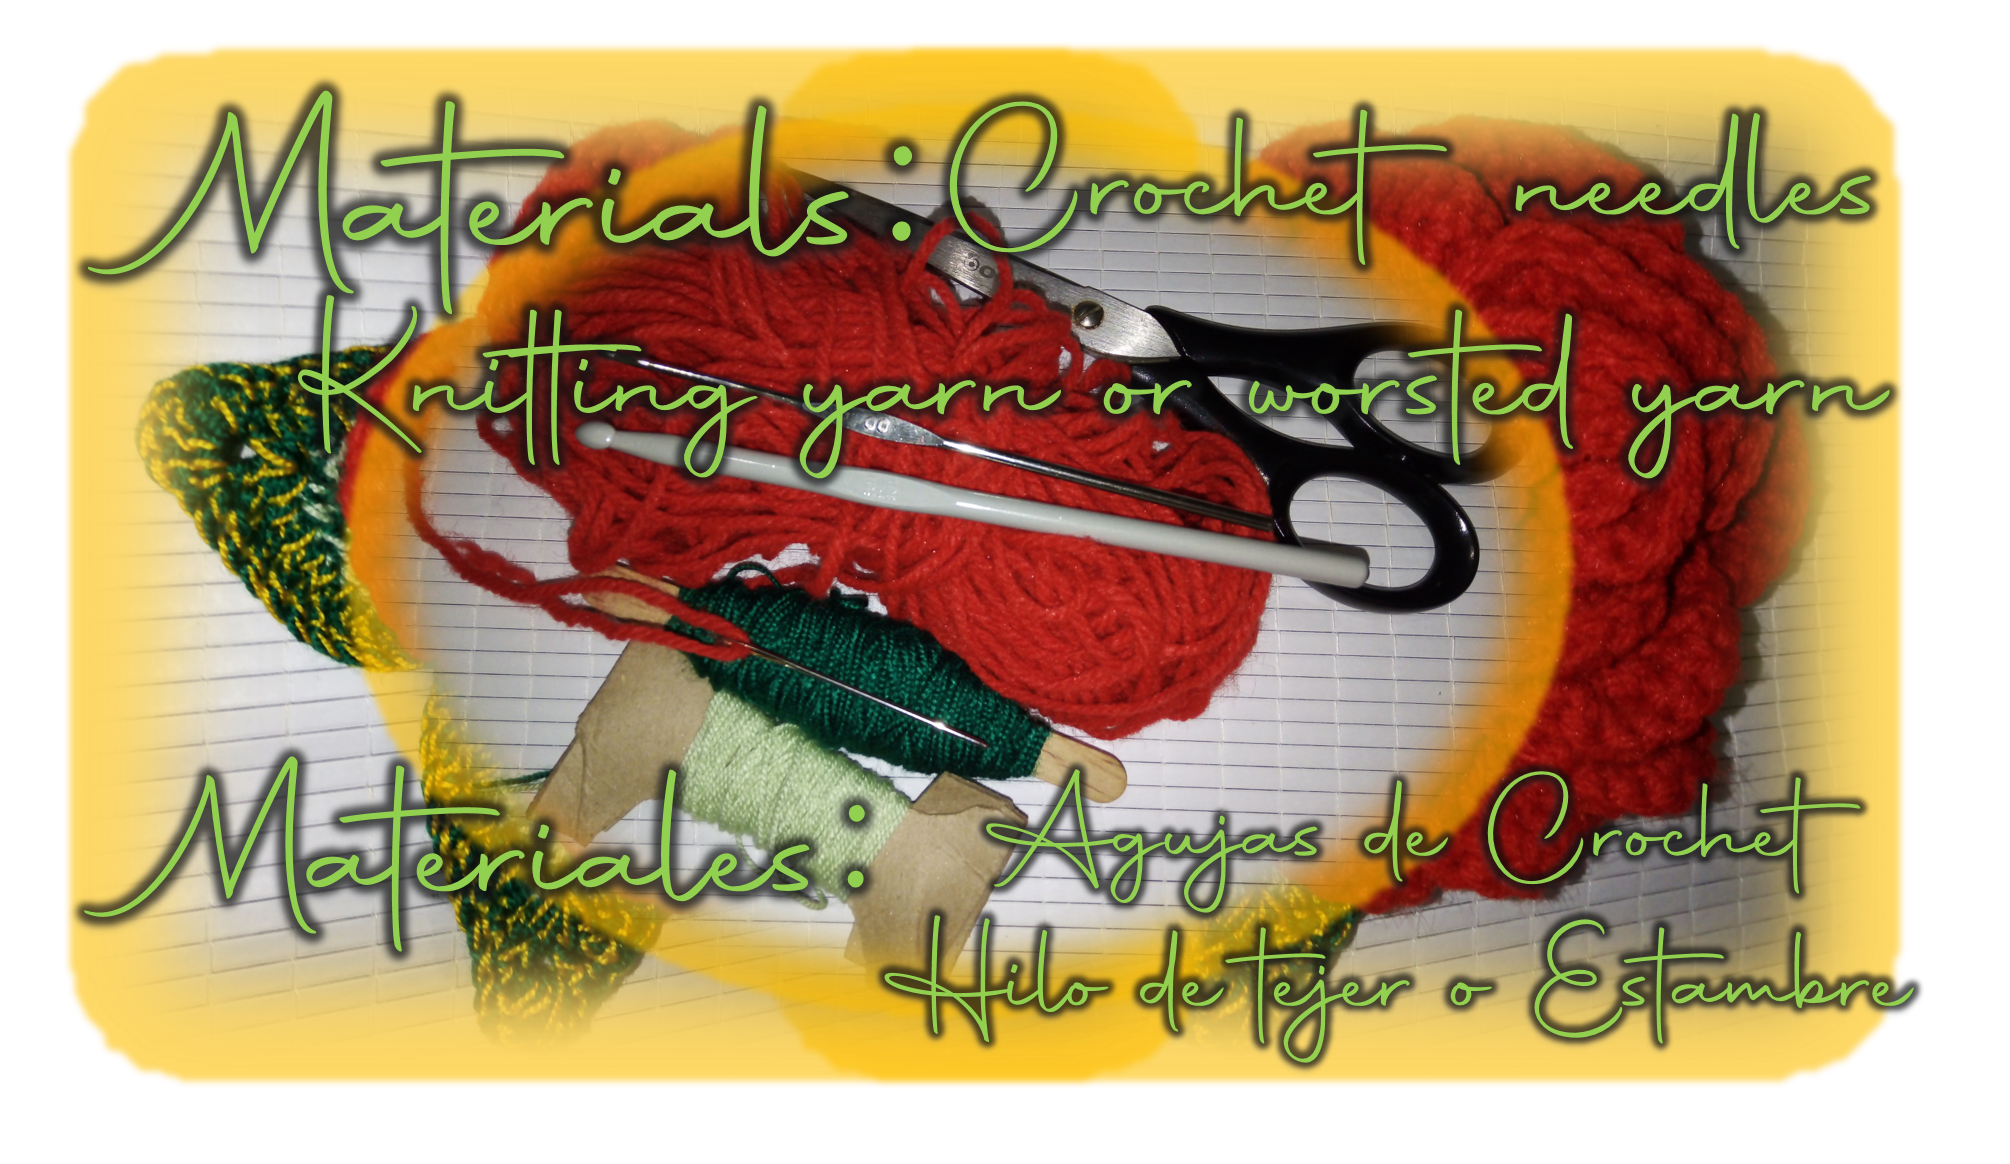
Los materiales que necesitaran son muy pocos y fáciles de encontrar en cualquier mercería, solo necesitan hilo de tejer, agujas de acuerdo a grosor del hilo, aguja estambrera y tijeras. Ahora, debo mencionar, que, para realizar la flor de prueba, utilice un estambre grueso y salió una flor bastante grande, tiene 12 cm de diámetro, así que, deben tener en cuenta que, dependiendo el grosor del hilo, el tamaño de la flor variará. Por ello, en mi caso, como la necesito para una niña pequeña, la próxima vez usaré hilo delgado para que salgan más pequeñas y se ajusten a lo que necesito. Sin embargo, con este tamaño me parecen que quedaría genial decorando un sombrero, un gorro o una bufanda. Pero bueno, ya es momento deponer manos a la obra, seguidamente le detallo los pasos, primeramente, iniciaré con las instrucciones para la flor y luego colocaré las de las hojas.
The materials you will need are very few and easy to find in any haberdashery, you only need knitting yarn, needles according to the thickness of the yarn, stamper needle and scissors. Now, I must mention, that, to make the test flower, I used a thick yarn and it came out a pretty big flower, it has 12 cm in diameter, so, you must keep in mind that, depending on the thickness of the yarn, the size of the flower will vary. So, in my case, as I need it for a little girl, next time I will use thin yarn so that they come out smaller and fit what I need. However, with this size I think it would look great decorating a hat, a cap or a scarf. But well, it's time to get down to work, here are the steps, first, I'll start with the instructions for the flower and then I'll place the instructions for the leaves.
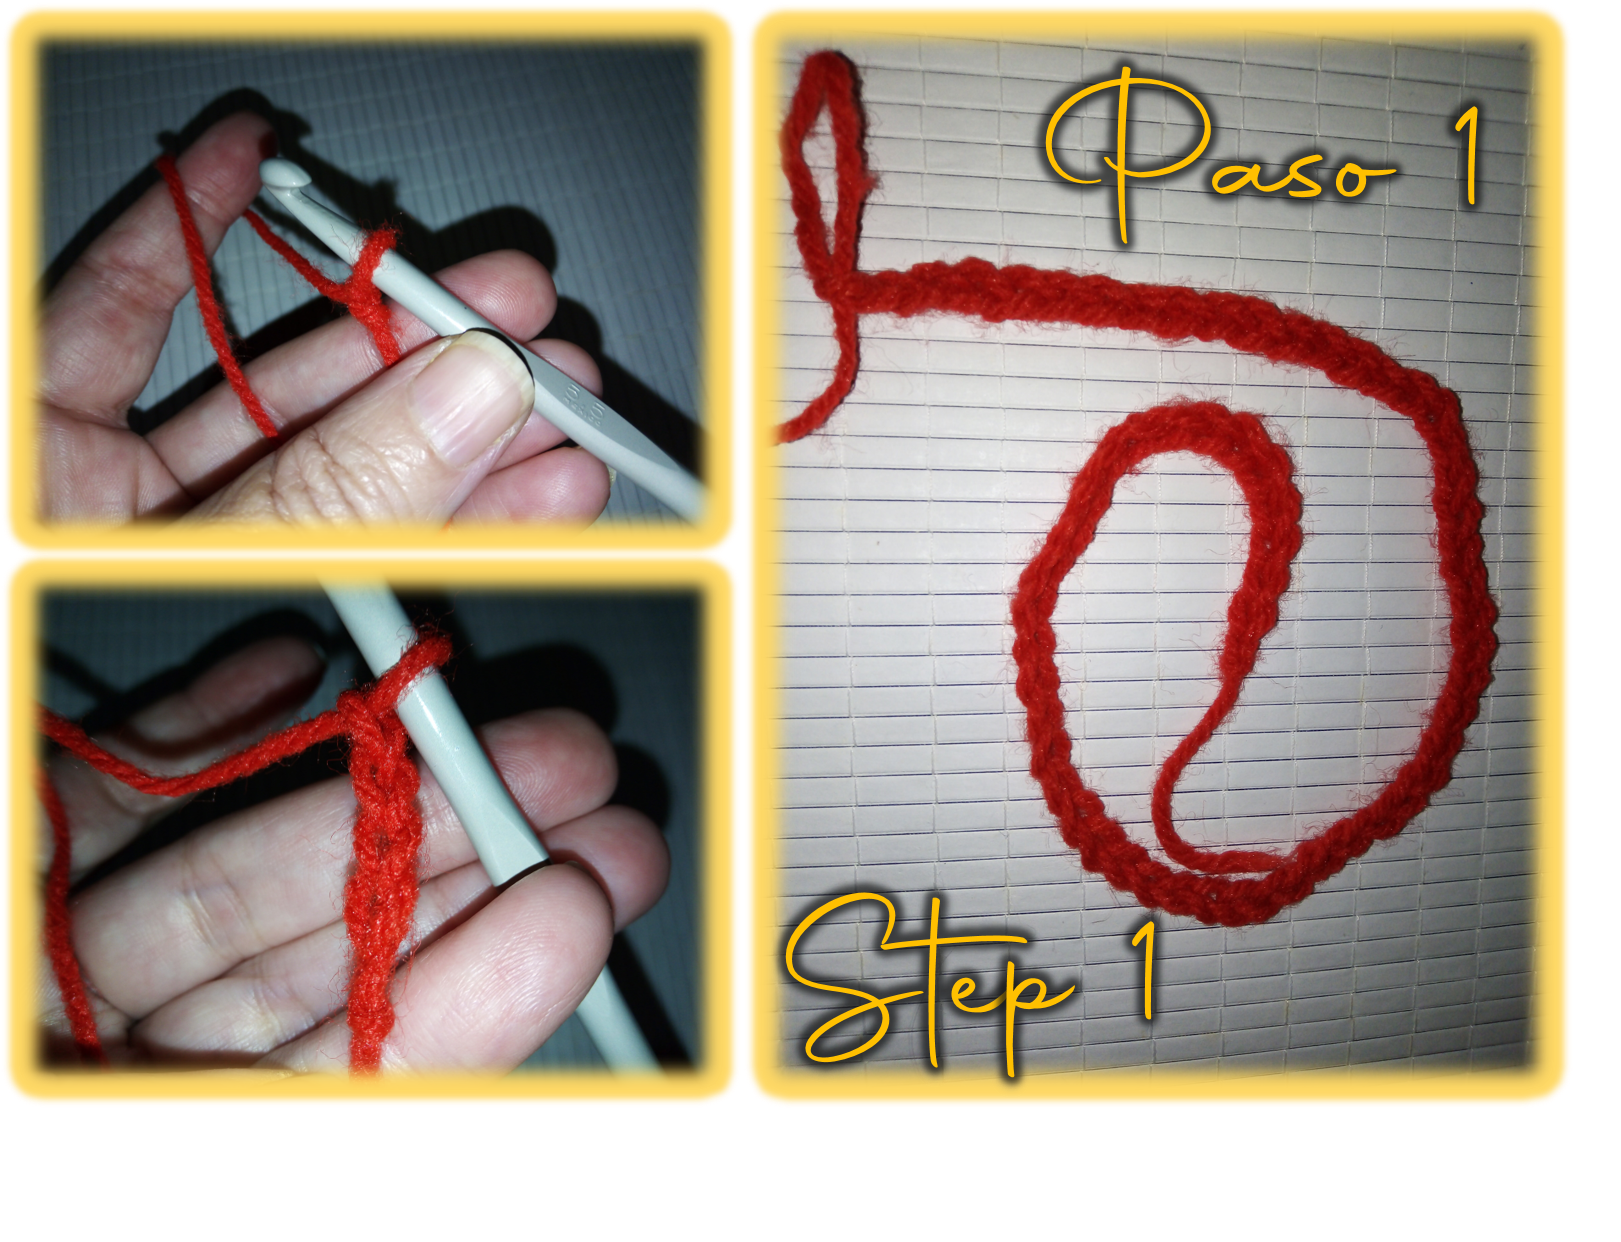
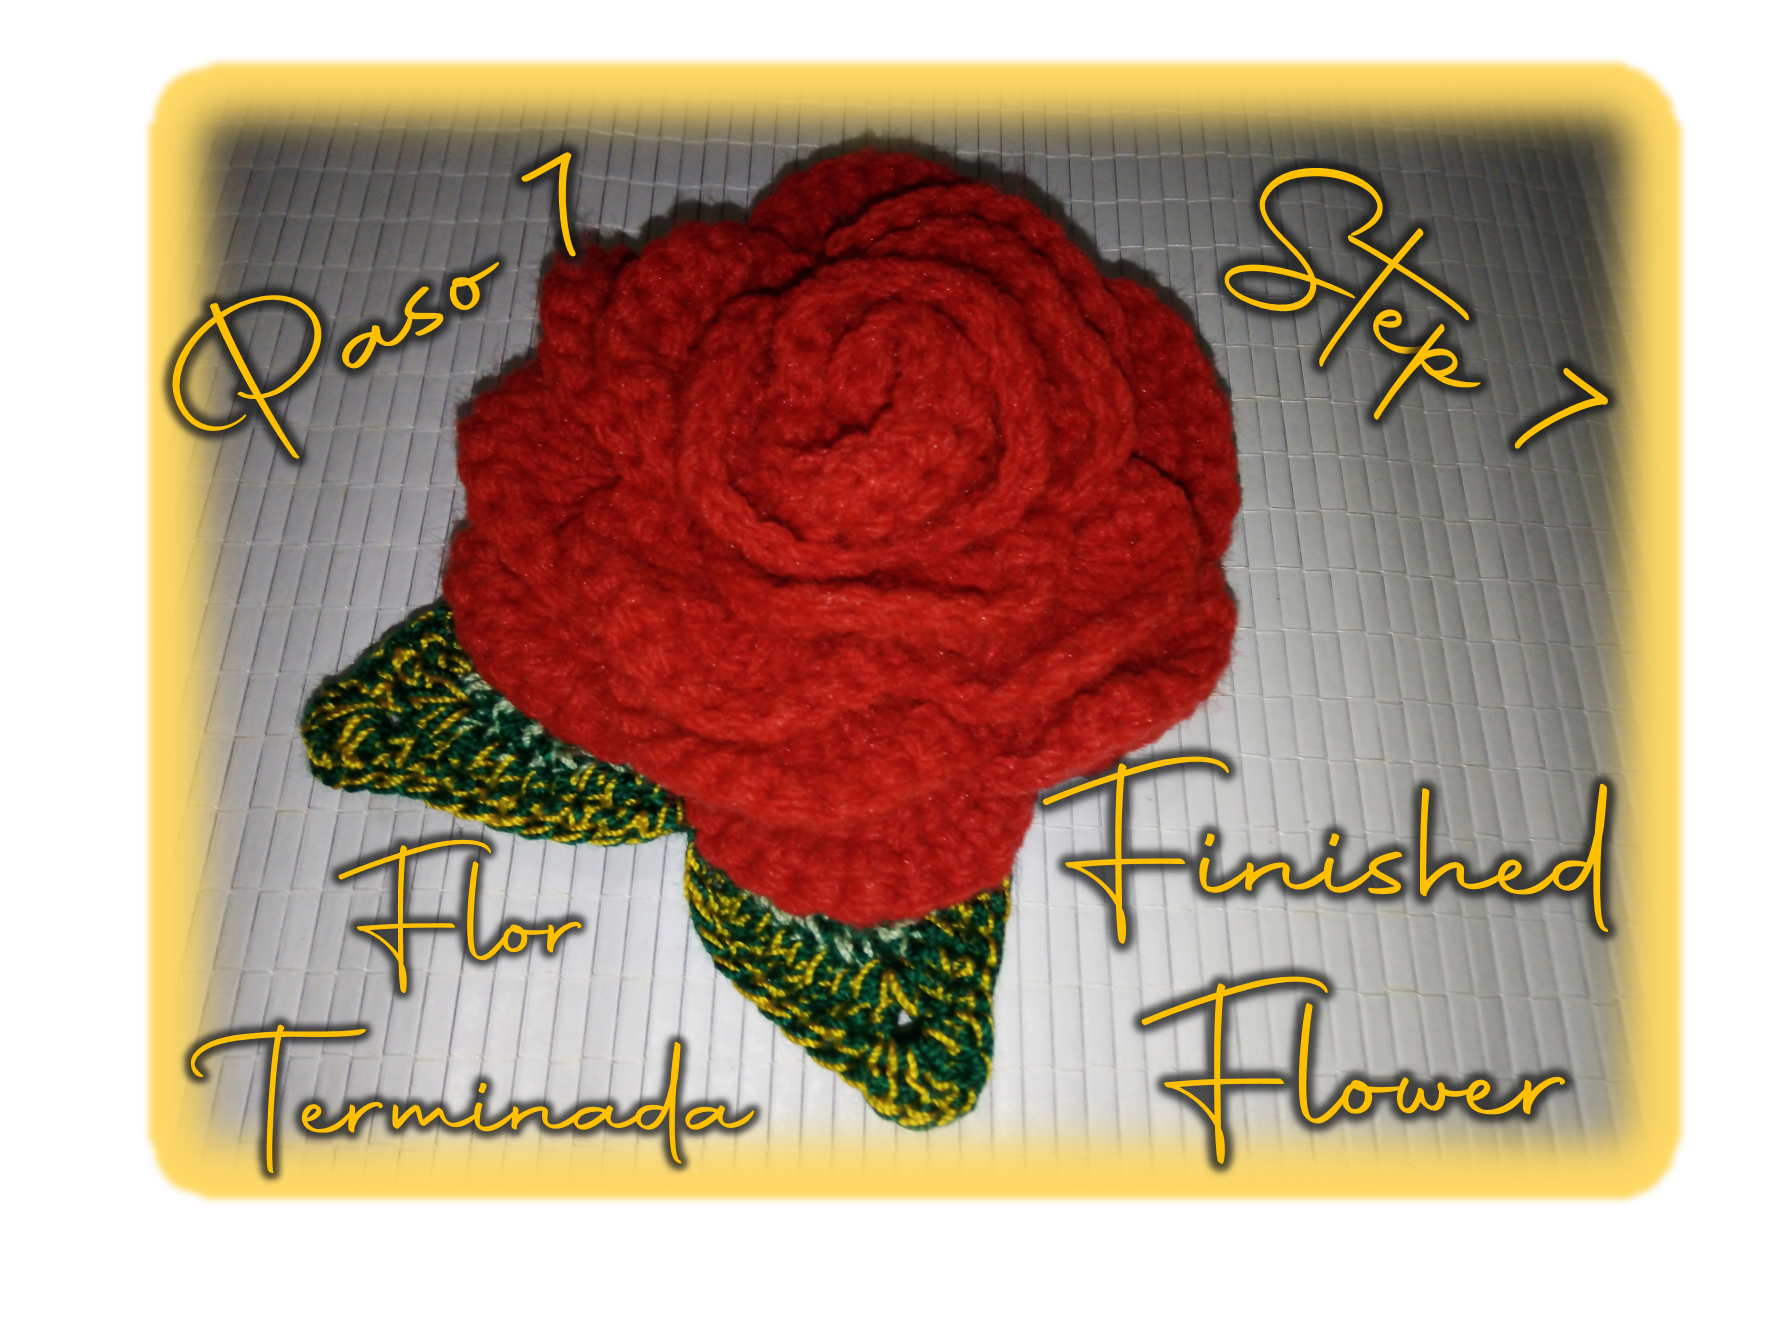
Paso 1:
Lo primero que realizaremos para comenzar la tira con la que formaremos nuestra hermosa rosa será muy sencillo, trabajaremos 60 puntos de cadenetas.
Step 1:
The first thing we will do to start the strip with which we will form our beautiful rose will be very simple, we will work 60 chain stitches.
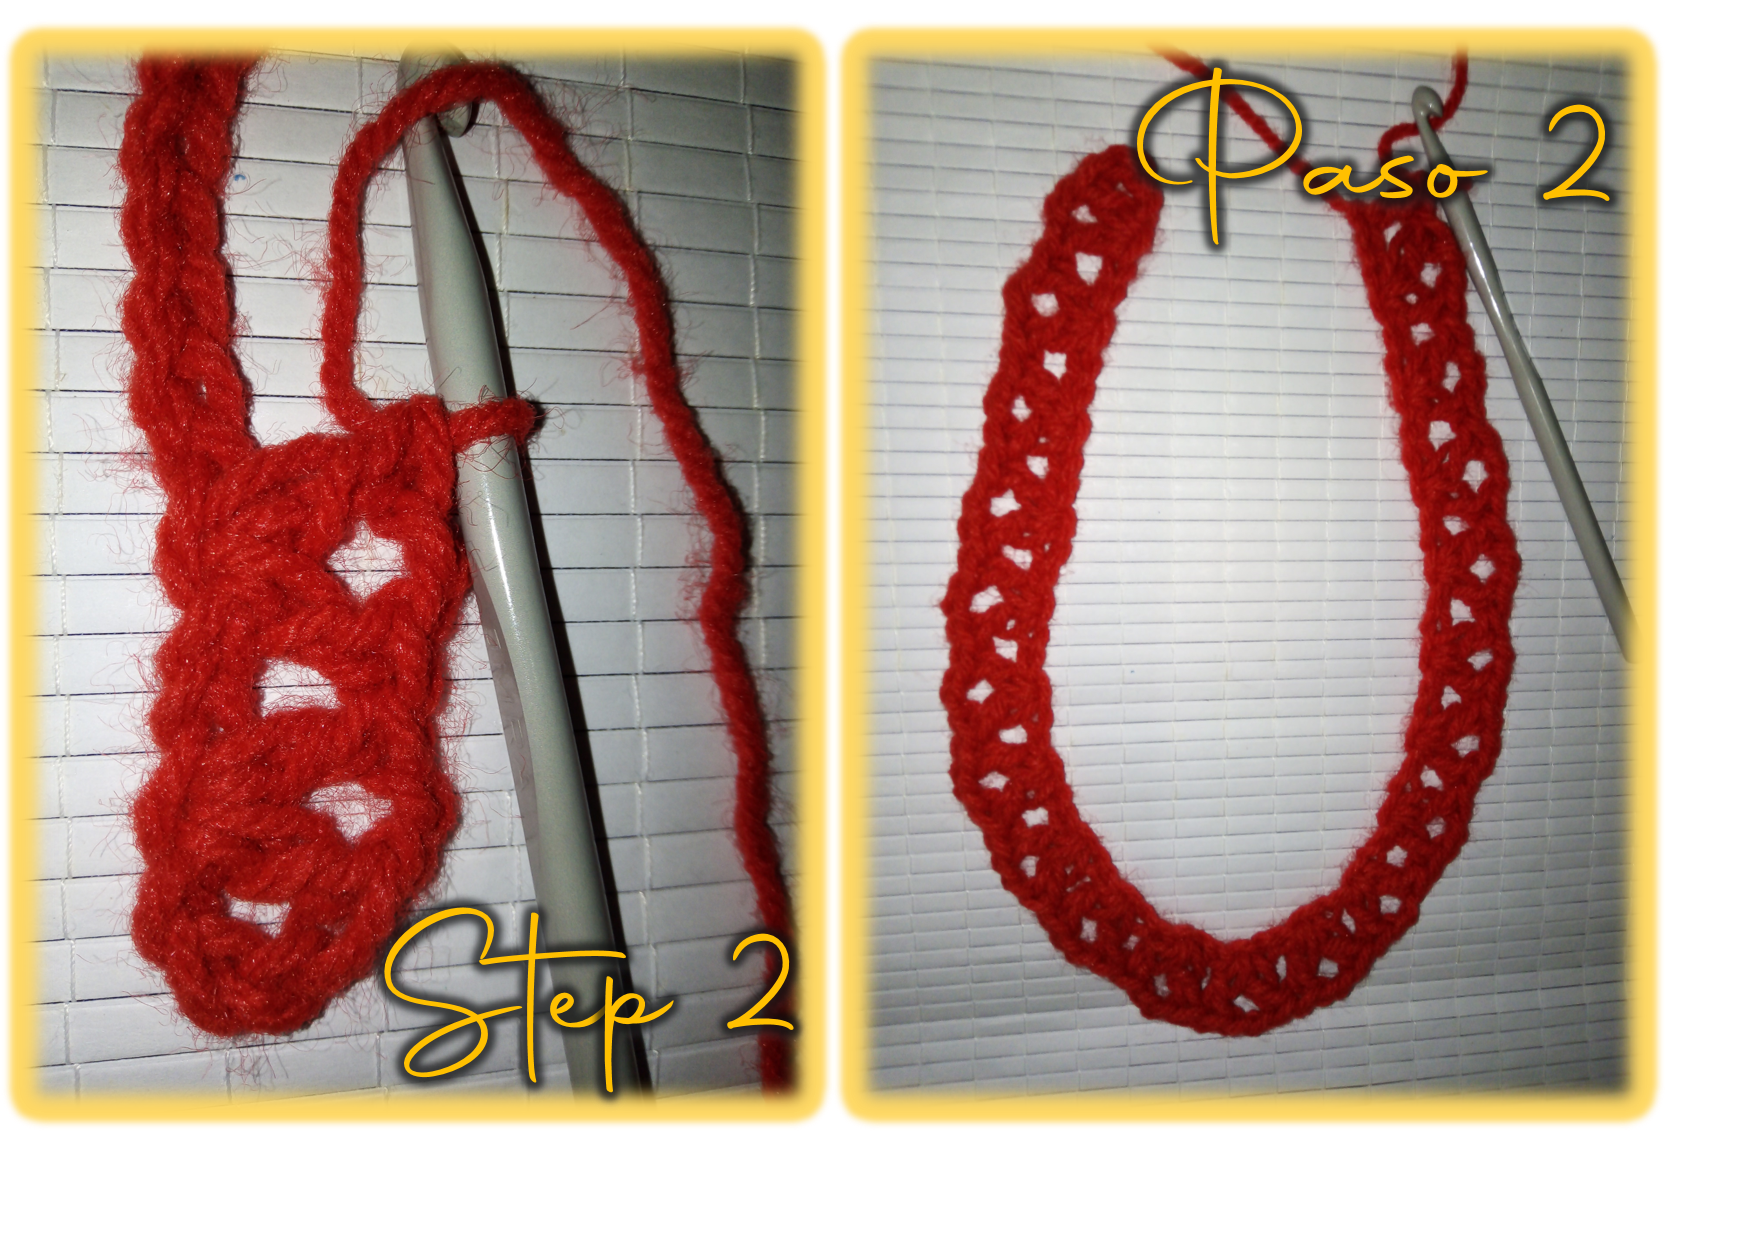
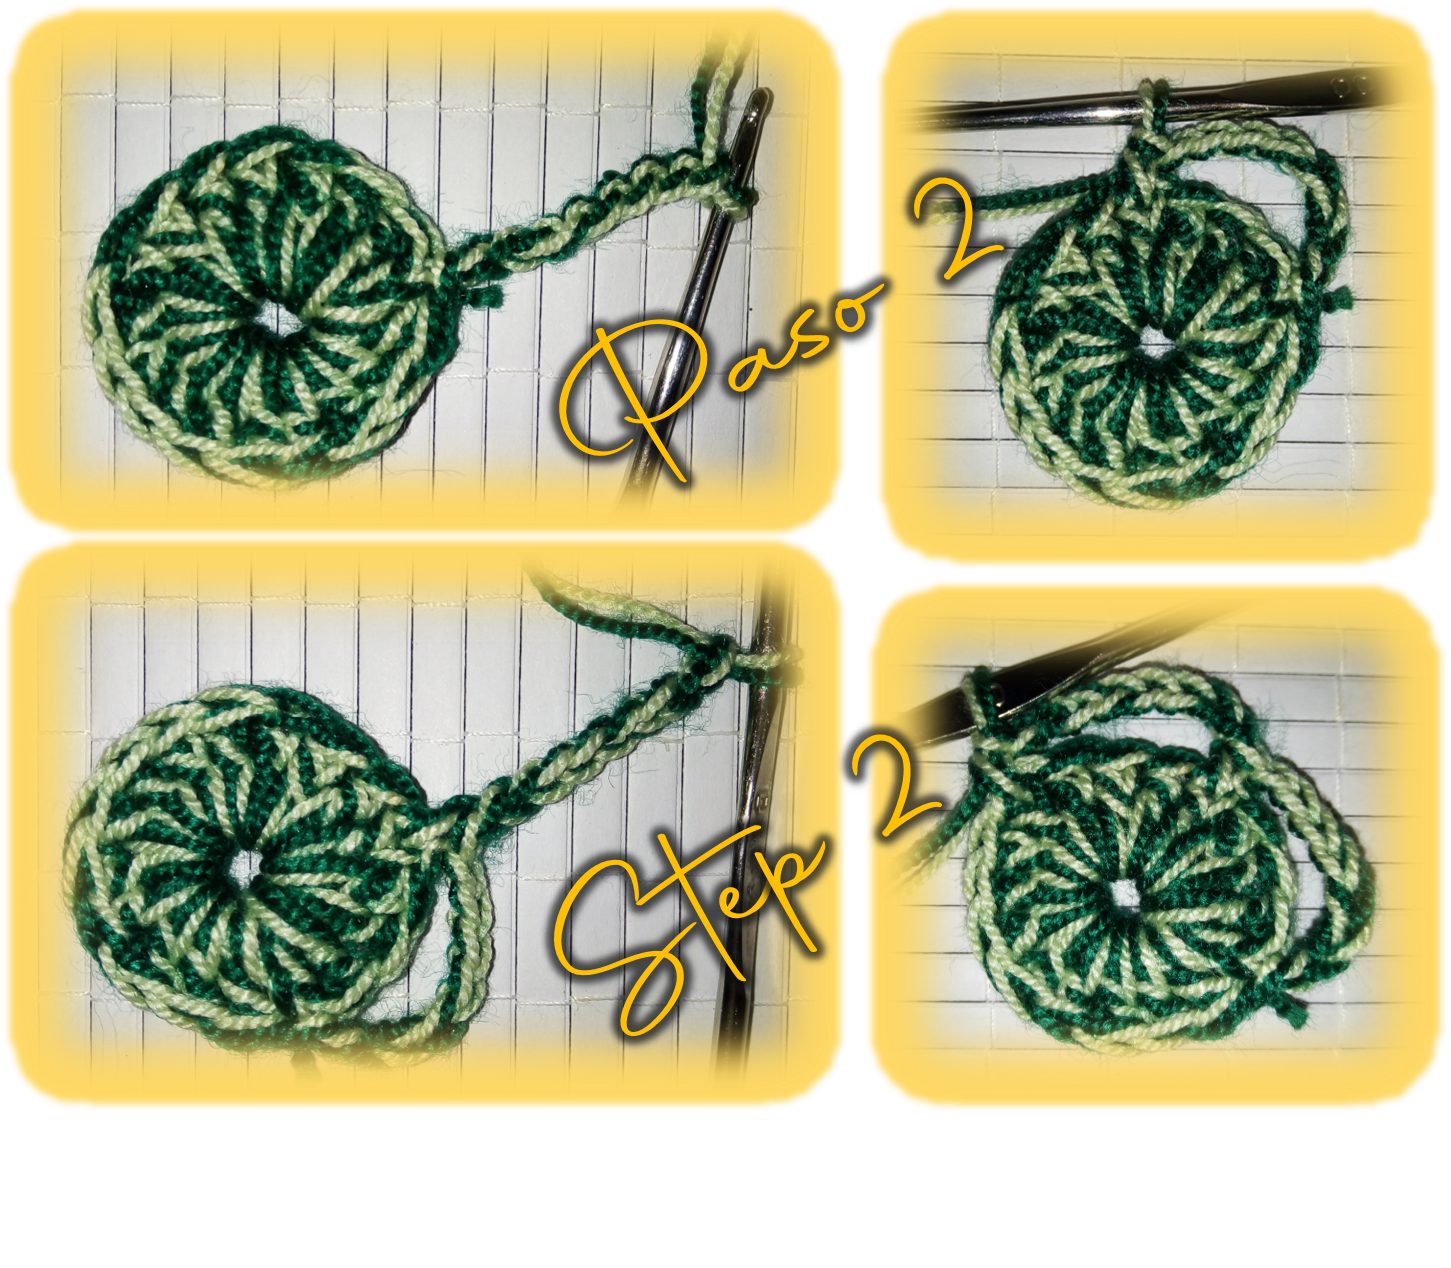
Paso 2:
Para esta nueva hilera, trabajaremos 3 cadenetas que son equivalentes a un punto alto, ahora nos toca regresarnos, para ello contamos 3 puntos de la cadeneta base. En ese punto, realizaremos un punto alto, después 2 cadenas y en el mismo punto de la base hacemos otro punto alto, con ello formaremos una especie de “V”. Seguido contaremos 3 puntos de la base y haremos nuevamente un punto alto, seguido de 2 cadenetas y un punto alto en el mismo punto de la base. Ese patrón lo continuaremos haciendo hasta terminar esta segunda hilera.
Step 2:
For this new row, we will work 3 chain stitches that are equivalent to a high stitch, now it is our turn to go back, for this we count 3 stitches from the base chain stitch. In that stitch, we will make a double crochet, then 2 chains and in the same stitch of the base we will make another double crochet, with this we will form a kind of "V". Then we will count 3 stitches of the base stitch and we will knit again a single crochet, followed by 2 chains and a single crochet in the same stitch of the base stitch. We will continue this pattern until the end of this second row.
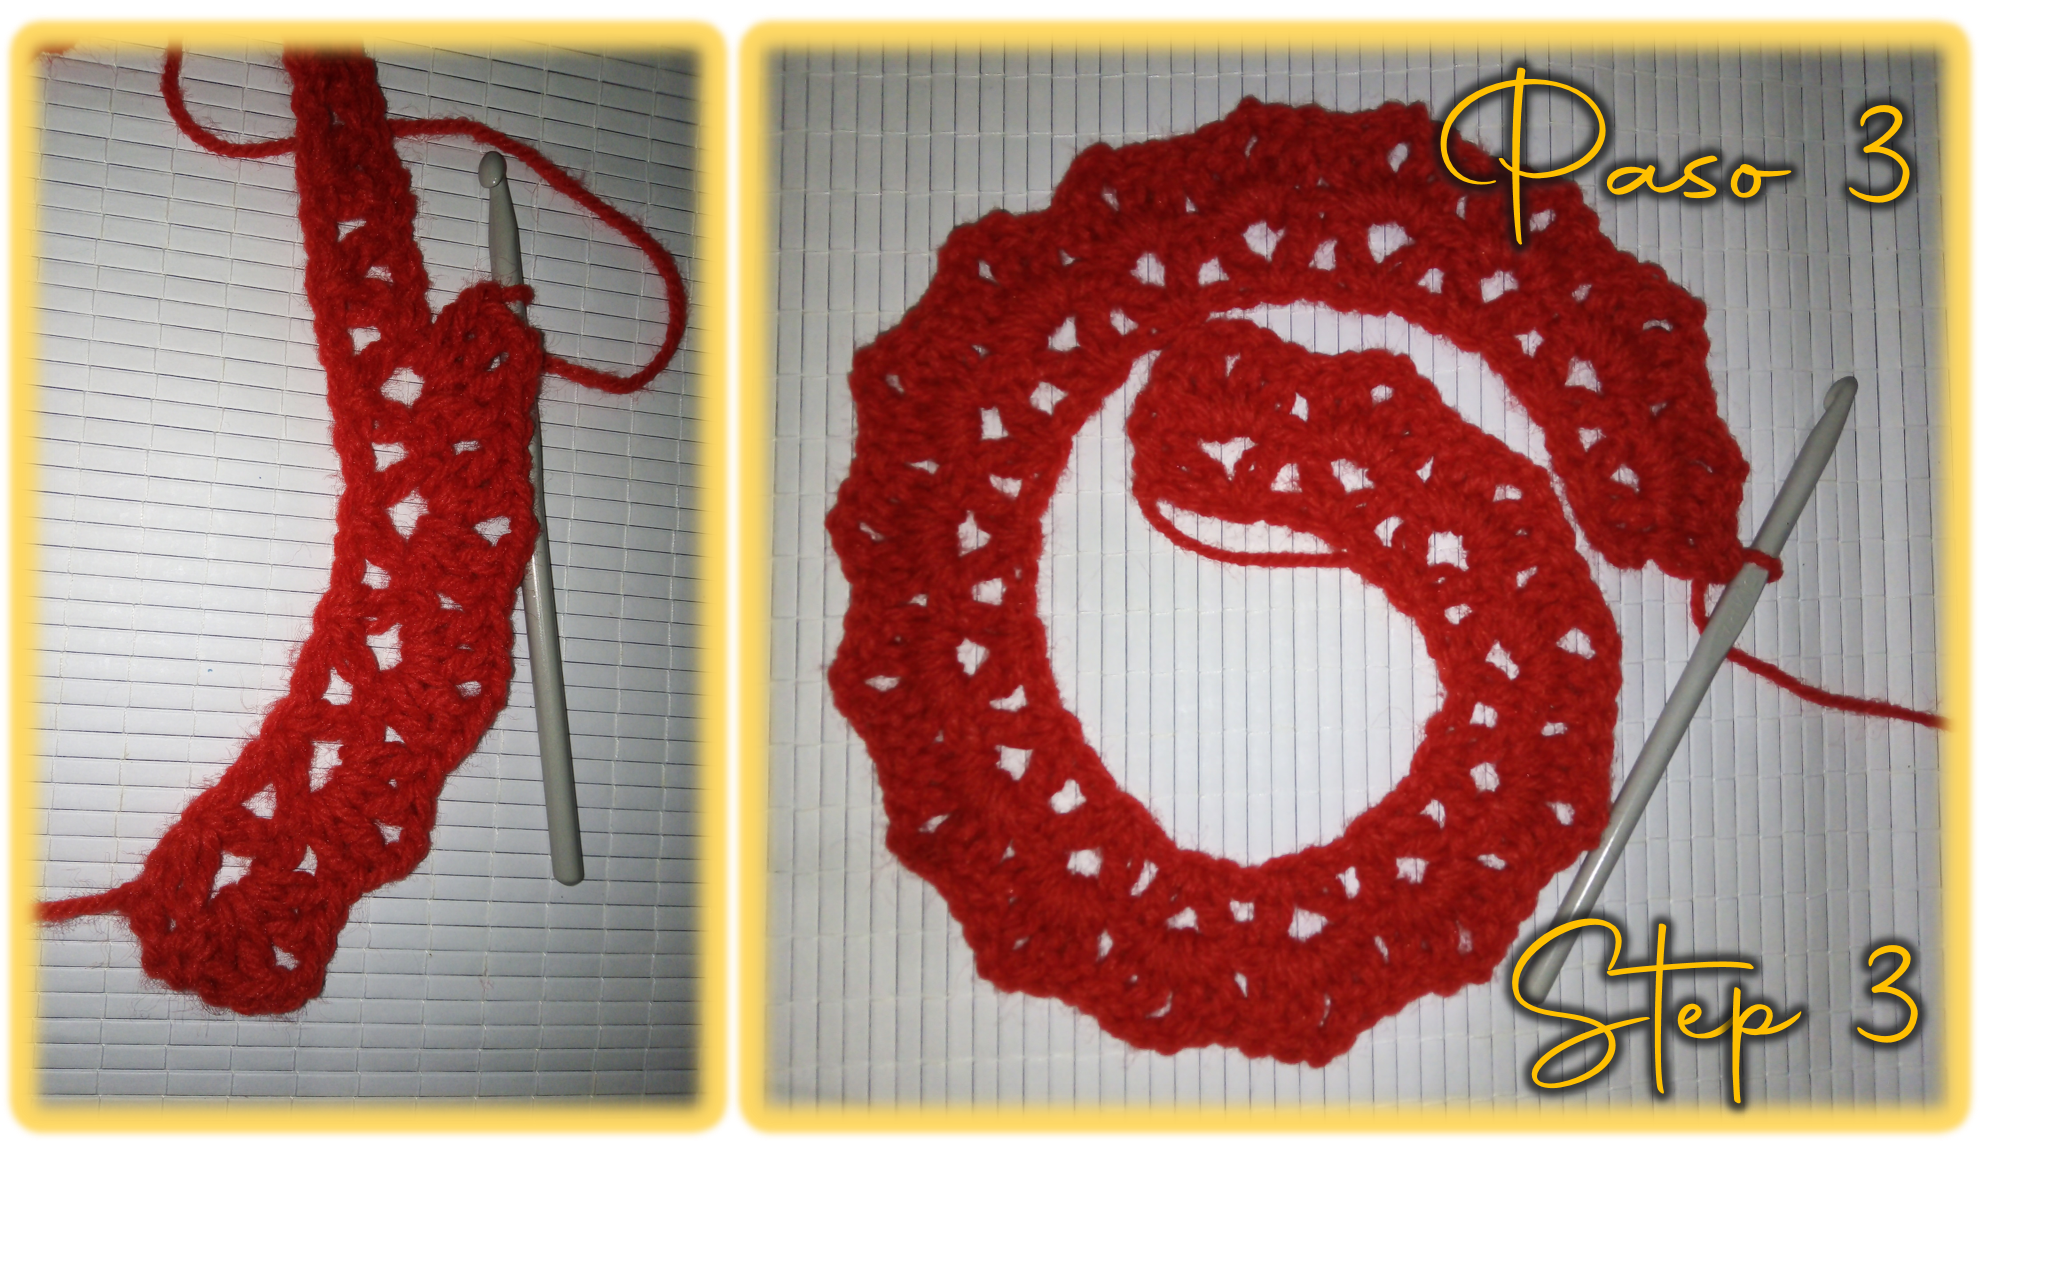
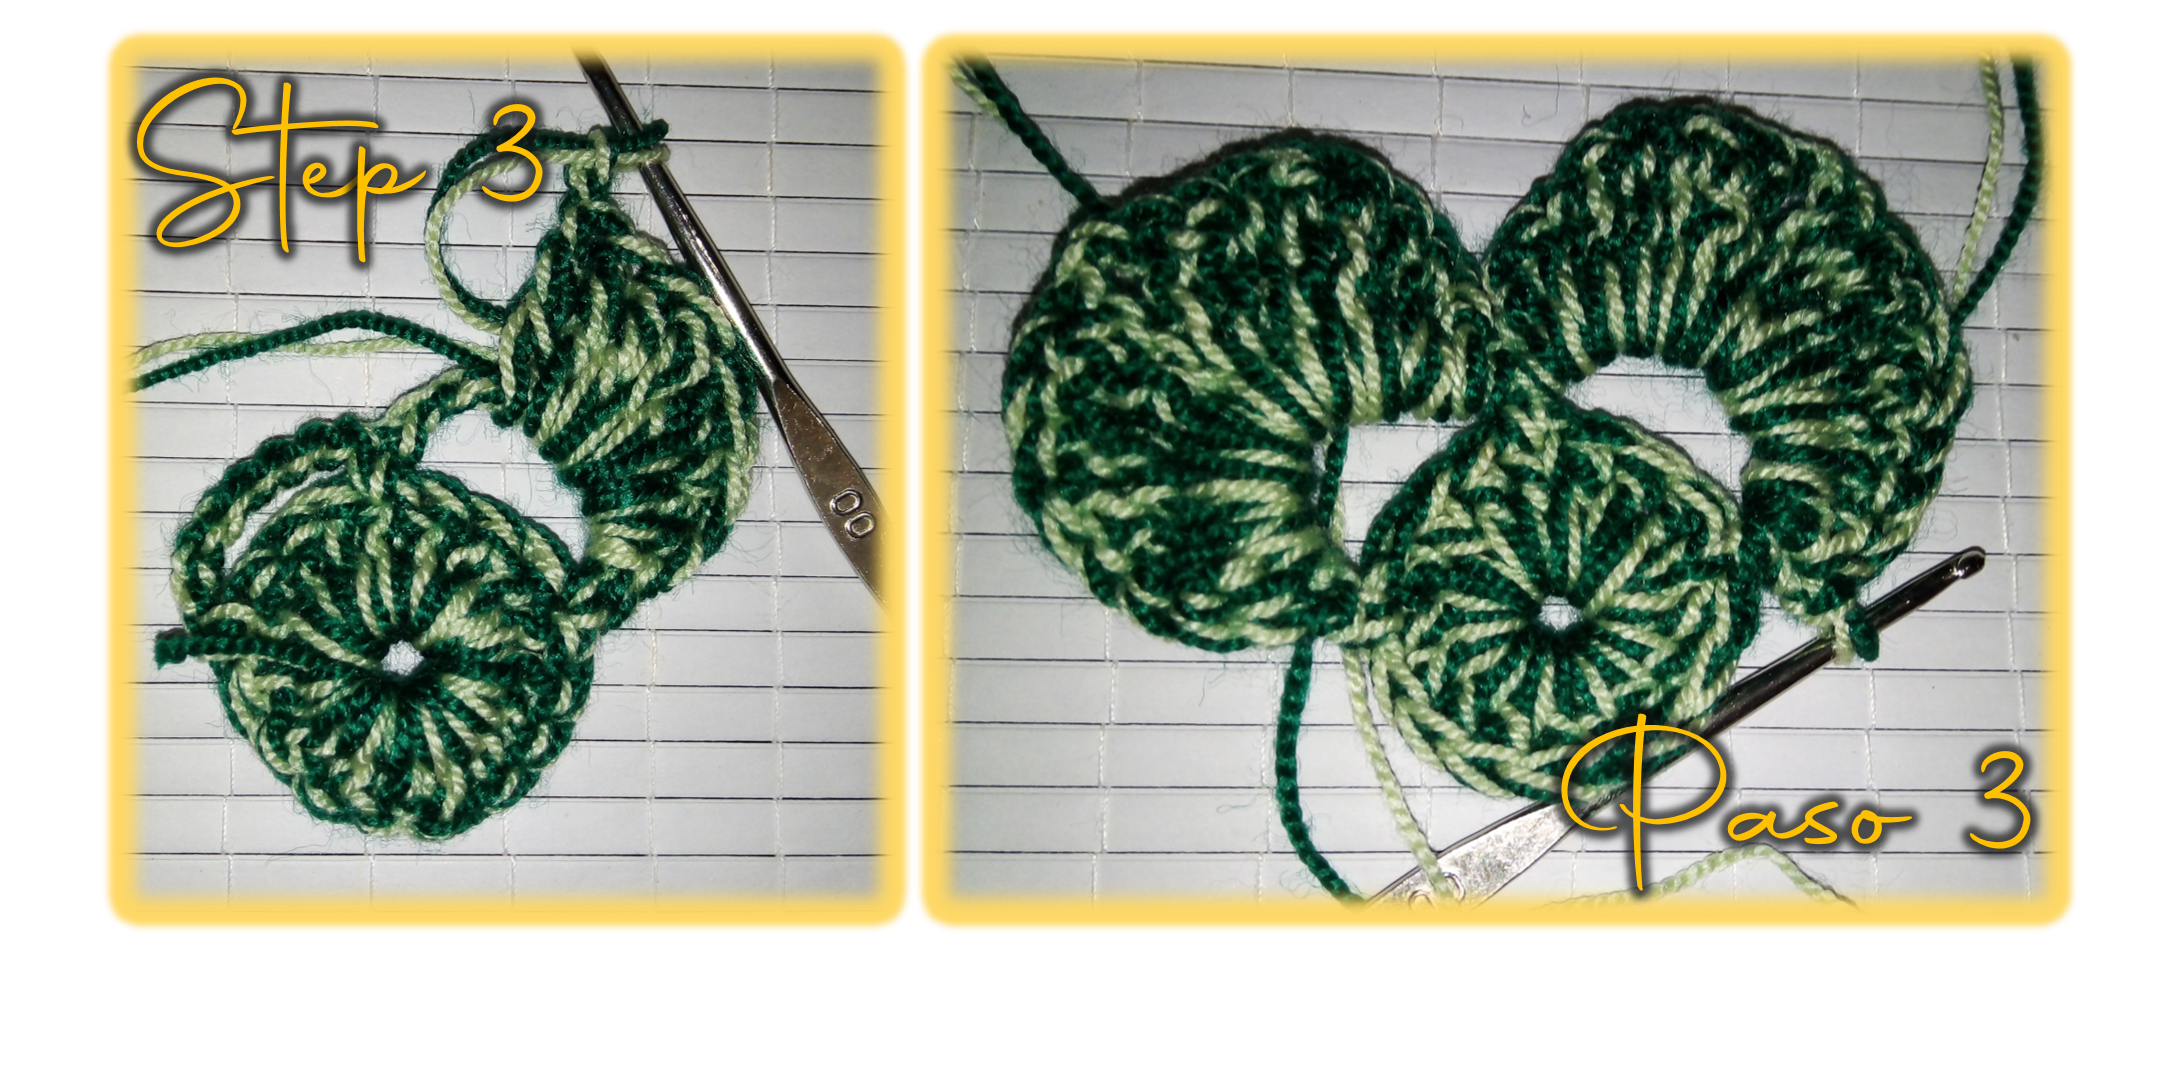
Paso 3:
Para la tercera hilera le damos la vuelta a nuestro tejido para regresarnos, realizamos una lazada y hacemos dos puntos altos en los puntos de las cadenetas de la base, luego trabajamos dos cadeneras y en el mismo sitio realizamos dos puntos altos más. Seguidamente, saltamos a los siguientes puntos de cadeneta en la base y tejemos nuevamente dos puntos altos, seguidos de dos cadenetas y nuevamente dos puntos altos. Este patrón lo continuaremos haciendo hasta que terminemos toda la hilera, nuestro último punto será un punto deslizado.
Step 3:
For the third row we turn our knitting around to go back, make a loop and knit two high stitches in the chain stitches at the base, then we work two chain stitches and in the same place we knit two more high stitches. Next, we jump to the next chain stitches at the base and again knit two double crochet stitches, followed by two chain stitches and again two double crochet stitches. We will continue this pattern until we finish the whole row, our last stitch will be a slip stitch.
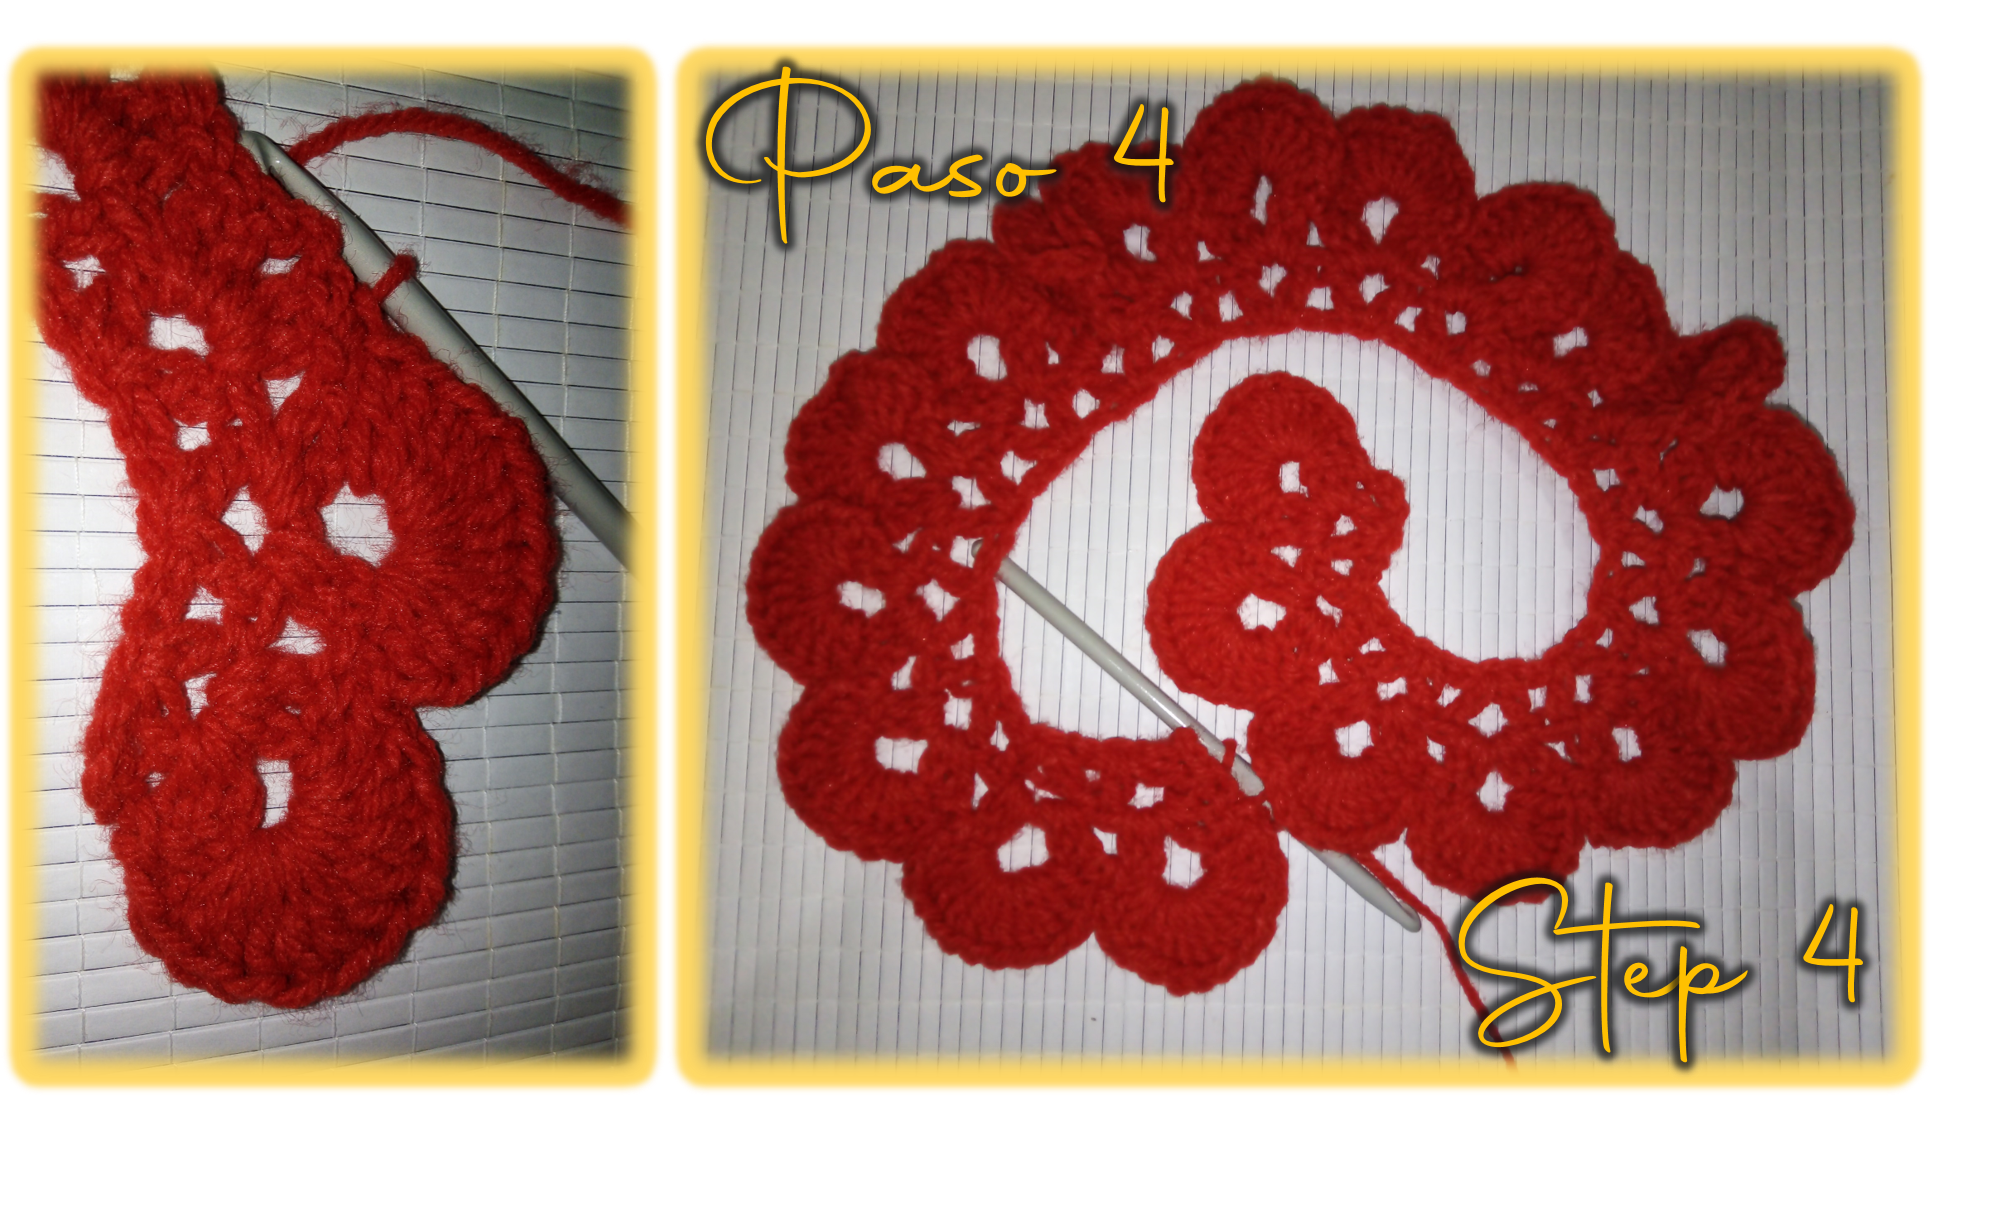
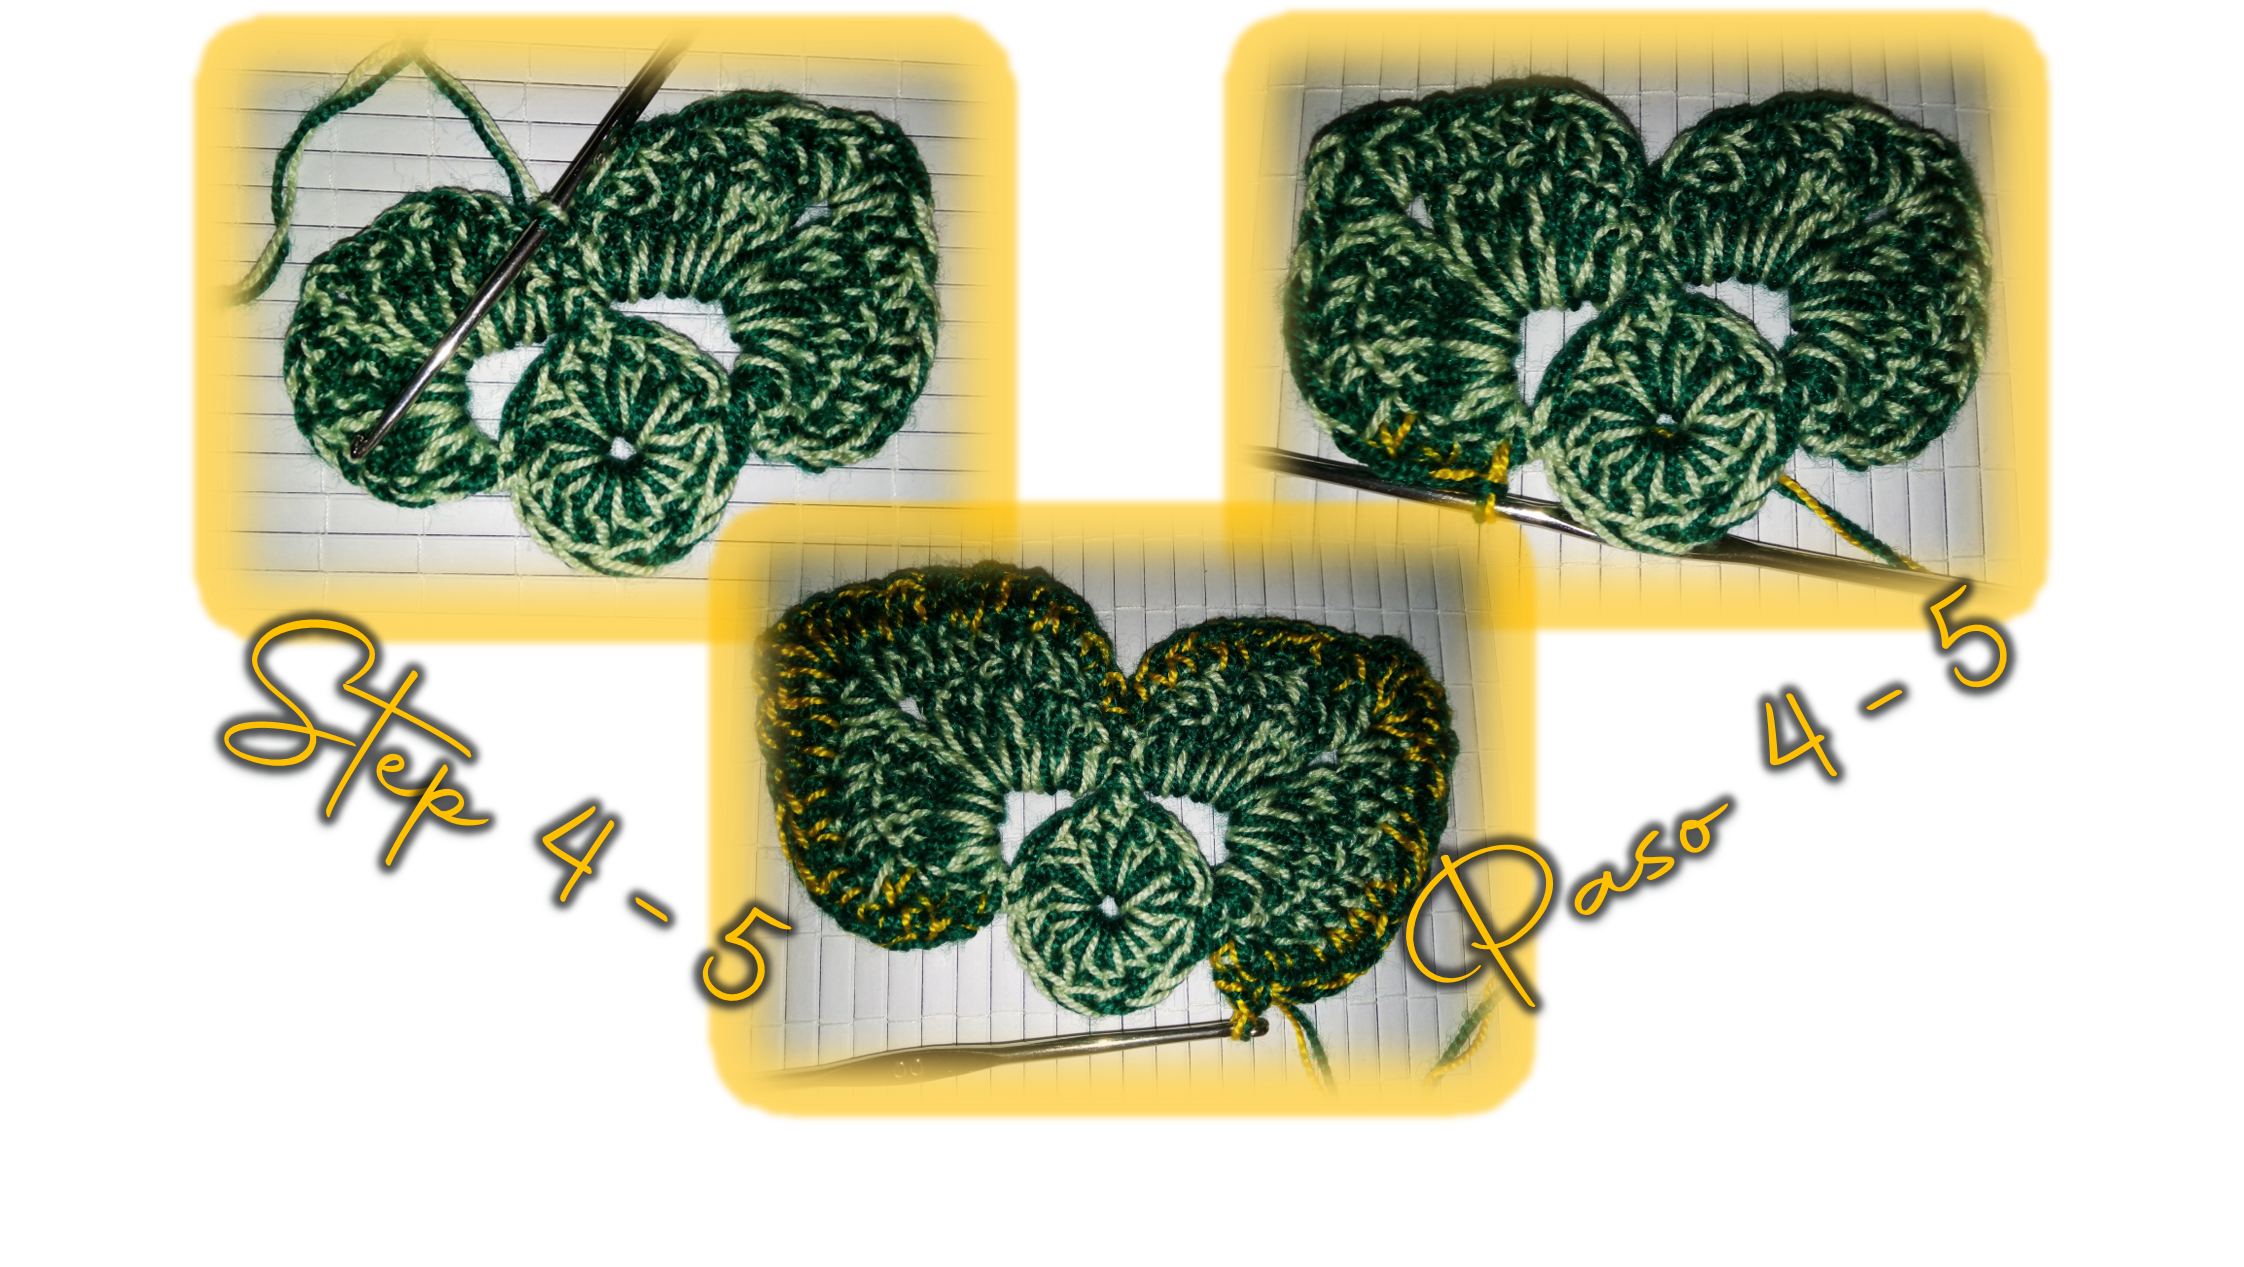
Paso 4:
Le damos nuevamente la vuelta a nuestro tejido, seguidamente, hacemos una lazada y dentro de nuestro punto de dos cadenetas de nuestra hilera anterior haremos 12 puntos altos. Ahora, en el siguiente punto donde se unen las “V” en la hilera anterior realizaremos un punto bajo, y pasaremos nuevamente al punto de las cadenetas donde realizaremos nuevamente 12 puntos altos. Seguiremos haciendo lo mismo hasta completar toda la hilera y terminaremos con un punto deslizado al final.
Step 4:
We give our knitting a lap again, next, we make a loop and inside our two-chain stitch from our previous row we will make 12 high stitches. Now, in the next stitch where the "V" join in the previous row we will knit a single crochet, and we will pass again to the chain stitch where we will knit again 12 double crochet stitches. We will continue doing the same until we complete the whole row and we will finish with a slip stitch at the end.
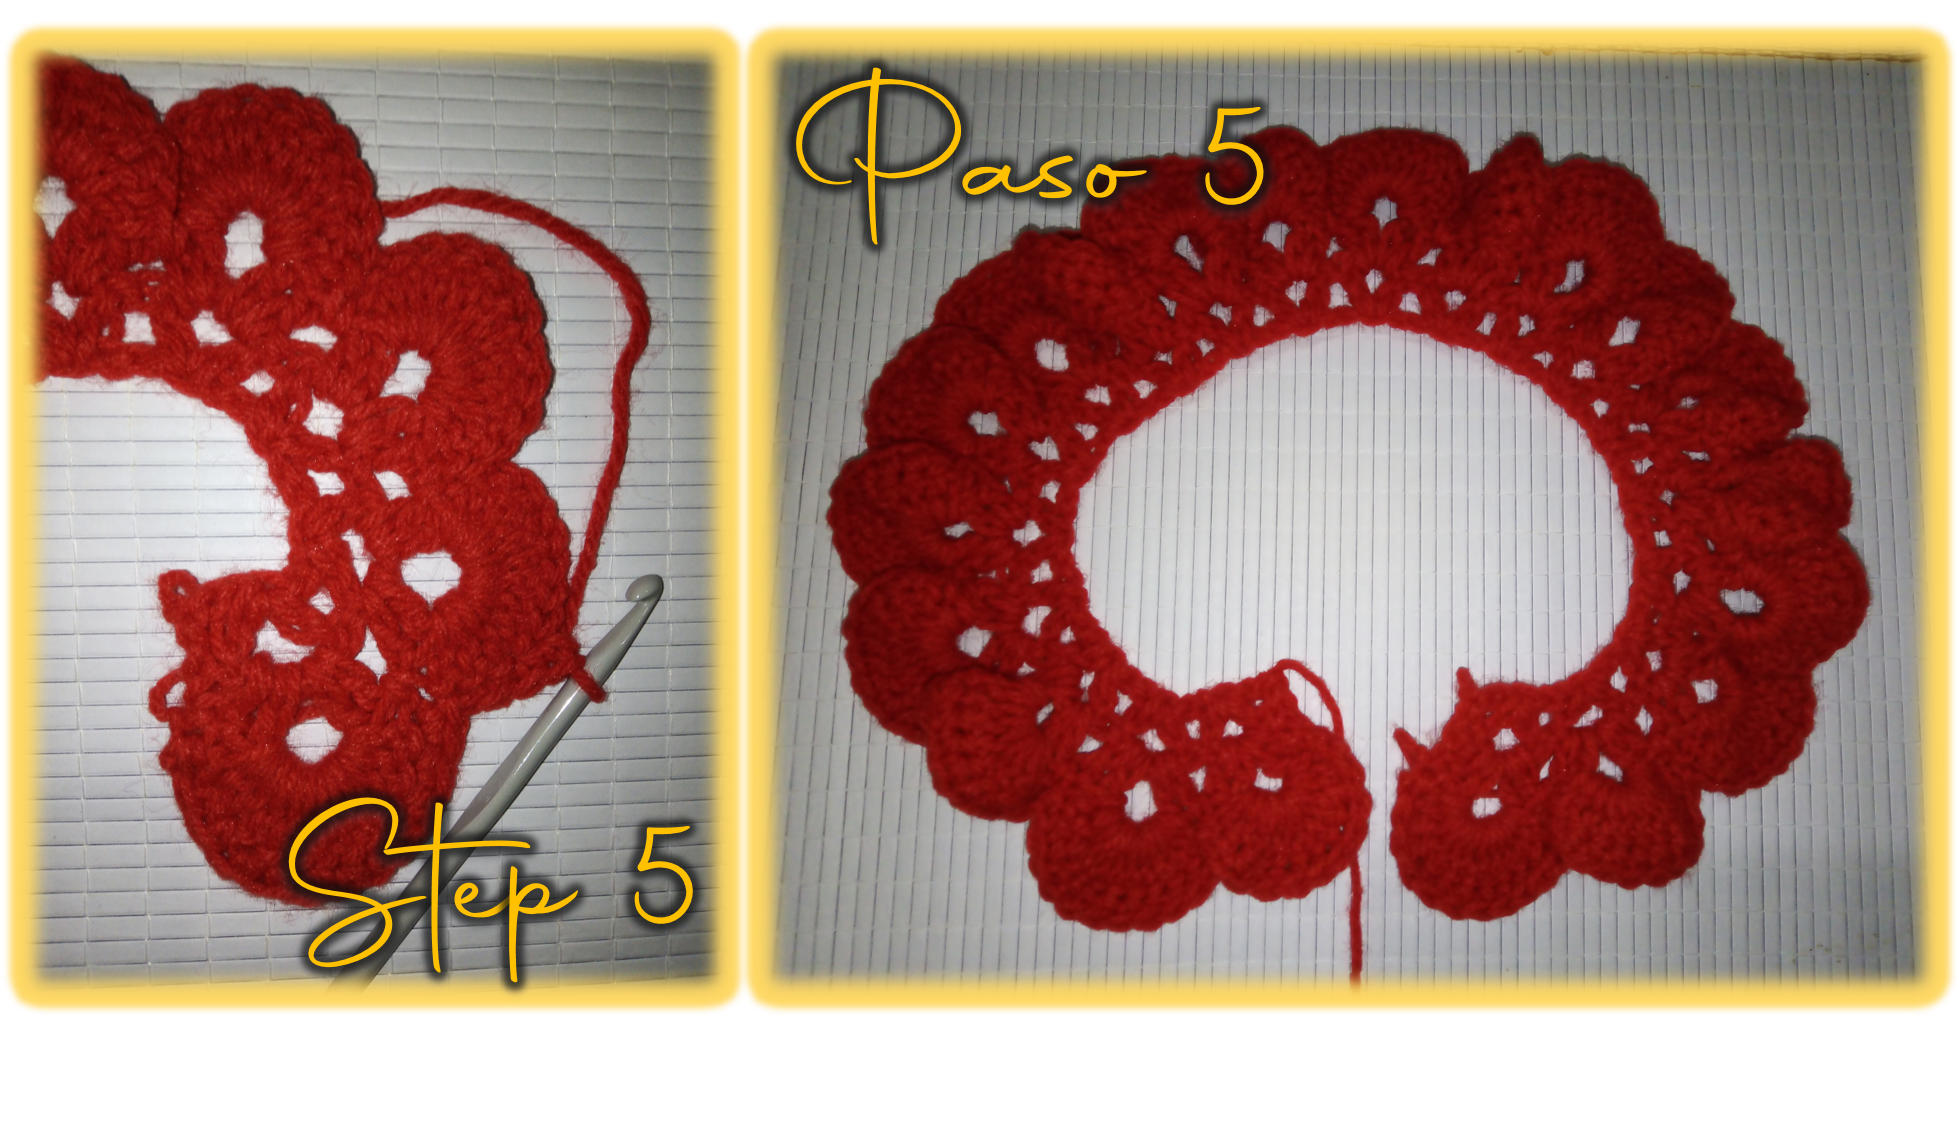
Paso 5:
Llego el momento de terminar nuestro tejido para, esta última hilera la podemos hacer en un hilo de otro color o seguimos con el mismo color de hilo, es a nuestro gusto, yo cambiaré el color, por una lana de color blanco hueso. Bueno, durante esta hilera, comenzaremos haciendo medios puntos en cada uno de los puntos altos de la base, cuando lleguemos al punto donde realizamos un punto medio en la base, realizaremos un punto deslizable. Inmediatamente después, comenzaremos a realizar puntos medios sobre los siguientes 12 puntos altos de la base y luego un punto deslizable. Ese será el patrón que seguiremos hasta completar todo el recorrido y finalmente terminar nuestra tira.
Step 5:
The time has come to finish our knitting for, this last row we can do it in a yarn of another color or we continue with the same color of yarn, it is to our taste, I will change the color, for an off-white color wool. Well, during this row, we will start making half stitches in each of the high stitches of the base, when we get to the point where we make a half stitch in the base, we will make a slip stitch. Immediately after that, we will start making half stitches on the next 12 high stitches of the base and then a slip stitch. That will be the pattern we will follow until we complete the whole course and finally finish our strip.
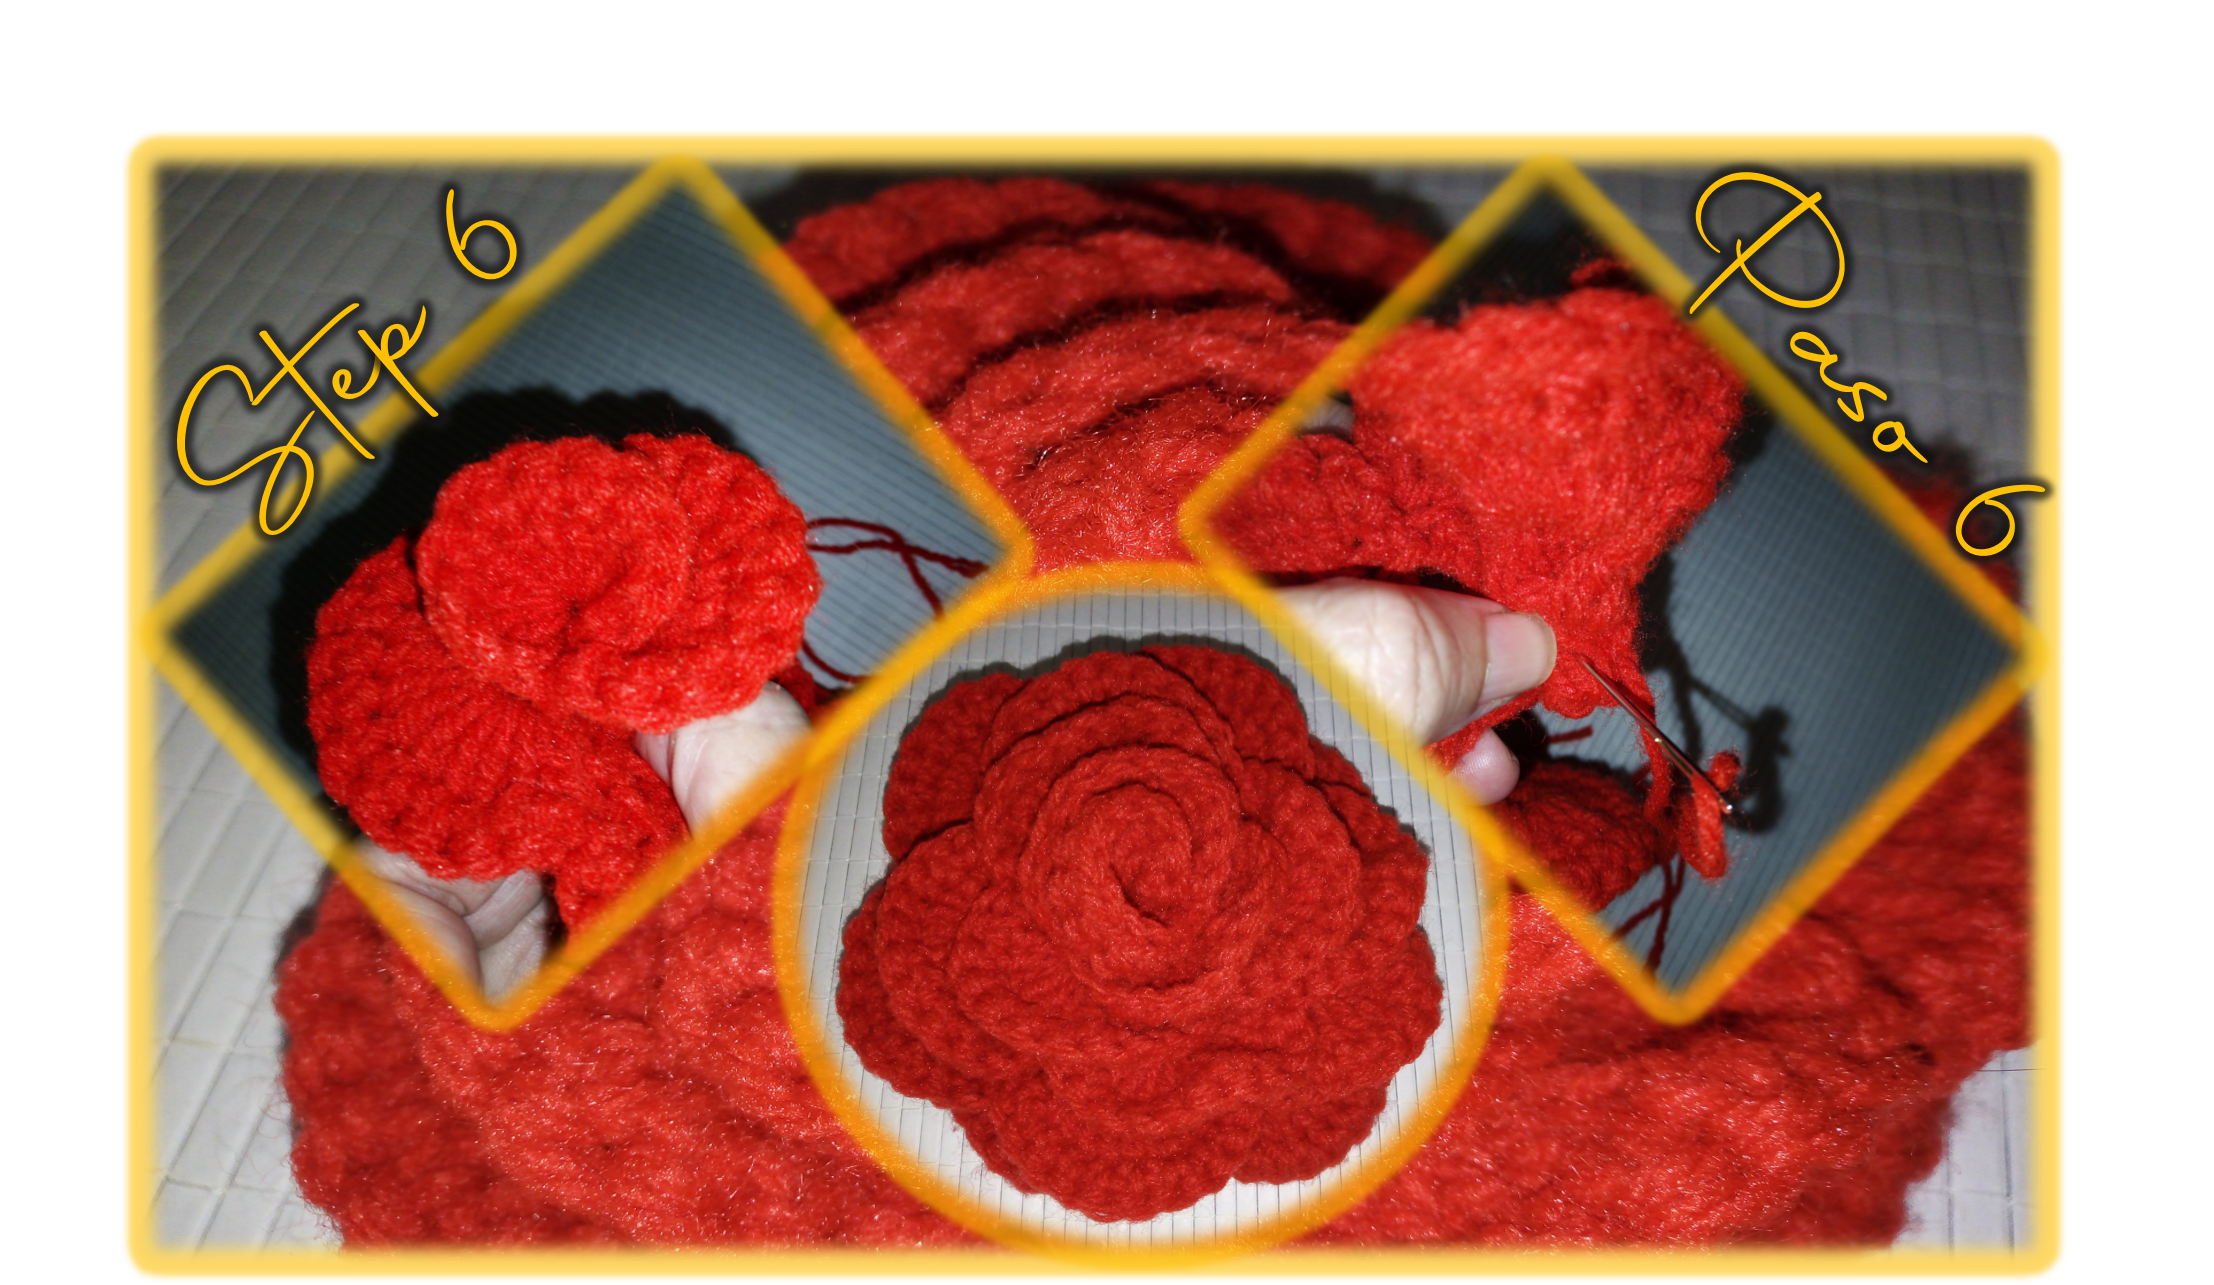
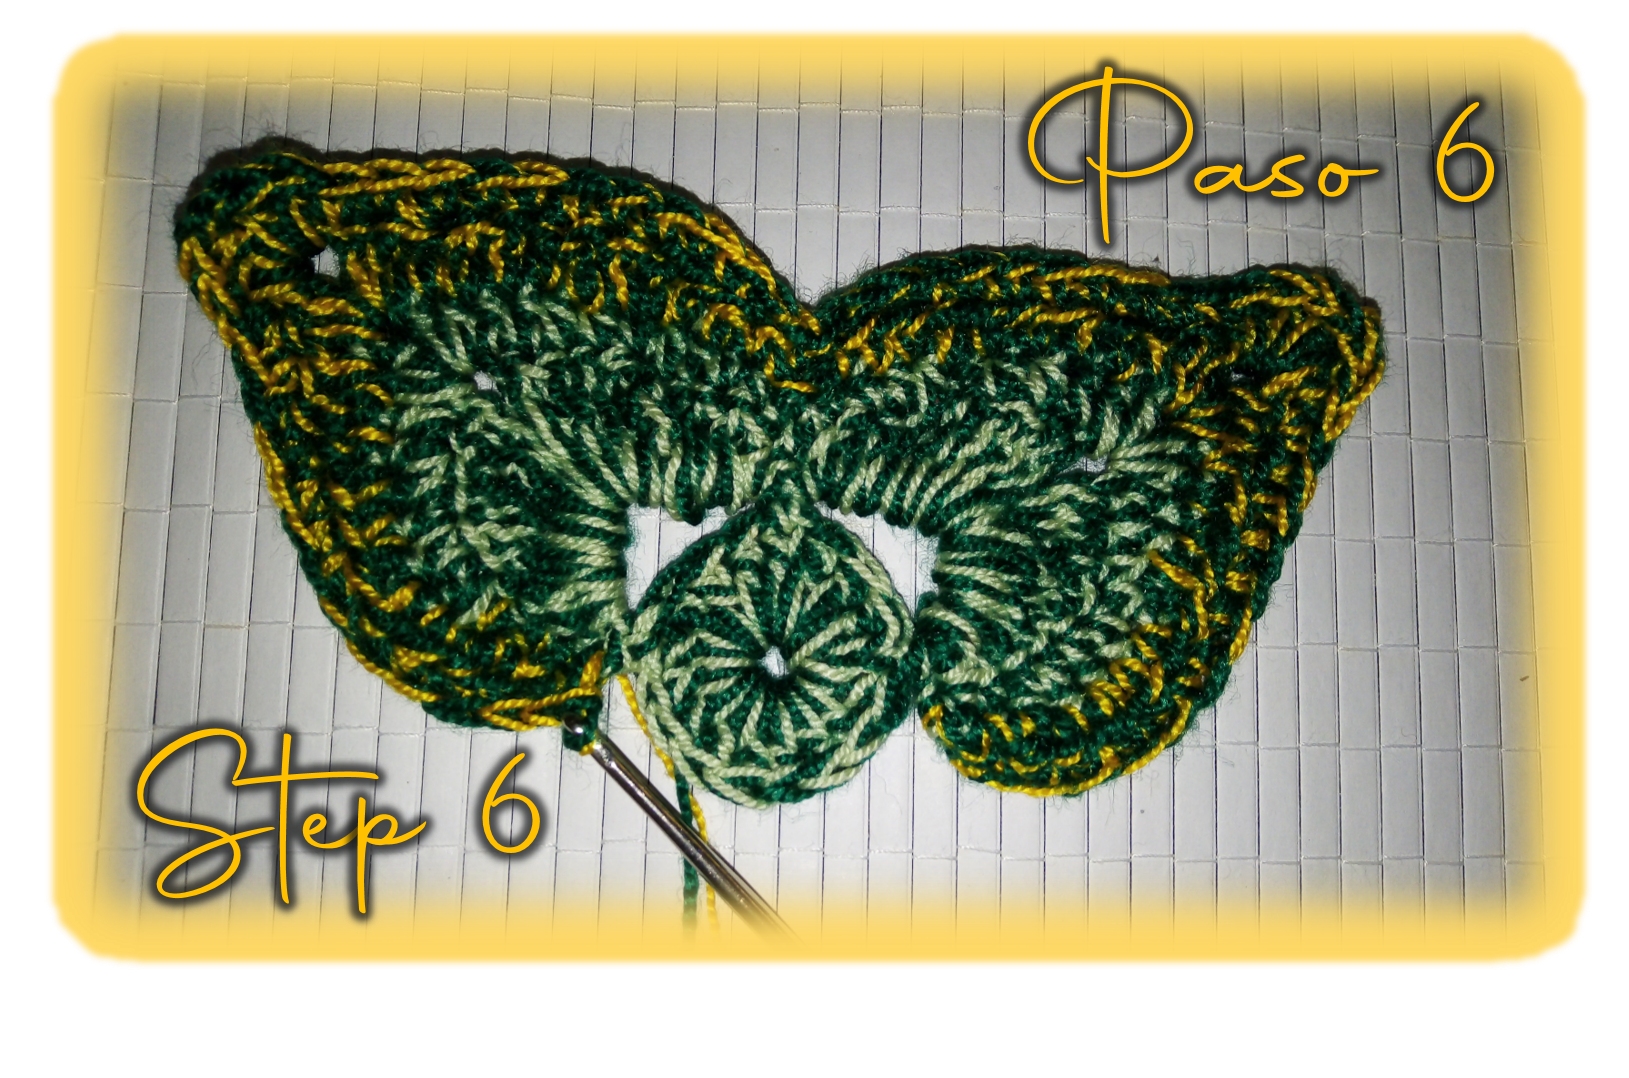
Paso 6:
Ya con nuestra tira lista debemos hacer un nudo para asegurar que no se desteja el trabajo y debemos recordar dejar un hilo largo para ir cosiendo mientras armamos la flor. Para el armado, simplemente la iremos enrollando la tira en forma de espiral y cuidadosamente dándole forma a nuestra flor mientras por la parte de la base la fijamos con el hilo que dejamos.
Step 6:
Once our strip is ready, we must tie a knot to ensure that the work does not unravel and we must remember to leave a long thread to sew while we assemble the flower. For the assembly, we will simply roll the strip in a spiral shape and carefully giving shape to our flower while we fix it at the base with the thread we left.
Ya terminamos nuestra flor ahora toca iniciar el proceso de elaboración de las hojas, seguidamente le detallaré cada uno de los pasos que deben seguir para realizarlas.
We have finished our flower, now it is time to start the process of making the leaves, next I will detail each of the steps that must be followed to make them.
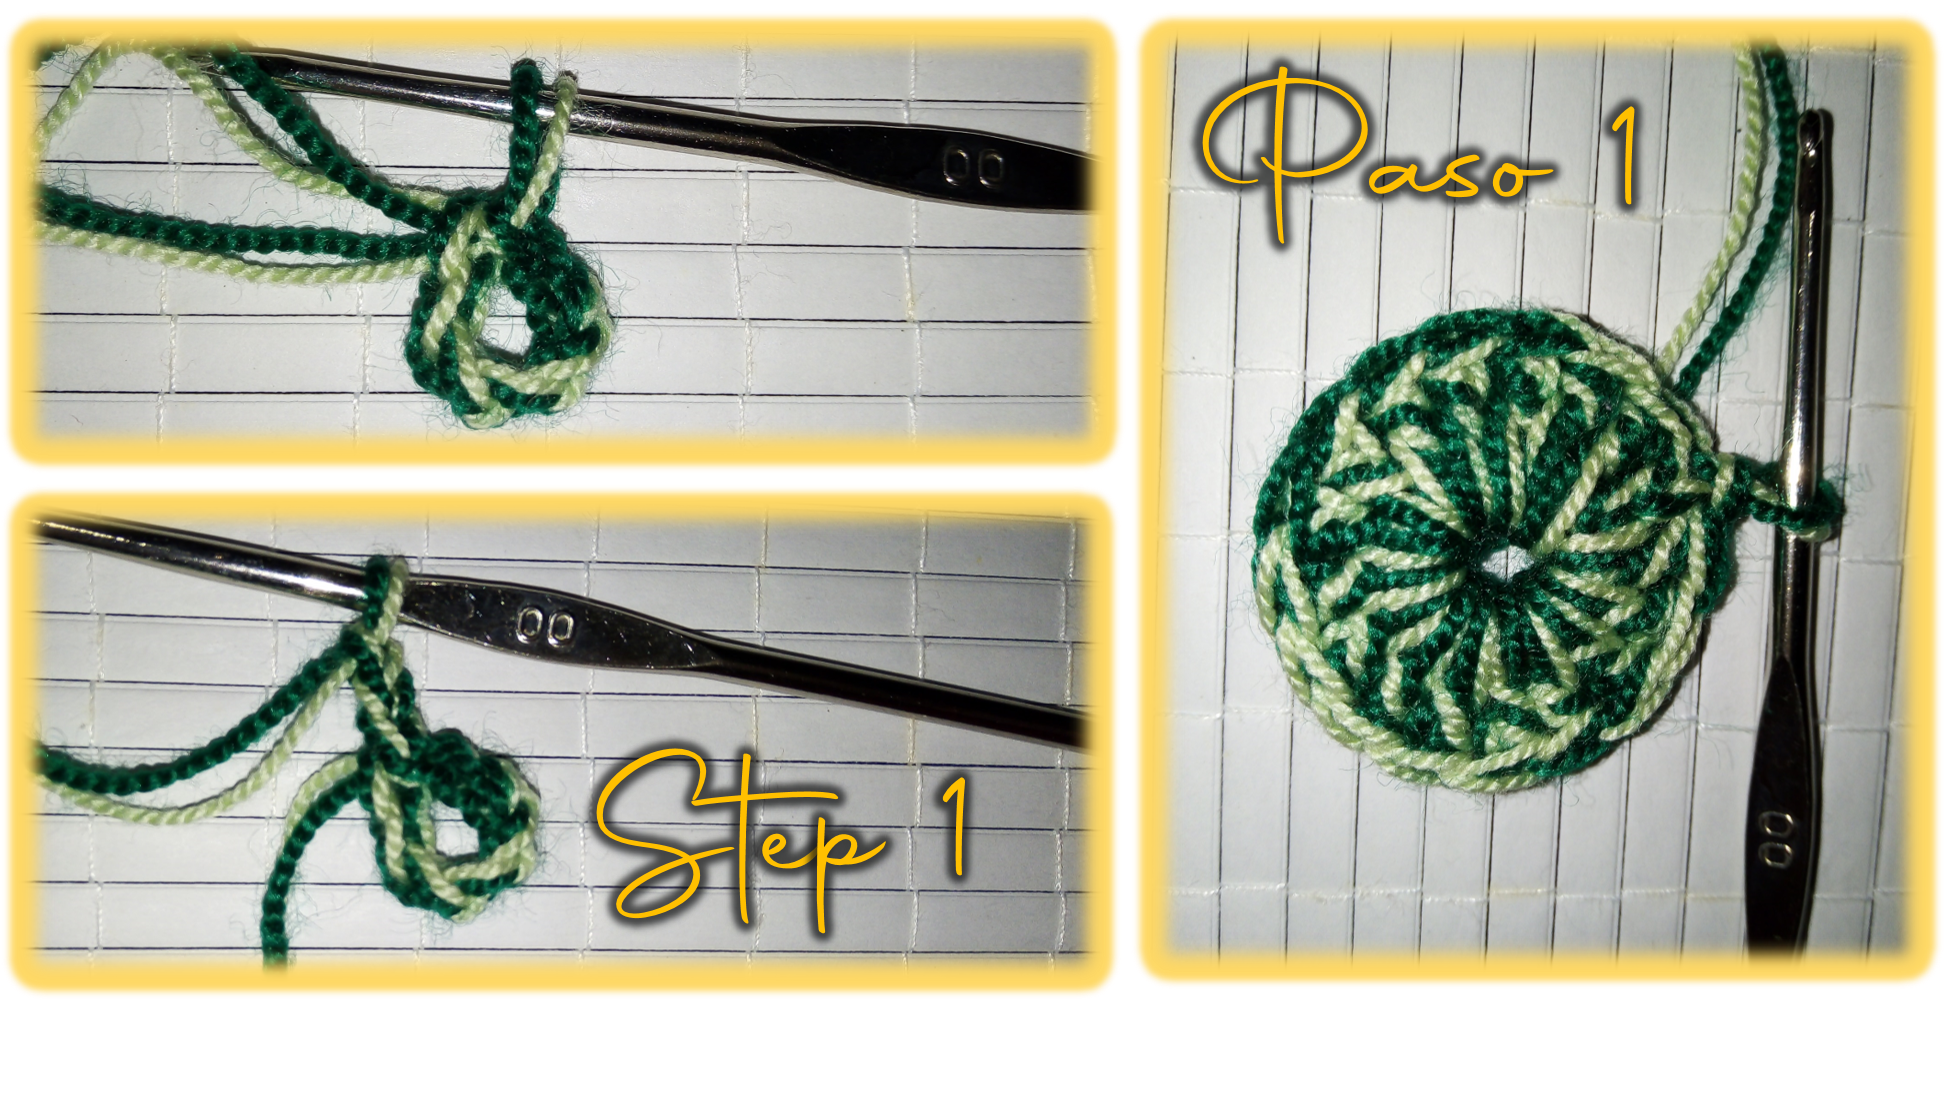
Paso 1:
Iniciamos con 8 cadenetas, unimos con el punto inicial con un punto deslizado y subimos 3 cadenetas que equivale a un punto alto. Seguido, dentro del anillo tejemos 16 puntos altos y cerramos con un punto deslizado.
Step 1:
We start with 8 chains, join to the starting stitch with a slip stitch and go up 3 chains which is equivalent to a single crochet. Then, inside the ring we knit 16 double crochet and close with a slip stitch.
Paso 2:
Subimos 8 cadenetas, luego contamos 4 puntos altos de la base y allí realizamos un punto bajo. Seguido realizamos nuevamente 8 cadenetas contamos 4 puntos altos de la base y allí realizamos un nuevo punto bajo. Con esto, tenemos la base para la realización de 2 hojas, sin embargo, podríamos hacer 2 hojas más si lo deseamos, repitiendo el proceso anterior.
Step 2:
We go up 8 chain stitches, then we count 4 high stitches from the base and there we cast on a single crochet. Then we knit again 8 chain stitches, count 4 stitches from the base and knit a new single crochet. With this, we have the base for the realization of 2 leaves, however, we could make 2 more leaves if we wish, repeating the previous process.
Paso 3:
Continuando, ahora le doy vuelta al tejido y comienzo a tejer dentro de mis 8 puntos de cadenetas, un punto bajo, medio punto alto, 3 puntos altos, 5 dobles puntos altos (se hacen 2 lazadas), luego tejo 2 cadenas de separación, hago una doble lazada y 5 dobles puntos altos, luego nuevamente 3 puntos altos, medio punto alto y termino con un punto bajo. Para la siguiente hoja, tejeremos dentro los siguientes 8 puntos de cadenetas, la misma secuencia de puntos que tejimos en el grupo de cadenetas anteriores.
Step 3:
Continuing, I now turn the knitting over and begin to knit within my 8 chain stitches, a single crochet, half double crochet, 3 double crochets, 5 double double crochets (2 loops are made), then I knit 2 separating chains, make a double loop and 5 double crochets, then again 3 double crochets, half double crochet and finish with a single crochet. For the next leaf, we will knit inside the next 8 chain stitches, the same sequence of stitches that we knitted in the previous group of chain stitches.
Paso 4 y 5:
Damos vuelta al tejido, hacemos un punto deslizado, seguido de un punto medio, luego tejeremos medios puntos altos hasta llegar a los 2 punto de cadeneta de la base. Luego dentro de los 2 puntos de cadenetas trabajaremos, 2 medios puntos altos, 2 cadenetas y 2 medios puntos altos más. Luego tejeremos medios puntos altos en cada punto de la base, pero 2 puntos antes de terminar, tejeremos primero un punto medio, seguido de un punto deslizado.
Step 4 and 5:
We go around the lap, knit a slip stitch, followed by a stockinette stitch, then we will knit half double crochet until we reach the 2 chain stitches at the base. Then inside the 2 chain stitches we will work, 2 half double crochets, 2 chain stitches and 2 more half double crochets. Then we will knit half double crochet in each stitch of the base, but 2 stitches before we finish, we will knit a half double crochet first, followed by a slip stitch.
Paso 6:
Iniciamos con un punto deslizado, luego hacemos medios puntos en cada punto de la base, cuando llegamos a los 2 puntos de cadenetas, dentro, realizaremos 2 puntos medios, seguidos de 2 cadenetas y 2 puntos medios. Seguidamente, continuamos tejiendo un punto bajo en cada uno de los siguientes puntos de la base, hasta encontrarnos con el último punto donde haremos un punto deslizado. Realizaremos exactamente lo mismo, en el caso de la otra hoja.
Step 6:
We start with a slip stitch, then we knit a half stitch in each stitch of the base, when we reach the 2 chain stitches, inside, we will knit 2 half stitches, followed by 2 chain stitches and 2 half stitches. Then, we continue knitting a single crochet in each of the following stitches of the base, until we reach the last stitch where we will knit a slip stitch. We will do exactly the same, in the case of the other leaf.
Paso 7:
Una vez que terminamos las hojas, al igual que en el caso de la flor, una vez que aseguramos nuestro tejido para que no se desteja, también dejamos un hilo largo para poder fijar las hojas a la flor. Igual que con la flor solo colocamos puntadas lo más invisible posible y con esto nuestra hermosa flor esta finalmente terminada.
Step 7:
Once we finish the leaves, just like with the flower, once we secure our fabric so it doesn't unravel, we also leave a long thread so we can attach the leaves to the flower. Just as with the flower we just place stitches as invisible as possible and with this our beautiful flower is finally finished.
Bueno, no me queda más que despedirme, esperando que les gustara mi nuevo proyecto de tejido y se animen a realizarlo, como ven es sumamente sencillo. Se me ocurre que podrían usarla de varias formas distintas, desde adornar una diadema, colocarle una elástica para usarla para hacer una coleta o ponerle un alfiler y usarla de prendedor. En fin, es tan hermosa, que de seguro les dará un hermoso toque al proyecto donde la coloquen. Bendiciones para todos y recuerden cuidarse y cuidar a los suyos poniendo en práctica las medidas de bioseguridad.
Well, I just have to say goodbye, hoping that you liked my new knitting project and that you are encouraged to make it, as you can see it is very simple. It occurs to me that you could use it in several different ways, from decorating a headband, to put an elastic to use it to make a ponytail or put a pin and use it as a pin. In short, it is so beautiful, it is sure to add a beautiful touch to any project where you place it. Blessings to all and remember to take care of yourselves and your loved ones by putting biosecurity measures into practice.
Contenido y fotografías de mi propiedad intelectual
Información Técnica
| Cámara | Pentax * istDL |
|---|---|
| Lente | * Pentax 18-55 |
| Iluminación | Luz Natural |
| Locación | Barcelona, Estado Anzoátegui, Venezuela |
Content and photographs of my intellectual property
Technical information
| Camera | Pentax * istDL |
|---|---|
| Lens | * Pentax 18-55 |
| Lighting | Natural Light |
| Location | Barcelona, Anzoátegui State, Venezuela |


The rewards earned on this comment will go directly to the person sharing the post on Twitter as long as they are registered with @poshtoken. Sign up at https://hiveposh.com.
Francys, esa flor es super hermosa. que bella te quedo, ademas que el rojo es mi color favorito.
Hola querida @carolinacardoza, feliz y bendecido domingo, me alegra mucho que te gustara la flor, a mi también me encantó como quedó y ciertamente, el color rojo le da un toque muy atractivo. Te envío un gran abrazo amiga.
At first glimpse I really thought it was a natural flower, you really did a good handcrafted art..nice to look at.
Thank you for your visit, it is very pleasant to read your words and know that you liked it. I send you many blessings.
Wow it really looks nice 👍
Thank you, I'm glad you liked it.
Your welcome
Congratulations, your post has been upvoted by @dsc-r2cornell, which is the curating account for @R2cornell's Discord Community.
Enhorabuena, su "post" ha sido "up-voted" por @dsc-r2cornell, que es la "cuenta curating" de la Comunidad de la Discordia de @R2cornell.
Gracias por el apoyo @blessed-girl, bendiciones para ti, para el Sr. @r2cornell y todo el equipo de trabajo en general.
Espectacular 👏 eres realmente muy buena en lo que haces 👏💛 saludos y bendiciones.
Gracias cariño, me alegra que te gustara, te envío muchas bendiciones.
Congratulations @francyrios75! You have completed the following achievement on the Hive blockchain and have been rewarded with new badge(s) :
Your next target is to reach 3500 comments.
You can view your badges on your board and compare yourself to others in the Ranking
If you no longer want to receive notifications, reply to this comment with the word
STOPCheck out the last post from @hivebuzz: