Bienvenidos Queridos Amantes de la Artes Manuales
Welcome Dear Manual Arts Lovers
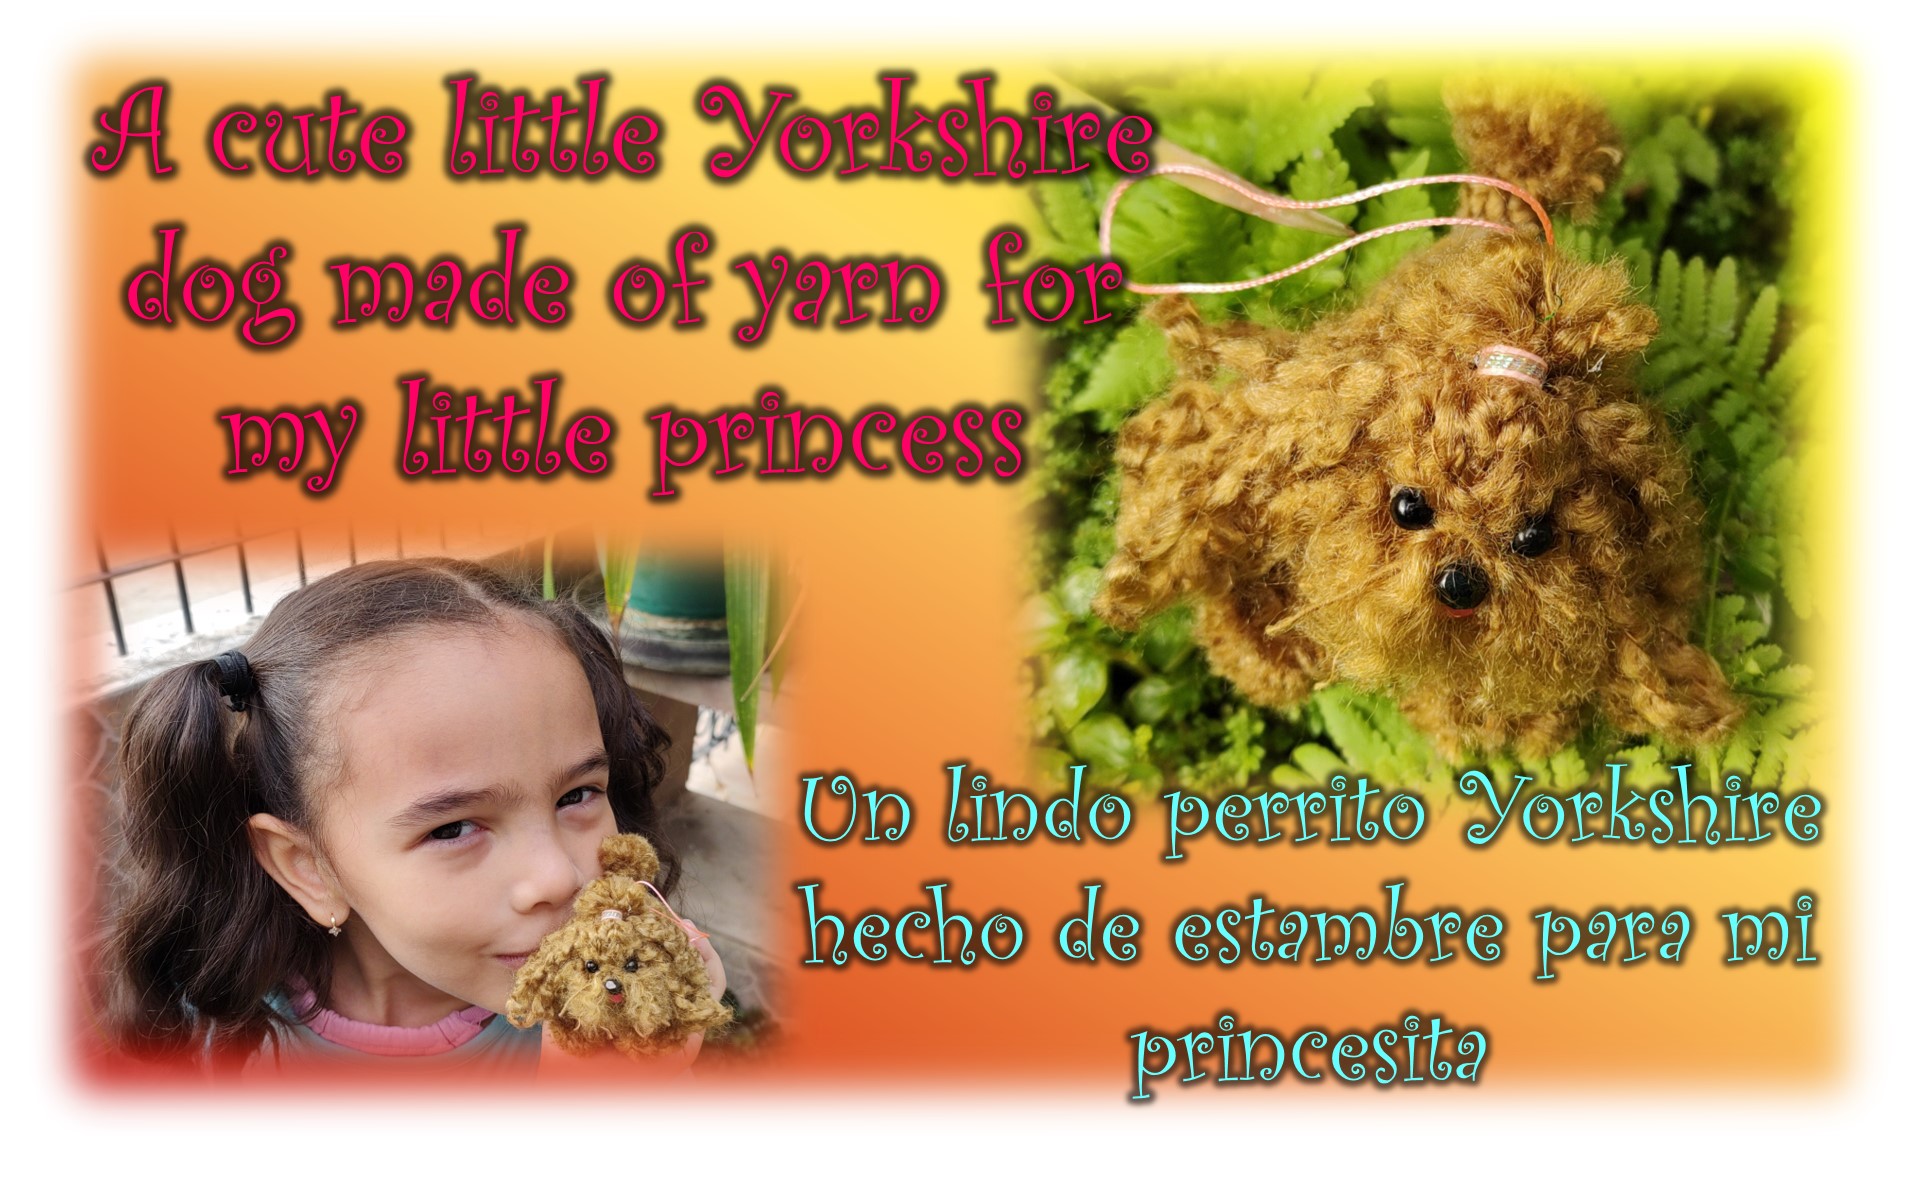

Feliz semana para todos mis queridos lectores, espero que el fin de semana les permitiera recargarse de muchas energías para iniciar esta semana con muy buen ánimo. Yo, por mi parte, estuve trabajando para complacer una nueva petición de mi pequeña Nadiah, ella esta encantada con las miniaturas hechas con hilo de estambre. Se la pasa buscándome videos en internet, para que le haga un nuevo amiguito de estambre, en esta ocasión quiso que le hiciera un perrito Yorkshire.
Happy week to all my dear readers, I hope the weekend allowed you to recharge with lots of energy to start this week in good spirits. I, for my part, have been working to fulfill a new request from my little Nadiah, she is delighted with the miniatures made with worsted yarn. She keeps looking for videos on the internet for me to make her a new yarn friend, this time she wanted me to make her a Yorkshire dog.
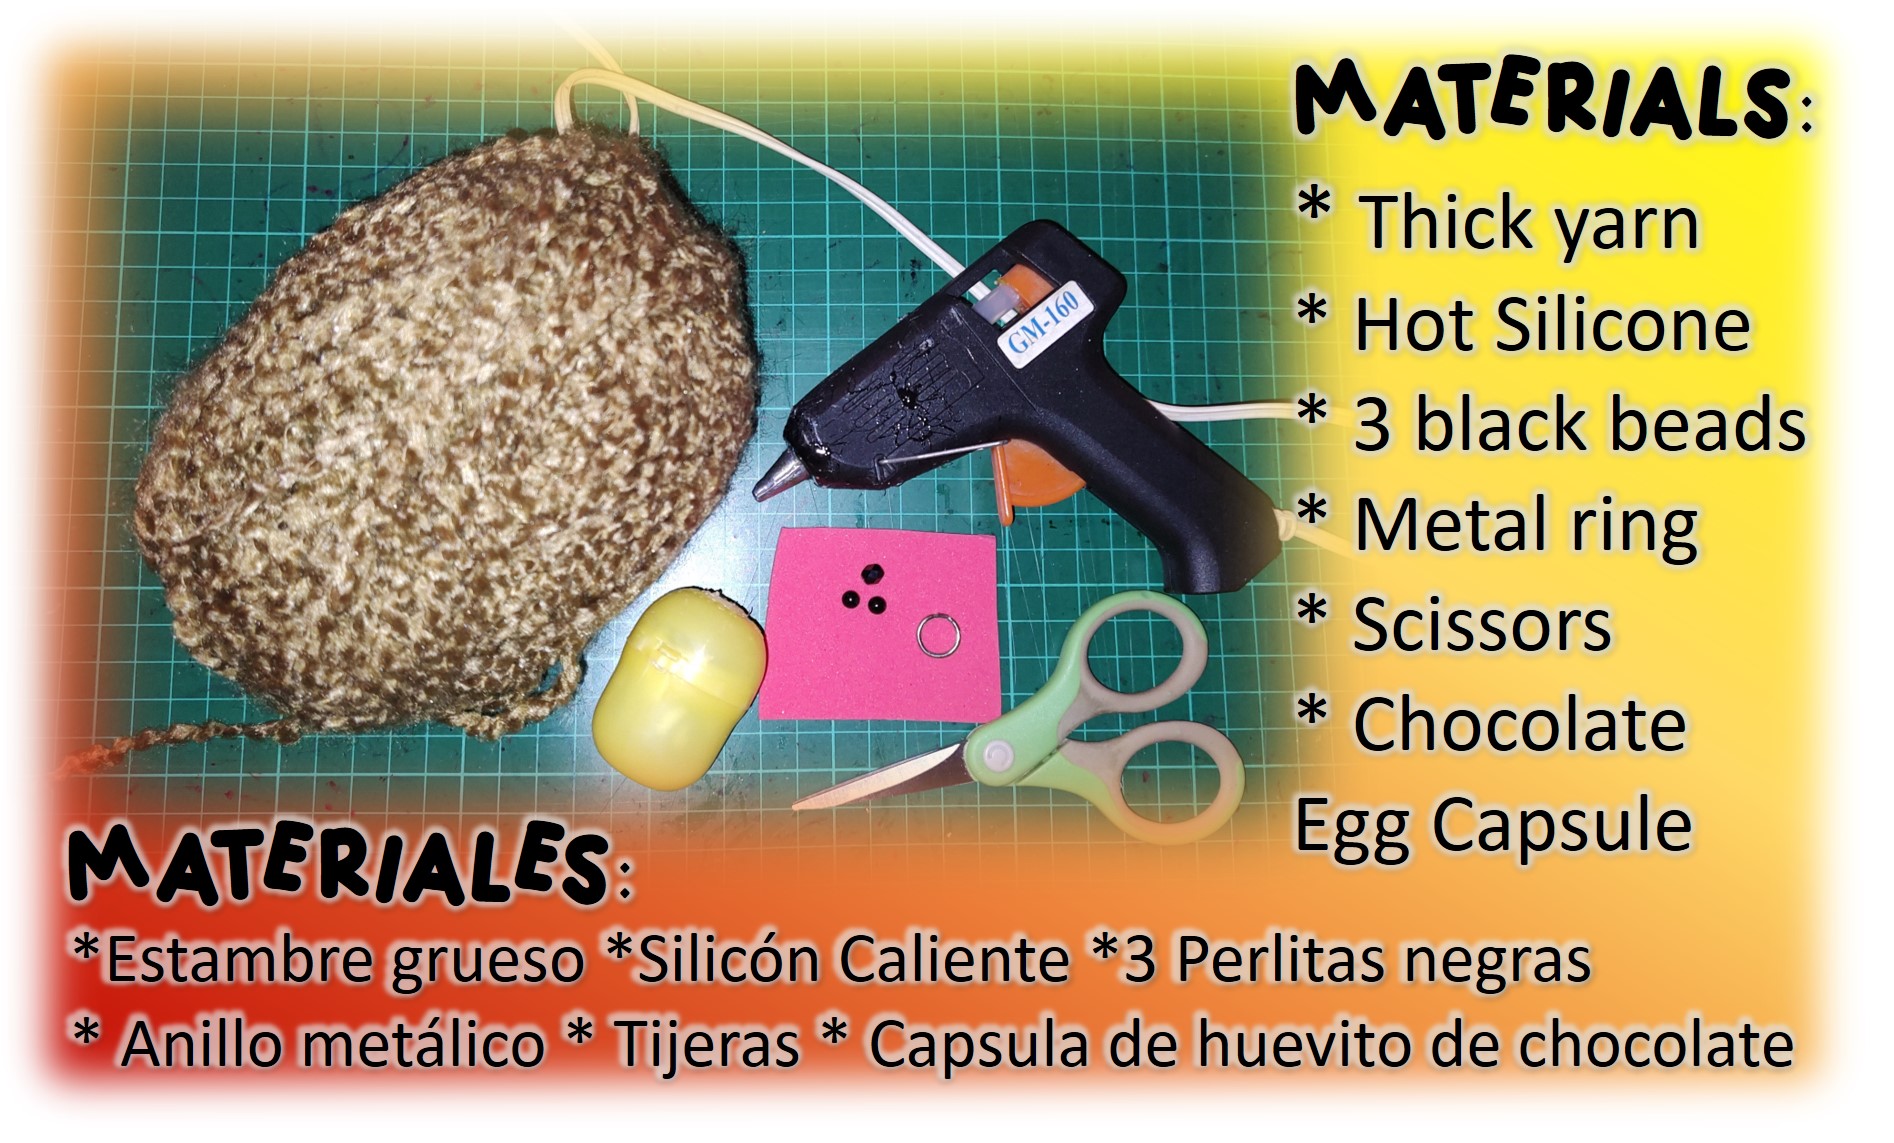
No se lo había podido hacer por falta de tiempo, pero este fin de semana decidí buscar un tiempito para realizarlo. En el transcurso de la semana pasada estuve ubicando los materiales, y como pueden observar en la imagen son muy pocos y accesibles. Quizás, el que se puede complicar un poco en encontrar es la capsula, pero tampoco creo, porque esas golosinas de chocolate en forma de huevitos que traen juguetitos dentro se consiguen en todos lados. Y como verán este proyecto es una excelente forma de reutilizar esas capsulas plásticas, que acostumbramos botar, y de esa forma también cuidamos el planeta.
I had not been able to do it for lack of time, but this weekend I decided to find some time to do it. During the past week I have been looking for the materials, and as you can see in the image, they are very few and accessible. Perhaps, the one that can be a little complicated to find is the capsule, but I don't think so, because those chocolate egg-shaped candies with little toys inside can be found everywhere. And as you can see, this project is an excellent way to reuse those plastic capsules that we use to throw away, and in this way we also take care of the planet.
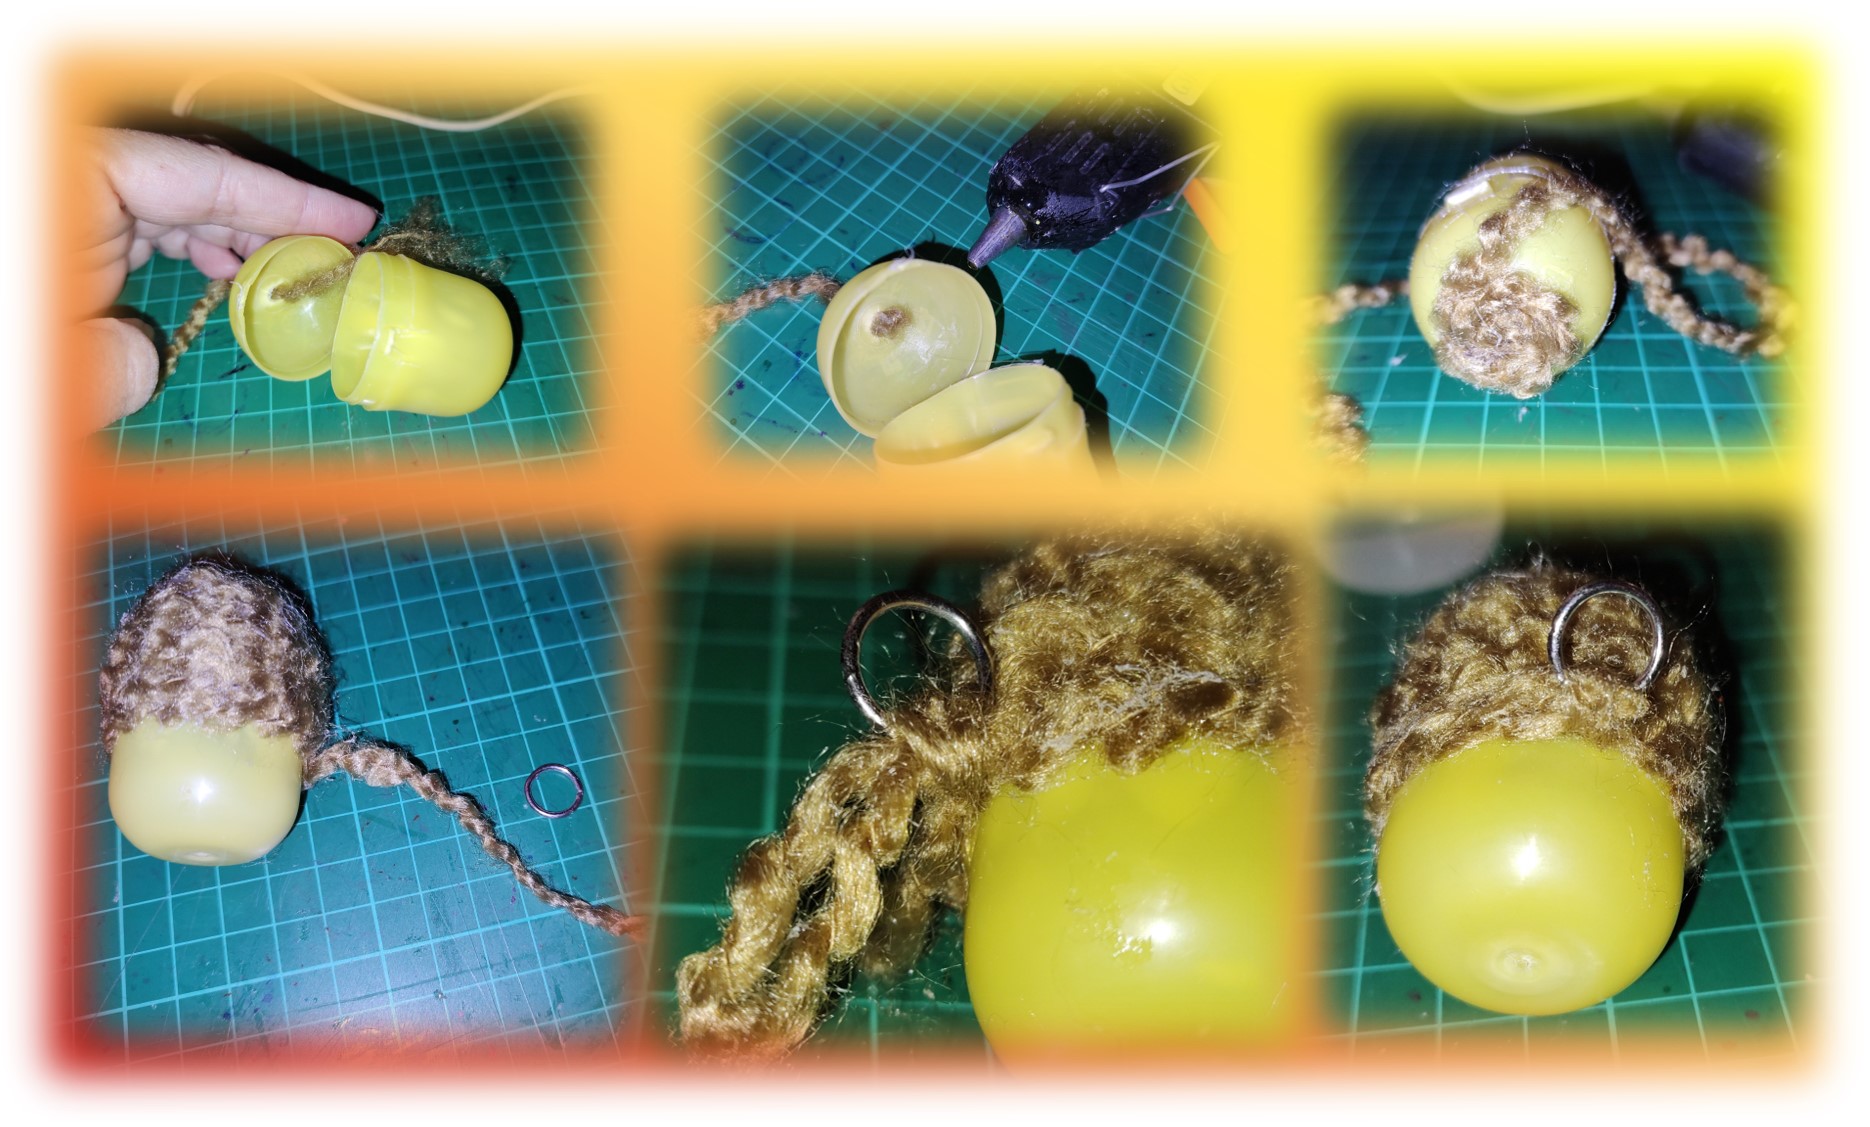
Bueno ya tenemos todos los materiales así que pongámonos manos a la obra. Lo primero fue que me di cuenta que la capsula, en el centro de la tapa tenia un hoyito, así que por allí pasé la hebra de estambre y lo aseguré con un nudo y un poco de pegamento. Después de eso, cerré la capsula, empecé a colocar pegamento y fui envolviendo con el estambre la capsula como ven en la imagen. Cuando llegué más o menos a la mitad, coloque el último punto de pegamento, esperé que secara bien y procedí a colocar la argollita, la anudé bien y la aseguré con pegamento.
Well we already have all the materials so let's get down to work. The first thing was that I realized that the capsule, in the center of the lid had a little hole, so I put the yarn through there and secured it with a knot and some glue. After that, I closed the capsule, started to put glue and wrapped the yarn around the capsule as you can see in the picture. When I got more or less halfway, I placed the last dot of glue, waited for it to dry well and proceeded to place the little ring, knotted it well and secured it with glue.
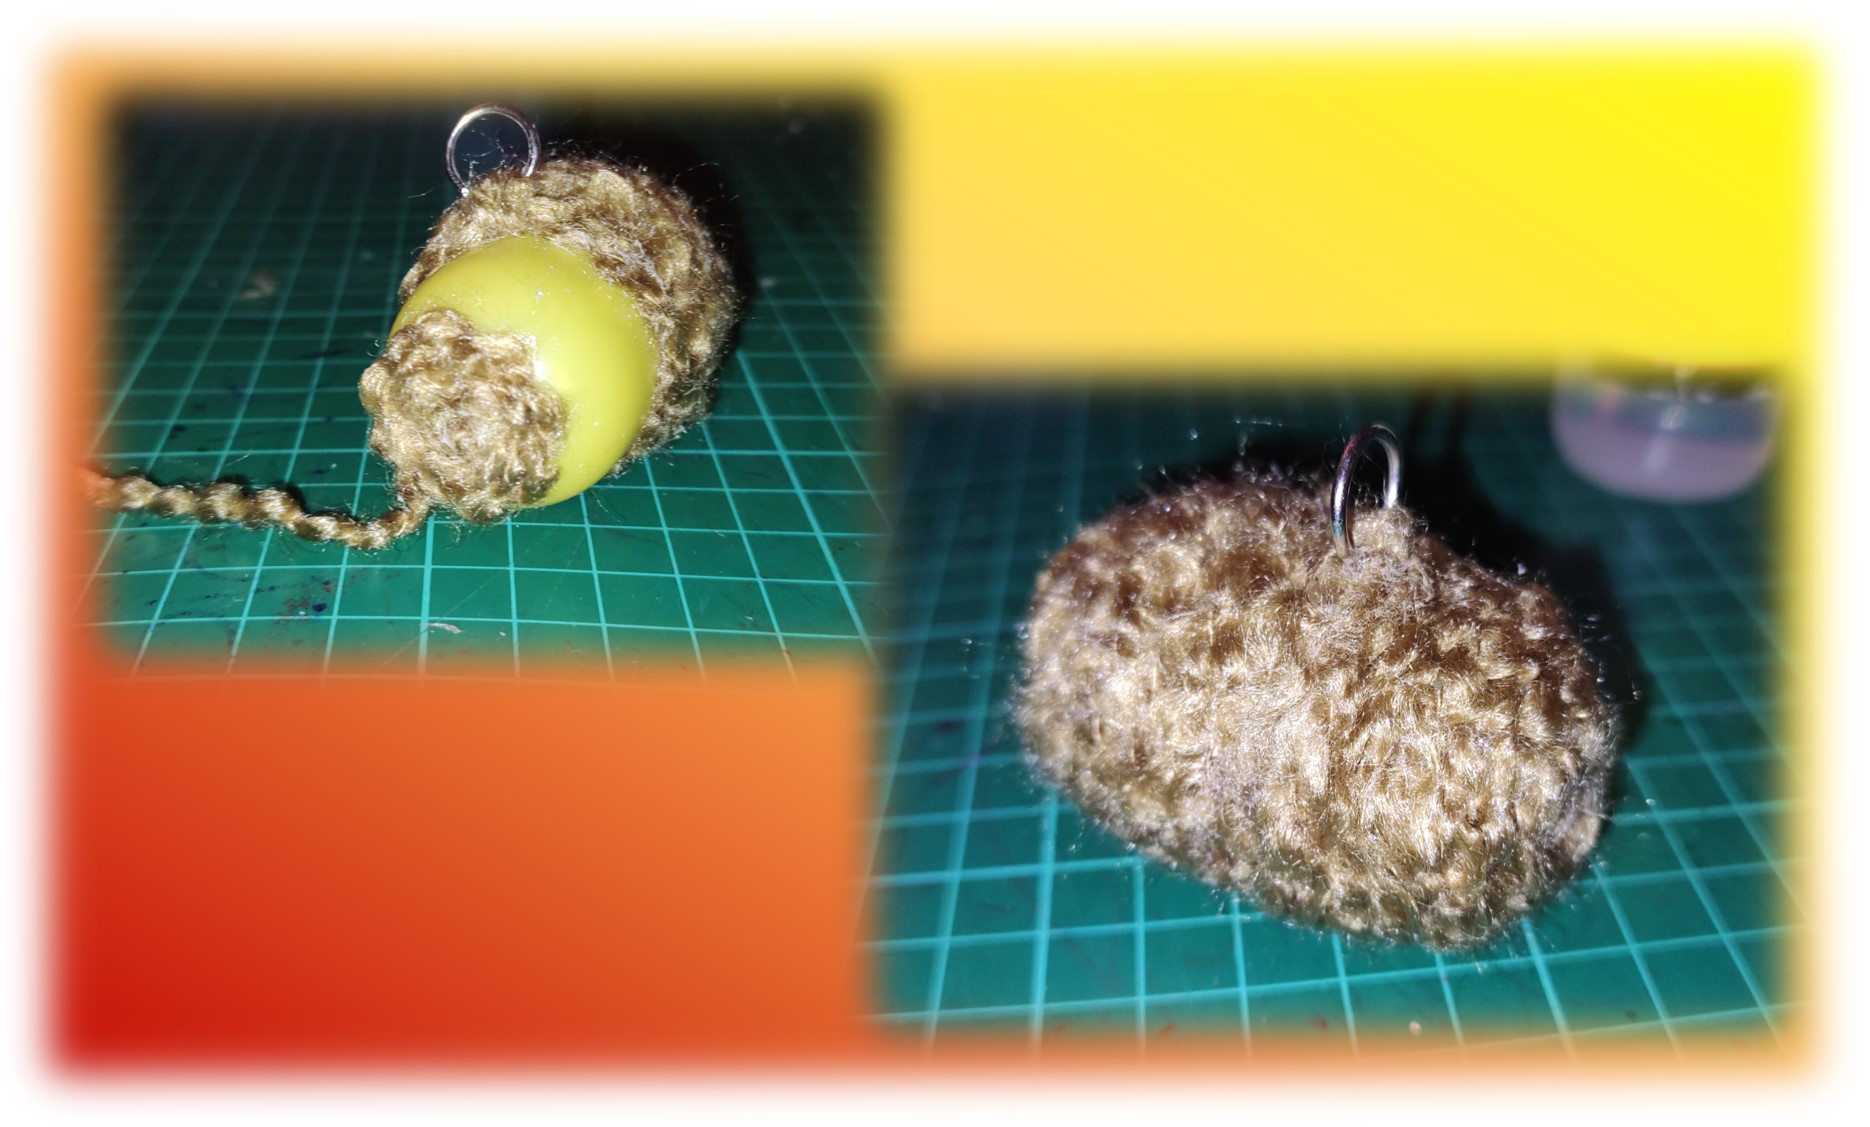
Ahora, toca forrar con el estambre el otro extremo de la capsula, igual que en caso anterior, fijé la punta del estambre y luego en forma de espiral fui cubriendo con mucho cuidado toda la capsula, asegurándome de fijar muy bien con el pegamento. Cuando terminé todo el espacio que me faltaba por cubrir con el estambre, corté la hebra de estambre y la punta la aseguré muy bien con pegamento.
Now, it's time to cover the other end of the capsule with the yarn, just like in the previous case, I fixed the tip of the yarn and then in a spiral shape I covered the whole capsule very carefully, making sure to fix it very well with glue. When I finished all the space I had left to cover with the yarn, I cut the strand of yarn and secured the tip with glue.
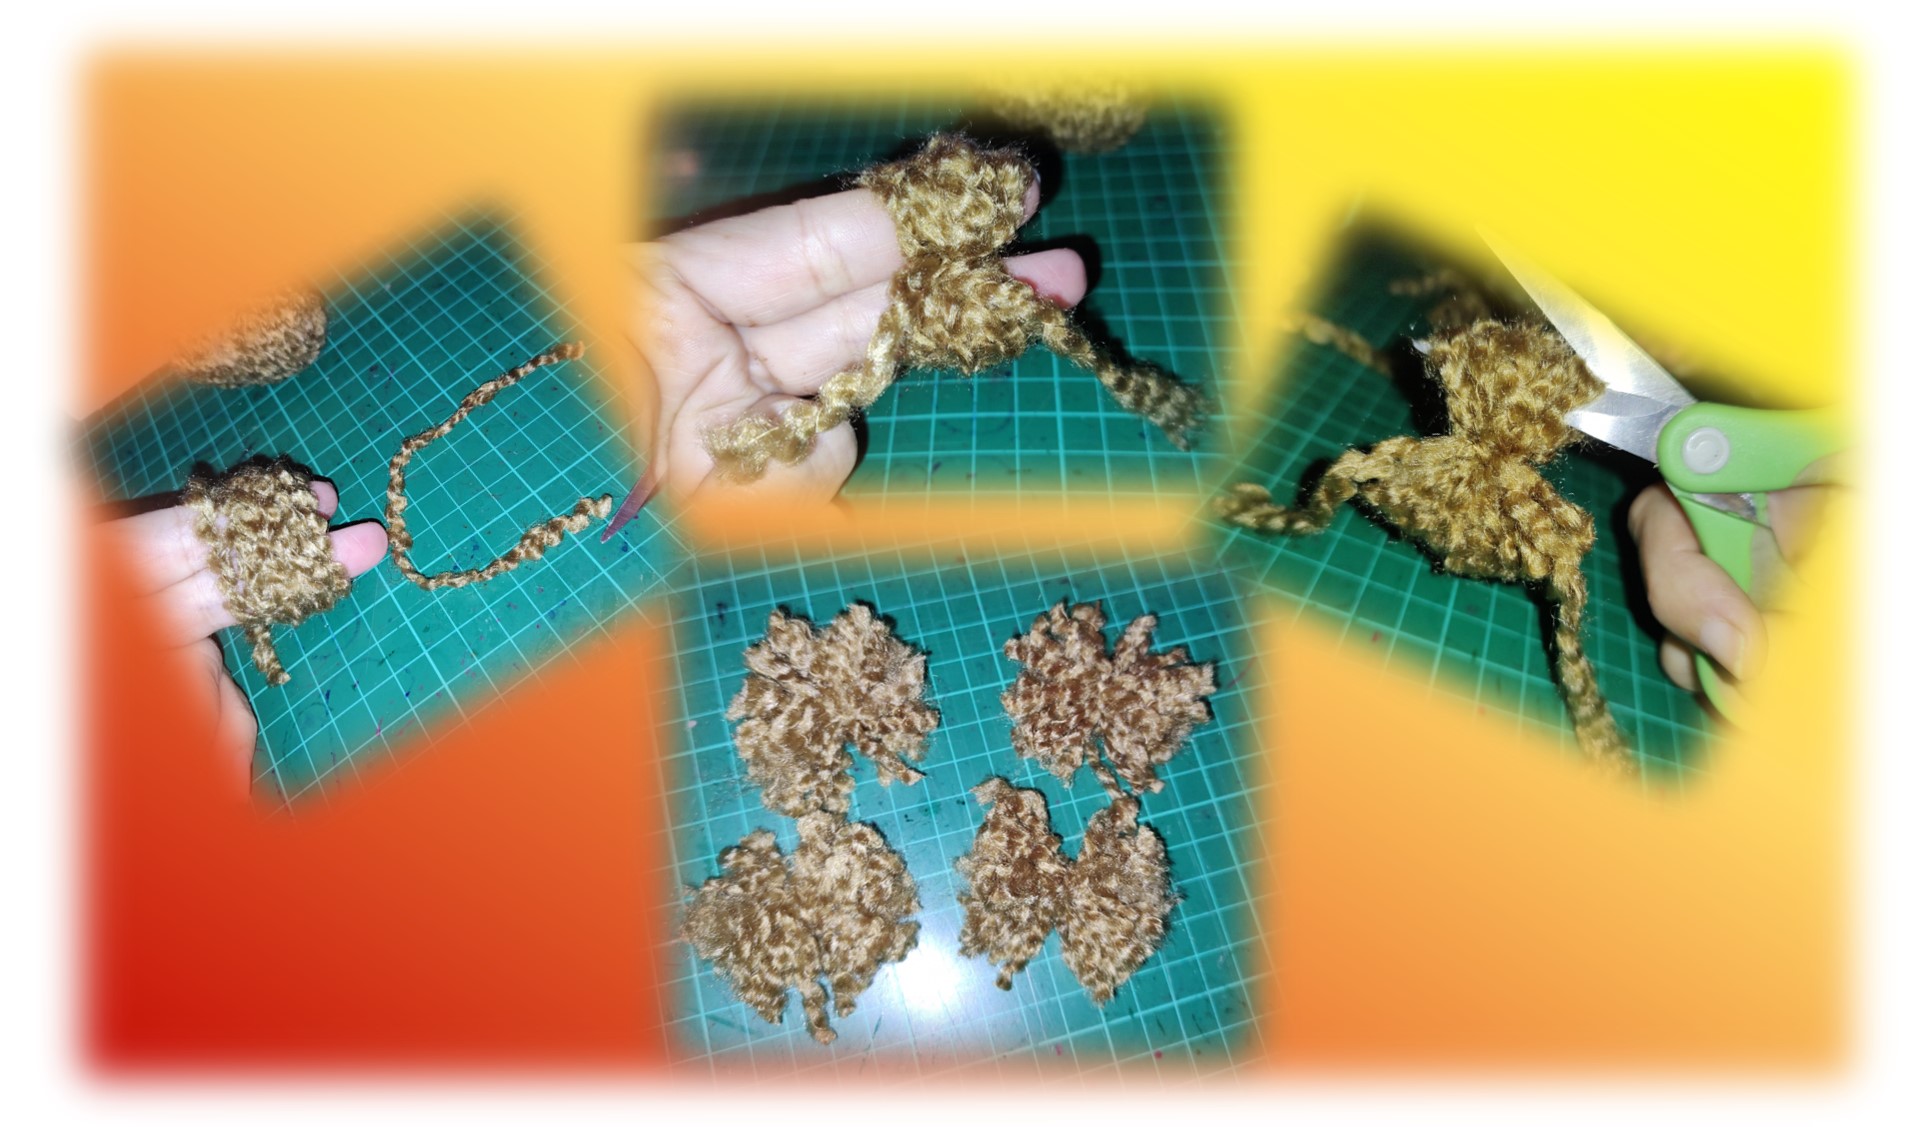
En el paso anterior forramos la capsula, y con ello el cuerpito del perrito está listo, ahora hay que hacerle las patitas. Para hacer las patitas hay que hacer 4 pequeñas borlas de estambre, entonces, tomaremos la hebra de estambre y le daremos 10 vueltas alrededor de nuestros dedos índice y medio. Después tomaremos un trocito de estambre y amararemos nuestra pequeña madeja, justo por el centro y cortaremos los extremos, este procedimiento lo repetiremos, hasta completar las 4 patitas.
In the previous step we lined the capsule, and with that the puppy's body is ready, now we have to make the paws. To make the paws we have to make 4 small yarn tassels, then, we will take the yarn and we will make 10 turns around our index and middle fingers. Then we will take a small piece of yarn and we will tie our little skein, right through the center and we will cut the ends, we will repeat this procedure, until we complete the 4 little legs.
Ahora, recuerdan que cuando forramos la capsula colocamos un anillo, bueno, se supone que esa parte corresponde al lomo del perrito, así que, en la zona exactamente debajo deberían ir las patitas. En los extremos 4 extremos de la zona correspondiente a la barriguita le pegaremos las 4 patitas como pueden observar en la imagen. Una vez que esté bien seco el pegamento, empezamos a darle forma a las borlas, recortándolas con mucho cuidado hasta darle la forma a las patitas.
Now, remember that when we lined the capsule, we placed a ring, well, that part is supposed to correspond to the back of the puppy, so, in the area just below should be the paws. At the 4 ends of the area corresponding to the belly we glue the 4 little paws as you can see in the image. Once the glue is dry, we begin to shape the tassels, cutting them carefully until we give the shape to the paws.
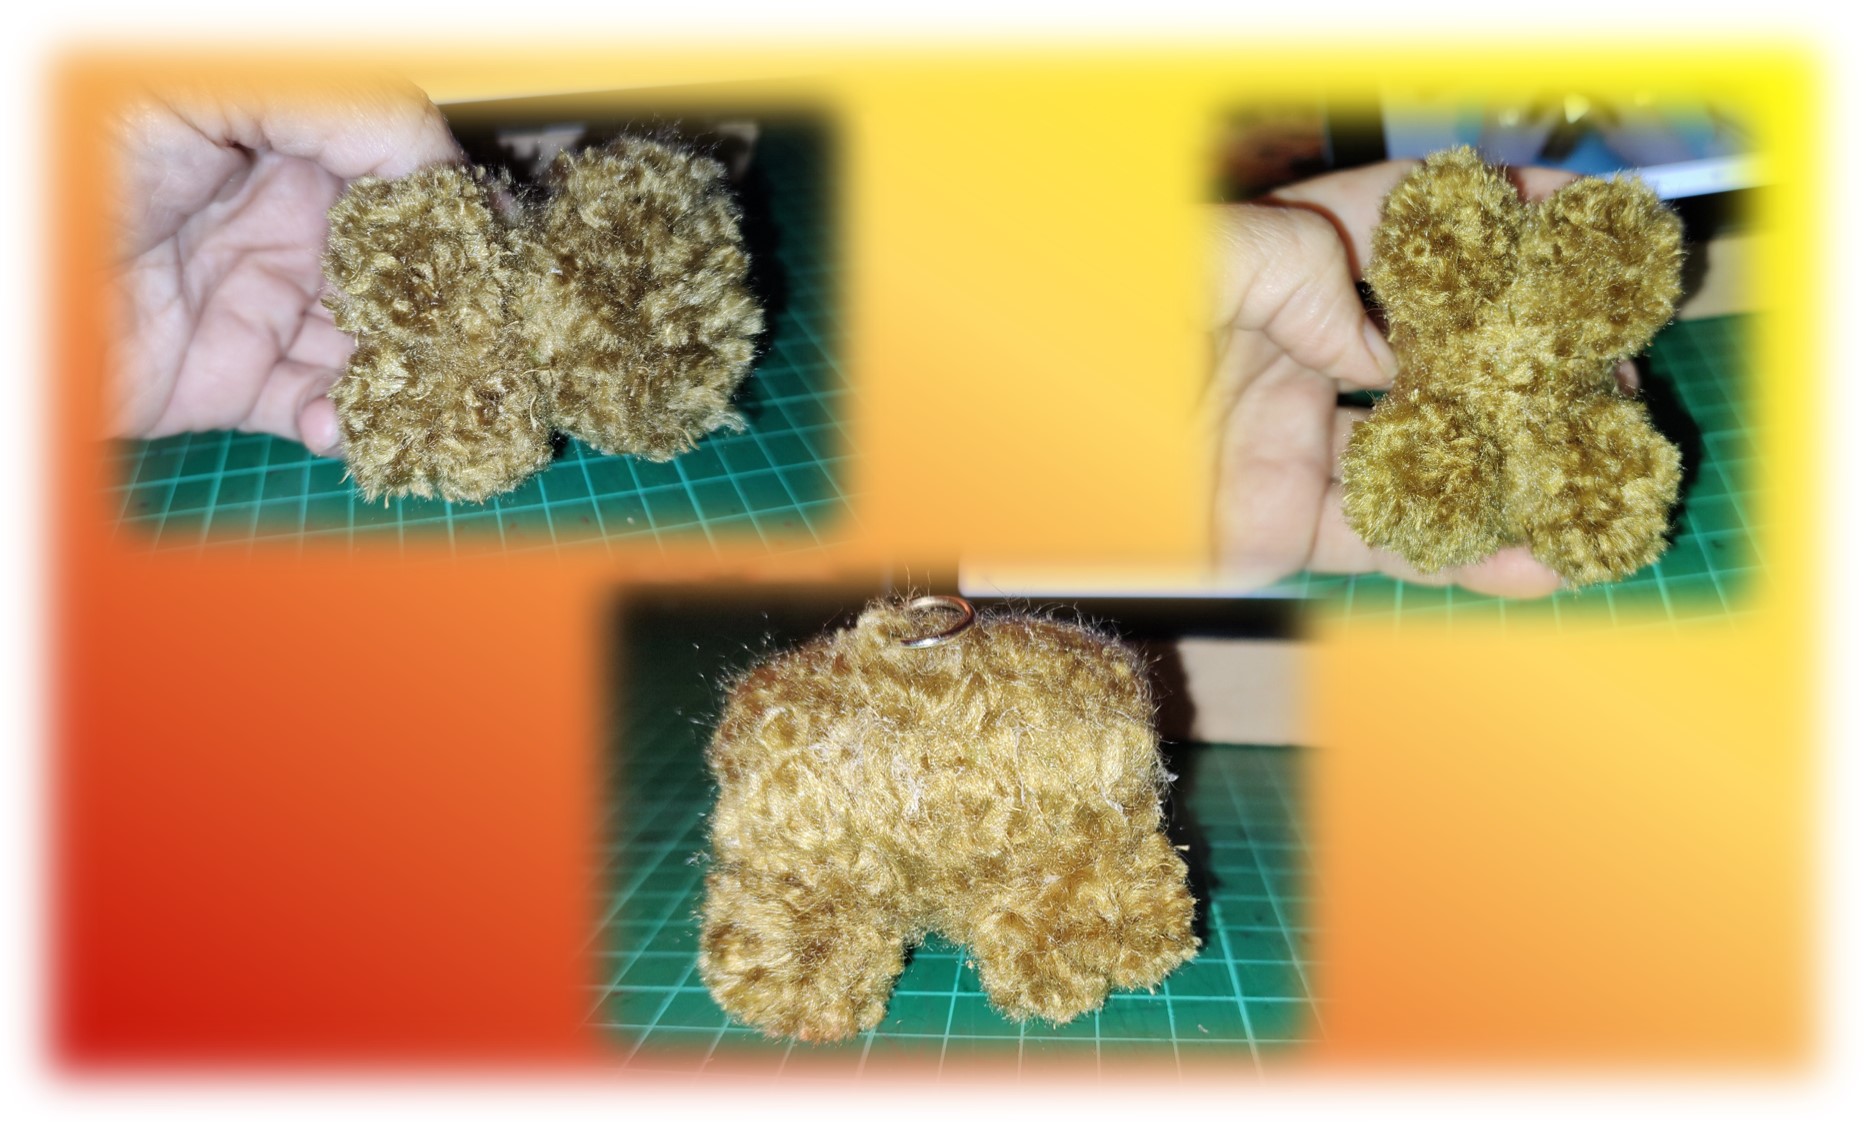
Toca hacer la colita del perrito, para ello le di unas 8 vueltas con el estambre a mi dedo índice, seguidamente con una hebra amarré la pequeña madeja por el centro. Luego doblé la madeja por la mitad y amarré el doblez con otra hebra y recorté el otro extremo para emparejar las hebras. Finalmente, usando pegamento fije la colita en su lugar como pueden ver en la imagen.
It's time to make the tail of the little dog, for this I gave about 8 turns with the yarn to my index finger, then with a strand I tied the small skein in the center. Then I folded the skein in half and tied the fold with another strand and trimmed the other end to match the strands. Finally, using glue I fixed the tail in place as you can see in the picture.
Para hacer las orejitas debemos armar otra madeja, para ello, enrolle unas 10 veces el estambre alrededor de mis 4 dedos. Seguidamente, amarré la madeja por la mitad con una hebra y luego como pueden ver en la imagen pegué las orejitas.
To make the little ears we have to make another skein, so I wound the yarn about 10 times around my 4 fingers. Next, I tied the skein in half with a strand of yarn and then as you can see in the picture, I glued the ears.
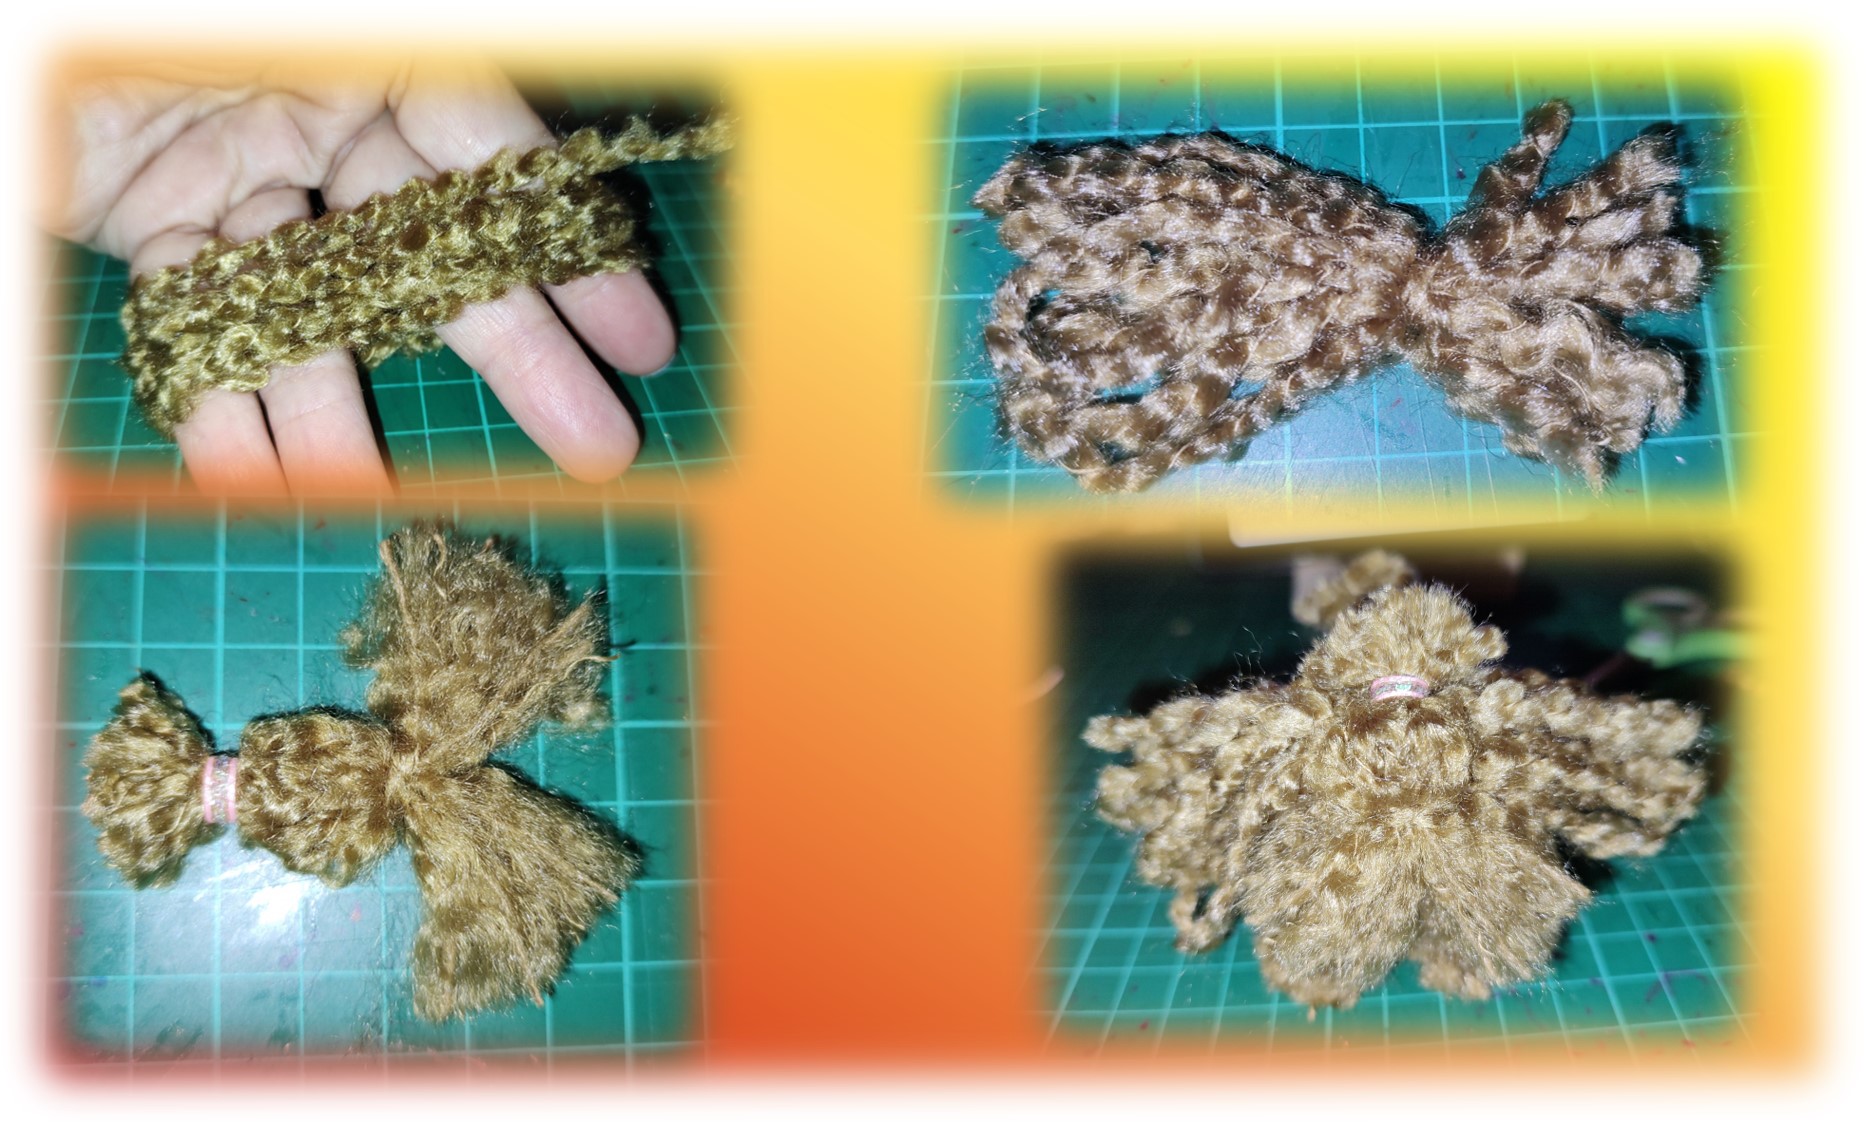
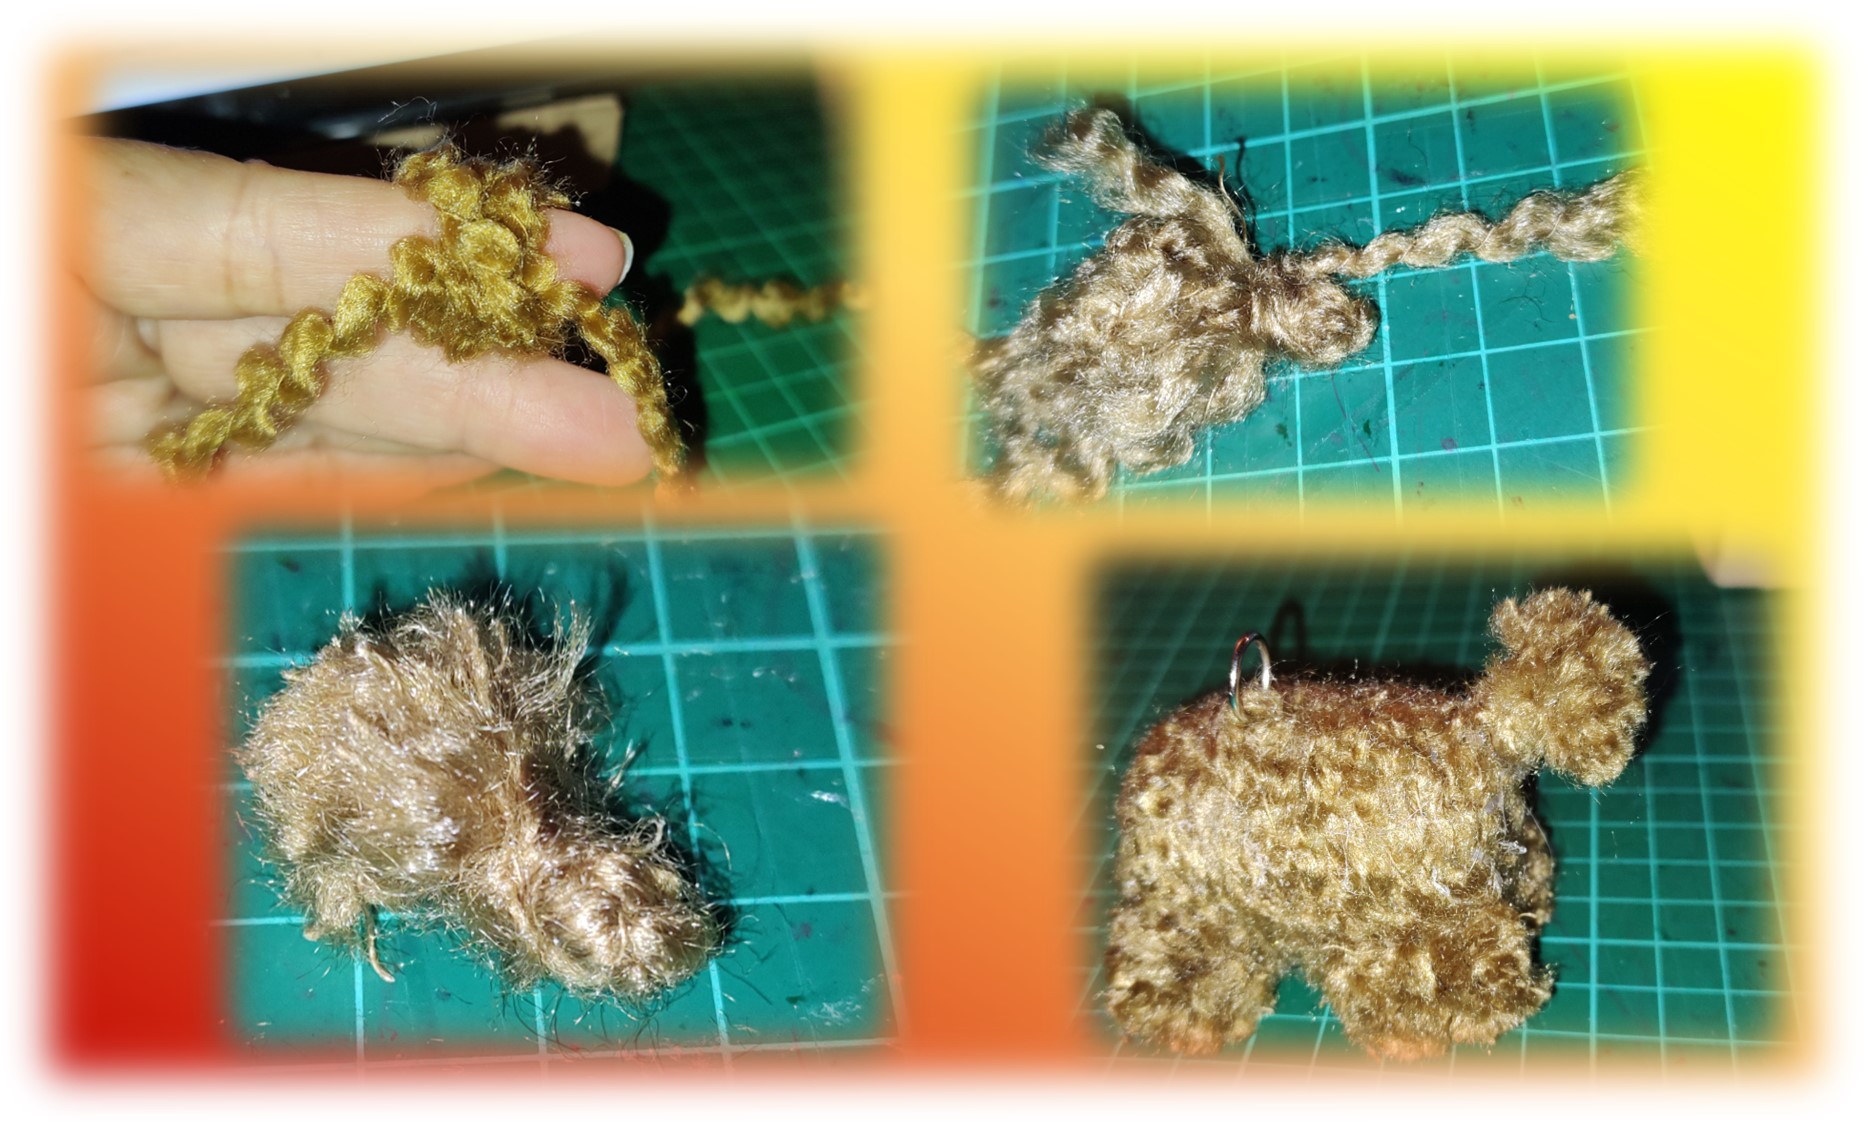
Falta hacerle la carita, bigotes y el moño al pequeño perrito Yorkshire, también usé para esto una madeja del ancho de mis cuatro dedos, alrededor de los cuales, enrollé 10 vueltas de estambre. Después anudé la madeja en dos lugares distintos como pueden ver en la imagen, en la parte que corresponde al bigote del perrito lo anudé con una hebra de estambre. El otro amarre lo realice con un pedacito de cinta, ya que, ese simularía la colita que acostumbran colocarle a esa raza de perritos. Finalmente, con pegamento la ubique en el lugar que correspondía como pueden apreciar en las imágenes.
It remains to make the little face, whiskers and bow to the little Yorkshire dog, I also used for this a skein the width of my four fingers, around which, I wound 10 turns of yarn. Then I knotted the skein in two different places as you can see in the picture, in the part that corresponds to the dog's mustache I knotted it with a strand of yarn. The other knot was made with a piece of ribbon, since it would simulate the little tail that is usually placed on this breed of dog. Finally, with glue I placed it in the corresponding place as you can see in the pictures.
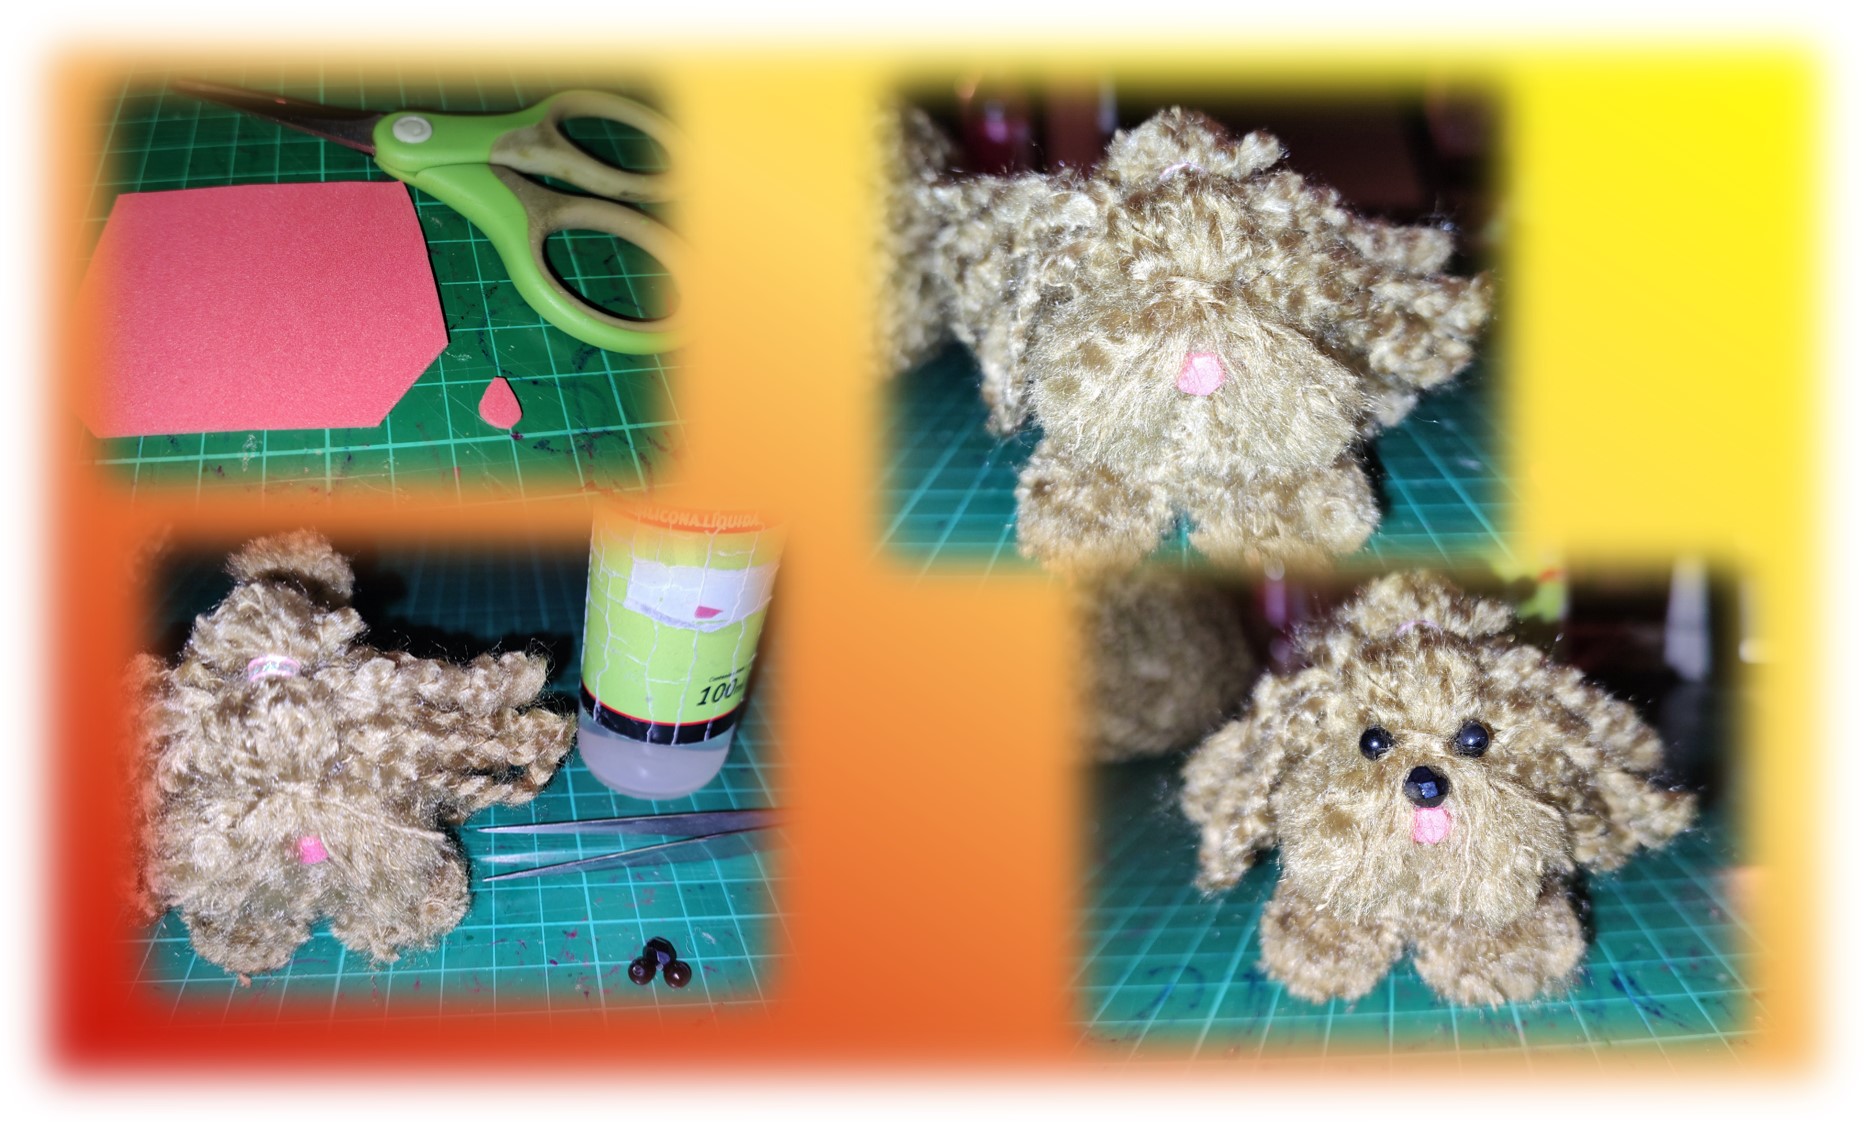
Ya le falta muy poco al perrito, ahora le colocaremos los ojitos, nariz y lengüita. Para la lengüita recorte un pedacito de foami rojo y lo peque con silicón debajo de los bigotes del perrito. En cuanto a los ojitos y la nariz, usé unas perlitas negras y las ubiqué cada una en su sitio como pueden apreciar en la imagen.
The puppy is almost ready, now we will place the eyes, nose and tongue. For the tongue, I cut a little piece of red foami and stuck it with silicone under the whiskers of the puppy. As for the eyes and nose, I used some black beads and placed each one in its place as you can see in the picture.
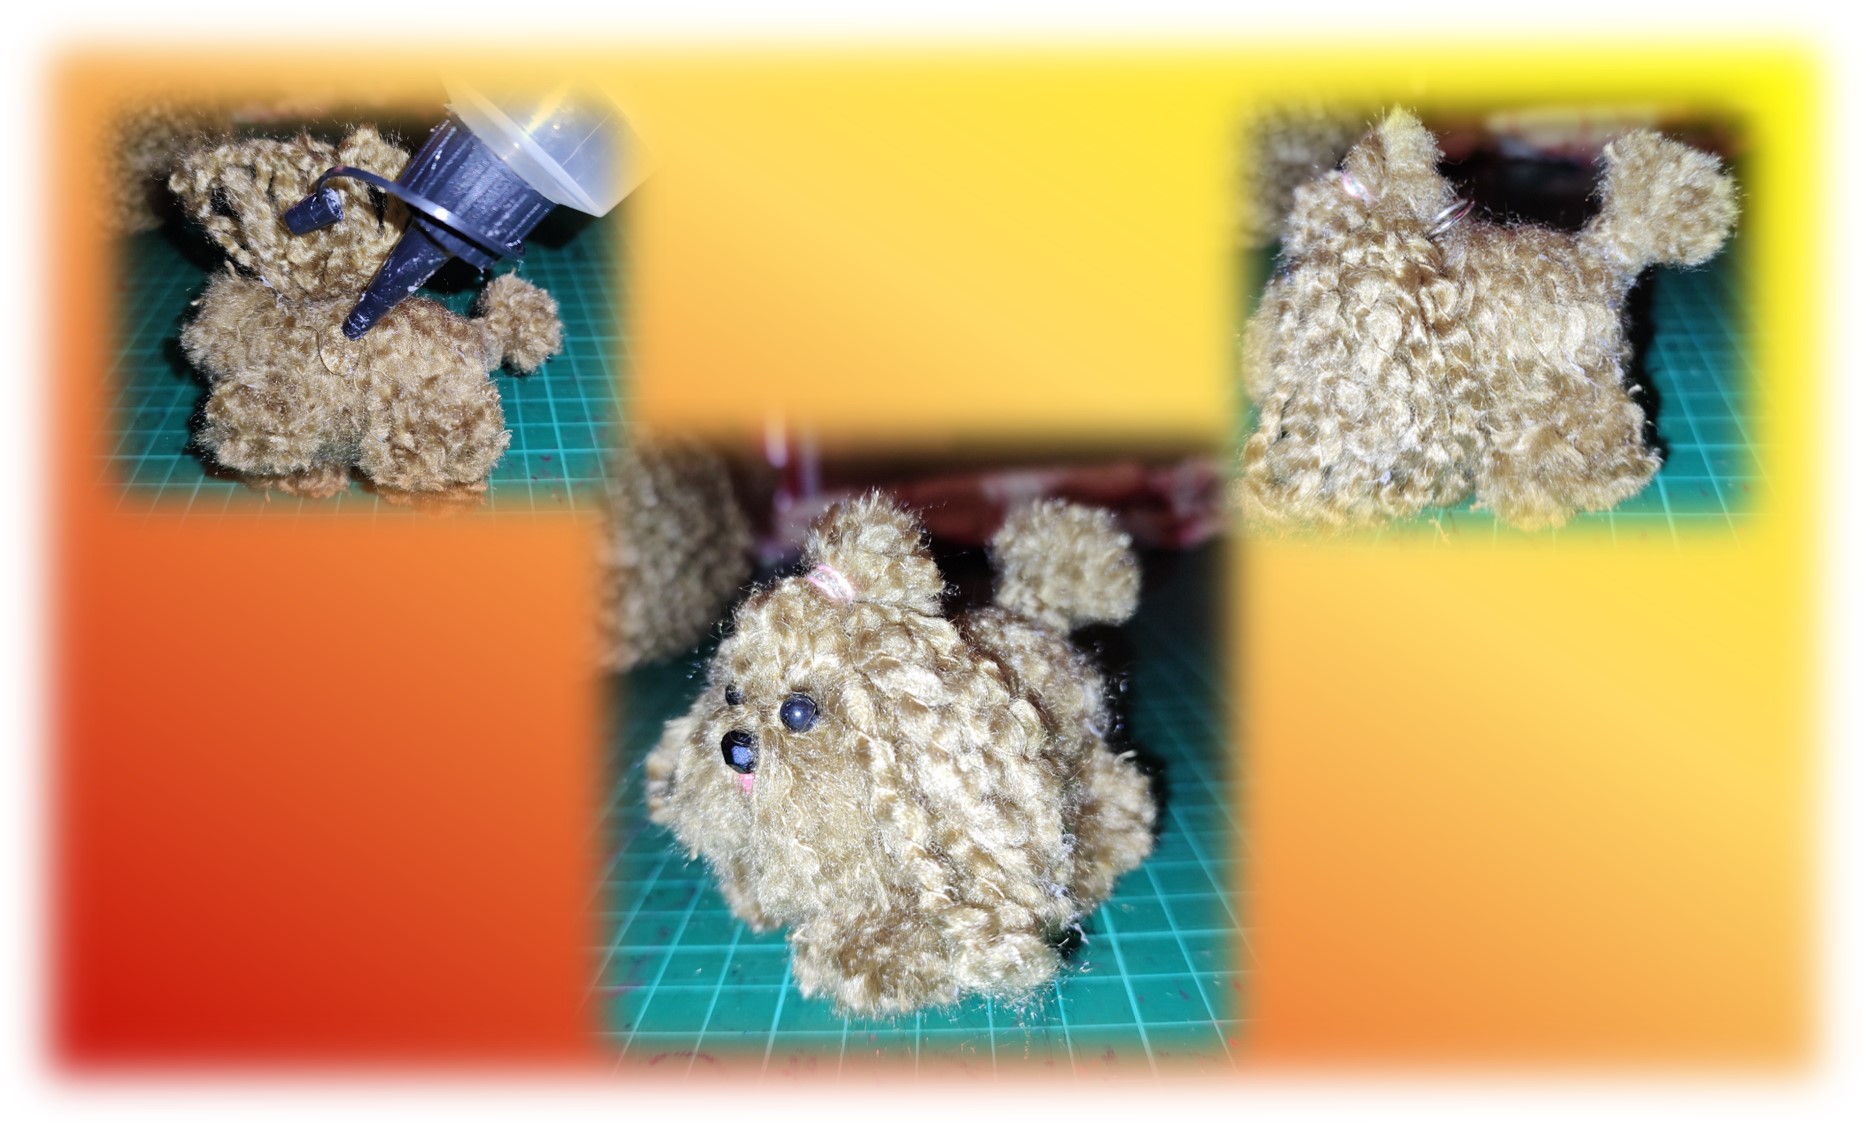
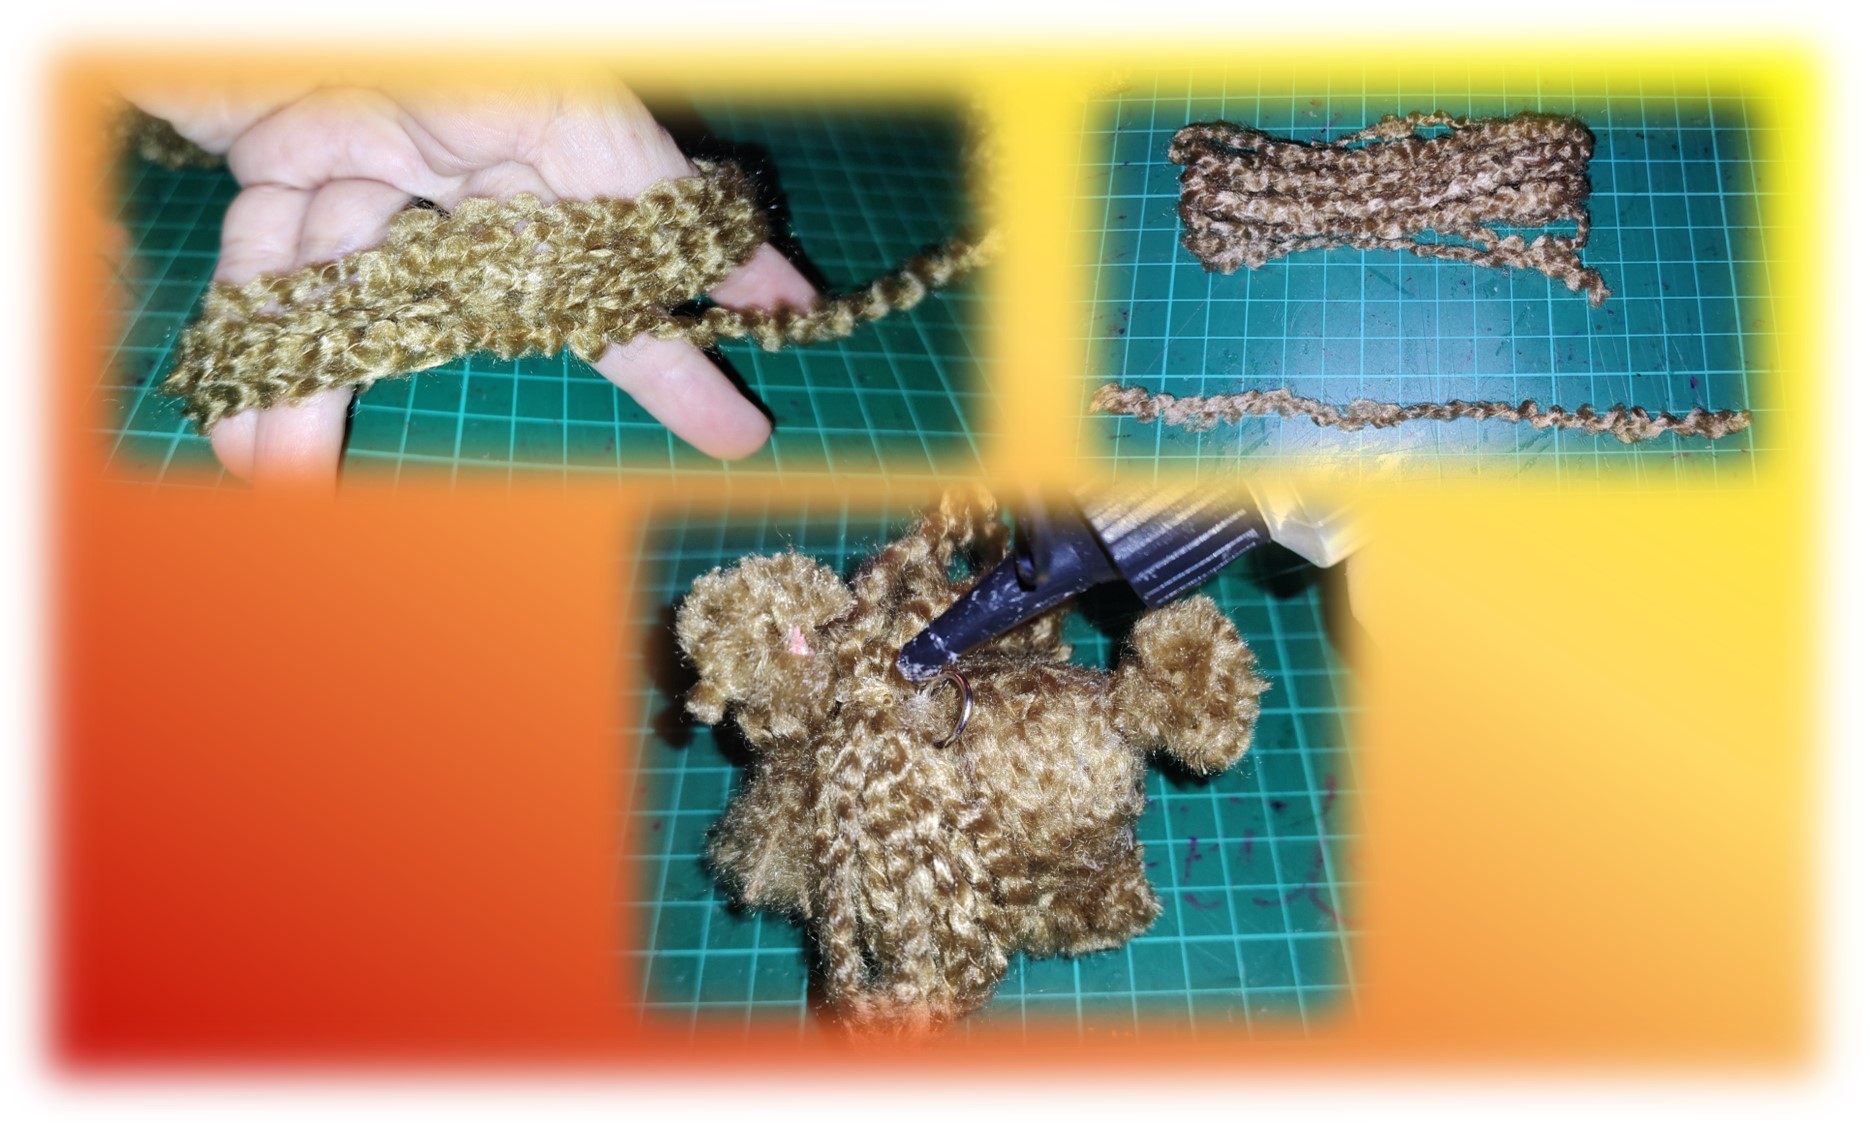
Como último detalle, peque las hebras de estambre que simulan las orejitas del perrito, como pueden apreciar en la imagen, para que mantuvieran la forma. También, amarre un cordoncito en el anillo metálico, para que mi hija lo pudiera colgar en su mochila del colegio, o en cualquier otro bolso.
As a last detail, I glued the yarn strands that simulate the dog's ears, as you can see in the picture, to keep the shape. Also, I tied a string on the metal ring, so that my daughter could hang it on her school bag, or any other bag.
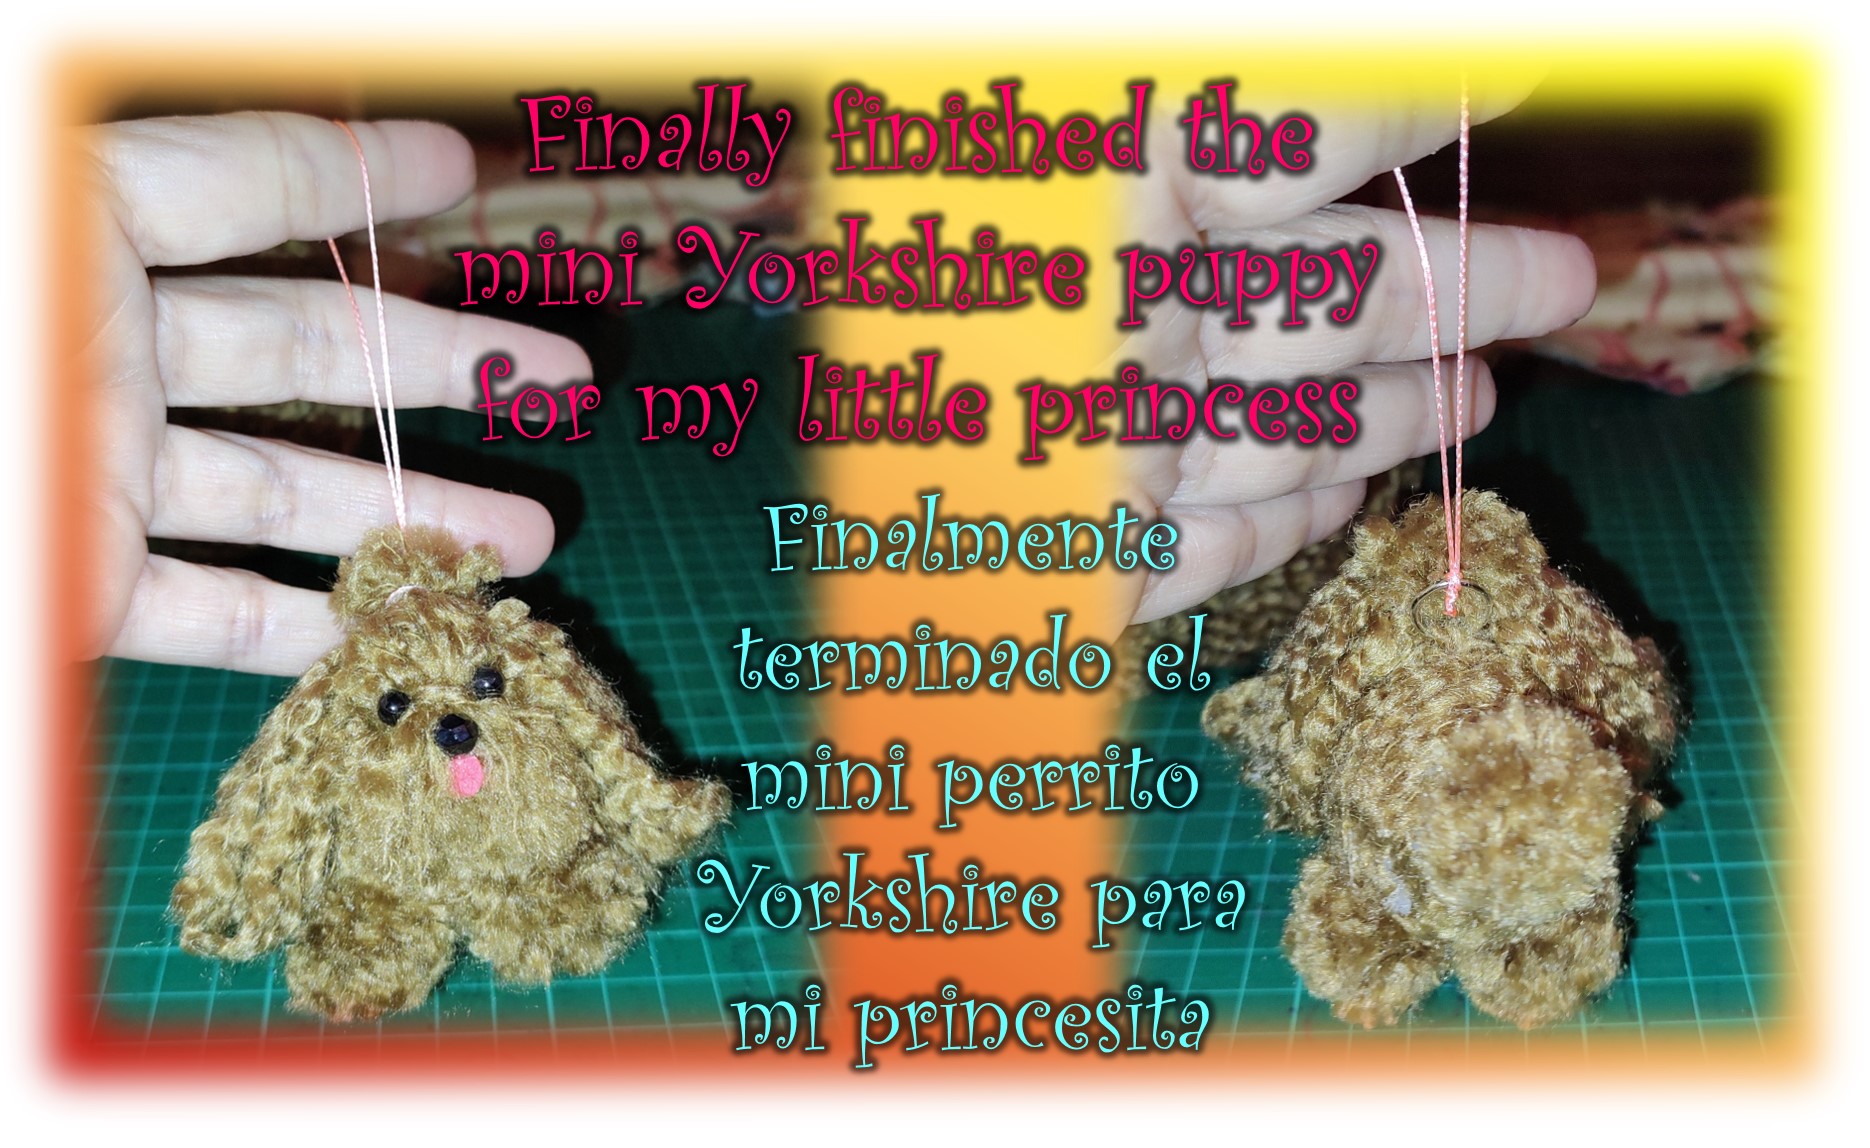
Bueno, como pueden observar en la imagen ya la nueva mascotita de mi pequeña Nadiah está terminada, y no sé, que les parece a ustedes, pero, modestia aparte, creo que me quedo muy linda y tierna. Espero disfrutaran el proceso de elaboración y se animen a realizar su propio perrito Yorkshire. Hasta una próxima ocasión, Dios los bendiga enormemente.
Well, as you can see in the picture, my little Nadiah's new pet is finished, and I don't know what you think of it, but, modesty aside, I think it is very cute and cuddly. I hope you enjoyed the process of elaboration and I encourage you to make your own Yorkshire puppy. Until next time, God bless you all enormously.
Contenido y fotografías de mi propiedad intelectual
Información Técnica
| Cámara | Pentax * istDL |
|---|---|
| Lente | * Pentax 18-55 |
| Iluminación | Luz Natural |
| Locación | Barcelona, Estado Anzoátegui, Venezuela |
Content and photographs of my intellectual property
Technical information
| Camera | Pentax * istDL |
|---|---|
| Lens | * Pentax 18-55 |
| Lighting | Natural Light |
| Location | Barcelona, Anzoátegui State, Venezuela |


Congratulations @francyrios75! You have completed the following achievement on the Hive blockchain And have been rewarded with New badge(s)
Your next target is to reach 49000 upvotes.
You can view your badges on your board and compare yourself to others in the Ranking
If you no longer want to receive notifications, reply to this comment with the word
STOPTo support your work, I also upvoted your post!
Check out our last posts:
Qué interesante arte manual y que bueno que lo enseñes a otros
Y además, super sencillo y hermoso. Gracias por tu visita 😃
Con el apoyo de la familia.
También nos puedes apoyar en nuestro Trail de TopFiveFamily
Si desea delegar HP al proyecto de la Familia del Top Family puedes hacerlo desde aquí: Delegue 5 HP - Delegue 10 HP - Delegue 20 HP - Delegue 30 HP - Delegue 50 HP - Delegue 100 HP.
Una manualidad realizada con mucha dedicación y alegría. Felicidades !LOLZ
lolztoken.com
now we just call him Phil.
Credit: reddit
@francyrios75, I sent you an $LOLZ on behalf of @felixgarciap
(1/4)
Use the !LOL or !LOLZ command to share a joke and an $LOLZ
Si quieres formar parte de nuestro trail de curación, ingresa a HIVEVOTE, haciendo clic en la imagen del capybara aristocratico. Capybaraexchange tu casa de cambio, rapida, confiable y segura
En colaboración con
Qué bonitos mini-juguetes.