Bienvenidos Queridos Amantes de la Artes Manuales
Welcome Dear Manual Arts Lovers
Saludos queridos lectores fanáticos de las artes manuales, siempre es un placer el poder estar de vuelta con ustedes y, sobre todo, con un proyecto como el que les comparto hoy, tomando en cuenta que aquí en Venezuela se celebra el día de las madres. Y antes de seguí, por supuesto quiero desearles a todas las madres, que hoy pasen un maravilloso día en compañías de sus grandes amores. Y bueno, uno de nuestros principales anhelos como madres, es hacer felices a nuestros hijos, y ese es el objetivo del proyecto de hoy, que además, es súper hermoso, muy sencillo y lo mejor necesitaran muy pocos materiales. Se trata de un muy tierno erizo, hecho con estambre, que de seguro adoraran.
Greetings dear readers, fans of manual arts, it is always a pleasure to be back with you and, above all, with a project like the one I share with you today, taking into account that here in Venezuela we celebrate Mother's Day. And before I go on, of course I want to wish all mothers, that today they spend a wonderful day in the company of their great loves. And well, one of our main desires as mothers, is to make our children happy, and that is the goal of today's project, which is also super beautiful, very simple and the best thing is that you will need very few materials. It is a very cute hedgehog, made with yarn, that they will surely love.


Debo confesarles que este proyecto no fue idea mía, sino de mi pequeña Nadiah, ella consiguió el tutorial en internet y desde que lo vio, no paro de pedirme que le hiciera uno. Por supuesto, cuando lo vi, a mí también me encanto. Además, como no aprovechar la oportunidad hacer feliz a mi pequeña Nadiah y llenar mi corazón de regocijo al ver la alegría en sus hermosos ojitos.
I must confess that this project was not my idea, but my little Nadiah's, she got the tutorial on the internet and since she saw it, she kept asking me to make one for her. Of course, when I saw it, I loved it too. Besides, how could I not take the opportunity to make my little Nadiah happy and fill my heart with joy to see the joy in her beautiful eyes.
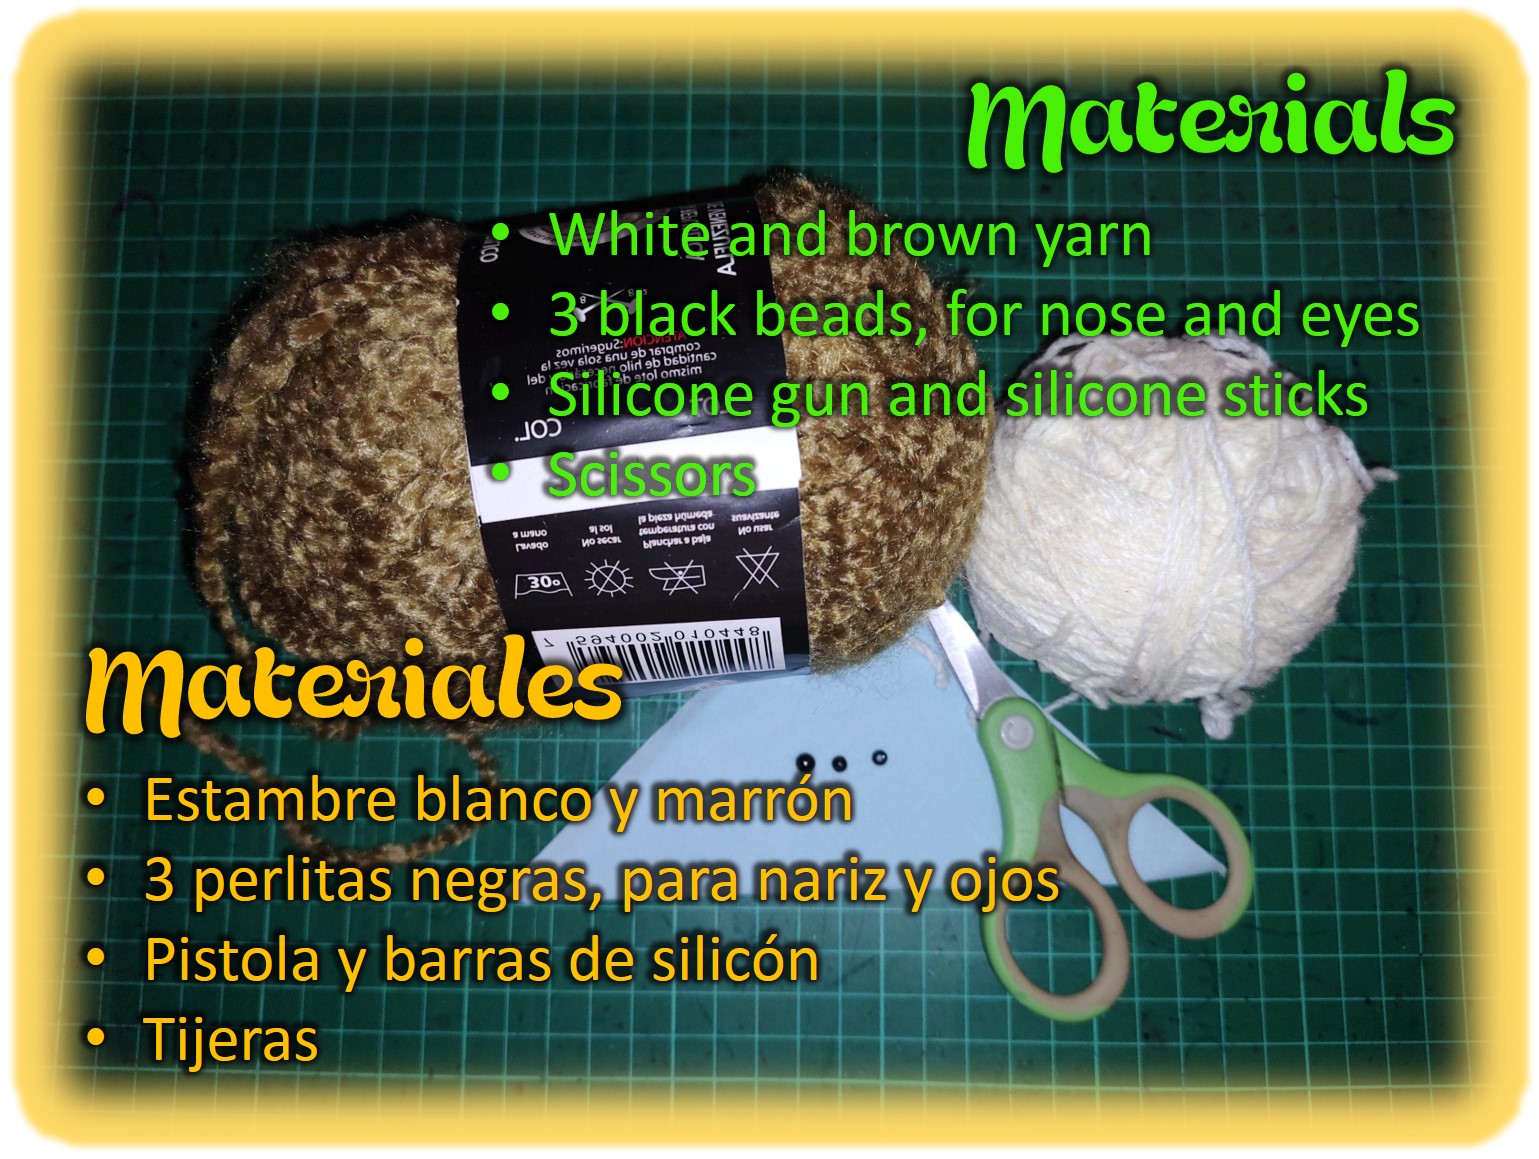
En lo que tuve un poco de tiempo, busqué los materiales, los cuales, como pueden observar en la imagen, solo se necesitará un poco de estambre, marrón y otro poco de blanco. Claro, si gustan, también pueden usar otros colores de su preferencia, eso es a su gusto. Además, necesite unas tijeras y un poco silicón caliente para pegar algunos elementos.
As soon as I had some time, I looked for the materials, which, as you can see in the picture, you will only need a little bit of yarn, brown and a little bit of white. Of course, if you like, you can also use other colors of your preference, it's up to you. Also, you will need a pair of scissors and some hot silicone to glue some elements.
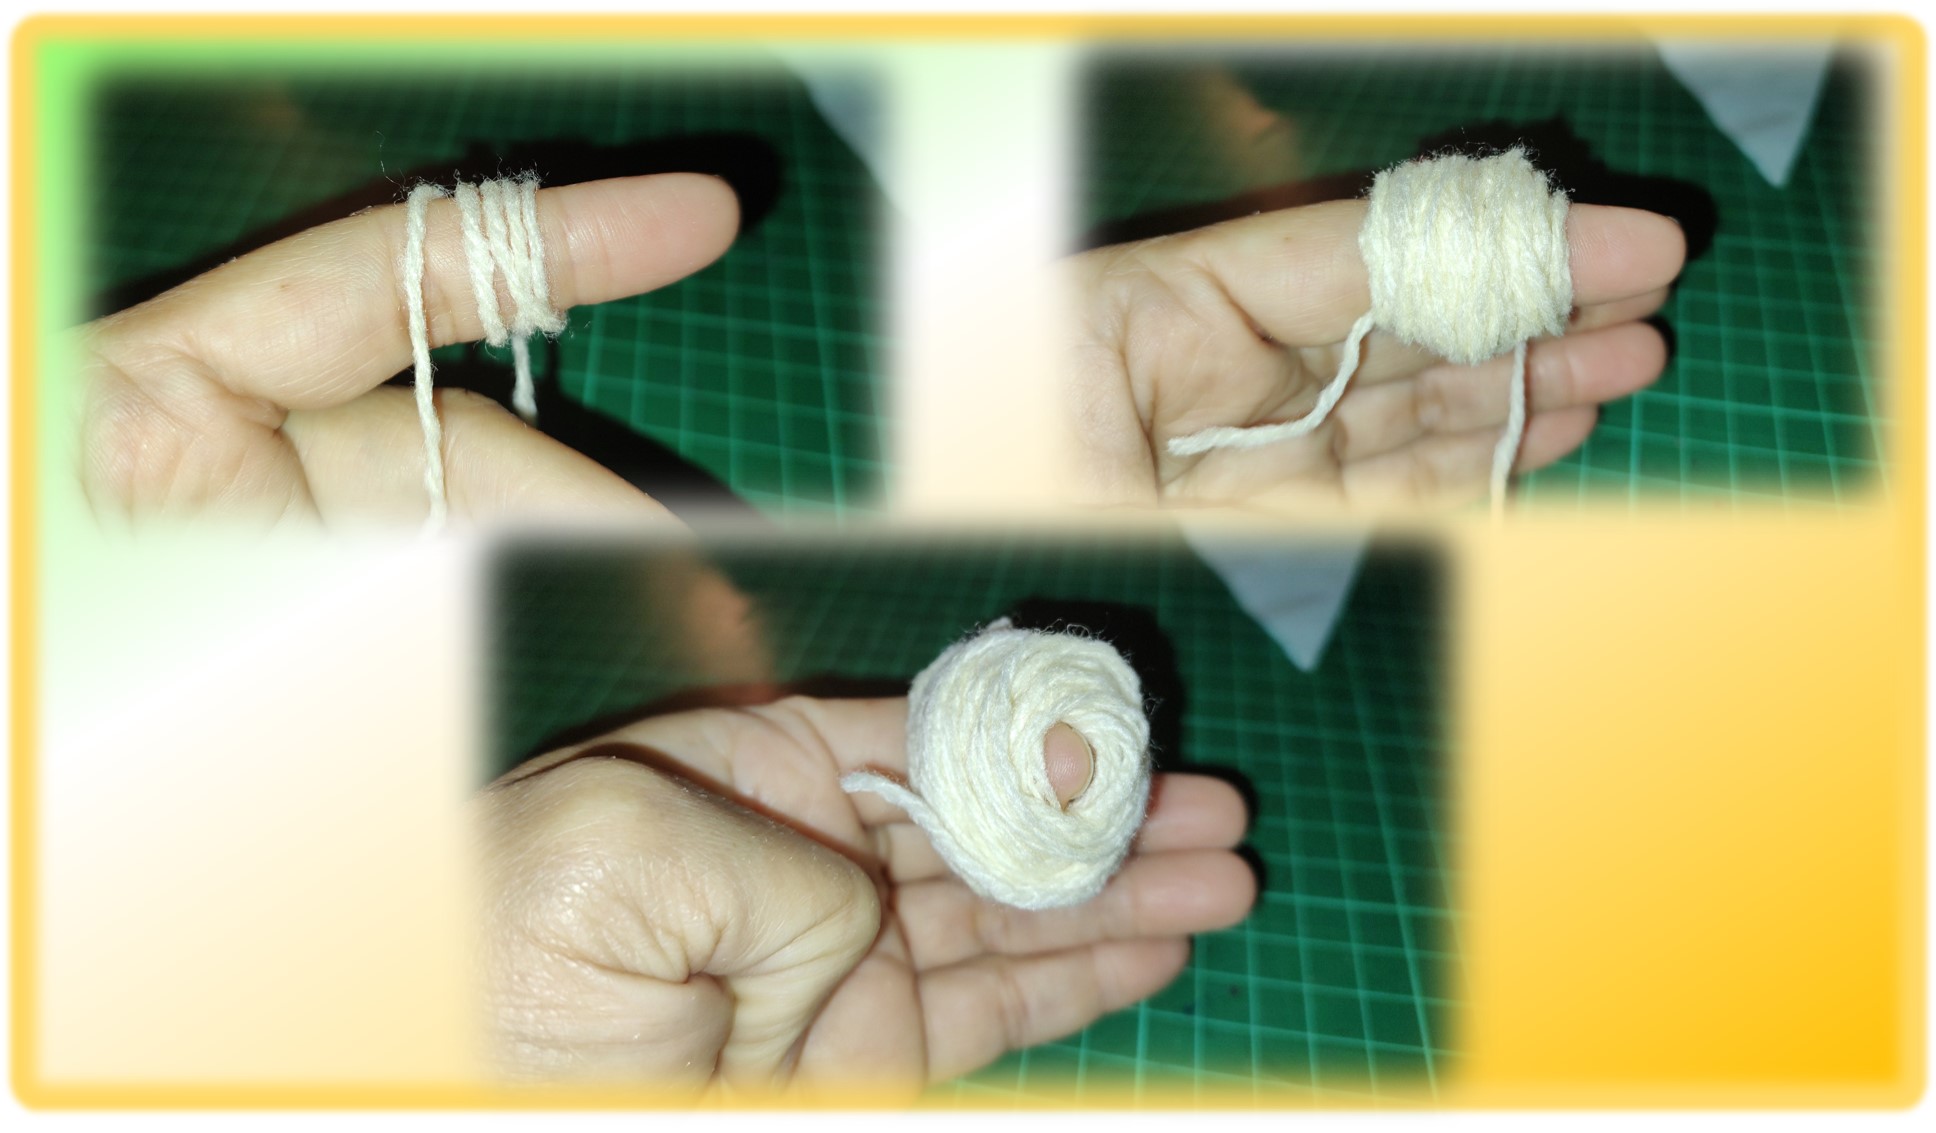
Pero, iniciemos con el proceso de elaboración de este tierno erizo, que, por cierto, en el caso del que les muestro, se llama Floris, ese nombre se lo puso mi pequeña Nadiah. Bueno, lo primero es tomar el estambre de color blanco y empezaremos a enrollarlo en el dedo índice, hasta completar 80 vueltas, tal como pueden ver en la imagen anterior.
But, let's start with the process of making this tender hedgehog, which, by the way, in the case of the one I show you, is called Floris, that name was given to her by my little Nadiah. Well, the first thing to do is to take the white yarn and start wrapping it around the index finger, until completing 80 turns, as you can see in the image above.
Una vez que completamos las 80 vueltas, con mucho cuidado sacamos el dedo y tomamos un trozo de hilo adicional y tal cual como ven en la imagen amarramos el trozo de hilo justo por la mitad de la pequeña madeja de hilo. Damos varias vueltas con la hebra de hilo y apretamos bien nos debe quedar similar a un lazo, finalmente anudamos bien para que quede bien seguro y reservamos para cuando necesitemos utilizar.
Once we complete the 80 turns, very carefully we take out the finger and take an additional piece of yarn and as you can see in the picture, we tie the piece of yarn just in the middle of the small skein of yarn. We make several turns with the thread strand and tighten it well, it should be similar to a loop, finally we knot it well so that it is secure and we reserve it for when we need to use it.
Ahora, toca utilizar el estambre marrón, realizaremos algo similar a lo que hicimos con el hilo blanco. Sin embargo, en este caso en lugar de envolver el hilo alrededor de un solo dedo, lo haremos alrededor de los dedos índice y medio. De igual forma debemos realizar en total 80 vueltas y una vez terminemos, tomamos un trozo del mismo hilo y lo amarramos justo por la mitad de la madeja, recuerden anudar muy bien y reservamos.
Now, it is time to use the brown yarn, we will do something similar to what we did with the white yarn. However, in this case instead of wrapping the yarn around one finger, we will wrap it around the index and middle fingers. In the same way we must make a total of 80 turns and once we finish, we take a piece of the same yarn and tie it right in the middle of the skein, remember to knot it very well and reserve.
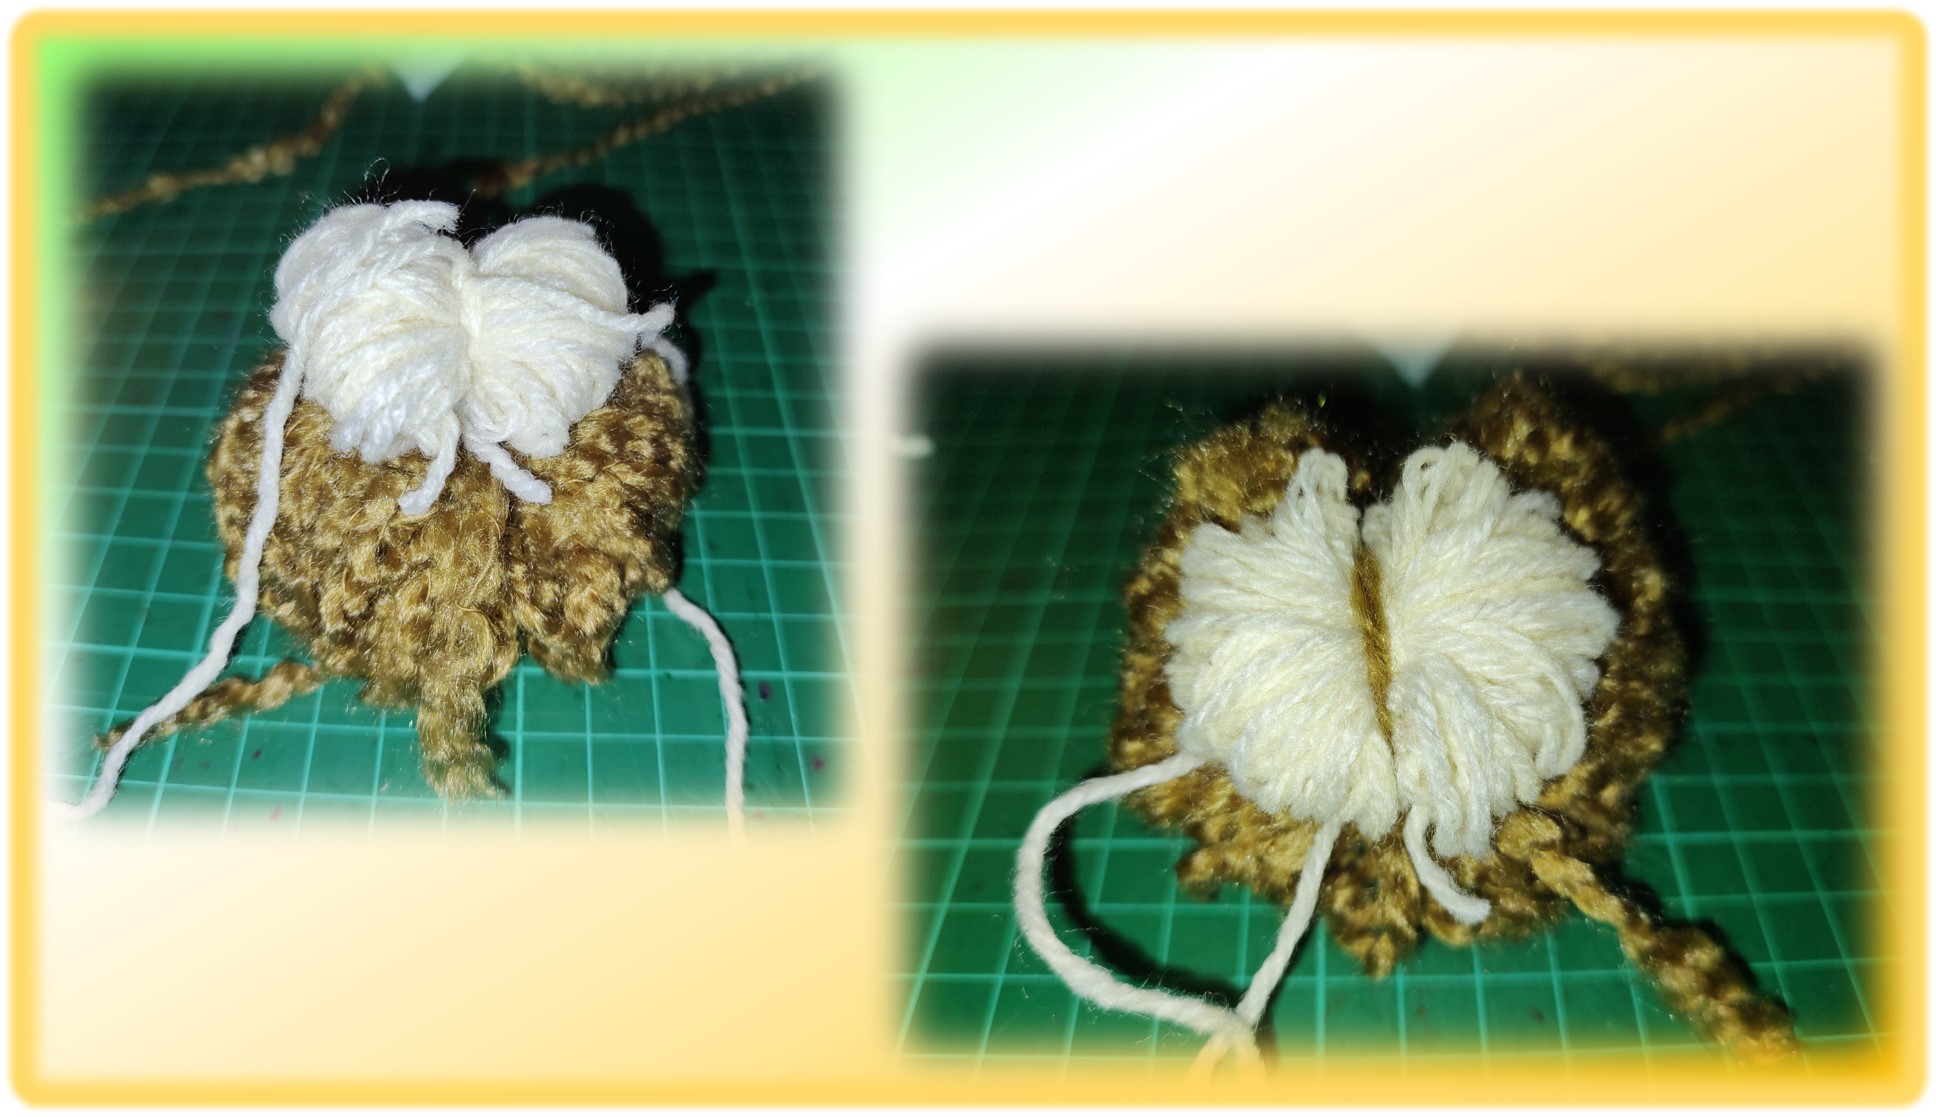
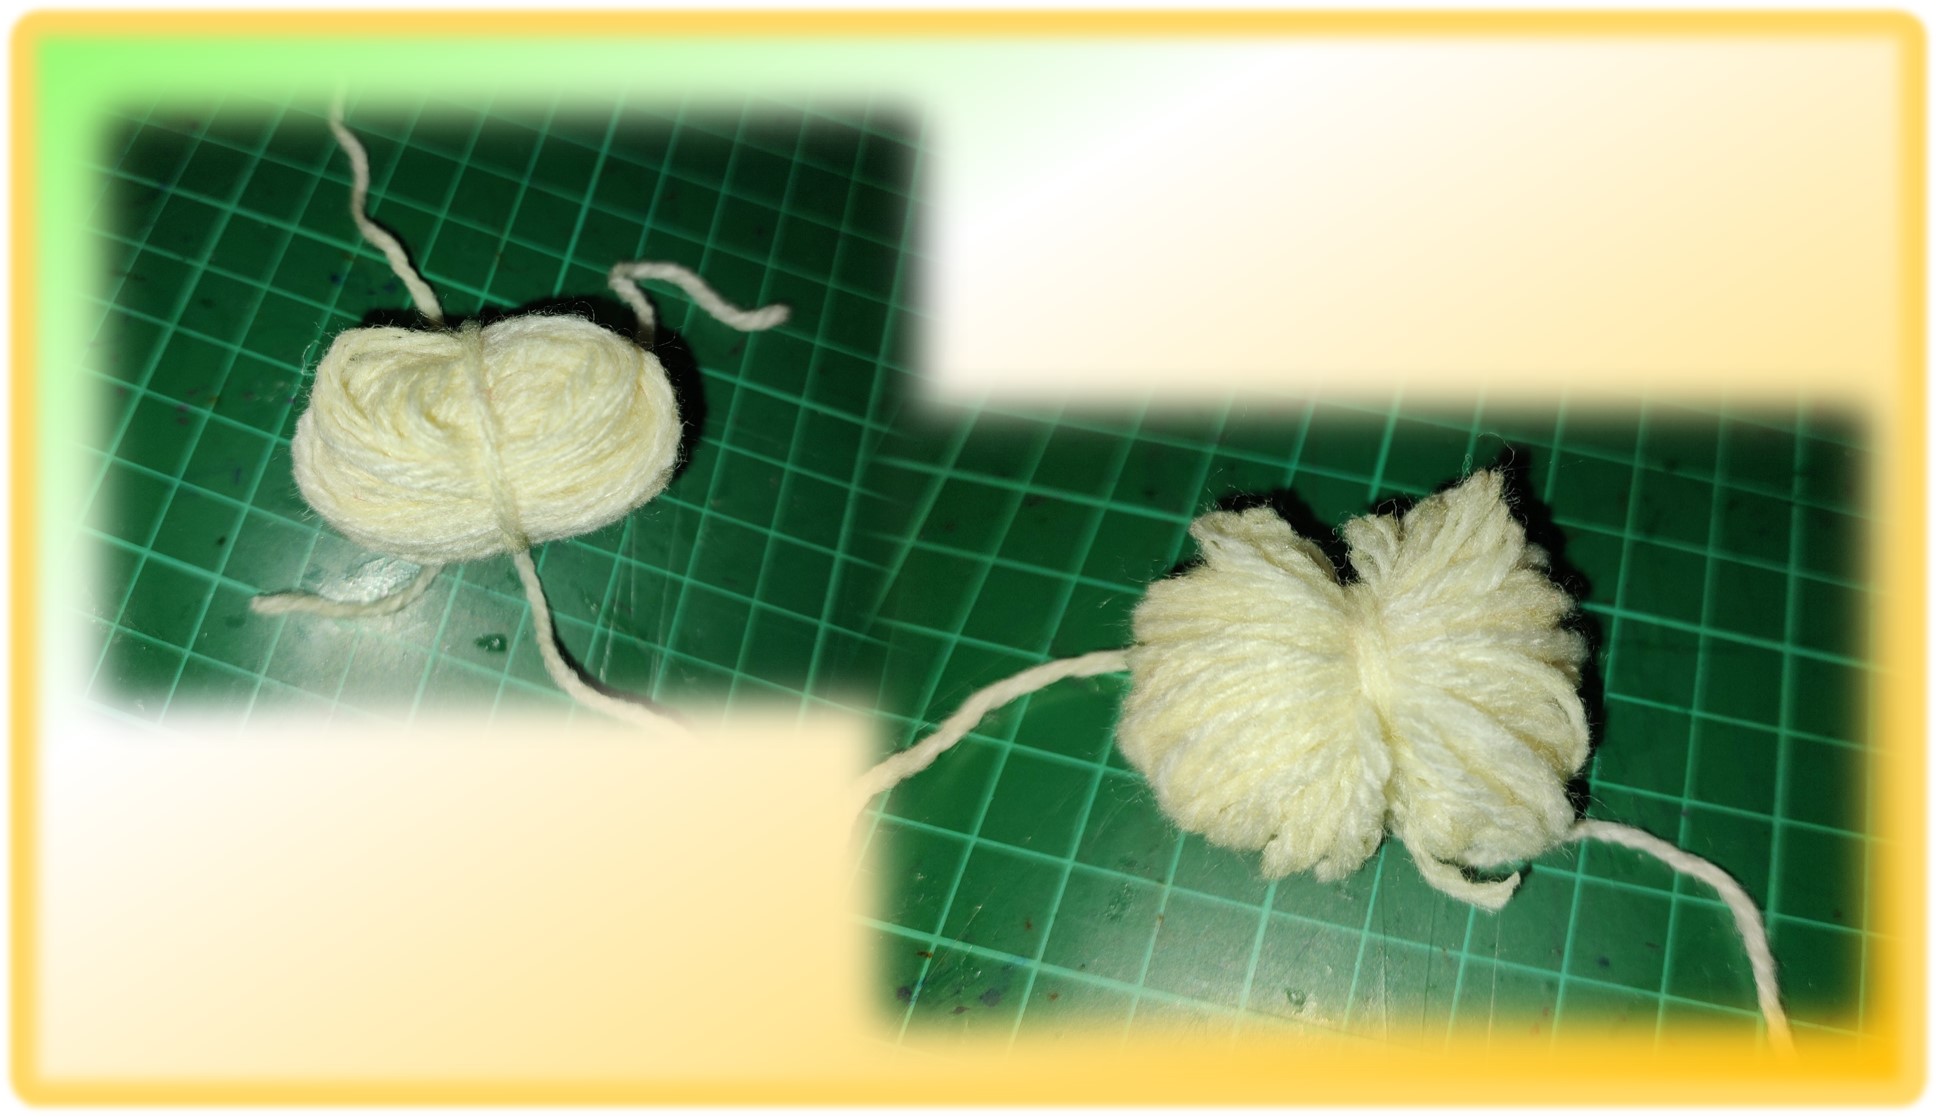
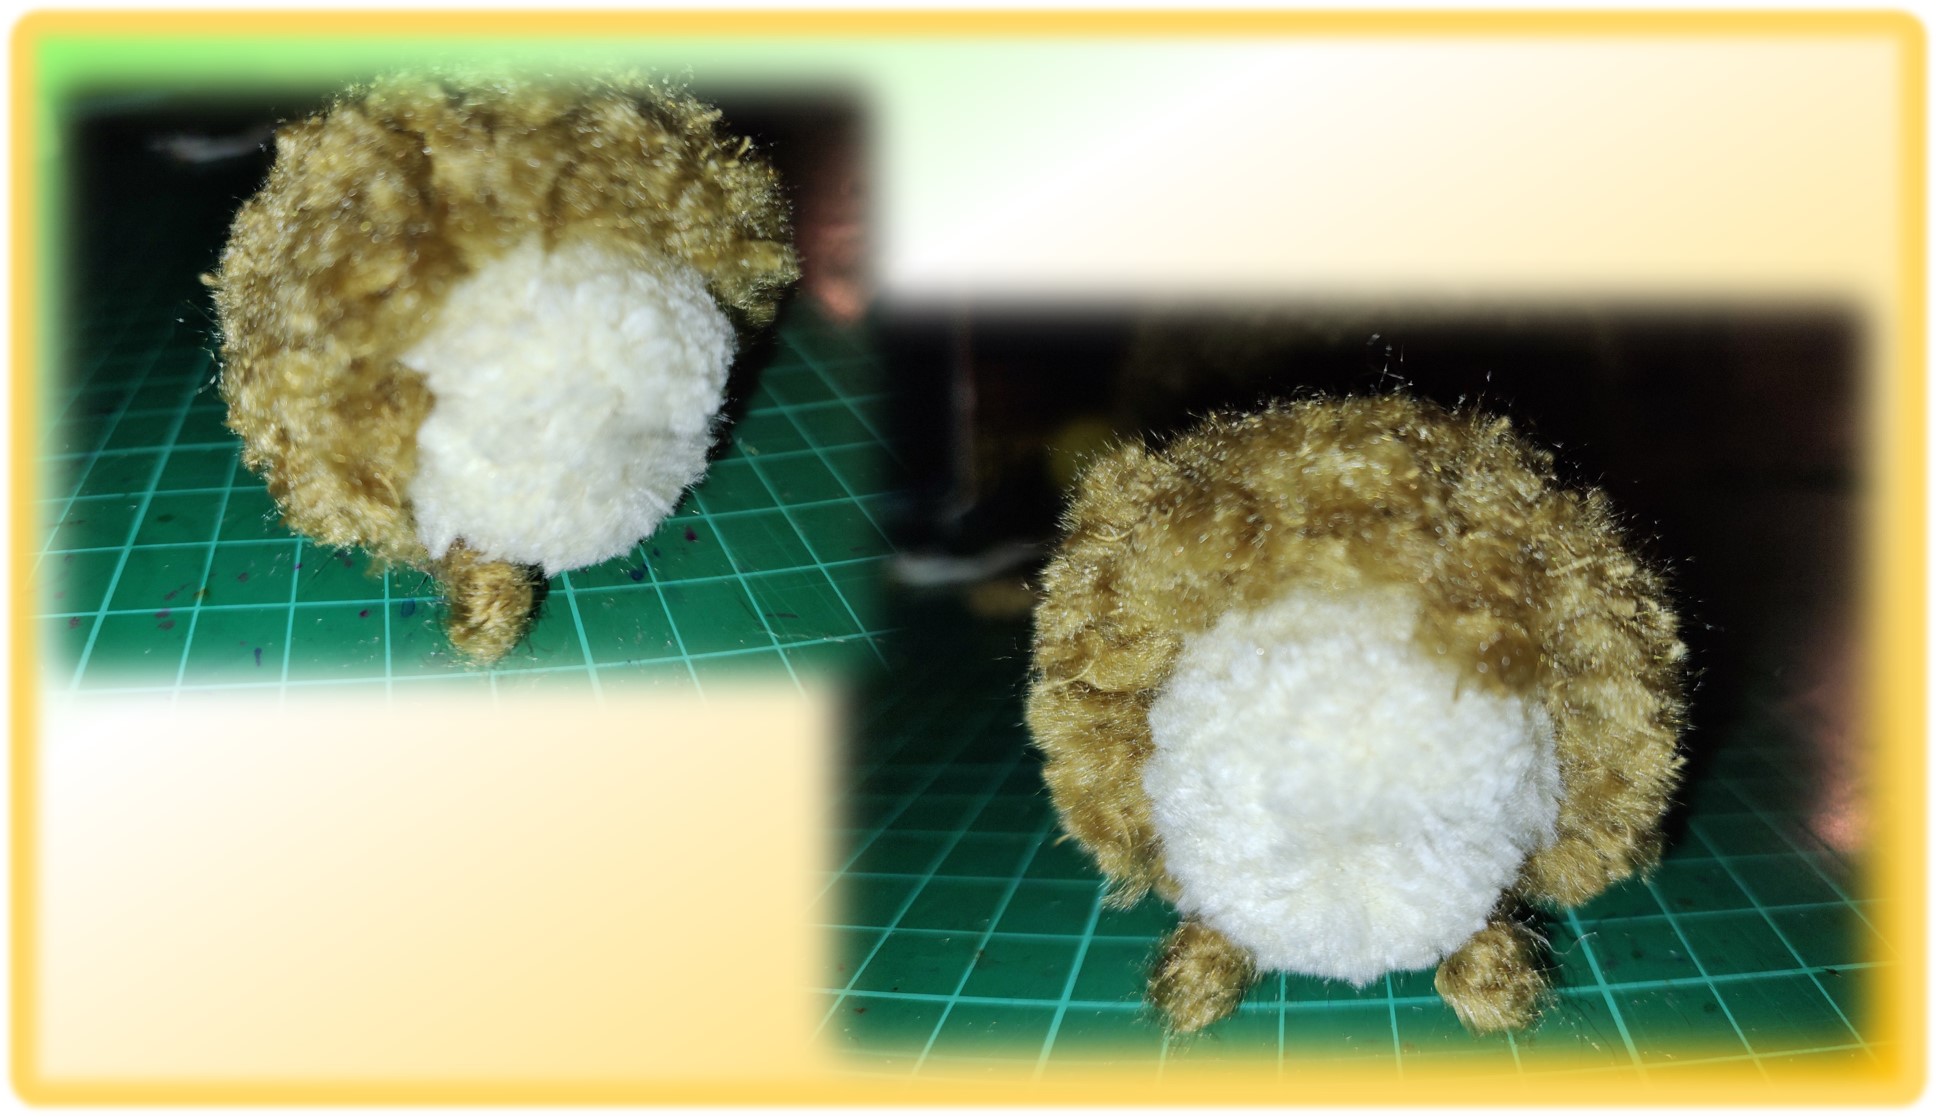
Ya tenemos 2 madejitas de estambre una pequeña de color blanco y una más grande de color marrón. Ahora las uniremos, para ello colocaremos una sobre la otra, tomamos el sobrante de la hebra que usamos para atar la madeja de color marrón y con ella amarramos la madeja de color blanco. Para asegurarla mejor, también tomamos la hebra con la que anudamos la madeja blanca y con ella amarramos la madeja marrón. Les debería quedar tal cual les muestro en la imagen de arriba.
We already have 2 skeins of yarn, a small white skein and a larger brown skein. Now we will join them together, to do this we will place one on top of the other, we take the excess of the yarn we used to tie the brown skein and with it we tie the white skein. To secure it better, we also take the strand with which we tied the white skein and with it we tie the brown skein. It should look just as I show you in the image above.
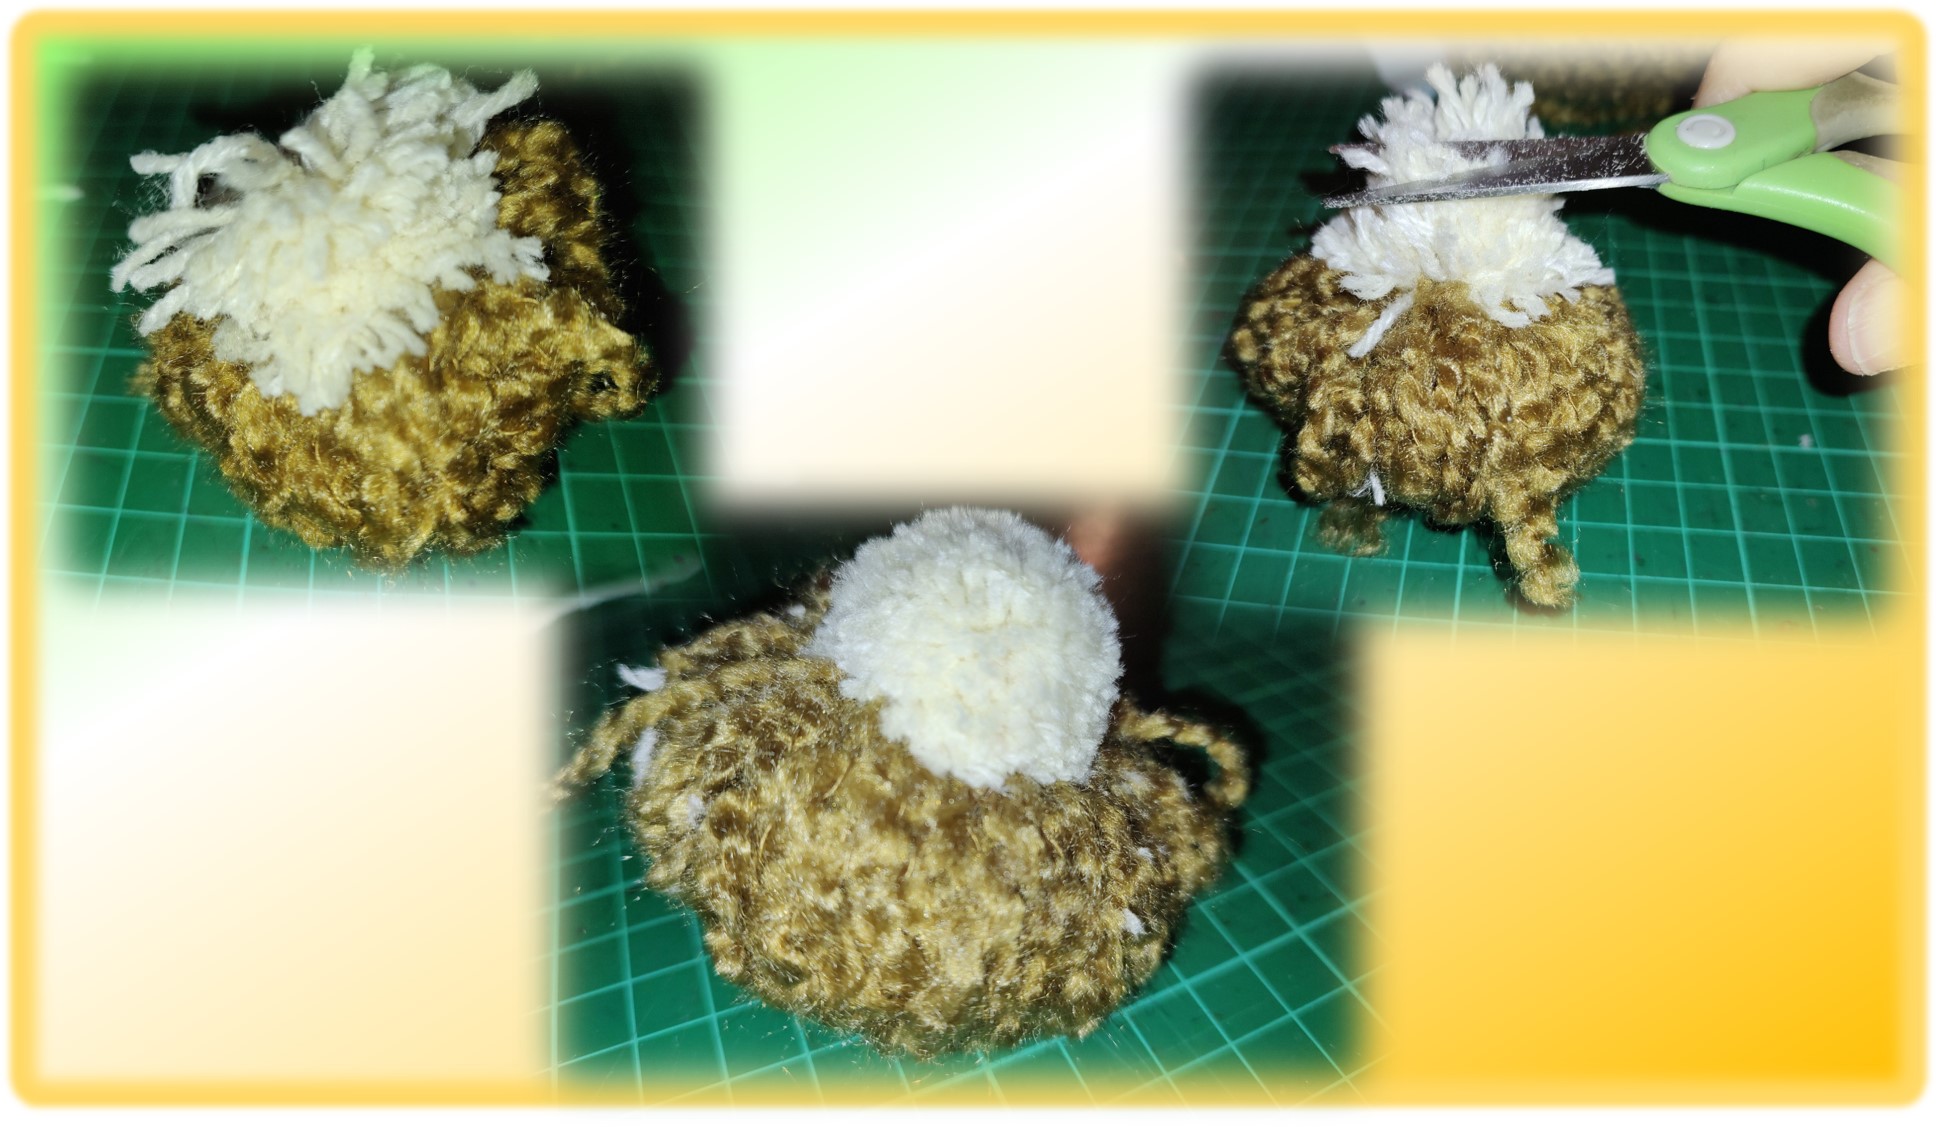
Ahora, toca darles forma a las borlas, iniciemos con el color blanco, empezamos cortando las hebras unidas en uno de los lados, para luego cortar las del otro lado. Después de que todas las hebras están separadas, debemos recortarlas para darle la forma redondeada, les debe quedar más o menos como se ve en la imagen.
Now, it is time to shape the tassels, let's start with the white color, we begin by cutting the strands together on one side, and then cut the strands on the other side. After all the strands are separated, we must cut them to give the rounded shape, it should be more or less as shown in the image.
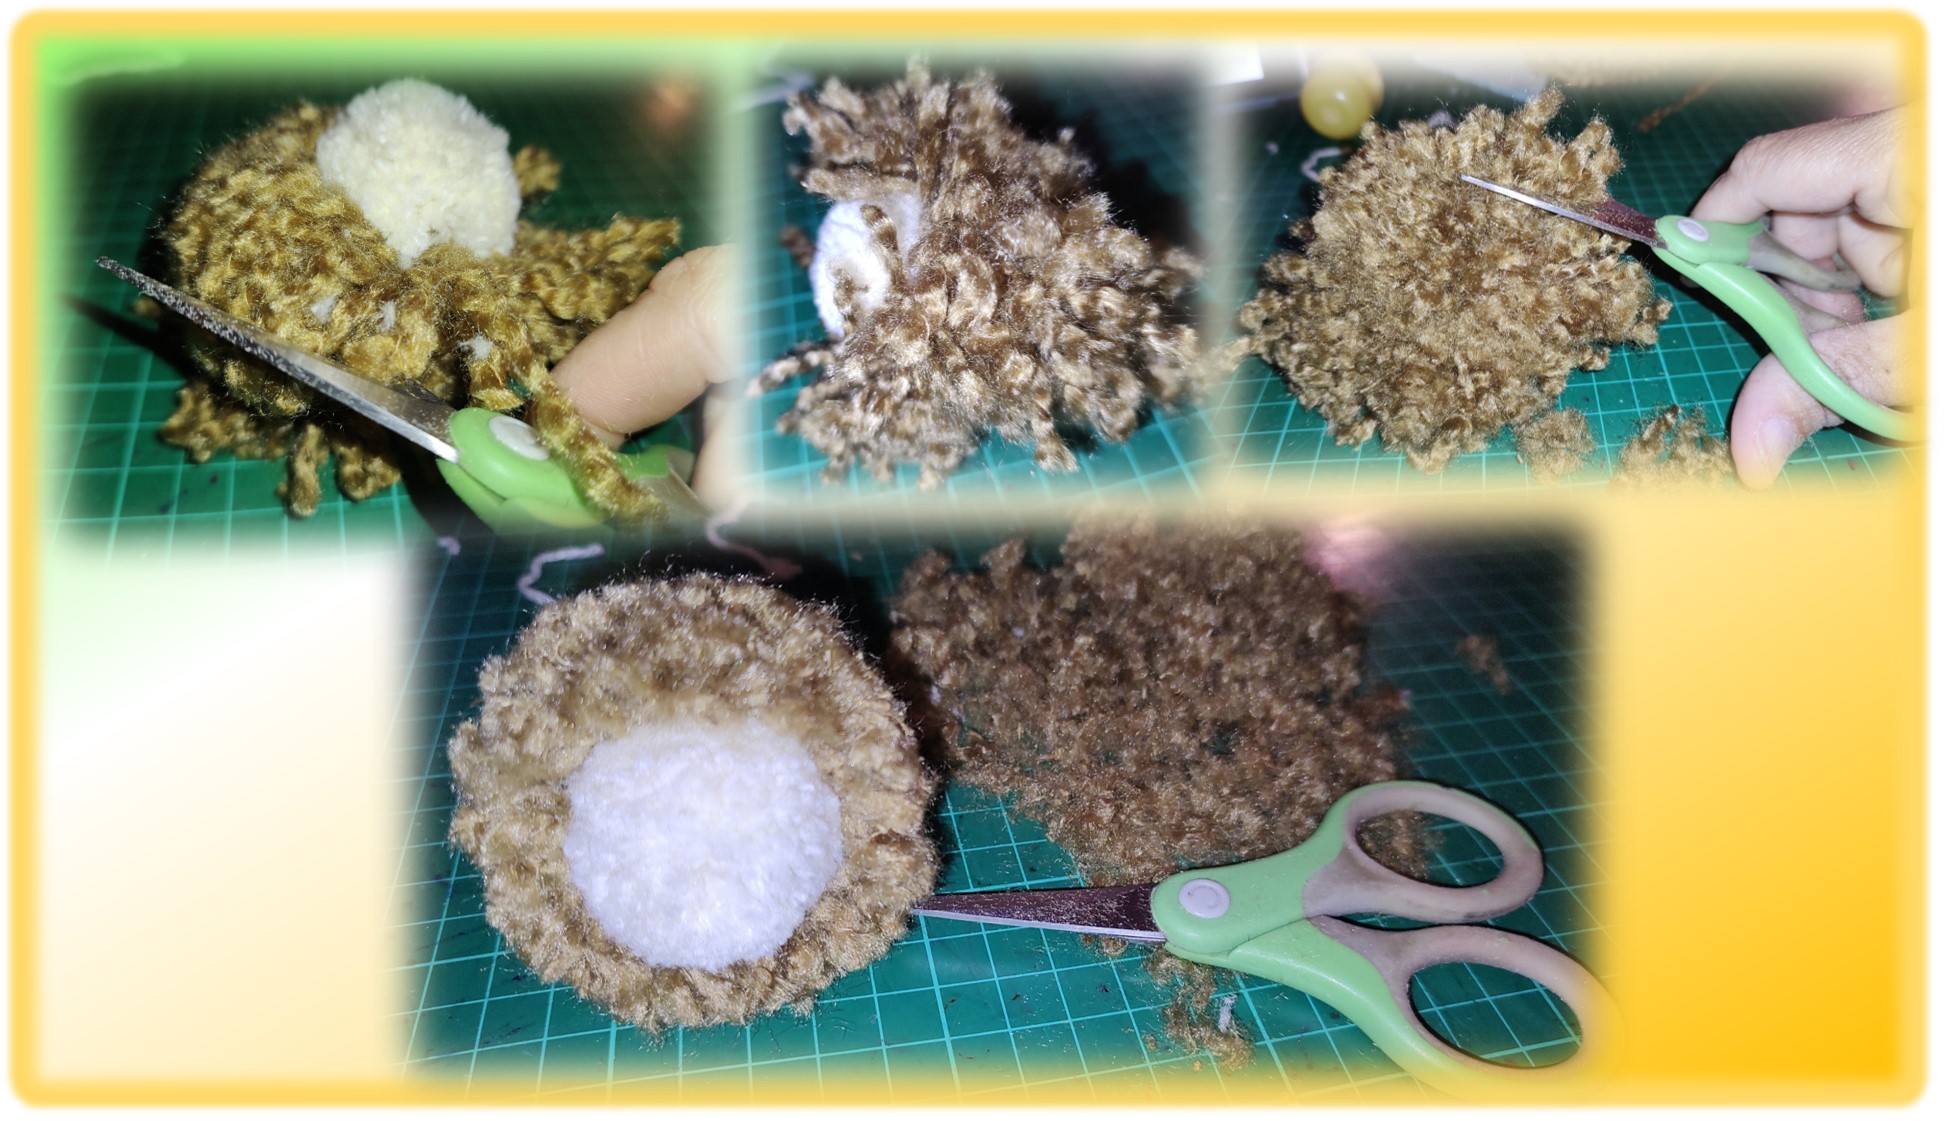
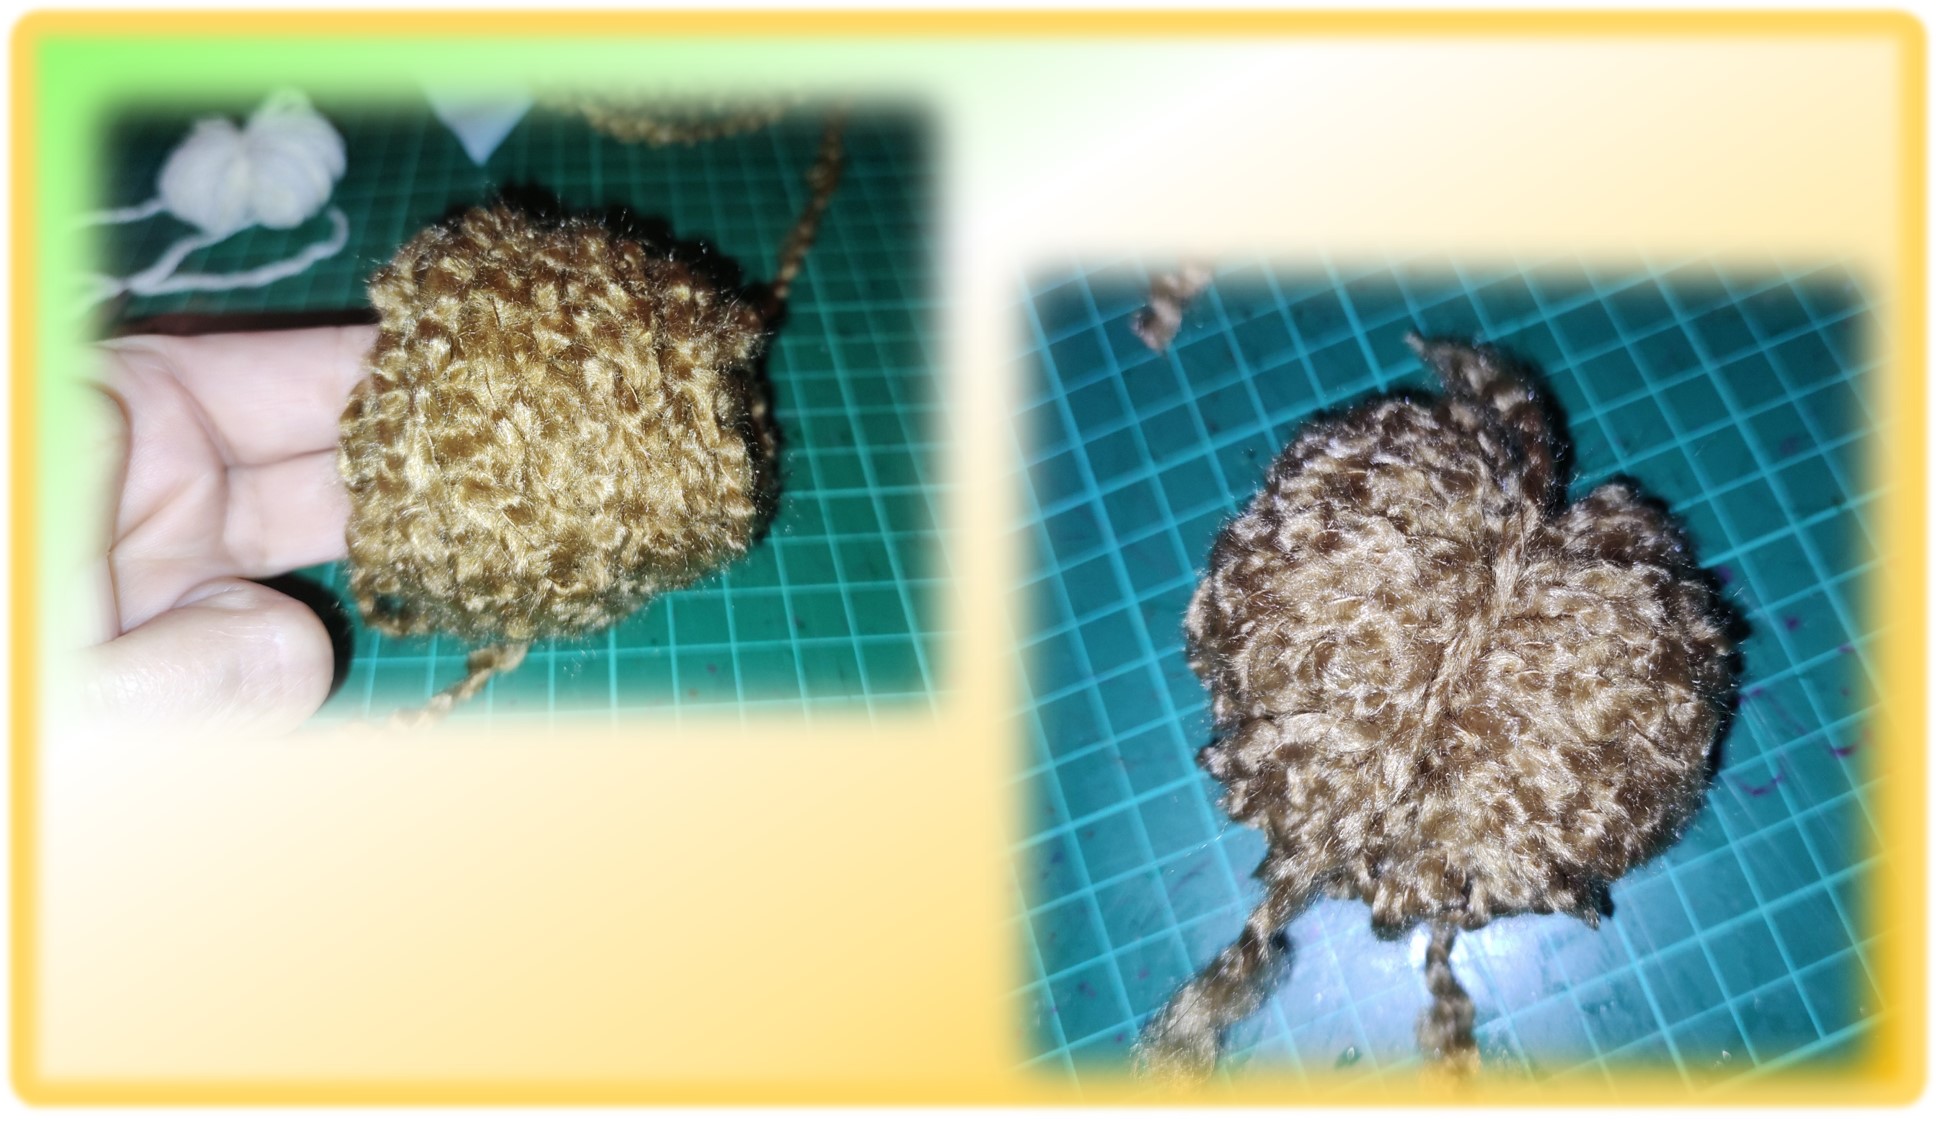
Una vez que terminamos con el lado blanco, pasamos al lado marrón, de igual forma, separamos las hebras cortando por la mitad. Una vez que separamos ambos lados empezados a recortar para darle la forma redondeada, en este caso, dejamos las hebras un poco más largas que en el caso del lado blanco. Con la imagen que les dejo arriba se pueden dar una idea de cómo debería quedar.
Once we are done with the white side, we move on to the brown side, in the same way, we separate the strands by cutting in half. Once we separate both sides, we start trimming to give it the rounded shape, in this case, we leave the strands a little longer than in the case of the white side. With the image above you can get an idea of how it should look.

A continuación, decidiremos en qué lugar le pondremos las patitas al erizo, esto, porque esa parte la debemos recortar un poco más. Esa zona, nos debe quedar aplanada para que se pueda mantener paradito nuestro erizo.
Next, we will decide where we will put the hedgehog's legs, because that part should be trimmed a little more. That area should be flattened so that our hedgehog can stand upright.
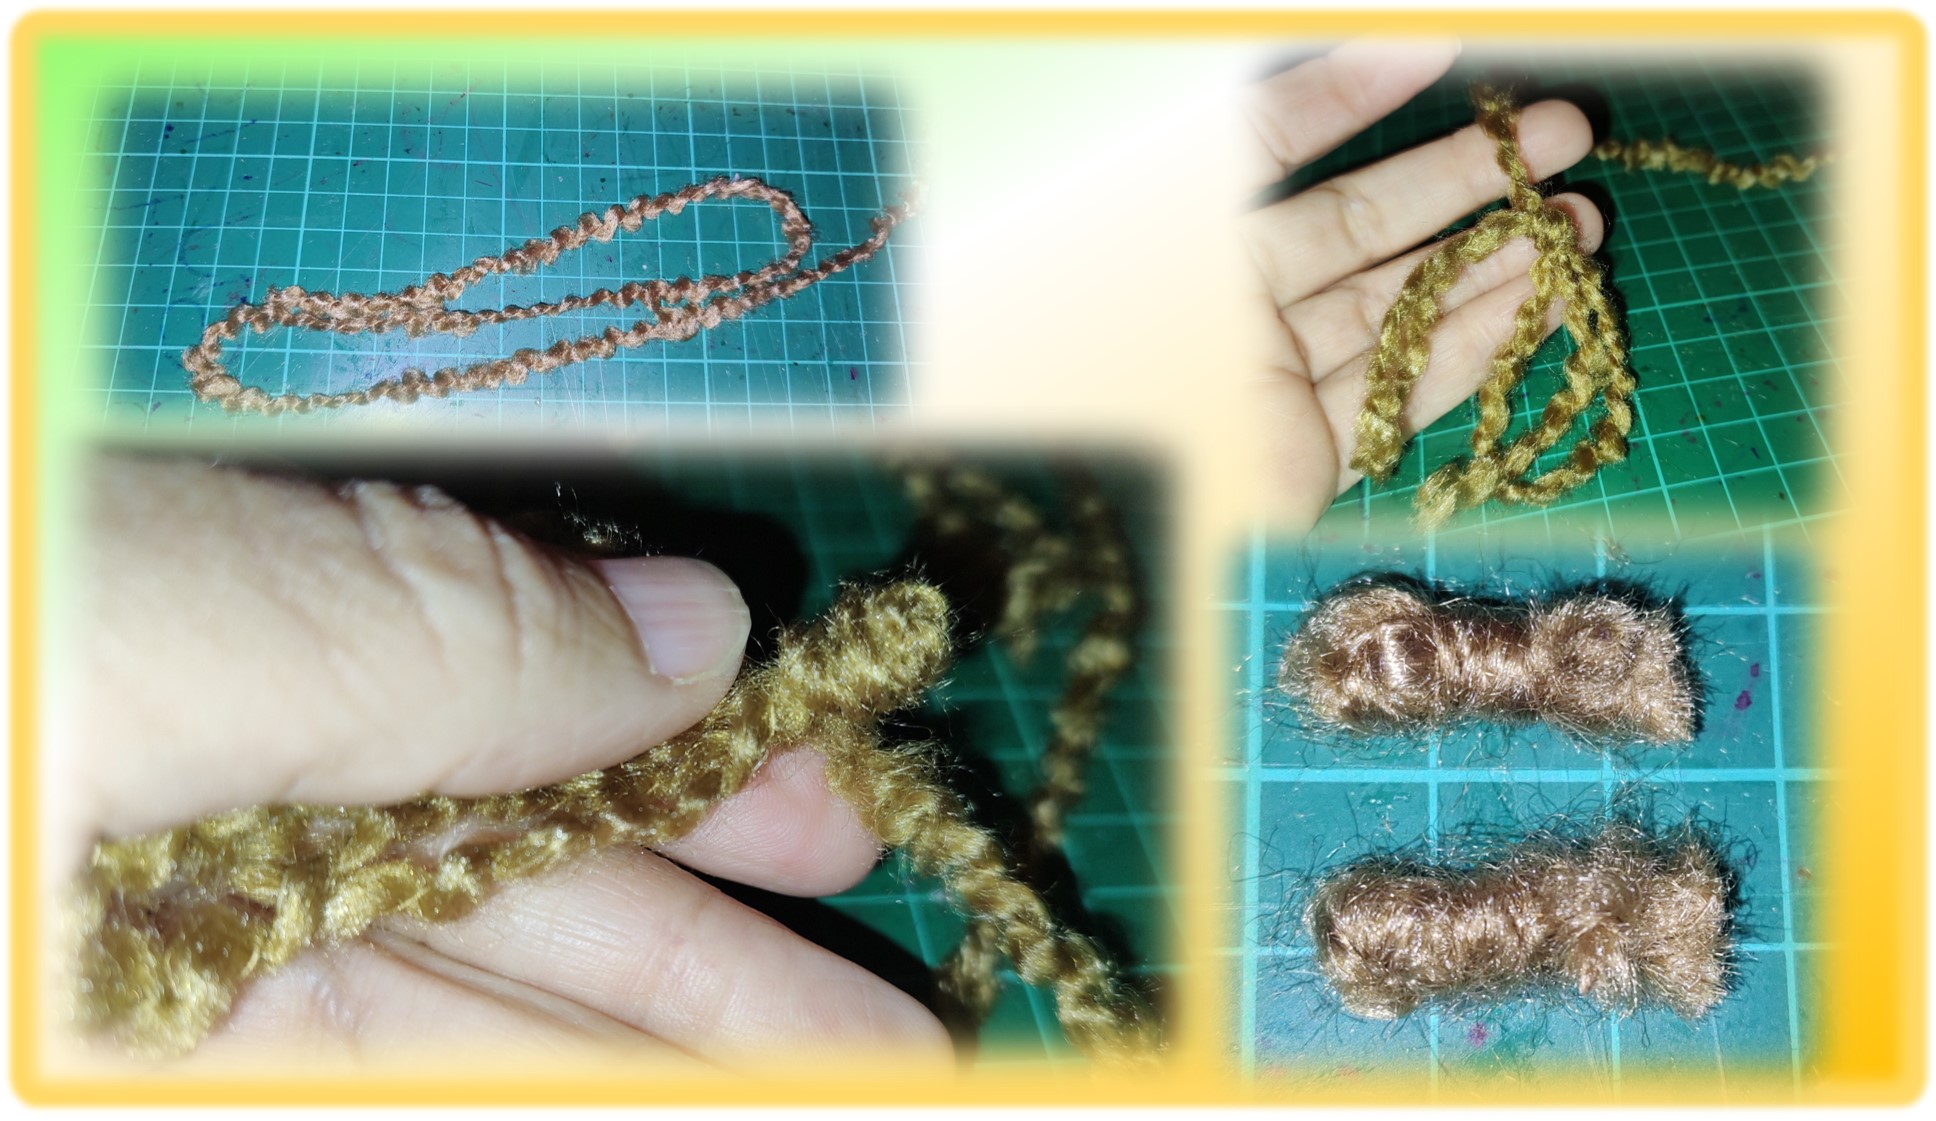
Ya resuelto donde se colocarán las patitas del erizo, debemos hacerlas. Como ven en la imagen sin cortar la hebra la doblamos en tres partes. Luego más o menos a la mitad realizamos un nudito, para seguidamente dobla la pieza a nivel del nudo. Ahora, con el extremo de hilo que no hemos separado de la madeja iremos enrollando la hebra, lo más pegado que podamos una de otra. Las patitas les deberían quedar como les muestro en la imagen que les deje arriba.
Already figured out where the legs of the hedgehog will be placed, we must make them. As you can see in the picture, without cutting the thread, we fold it in three parts. Then more or less in the middle we make a knot, to then fold the piece at the level of the knot. Now, with the end of the thread that we have not separated from the skein we will wind the thread, as close as possible to each other. The legs should look as I show you in the image above.
Ya las patitas están listas solo resta pegarlas en el lugar que ya habíamos adecuado para ello. Para pegarlas usaremos un poco de silicón caliente. Con mucho cuidado y delicadeza, le colocamos silicón y las ubicamos, tal cual como les muestro en la imagen.
Now the little legs are ready, all that remains is to glue them in the place we have already prepared for them. To glue them we will use some hot silicone. With great care and delicacy, we put silicone and place them, as shown in the image.
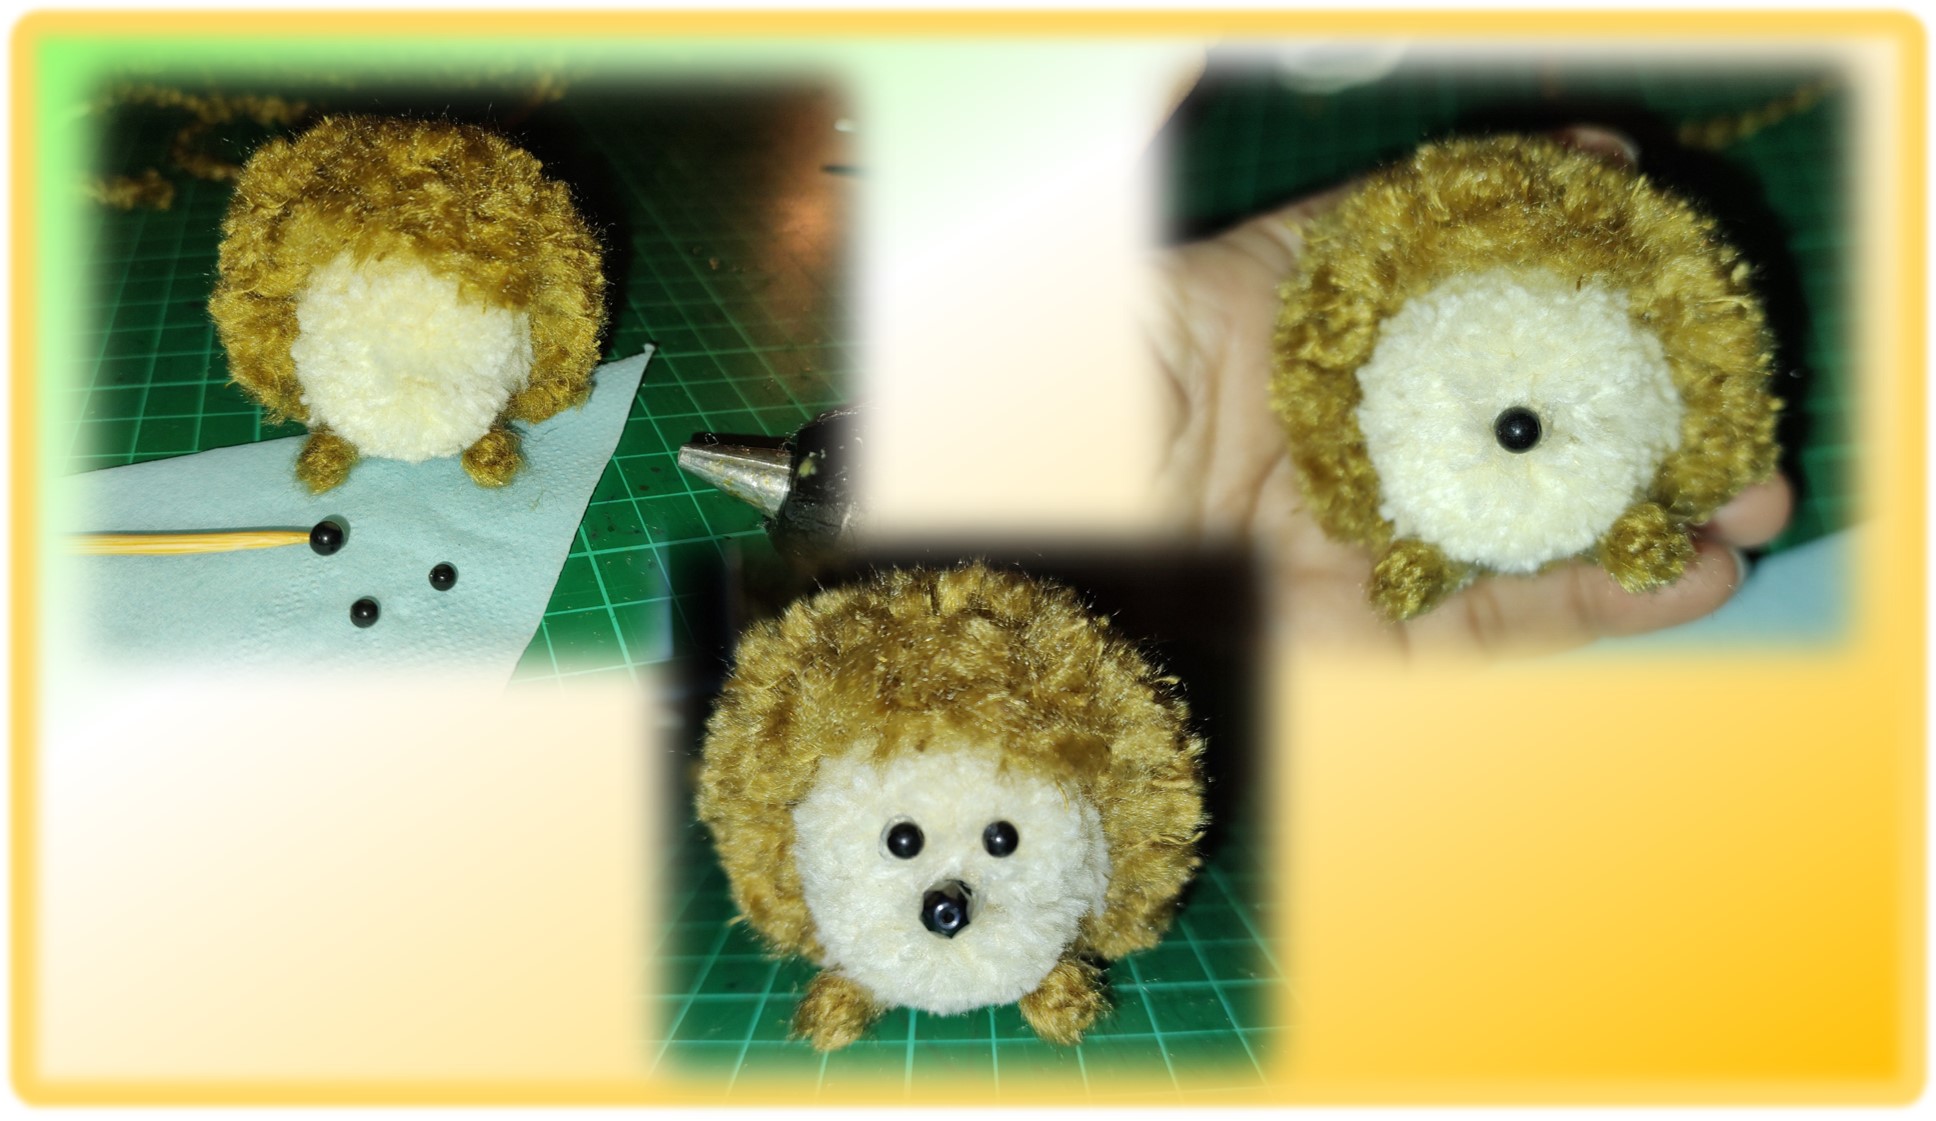
Llego el momento de pegar los ojitos y nariz, para ello utilicé también silicón caliente y para no quemarme, me ayudé con un palito de altura. Como saben, las perlitas que se usan en manualidades, normalmente tienen hoyitos, entonces por allí introducimos la punta del palillo para sostenerlas. Luego ponemos pegamento e inmediatamente las ubicamos en el lugar que les corresponda, con ello la carita del erizo está lista.
It was time to glue the eyes and nose, for this I also used hot silicone and to avoid burning myself, I helped myself with a toothpick. As you know, the beads that are used in crafts, usually have holes, so there we introduce the tip of the stick to hold them. Then we put glue and immediately place them in the corresponding place, with that the hedgehog's face is ready.
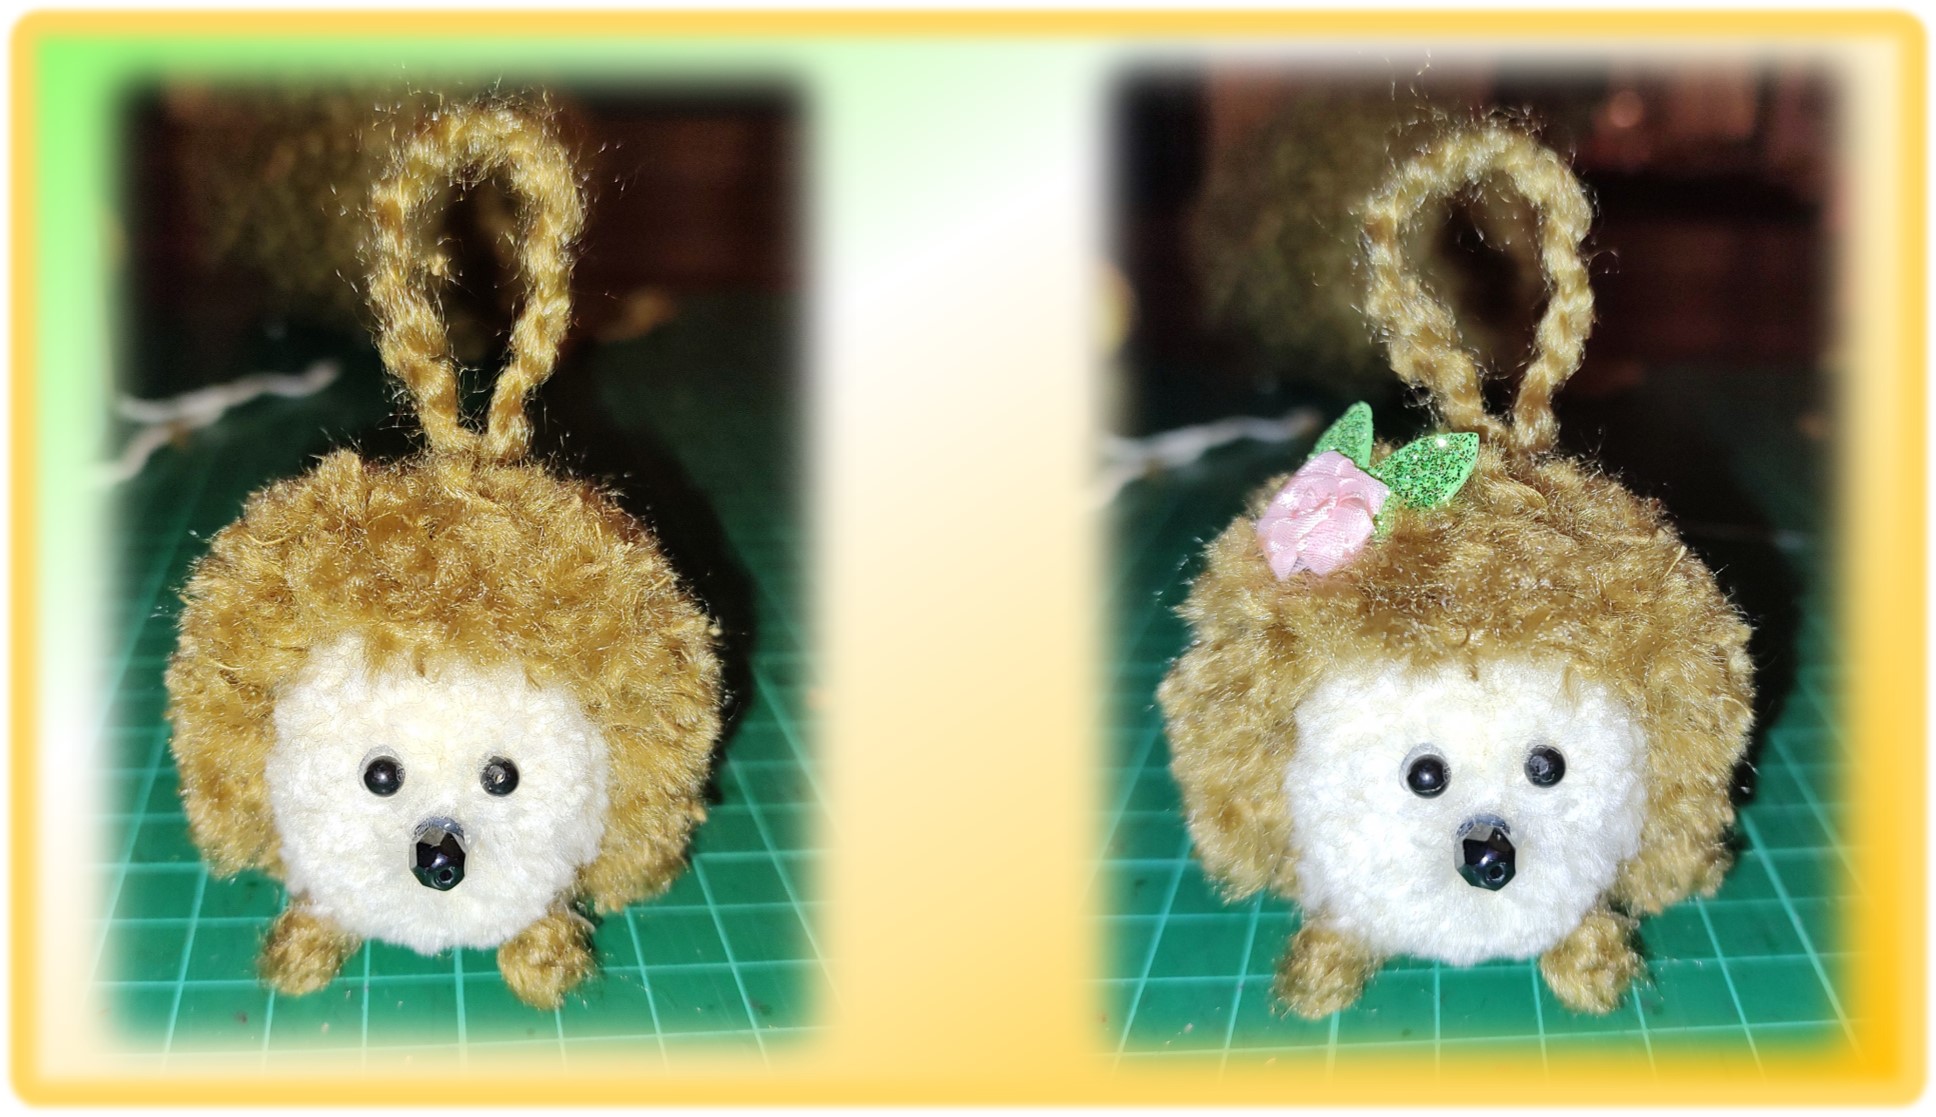
Como detalle final, con mucho cuidado y con la ayuda de una aguja, le coloque una especie de colgadero al erizo, ya que, mi pequeña lo quería para colgarlo en su bolso del colegio. Y por supuesto, para terminar, le coloqué un adorno en su cabecita, ya que, es un erizo niña, como ya les comenté al inicio, se llama Floris el Erizo, jajajaja.
As a final detail, very carefully and with the help of a needle, I placed a kind of hanger on the hedgehog, since my little girl wanted to hang it on her school bag. And of course, to finish, I put an ornament on his head, since he is a little girl hedgehog, as I told you at the beginning, his name is Floris the Hedgehog, hahahaha.
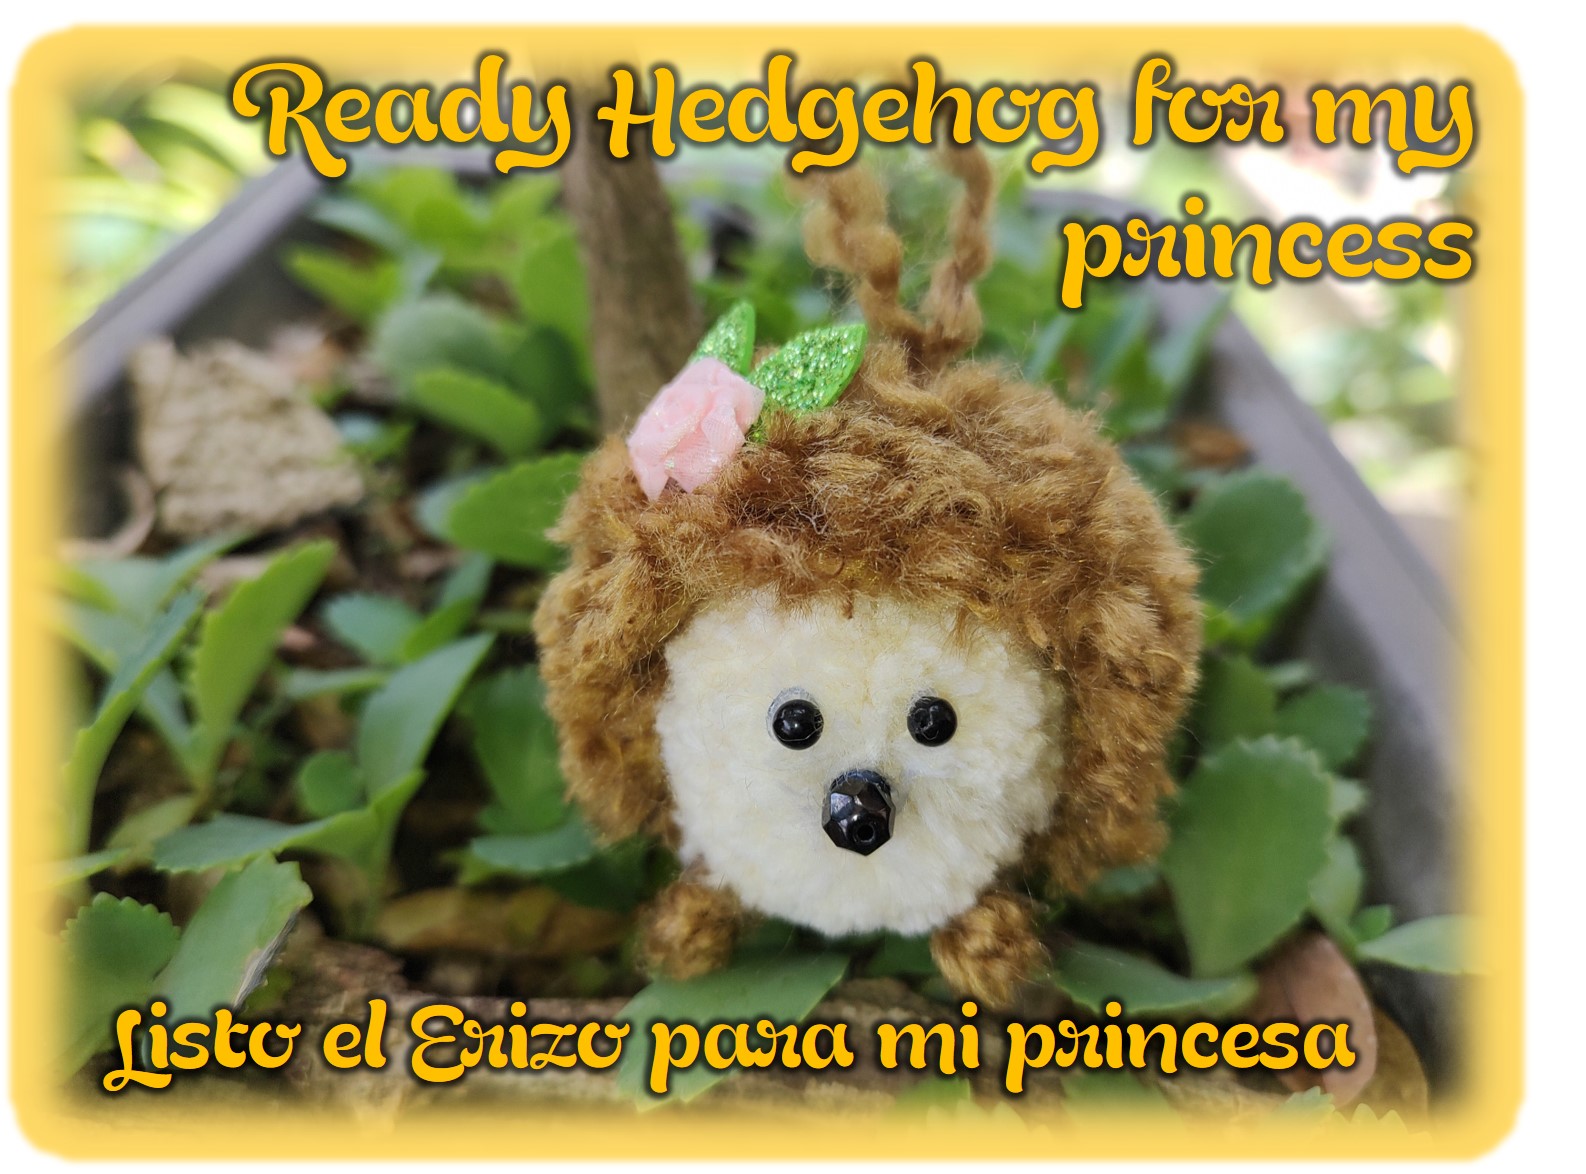
Bueno, mis queridos lectores, como pueden ver Floris el Erizo, ya esta lista para que mi hija la lusca colgada en su morral del colegio. Aunque les confieso que no siempre está allí, porque la mayoría del tiempo mi niña la tiene cumpliendo algún papel en sus juegos de aventuras, jajajaja. Espero que les gustara este sencillo proyecto y por supuesto se animen a realizarlo, Dios los bendiga y hasta la próxima ocasión.
Well my dear readers, as you can see Floris the Hedgehog, is ready for my daughter to see it hanging in her backpack at school. Although I confess that it is not always there, because most of the time my daughter has it playing some role in her adventure games, hahahaha. I hope you like this simple project and of course you are encouraged to do it, God bless you and see you next time.
Contenido y fotografías de mi propiedad intelectual
Información Técnica
| Cámara | Pentax * istDL |
|---|---|
| Lente | * Pentax 18-55 |
| Iluminación | Luz Natural |
| Locación | Barcelona, Estado Anzoátegui, Venezuela |
Content and photographs of my intellectual property
Technical information
| Camera | Pentax * istDL |
|---|---|
| Lens | * Pentax 18-55 |
| Lighting | Natural Light |
| Location | Barcelona, Anzoátegui State, Venezuela |


Saludos @ackhoo 😊 muy agradecida de recibir tu apoyo, salud y bendiciones para ti y todo el equipo de trabajo de @qurator.
Hola , quedo muy bonito tu trabajo, gracias por compartir.
Gracias a ti por la visita, es grato saber que te gustó. Feliz inicio de semana.
Hola, @francyrios75!! me encantó cómo quedó y lo tierno que se ve😍. Qué bueno que a tu hija le haya gustado también 💕 gracias por compartir este tutorial!!
Hola, gracias a ti por la visita, y me alegra mucho saber que te gustó. Feliz inicio de semana 😊
Que belleza, me encanta 👍
Gracias, me alegra muchísimo. Feliz inicio de semana 😊
Con el apoyo de la familia.
También nos puedes apoyar en nuestro Trail de TopFiveFamily
Si desea delegar HP al proyecto de la Familia del Top Family puedes hacerlo desde aquí: Delegue 5 HP - Delegue 10 HP - Delegue 20 HP - Delegue 30 HP - Delegue 50 HP - Delegue 100 HP.
Si quieres formar parte de nuestro trail de curación, ingresa a HIVEVOTE, haciendo clic en la imagen del capybara aristocratico. Capybaraexchange tu casa de cambio, rapida, confiable y segura
En colaboración con
Que tierno este erizo es precioso y sencillo de hacer.