Bienvenidos Queridos Amantes de la Artes Manuales
Welcome Dear Manual Arts Lovers
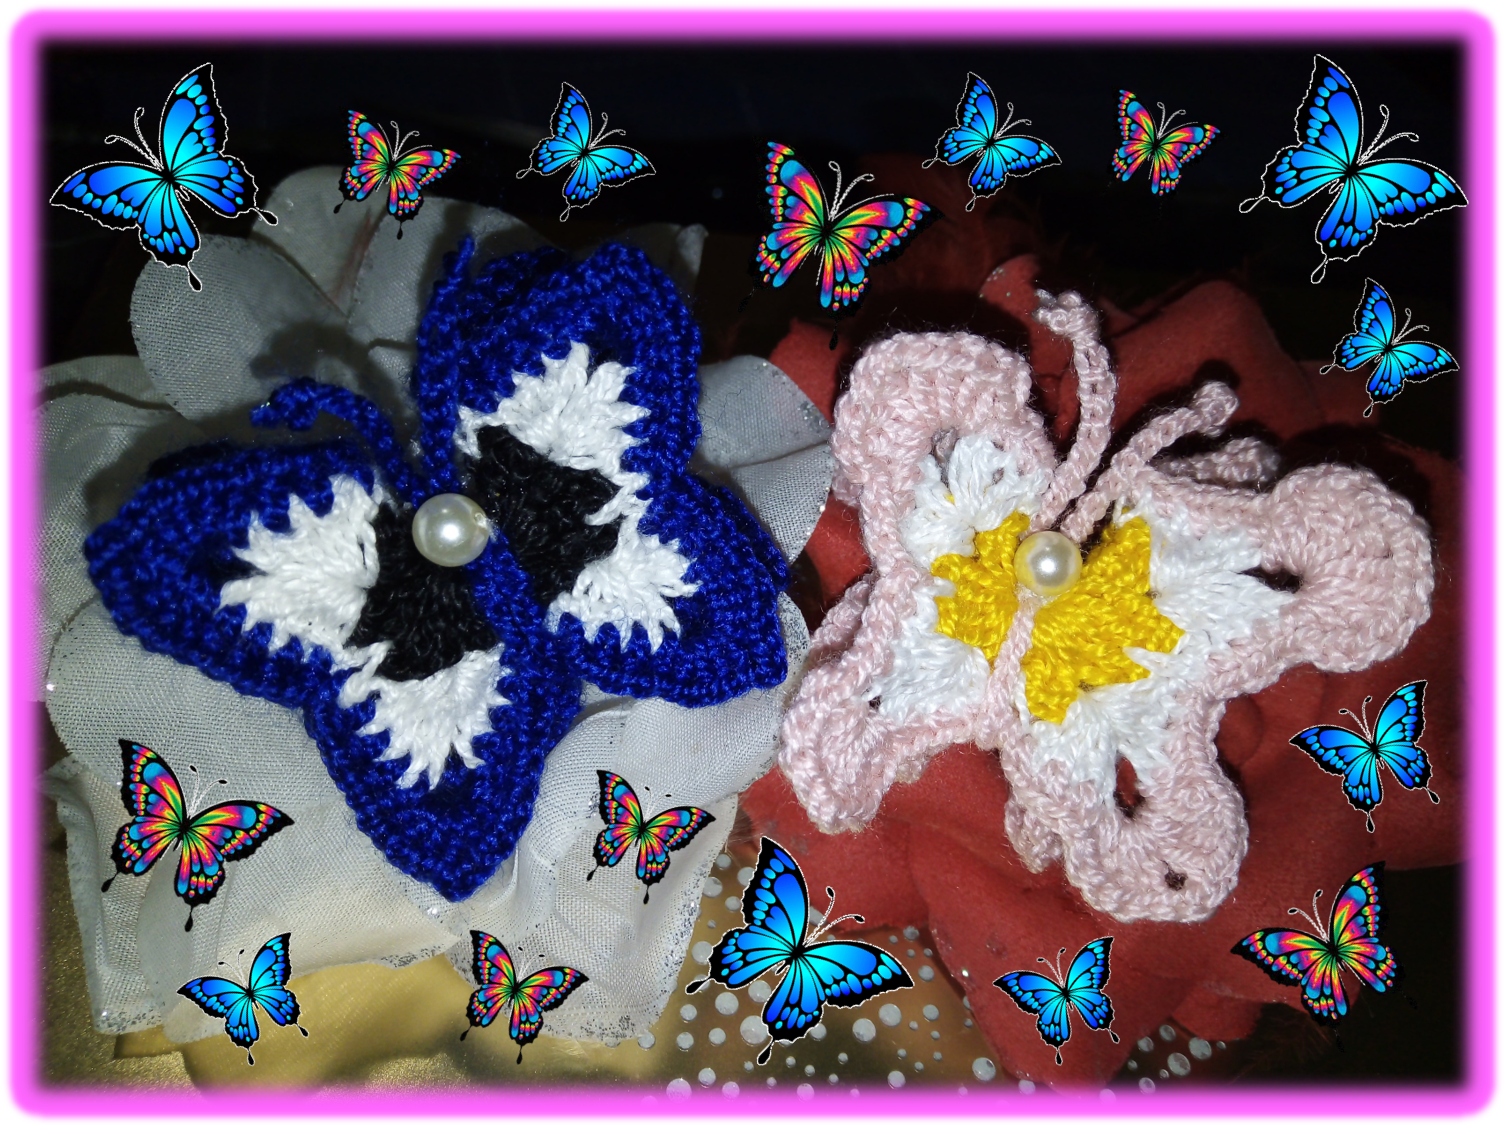

Las mariposas son uno de mis insectos favoritos, son tan coloridas y delicadas, que parecen lindas y pequeñas Hadas revoloteando alrededor de las flores. Por ello, cuando me tope en las redes, con el proyecto que hoy les mostraré, inmediatamente me dispuse a realizarlo. Por supuesto, no podía dejar de documentarlo fotográficamente, para así, poder compartir el paso a paso con ustedes. Como pueden ver en las imágenes, son unas hermosas mariposas tridimensionales, tejidas en crochet y no me creerán lo sencillas que son de elaborar.
Butterflies are one of my favorite insects, they are so colorful and delicate, they look like cute little fairies fluttering around flowers. So, when I stumbled upon the project that I will show you today, I immediately set out to make it. Of course, I couldn't help documenting it photographically, so I could share the step by step with you. As you can see in the images, they are beautiful three-dimensional butterflies, crocheted and you won't believe how easy they are to make.

En cuanto a los materiales son muy pocos, solo necesitaran hilo de tejer de distintos colores, aguja de crochet, acorde con el grosor del hilo, perlitas, hilo y aguja de coser. Es un proyecto realmente genial, ya que, con el podemos dar uso a esos restos de hilo que siempre nos quedan de otros proyectos, y que no nos alcanza para hacer otra cosa. Se me ocurren muchos usos para estas hermosas maripositas, por ejemplo, que les parece decorar un vestido o blusa, adornar un cintillo, o un sombrero, en fin, es cuestión de darle rienda suelta a su creatividad. Pero, ya está bueno de charlas, demos inicio al paso a paso del como realice estas simpáticas maripositas.
As for the materials are very few, you will only need knitting yarn of different colors, crochet needle, according to the thickness of the yarn, beads, thread and sewing needle. It is a really great project, because with it we can make use of those leftover yarns that we always have left over from other projects, and that we do not have enough to do something else. I can think of many uses for these beautiful butterflies, for example, how about decorating a dress or blouse, decorating a headband, or a hat, well, it's a matter of giving free rein to your creativity. But, enough talk, let's start with the step by step of how to make these cute little butterflies.
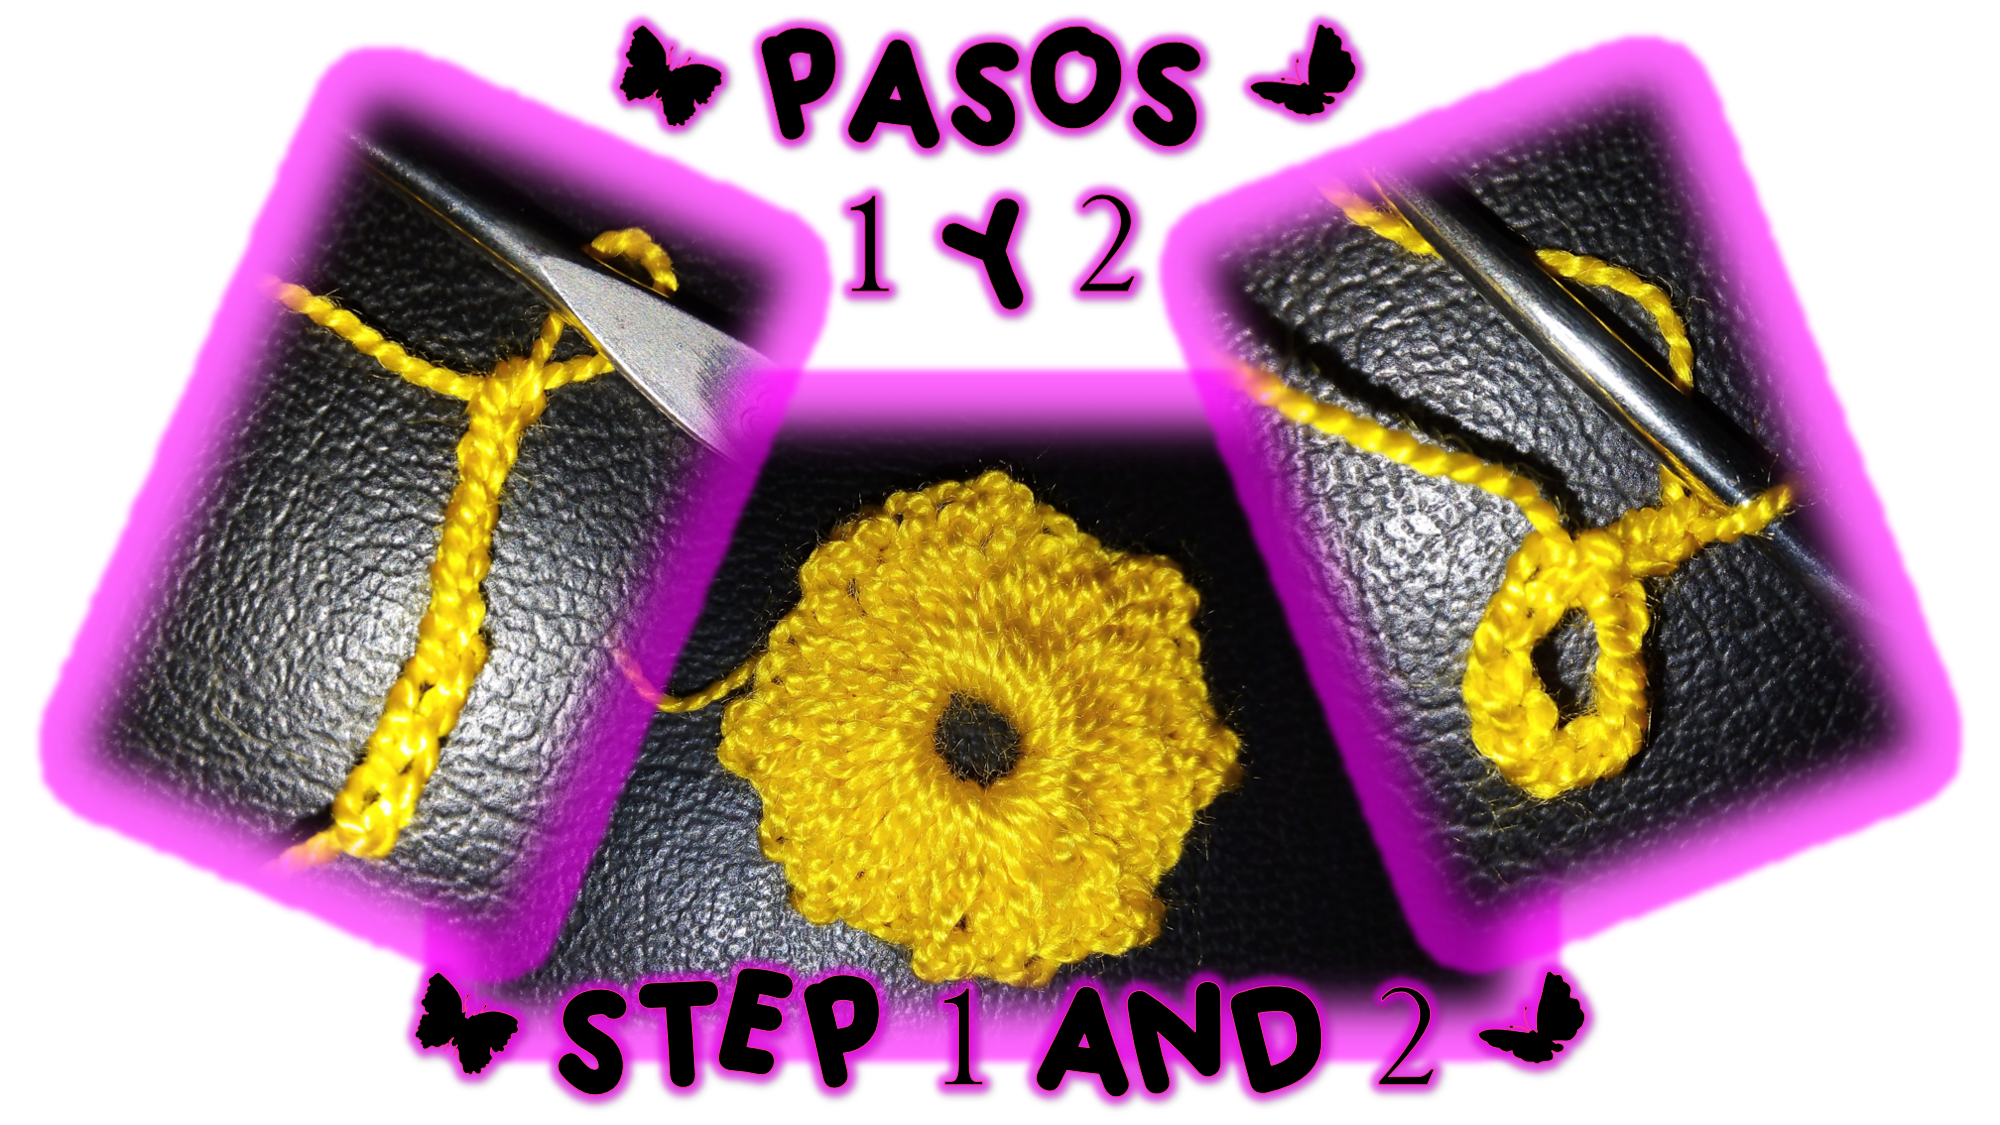
Paso 1 y 2
Iniciaremos nuestro trabajo realizando 8 puntos de cadenetas y con ellos formaremos un círculo, uniendo sus extremos con un punto deslizado. Seguidamente subiremos con 3 cadenetas, que, en este caso, valdrá por nuestro 1er punto alto, por lo que tejeremos 3 puntos altos más, para completar lo equivalente a 4 puntos altos, después, trabajaremos 2 cadenetas. Ese será nuestro patrón que debemos repetir 7 veces más hasta rellenar nuestro círculo central. Cuando terminemos nuestras repeticiones cerraremos con un punto deslizable, rematamos y cortamos el hilo, porque en la siguiente vuelta usaremos otro color de hilo.
Step 1 and 2
We will start our work by making 8 chain stitches and with them we will form a circle, joining their ends with a slip stitch. Then we will go up with 3 chain stitches, which, in this case, will be valid for our 1st high stitch, so we will knit 3 more high stitches, to complete the equivalent of 4 high stitches, then, we will work 2 chain stitches. That will be our pattern that we must repeat 7 more times until we fill our center circle. When we finish our repetitions we will close with a slip stitch, we finish off and cut the yarn, because in the next lap we will use another color of yarn.
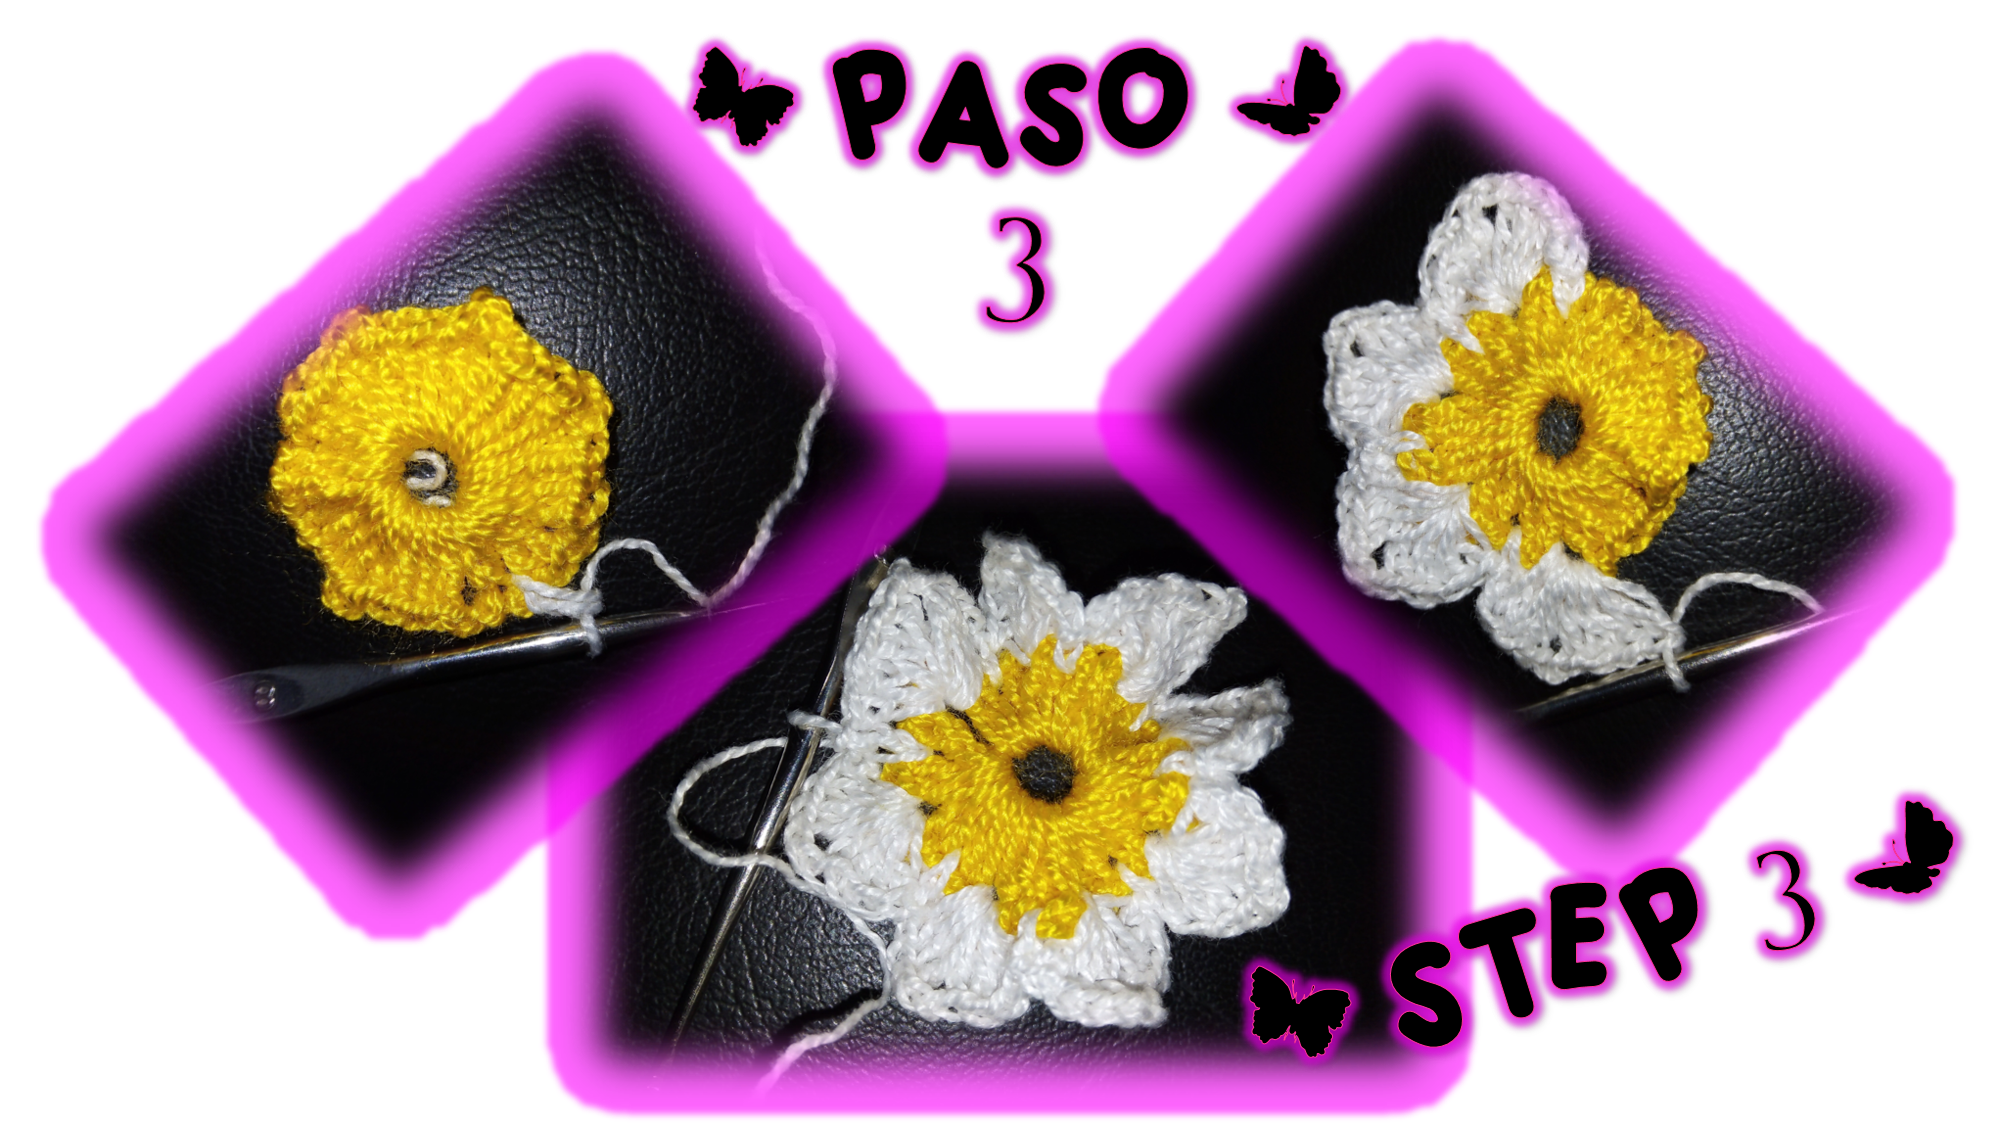
Paso 3
Como ya les dije antes, ahora tejeremos con otro color, para que nuestras mariposas queden bien coloridas. Para reiniciar nuestro tejido, nos ubicamos en cualquier parte del tejido donde se encuentren 4 puntos altos juntos, en el punto medio de esos 4 puntos meteremos y aseguraremos nuestra nueva hebra para comenzar a tejer con el nuevo color. Subiremos con un punto medio, realizamos una lazada y saltaremos, los siguientes puntos altos para llegar a los 2 puntos de cadenetas. Dentro de esos dos puntos de cadenetas de la base, procederemos a trabajar, 4 puntos altos, 2 puntos de cadenetas y 4 puntos altos, para saltar nuevamente al centro del siguiente grupo de 4 puntos altos de la base. Allí, realizaremos otro punto medio y continuaremos realizando la misma secuencia de puntos que les acabo de describir hasta culminar nuestra vuelta, que cerraremos con un punto deslizado. Finalmente, remataremos muy bien y cortaremos el hilo, porque nuevamente nos toca cambiar la tonalidad de nuestro hilo.
Step 3
As I told you before, now we will knit with another color, so that our butterflies will be well colored. To restart our knitting, we place ourselves in any part of the fabric where there are 4 high stitches together, in the middle stitch of those 4 stitches we will put and secure our new yarn to start knitting with the new color. We will go up with a medium stitch, we will make a loop and we will skip, the following high stitches to reach the 2 chain stitches. Within those two chain stitches of the base, we will proceed to work, 4 high stitches, 2 chain stitches and 4 high stitches, to jump again to the center of the next group of 4 high stitches of the base. There, we will knit another medium stitch and continue knitting the same sequence of stitches that I just described until the end of our lap, which we will close with a slip stitch. Finally, we will finish off very well and cut the yarn, because once again we have to change the tone of our yarn.
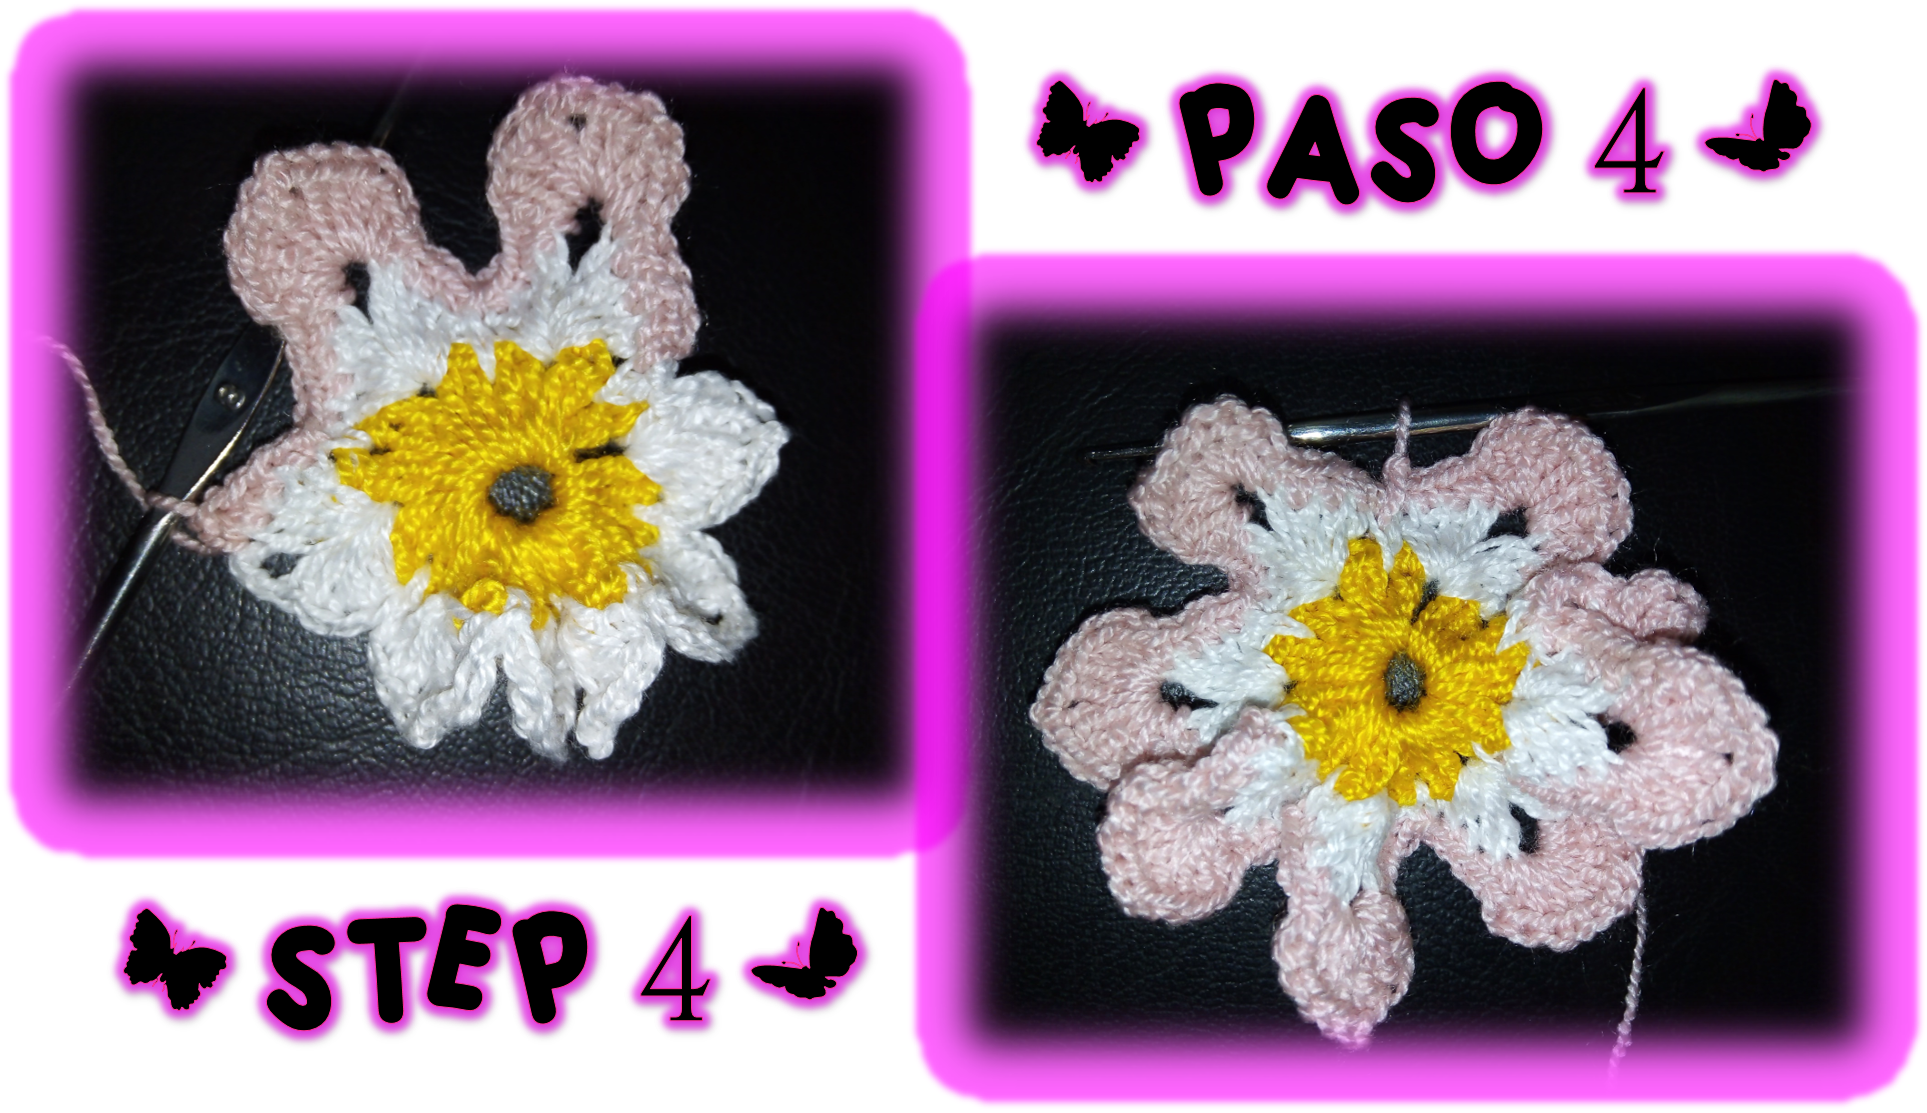
Paso 4:
Esta será nuestra última vuelta, partiremos desde el mismo punto donde terminamos la vuelta anterior, aseguramos bien nuestro nuevo hilo y comenzaremos a tejer. Realizaremos puntos bajos sobre cada punto alto de la base y cuando lleguemos a los puntos de cadenetas, tejeremos 4 puntos bajos, 2 cadenetas y seguido, 4 puntos bajos más. Seguido volvemos a tejer puntos bajos sobre cada punto alto de la base, cuando lleguemos al punto bajo de la base, allí realizaremos un punto deslizado y comenzamos nuevamente nuestra la secuencia de puntos que les acabo de describir. Así continuaremos hasta completar la vuelta, para terminar como siempre, cerrando con un punto deslizado.
Step 4
This will be our last lap, we will start from the same stitch where we finished the previous lap, we will secure our new yarn well and start knitting. We will knit single crochet over each high stitch of the base and when we reach the chain stitches, we will knit 4 single crochets, 2 chain stitches and then 4 more single crochets. Then we return to knit single crochet over each high stitch of the base, when we reach the low stitch of the base, there we will knit a slip stitch and we start again our sequence of stitches that I just described. We will continue in this way until we complete the lap, to finish as always, closing with a slip stitch.

Paso 5:
Ahora, continuaremos tejiendo 9 puntos de cadeneta, estas cadenetas nos servirán para simular el cuerpecito de la mariposa. Bueno, ya tejimos todo lo que necesitábamos, toca armar la mariposa, hasta este momento, si detallan el trabajo que realizaron se darán cuenta que tienen la forma de flor de 8 pétalos. Pues doblaremos, exactamente por la mitad nuestra flor, sobreponiendo los 4 pétalos de la mitad superior, sobre la mitad inferior como les muestro en el grupo de imágenes ubicado, encima de este párrafo. Recuerdan los puntos de cadenetas que habíamos tejido, con esta, envolveremos el centro de nuestra mariposa, haciendo las veces de su cuerpo y a la vez ayudará a fijar todo en su lugar. Finalmente, aseguramos con puntos deslizados y con mucho cuidado escondemos nuestro remate para que no se vea y nuestro trabajo quede excelentemente terminado.
Step 5
Now, we will continue knitting 9 chain stitches, these chain stitches will serve us to simulate the little body of the butterfly. Well, we have knitted everything we needed, it's time to assemble the butterfly, up to this point, if you detail the work you did, you will notice that it has the shape of a flower with 8 petals. Well, we will fold our flower exactly in half, superimposing the 4 petals of the upper half on the lower half as I show you in the group of images located above this paragraph. Remember the chain stitches that we had knitted, with this one, we will wrap the center of our butterfly, acting as its body and at the same time it will help to fix everything in its place. Finally, we secure with slipped stitches and very carefully we hide our finishing touch so that it will not be seen and our work will be excellently finished.
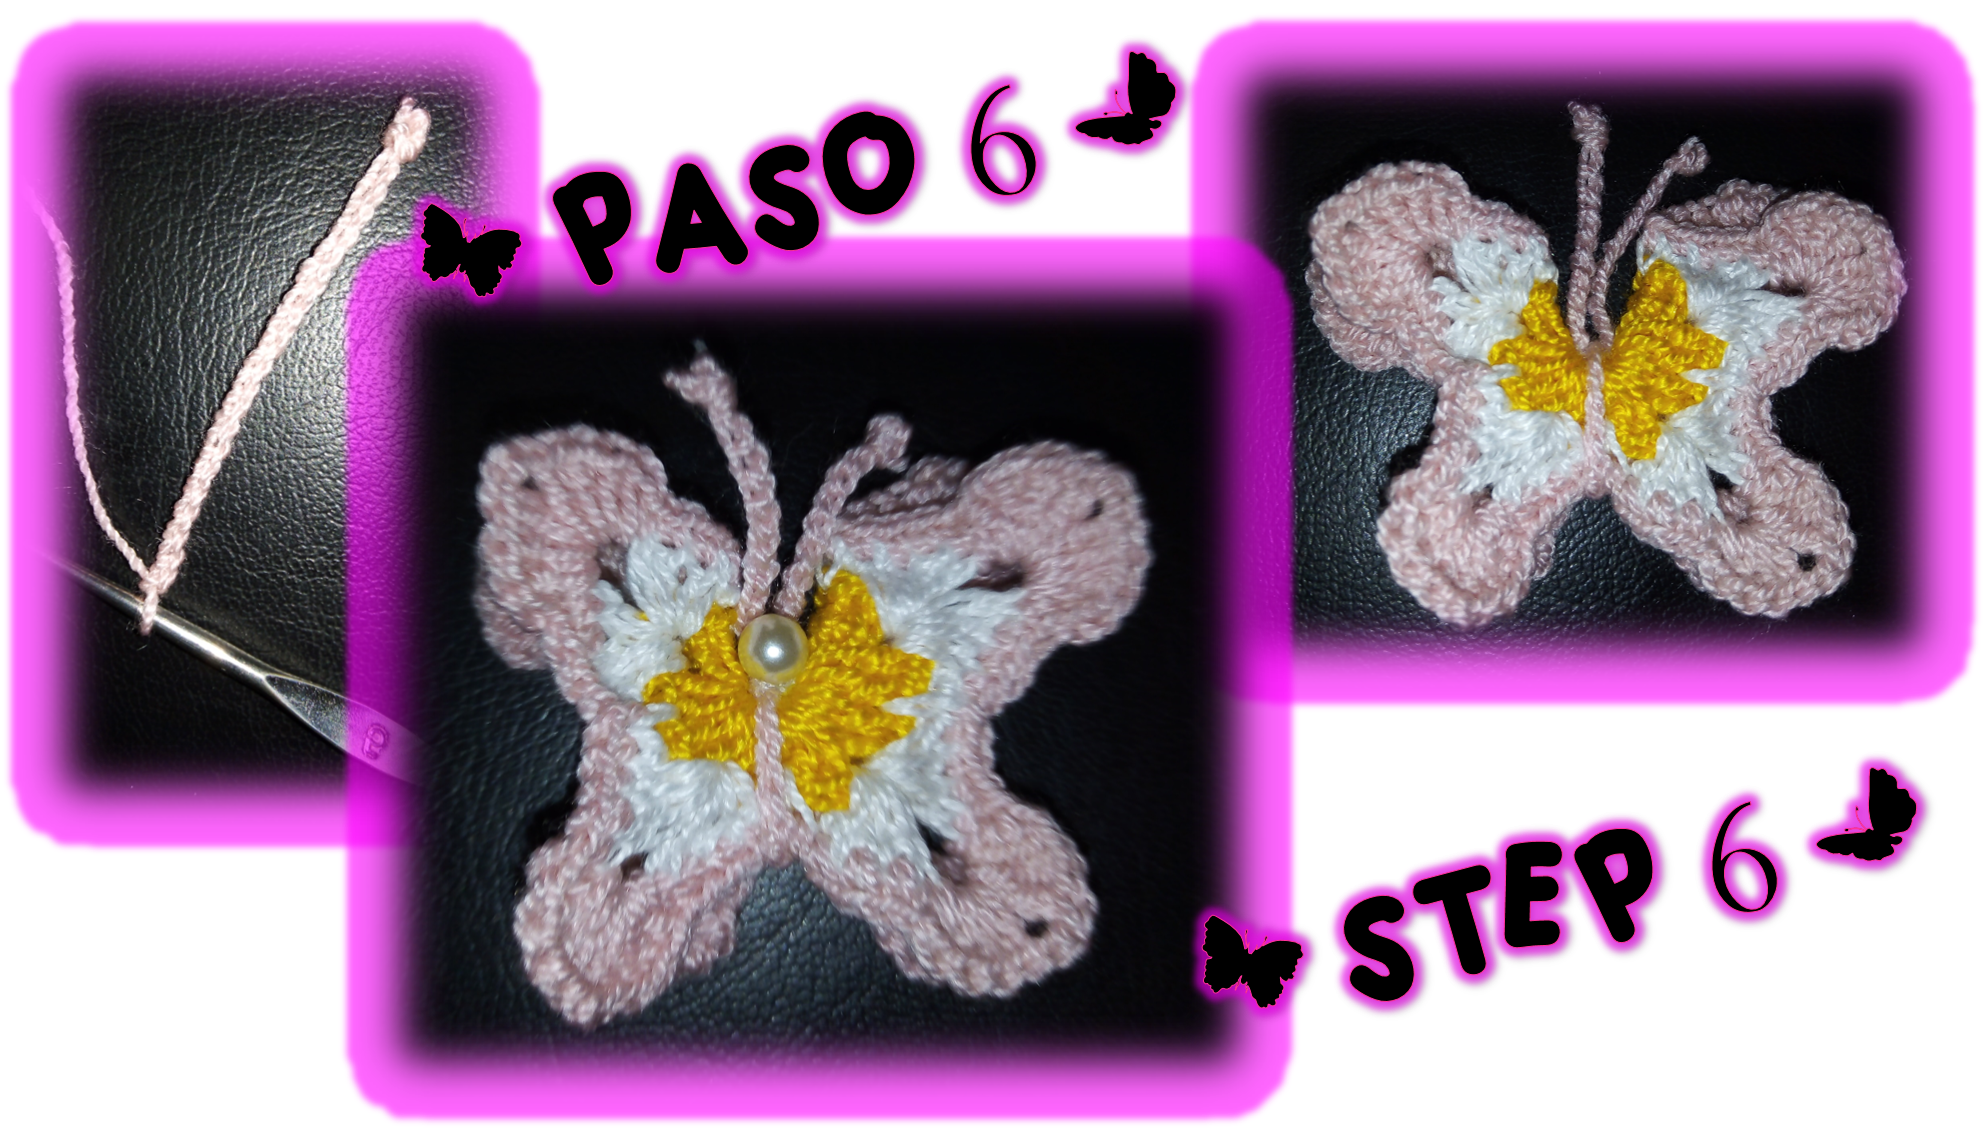
Paso 6:
Como paso final, tejeremos otra cadeneta con la cual realizaremos las antenas, el largo dependerá del tamaño de la mariposa. Esto porque se me olvido comentarles, que dependiendo del grosor del hilo que usemos el tamaño variará, a mayor grosor del hilo, por supuesto nuestra mariposa será más grande y viceversa. Una vez, que hemos definido el tamaño de nuestras antenas, le hacemos unos nuditos en los extremos y simplemente las fijamos con hilo y aguja. El último detalle, que por cierto es opcional, es colocar una perlita, para emular la cabeza de la mariposa, igualmente la fijamos con hilo y aguja. Con este último detalle, nuestra mariposa está completamente terminada y lista para decorar hermosamente los proyectos que queramos.
Step 6
As a final step, we will weave another chain stitch with which we will make the antennae, the length will depend on the size of the butterfly. This is because I forgot to tell you that depending on the thickness of the yarn we use the size will vary, the thicker the yarn, of course our butterfly will be bigger and vice versa. Once we have defined the size of our antennae, we make some knots at the ends and simply fix them with thread and needle. The last detail, which by the way is optional, is to place a bead, to emulate the head of the butterfly, we also fix it with thread and needle. With this last detail, our butterfly is completely finished and ready to decorate beautifully the projects we want.
No me queda más que despedirme de ustedes, esperando que les gustara el proyecto que les traje en esta oportunidad, como pudieron ver es sumamente sencillos, así que, espero se animen a realizarlo. Se les quiere y recuerden cuidarse y cuidar a los suyo poniendo en práctica las medidas de bioseguridad.
I just have to say goodbye to you, hoping that you liked the project I brought you this time, as you could see it is very simple, so I hope you are encouraged to do it. I love you and remember to take care of yourselves and your loved ones by putting into practice the biosecurity measures.
Contenido y fotografías de mi propiedad intelectual
Información Técnica
| Cámara | Pentax * istDL |
|---|---|
| Lente | * Pentax 18-55 |
| Iluminación | Luz Natural |
| Locación | Barcelona, Estado Anzoátegui, Venezuela |
Content and photographs of my intellectual property
Technical information
| Camera | Pentax * istDL |
|---|---|
| Lens | * Pentax 18-55 |
| Lighting | Natural Light |
| Location | Barcelona, Anzoátegui State, Venezuela |


The rewards earned on this comment will go directly to the person sharing the post on Twitter as long as they are registered with @poshtoken. Sign up at https://hiveposh.com.
Gracias por su apoyo.
Great hand crafts you got there.
Thank you for your visit, I am very happy that you liked it. Greetings and blessings.
Estan muy lindos tus ganchos amiga gracias por compartir tu paso a paso
Gracias a ti por la visita, me alegra mucho que te gustara.