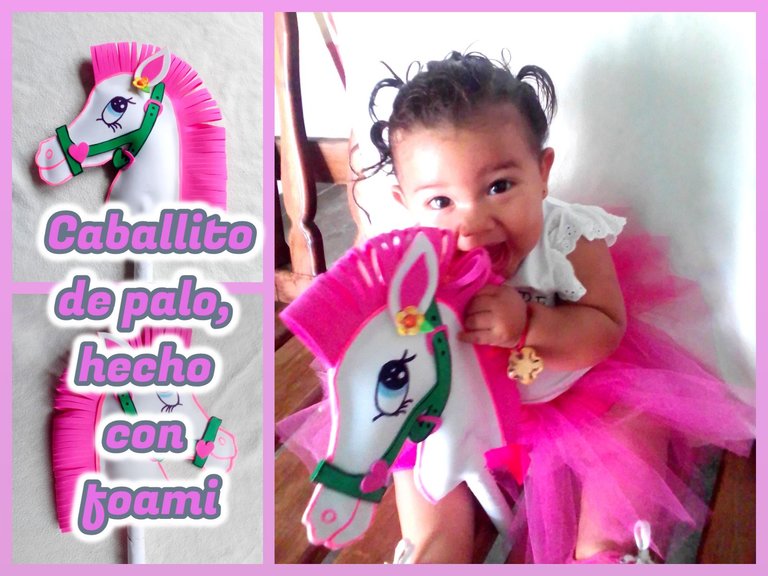
My appreciated friends, and members who make up this creative community, happy and pleased to be able to be with you again, imparting my talent to you. Let's say I abandon them, for a few months. My daughter at that time was very young and well, she needed all of her attention, thanks to her I have learned a lot about the value of being a mother. Nowadays she is grown up, I am a very happy mother to have her with me. Now I can resume my activities, which I have a little more free time. To start this big day, I made a wooden horse for her, with materials that were in my home. Without further ado, the most important thing comes, the steps and their beautiful finish.
Mis apreciados amigos, y miembros que conforman esta creativa comunidad, feliz y contenta de poder estar de nuevo con ustedes, impartiéndoles mi talento. Digamos que los abandone, unos meses. Mi hija para ese momento estaba muy chiquita y bueno necesitaba todas las atenciones, gracias a ella he aprendido mucho el valor de ser madre. Hoy en día ya está grande, yo una mama muy feliz de tenerla conmigo. Ahora sí puedo retomar mis actividades, la cual tengo un poco mas de tiempo libre. Para comenzar este gran día, elabore para ella un caballito de palo, con materiales que se encontraban en mi hogar. Sin más que decir viene lo más importante, los pasos y su bella terminación.
Next, you will observe little by little in each of the steps, the martial arts that you use to achieve the correct objective.
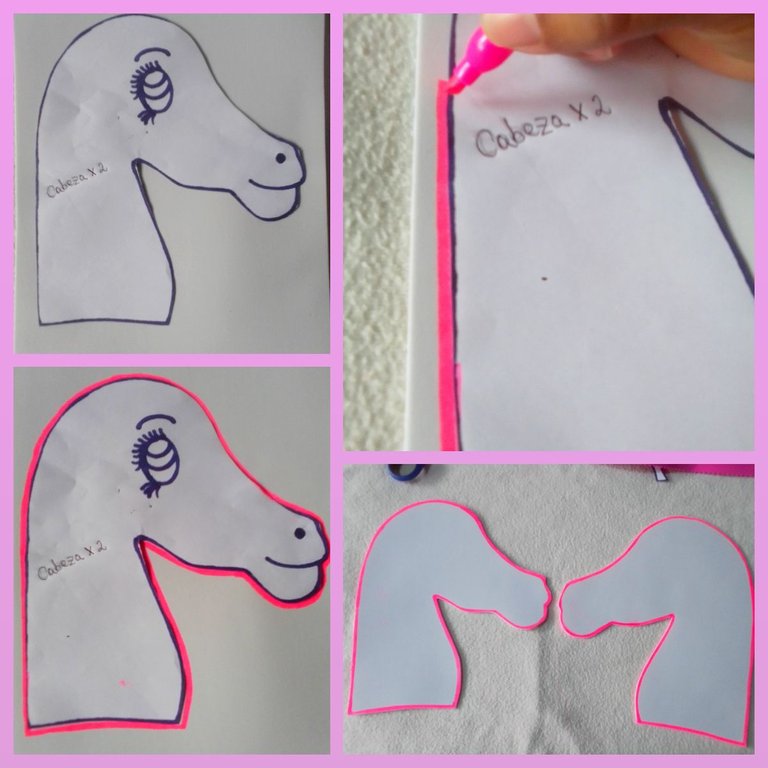
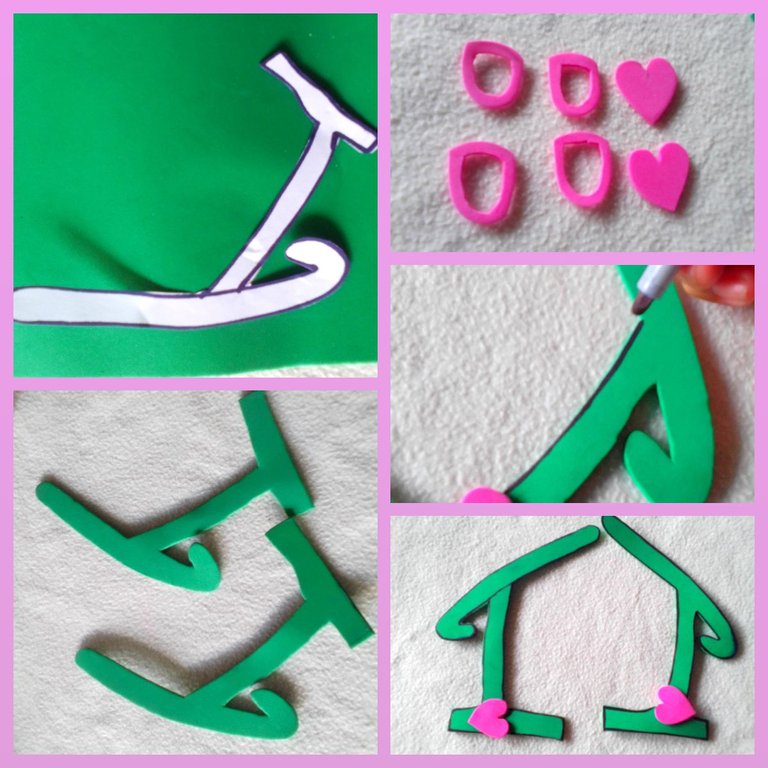
Step 1:
Make a pattern, from the head, in order to mark 2 equal pieces, using white foam, to achieve this. I used a fuchsia highlighter, marking all around the contour, once ready, I proceeded to make the other part, to make the 2 pieces, when cut it will look like this.
A continuación observarán poco a poco en cada uno de los pasos, los marciales que use para lograr el objetivo correcto.
Paso 1:
Elabore un patrón, de la cabeza, con la finalidad de marcar 2 piezas iguales, utilizando foami blanco, para lograr esto. Use un resaltador fucsia, marcando por todo el contorno, una vez listo, procedí a elaborar la otra parte, para hacer las 2 piezas, al cortar quedará así.
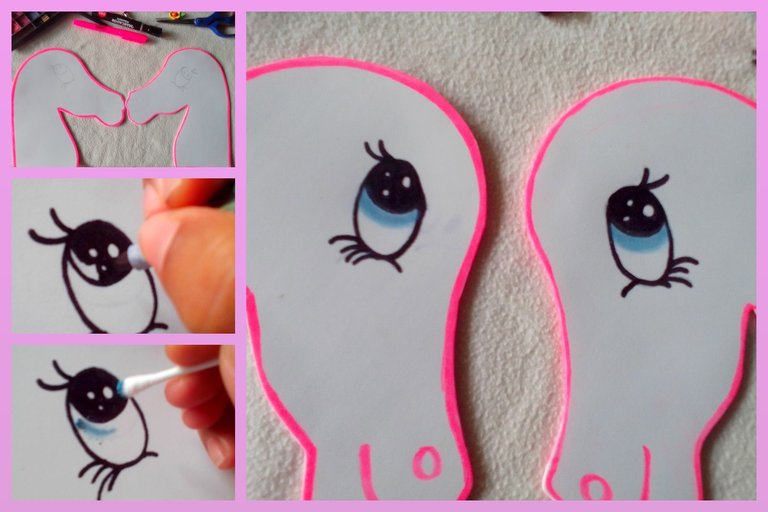
Step 2:
Use a pencil to make both eyes, this way use a fine tip black marker to outline around and fill in. Then use blue shadow, using a Q-tip to finish coloring the eyes, to finish drawing the snout.
Paso 2:
Use un lápiz para hacer ambos ojos, de esta forma use un marcador negro punta fina, para delinear alrededor y rellenar. Luego use sombra azul, haciendo uso de un hisopo para terminar de colorear los ojos, para culminar dibuje el hocico.
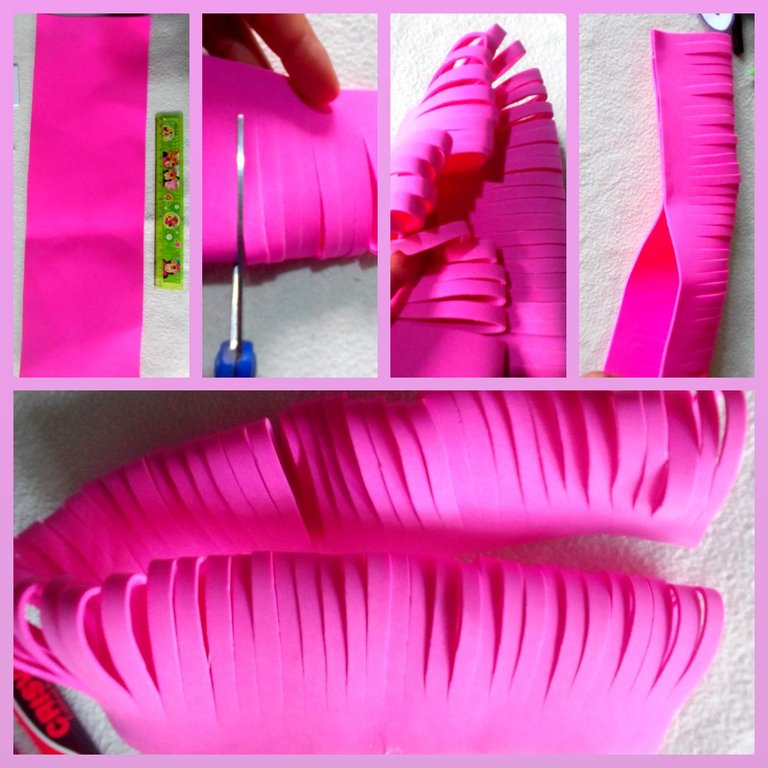
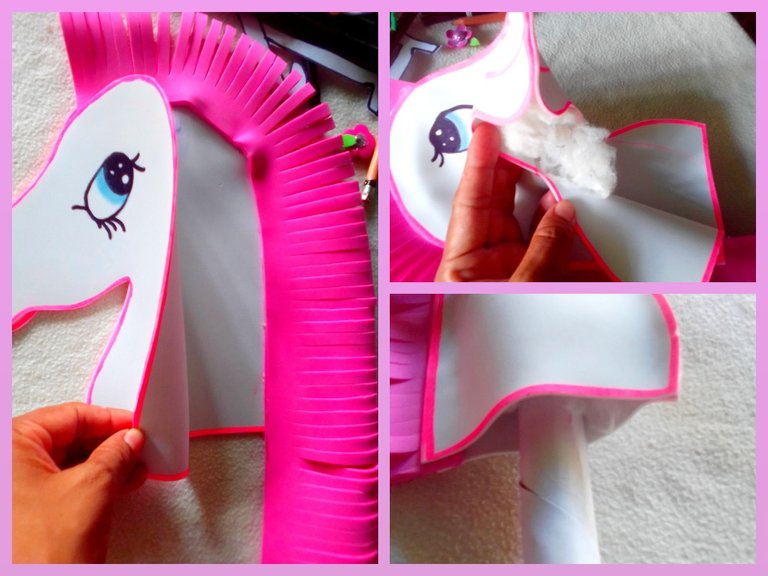
Step 3:
From the fuchsia color, cut a rectangle 44 cm long x 14 cm wide, fold it in half and cut it into thin strip shapes, when finished I join front to front and glue.
Paso 3:
Del color fucsia, corte un rectángulo de 44 cm de largo x 14 cm ancho, lo doble a la mitad y corte en formas de tiras finas, al culminar uní frente con frente y pegue.
Step 4:
Use the green to cut 2 straps, taking into account the pattern, then with the fuchsia color make the strap clasps, pass a black marker along the entire edge of the strap.
Paso 4:
Utilice el verde, para cortar 2 correas, tomando en cuenta el patrón, luego con el color fucsia realice los broches de la correa, por todo el orillo correa pase marcador negro.
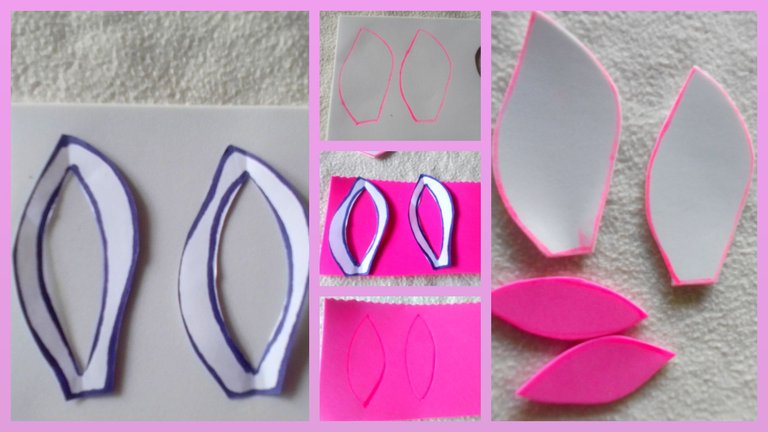
Step 5:
To make the ears, use white and fuchsia, mark with the same fuchsia marker and cut, forming a total of 4 pieces.
Paso 5:
Para hacer las orejas use blanco y fucsia, marque con el mismo marcador fucsia y corte, formando un total de 4 piezas.
Step 6:
In this part, I began to assemble the llegua, thus gluing the entire edge from the inside out, what is called the mane, which is the hair. After joining the two pieces, I filled it with batting, leaving a space and I introduced a stick already covered in white and closed it.
Paso 6:
En esta parte, comencé a armar la llegua, pegándole así por todo el orillo de adentro hacia afuera, lo que se llama el crin, que viene siendo el cabello, luego de unir las dos piezas, la rellene con guata, dejando un espacio e introduje un palo ya forrado de color blanco y cerré.
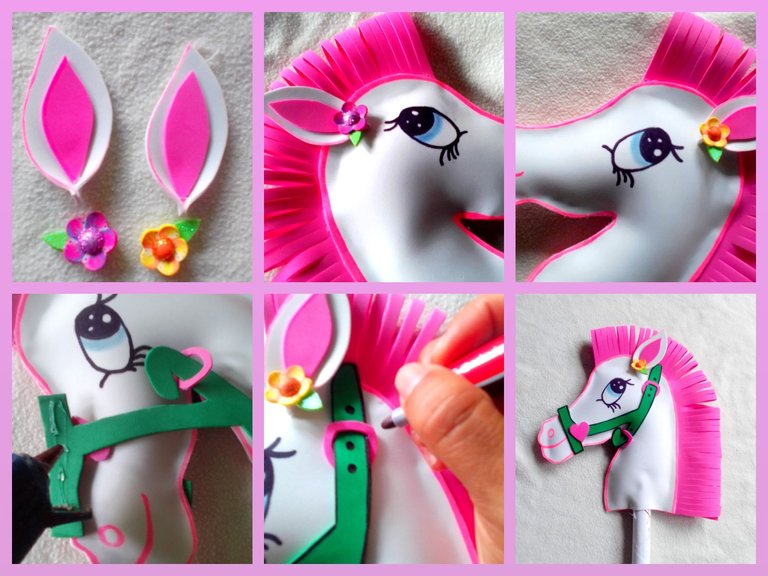
Once the ears were glued, I proceeded to place them on the head and for decoration I placed a small flower on each ear, as you can see I am adding silicone to glue the strap and part of its brooches, then I made some dots with the black marker, resembling of some holes. Here I leave you with this beautiful creation that I made for my daughter, the rock horse, but female. I really loved the colors used, to make this new project possible, the combination is perfect.
I leave you until another day, I hope you enjoy this beautiful creation. Greetings.
Ya pegadas las orejas, procedí a colocarlas en la cabeza y para su decoración le coloqué a cada oreja una flor pequeña, como pueden ver estoy agregando silicona para pegar la correa y parte de sus broches, luego hice con el marcador negro unos puntos, semenjazas de unos agujeros. Aquí los dejo con esta bella creación que hice para mi hija, el caballito de palo, pero hembra. Me encanto mucho los colores que utilice, para hacer posible este nuevo proyecto, la combinación es perfecta.
Los dejo, hasta otro nuevo día, espero que disfruten de esta bella creación. Saludos.
Collage making program: Fotojet Link
Translated from google translator Link
Photo editing program: PhotoFiltre 7
Las fotos fueron tomadas desde un Xiaomi Mi A2.
Programa para hacer el collage: Fotojet Enlace
Traducido del traductor de Google Enlace
Programa para editar fotos: PhotoFiltre 7
I say goodbye until another opportunity.
Thanks for your support.
Me despido hasta otra oportunidad.
Gracias por su apoyo.
Copyright @imargasa. All rights reserved.
The joy on her face says it all. So beautiful. 👏🏿
Yeehaw! What a heartwarming tale of creativity and motherhood! Your devotion to your daughter is as admirable as a lone cowboy riding into the sunset. Your crafty skills in making a wooden horse are as impressive as lassoing a wild stallion. Keep shining bright like a lone star in the vast desert sky!
demasiado bello, que talento amiga!!
Hermoso es increíble como hasta tiene personalidad este caballito, es ideal para regalar
Discord Felicitaciones, su publicación ha sido votada por @ dsc-r2cornell. Puedes usar el tag #R2cornell. También, nos puedes encontrar en
Pero que cosita mas linda 😍 te quedó mejor que comprado 👍
La bebe hizo el control de calidad y le encanto, por esa sonrisa vale la pena realizar este caballito. Quedo muy bonito y es creativo sobretodo por el tipo de material que utilizaste. Saludos
Te ha quedado genial tu caballo de foami, se le nota la felicidad en el rostro de tu hija y ya por ahí demuestras ser una buena madre, debido a que le hiciste un hermoso regalo, gracias por compartir
Escrito por lionsaturbix / Written by lionsaturbix
¡¡¡Buen trabajo!!! Gracias por publicar tu excelente contenido en Hive Diy.