Versión en Español:
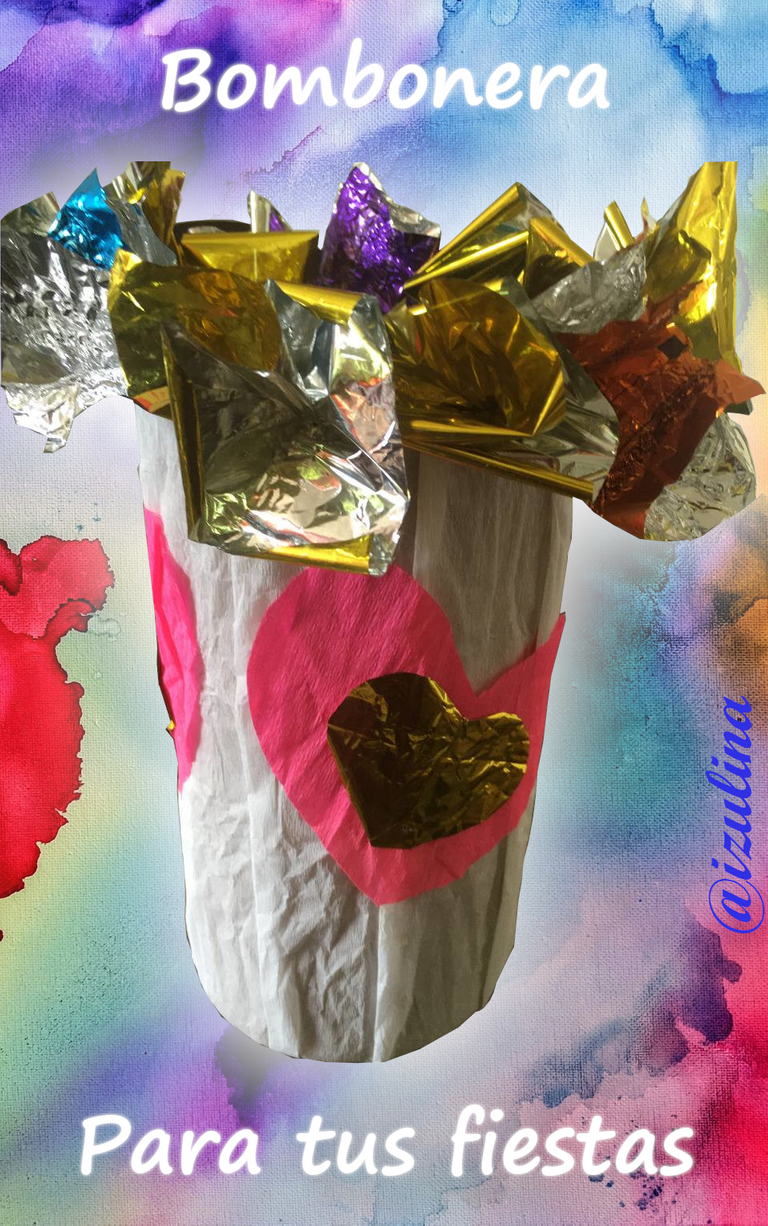
Estimados Hivers de la comunidad Hive DIY, es un gusto para mí poder compartir con ustedes el paso a paso para crear esta bombonera, deseándoles que tengan éxitos.
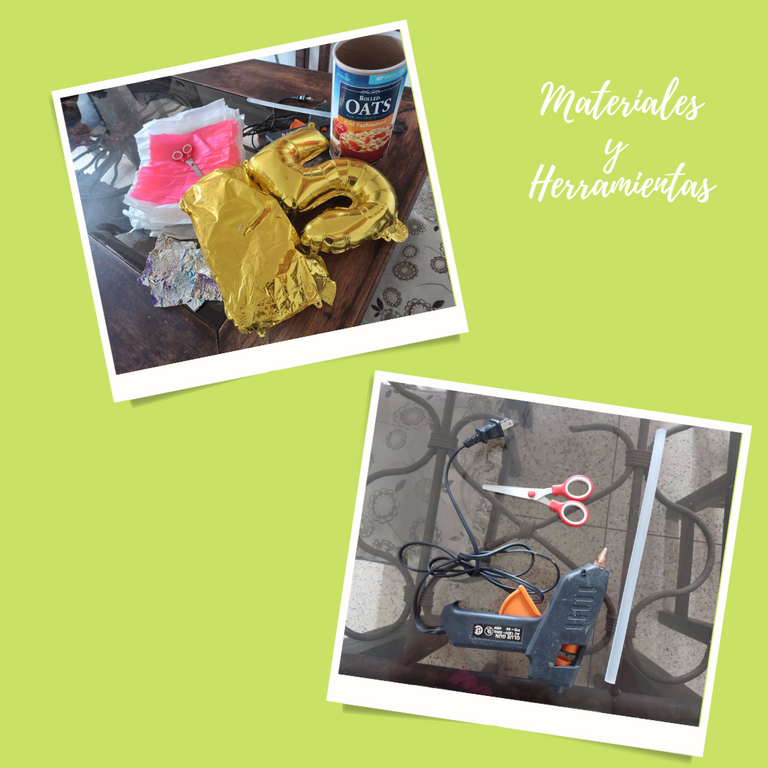
La idea de la bombonera, surgió al ver el envase de cartón de un pote de avena que le regalaron a mi madre y pensé: ¿qué puedo hacer con él? pasaron varios días y recordé que tenía algunos materiales guardados en una gaveta, un par de globos con forma de número, que sobraron de una fiesta de quince años, y decidí que haría pañuelitos con ellos. Muchos de ustedes se preguntarán ¿qué pañuelos? más adelante en este post lo podrán ver.
Se me pasó por la mente que usaría también el globo del número cinco pero no hizo falta, con el globo del número uno fue suficiente. No crean que lo reventé para decorar este cilindro,🤣 sino que ya anteriormente se me había reventado, de todas maneras pensaba reventar el globo del número cinco😇.
Materiales:
Papel Crepé blanco y fucsia.
Globo del número 1.
3 envoltorios de bombones.
Barra de silicón.
Herramientas:
Pistola de silicón.
Tijeras.
A disfrutar del proceso:
Paso 1:
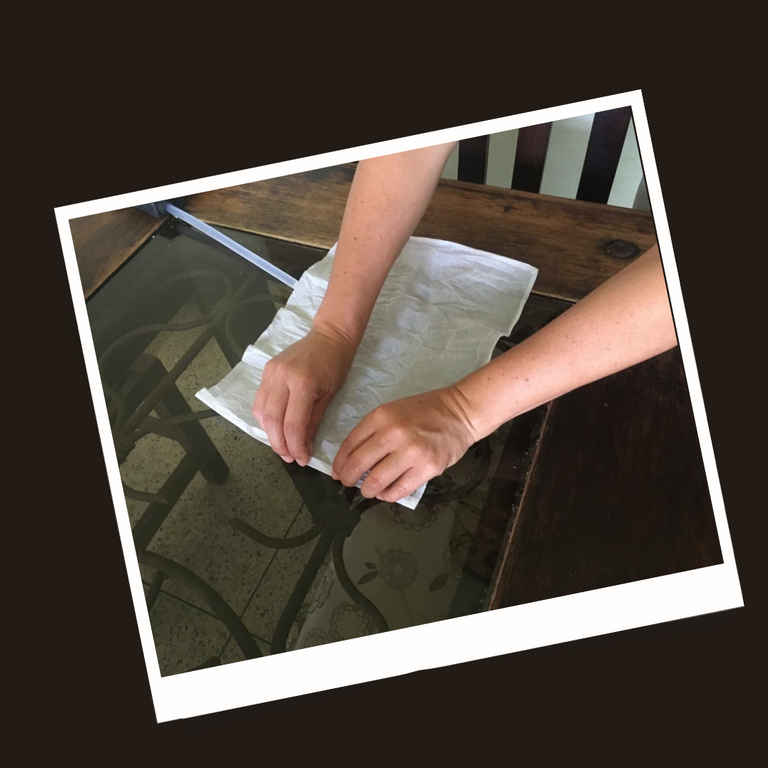
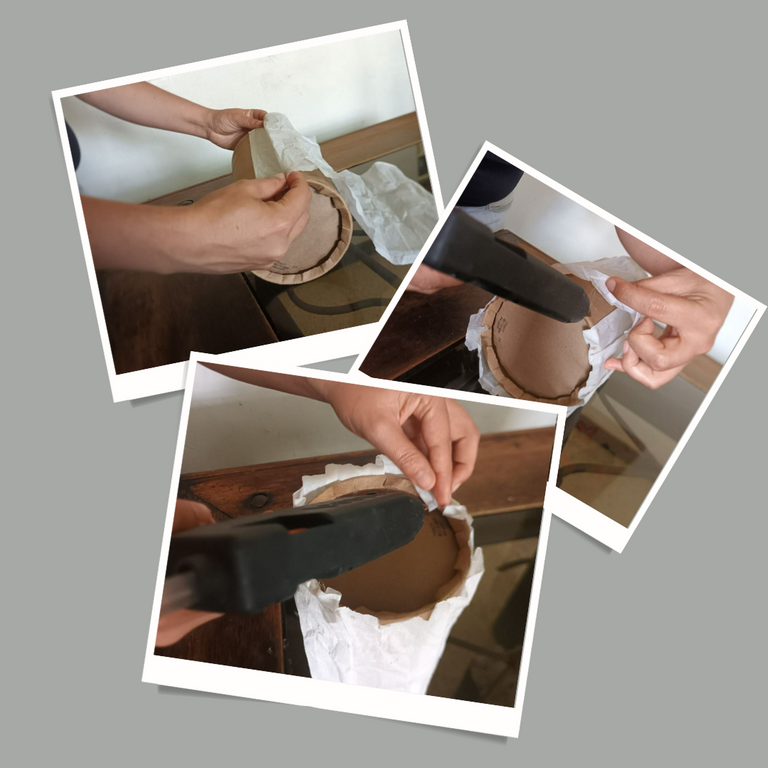
Le quitamos la etiqueta del envase de avena.

Paso 2 y 3:
Medimos el tamaño del envase, cortamos el pliegue del papel blanco un poco más alto que el cilindro y en su base repetimos la operación pero más abajo del pote.
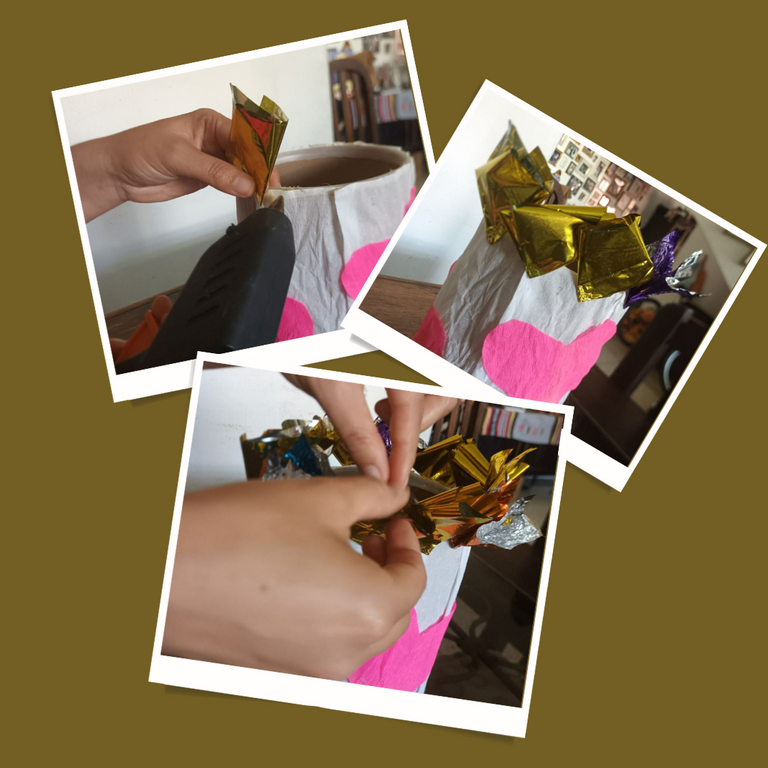
Doblamos uno de los bordes del papel crepé ya cortado, el que va en la parte superior del envase. También doblamos la parte de los lados. Mientras hacemos esto ponemos a calentar la pistola de silicón.
Paso 4:
Comenzamos a pegar con cuidado el papel crepé con el silicón, en el cilindro, vamos haciendo pequeños dobleces de forma vertical con el papel blanco y lo vamos pegando. Para que tenga un diseño más bonito.
Paso 5:
Después de forrar nuestro cilindro pegamos el papel crepé sobrante en la base con mucho cuidado para no quemarnos con el silicón caliente.
Paso 6:
Hacer 4 corazones dos grandes y dos más pequeños, me guie con el corazón que recorté primero para hacer el segundo corazón de un mismo tamaño grande. Luego recorté el tamaño del corazón más pequeño, repito la misma operación y así obtengo los 4 corazones.
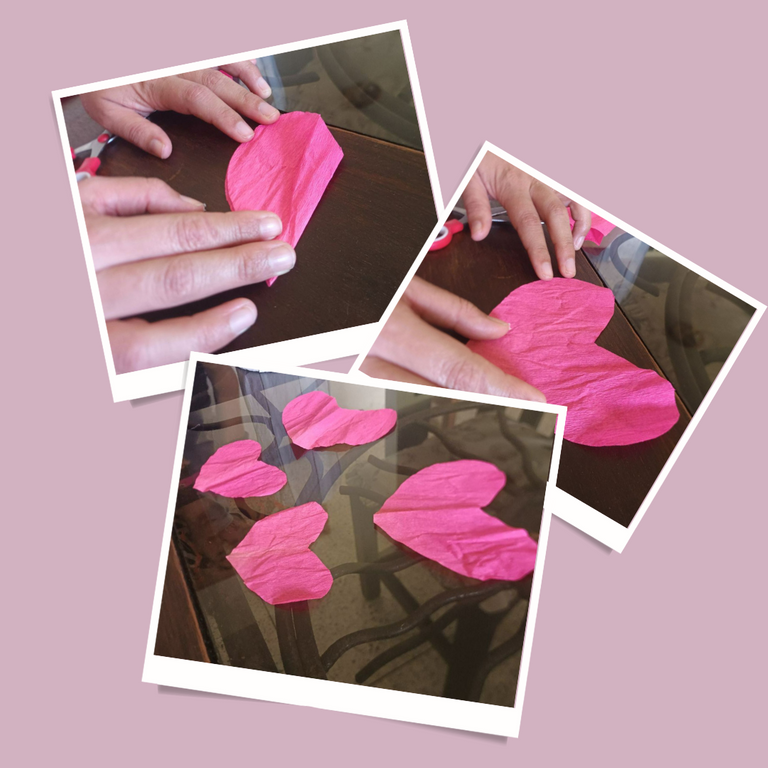
Paso 7:
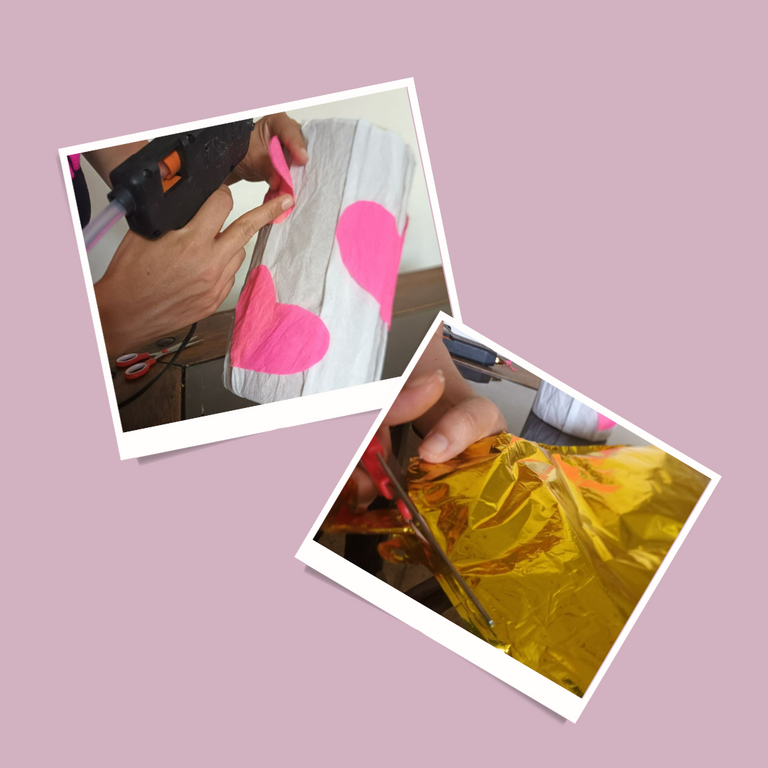
En este paso pegamos los corazones a nuestro gusto en el pote, asegurándonos que se vean bonitos. Les recuerdo que deben tener mucho cuidado con la manipulación de la pistola de silicón, ya que la punta es muy caliente y si te cae silicón en la piel te puede quemar fuertemente. Así que debemos trabajar con delicadeza, apretar suavemente el gatillo ya que necesitaríamos solamente pequeños puntos de silicón.
Paso 8:
Cortamos los bordes del globo del número uno de cumpleaños.
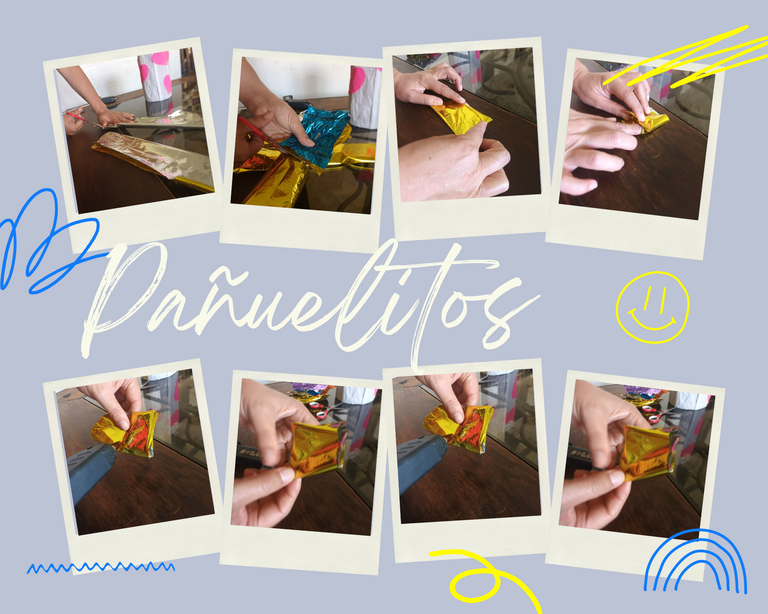
Paso 9:
Hacemos los pañuelitos, para ello, debemos recortar el globo tomando como patrón el tamaño del envoltorio de bombones. También pueden ser de forma cuadrada, (en el caso de no hacerlo con la envoltura del bombón).
Debemos doblarlos por la mitad, luego lo volvemos a doblar otra vez por la mitad de la mitad ya doblada. Le aplicamos silicón en la parte del último dobles, sólo en la esquina, no por toda la división. En este caso quise dejar el color dorado del globo por afuera y en el caso de los envoltorios de los bombones dejando el color plateado por dentro). A continuación muestro el proceso con las imágenes.
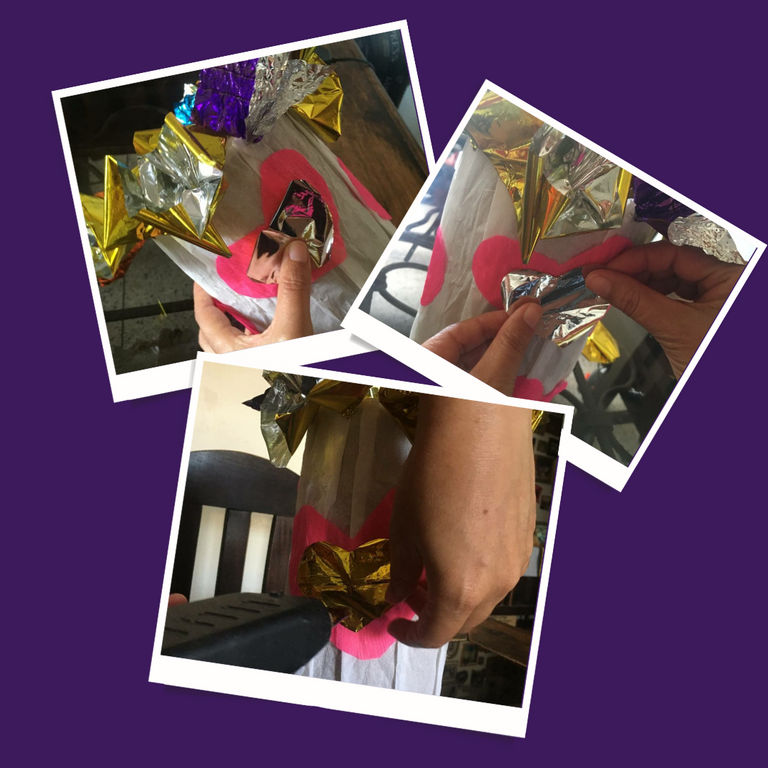
Paso 10:
Pegamos los pañuelos en la parte superior del envase de acuerdo al gusto. En este caso seleccioné una serie de 3 pañuelos dorados y uno del envoltorio de los bombones y así sucesivamente hasta cubrir el círculo. Luego de colocarlos, abrimos el que pegamos primero como si fuera una flor y así vamos abriendo por orden hasta llegar al último, para darle chance a que se hayan pegado. Al abrir los pañuelitos quedará muy bonito y adornarán bastante el cilindro.
Paso 11:
Como se veía que le faltaba un toque en la decoración hice otros 4 corazones con los recortes sobrantes del globo, para ser pegados en el centro de los corazones de color fucsia. Los medí al ojo porciento tomando en cuenta el tamaño del corazón fucsia y los fui recortando guiándome por el primer corazón de color dorado, haciendo el segundo corazón dorado grande. Repetí el procedimiento para los corazones más pequeños, en estos últimos me interesaba que el lado plateado quedara por fuera, procedí a pegarlos con la pistola de silicón.
Y listo tenemos nuestro cilindro decorado para ser llenado con bombones o caramelos.
Se utilizó Canva.
Las fotos son propias y no han sido publicadas anteriormente a este post.
Traductor: www.deepl.com.
English version:
Dear Hivers of the Hive DIY community, it is a pleasure for me to share with you the step by step to create this bombonera, wishing you success.
The idea of the bombonera, came when I saw the cardboard container of a pot of oatmeal that was given to my mother and I thought: what can I do with it? several days passed and I remembered that I had some materials stored in a drawer, a couple of balloons in the shape of a number, left over from a quinceañera, and I decided that I would make some tissues with them. Many of you may be wondering what scarves? you will see later in this post.
It crossed my mind that I would also use the number five balloon but I didn't need to, the number one balloon was enough. Don't think that I popped it to decorate this cylinder,🤣 I had already popped it before, anyway I was thinking of popping the number five balloon😇.
Materials: .
White and fuchsia crepe paper.
Number 1 balloon.
3 chocolate wrappers.
Silicone stick.
Silicone gun.
Scissors.
Enjoy the process:
Step 1:
We took the label off the oatmeal container.
Steps 2 and 3: **
We measure the size of the container, cut the fold of the white paper a little higher than the cylinder and at its base we repeat the operation but lower than the pot.
Fold one of the edges of the crepe paper already cut, the one that goes on top of the container. We also fold the side part. While we do this we heat the silicone gun.
Step 4:
We begin to carefully glue the crepe paper with the silicone, in the cylinder, we are making small folds vertically with the white paper and we are gluing it. For a nicer design.
Step 5:
After lining our cylinder we glue the leftover crepe paper on the base very carefully so as not to burn ourselves with the hot silicone.
Step 6:
Make 4 hearts two large and two smaller, I was guided with the heart I cut out first to make the second heart of the same large size. Then I cut out the size of the smaller heart, I repeat the same operation and so I get the 4 hearts.
Step 7:
In this step we glue the hearts to our liking on the pot, making sure they look pretty. I remind you that you must be very careful with the handling of the silicone gun, as the tip is very hot and if you get silicone on your skin it can burn you badly. So we must work delicately, gently pull the trigger as we would need only small dots of silicone.
Step 8:
We cut the edges of the number one birthday balloon.
Step 9:
We make the handkerchiefs, for this, we must cut out the balloon taking as a pattern the size of the chocolates wrapper. They can also be square-shaped, (in the case of not doing it with the bonbon wrapper).
Fold it in half, then fold it again in half of the already folded half. We apply silicone on the part of the last fold, only on the corner, not all over the division. In this case I wanted to leave the golden color of the balloon on the outside and in the case of the chocolate wrappers I wanted to leave the silver color on the inside). Below I show the process with the images.
Step 10:
We glue the handkerchiefs on the top of the container according to taste. In this case I selected a series of 3 golden handkerchiefs and one from the chocolate wrapper and so on until the circle is covered. After placing them, we open the one we glued first as if it were a flower and so we open them in order until we get to the last one, to give them a chance to stick together. Opening the handkerchiefs will be very nice and will decorate the cylinder.
Post Instagram collage summer minimalist blue(8).png]()
Step 11:
As it looked like it was missing a touch in the decoration I made another 4 hearts with the leftover balloon cutouts, to be glued in the center of the fuchsia hearts. I measured them by eye percent taking into account the size of the fuchsia heart and I cut them out, following the first gold heart, making the second large gold heart. I repeated the procedure for the smaller hearts, in the latter I wanted the silver side to be on the outside, I proceeded to glue them with the silicone gun.
Post Instagram collage summer minimalist blue(9).png]()
And ready we have our decorated cylinder to be filled with chocolates or candies.
Canva was used.
The photos are my own and have not been published prior to this post.
Translator: www.deepl.com.
¡Hola @izulina! Muy bonito trabajo elaborado con suma delicadeza.
Hola @tiaene ¡Muchas gracias!
!discovery 25
This post was shared and voted inside the discord by the curators team of discovery-it
Join our community! hive-193212
Discovery-it is also a Witness, vote for us here
Delegate to us for passive income. Check our 80% fee-back Program
Your content has been voted as a part of Encouragement program. Keep up the good work!
Use Ecency daily to boost your growth on platform!
Support Ecency
Vote for new Proposal
Delegate HP and earn more