
Have everyone a greeting, especially to all my dear crafty and creative friends who day by day show us their creative crafts and arts, in this lovely #HiveDiy community.
I am pleased to be with you again today presenting another of my projects, although I am not feeling very well in health I had three days trying to publish my post but here we are in the fight ... I hope you like it.
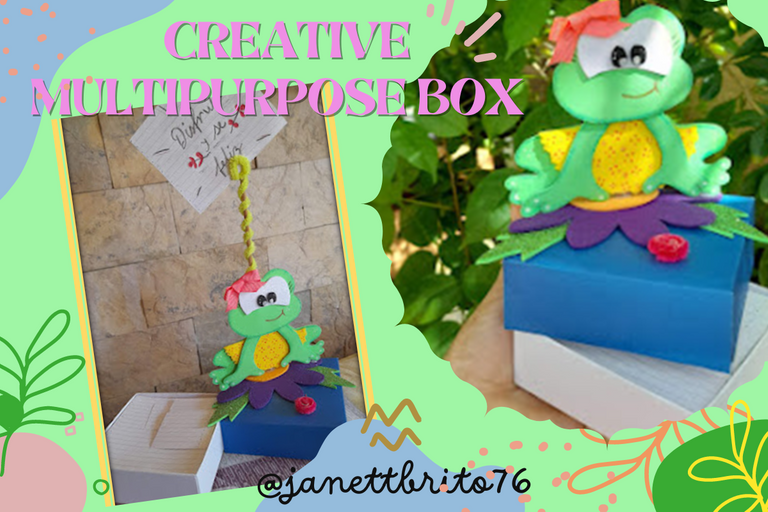
This time I am going to show you step by step how to make a beautiful and creative multipurpose box with recycled material. I tell you that the box when I visualized it was a little box to keep notes, but then I saw that not only serves to keep the notes but can be used to give away on birthdays as surprise boxes, to decorate the desktop as a photo holder or note holder, that's why then I put multipurpose box, because you can use it for many things, it is also quite economical and simple to develop, you just have to have a little creativity to decorate it.
Well my creative friends, don't miss the step by step to make this beautiful and creative multipurpose box, so let's get started!

Tengan todos un saludo, especialmente a todos mis queridos amigos artesanos y creativos que día a día nos muestran sus creativas manualidades y artes, en esta adorable comunidad de #HiveDiy.
Me complace nuevamente estar hoy con ustedes presentándole otro de mis proyecto, aunque no me encuentro muy bien de salud ya tenia tres días tratando de publicar mi post pero aquí estamos en la lucha...espero que les sea de su agrado.
En esta oportunidad les voy a enseñar el paso a paso de cómo realizar una hermosa y creativa cajita multiuso con material de reciclaje. Les cuento que la cajita cuando la visualice fue en una cajita guarda notas, pero luego vi que no solo nos sirve para guardar las notas sino que se puede utilizar para obsequiar en los cumpleaños como cajitas sorpresas, para decorar el escritorio como un porta foto o porta notas, es por eso que luego le puse cajita multiuso, porque la puedes utilizar para muchas cosas, ademas es bastante económica y sencilla de elaborar, solo tienes que tener un poco de creatividad para decorarla.
Bueno mis creativas amigas no se pierdan el paso a paso para hacer esta hermosa y creativa cajita multiuso. ¡¡Entonces empecemos pues!!

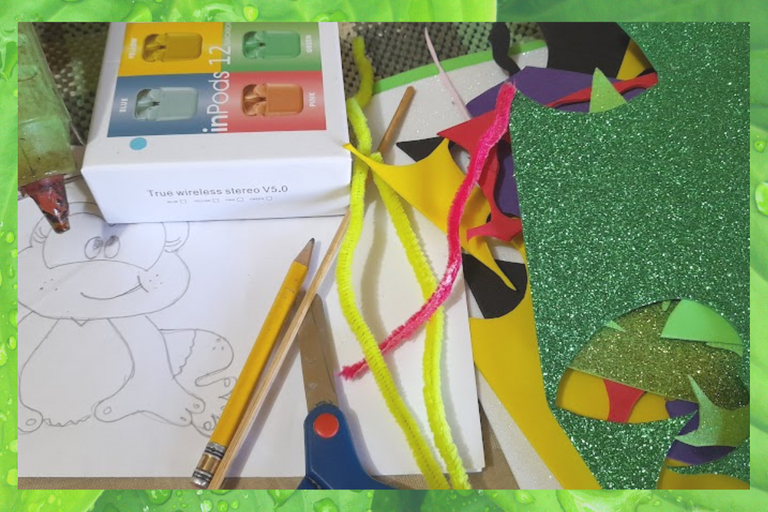
- EVA glue (green, yellow, frosted white, frosted green, purple and orange)
- Dark blue cardboard
- Green and pink pipe cleaner
- Recycled box
- Scissors
- Silicone
- Height stick
- Goma eva (verde, amarillo, blanco escarchado,verde escarchado, morado y naranja)
- Cartulina azul oscuro
- Limpia pipas verde y rosado
- Cajita reciclada
- tijera
- Silicon
- Palito de altura

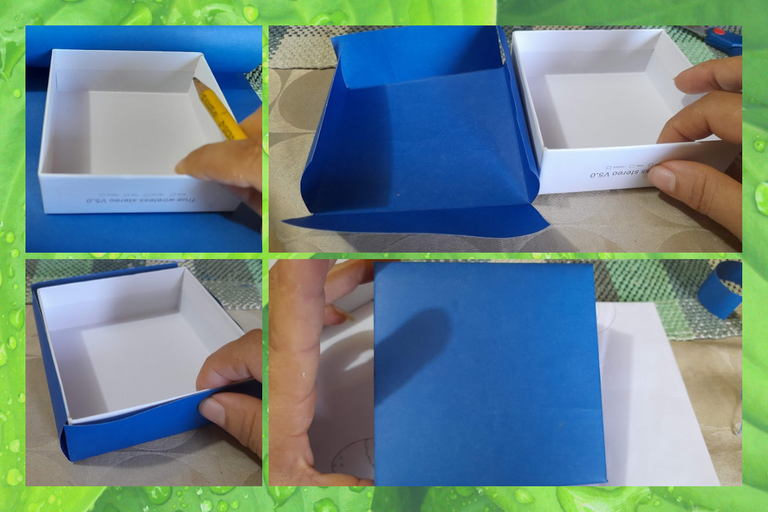
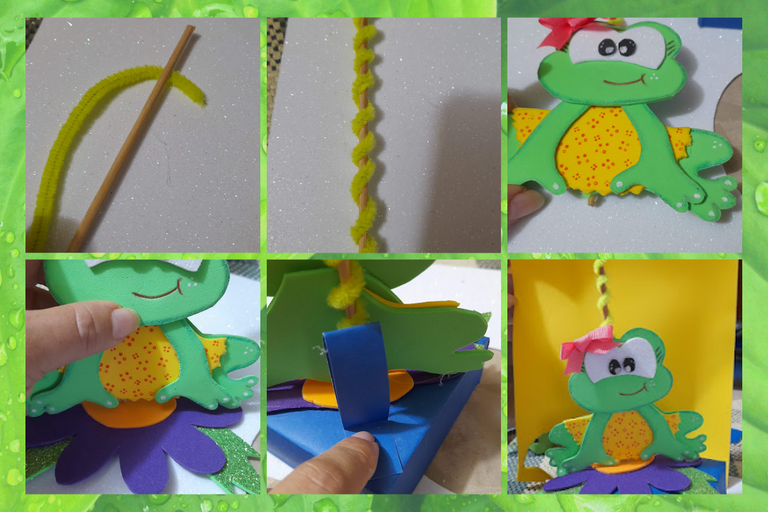
1:To cover the lid of our box with the blue cardboard, we start by marking the measurements of the lid on the cardboard, then we cut out and glue.
1: Para forrar la tapa de nuestra cajita con la cartulina azul, iniciamos marcando las medidas de dicha tapa en la cartulina luego recortamos y pegamos.
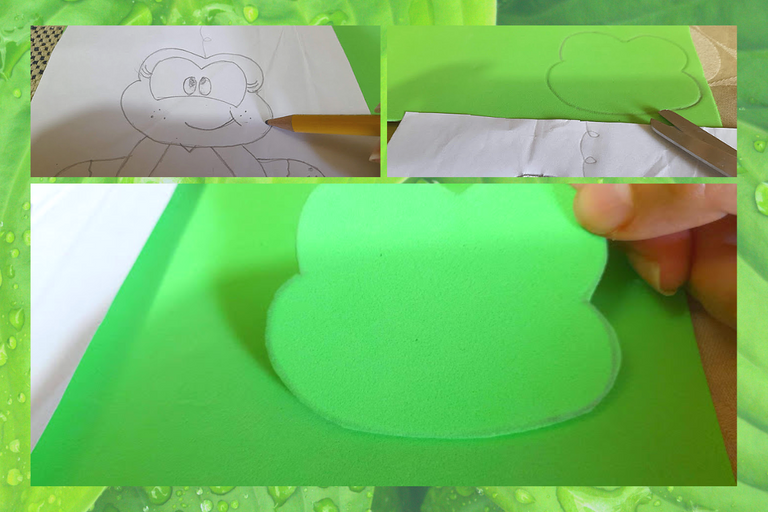
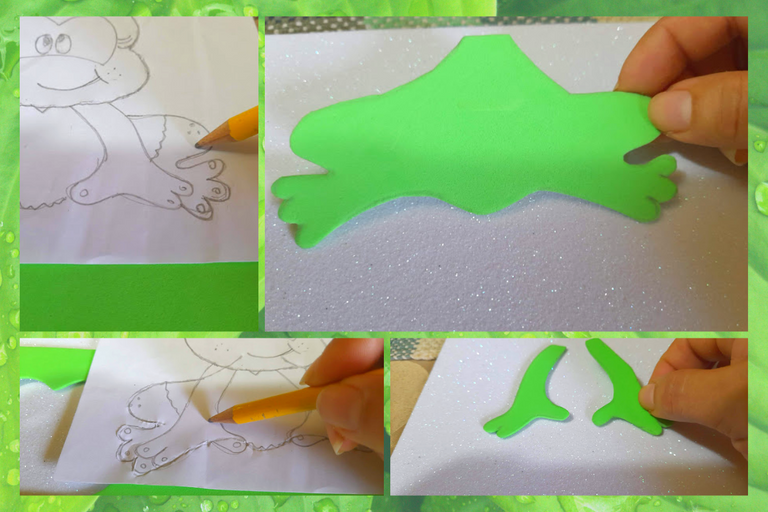
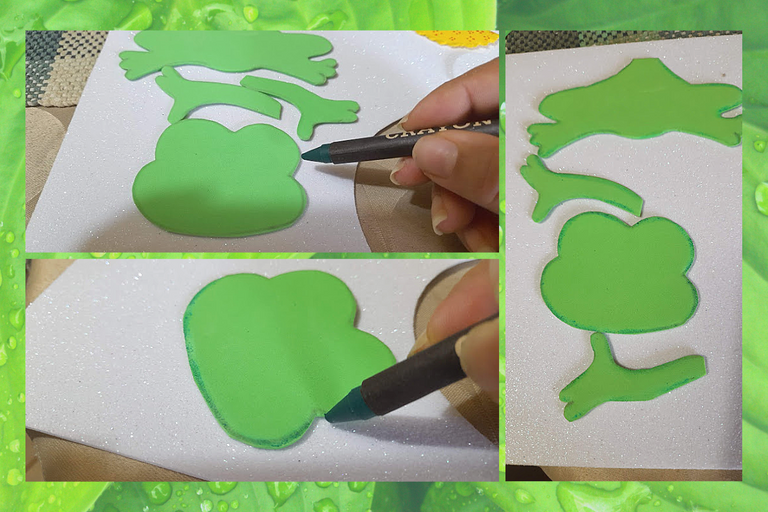
2: Now we take our frog figure and proceed to mark each of the pieces of the frog's body on the green eva rubber, as you can see, and then we cut it out.
2: Ahora tomamos nuestra figura de ranita y procedemos a marcar cada una de las piezas del cuerpo de dicha ranita en la goma eva verde, como pueden observar y luego recortamos.
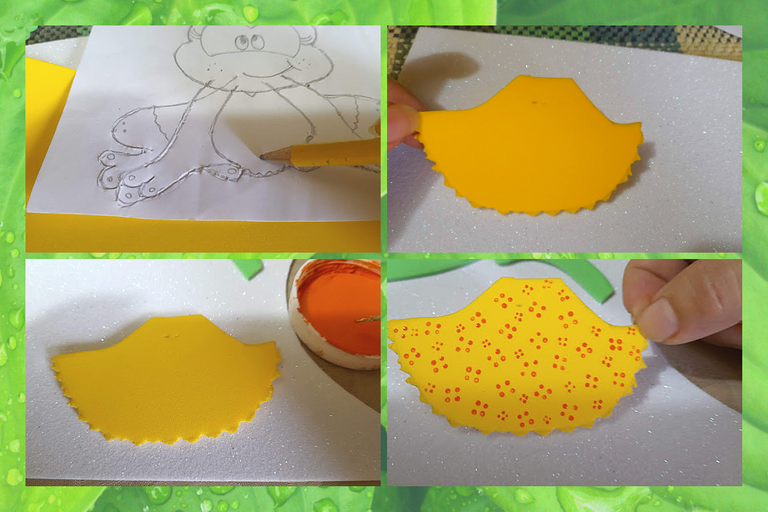
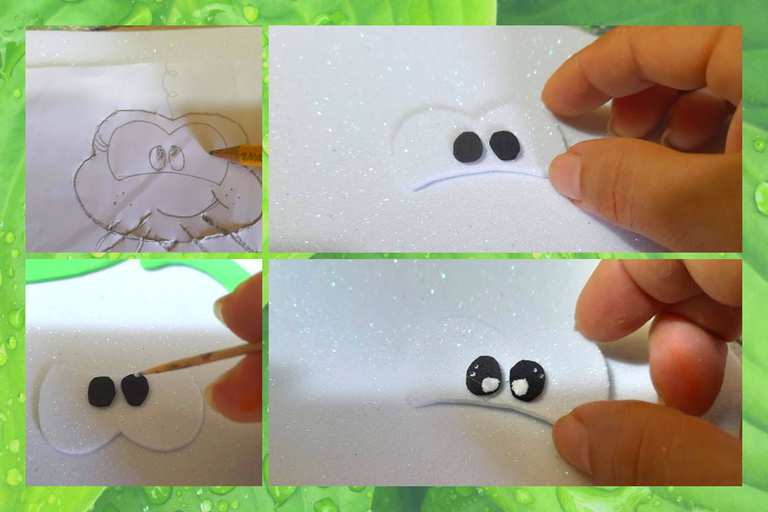
3: Then we proceed to mark and cut out the dress in the yellow eva rubber and with the help of a toothpick we draw a series of dots, then in the frosted white and black eva rubber we mark and cut out the eyes and with the toothpick and white paint we make some dots to give life to the eyes.
3: Seguidamente procedemos a marcar y recortar en la goma eva amarillo el vestido y con la ayuda de un palillo le dibujamos una serie de puntos, luego en la goma eva blanco escarchado y negro marcamos y recortamos los ojitos y con el palillo y pintura blanca les hacemos unos puntos para darle vida a los ojos.
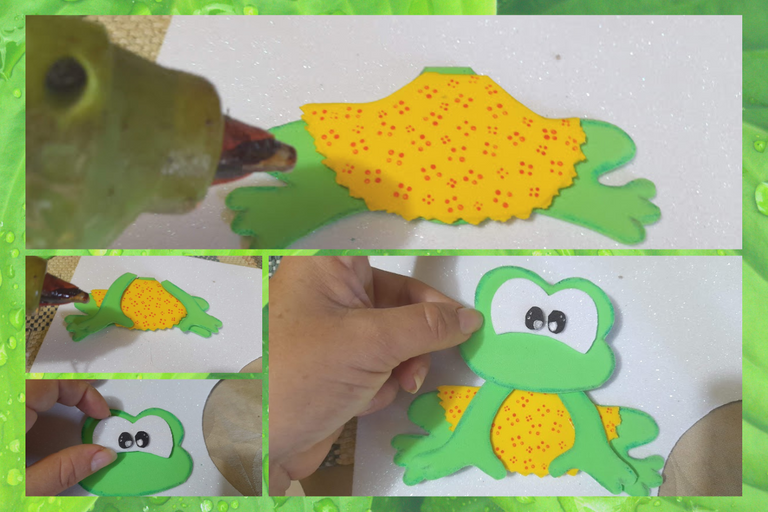
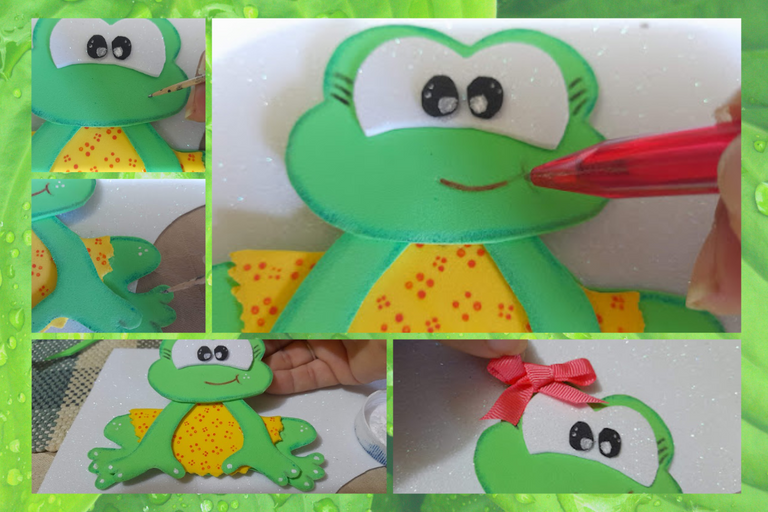
4: With a green wax crayon we proceed to give a little shadow on the edge of each piece of the frog's body. Then we proceed to glue each of the pieces to form our frog, with the toothpick we make the mark of the little mouth on the face and then with the red pen we mark it, then we highlight the fingers with white dots on each one of them and to finish our frog we place a beautiful bow on the head.
4: Con un creyon de cera verde procedemos a darle un poco de sombra por el borde de cada pieza del cuerpo de la ranita. Después procedemos a pegar cada una de las piezas hasta formar nuestra ranita, con el palillo le realizamos en la carita la marca de la boquita y luego con el lapicero rojo la remarcamos, luego le resaltamos sus dedos con unos puntos blancos en cada uno de ellos y para finalizar nuestra ranita le colocamos un hermoso lacito en la cabeza.
5: To decorate the box a little more, make a half flower with the purple eva rubber placing the orange center and in the frosted green eva rubber cut out two leaves, then we cover the high stick with the green pipe cleaner, then we proceed to paste it behind our frog, then we paste it on top of the flower and then we paste it on one side of the lid of the box and so that it does not fall we paste behind the stick a corner made of cardboard and ready...
5: Para decorar un poco mas la cajita realice media flor con la goma eva morada colocandole el centro naranja y en la goma eva verde escarchada recorte dos hojitas, seguidamente forramos el palito de altura con el limpia pipas verde, luego procedemos a pegarlo por detras de nuestra ranita, seguidamente la pegamos encima de la flor y luego la pegamos en un lado de la tapa de la caja y para que no se nos caiga le pegamos por detrás del palito un angulo elaborado de cartulina y listo..

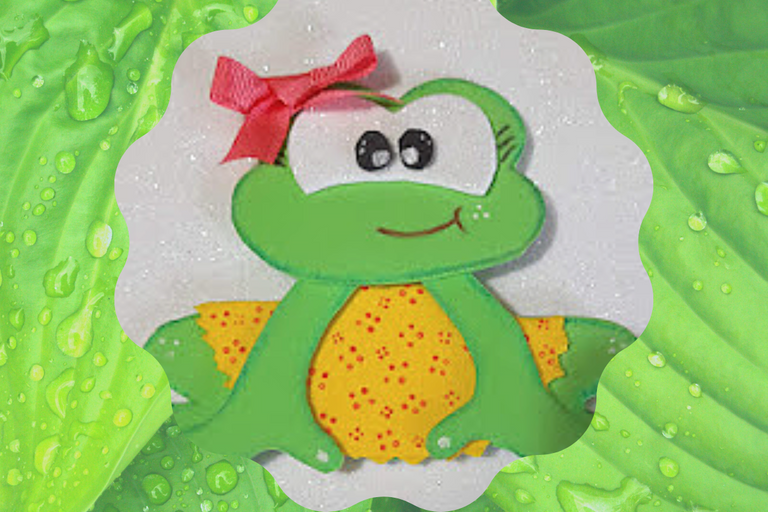
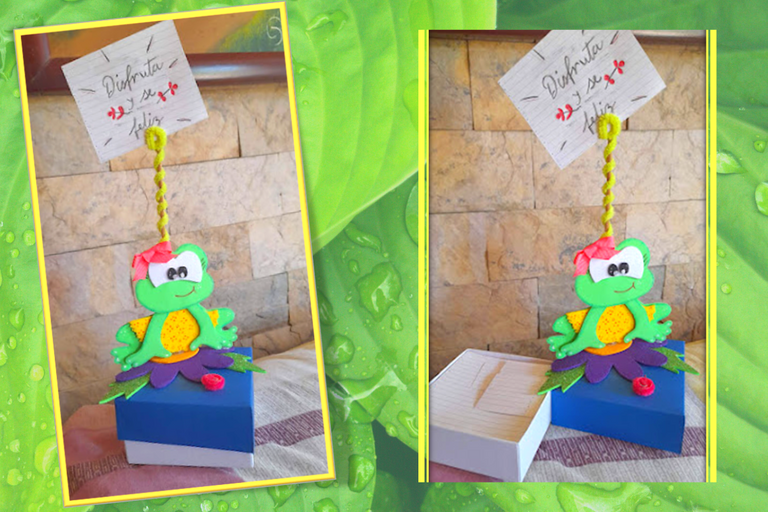
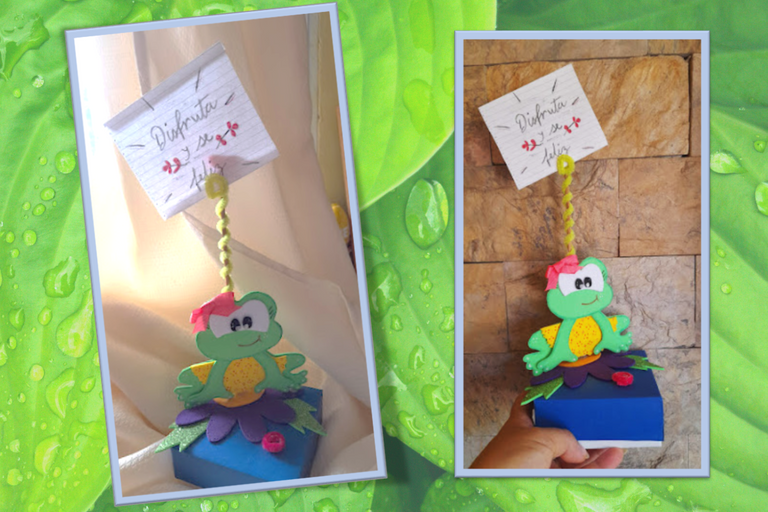
My dear crafters, this is the final result of my cute and creative multipurpose box, I hope you liked my project today and I hope you are encouraged to recycle!
See you next time!
Mis queridas artesanas este es el resultado final de mi linda y creativa cajita multiuso. ¡Espero les haya gustado mi proyecto de hoy y espero se animen al reciclaje!
¡Hasta una próxima publicación!
Portada y plantillas elaboradas en canva
Fuente Separador
Imagen referencial

The photographs were taken with a Samsung A12 smartphone, the text was translated into English with the Deepl translator.link
The banner was designed on canvas link
Las fotografías fueron tomadas con un teléfono inteligente Samsung A12, el texto fue traducido al ingles con el traductor Deepl.link
El banner fue diseñado en canvas link
Thank you for sharing this amazing post on HIVE!
Your content got selected by our fellow curator @rezoanulvibes & you just received a little thank you via an upvote from our non-profit curation initiative!
You will be featured in one of our recurring curation compilations and on our pinterest boards! Both are aiming to offer you a stage to widen your audience within and outside of the DIY scene of hive.
Join the official DIYHub community on HIVE and show us more of your amazing work and feel free to connect with us and other DIYers via our discord server: https://discord.gg/mY5uCfQ !
If you want to support our goal to motivate other DIY/art/music/homesteading/... creators just delegate to us and earn 100% of your curation rewards!
Stay creative & hive on!
Congratulations @janettbrito76! You have completed the following achievement on the Hive blockchain and have been rewarded with new badge(s):
Your next target is to reach 63000 upvotes.
You can view your badges on your board and compare yourself to others in the Ranking
If you no longer want to receive notifications, reply to this comment with the word
STOPCheck out the last post from @hivebuzz:
Support the HiveBuzz project. Vote for our proposal!