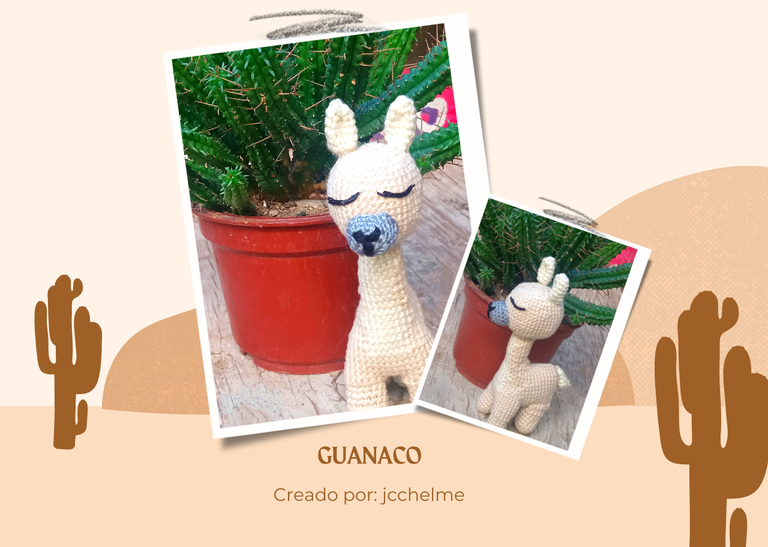
Saludos artesanos de Hive 🙋🏻♀️,
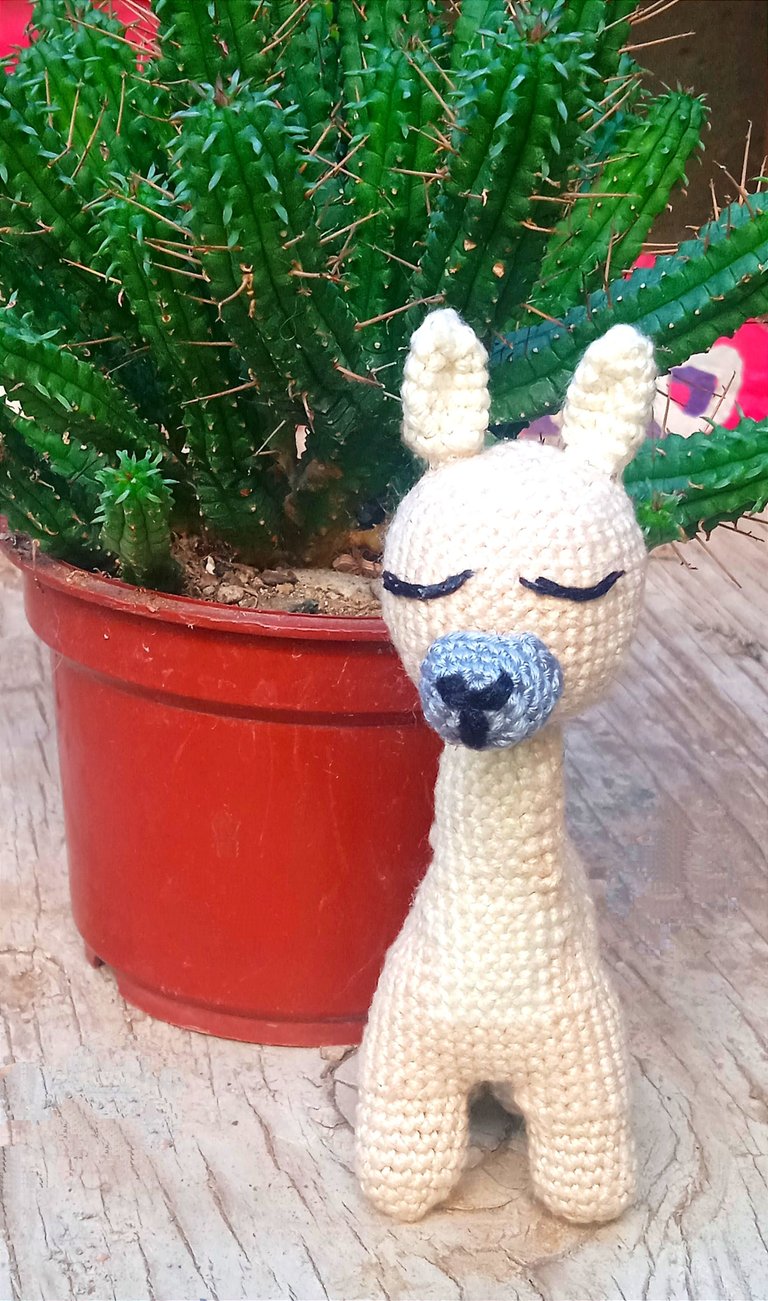
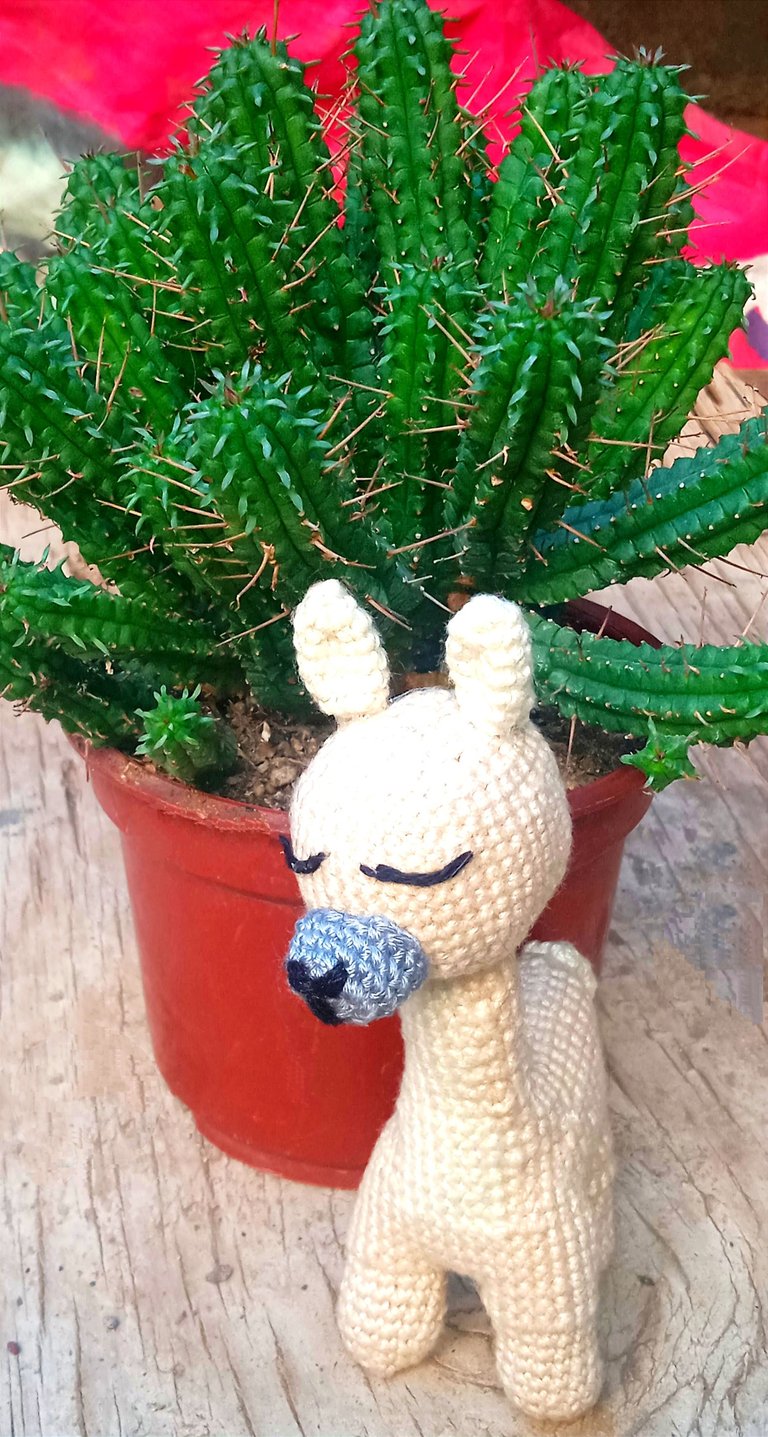
Hoy voy a compartir con ustedes un post sobre mi más reciente proyecto de amigurumi: un guanaco. Este animal, aunque comparte similitudes con las llamas, vicuñas y alpacas, tiene sus propias características distintivas. Una de ellas es su naturaleza salvaje, lo cual me llevó a decidir no agregarle ningún accesorio, como frecuentemente se hace con amigurumis de llamas. Quería que mi creación reflejara la esencia pura y natural de estos bellos animales tan representativos de mi región.
El proceso de crear este guanaco ha sido un viaje de exploración y aprendizaje. Ya que el diseño del patrón, no resultó como exactamente lo esperaba, considero que cada proyecto es un paso adelante en mi camino creativo. Por eso, aunque este modelo en particular no terminó siendo mi favorito, ya estoy planeando intentarlo nuevamente con un patrón diferente.
De todas maneras aquí dejo el proceso, supongo que cada error nos enseña algo valioso.
Greetings Hive crafters 🙋🏻♀️,
Today I am going to share a post about my most recent amigurumi project: a guanaco. This animal, although it shares similarities with llamas, vicuñas, and alpacas, has its own distinctive characteristics. One of these is its wild nature, which led me to decide not to add any accessories, as is often done with llama amigurumis. I wanted my creation to reflect the pure and natural essence of these beautiful animals so representative of my region.
The process of creating this guanaco has been a journey of exploration and learning. Since the pattern design did not turn out exactly as I had hoped, I consider each project a step forward in my creative path. Therefore, even though this particular model did not end up being my favorite, I am already planning to try again with a different pattern.
Anyway, here I leave the process, I guess every mistake teaches us something valuable.
Materiales / Materials
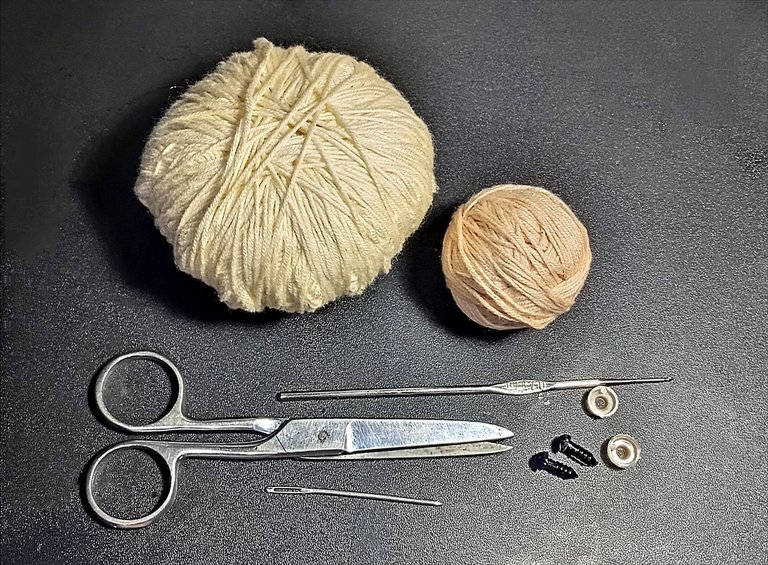
- Hilo de algodón color crema
- hilo de algodón beige
- Hilo de algodón color gris
- Crochet de 0.75 mm
- algodón sintético
- Tijeras
- aguja
- Ojos de seguridad o hilo negro de bordar
- Cream-colored cotton yarn
- Beige cotton yarn
- Gray cotton yarn
- 0.75 mm crochet hook
- Synthetic cotton
- Scissors
- Needle
- Safety eyes or black embroidery thread
Elaboración / Elaboration
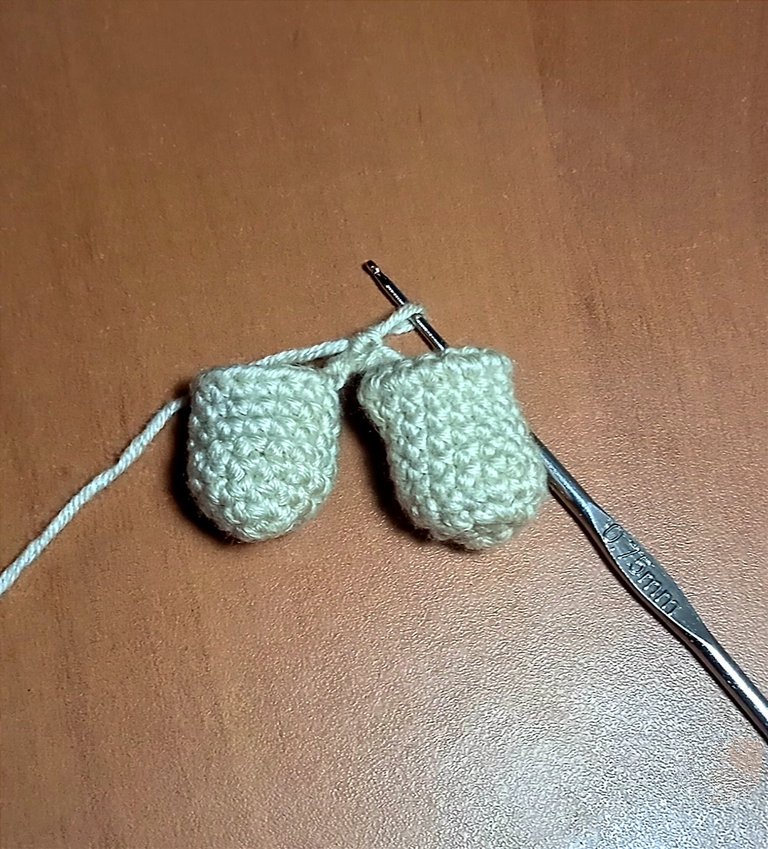
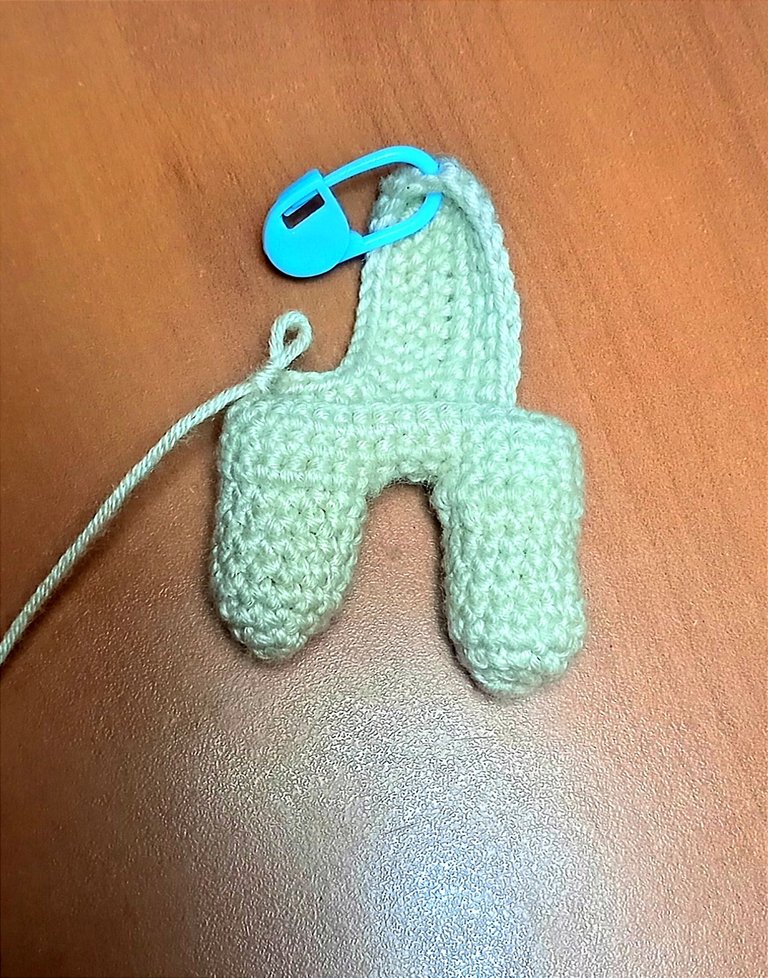
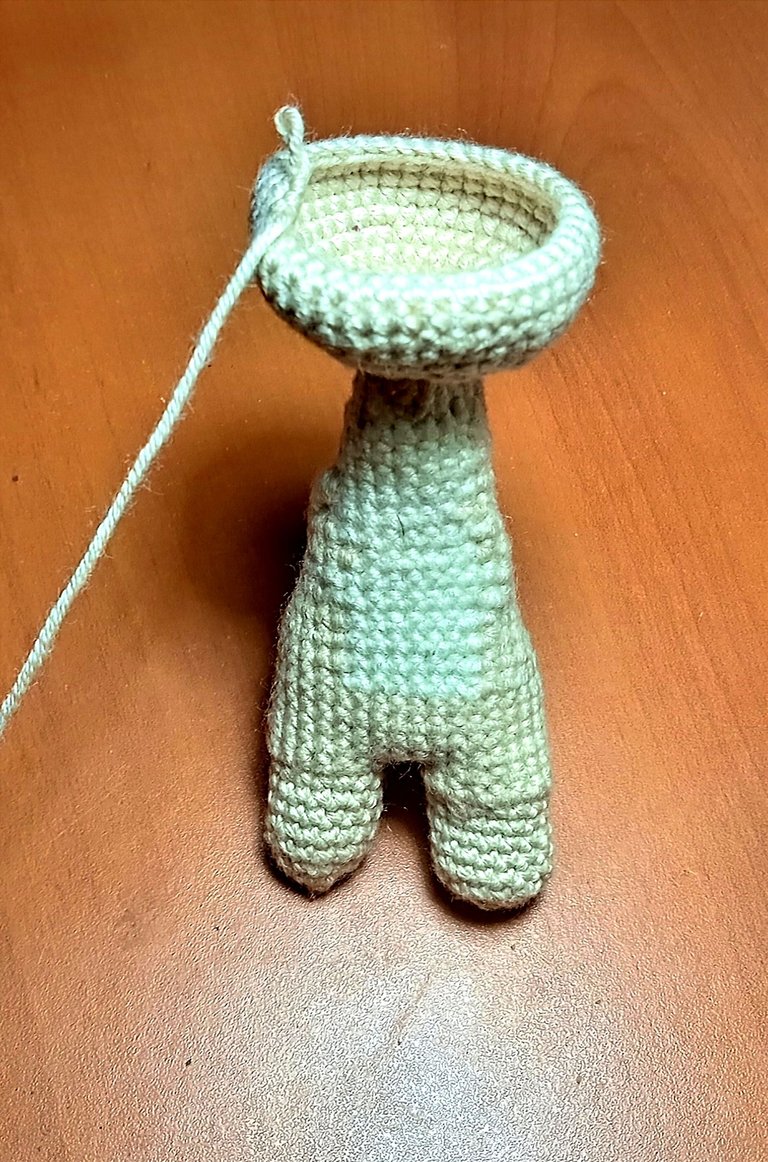
Patas (hacer 4)/Legs (make 4)
|
|
Vuelta 1: 6 puntos bajos en un
anillo mágico (6)
Vuelta 2: 6 aumentos (12)
Vuelta 3: 3 puntos bajos, 1 aumento repetir toda la vuelta (15)
De la vuelta 4 a 8: 15 puntos bajos.
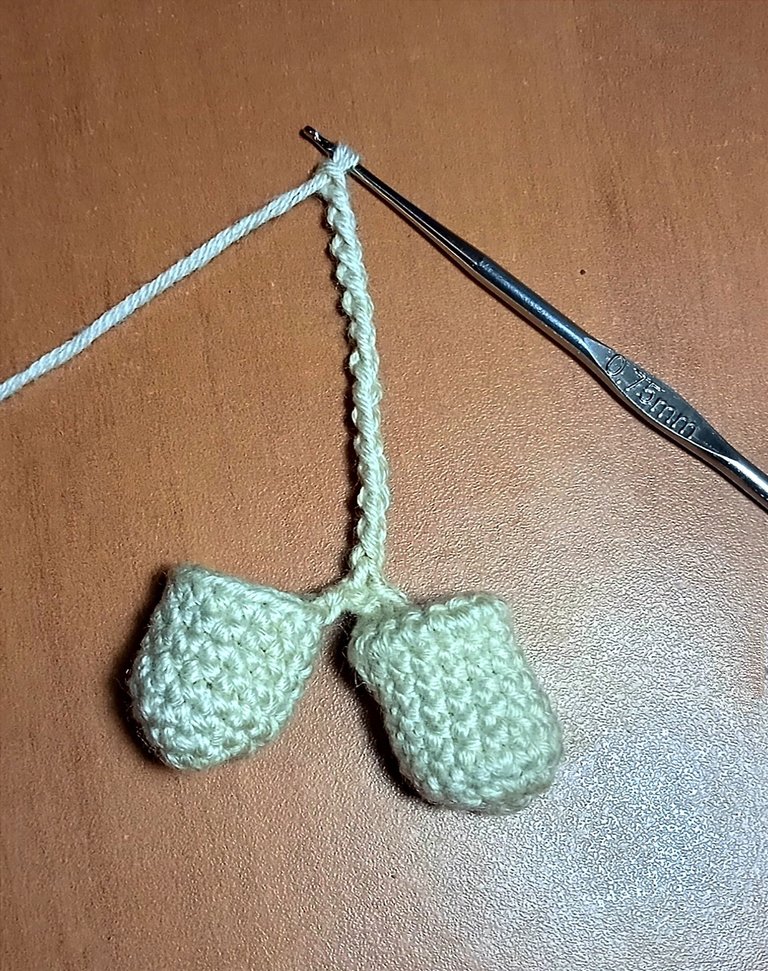
Para unir las patas delanteras: hice 3 cadenas y uní con un punto deslizado a la otra pata. Teji puntos bajos alrededor hasta llegar a la primera cadena, luego levanté 14 cadenas para formar la base del cuerpo del guanaco.
Round 1: 6 single crochet in a magic ring (6)
Round 2: 6 increases (12)
Round 3: 3 single crochet, 1 increase repeat around (15)
From round 4 to 8: 15 single crochet.
To join the front legs: I made 3 chains and joined with a slip stitch to the other leg. I crocheted single crochet around until reaching the first chain, then I made 14 chains to form the base of the guanaco's body.
Cuerpo/Body
|
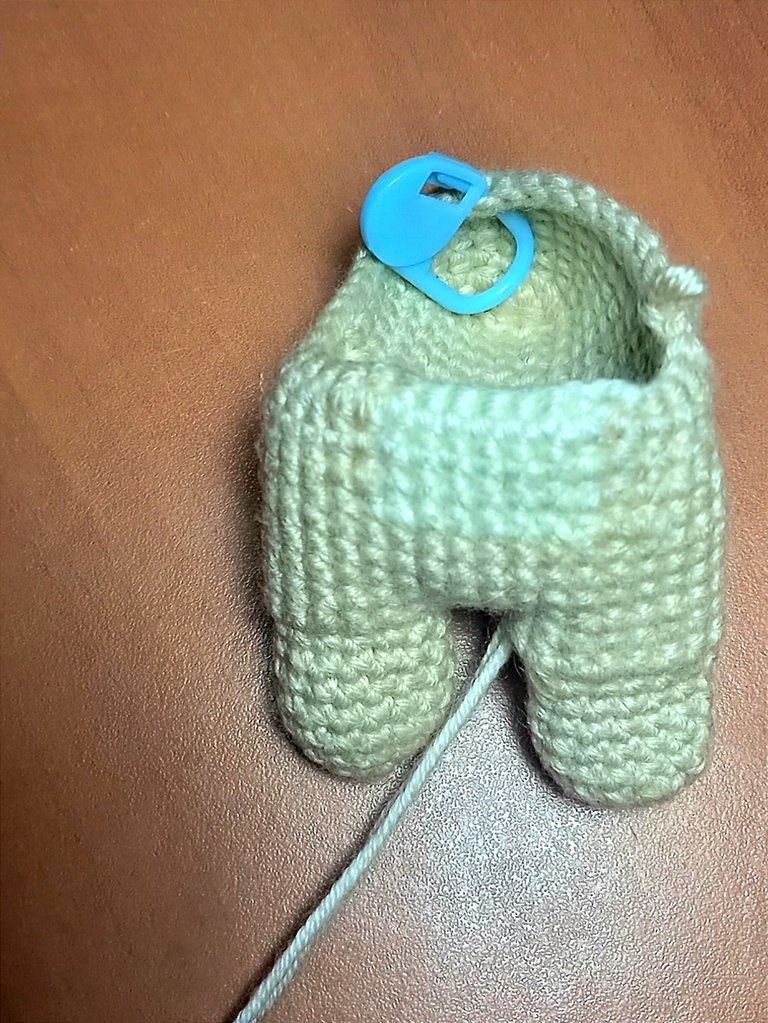
|
1- fuí tejiendo puntos bajos alrededor de las patas y las 14 cadenas. En los extremos de las bases de las cadenas, hice 1 disminución. Repetí esto 14 veces.
2- 4 vueltas de puntos bajos.
1- I crocheted single crochets around the legs and the 14 chains. At the ends of the chain bases, I made one decrease. This was repeated 14 times.
2- 4 rounds of single crochets.
Cuello/Neck
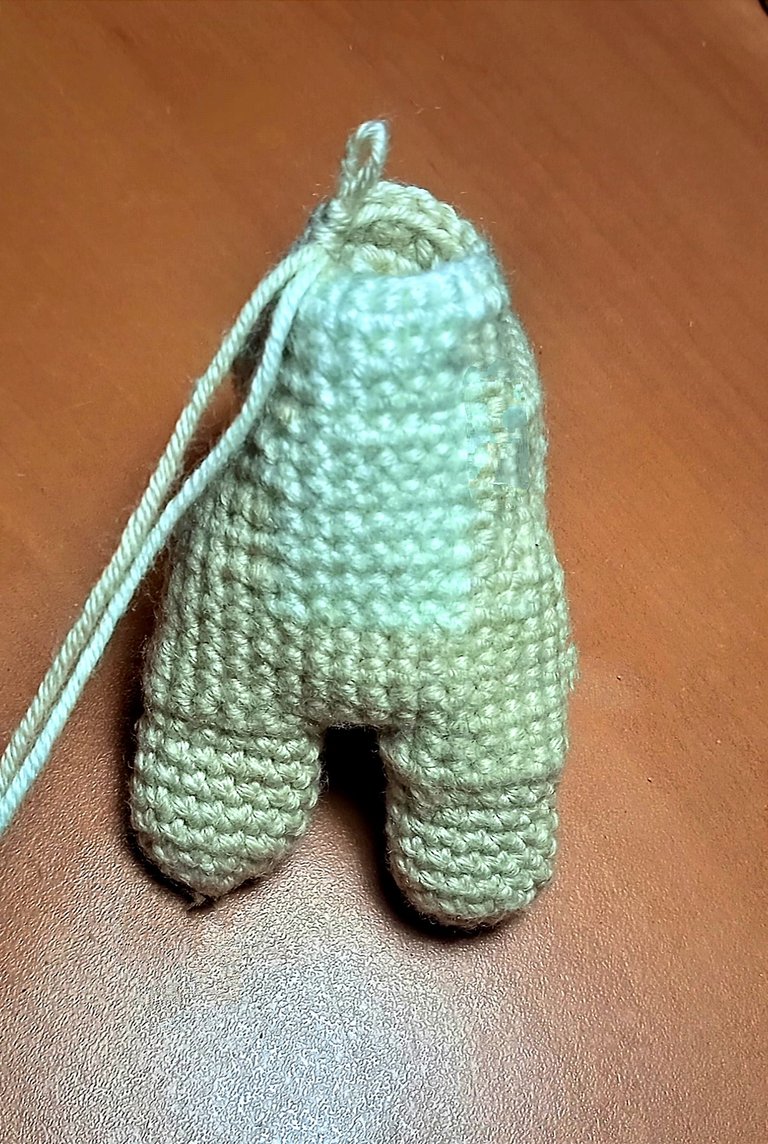
|

|
1- Separé 12 puntos al frente, levanté 6 cadenas y enganché al punto 1 de los separados. Esto crea una sección distinta.
2- Luego fui tejiendo alrededor 15 vueltas de 18 puntos bajos.
1- I separated 12 stitches at the front, made 6 chains, and attached them to the first of the separated stitches. This creates a distinct section.
2- Then I crocheted around, making 15 rounds of 18 single crochets.
Cabeza/Head
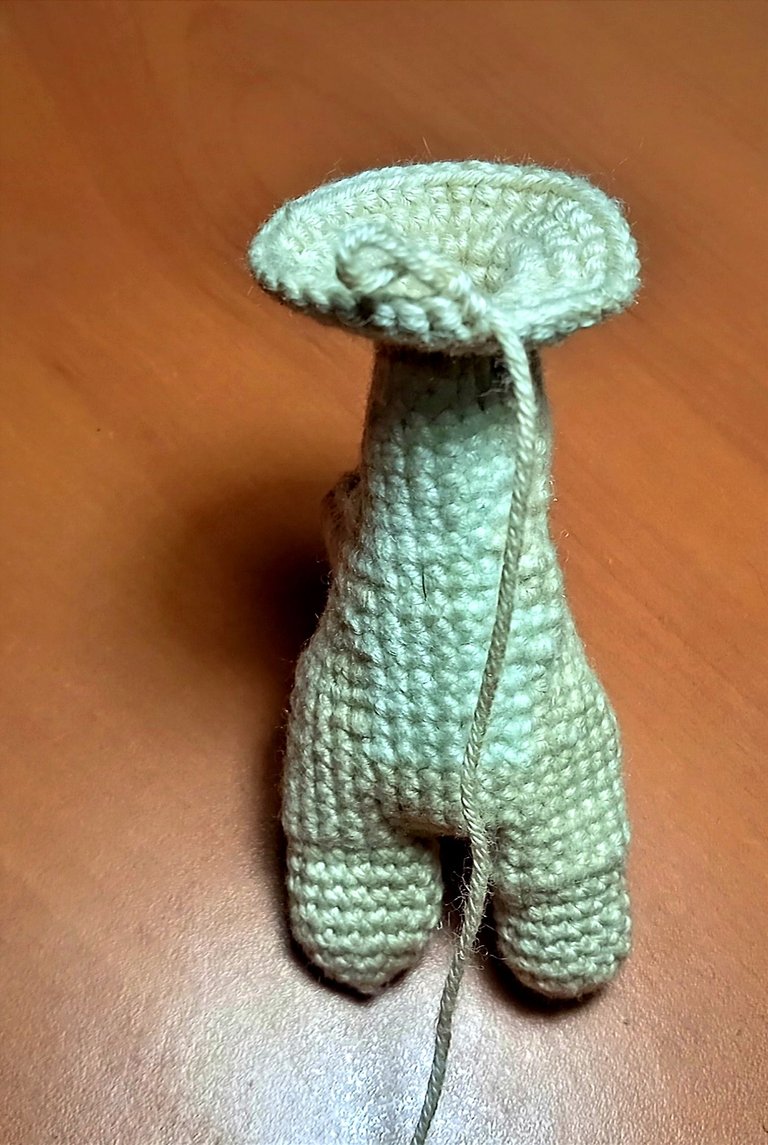
|
|
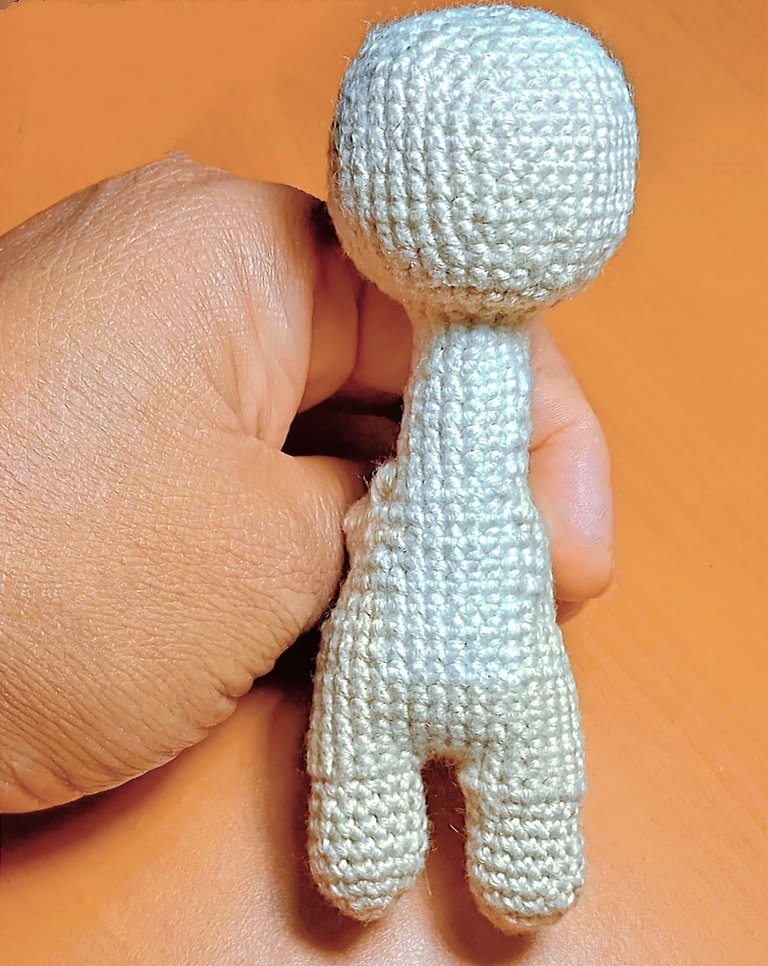
1- Sin cortar el hilo enseguida de terminar el cuello continúe con aumentos, y seguí con una vuelta de puntos bajos.
2- 5 puntos bajos, 1 aumento y luego 6 vueltas de puntos bajos.
3- 5 puntos bajos, 1 disminución, seguí con una vuelta de puntos bajos.
4- 4 puntos bajos, 1 disminución, sigue con una vuelta de puntos bajos.
5- hora de rellenar
6- 3 puntos bajos, 1 disminución
7- 2 puntos bajos, 1 disminución
8- 1 punto bajo, 1 disminución
9- terminando con 6 disminuciones.
1- Without cutting the yarn immediately after finishing the neck, continue with increases, and then follow with a round of single crochets.
2- 5 single crochets, 1 increase, and then 6 rounds of single crochets.
3- 5 single crochets, 1 decrease, followed by a round of single crochets.
4- 4 single crochets, 1 decrease, continue with a round of single crochets.
5- Time to stuff.
6- 3 single crochets, 1 decrease.
7- 2 single crochets, 1 decrease.
8- 1 single crochet, 1 decrease.
9- Finishing with 6 decreases.
Lomo/Back
1- 15 puntos bajos, 3 disminuciones
2- 15 puntos bajos, repetí 2 veces más.
3- Rellené el resto del cuerpo y el cuello antes de cerrar con la aguja tomando las hebras delanteras.
1- 15 single crochets, 3 decreases
2- 15 single crochets, repeat 2 more times.
3- I stuffed the rest of the body and the neck before closing with the needle, taking the front loops.
Orejas (hacer 2)/Ears (make 2)
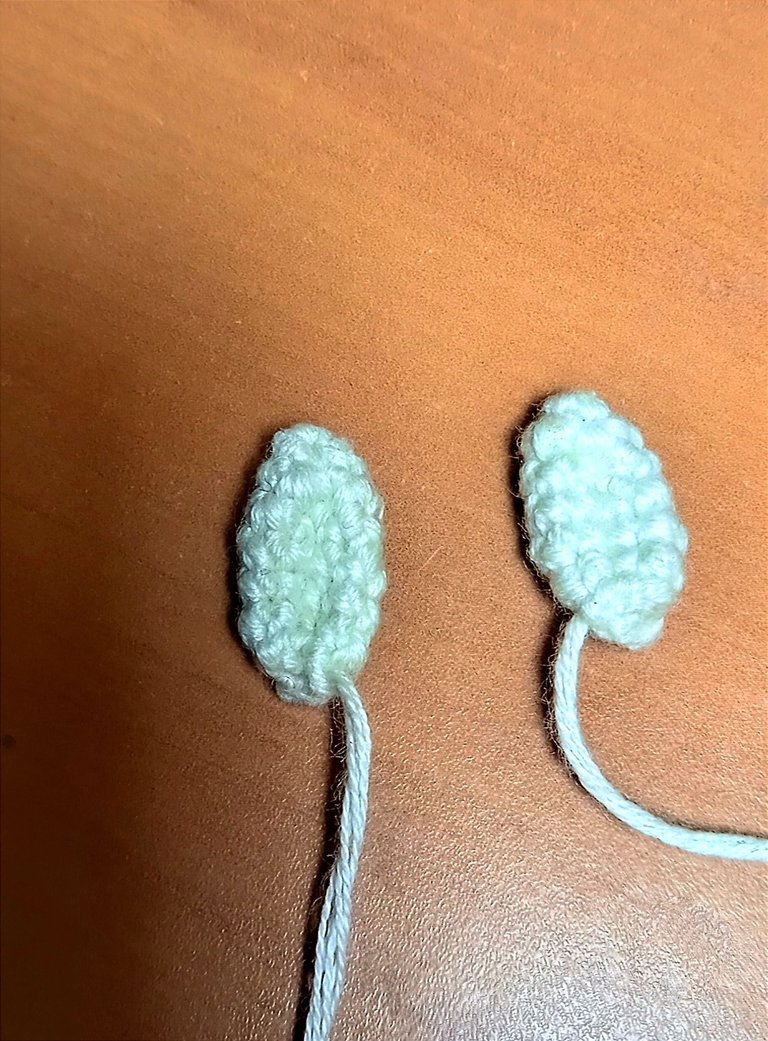
1- Anillo mágico con 6 puntos bajos
2- 6 aumentos
3- 1 punto bajo, 1 aumento
4- 5 vueltas de solo puntos bajos
1- Magic ring with 6 single crochets
2- 6 increases
3- 1 single crochet, 1 increase
4- 5 rounds of only single crochets
Bozal/Muzzle

1- Utilicé hilo gris para tejer 1 anillo mágico con 6 puntos bajos
2- 6 aumentos
3- 1 punto bajo, 1 aumento
1- I used gray yarn to crochet 1 magic ring with 6 single crochets
2- 6 increases
3- 1 single crochet, 1 increase
Cola/Tail
1- Anillo mágico con 6 puntos bajos
2- 6 aumentos
3- 1 punto bajo, 1 aumento
4- 4 vueltas de puntos bajos para una cola más larga.
1- Magic ring with 6 single crochets
2- 6 increases
3- 1 single crochet, 1 increase
4- 4 rounds of single crochets for a longer tail.
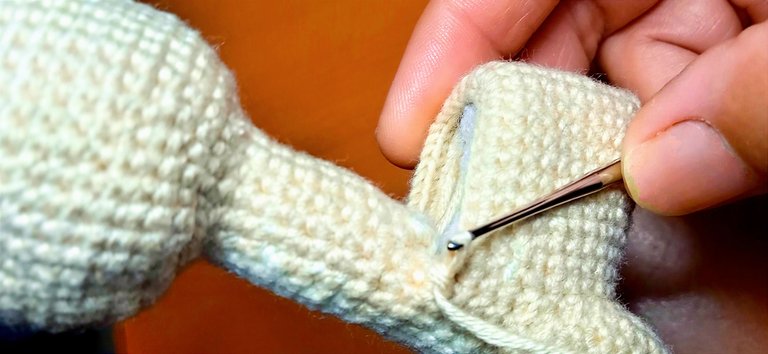
Resultado/Result
|
|
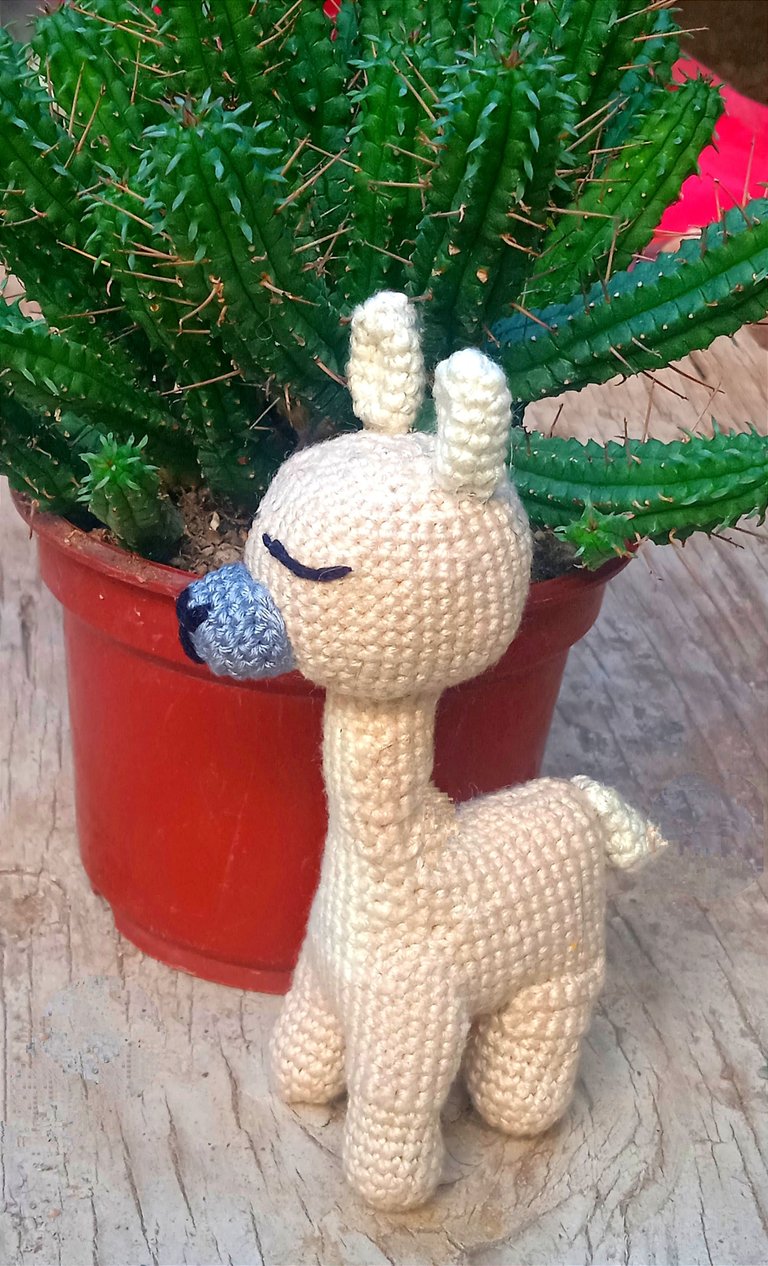
1- Cosí las orejas, la cola, y las dos patas traseras al cuerpo.
2- Borde de ojos con hilo negro y detalles de la nariz.
Olvidé mencionar que utilicé dos colores, ya que el pecho lo hice de color crema. Los guanacos tienen el vientre y el pecho blancos.
1- I sewed the ears, the tail, and the two back legs to the body.
2- I embroidered the eyes with black yarn and added nose details.
I forgot to mention that I used two colors, as I made the chest in cream color. Guanacos have a white belly and chest.
Cada día admiro más este arte, que gran trabajo, te quedo increíblemente genial y tierno.
Muchas gracias 😊
the results sooo great 😍 Yeah, mistake makes you perfect yang can give you valuable lesson. Just do not stop what you are starting. Keep it up!
so cute you are amazing, keep up the good work.
Que gran trabajo, el Guanaco quedó muy bien, se ve genial al lado de los cactus.
Ow! This is so cute!!
Congratulations @jcchelme! You have completed the following achievement on the Hive blockchain And have been rewarded with New badge(s)
Your next target is to reach 25000 upvotes.
You can view your badges on your board and compare yourself to others in the Ranking
If you no longer want to receive notifications, reply to this comment with the word
STOPCheck out our last posts: