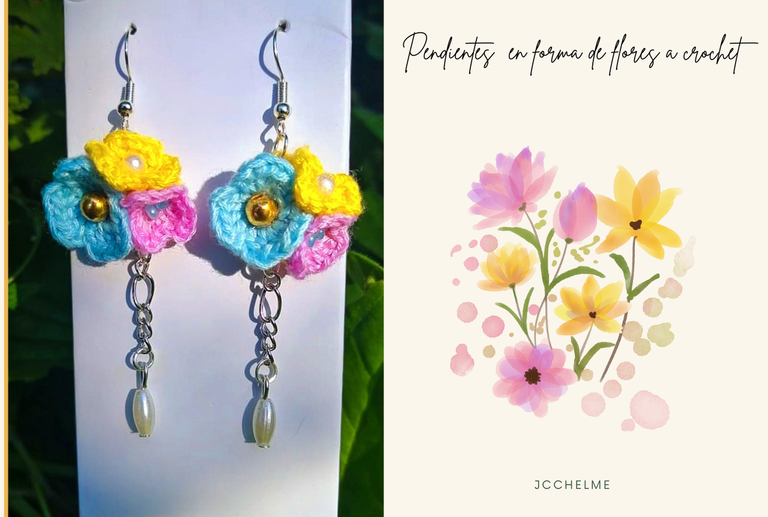
Hola a todos en Hive Diy. Quiero contarles cómo hice unos pendientes lindos en forma de flores. La idea surgió porque quería mezclar crochet y bisutería, pero prefería pendientes pequeños. Así que decidí hacer flores usando un crochet de 0.6 mm y un hilo delgado.
Fue un proceso divertido y creativo. Elegí un crochet pequeño para hacer detalles finos en las flores. Trabajé con un hilo delgado para lograr la delicadeza que buscaba. Me gusta más la bisutería discreta, por eso opté por pendientes pequeños en lugar de grandes.
Hice cada flor con cuidado, usando el crochet y el hilo como herramientas para dar vida a los pétalos. La combinación de destreza y creatividad me permitió no solo hacer joyas bonitas, sino también contar una historia de dedicación meticulosa. Estos pendientes no solo son accesorios, son pequeños tesoros que llevan consigo el encanto de la artesanía. ¡Espero que disfruten de mí creatividad en Hive Diy!
Hello everyone at Hive Diy. I want to tell you how I made some cute flower-shaped earrings. The idea came up because I wanted to mix crochet and jewelry, but I preferred small earrings. So, I decided to make flowers using a 0.6 mm crochet hook and thin thread.
It was a fun and creative process. I chose a small crochet hook to add fine details to the flowers. I worked with thin thread to achieve the delicacy I was looking for. I prefer subtle jewelry, that's why I opted for small earrings instead of large ones.
I crafted each flower carefully, using the crochet hook and thread as tools to bring the petals to life. The combination of skill and creativity allowed me to not only create beautiful jewelry but also tell a story of meticulous dedication. These earrings are not just accessories; they are small treasures carrying the charm of craftsmanship. I hope you enjoy my creativity at Hive Diy!
Materiales / Materials
|
|
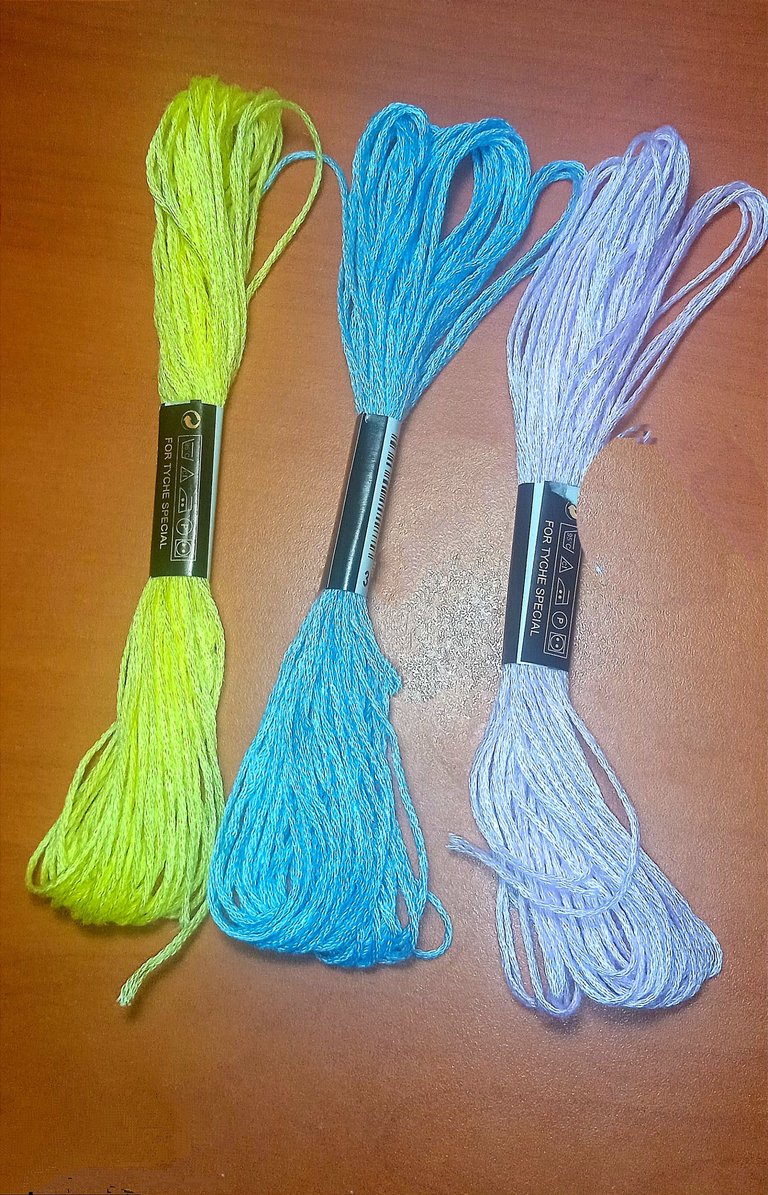
- hilo de bordar color amarillo
- hilo de bordar color fucsia
- hilo de bordar color celeste
- crochet número 0.6 mm
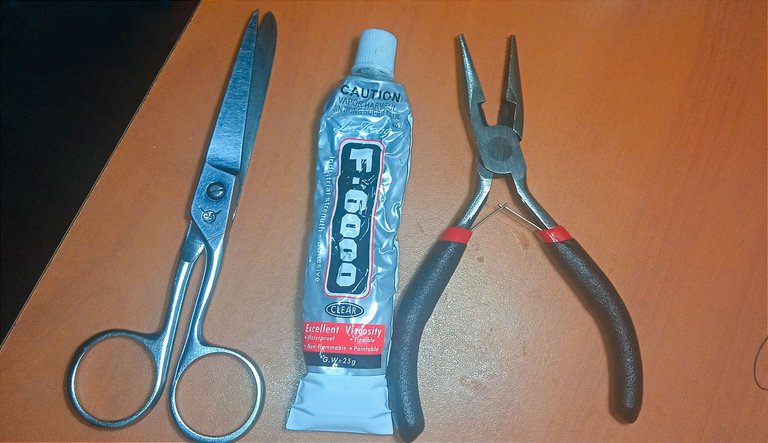
- Tijeras
- Pegamento para bisutería
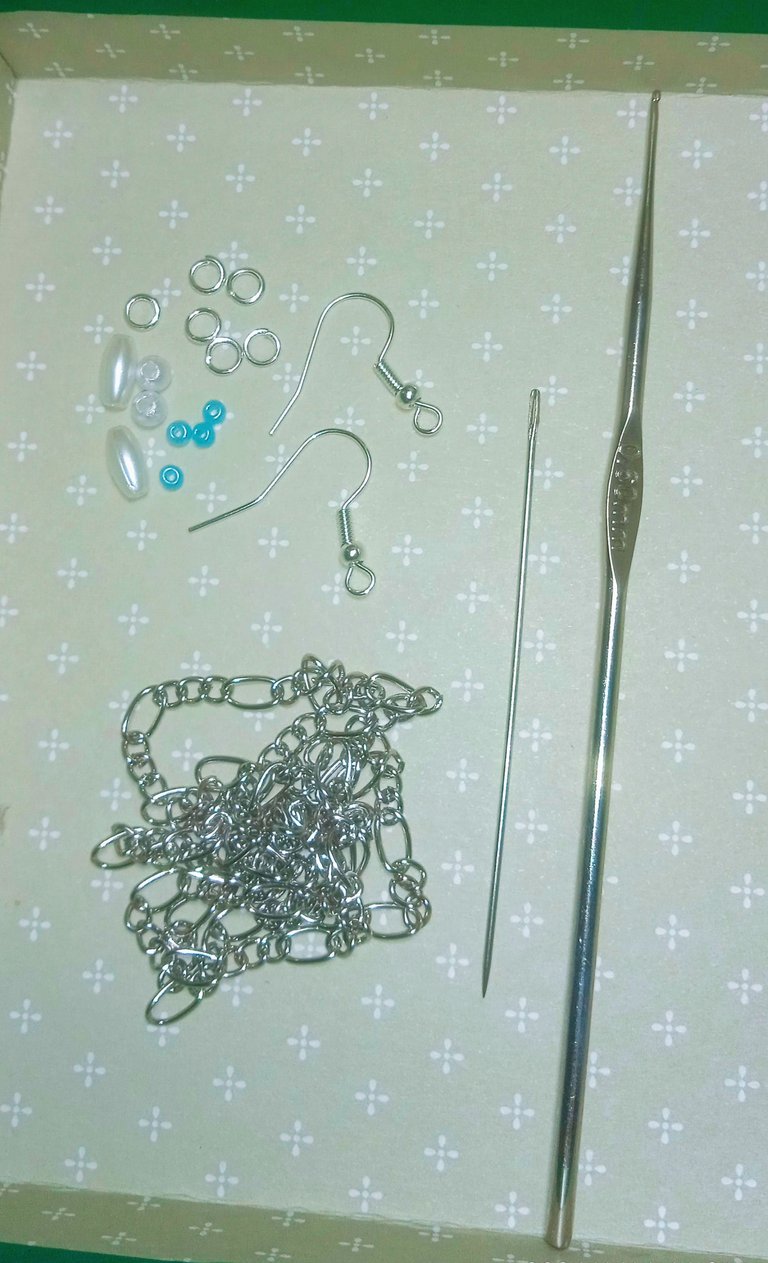
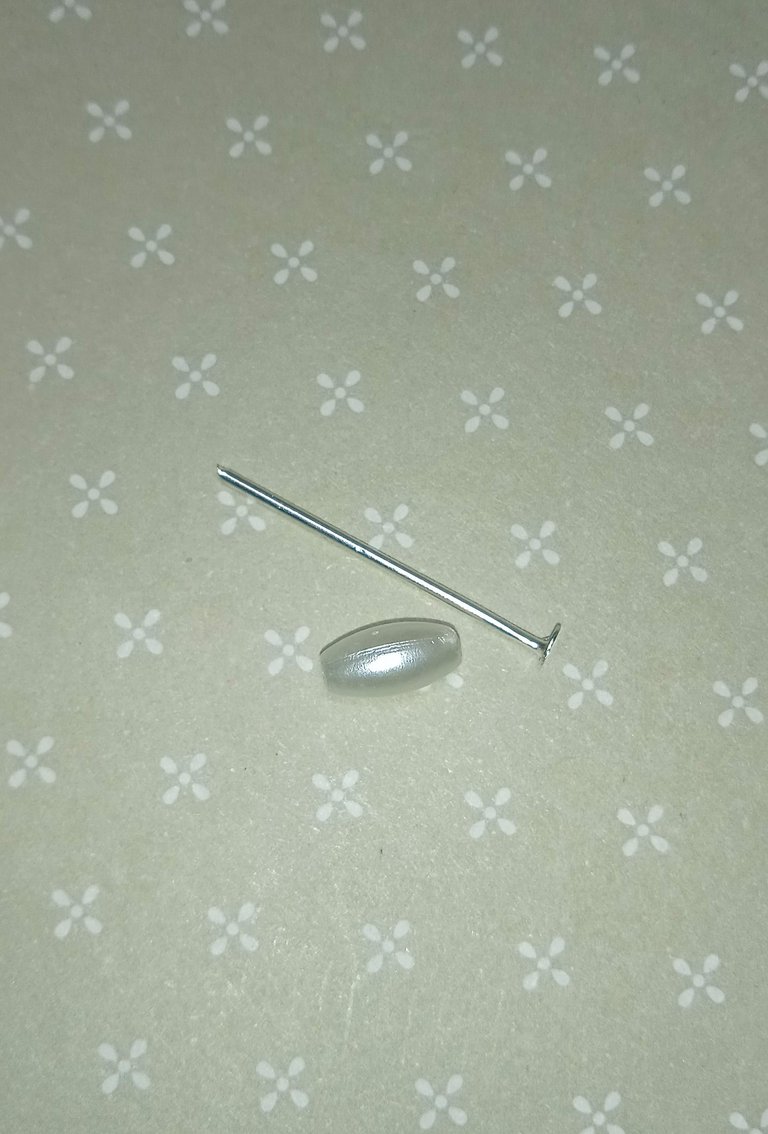
- 2 perlas forma de gota, 2 redondas y 4 mostacillas celestes
- 6 argollas pequeñas
- 2 ganchos para pendientes
- 1 alicate para bisutería
- 1 trozo de cadena
- 2 pasadores de cabeza plana
- aguja
- Yellow embroidery thread
- fuchsia embroidery thread
- Sky blue embroidery thread
- 0.6 mm crochet hook
- Scissors
- Jewelry glue
- 2 teardrop-shaped pearls and 2 round pearls
- 6 small jump rings
- 2 earring hooks
- 1 jewelry pliers
- 1 piece of chain
- 2 flat headpins
- Needle
Elaboración / Elaboration

|
|
|
|
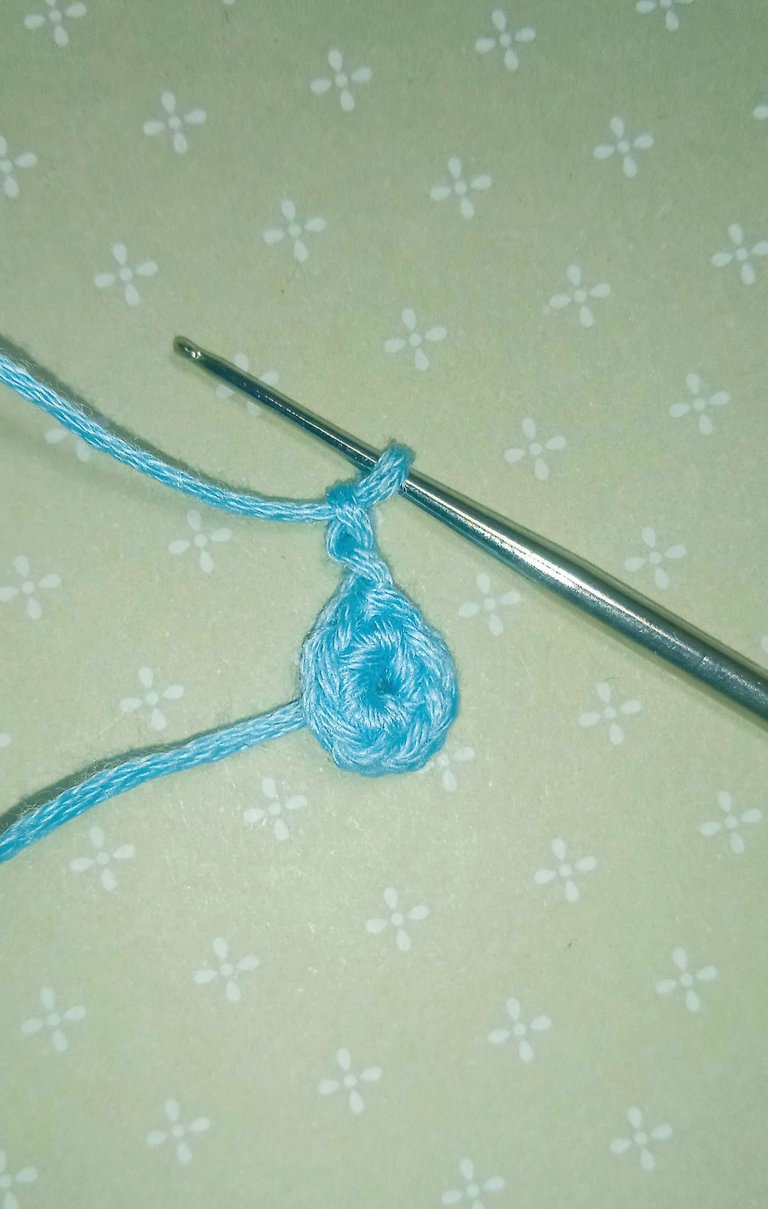
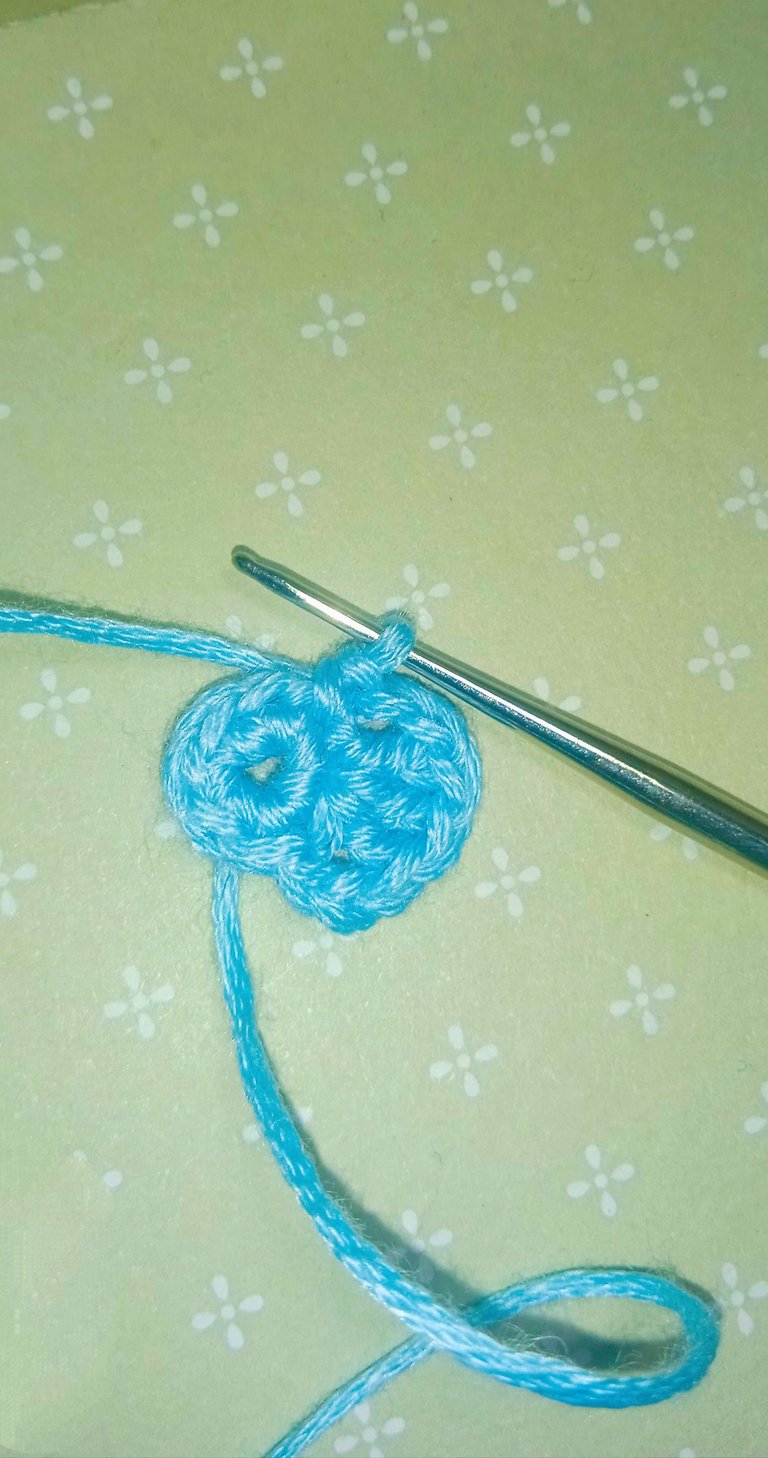
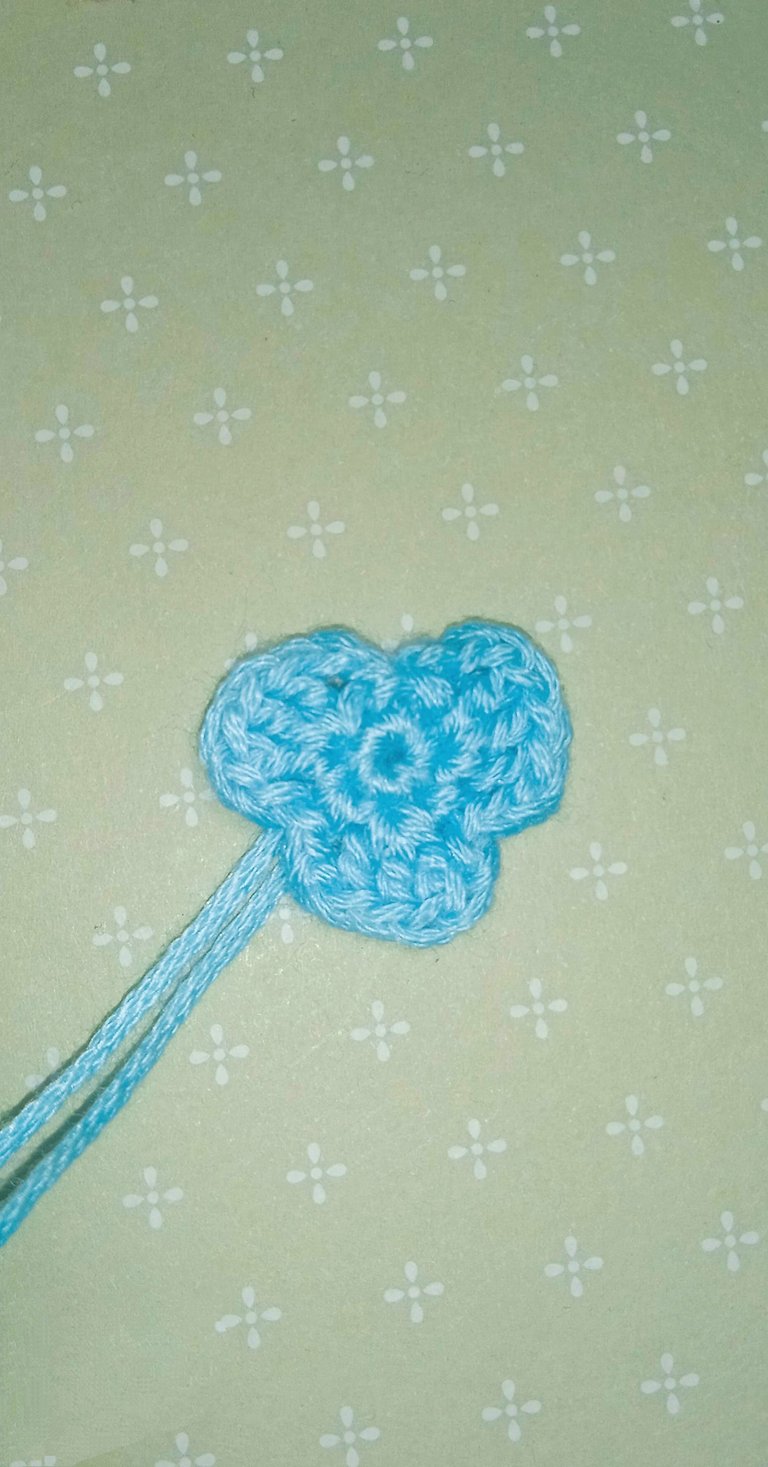
Comencé con el hilo celeste haciendo un anillo mágico y 6 puntos bajos, para luego continuar con está secuencia para hacer cada pétalo:
Levanté 2 cadenas, e hice 3 varetas (punto alto) en el siguiente punto. Para terminar levanté 2 cadenas nuevamente e hice un punto bajo.
Esto lo repetí hasta tener 3 pétalos exactos.
I started with the light blue yarn by making a magic ring and 6 low stitches. Continue with this sequence to make each petal:
I picked up 2 chains, and made 3 varettes (high stitch) in the next stitch. To finish I picked up 2 chains again and made a single crochet.
I repeated this until I had exactly 3 petals.

|
|
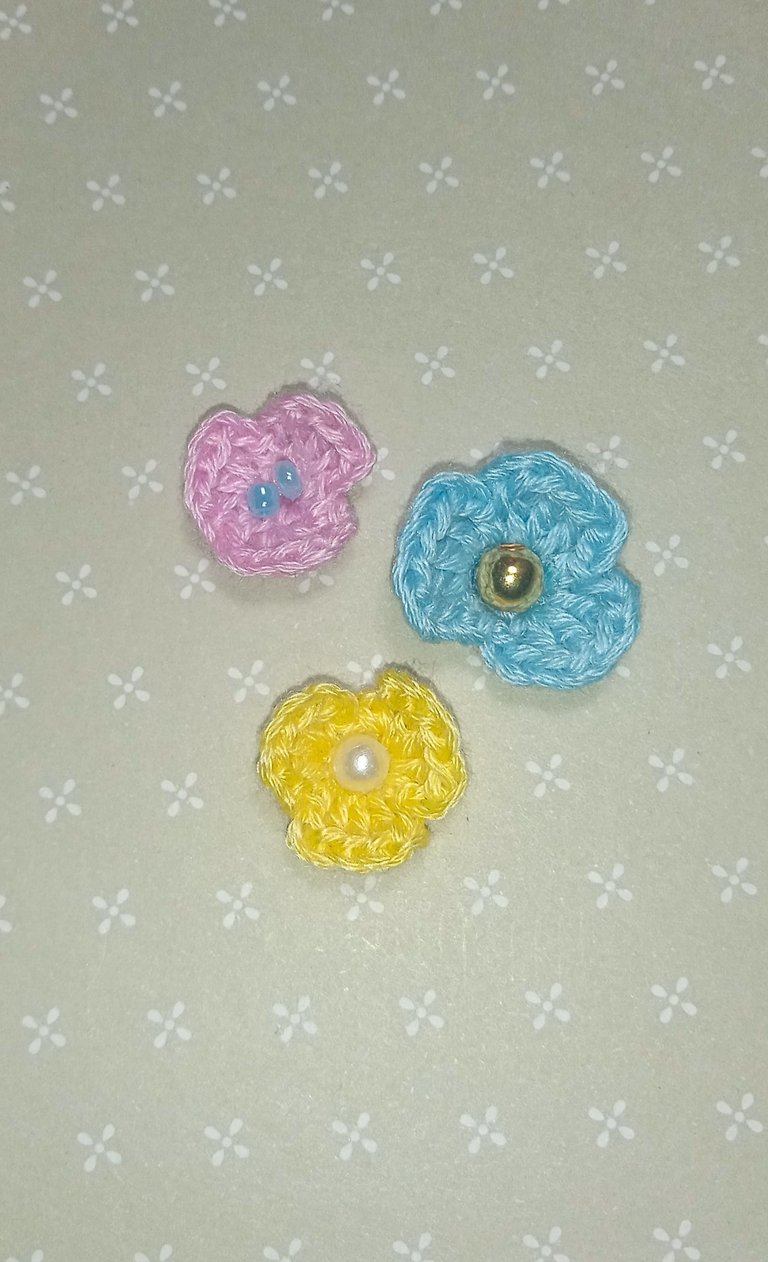
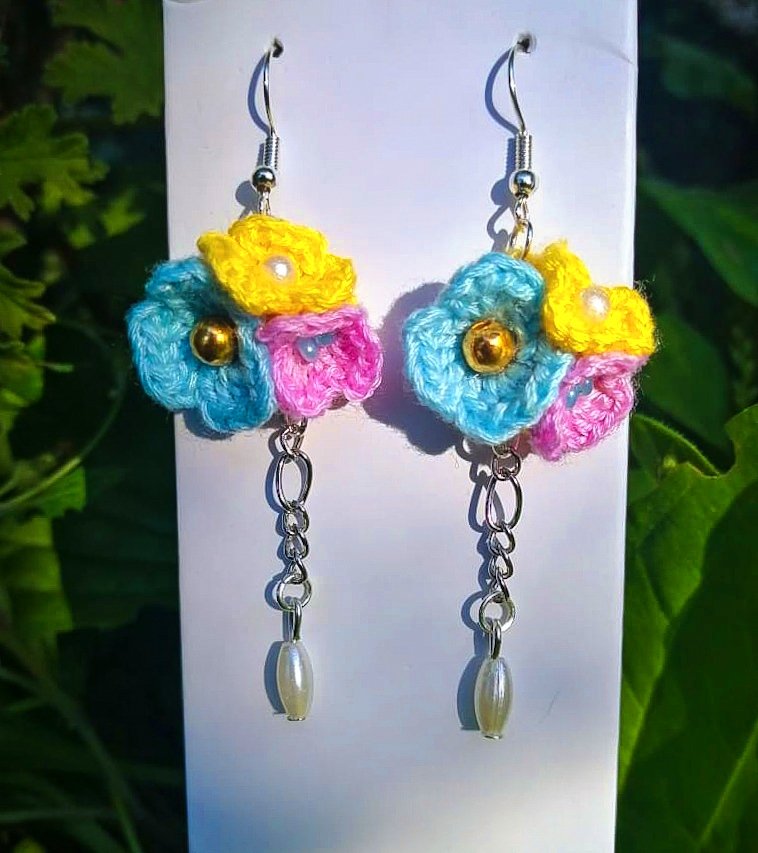
Hice 3 flores de distintos colores cada una, con el mismo patrón. Aunque dos las tejí más pequeñas, y luego a cada una de ellas le coloque una perla en el centro, las cuales pegué.
I made 3 flowers of different colours each, with the same pattern. But I made them smaller, and then I put a pearl in the centre of each of them, which I glued.
|
|
|

|

|
|
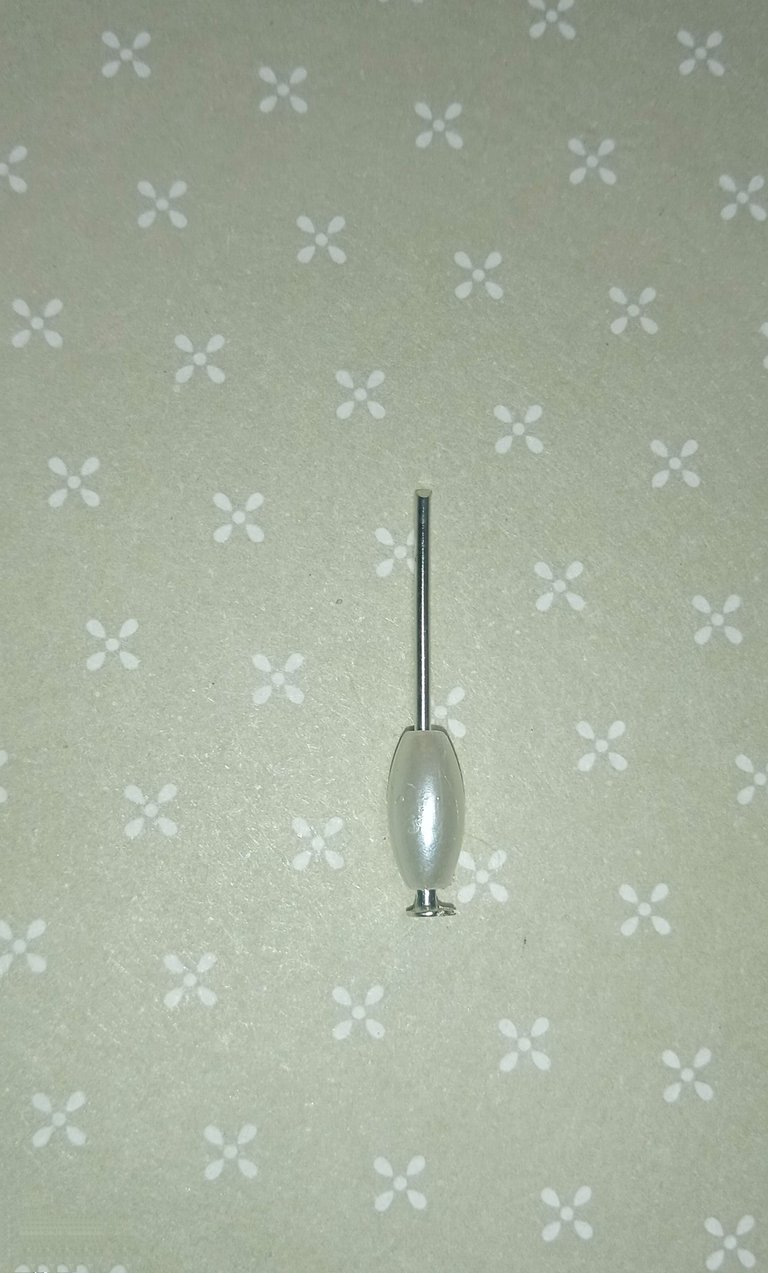
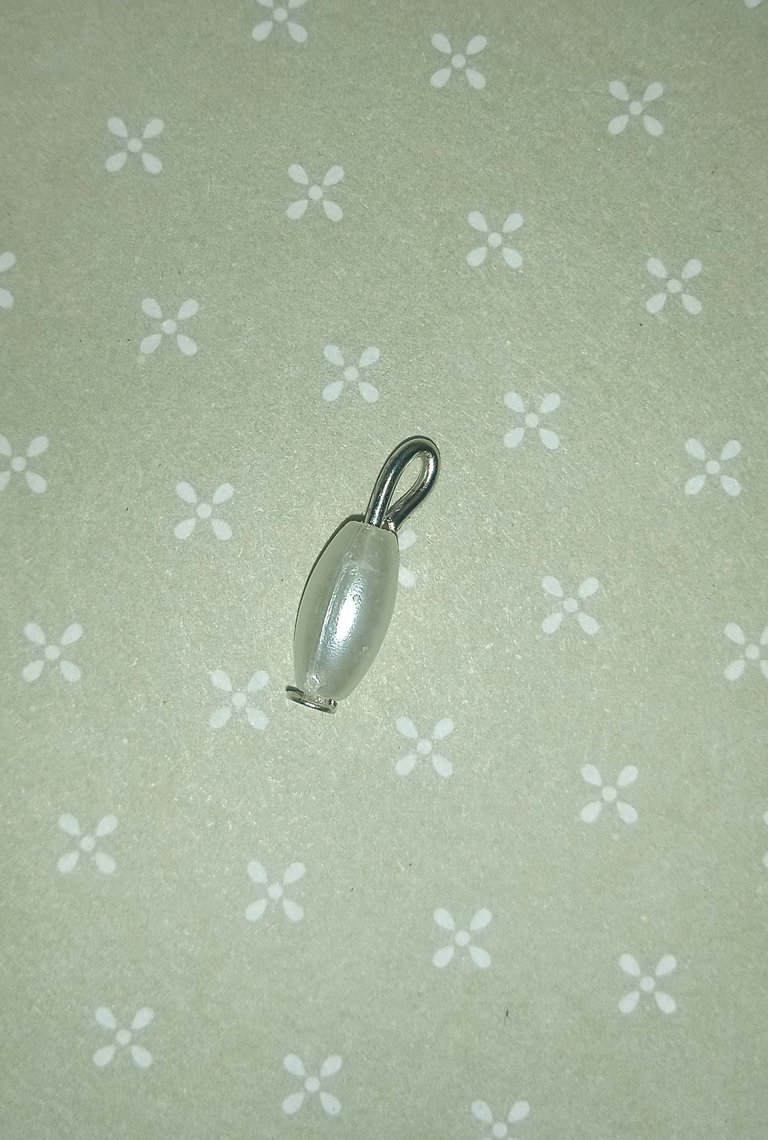
Luego introduje el pasador de cabeza plana en las perlas ovaladas, y con el alicate le hice un ojal. Dónde con una argolla uní la perla con la cadena.
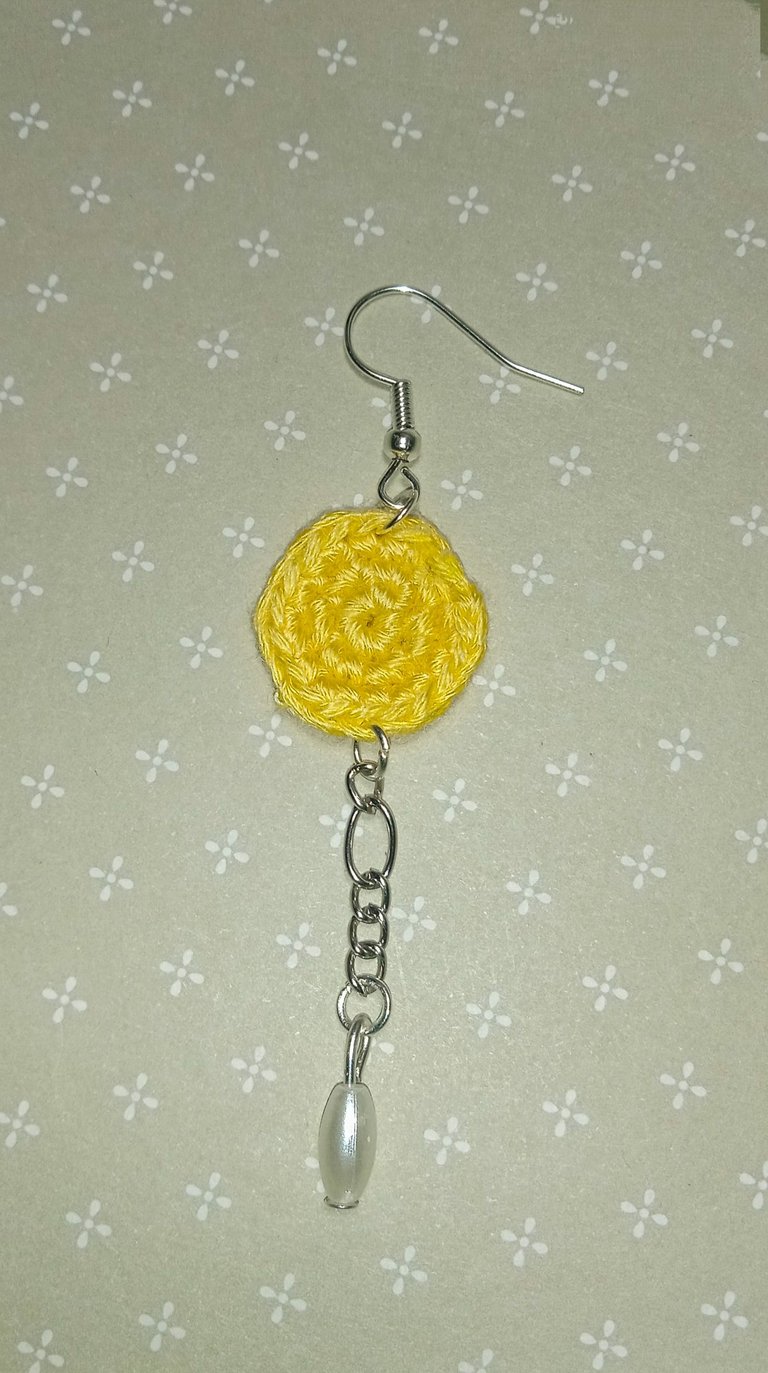
Confeccioné con el hilo amarillo un círculo tejido a crochet.
Para ello hice un anillo mágico, con 6 puntos bajos. En la segunda vuelta teji solo aumentos, quedando con 12 puntos en total.
Para la tercera vuelta hice una secuencia de: 1 punto bajo, 1 aumento y cerré con un punto deslizado.
Entonces a esta pieza le coloque la cadena que prepare anteriormente, y también el gancho.
Then I inserted the flat-headed pin into the oval beads, and with the pliers I made an eyelet. I attached the pearl to the chain with a ring.
With the yellow thread I made a crocheted circle.
For this I made a magic ring, with 6 single crochet stitches. In the second row I knitted only increases, leaving 12 stitches in total.
For the third row I made a sequence of: 1 single crochet, 1 increase and closed with a slip stitch.
Then to this piece I attached the chain I prepared earlier, and also the hook.
|
|
Por último pegue cada flor en la base amarilla.
Mientras tejía no me gustó el color lila, para la flor pequeña, así que cambie por un color fucsia. Es por ello que la fotografía de los materiales tiene un lila en vez de un fucsia.
Espero que les guste el resultado. 🤗
Finally I glued each flower on the yellow base.
While weaving I didn't like the lilac colour for the small flower, so I changed it to a fuchsia colour. That's why the picture of the materials has a lilac instead of a fuchsia.
I hope you like the result. 🤗

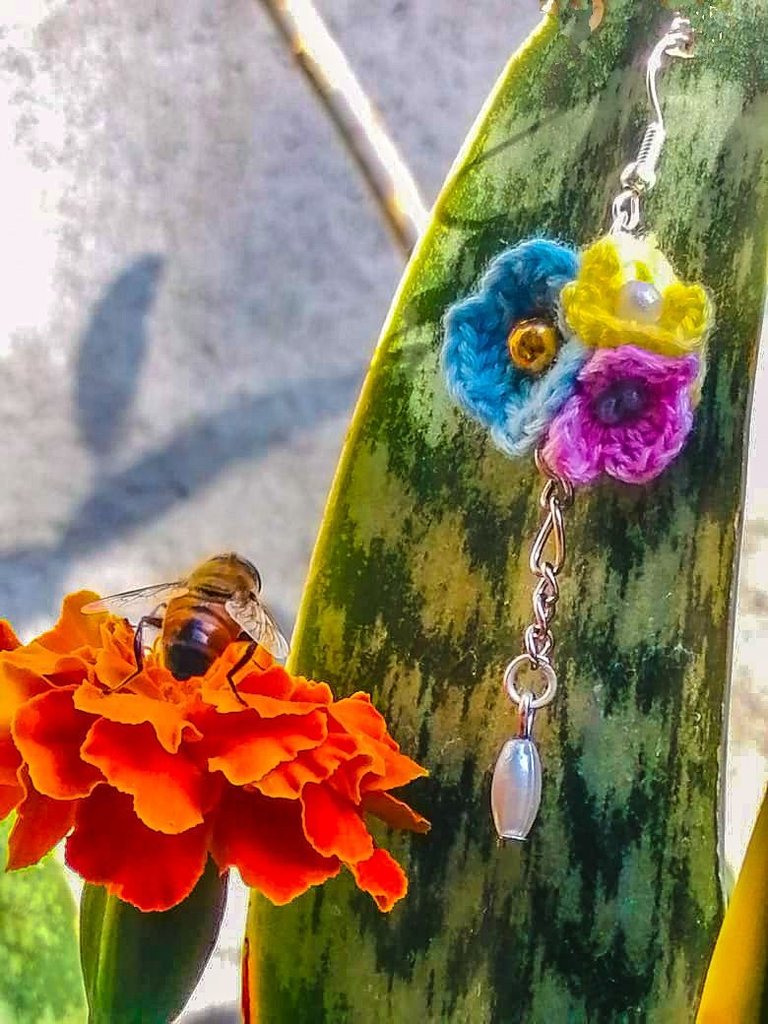
Las imágenes del resultado fueron tomadas para mí por la usuaria de Hive @alejandralita. Me gustó que justo había una abeja, como sí estubiera observando las flores a crochet para tomar su nectar y polen. Gracias 😊🐝
The photos of the result were taken by Colmena user @alejandralita. I liked that there was only one bee, as if it was watching the crocheted flowers to take their nectar and pollen. Thank you 😊🐝
Te quedaron bonitos los pendientes. Un paso a paso detallado y con buenas fotos.
Saludos @jcchelme
Muchas gracias 😊
Congratulations, your post has been upvoted by @dsc-r2cornell, which is the curating account for @R2cornell's Discord Community.
Enhorabuena, su "post" ha sido "up-voted" por @dsc-r2cornell, que es la "cuenta curating" de la Comunidad de la Discordia de @R2cornell.
¡¡¡Buen trabajo!!! Gracias por publicar tu excelente contenido en Hive Diy.
Están muy bonitos me gustan mucho
Estan re lindos y la foto con la abeja le da el toque natural. 🌼🏵️
😉🌸🐝