Buenas, buenas por aquí, gente linda de Hive, les deseo un maravilloso dia. Cargado de buena vibra, de mucha alegria y sobre todo mucho amor. El dia de hoy les voy a compartir un lindo paso a paso, de la confeccion de un hermoso vestido de girasol, esta vez para una preciosa nena de 3 años.
Hello, hello here, beautiful people of Hive, I wish you a wonderful day. Full of good vibes, lots of joy and above all lots of love. Today I'm going to share with you a nice step by step, of the making of a beautiful sunflower dress, this time for a beautiful 3 years old baby girl.
Ya con este tipo de tejidos, he creado diversos estilos y modelos, los cuales mas adelante les compartire un lindo video con todos mis trabajos realizados en estos bellos estampados. Debo decir que su composicion no es de mis favoritas. Pero la gama de colores me flipa, es una belleza. Cada creacion con estos estampados es un extasis a los ojos.
Already with this type of fabrics, I have created several styles and models, which later I will share a nice video with all my works made in these beautiful prints. I must say that their composition is not one of my favorites. But the range of colors flip me, it's a beauty. Each creation with these prints is an ecstasy to the eyes.
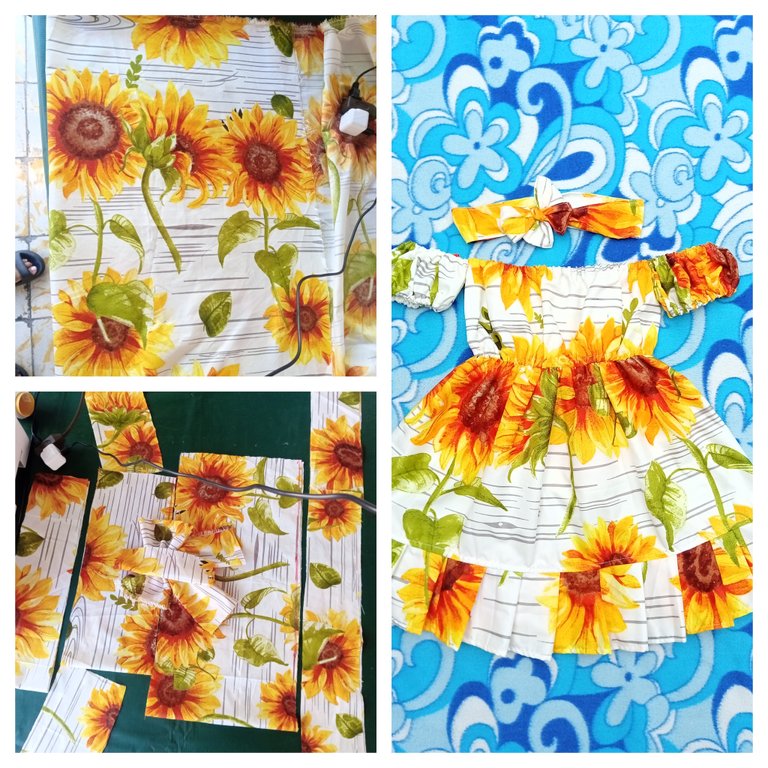
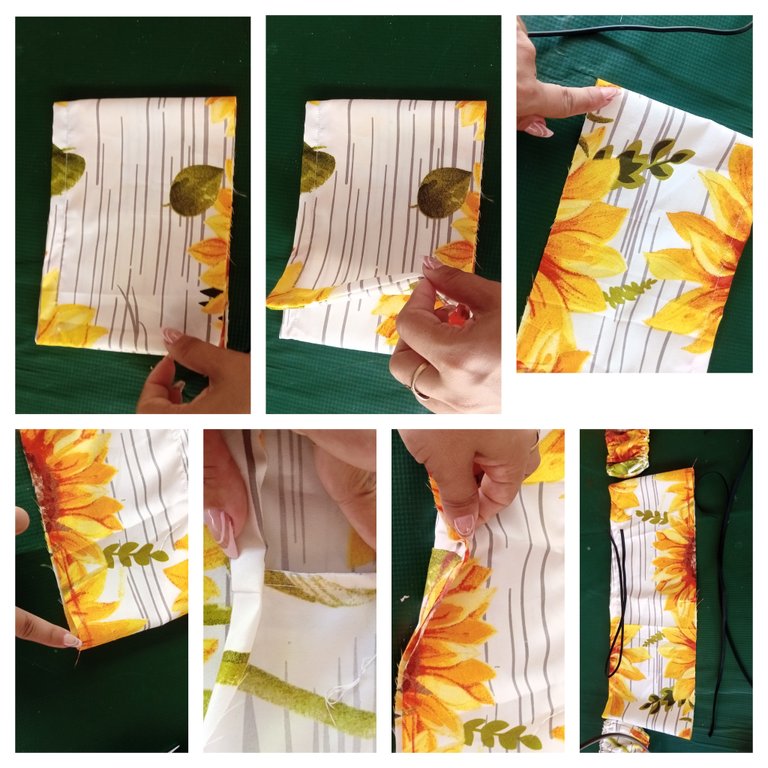
Aquí les dejo un minitutorial, con un pequeño collage de fotos, mostrando el paso a paso del mismo y los materiales que utilice para recrear esta prenda. Para los amantes del reto y la costura, espero que les sirva y ayude en sus creaciones futuras.
Here is a mini tutorial, with a small collage of photos, showing the step by step and the materials I used to recreate this garment. For those who love the challenge and sewing, I hope it will help you in your future creations.
Materiales / Materials
sunflower fabric
Scissors
Thread and needle
Elastic
Measuring tape
Pins
Sewing machine
Procedimiento:
1er paso:
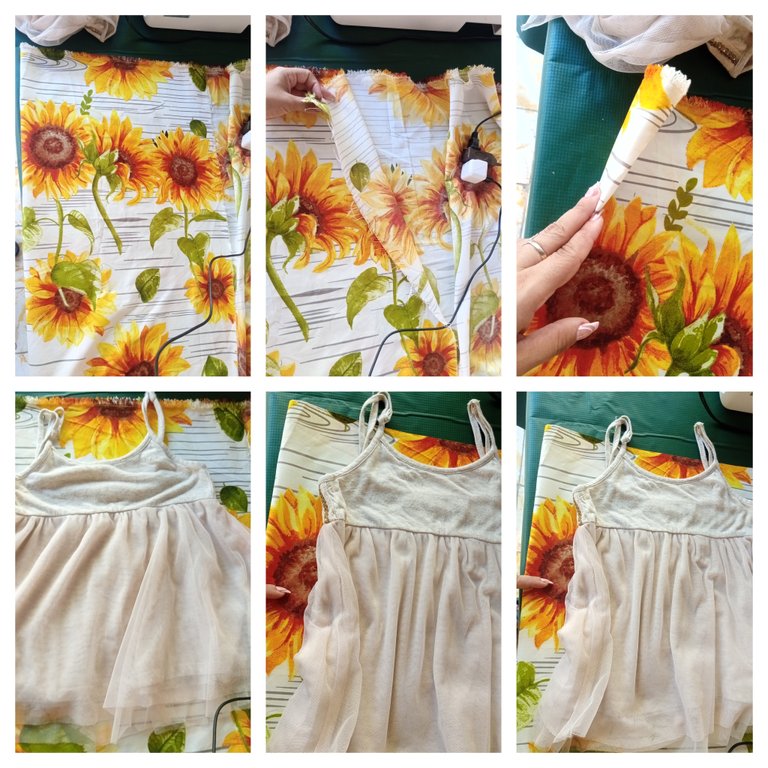
Doblar la tela a la mitad, dejando las dos caras de al derecho por dentro. Luego coloque una muestra de un vestidito de la niña por encima de la tela, para tener un aproximado del ancho y el largo de la pieza que se va a realizar.
Procedure:
1st step:
Fold the fabric in half, leaving the two sides right sides together on the inside. Then place a sample of one of the girl's dresses on top of the fabric, to get an approximation of the width and length of the piece to be made.
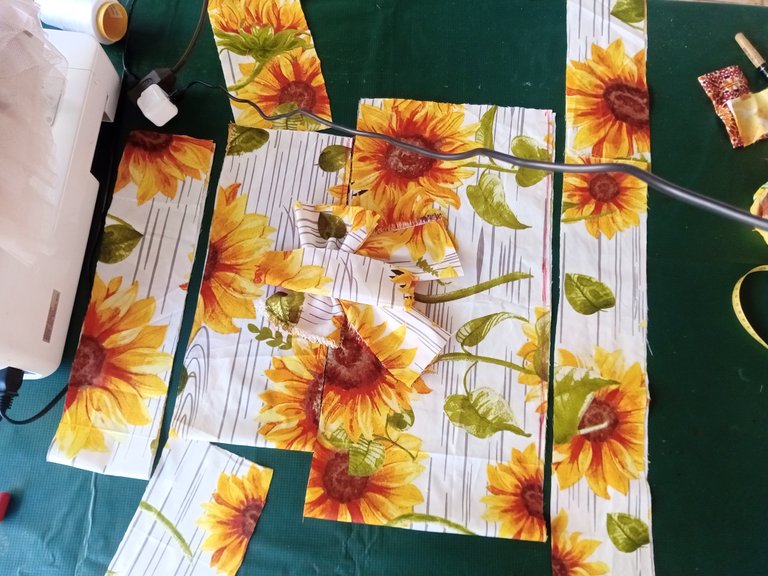
2do paso:
Medi la tela, dividiendola en total en tres partes: crop top con manguitas, seguido de una falda y un vuelo largo que adorne la parte baja del vestido. Al igual que unos retazos para conformar un lazo que adornara la parte tracera del vestido y una linda cinta como accesorio final para adornar el cabello.
2nd step:
Measure the fabric, dividing it in total into three parts: crop top with sleeves, followed by a skirt and a long flounce that adorns the bottom of the dress. As well as a few pieces to form a bow to adorn the back of the dress and a pretty ribbon as a final accessory to adorn the hair.
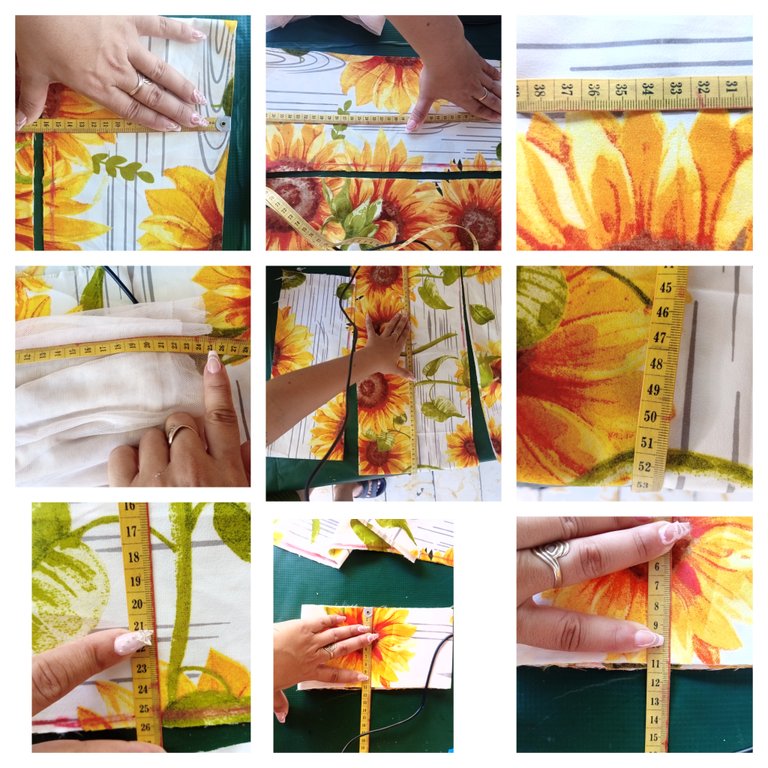
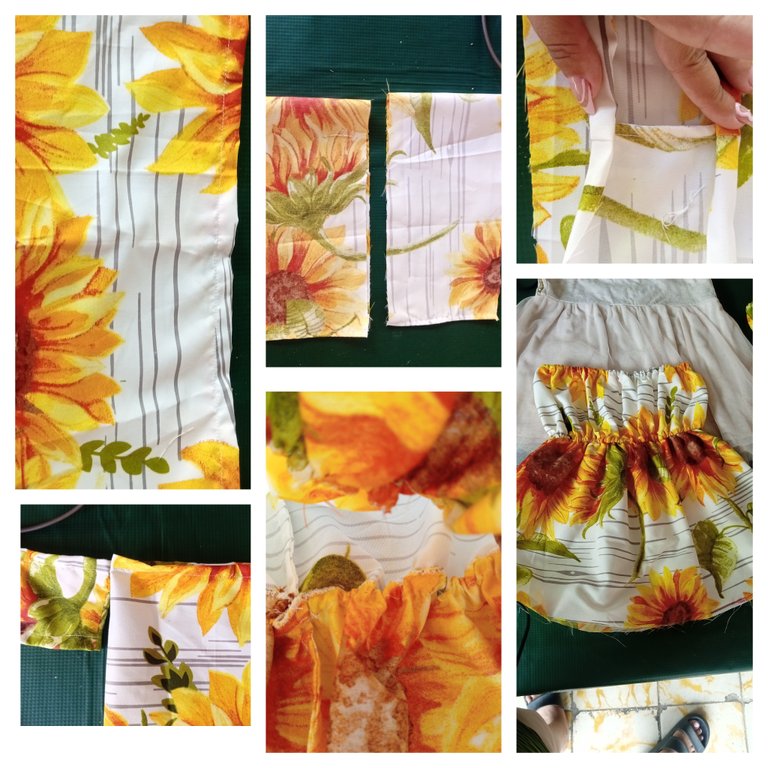
Para el 1er corte realizado, correspondiente con la parte superior. Corte un liston de 16cm de largo x 40cm de ancho.
Para el 2do corte, correspondiente con la parte inferior, necesite otro liston mas grande con aproximadamente 25cm de alrgo x 53cm de ancho.
Para el 3er corte, esta vez ,mas estrecho, pero mucho mas largo, para poder risarlo a la hora de realizar el vuelo.
For the 1st cut made, corresponding to the upper part. Cut a 16cm long x 40cm wide strip.
For the 2nd cut, corresponding to the lower part, I needed another larger strip approximately 25cm long x 53cm wide.
For the 3rd cut, this time, narrower, but much longer, to be able to pray it at the time of the flight.
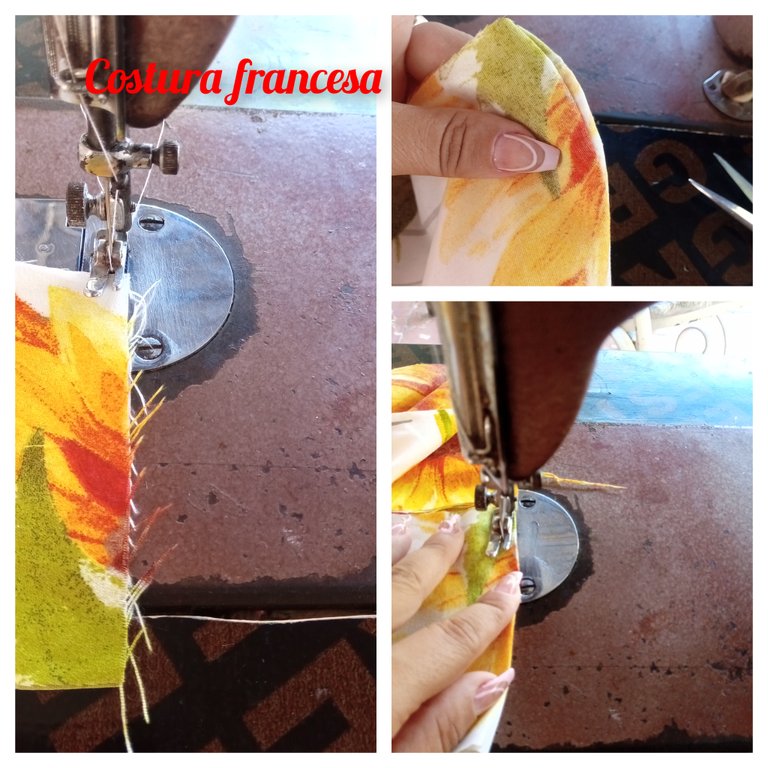
3er paso:
Cosi todos los listones por separado. Uniendo revez con reves al final. Porque para trabajar con estos tejidos que tienden a desilarse, prefiero realizar una costura francesa. Creo que es asi como le dicen. Y realice todo el bajo del vuelo, antes de unirlo con la parte baja, que corresponde con la falda.
Step 3:
Sew all the ribbons separately. Joining back to back at the end. Because to work with these fabrics that tend to fray, I prefer to make a French seam. I think that's how they call it. And I made all the bottom of the hem, before joining it to the bottom, which corresponds to the skirt.
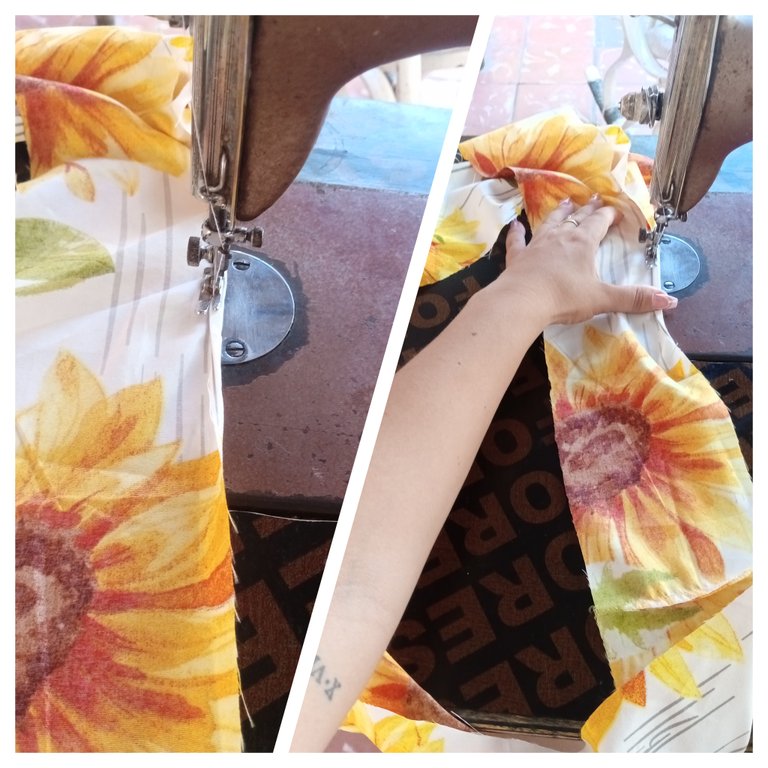
4to paso:
Coloque la parte inferior o sea el crop top x encima de la parte inferior. Siempre, marcando 4 puntos, para que queden siempre bien distribuido el vestido . Apuntando reves con derecho. Una vez colocado los alfileres por todo ese borde. Pase la costura, lo voltie, quedando asi el derecho con el derecho. Como la parte de abajo es mas ancha, hay que ir rizando la tela a medida que se va cociendo.
4th step:
Place the bottom part or the crop top x on top of the bottom part. Always, marking 4 points, so that the dress is always well distributed. Pointing back to back with right. Once placed the pins all along that edge. Pass the seam, I turned it over, leaving the right side with the right side. As the bottom is wider, you have to go curling the fabric as it is cooked.

5to paso:
Acente la costura, con una larga puntada por todo el borde, y realice el mismo procedimiento pero dejando 3cm de ancho. Para luego pasar el elastico por dentro de la misma.
5th step:
Acente the seam, with a long stitch all around the edge, and perform the same procedure but leaving 3cm wide. Then pass the elastic through the inside of the seam.

6to paso:
Realice un dobladillo de 2cm aporximadamente por toda la parte superior del vestido, o sea por lo correspondiente al crop top. Para luego pasar un elastico por todo el contorno.
6th step:
Make a hem of approximately 2cm around the top of the dress, that is, around the top of the crop top. Then pass an elastic around the whole contour.
7mo paso:
Doble el vestido en 4, la parte de abajo, y marque los 4 lados iguales. Lo mismo hice con el vuelo, para que quedara bien distribuido los mismos. Esos vuelos los fui montando uno encima el otro( con las imágenes, lo comprenderan mejor) pase costura por todo el borde y celle con un tik tak. Para darle un mejor acabado.
7th step:
Fold the dress in 4, the bottom part, and mark the 4 equal sides. The same thing I did with the flounce, so that they would be well distributed. I mounted those flights one on top of the other (with the pictures, you will understand it better) I sewed all around the edge and sewed with a tik tak. To give it a better finish.
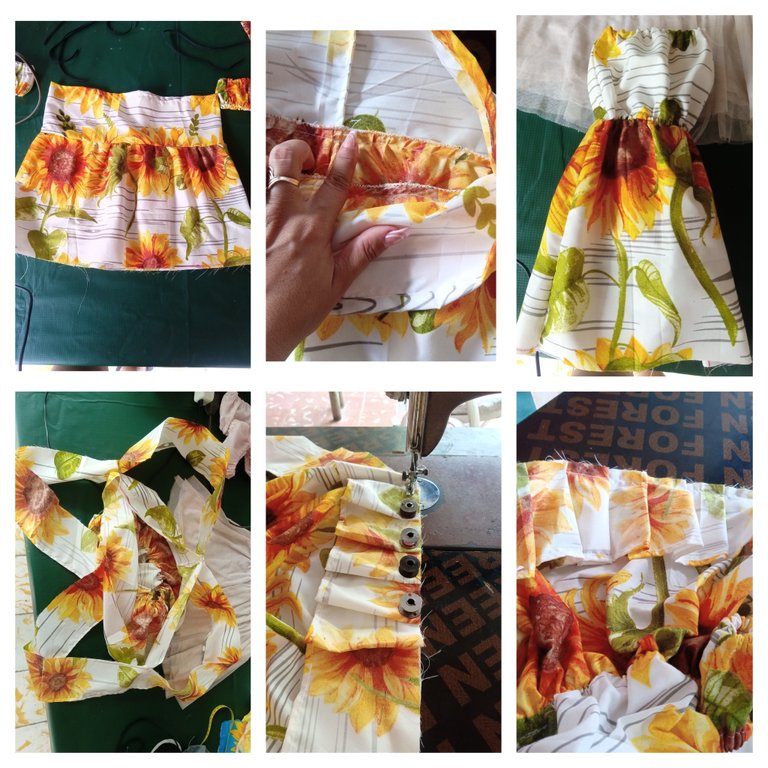
8vo paso:
Recorte dos pedazos de tela de 24cm de ancho y 10cm de alto. Las cerre, luego le realice los bajos, o sea los dobladillos, uno de ellos de cada manga debe de ser mas ancho que el otro. De ese modo luego se podra pasar el elastico por la misma. Para finalmente colocarlas a los dos costados del vestico, por la parte de arriba.
Step 8:
Cut two pieces of fabric 24cm wide and 10cm high. Close them, then make the hems, one of them of each sleeve should be wider than the other. That way the elastic can then be passed through the sleeve. To finally place them on the two sides of the dress, at the top.
9no paso:
Con los retasos sobrantes confeccione el lazo y la cinta para el cabello.
9th step:
With the leftover scraps make the bow and headband.

Resultado:
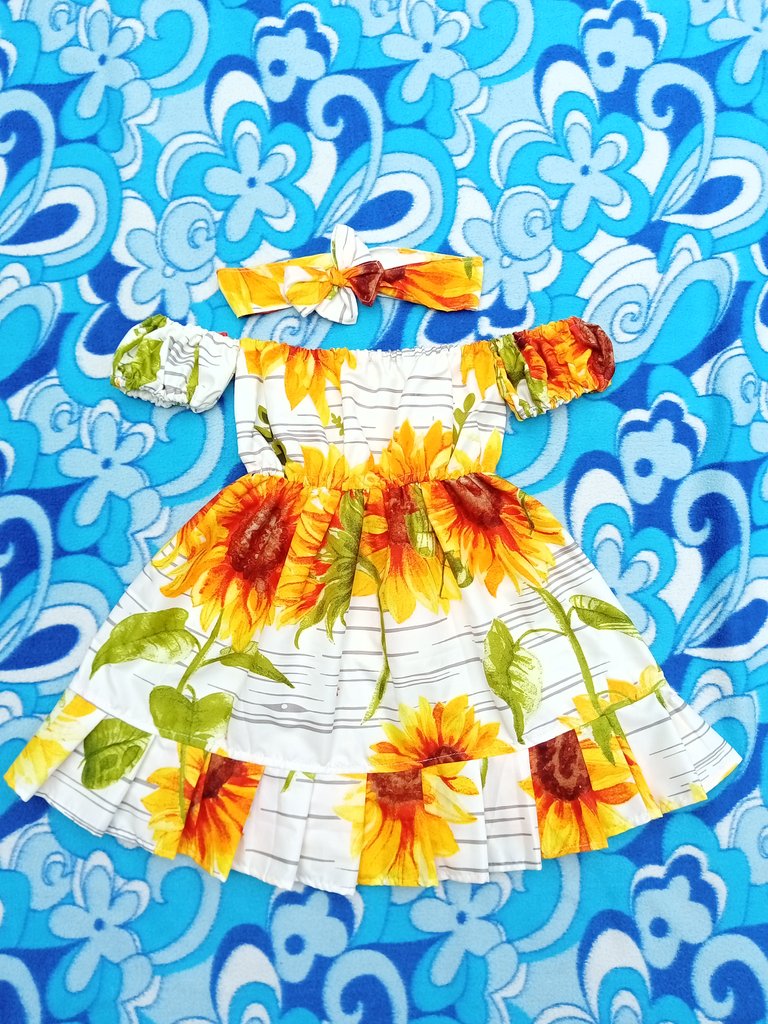

De esta manera se puede crear un lindo vestido, no formal, a la moda, en tendencia y sobre todo, una prenda ideal para convinarlo con cualquier tipo de calsado, siempre a comodidad del que lo porte.
Result:
This way you can create a nice dress, not formal, fashionable, trendy and above all, an ideal garment to match it with any type of outfit, always at the comfort of the wearer.
Espero que les alla gustado y les sirva de alguna ayuda este pequeño minitutorial. Pido disculpas si no se entiende bien alguna informacion, pues nos soy muy buena explicando estos procedimientos. Gracias de antemano, espero y os guste mi contenido, y agradeceria que dejaran sus lindos comentarios y se aventuraran conmigo en este proyecto. Bendiciones y lindo dia.
I hope you liked it and I hope this little mini tutorial will be of some help to you. I apologize if some information is not well understood, because I am not very good at explaining these procedures. Thank you in advance, I hope you like my content, and I would appreciate if you could leave your nice comments and venture with me in this project. Blessings and have a nice day.
El texto o resumen es totalmente de mi autoria.
The text or summary is entirely my own.
Congratulations @karoly! You have completed the following achievement on the Hive blockchain And have been rewarded with New badge(s)
Your next target is to reach 1750 upvotes.
You can view your badges on your board and compare yourself to others in the Ranking
If you no longer want to receive notifications, reply to this comment with the word
STOP🤞🙏
👍👍
so cute summer dress :)
also, she looks happy to use that :)
anyway, please increase your engagement activities on Hive by visiting and commenting on other posts. we must support each other. also, you can reach more people to make your content can be read by people.
🙏🤞
🤞🙏
Lindo trabajo Amor 🌹👏
Gracias amor 🙏🤞🙃