
Buen dia gente linda y creativa de @hivediy!
Feliz y contenta por estar de vuelta ante esta gran familia compartiendo mis últimos proyectos textiles. Lluvia de bendiciones y puras cosas buenas.
El dia de hoy os traigo un lindo tutorial del diseño y confeccion de un pantalón acompañado de un chaleco, creado con ropa reciclada y un recorte de camuflaje.
Acompañame en esta linda creación...
Good morning, beautiful and creative people of @hivediy!
I'm so happy to be back with this amazing family, sharing my latest textile projects. Wishing you all the best and blessings! Today I'm bringing you a lovely tutorial on designing and sewing a pair of pants and a matching vest, created with recycled clothing and camouflage fabric scrap.
Join me in this fun creation...
Debo decir como siempre digo, que ame hacer este tipo de trabajo, hacia mucho moria por ejecutarlo, pero no me animaba y en muchas ocasiones comenzaba con otro proyecto, dejando a un lado ese.
Para su ejecución decidi hacer algo diferente, imagine varios diseños y los fui haciendo en una hoja, con una mejor vista eleji uno de los dos y comece a recortar los tejidos, asegurandome que cada pieza encajara bien y le diera un toque unico.
Su composición resulto ser bien entretenida y un poco compleja en comparación a otros proyectos que habia ejecutado. Pues debian quedar bien encajados para no desalinear y malformar la silueta.
Ya lista cada pieza, pues solo faltaba hacer la magia y crear.
I must say, as I always do, that I loved doing this kind of work. I'd been dying to do it for a long time, but I never got around to it, and many times I'd start another project, putting this one aside. For this one, I decided to do something different. I imagined several designs and sketched them on a sheet of paper. With a better view, I chose one of the two and started cutting out the fabrics, making sure each piece fit together well and gave it a unique touch. Its composition turned out to be quite fun and a bit complex compared to other projects I'd done. The pieces had to fit together perfectly to avoid misaligning or distorting the silhouette. With each piece ready, all that was left was to work my magic and create.
✨️✨️Diseños/ Designs✨️✨️

Aquí les dejo un minitutorial, con un pequeño collage de fotos, mostrando el paso a paso del mismo y los materiales que utilice para recrear esta prenda. Para los amantes del reto y la costura, espero que les sirva y ayude en sus creaciones futuras.
Me encantaría saber cual es tu opinión con repecto al modelo y tejido seleccionado.
Here's a mini-tutorial, with a small photo collage, showing the step-by-step process and the materials I used to recreate this garment. For those who love a challenge and sewing, I hope it's helpful and inspires your future creations.
I'd love to hear your opinion on the pattern and fabric I chose.
❤️❤️❤️❤️❤️❤️❤️❤️❤️❤️❤️❤️❤️❤️
Materiales / Materials
Jeans and camouflage cutout
Scissors
Thread and needle
Measuring tape
Pins
Sewing machine
Decorative linton
❤️❤️❤️❤️❤️❤️❤️❤️❤️❤️❤️❤️❤️❤️
Procedimiento:
1er paso:
Comence con este hermoso proyecto realizando en una hoja blanca el patrón o base del diseño que deseaba realizar.
Ya con cada pieza procedi a recortar y marcar en el tejido seleccionado, verificando si la distancia y tamaño de cada parte, correspondía con exactitud con el forro y relleno. Pues para que quede un proyecto lindo y duradero, estos detalles son muy importantes.
Procedure:
1st step:
I began this beautiful project by sketching the pattern or base of the design I wanted to create on a blank sheet of paper.
Then, with each piece in hand, I proceeded to cut it out and mark it on the selected fabric, verifying that the distance and size of each part corresponded exactly to the lining and filling. These details are very important for a beautiful and lasting project.


2do paso:
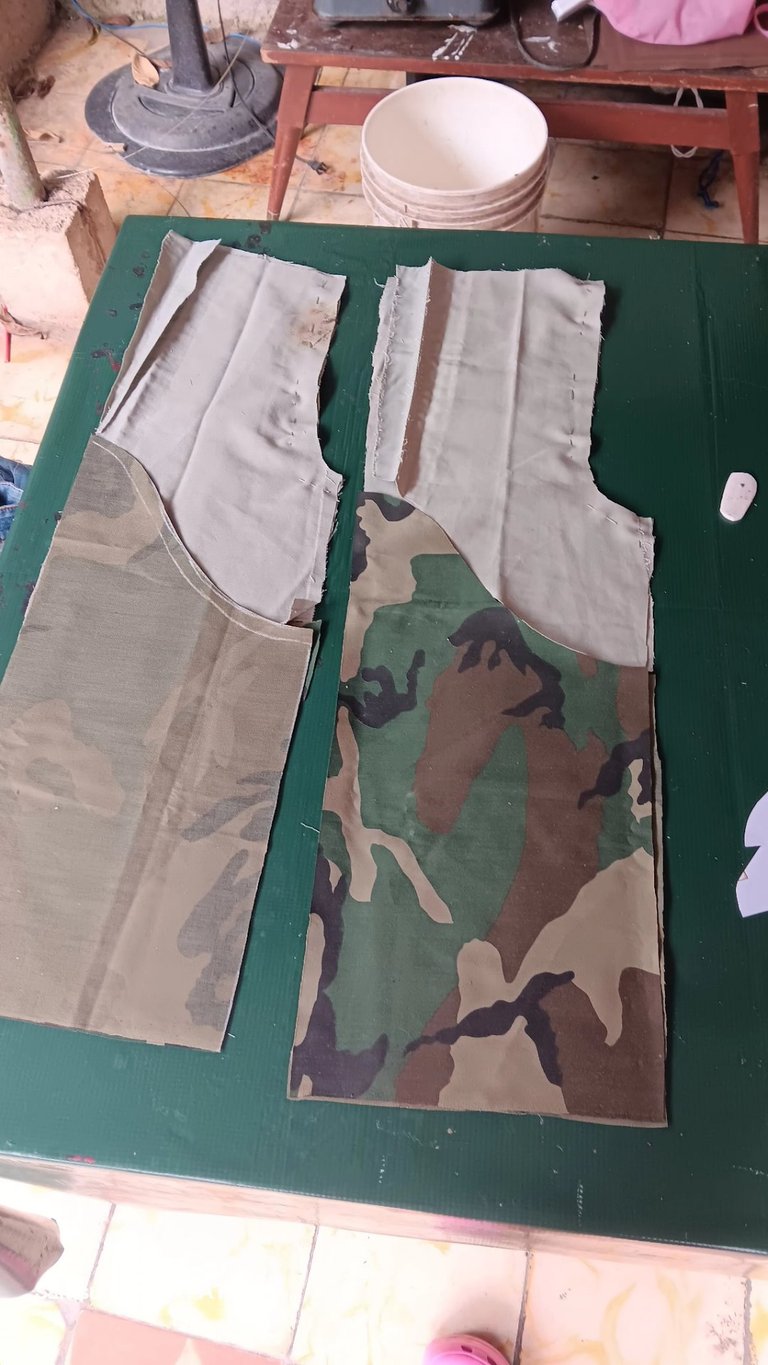
Una vez recortada y posicionada cada pieza procedi a coser los recortes de camuflaje encima de cada pieza en delanteros y traseros, colocando encima de la base, dejando a simple vista los margenes de costura.
Tambien para darle un toque mas urbano, desfleque o deshile toda el area baja en el tejido estampado con ayuda de un descosedor o tijera.
Cada pieza encajaba a la perfección logrando dos piezas como delanteros y dos como tracero. Seguido de este proceso uni por los laterales y el tiro, quedando asi mas estructurado el pantalón.
2nd step:
Once each piece was cut out and positioned, I proceeded to sew the camouflage cutouts onto each piece, both front and back, placing them on top of the base and leaving the seam allowances visible. Also, to give it a more urban touch, I frayed or unraveled the entire lower area of the printed fabric using a seam ripper or scissors.
Each piece fit together perfectly, resulting in two front pieces and two back pieces. Following this process, I joined the sides and the crotch seam, thus giving the pants a more structured look.


3er paso:
Debo decir que para mi aun le faltaba algo a este diseño, lo veia muy simple y sentia que podia dar mas. Asi que le añadi una linda estrella en uno de los lateriales, madre mia que dificil para que las puntas quedaran parejas, todo un reto. Pero aun asi sentia que le faltaba algo, asi que en el otro lateral le realice un bolsillo con tabeta y una especie de bolsillo estético encima, la idea era darle un toque mas urbano.
Para culminar esta prenda solo quedaba hacer el fajin y los bajos de cada pata. Para el fajin tome un linton ancho que tuviese la misma medida que el contorno de la parte alta del pantalon, la sujete con alfileres y pase costura, dejando una pequeña abertura para pasar el elastico al final.
Step 3:
I have to say that for me, this design was still missing something. I found it too simple and felt it could do more. So I added a cute star to one of the sides—my goodness, getting the points even was so difficult, quite a challenge! But even then, I felt it was lacking something, so on the other side, I added a flap pocket and a sort of decorative pocket on top. The idea was to give it a more urban touch.
To finish this garment, all that remained was to make the waistband and the hems of each leg. For the waistband, I took a wide strip of fabric that was the same measurement as the circumference of the upper part of the pants, pinned it in place, and sewed it, leaving a small opening at the end to thread the elastic through.


4to paso:
Para el chaleco, ya el tejido era precioso, pues tenia muchas evillas, bolsillos y otros, solo corte el molde con una muestra. Decidi agregar en la espalda el recorte de camuflaje, pues debia de ser coherente con el diseño del pantalon.
Comence uniendo las dos piezas de alante con la de la espalda por la parte de los hombros y luego costure por los laterales, añadiendo en la parte de la espalda un liston de ondas por todo el borde del empate.
Step 4:
For the vest, the fabric was already beautiful, with many buckles, pockets, and other details; I simply cut the pattern from a sample. I decided to add the camouflage trim to the back, as it needed to be consistent with the pants' design. I began by joining the two front pieces to the back piece at the shoulders, and then sewed along the sides, adding a wavy trim along the entire seam edge of the back seam..


5to paso:
Por ultimo añadi los bordes en las bocamangas y el cuello de la misma. Para ello cosi las puntas haciendo una especie de arco de adentro hacia afuera, quedando el arquito por fuera. En todas las pendras le realizo los tik tak a los margenes de costura, dandole un mejor acabado y evitando que se deshile.
5th step:
Finally, I added the edging to the cuffs and the collar. To do this, I sewed the points in a sort of arc from the inside out, leaving the small arc on the outside. On all the garments, I added a ticking stitch to the seam allowances, giving them a neater finish and preventing fraying.

✨✨✨✨❤️❤️❤️✨✨✨✨
Resultado/Result
✨✨✨✨❤️❤️❤️✨✨✨✨


Espero que les alla gustado y les sirva de alguna ayuda este pequeño minitutorial. Pido disculpas si no se entiende bien alguna informacion, pues no soy muy buena explicando estos procedimientos. Gracias de antemano, espero y os guste mi contenido, y agradeceria que dejaran sus lindos comentarios y se aventuraran conmigo en este proyecto. Bendiciones y lindo dia.
I hope you liked it and I hope this little mini tutorial will be of some help to you. I apologize if some information is not well understood, because I am not very good at explaining these procedures. Thank you in advance, I hope you like my content, and I would appreciate if you could leave your nice comments and venture with me in this project. Blessings and have a nice day.

El texto o resumen es totalmente de mi autoria.
The text or summary is entirely my own.
No solo me gustó el diseño exclusivo y convertir una linda pieza a partir de material recliclado, sino la modelo, es muy adorable :) Todas sus poses- Te felicito, a ambas.
Muchísimas gracias amiga @equipodelta. Me alegra saber que te haya gustado, pues mi hija adora modelar y posar para mis diseños. Tenga una tarde maravillosa
Lindo trabajo para tu niña de vestido jeans, excelente conjunto callejero Amor !! Felicidades.
Gracias amoe. Me alegra qye te haya gustado. Ame el resultado, pemsamdo wn como hacer uno para mi